• Tired of adverts on RWI? - Subscribe by clicking HERE and PMing Trailboss for instructions and they will magically go away!

Dogwood's Watchmaking Journey

dogwood

I'm Pretty Popular
Patron
Section Moderator
Certified
7/9/21
2,441
5,420
113
Canada
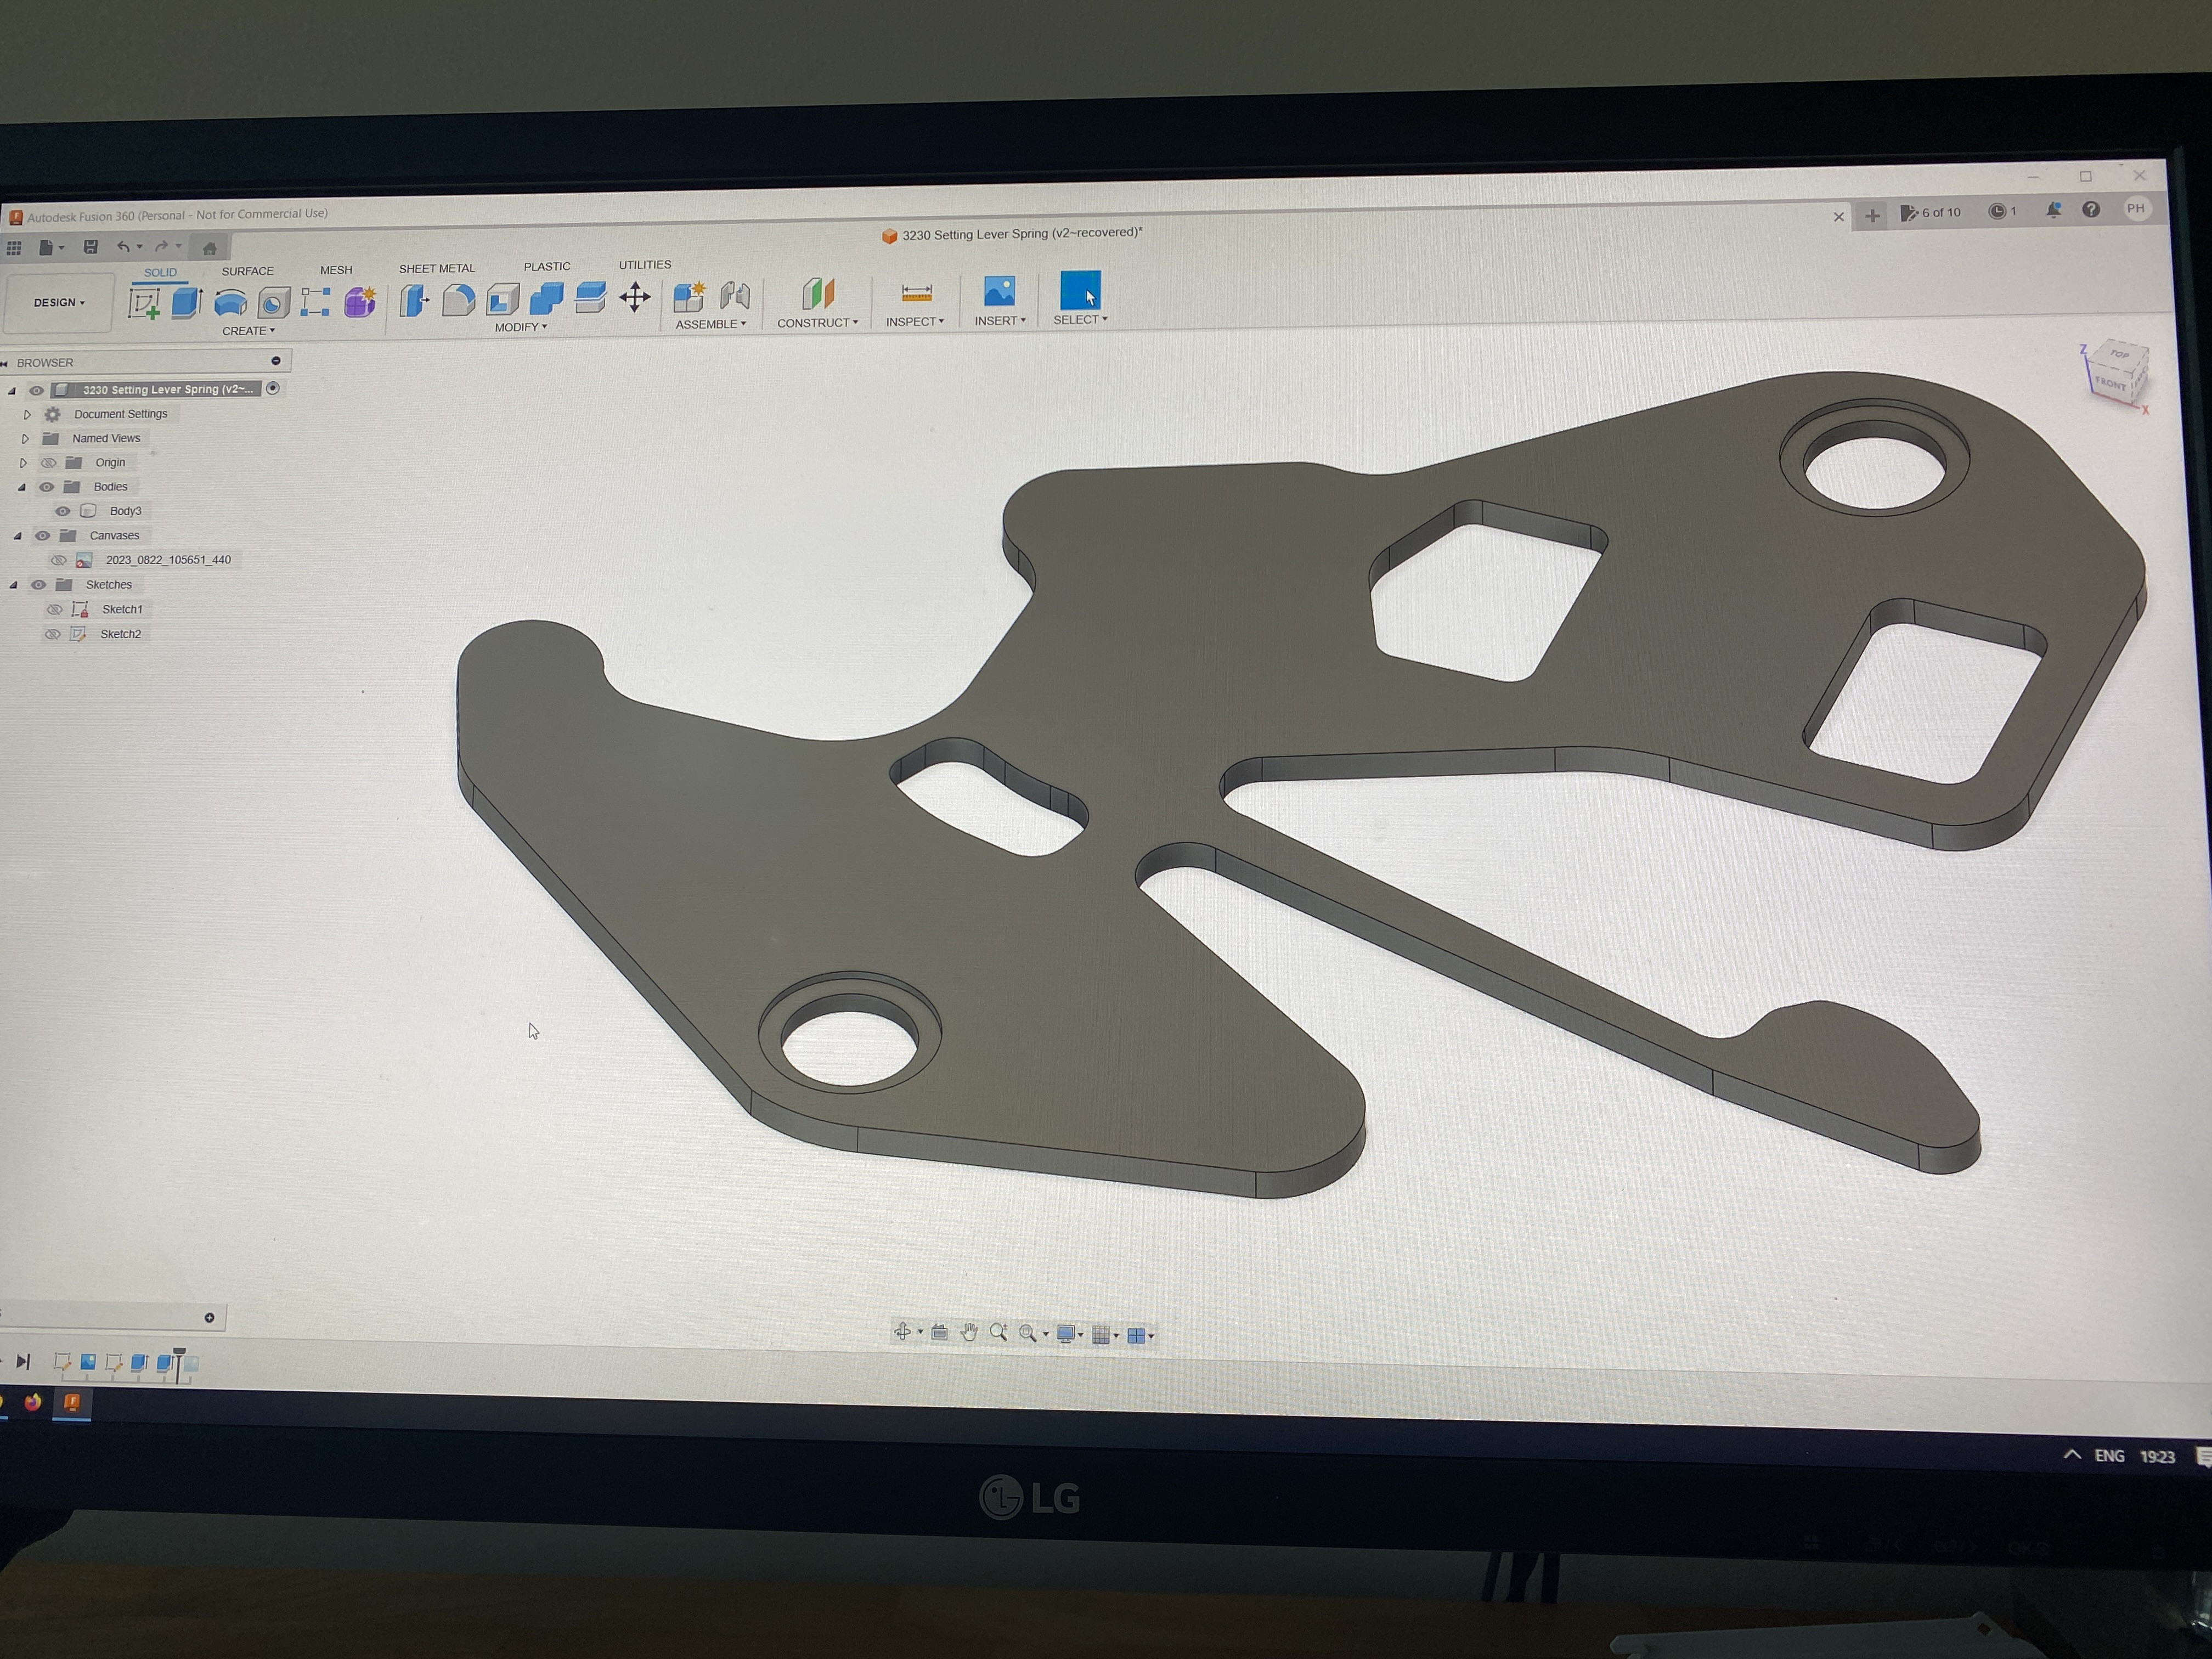
Updated the CAD for the 3230-231 setting lever spring part. I fixed the scale and cleaned up the cutouts for the sliding and winding pinion. I also increased the size of the screw holes and added 1.30mm diameter by 0.075mm counter bores for the screw holes since that’s what the factory part has. I’m looking forward to giving this updated design a try.


dogwood

I'm Pretty Popular
Patron
Section Moderator
Certified
7/9/21
2,441
5,420
113
Canada
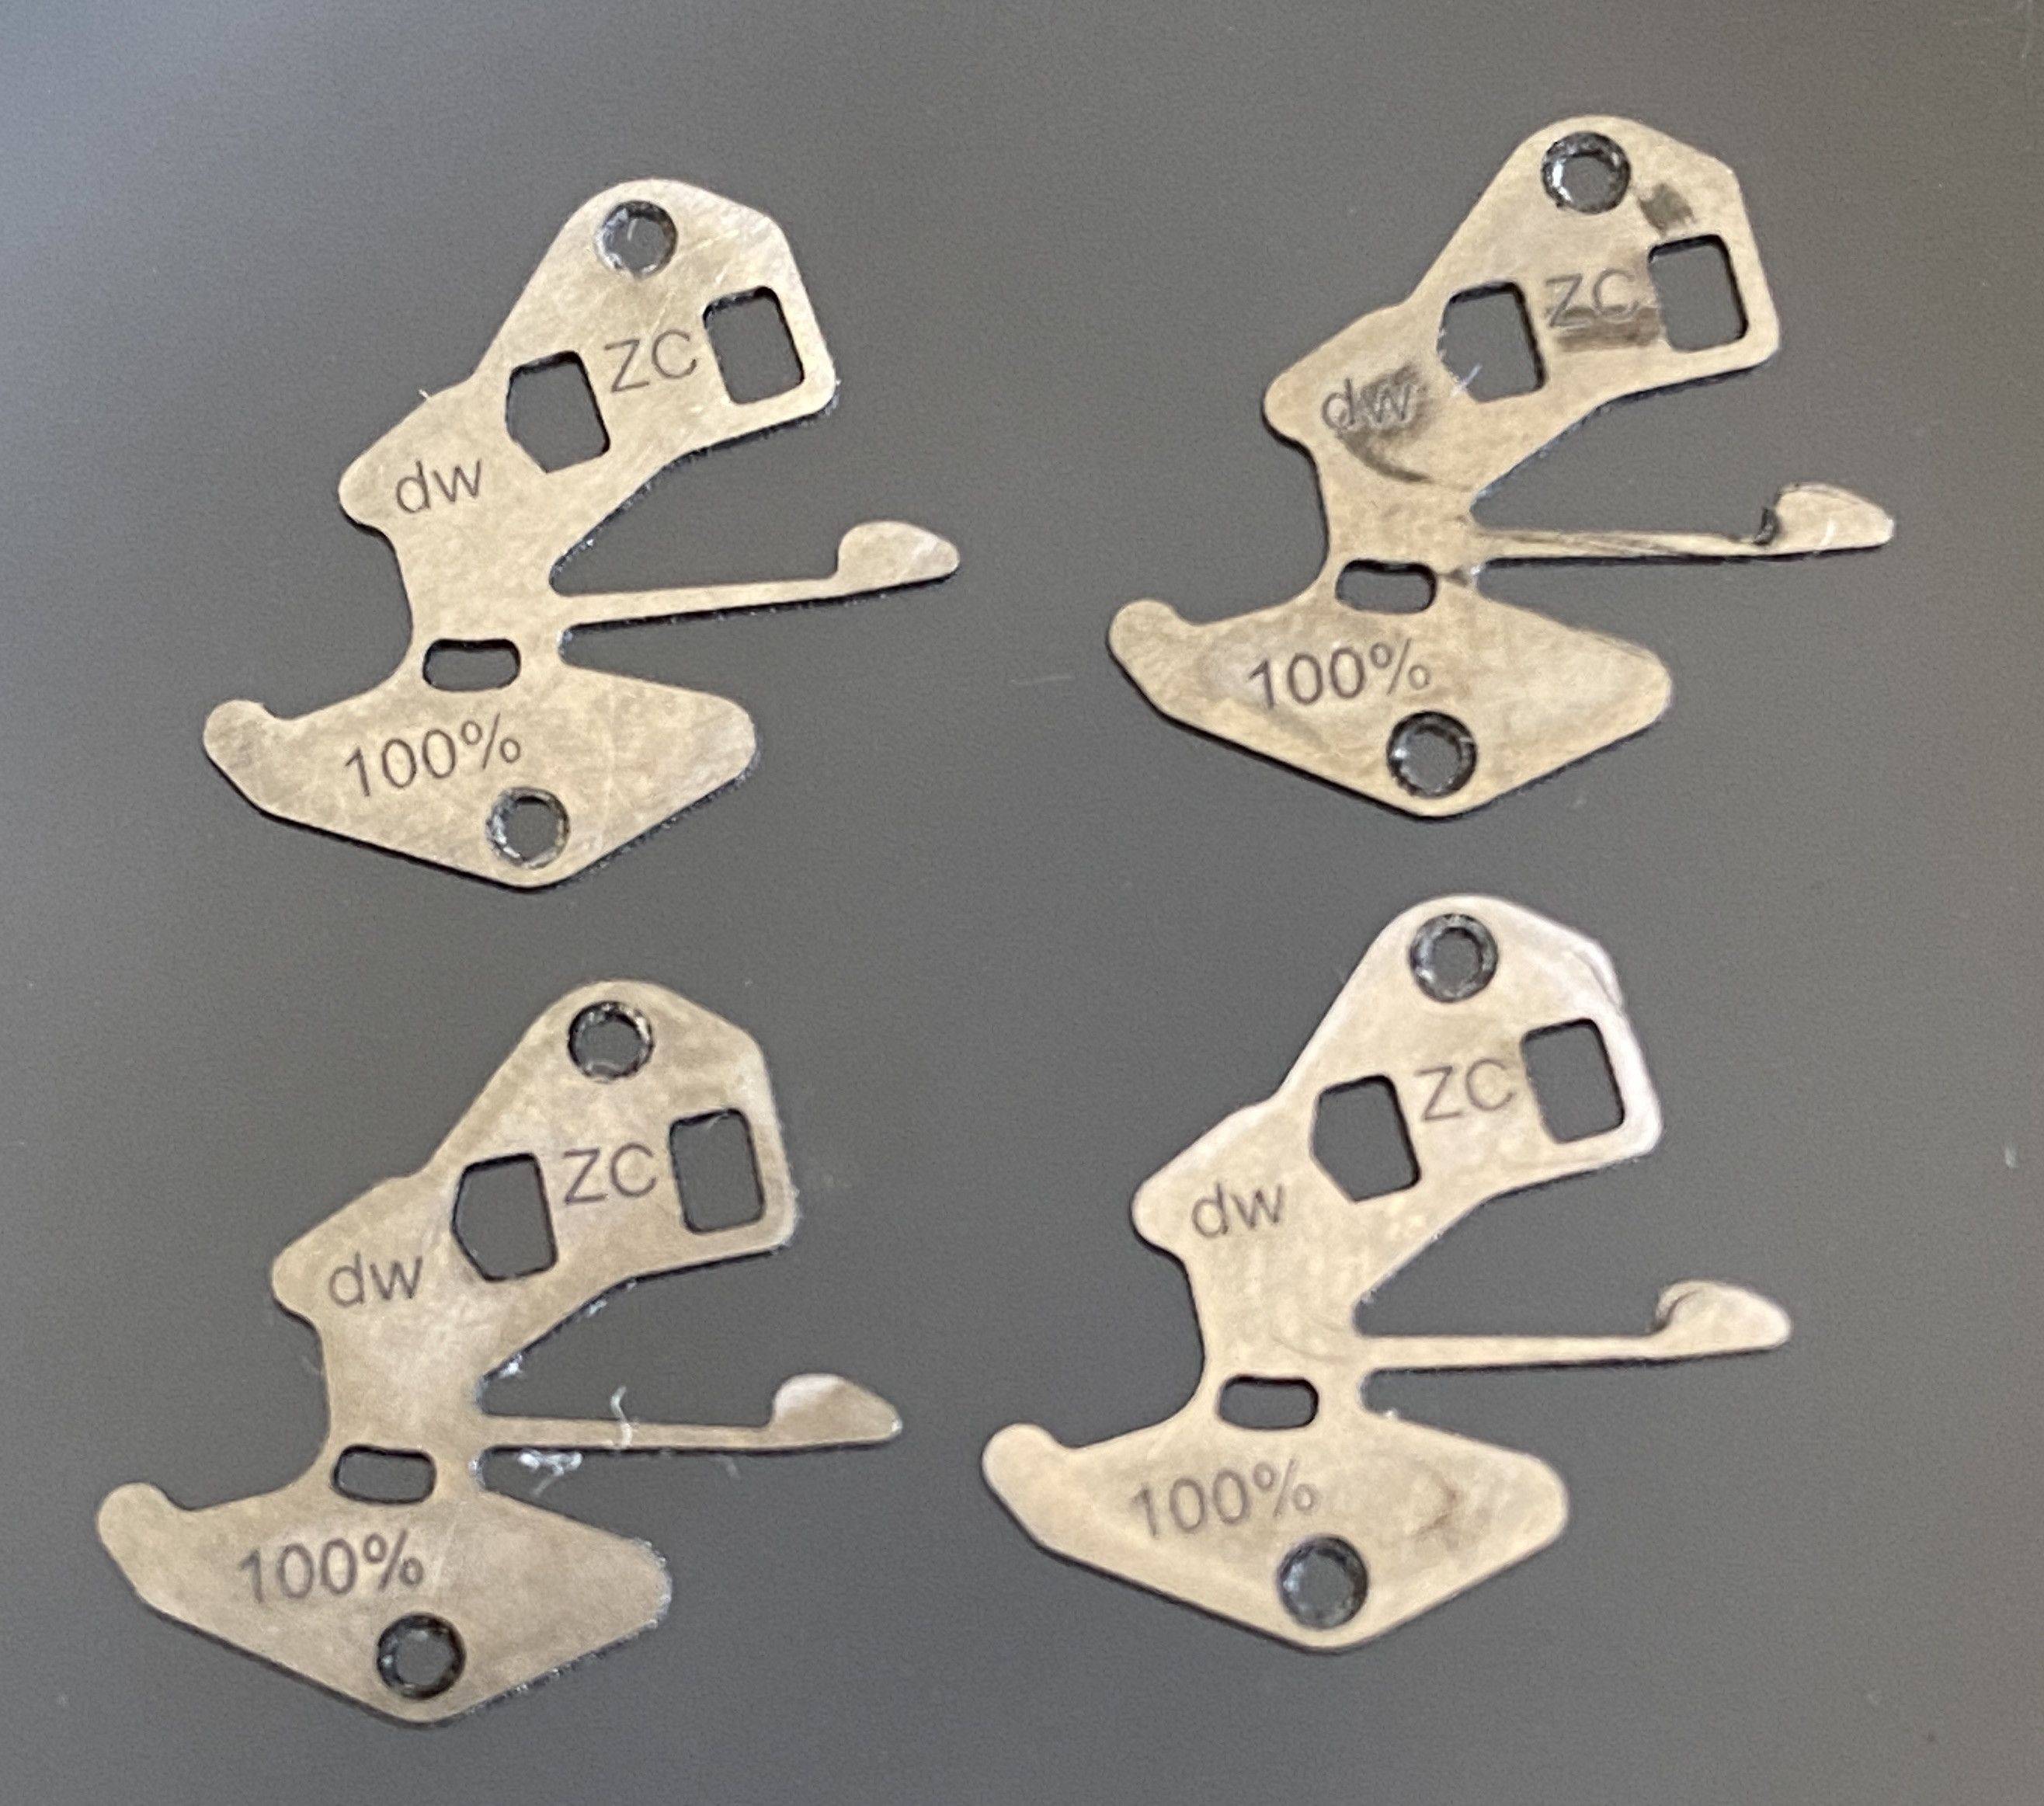
Update on the 3230-231 Setting lever spring for the no-date submariners and OPs from VSF with the vs3235 movement. @xZeroCoolx sent me a couple of new prototypes of the 3230-231 part... Since the last prototypes were slightly too big, we thought we'd try making a few samples at different scales. ZeroCool added a laser etched percentage to show the scale of the part, so that's what the "100%" laser marking is... the "dw" and "zc" marks are just for fun :)


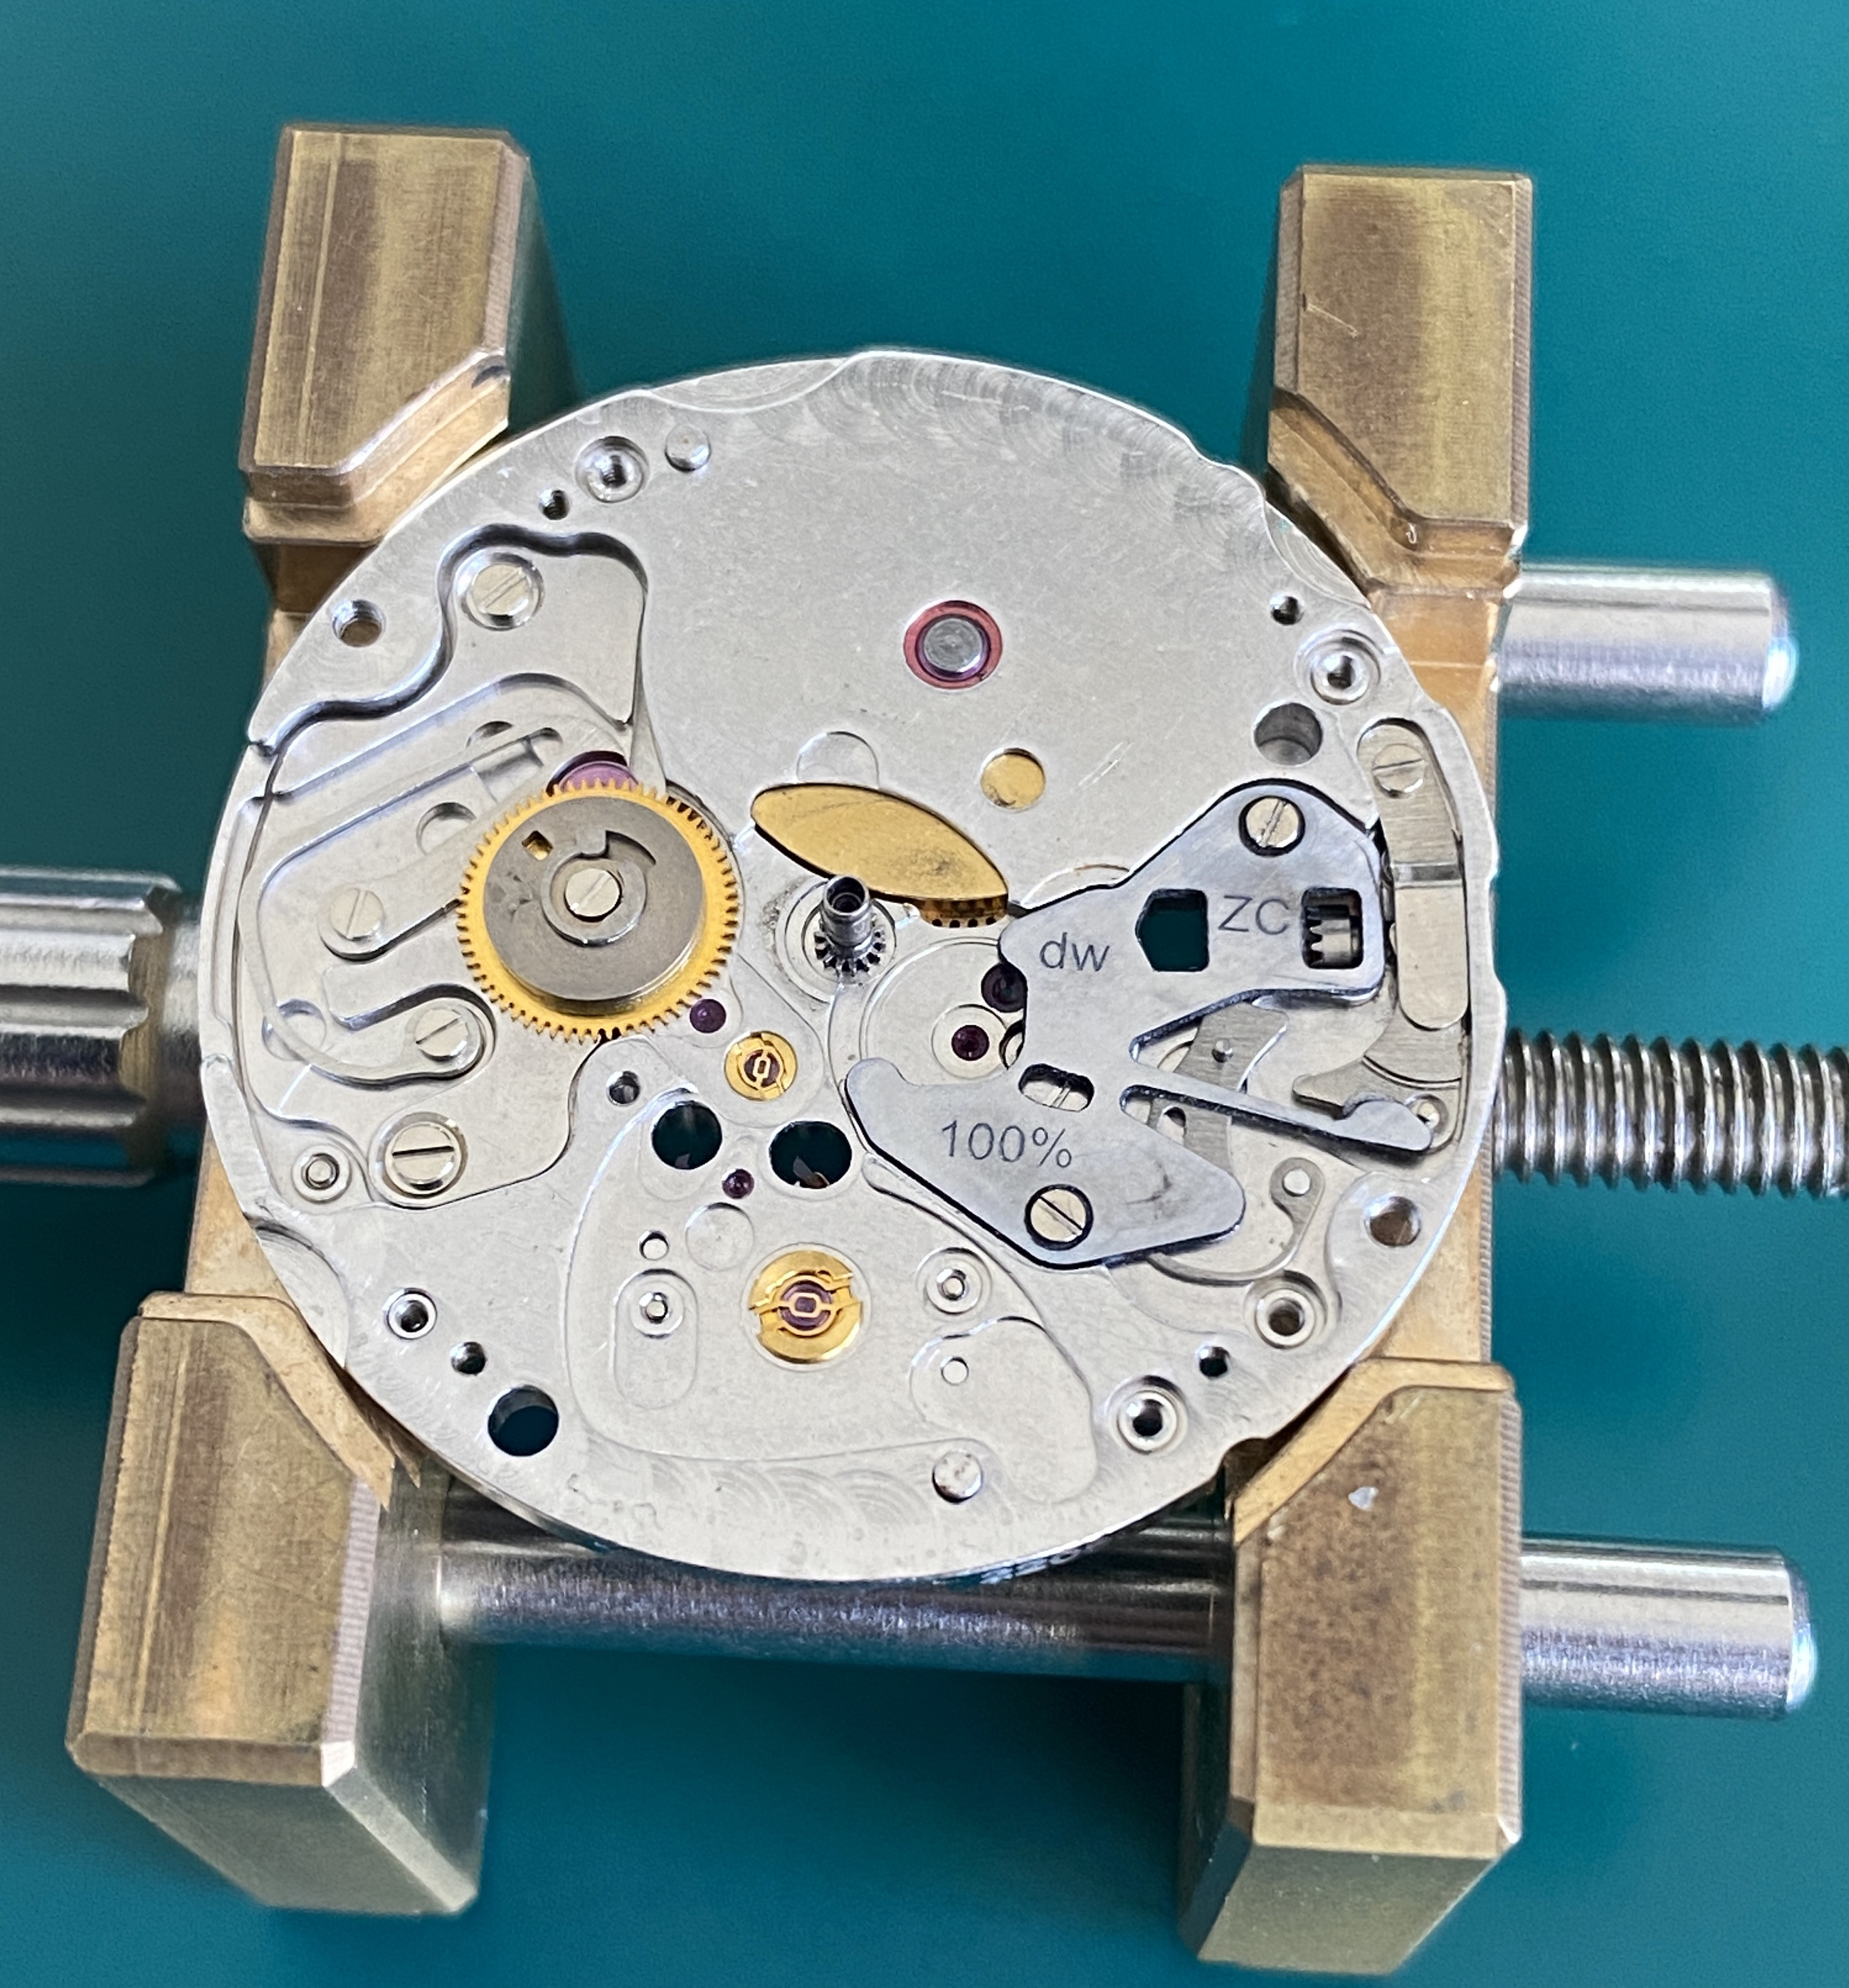
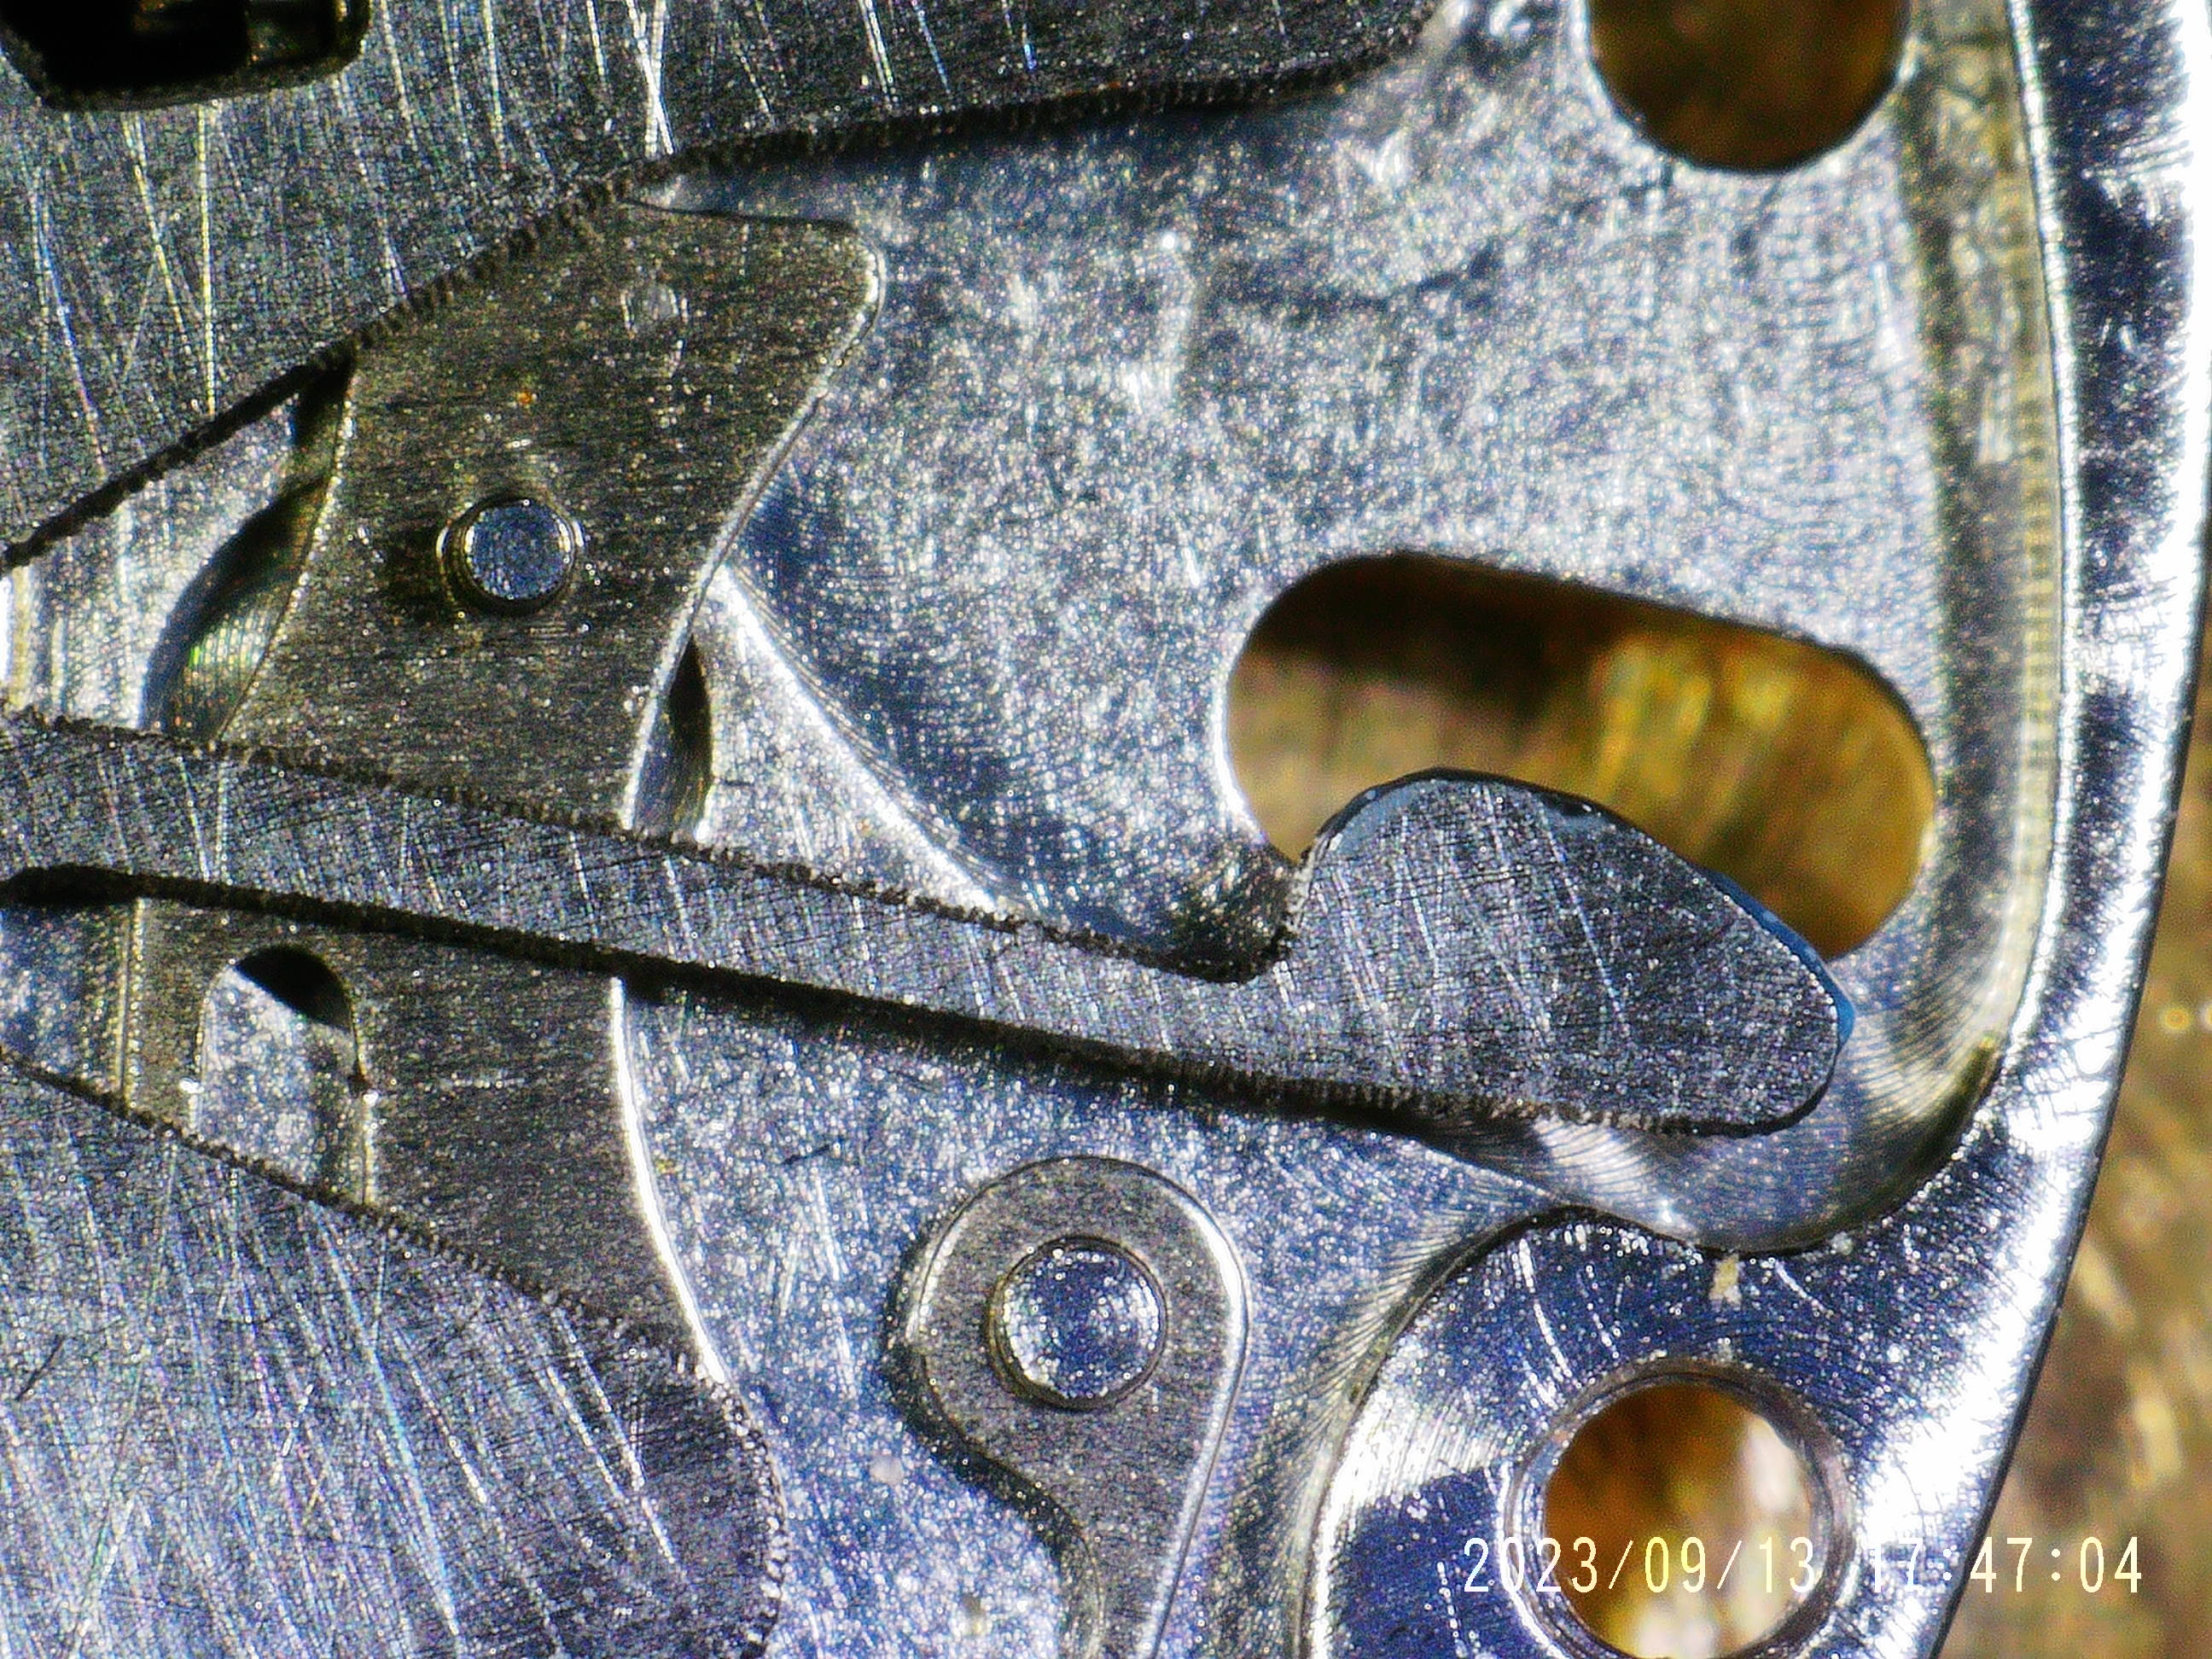
The fit this time is basically perfect... I'm really happy about this -- the three key points of contact for this part (the two screw holes and the spring lobe) are all in the right places.


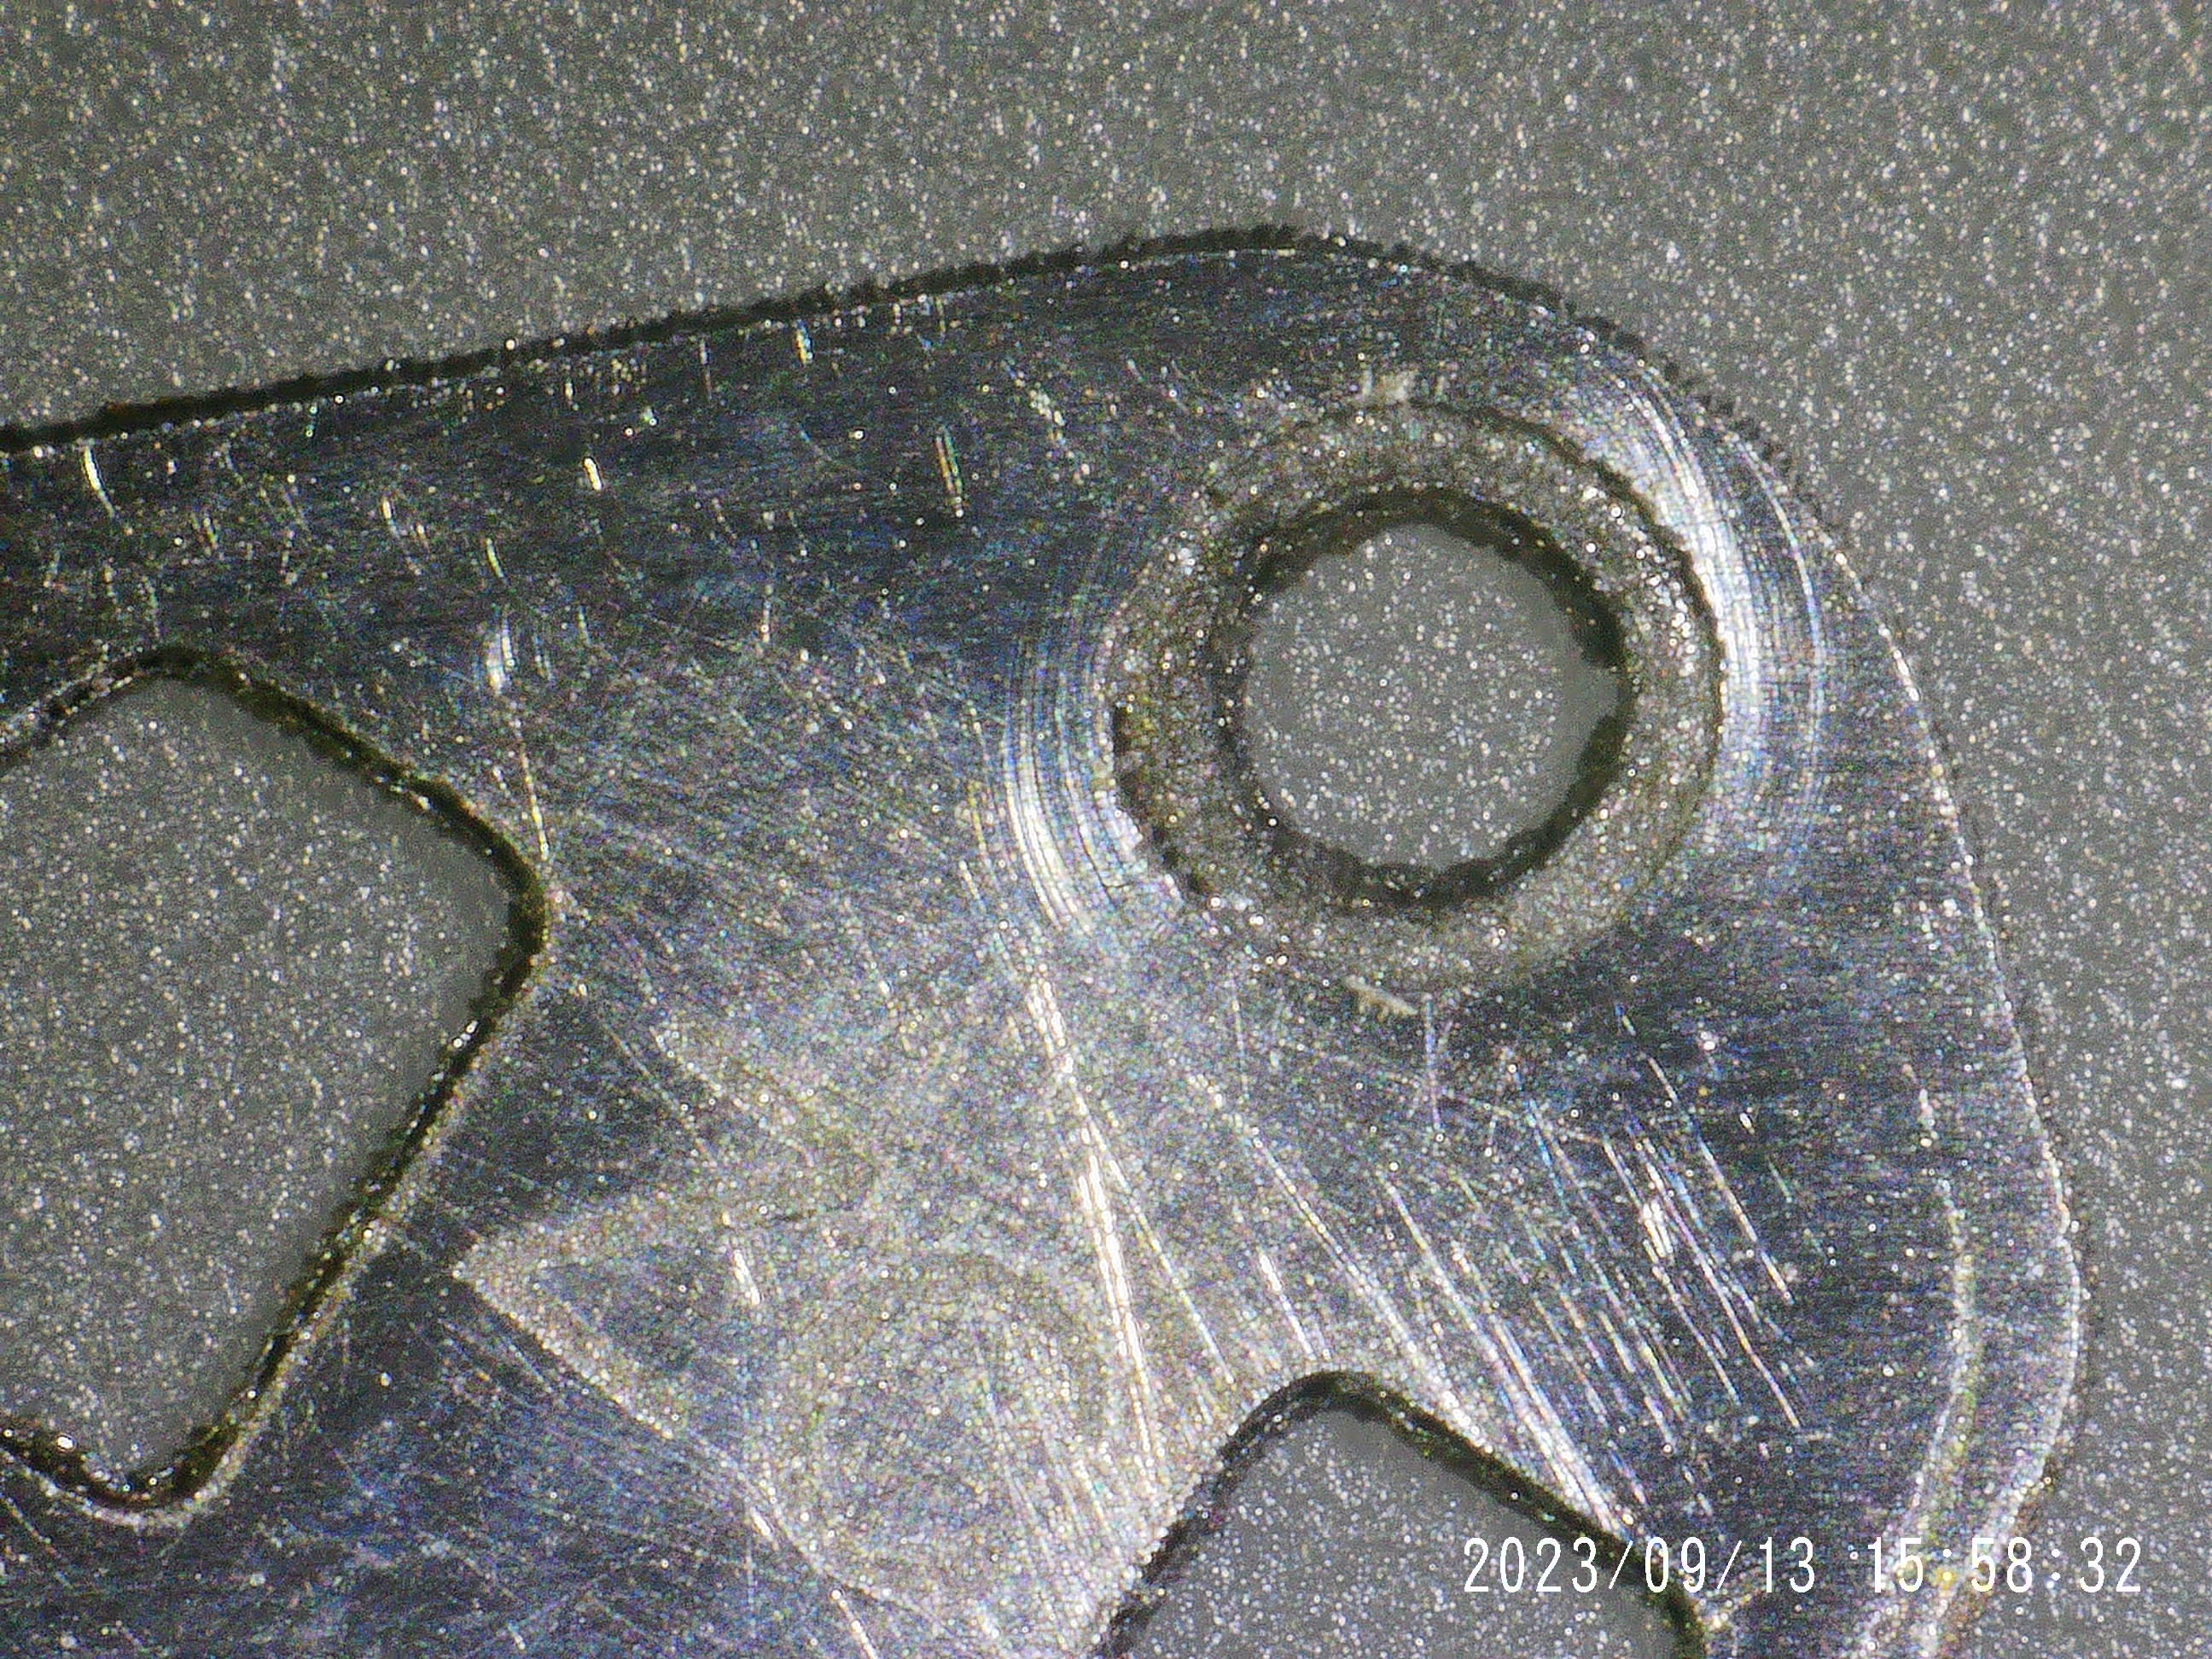
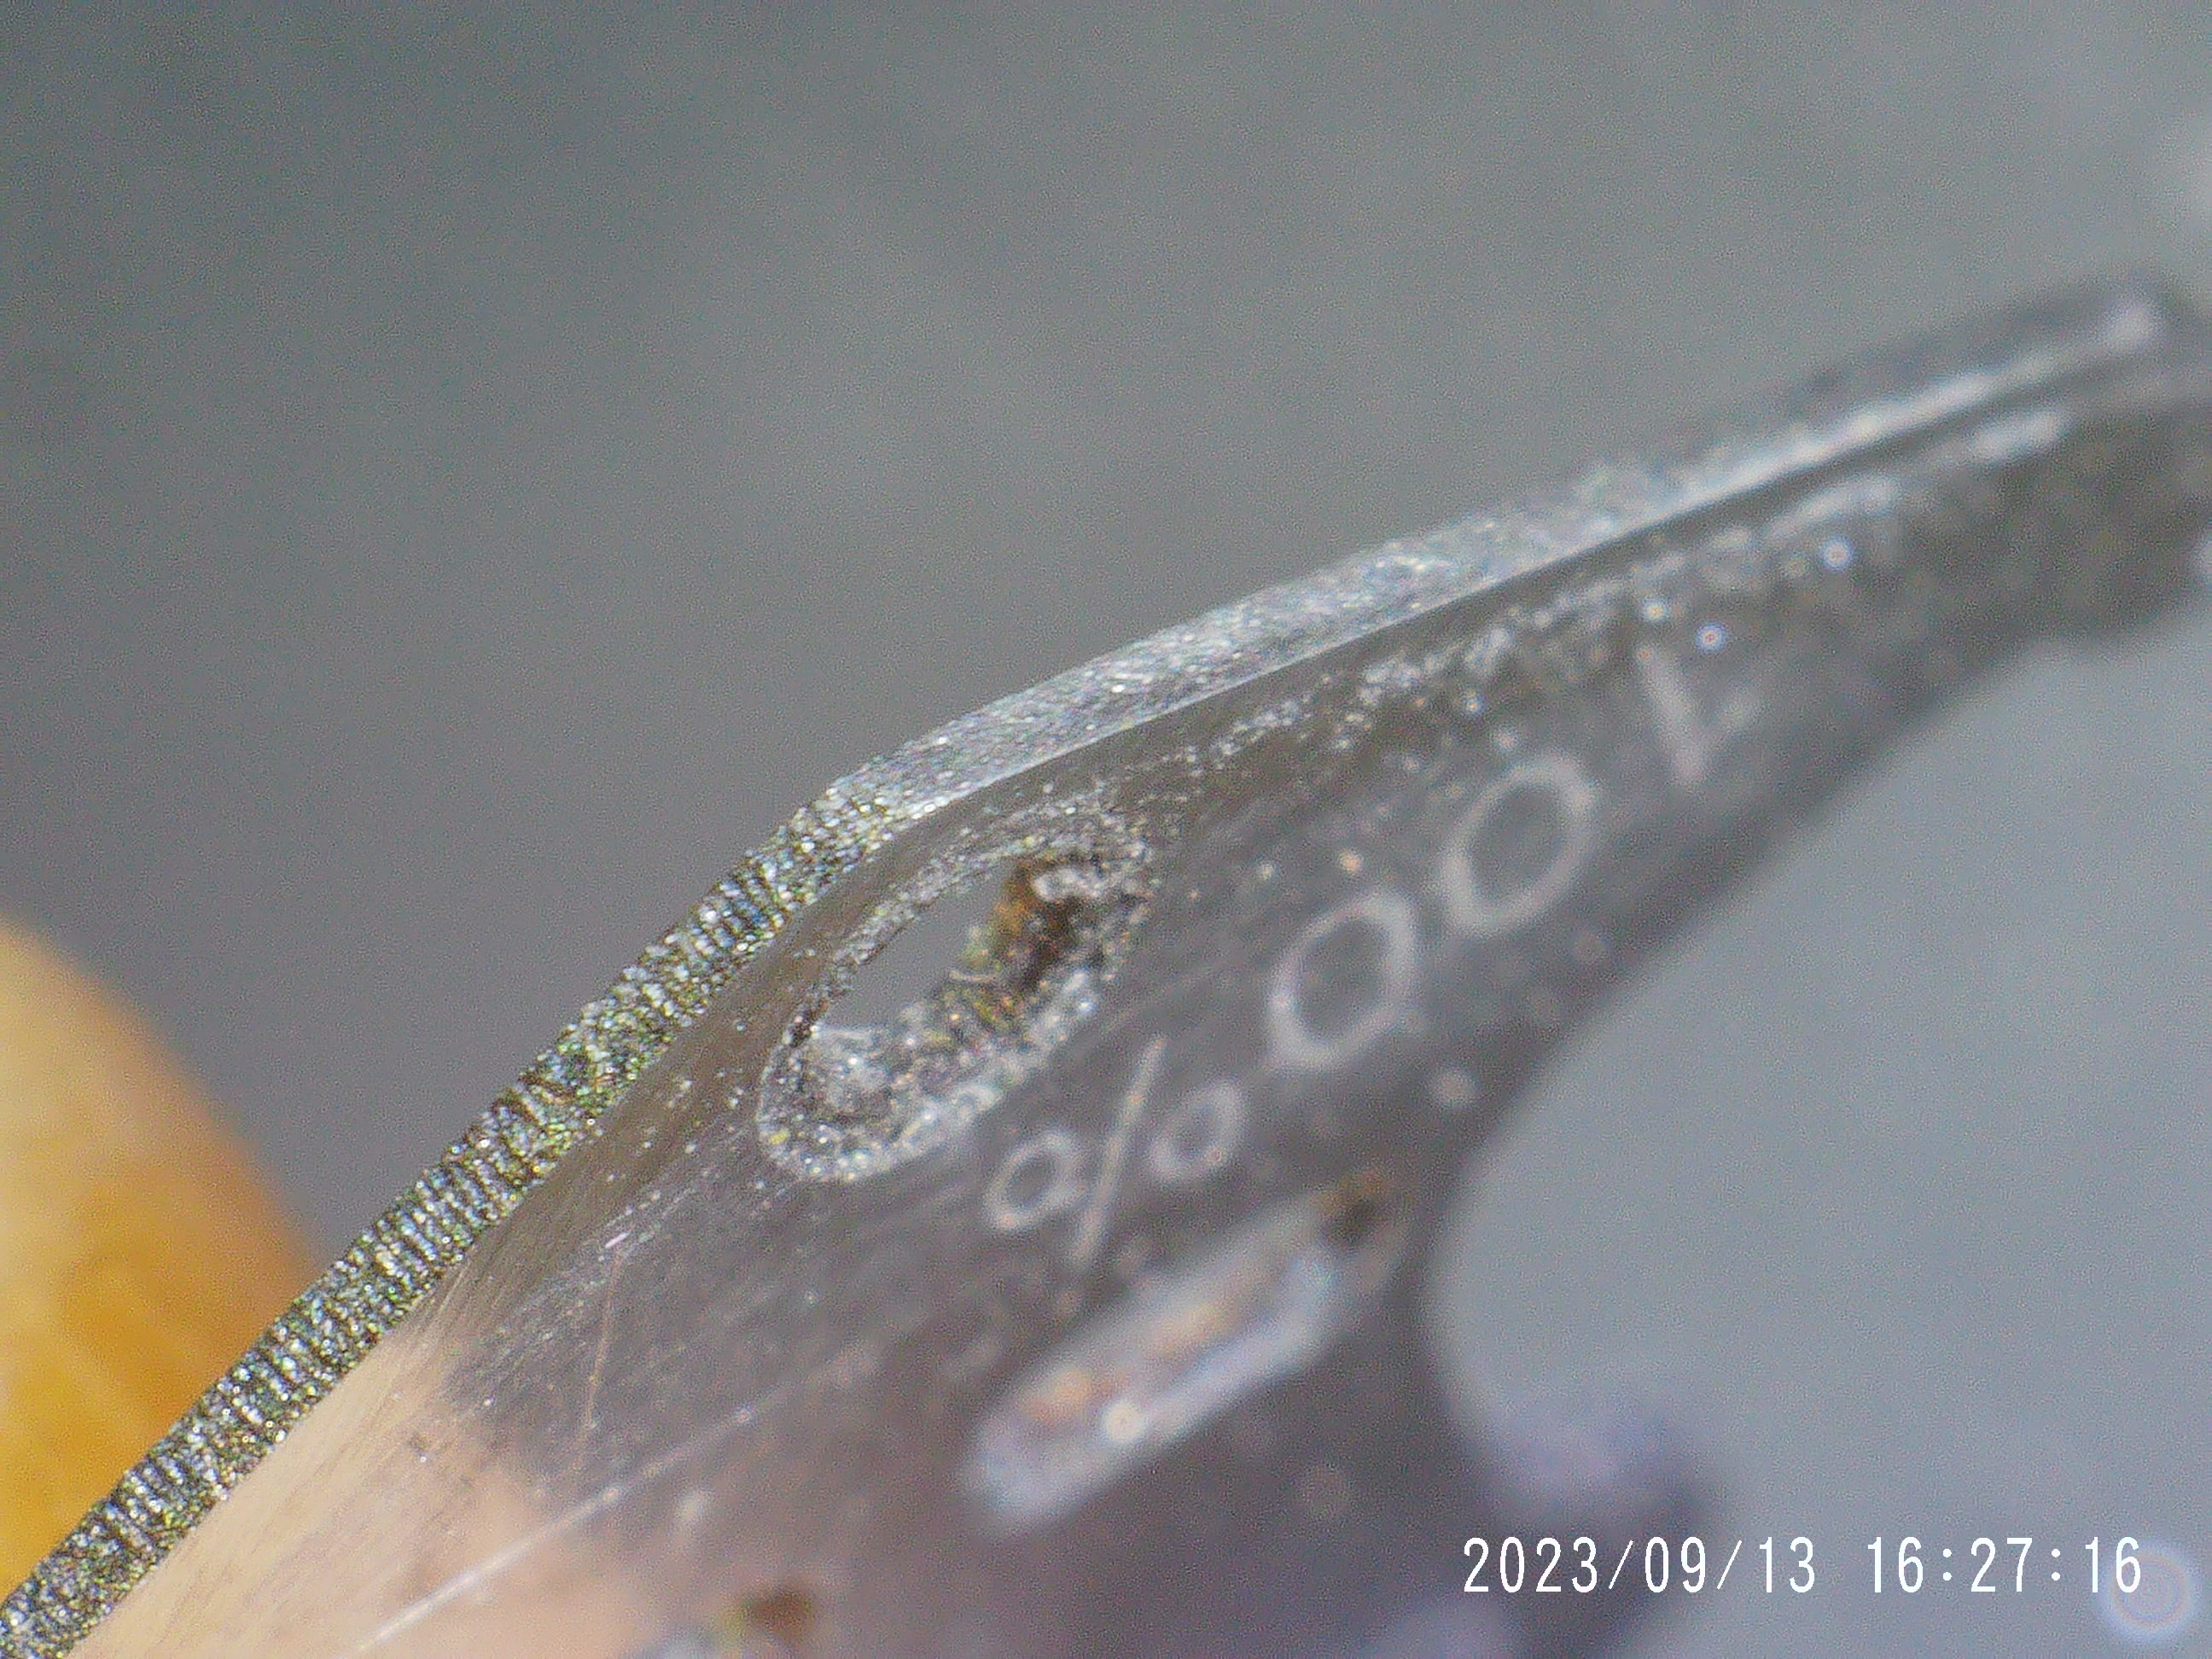
One of the downsides of using a fiber laser to cut these parts is that the surface finish of the edges of the parts is quite rough. This stands to reason since the process basically involves dumping a huge amount of IR laser light into the metal and turning it from a solid into a gas. I'm not sure if it's possible to get a smoother edge profile by using different settings, but as it stands, the screw holes need to be smoothed using a broach, and the edges of the spring lobe need to be hand finished (more on that in a bit).


As mentioned above, the edges of these fiber laser cut parts is quite rough... and rough isn't good for the side profile of the spring lobe, since the pin on the setting lever needs to slide along the lobe to go from the winding position to the time setting position.


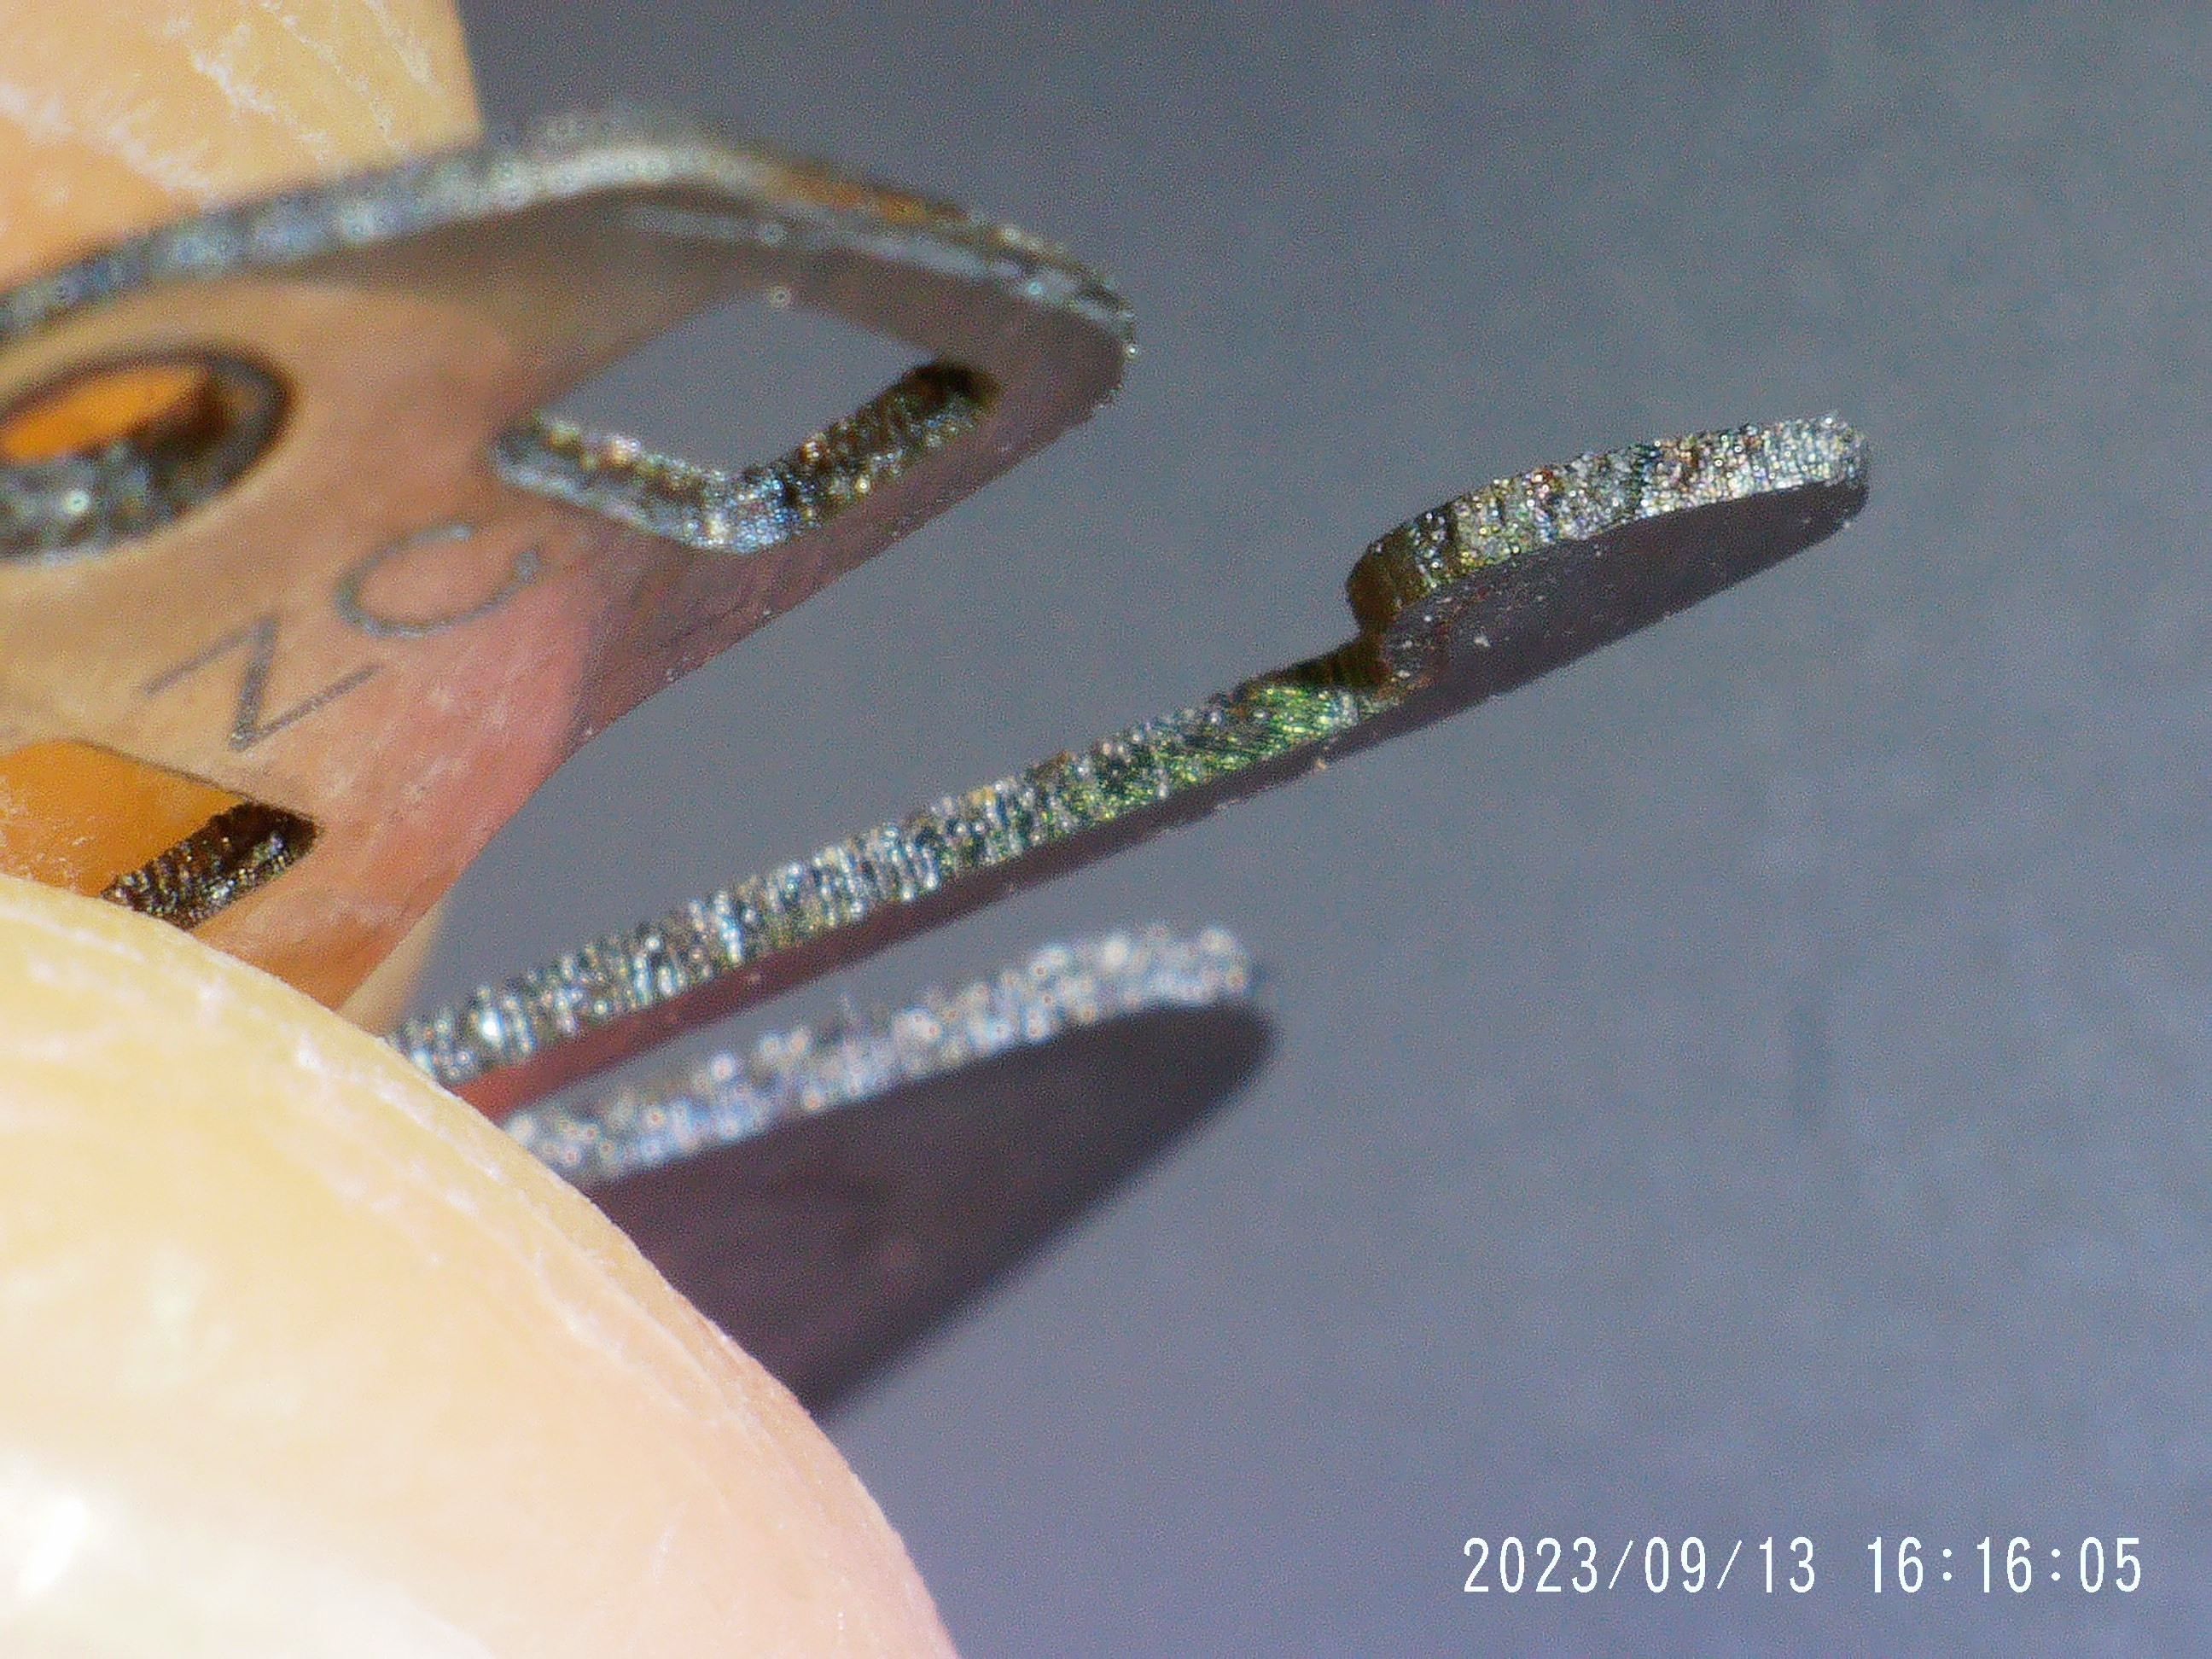
Fortunately, the edges of the part can be hand finished with sand paper to remove the marks from the fiber laser cutting. The picture below shows two edges, one unfinished, the other was sanded using 400, 800, 1200, and 2000 grit sand paper to remove the burrs and get a nice smooth finish.


Hand finishing the spring lobe is a bit more delicate than sanding the edges since it's on a long thin protrusion, and the material we're using at the moment tends to plastically deform quite easily (more on that later). But using the soft jaws of my vise for support, I was able to get quite a nice smooth finish on the spring lobe.


Here's a little video of the stem action with the current iteration of the spring design:


At this point the geometry of the part is pretty good. There are some tweaks that I'm going to make. e.g. I'm going to remove the cutout in the middle of the part since that's only there for the date corrector to slide in; and I'm also going to get rid of the screw hole counter bores which aren't necessary and complicate manufacture. But I do think I need to use a different type of steel for the part. The current prototypes are made from 0.25mm stainless (I'm not sure exactly which grade). But the current part tends to bend way too easily. I think the next version of this part needs to be made with "Spring Steel". I've been down the wiki-hole on spring steel this afternoon, and will look into buying some to test with.
 

AskMeAgain

I'm Pretty Popular
Certified
18/2/11
1,382
83
48
Far out thats some incredibly impressive work on all the watches.
The laser cutting is just next level mate.

Just wow!
 
  • Like
Reactions: dogwood

mightynimrod

Active Member
7/3/09
444
73
28
Blighty - Bomber Command
Good god man, this is the absolute schnizzle.

I've just started in my watchmaking journey and still buying tools, I've enough to disassemble a movement and reassemble to get used to things.

Very, very impressed mate.

Oh, have you got a link to the 5kg crystal press you bought from AE please?
 

dogwood

I'm Pretty Popular
Patron
Section Moderator
Certified
7/9/21
2,441
5,420
113
Canada
Good god man, this is the absolute schnizzle.

I've just started in my watchmaking journey and still buying tools, I've enough to disassemble a movement and reassemble to get used to things.

Very, very impressed mate.

Oh, have you got a link to the 5kg crystal press you bought from AE please?
Great that you’re starting your journey! Here’s the link to the 5kg press I bought on AliExpress.

C$487.28 | New 6173 Stainelss Steel Watch Case Presser with Nylon Die Set
 
  • Like
Reactions: mightynimrod

dogwood

I'm Pretty Popular
Patron
Section Moderator
Certified
7/9/21
2,441
5,420
113
Canada
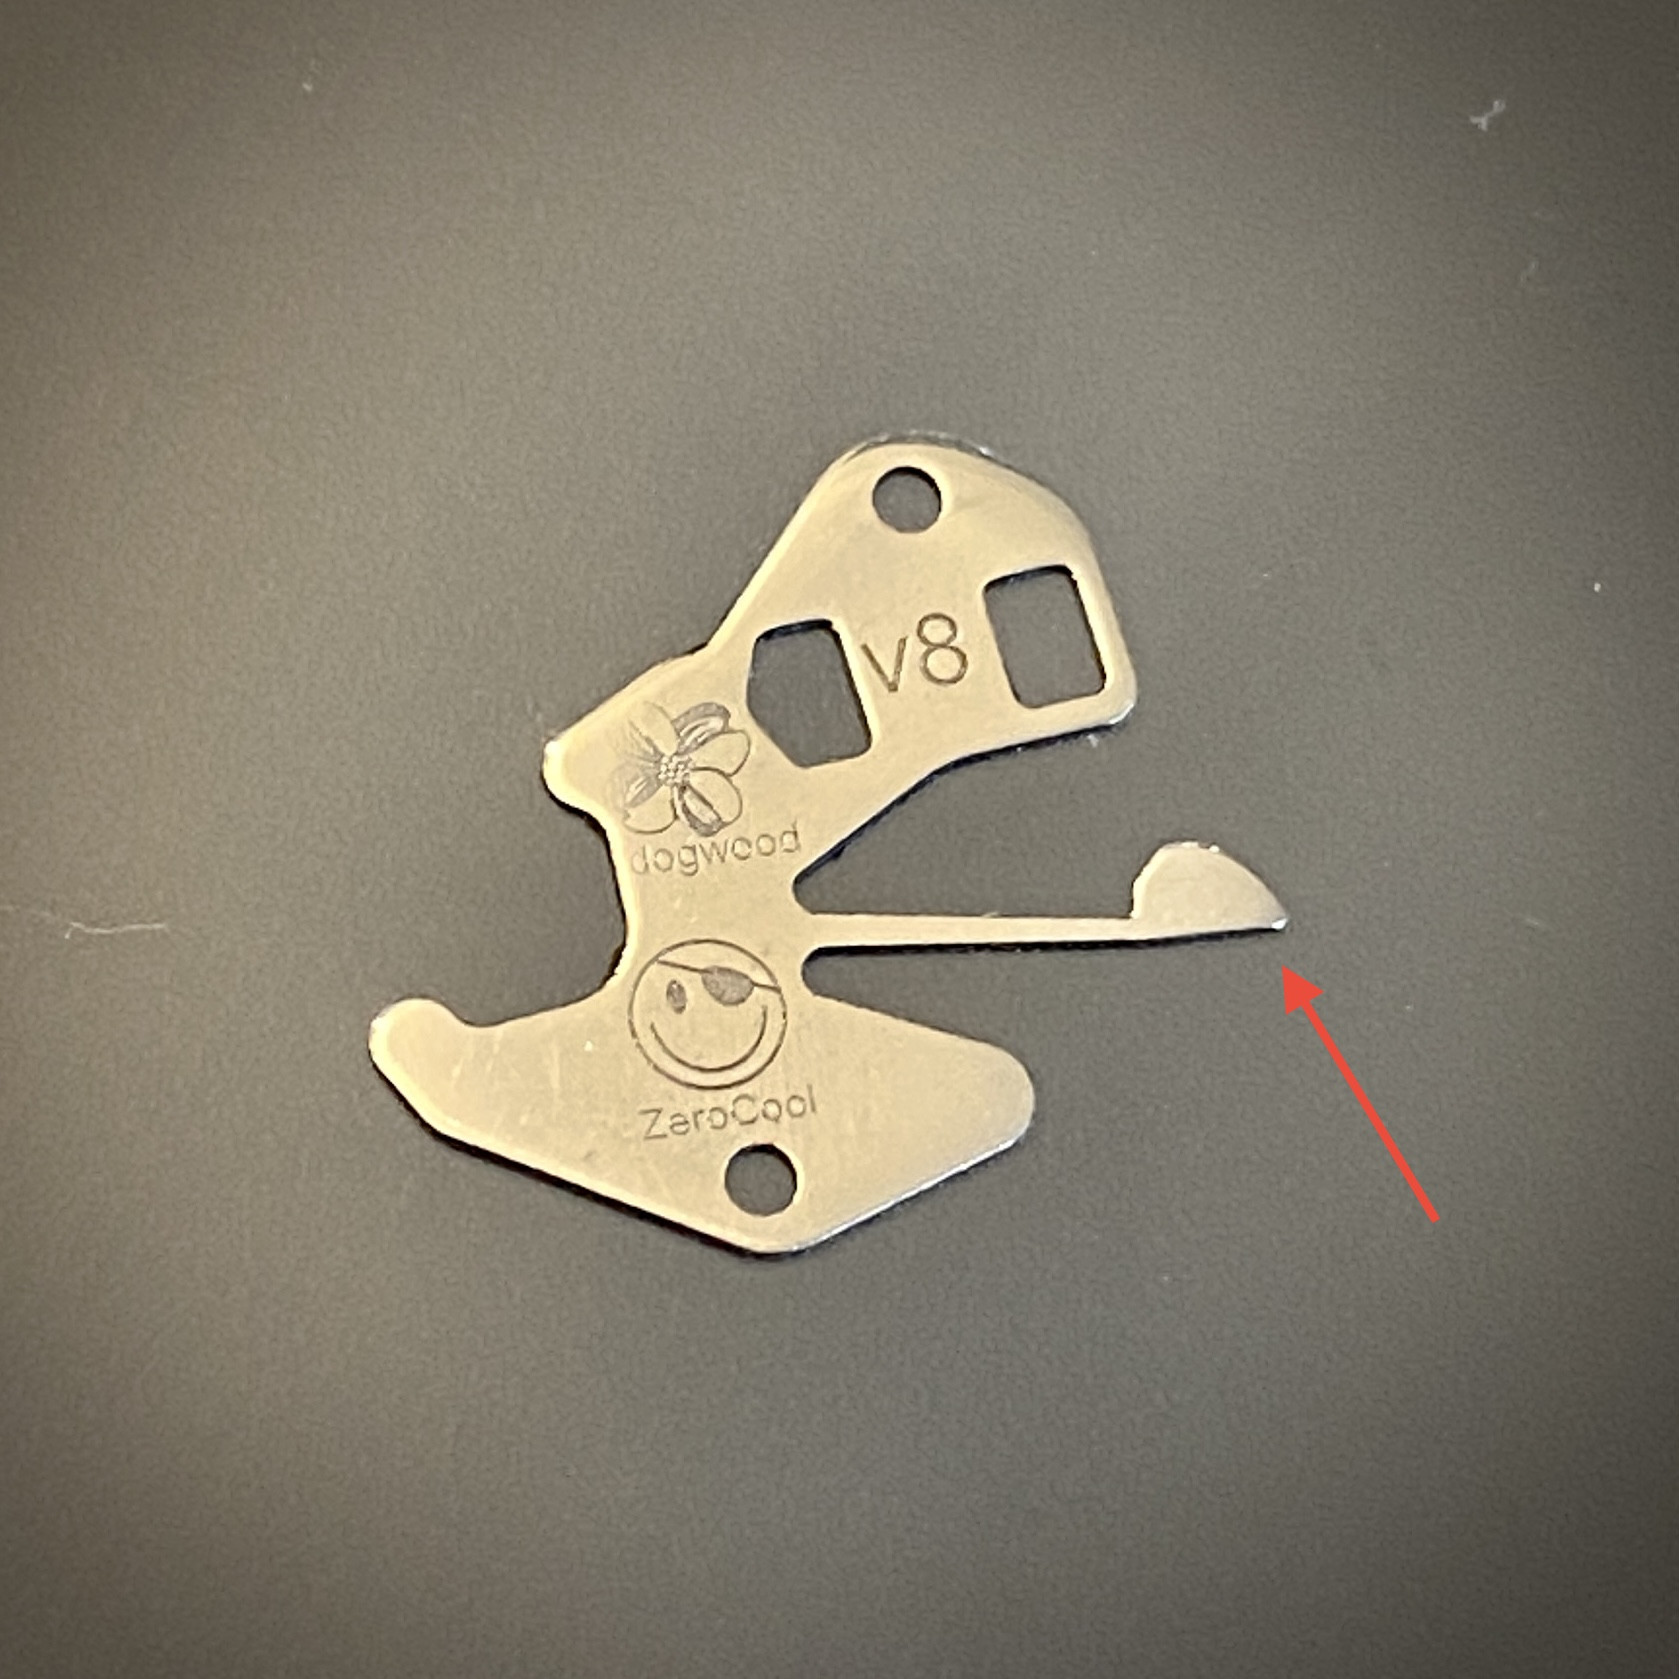
Version 8 of the VS3235 to VS3230 conversion setting lever spring has arrived courtesy of @xZeroCoolx. This version has a redesigned profile on the end of the spring lobe to give a more positive snap into each of the two crown positions. Unfortunately I got a little too creative with my CAD drawing when designing the new lobe profile and the tip of the lobe (red arrow) was too long and interfered with the mainplate.


I'll fix the lobe length issue in the next CAD version, but for testing I was able to trim the end of the lobe down with a Dremel. Here's a video of moving between the two stem positions. There's a very nice feel to the two stops. This prototype also uses a slightly different material -- I think this is 304 SS (@xZeroCoolx correct me if I'm wrong on this). We also have 0.25mm spring steel to test the next iteration, but I do kinda feel like this 304 SS might be stiff enough.


Also, hat tip to ZeroCool for adding some sweet etched branding onto the top surface of the part... sorry I marred it up a bit when I was deburring the part after my Dremel work.
 

xZeroCoolx

Active Member
Gold Patron
Certified
22/10/22
227
337
63
US
The first test was with .02" 304, which we figured would be too thick, but I had it lying around and decided it would work for a proof of concept. It did, but it was too thick as expected. The next test was with .01" 430, this was the correct thickness, but we had concerns about it bending and not springing back. The most recent test was .01" 304, which has given the best results yet and what you see above.

I have .01" 1075 spring steel to try next. Once @dogwood has the drawing updated, I will knock out a few of each, and he can play with them to see which works best.

Appreciate @dogwood turning out revisions to the CAD drawing quickly, even when I am messaging him at all hours.
 

OnTheSly

Getting To Know The Place
24/6/23
51
47
18
Best Coast
A new addition to my bench arrived today. I’m looking forward to using this… unfortunately one of the rings jars didn’t survive shipping. And for some unknown reason, the vendor (a watch repair supplier in Ontario Canada) didn’t include the bayonet mount mesh basket holder. But to the vendor’s credit they offered to ship out a replacement glass jar when I called to let them know — they didn’t even ask for evidence of the break. So that’s a nice touch.


I've got the same Elma unit, love it.

Have you had any issues with losing any printed/engraved text on the movement? I've only ever worked on vintage movements and haven't seen any issues over the last couple of years but I haven't yet run any clone movements through it.

Out of curiosity, what RPM setting do you use on the clean/rinse cycles? The manual said 35% but the RPM's seem much too low and parts were not coming out clean. I run mine at 70% for the clean/rinse cycles but was curious what you use.
 

dogwood

I'm Pretty Popular
Patron
Section Moderator
Certified
7/9/21
2,441
5,420
113
Canada
I've got the same Elma unit, love it.

Have you had any issues with losing any printed/engraved text on the movement? I've only ever worked on vintage movements and haven't seen any issues over the last couple of years but I haven't yet run any clone movements through it.

Out of curiosity, what RPM setting do you use on the clean/rinse cycles? The manual said 35% but the RPM's seem much too low and parts were not coming out clean. I run mine at 70% for the clean/rinse cycles but was curious what you use.
I have had one occasion where printed text came off of some movement plates. But generally I haven’t had issues. What fluids are you using? I use Zenith formula 67 for my first wash, then Zenith rinse solution number 3 for my second solution, then I use two rinses of 99.9% isopropyl alcohol (I always remove the pallet fork and balance before the IPA stages). I run the wash speed at 35-40% but I do scrub the mainplate, barrel, bridges, and jewel holes with an IPA soaked foam q-tip prior to loading them up in the washing baskets. I figure the initial manual scrub helps to break up any very tough debris and also gives me a chance to inspect the parts.
 

OnTheSly

Getting To Know The Place
24/6/23
51
47
18
Best Coast
I have had one occasion where printed text came off of some movement plates. But generally I haven’t had issues. What fluids are you using? I use Zenith formula 67 for my first wash, then Zenith rinse solution number 3 for my second solution, then I use two rinses of 99.9% isopropyl alcohol (I always remove the pallet fork and balance before the IPA stages). I run the wash speed at 35-40% but I do scrub the mainplate, barrel, bridges, and jewel holes with an IPA soaked foam q-tip prior to loading them up in the washing baskets. I figure the initial manual scrub helps to break up any very tough debris and also gives me a chance to inspect the parts.
I'm using L&R Exta Fine watch cleaning solution and their #3 rinse solution. I have a watch with a 8900 movement coming, the first time I might try running for only a minute at a time and checking to see if any lettering is coming off.
 

dogwood

I'm Pretty Popular
Patron
Section Moderator
Certified
7/9/21
2,441
5,420
113
Canada
I'm using L&R Exta Fine watch cleaning solution and their #3 rinse solution. I have a watch with a 8900 movement coming, the first time I might try running for only a minute at a time and checking to see if any lettering is coming off.
In general if the lettering is engraved or laser etched, I’ve found it to be safe in the machine. The only lettering I’ve had come of was lettering that was just printed onto the bridges without any engraving (physical or laser).
 
  • Like
Reactions: OnTheSly

Platomates

Getting To Know The Place
5/6/23
83
27
18
Singapore
I used all the stock CF except for the crystal which I replaced with a Deep crystal.
Did you sand down the gasket? I heard 2.7-2.85mm is the way to go for CF GMT II V3. I read somewhere that teh thickness of CF gasket is 2.90mm and the thickness of CF crystal is 1.70mm.
 

dogwood

I'm Pretty Popular
Patron
Section Moderator
Certified
7/9/21
2,441
5,420
113
Canada
Did you sand down the gasket? I heard 2.7-2.85mm is the way to go for CF GMT II V3. I read somewhere that teh thickness of CF gasket is 2.90mm and the thickness of CF crystal is 1.70mm.
I honestly can’t remember, but I suspect I left it stock and simply reused the cf crystal gasket.
 
  • Like
Reactions: Platomates

dogwood

I'm Pretty Popular
Patron
Section Moderator
Certified
7/9/21
2,441
5,420
113
Canada
I did a fun personal build this week... I recently picked up one of @Oascom's custom aventurine & meteorite Daytona dials.
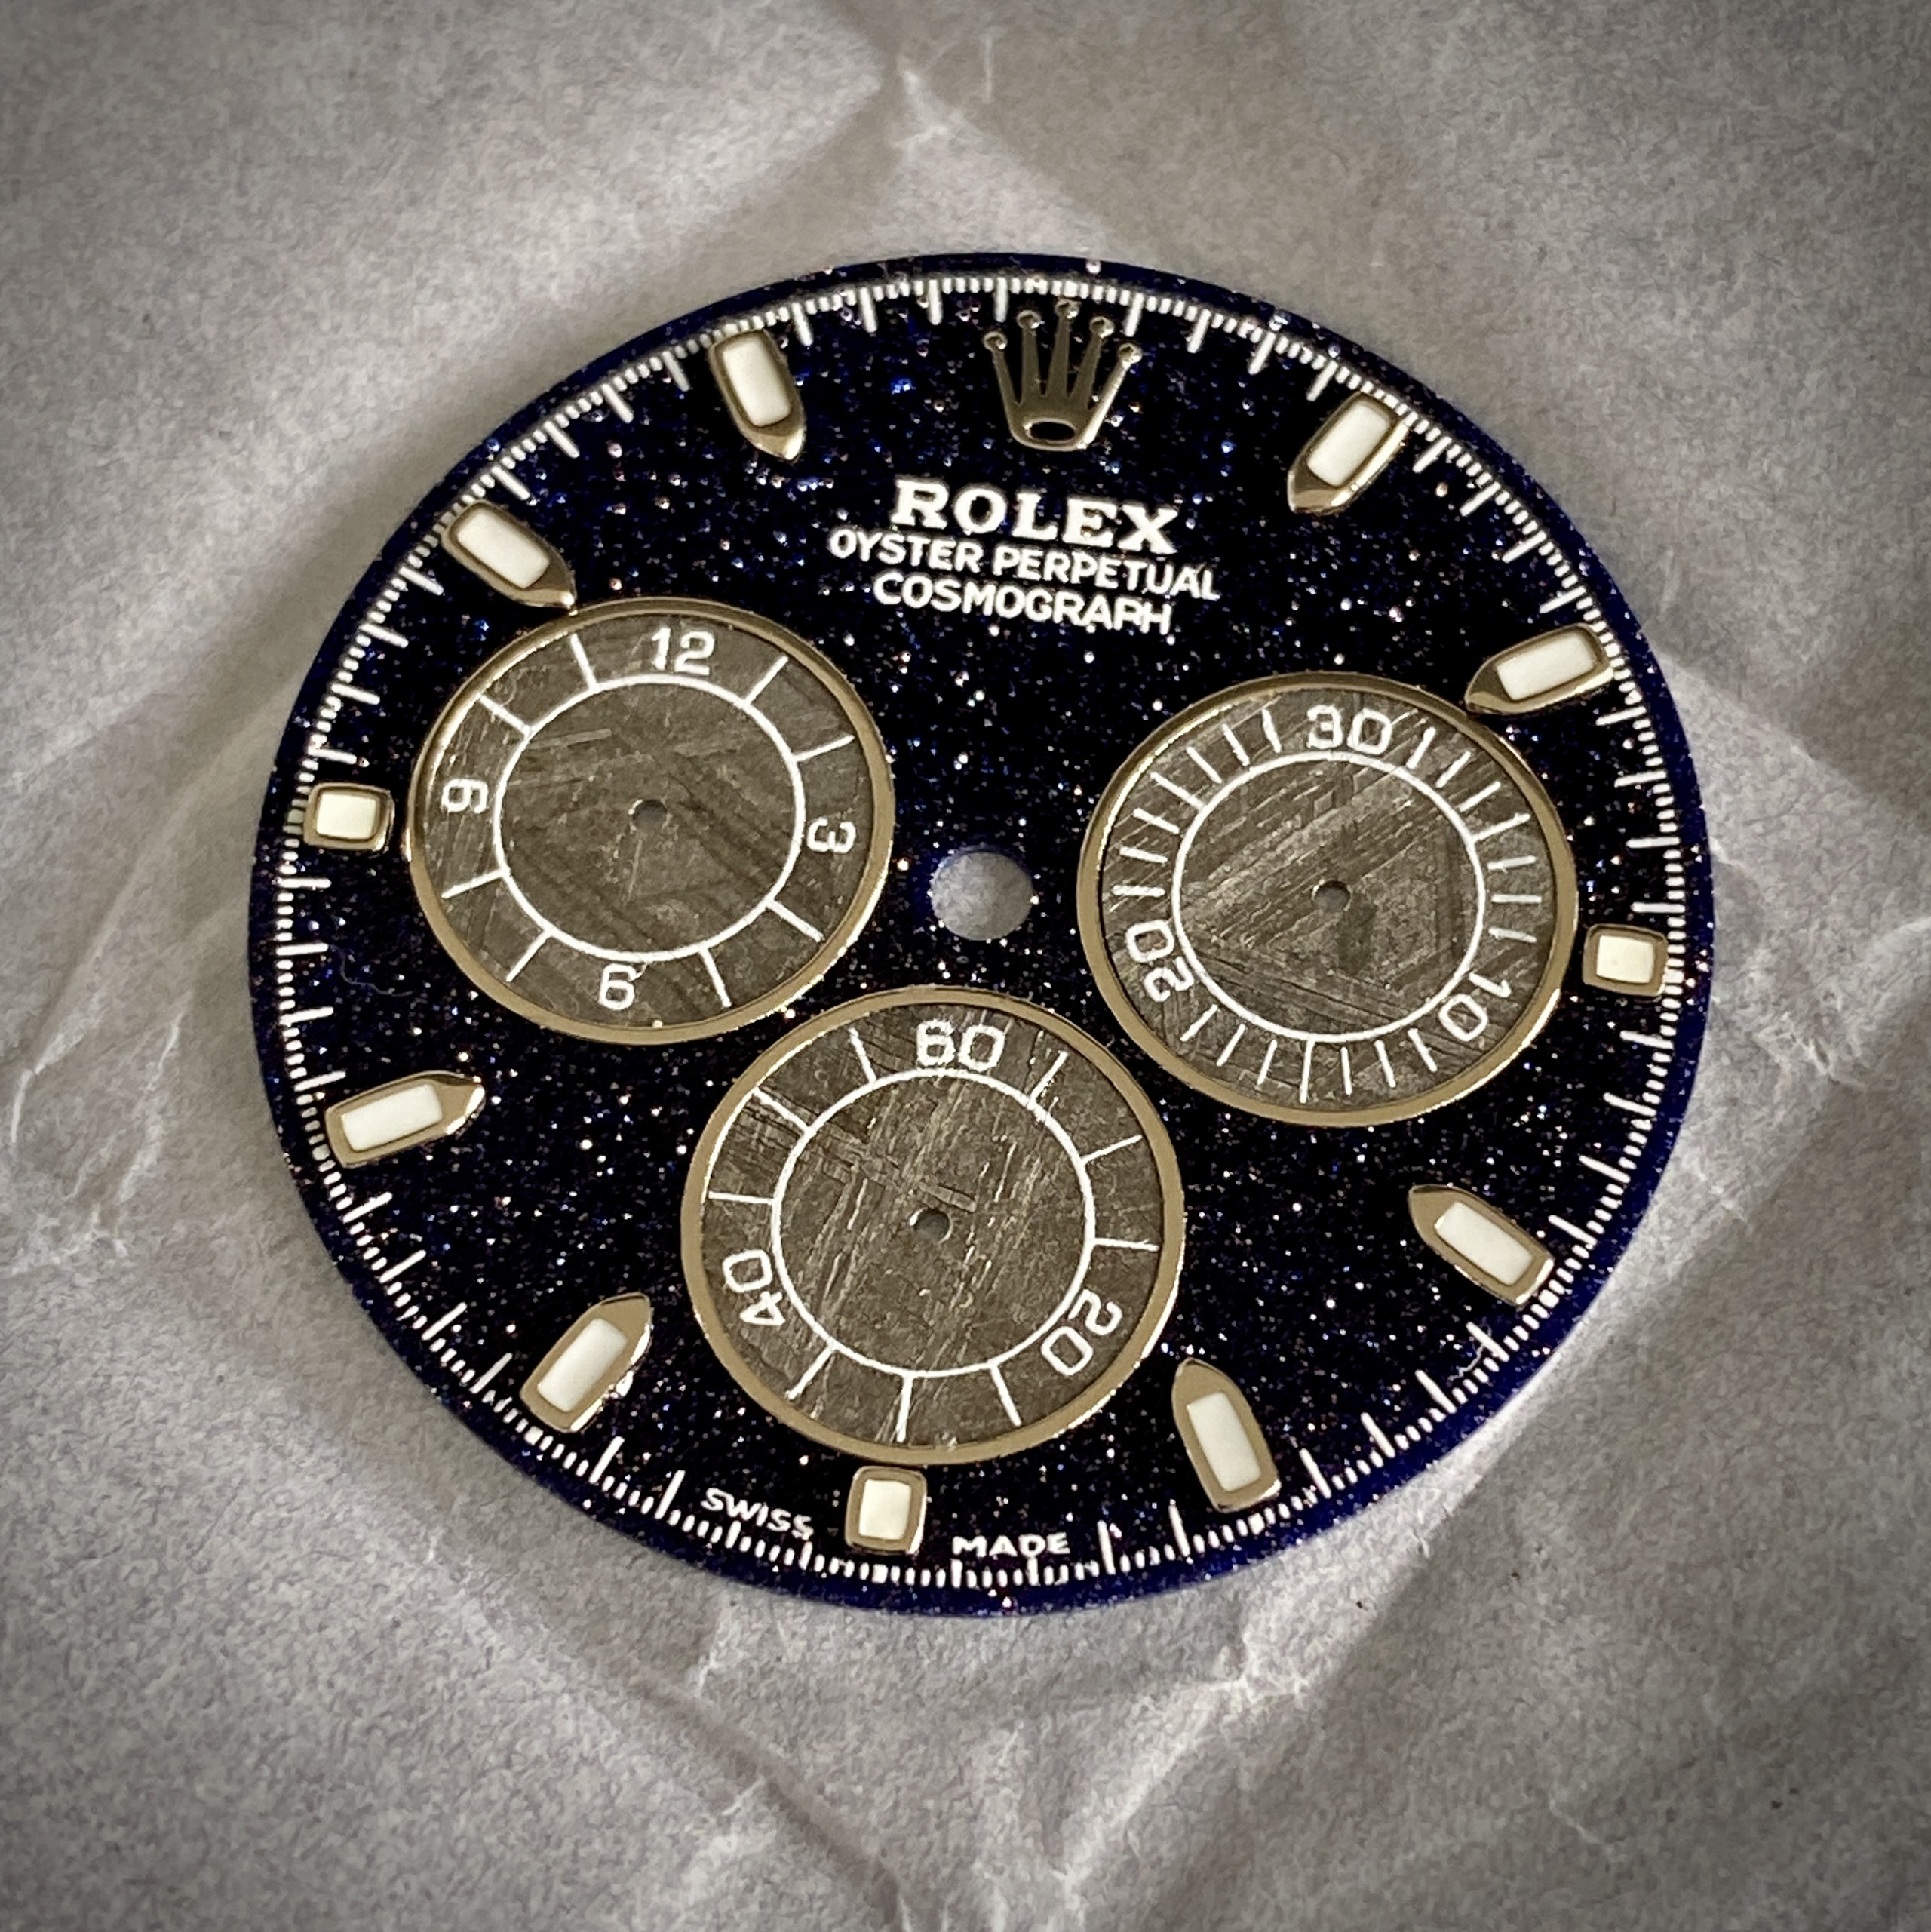


I've had a BTF 116509 in my watch box that has had very little wrist time, and I thought I'd try making a custom piece-unique Daytona. After giving the DD4130 a full service, I secured the new dial on the movement with two dots of 5 minute epoxy (Oascom's dials don't have dial feet). The fit and alignment was perfect.
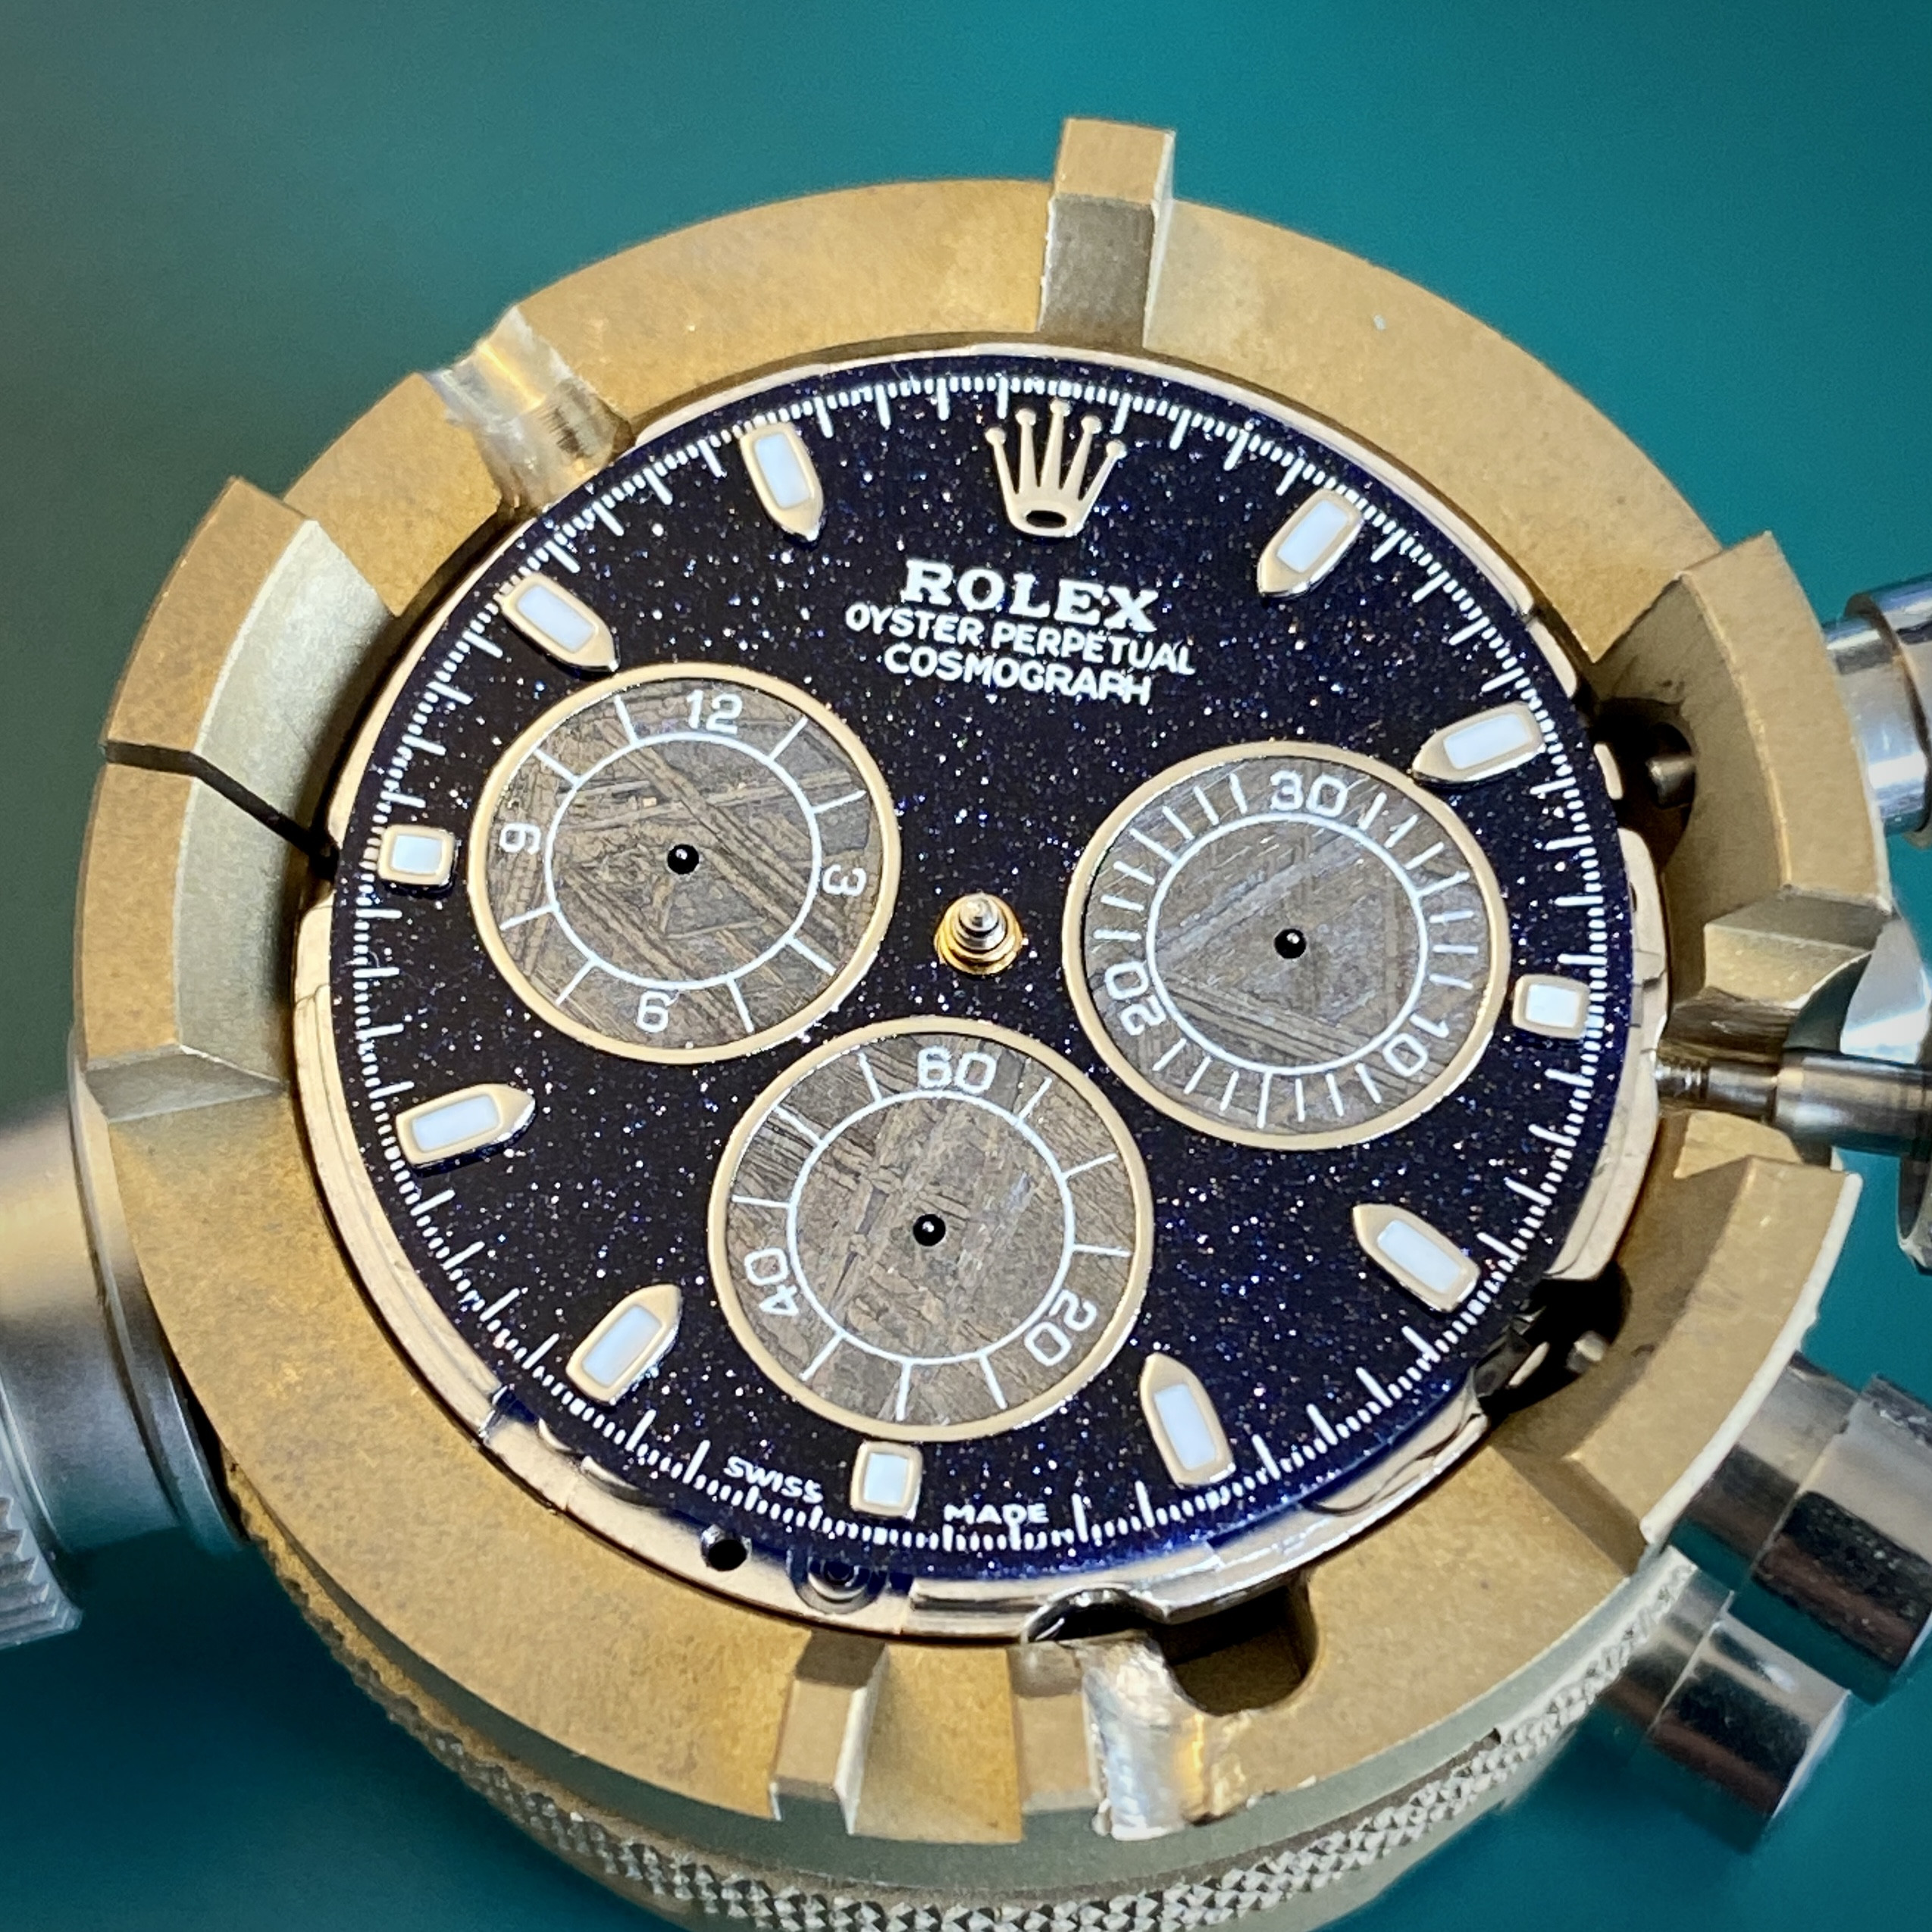


With the hands pressed on, I was starting to get very excited. The way the aventurine sparkles really goes with the "Cosmograph" theme of the original Daytona naming. The iron-nickel crystals of the meteorite sub-dials just add to the space theme of this build.
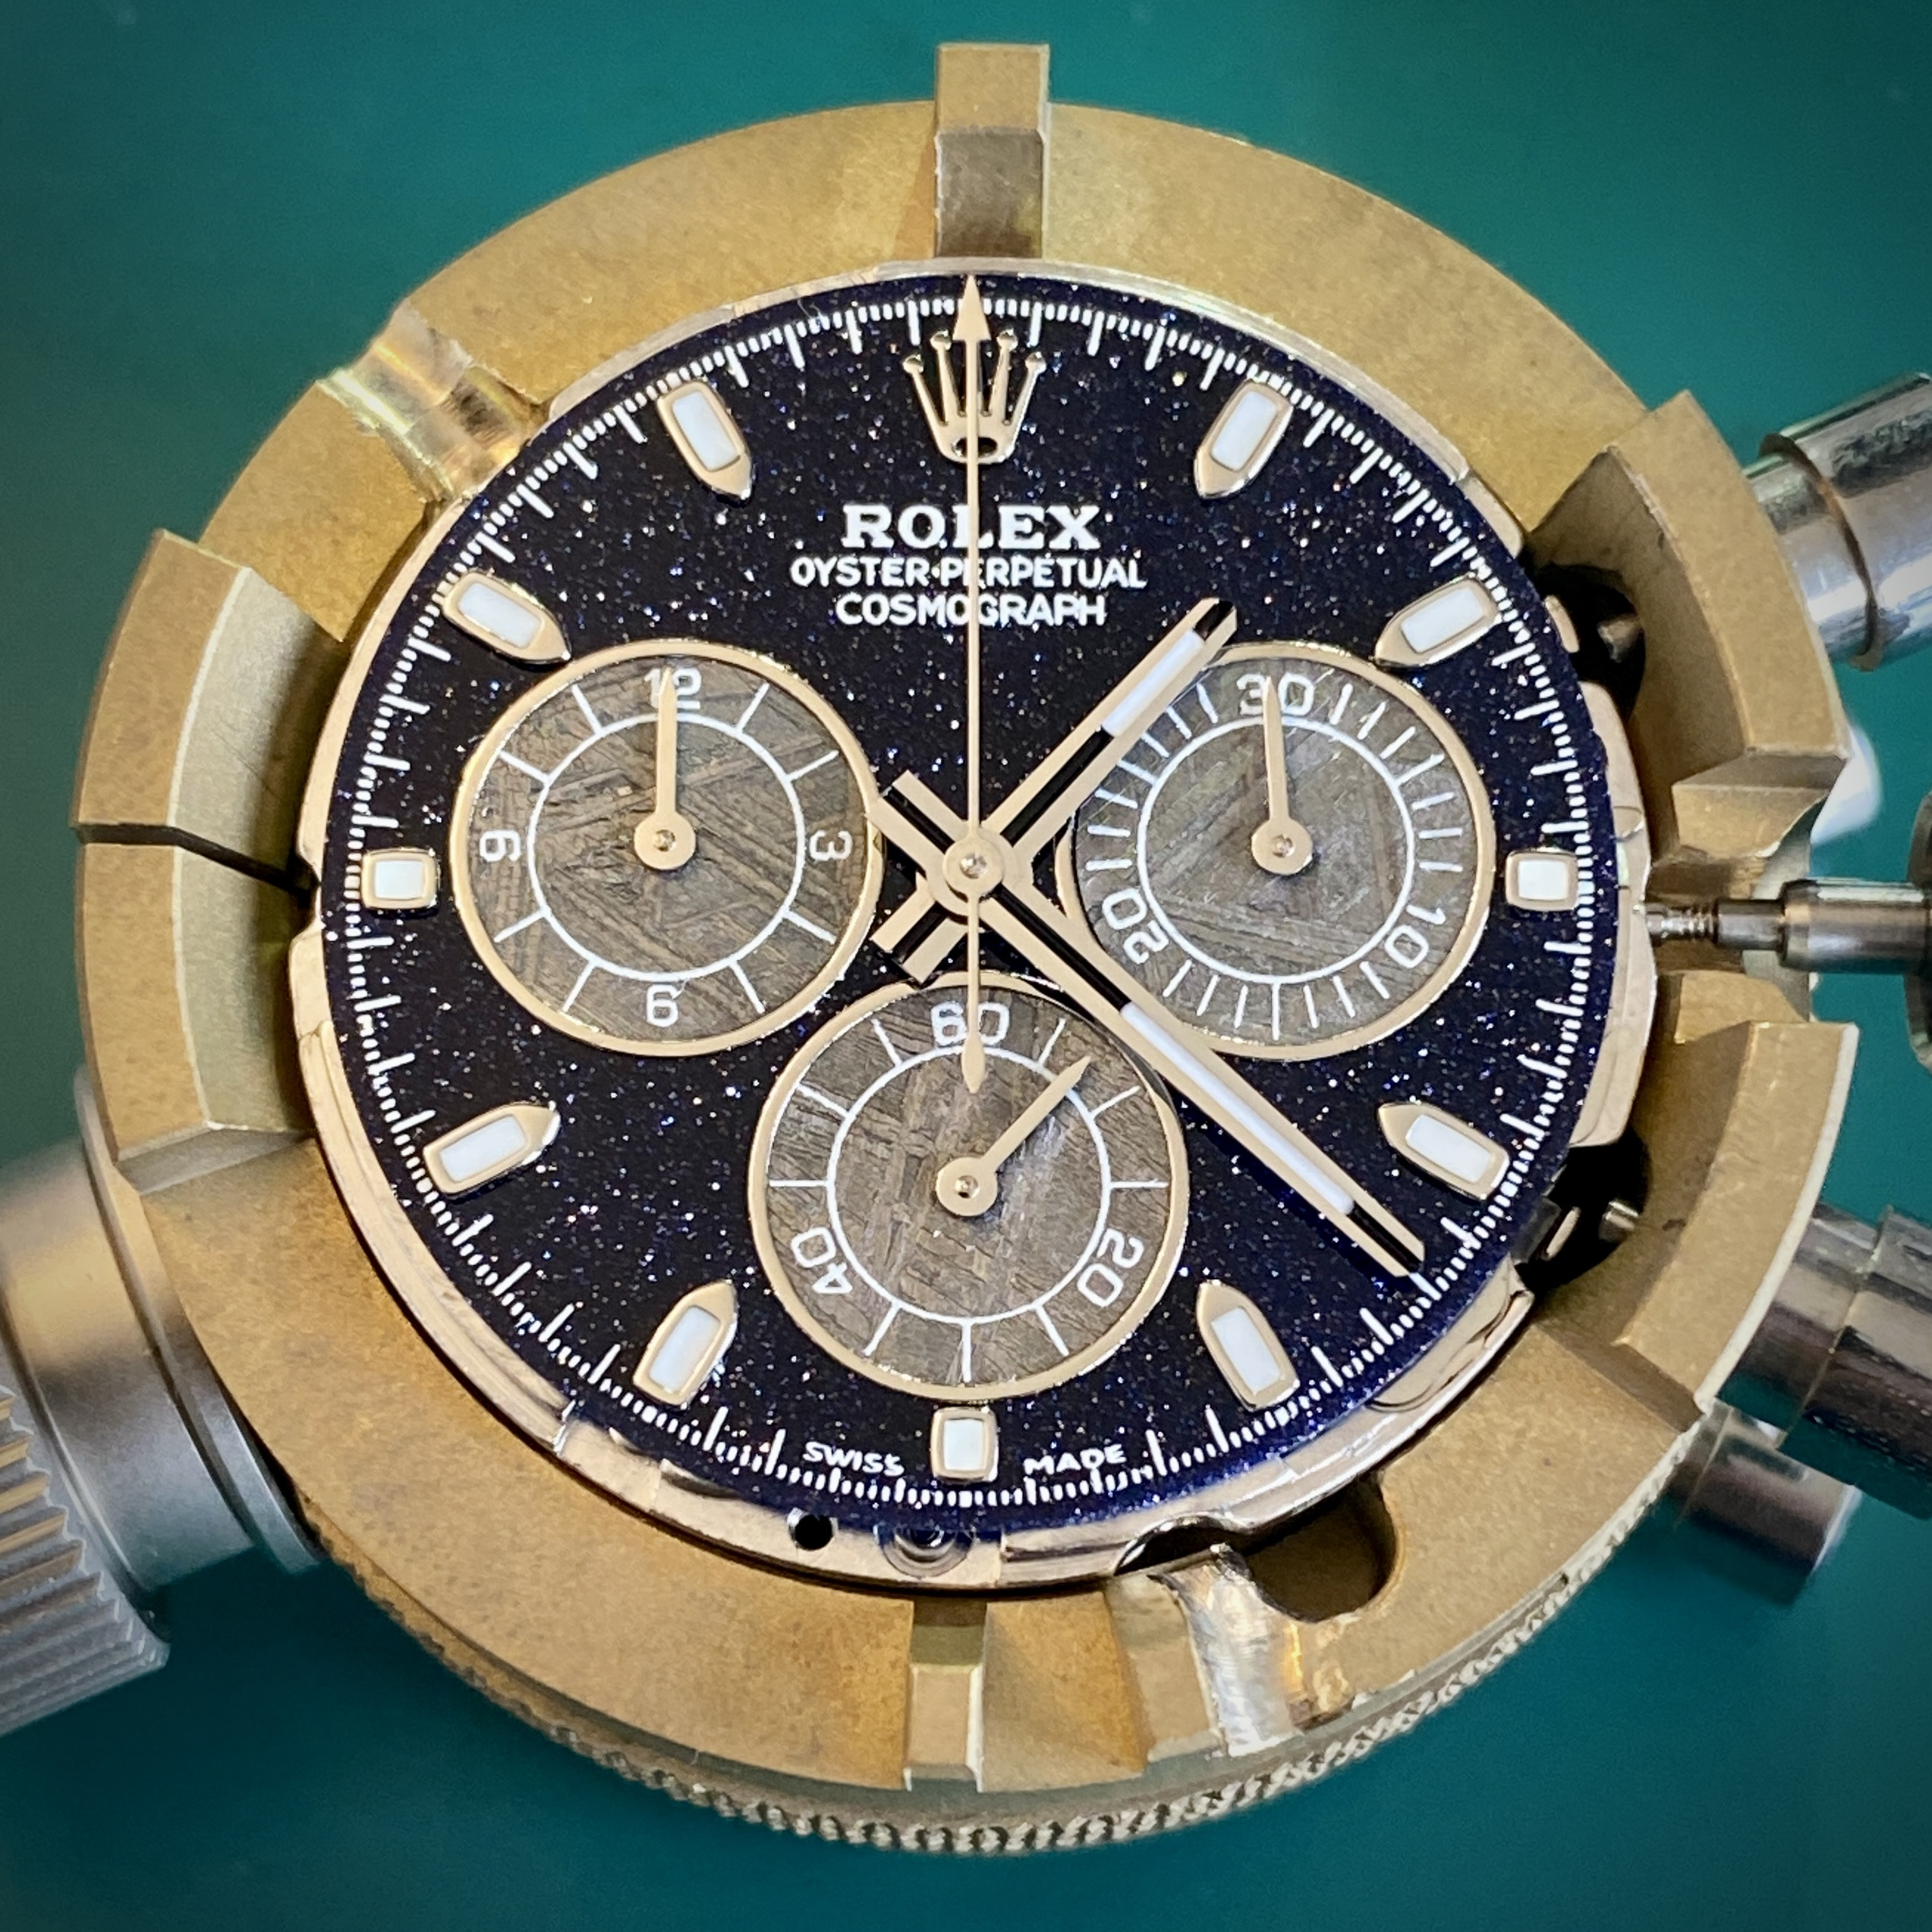


But as I was securing the movement + dial into the case with the case clamps, I heard a "crack"... I hadn't applied must torque to the case clamp screws, so I was surprised. When I flipped the watch and inspected it under the microscope, I saw a crack in the aventurine running in a half moon shape through the minute track.
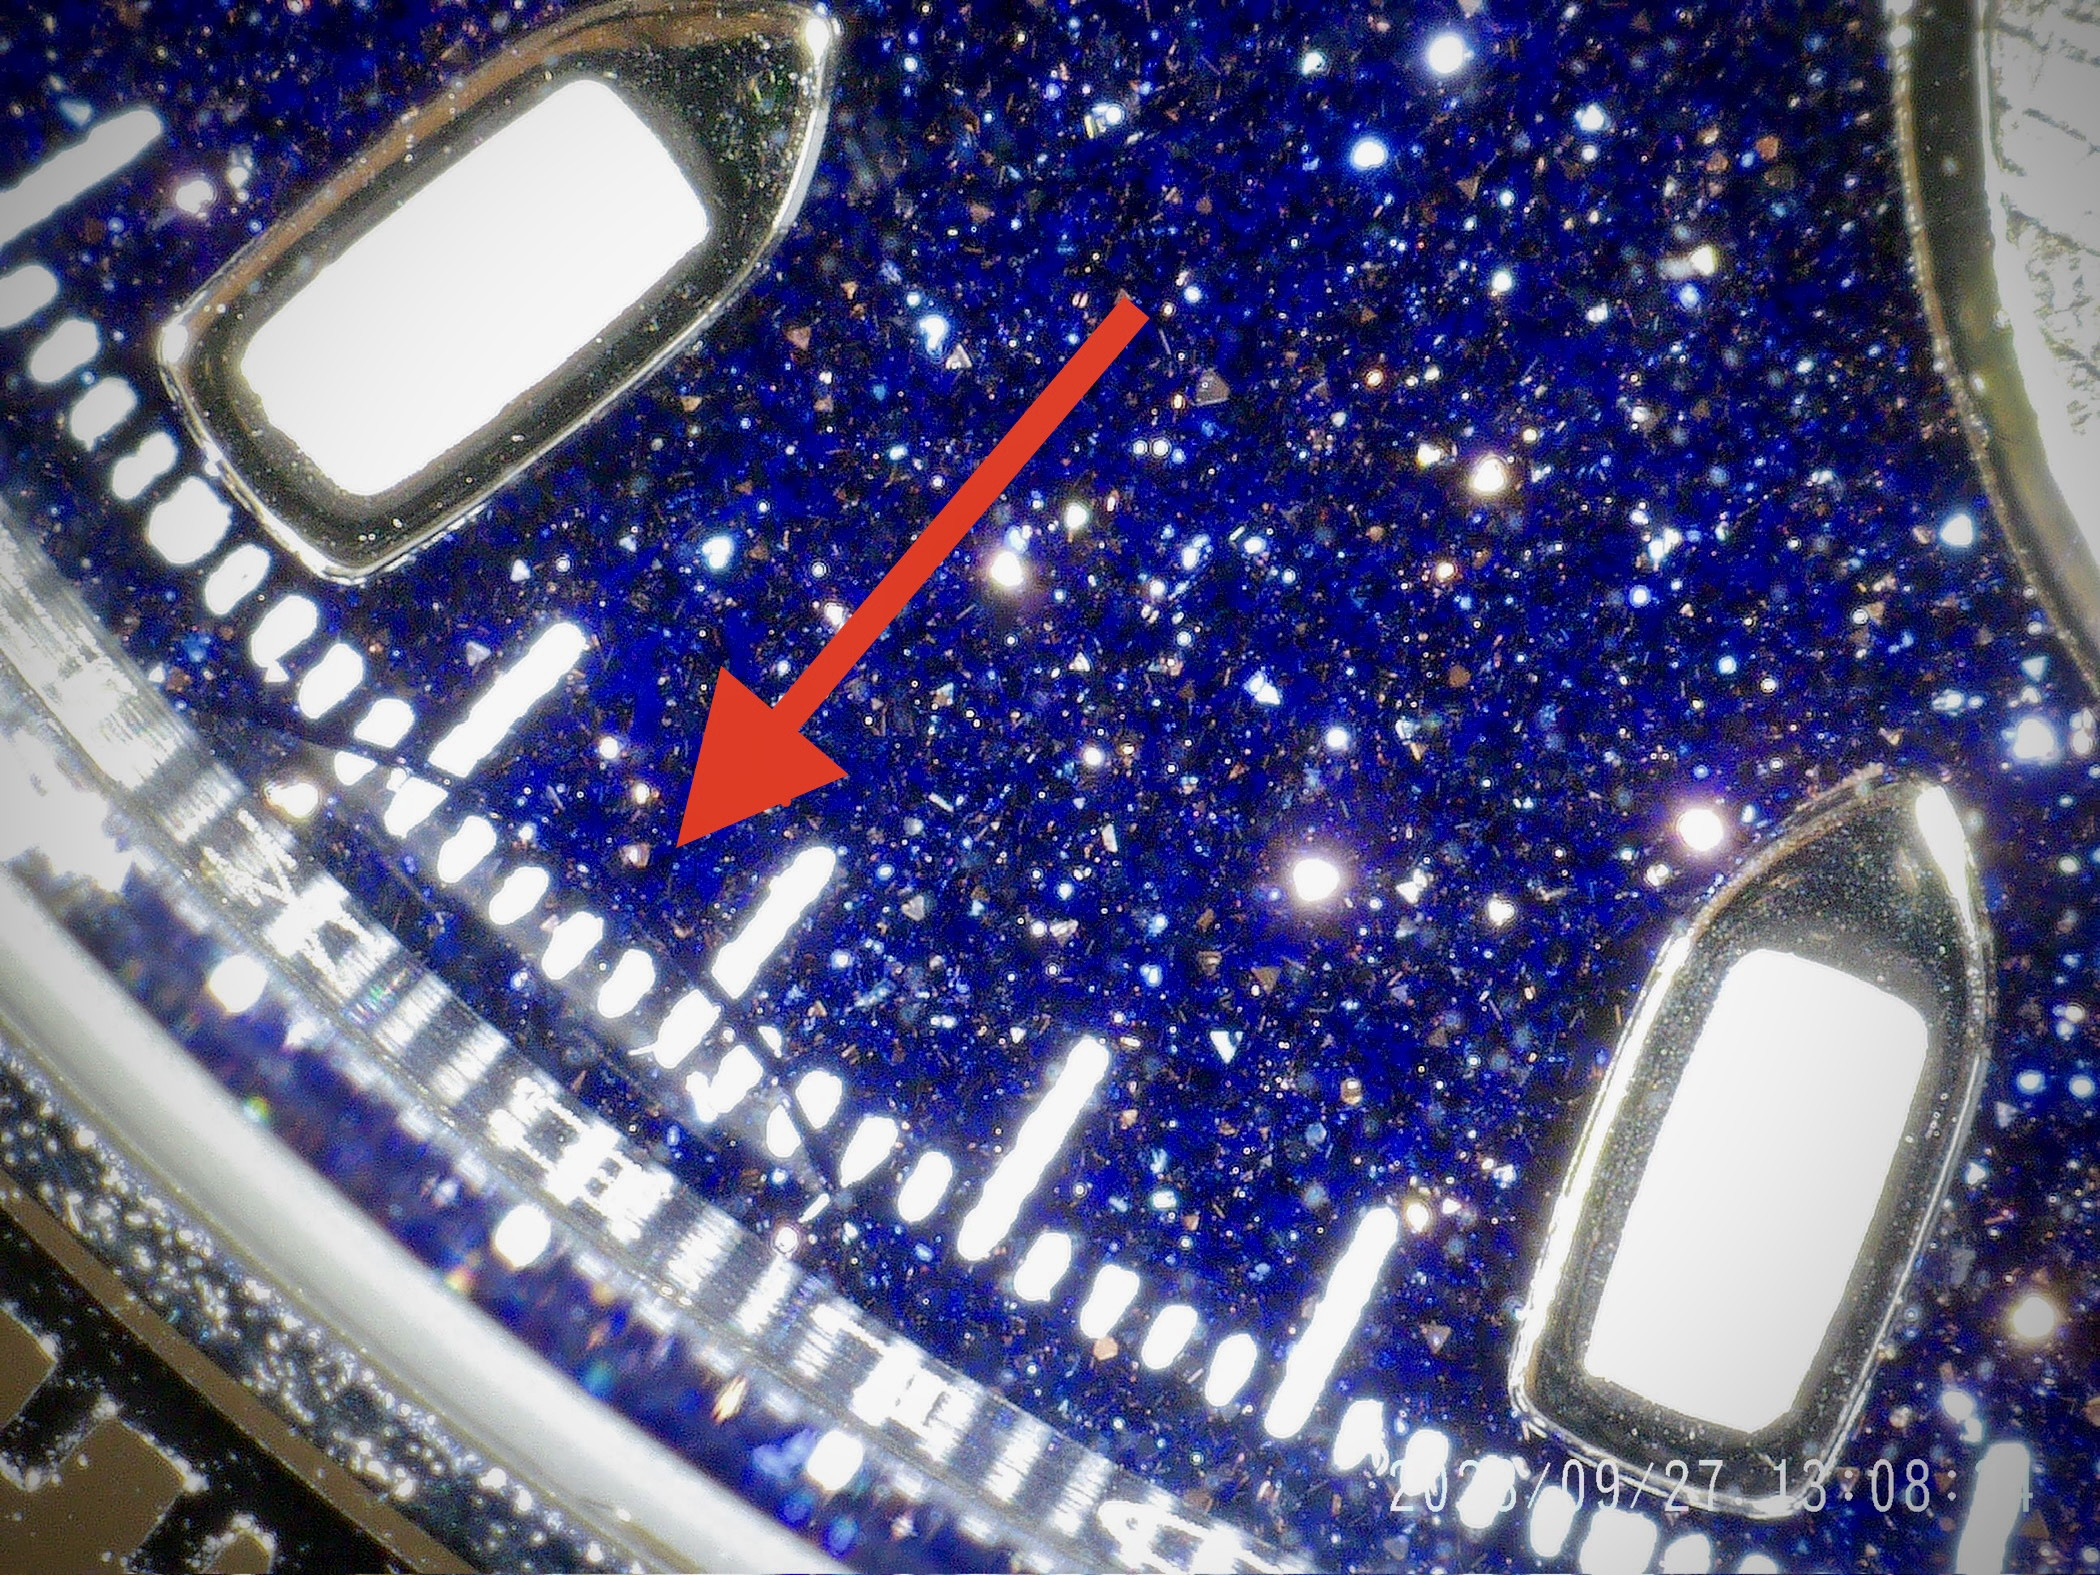


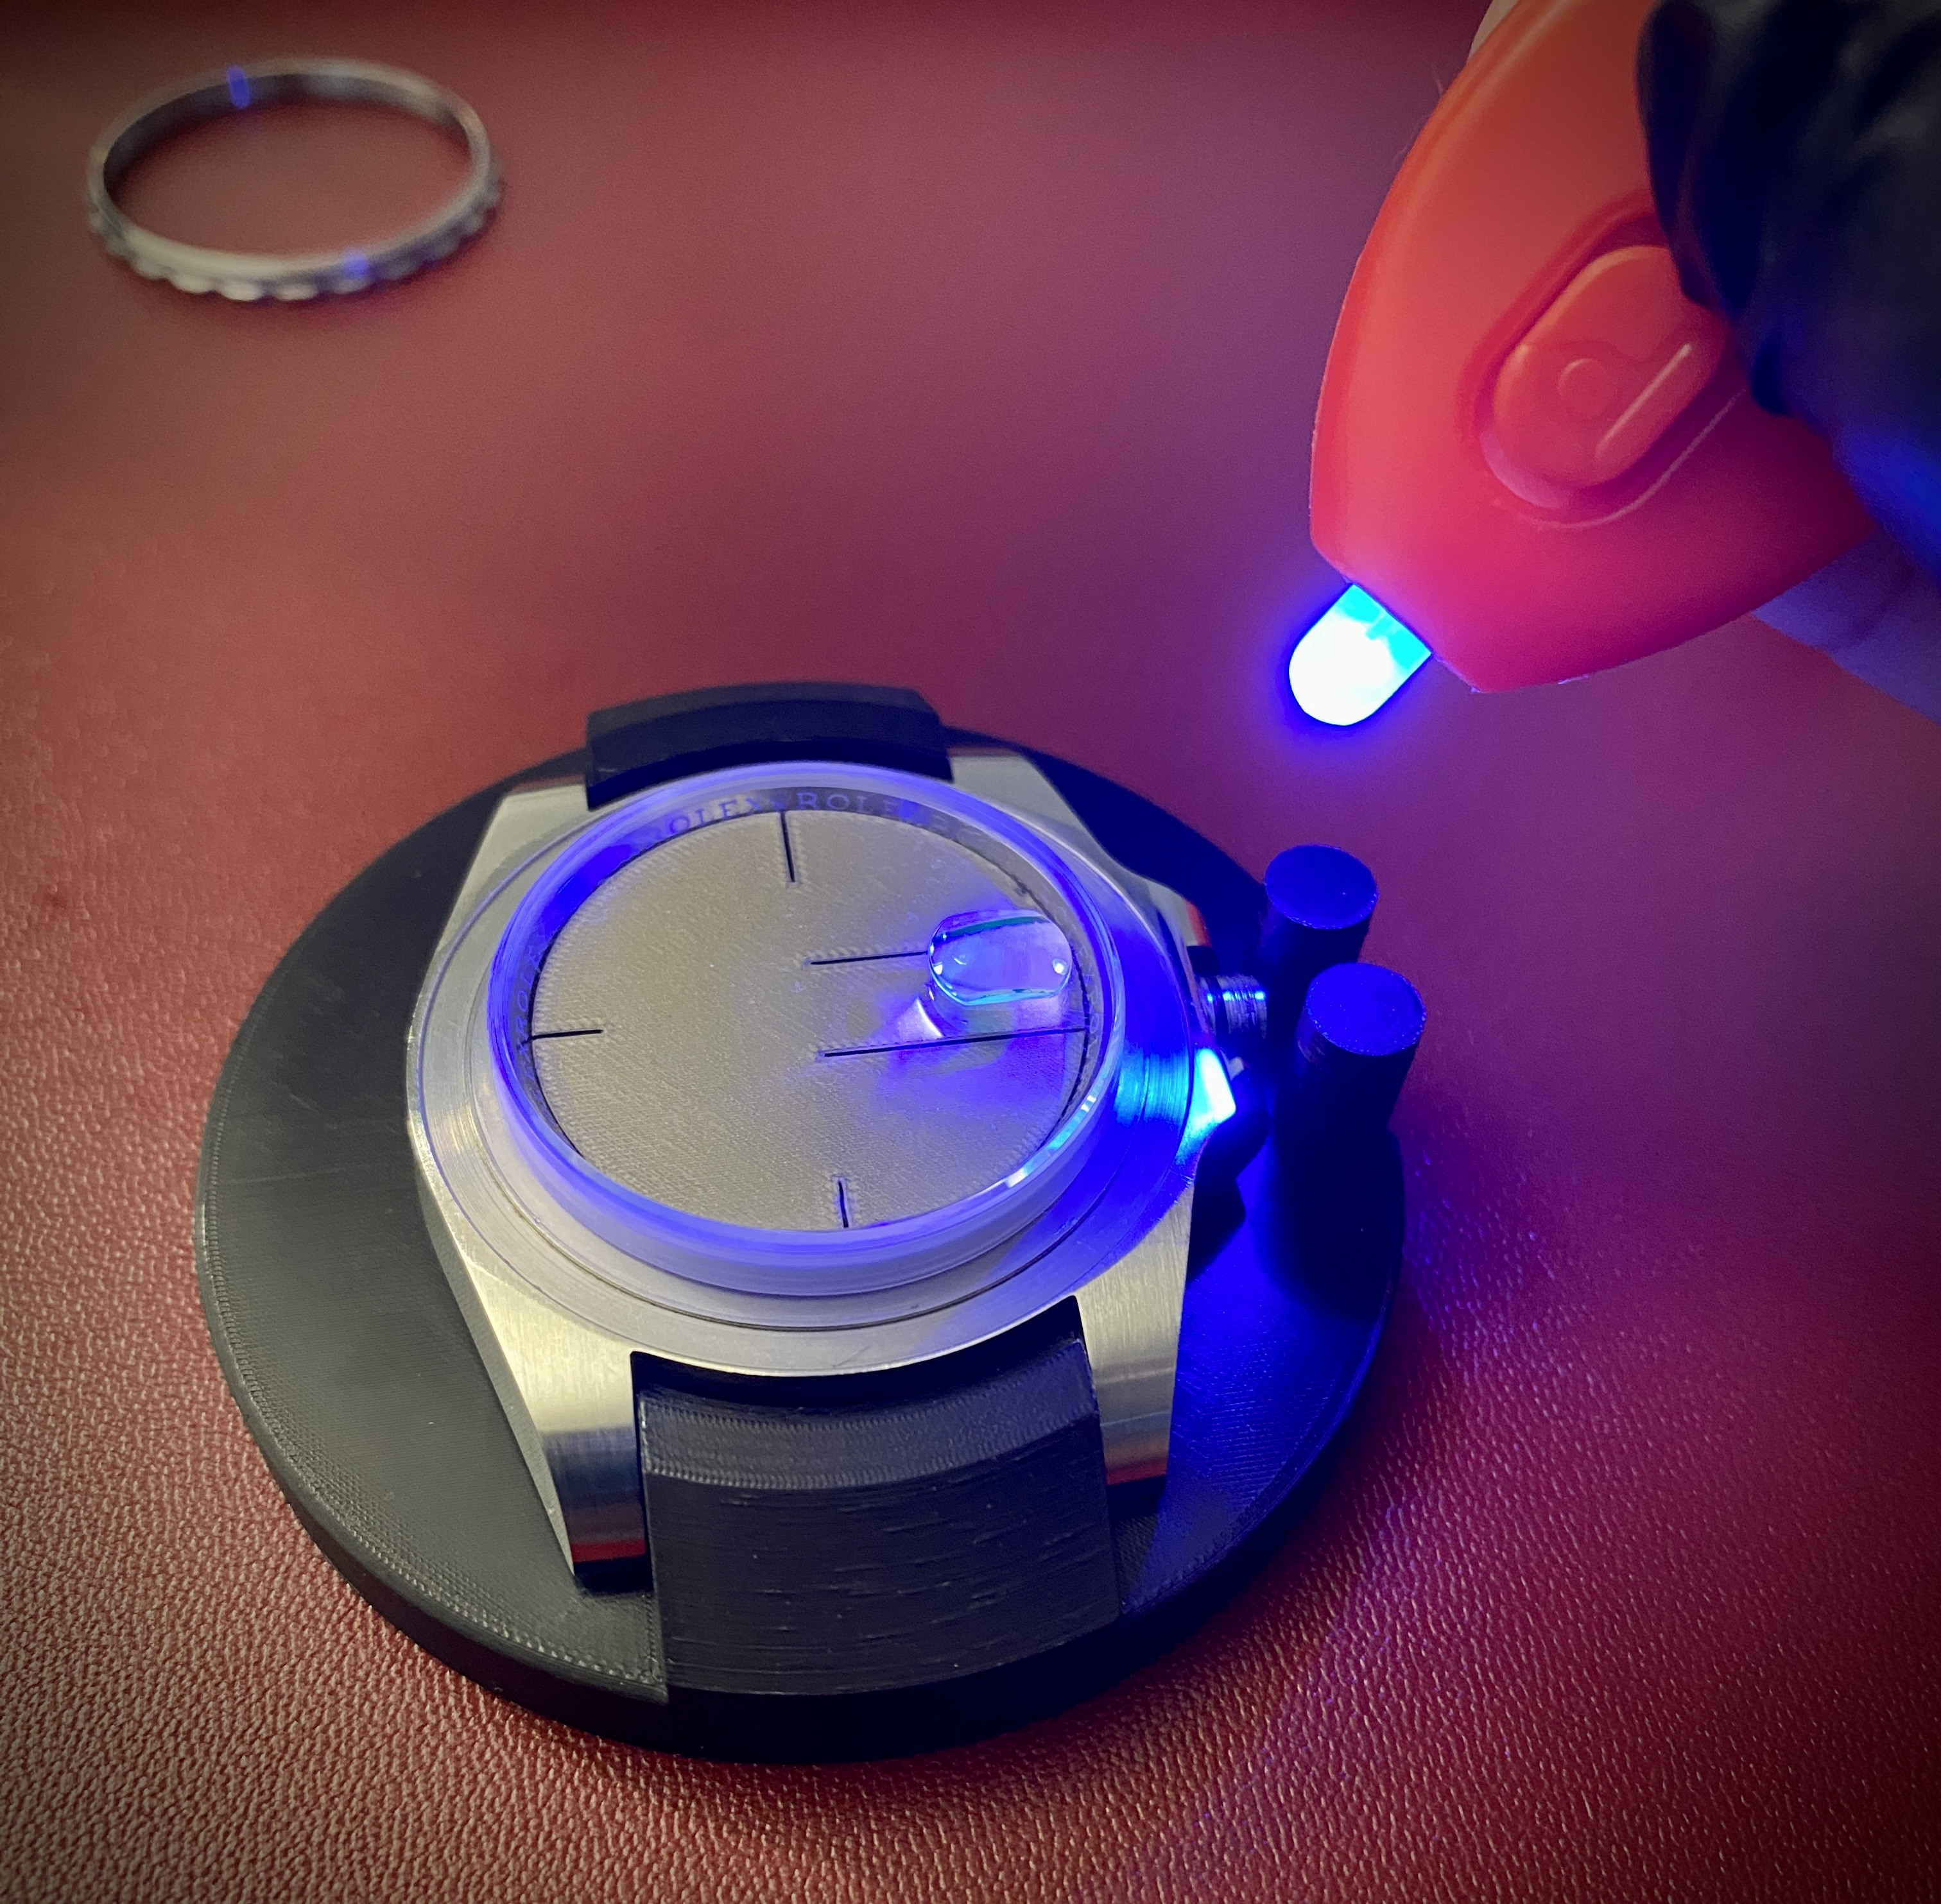
I knew that a stone dial would be brittle but I was surprised nonetheless. After a few messages back and forth with Oascom to discuss how the dial could be repaired, we came up with a plan to use optically clear UV glue to shut the gap and to use the movement as a jig for the procedure.
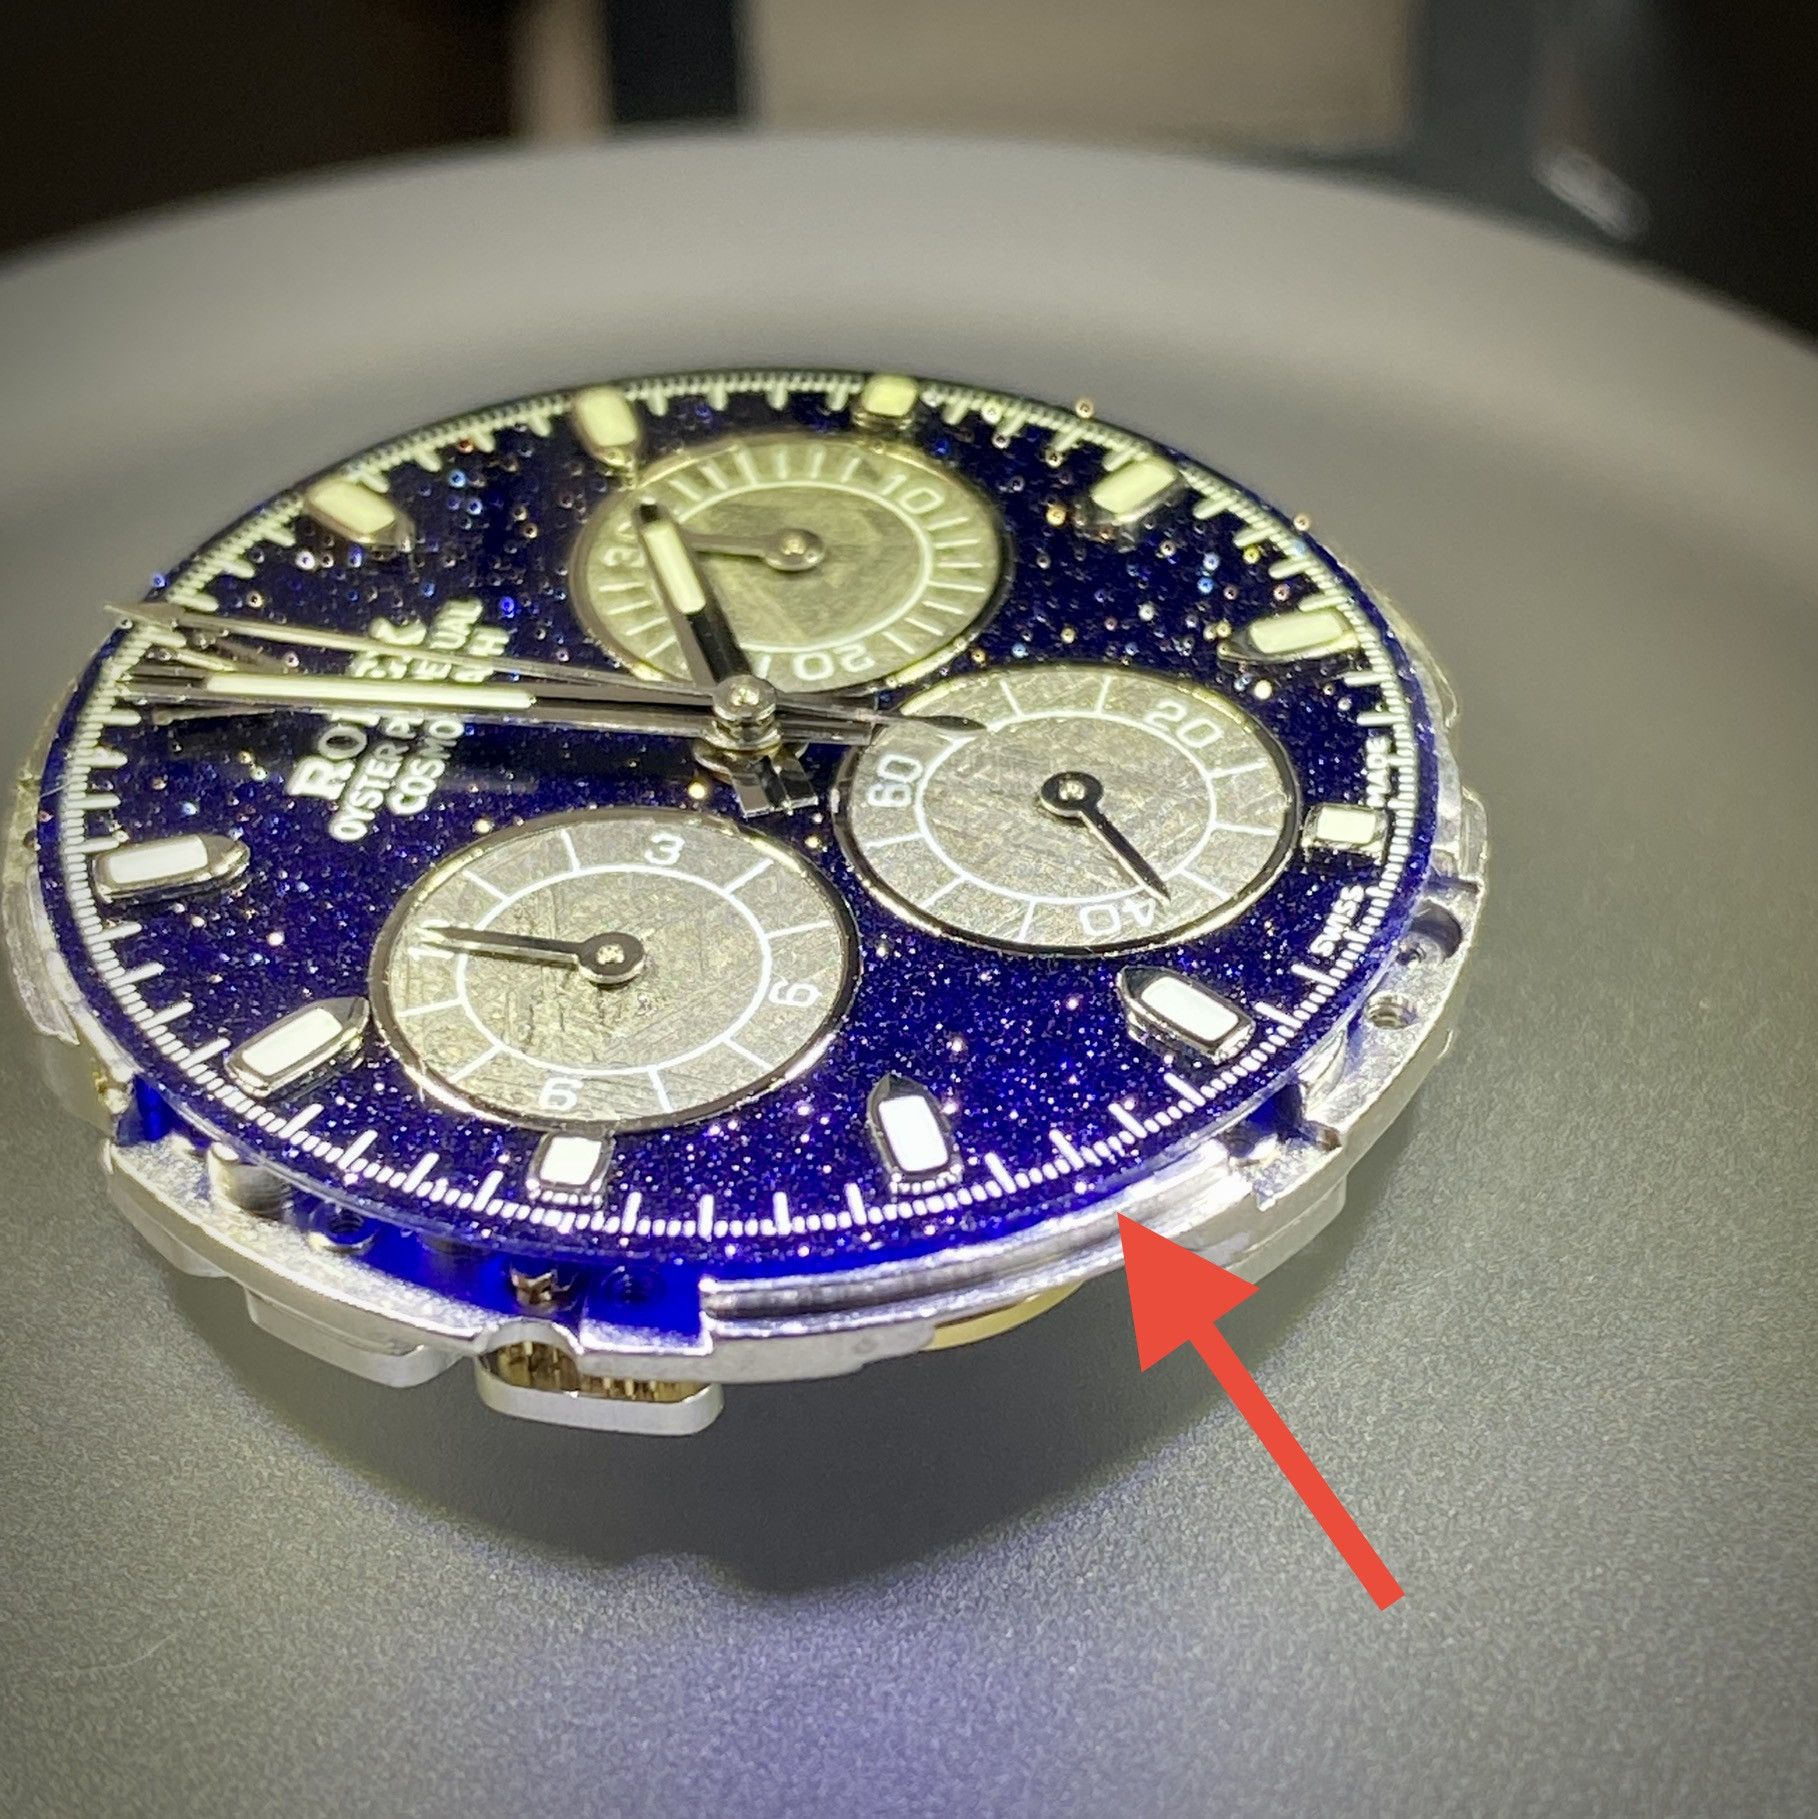


Fortunately the crack was over a part of the movement that was full height, and the crack hadn't gone clean through the dial, so it was a simple matter to apply a thin film of UV glue to the seam and then use a probe to squeeze the two sides together as I applied the UV LED light. (I didn't get any pictures of doing that since it required two hands).

With the dial repaired, I got the movement + dial back into the case. The crack in the printing case be seen in this macro shot on the 39 minute marker, but it's basically invisible to the naked eye.
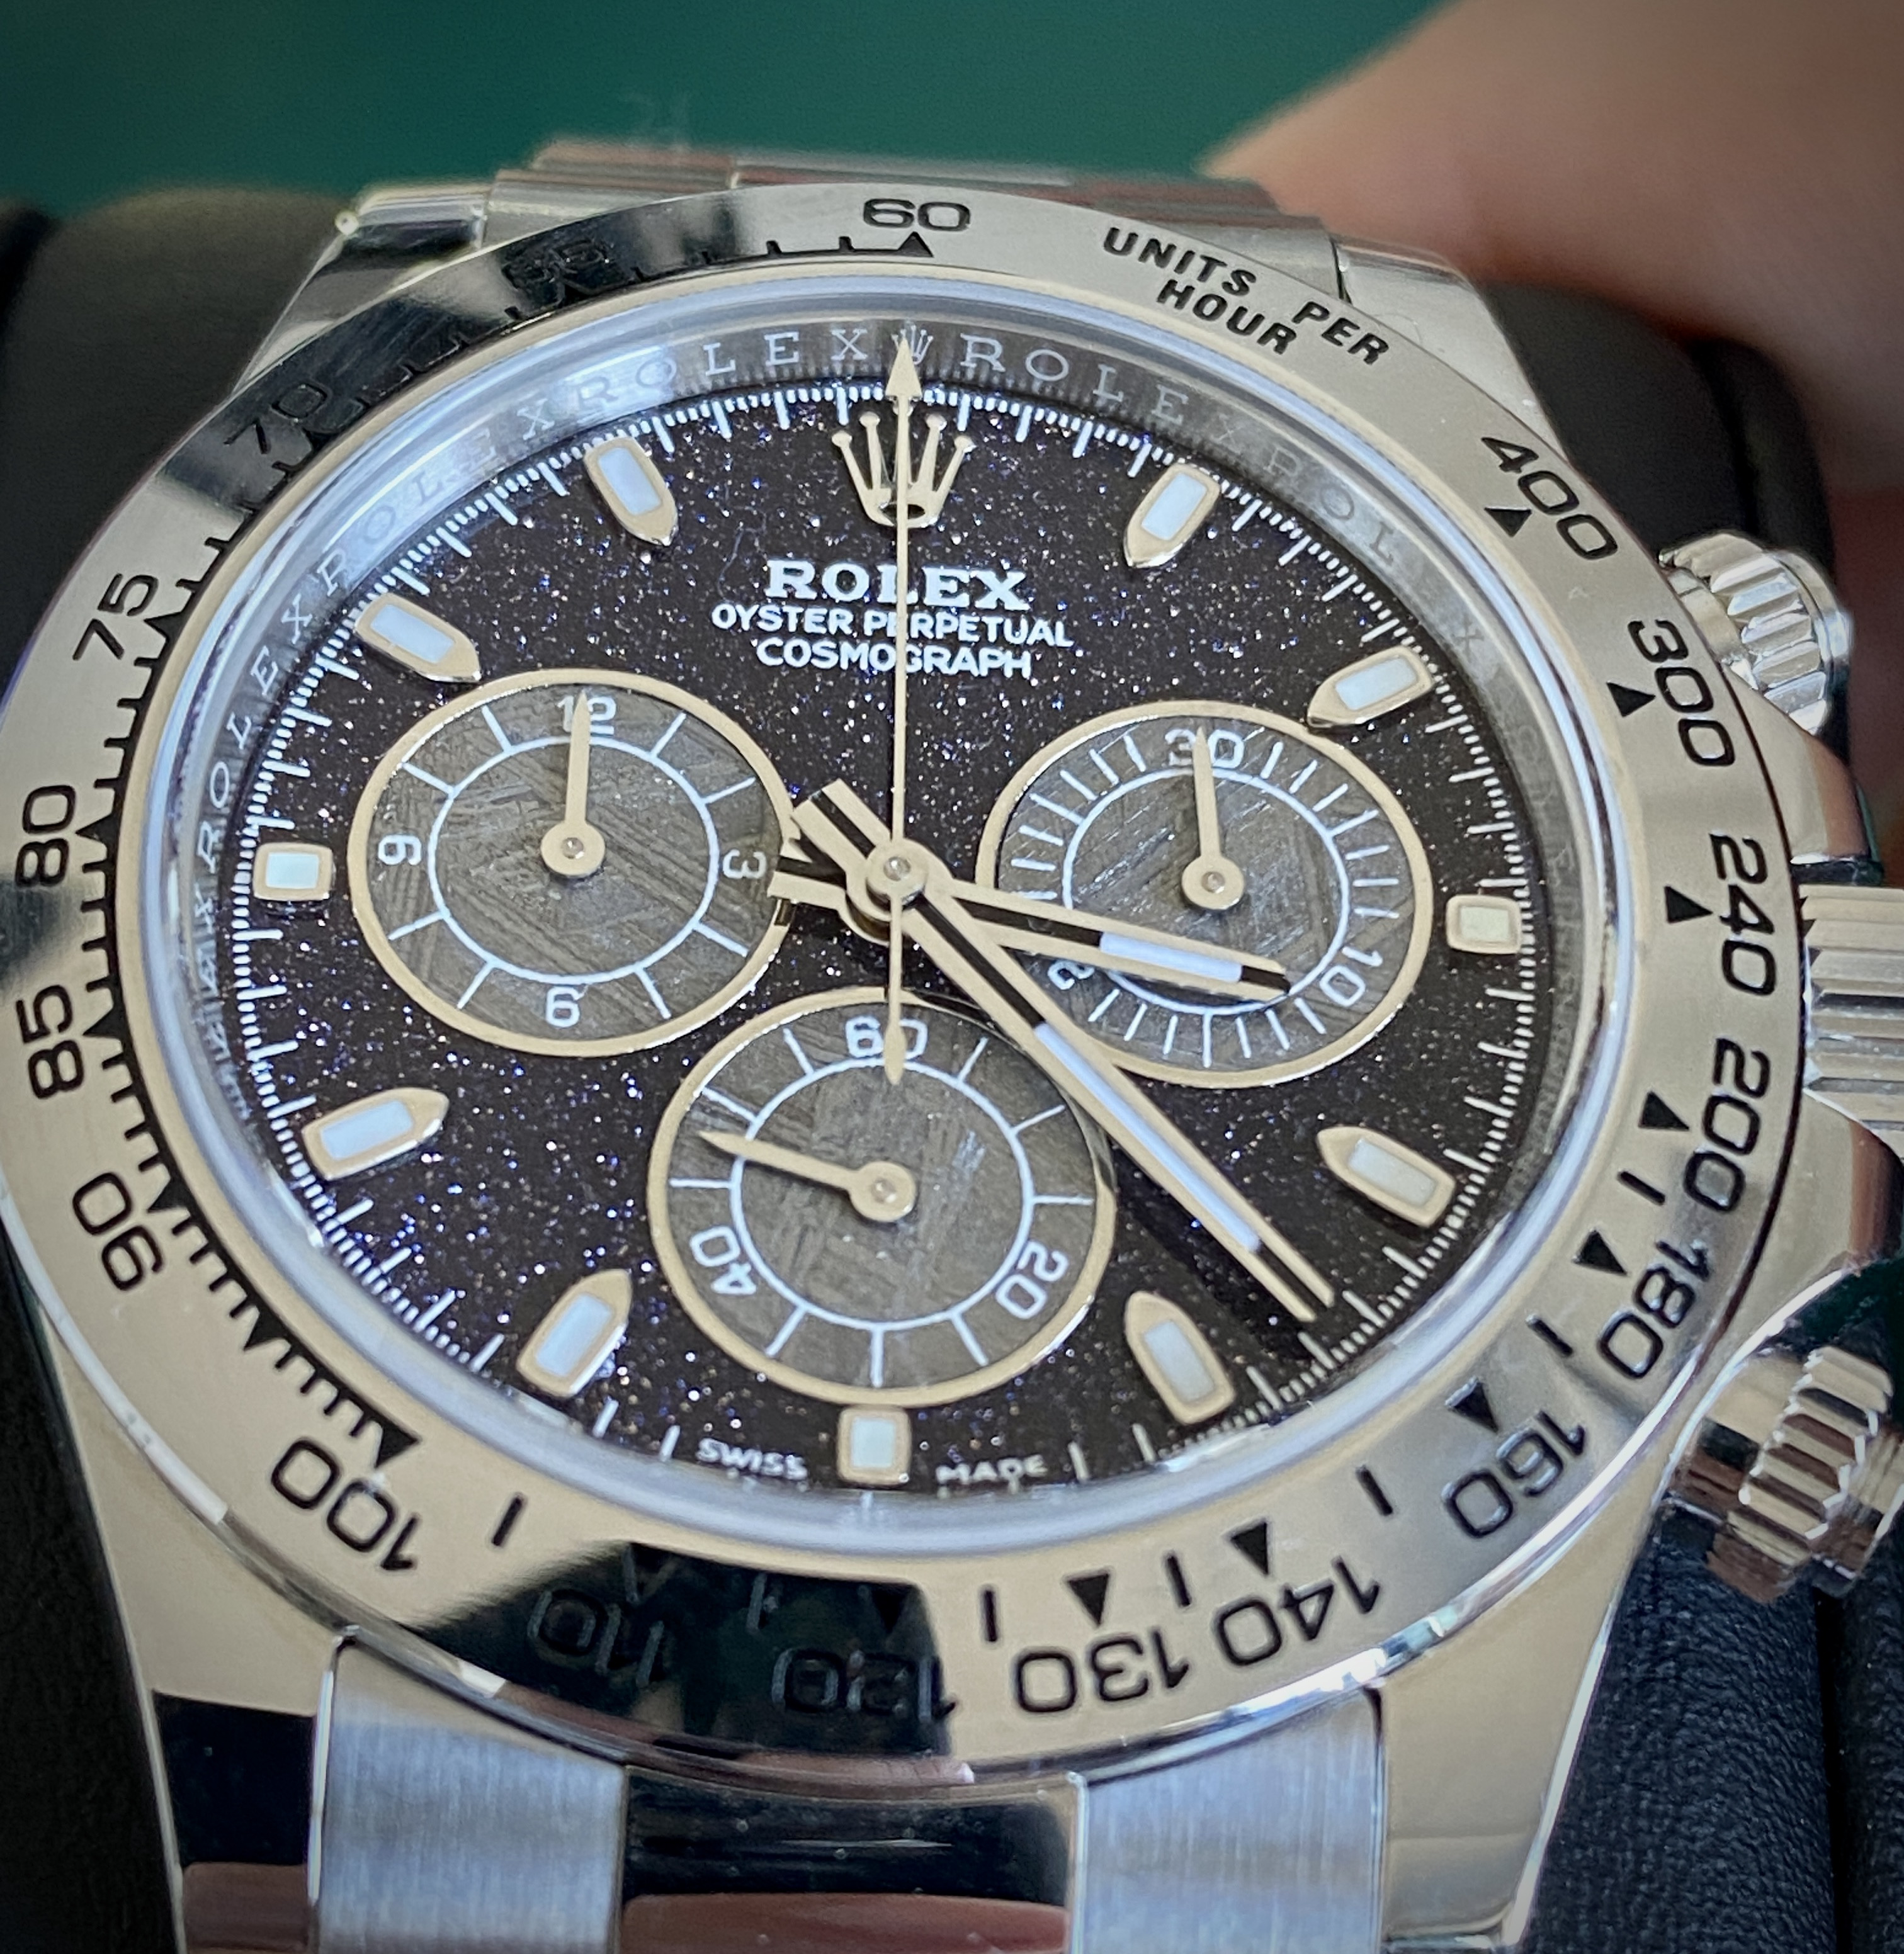


Pictures really don't do this dial justice. The aventurine sparkles really nicely as it moves through the light. I'm worried that it might be a little too much "bling" for my style. But it was a fun project nonetheless.
 

rankiba

Renowned Member
26/4/13
709
179
43
I did a fun personal build this week... I recently picked up one of @Oascom's custom aventurine & meteorite Daytona dials.


I've had a BTF 116509 in my watch box that has had very little wrist time, and I thought I'd try making a custom piece-unique Daytona. After giving the DD4130 a full service, I secured the new dial on the movement with two dots of 5 minute epoxy (Oascom's dials don't have dial feet). The fit and alignment was perfect.


With the hands pressed on, I was starting to get very excited. The way the aventurine sparkles really goes with the "Cosmograph" theme of the original Daytona naming. The iron-nickel crystals of the meteorite sub-dials just add to the space theme of this build.


But as I was securing the movement + dial into the case with the case clamps, I heard a "crack"... I hadn't applied must torque to the case clamp screws, so I was surprised. When I flipped the watch and inspected it under the microscope, I saw a crack in the aventurine running in a half moon shape through the minute track.


I knew that a stone dial would be brittle but I was surprised nonetheless. After a few messages back and forth with Oascom to discuss how the dial could be repaired, we came up with a plan to use optically clear UV glue to shut the gap and to use the movement as a jig for the procedure.


Fortunately the crack was over a part of the movement that was full height, and the crack hadn't gone clean through the dial, so it was a simple matter to apply a thin film of UV glue to the seam and then use a probe to squeeze the two sides together as I applied the UV LED light. (I didn't get any pictures of doing that since it required two hands).

With the dial repaired, I got the movement + dial back into the case. The crack in the printing case be seen in this macro shot on the 39 minute marker, but it's basically invisible to the naked eye.


Pictures really don't do this dial justice. The aventurine sparkles really nicely as it moves through the light. I'm worried that it might be a little too much "bling" for my style. But it was a fun project nonetheless.

Wow the dial looks stunning! Really glad it can be saved!
 
  • Like
Reactions: haze3715

KJ2020

Time Traveler
Supporter
12/3/18
35,657
71,278
113
Over the past few months, I've had many (many!) requests to install Deep crystals onto watches. Deep crystals are a nice upgrade if you're into the "invisible" crystal look. However, there have been several reports of watches failing pressure tests after Deep crystals have been installed. I was recently asked to install a Deep crystal on on of the new CF GMTs. The watch failed the pressure test after installing the Deep crystal, so I thought I'd try using a little bit of UV glue around the lip of the crystal to help seal any potential gaps.


This is my first time using UV glue to try to seal a crystal, and maybe I'm not using enough... but I still couldn't get the watch to pass a pressure test even with the UV glue around the edge of the Deep crystal.

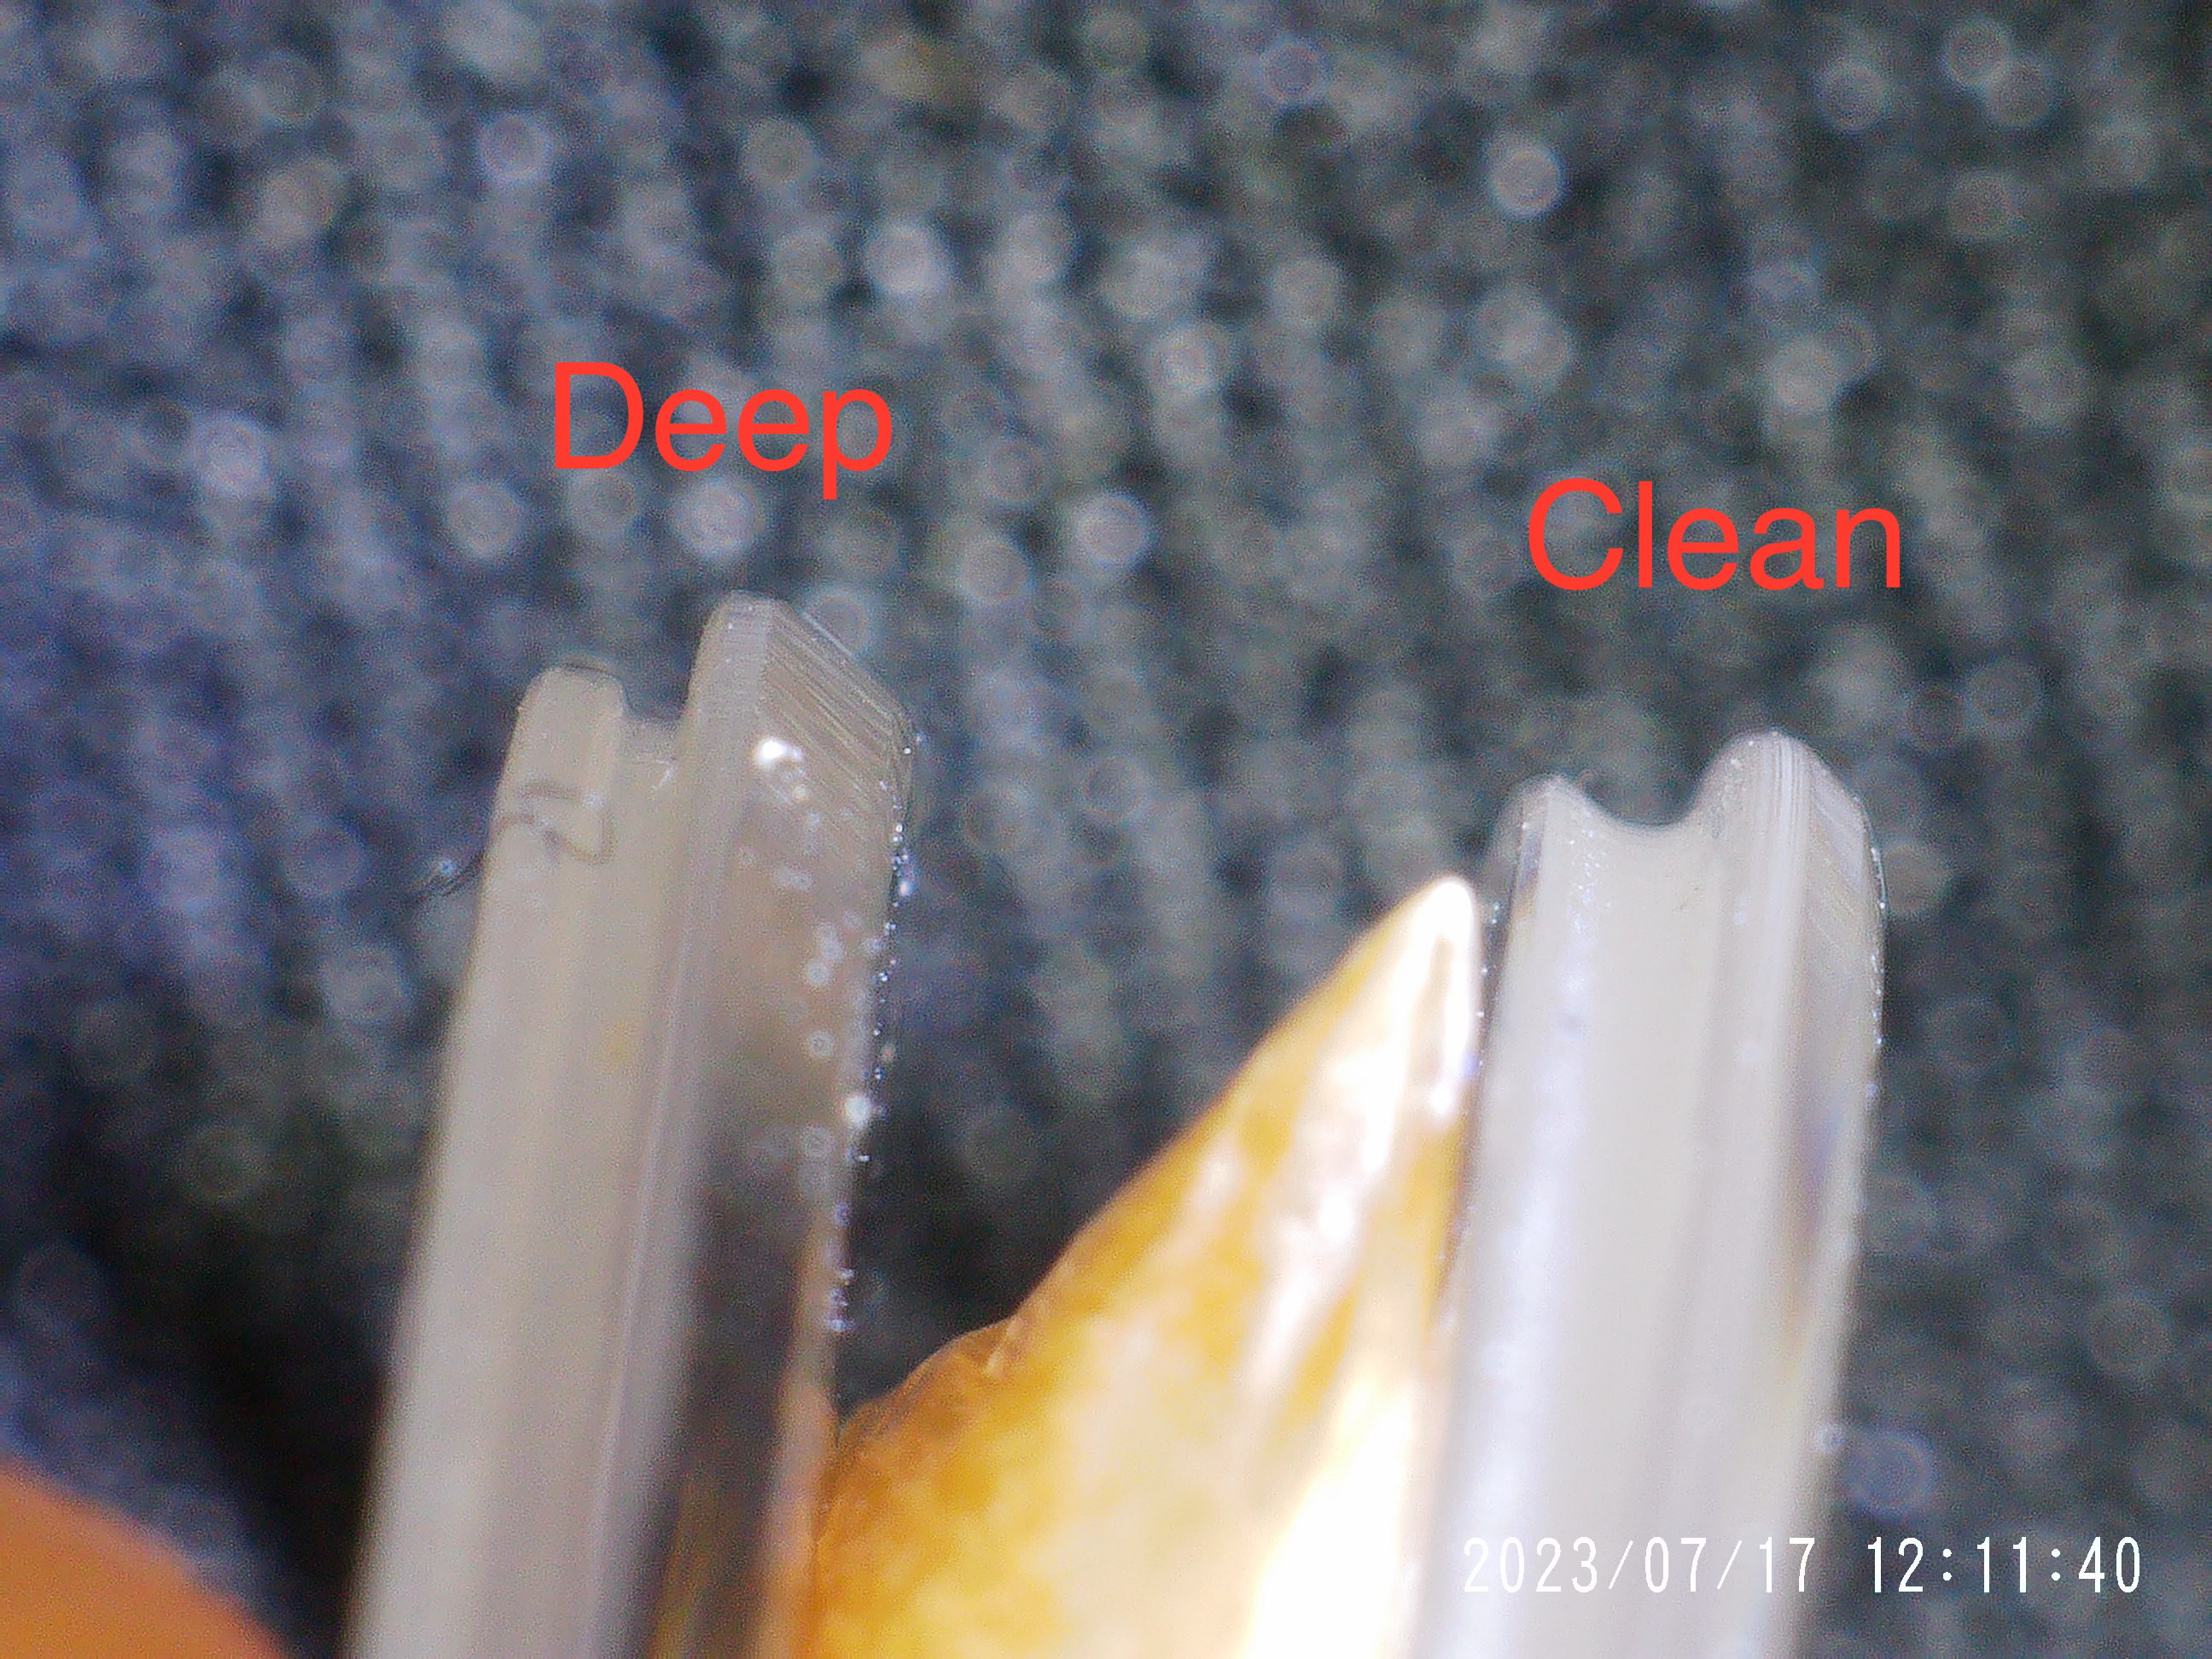
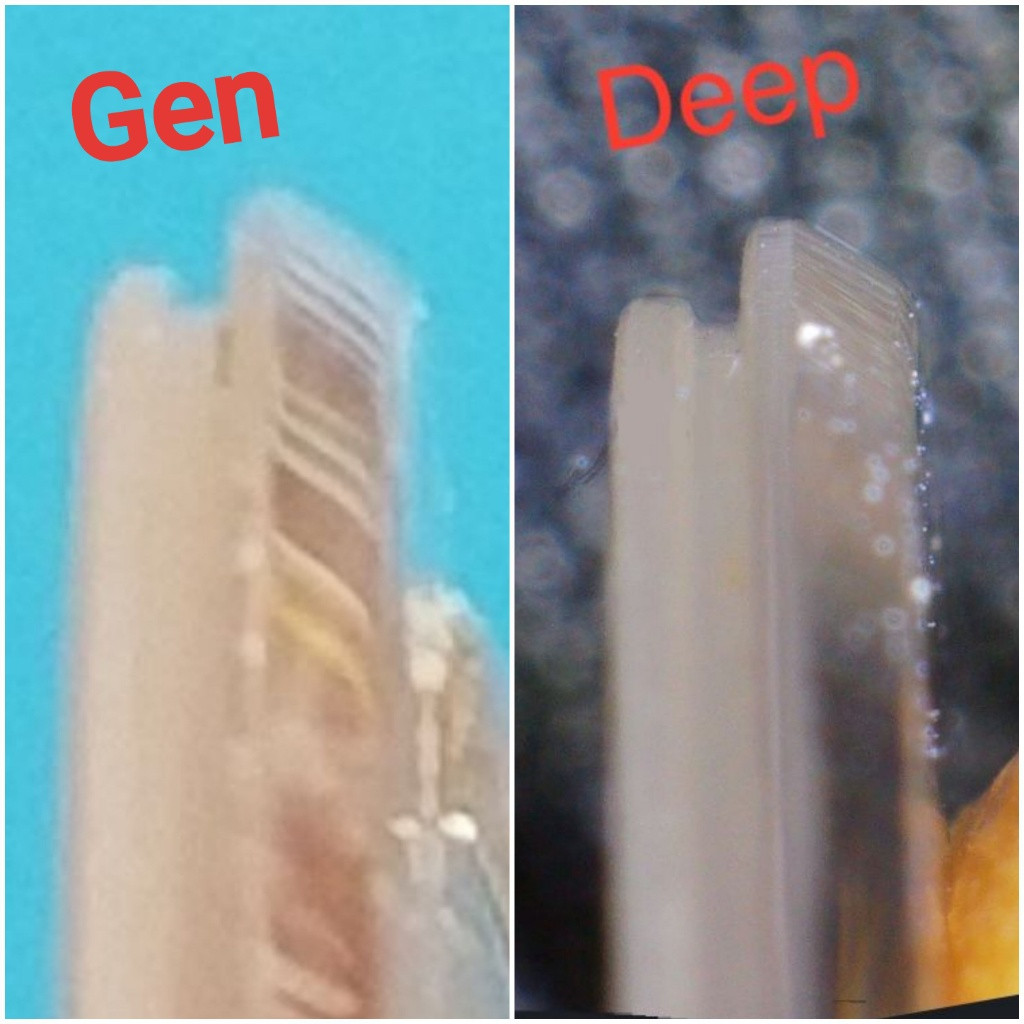
I decided to take a look at the lip profiles of both the CF stock and Deep crystals, and noticed that they have very different profiles where they connect to the crystal gasket.


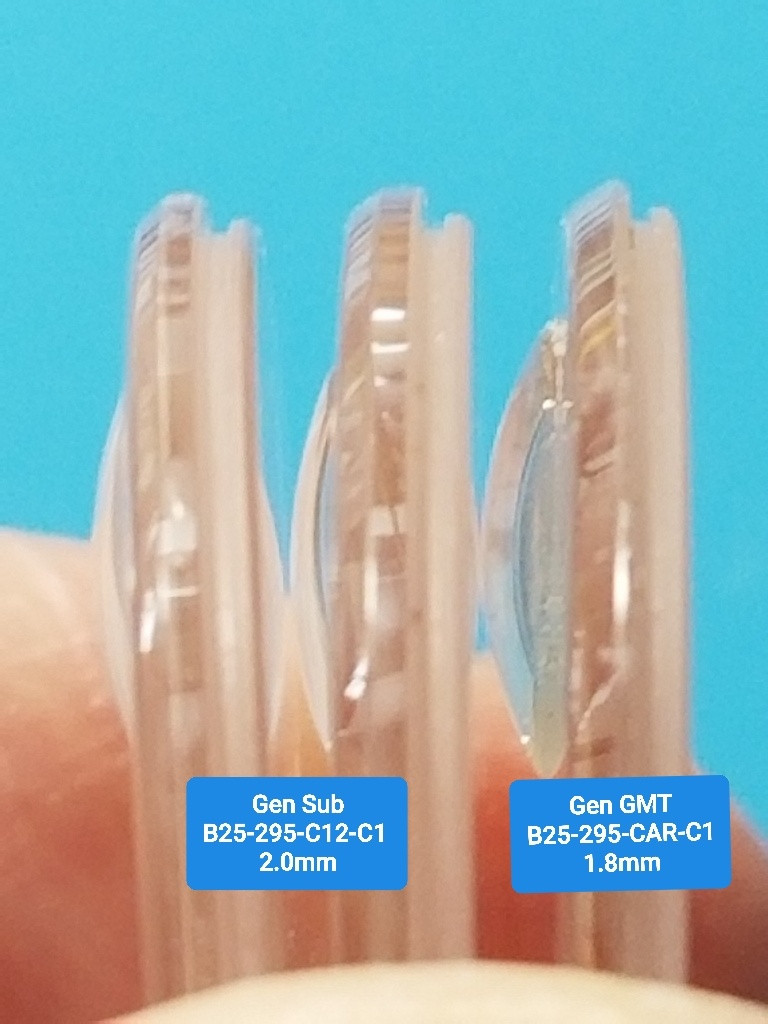
I suspect that I might be using too little UV glue to fill the U-shaped channel in the Deep crystal profile. I also don't have a gen GMT crystal to compare (if anyone does, please post a pic of the profile). I'm also curious if @xingpatrick or @xing_david can comment on the decision to have the sharper profile above rather than the smoother style of the CF crystal?
Bro here's a side profile pic of a gen GMT crystal

jpslL2.jpg


HnOLsE.jpeg
 
Last edited:
  • Like
Reactions: dogwood