• Tired of adverts on RWI? - Subscribe by clicking HERE and PMing Trailboss for instructions and they will magically go away!

The 1016: The Under Appreciated Thread

369mafia

Resident Explorer Expert
Patron
Certified
7/7/15
3,602
6,570
113
Canada
Beautiful build!

I was actually thinking about the waffle dials and how to replicate them. I hit some brass with a hammer (not watch related) a while back and noticed that the "negative relief" of the face of the hammer was impressed on the watch. Every dent, piece of grit, and imperfection was stamped onto the brass. It's how they used to strike coins back in the day (probably still do, no idea).

Now, trying to avoid another rabbit hole, I'm thinking something like a checkered surface, like they do for gun grips, on the face of a hammer would allow a perfect replication of the gen waffle dial.

Finish the face of a cheap claw hammer from the hardware store with a negative waffle finish (possibly just checker it, or have a gunsmith checker it), 3D print a jig to hold a dial in the proper position, and start stamping out dials by hitting the anvil part of a bench vice. The steel face would be much harder than the brass, so it should last quite a while before the pattern started to get sloppy. I'd assume several hundred dials, at least.

Remembering all the work Manodeoro mentioned perfecting his waffle dials (which for some reason I seem to remember involved multiple layers of waterslide decals, but maybe I'm remembering wrong), this seems like a much simpler (and likely more authentic) process.
Even a series of steel "circles" about 26mm in diameter, with checkering and a 2mm stem to hold the dial should work.

Alternatively, laser engraving the dial blank, or drag engraving it might work just as well. Some micro sol to "melt" the decal into the grooves (or even paint it and laser etch the gilt away) and it should look pretty good. I'm thinking if the dial blank is 285.mm, the area that's "waffled" is inside a 26mm circle, give or take.


The best thing about this hobby is it almost guarantees I'll live to be 100, just because I'm stubborn as hell and I keep getting ideas for new things to try...
Thank you. I am also pleased with how it came out. probably the most accurate build to date , so far.

I think your on to something. using a press of some sort to create the pattern would be ideal . however it may be difficult to apply the film free decal to the surface with the texture. however I support you going down this rabbit hole. that would be amazing , especially if you went all out and made a template that also presses the markers into the dial plate allowing for that recessed look and easy of lume application.

Yes Mandoreo uses multiple layers of film free decals to create the effect I assume he adds it and then presses the pattern into the ink while its setting for the pattern

THis MQ dial was the best on offer from 2017-2018 and cost a small fortune $$$ and it was not true gilt dial but the paint used does look pretty good . It was the best and only option at the time. I would say that the Raffles dial is at par with this dial , if anything it edges it out because a year into owing the mq dial the lume started to fall off , I have never had that happen to a raffles dial . washing it. chemicals, heat in the oven . that lume is solid. and for the price being less then a 10th of the price its worth it
 
  • Like
Reactions: Karbon74

dpd3672

Putting the "whore" in "horology" since 2023
Patron
Certified
29/5/23
1,787
2,923
113
USA
Thank you. I am also pleased with how it came out. probably the most accurate build to date , so far.

I think your on to something. using a press of some sort to create the pattern would be ideal . however it may be difficult to apply the film free decal to the surface with the texture. however I support you going down this rabbit hole. that would be amazing , especially if you went all out and made a template that also presses the markers into the dial plate allowing for that recessed look and easy of lume application.

Yes Mandoreo uses multiple layers of film free decals to create the effect I assume he adds it and then presses the pattern into the ink while its setting for the pattern

THis MQ dial was the best on offer from 2017-2018 and cost a small fortune $$$ and it was not true gilt dial but the paint used does look pretty good . It was the best and only option at the time. I would say that the Raffles dial is at par with this dial , if anything it edges it out because a year into owing the mq dial the lume started to fall off , I have never had that happen to a raffles dial . washing it. chemicals, heat in the oven . that lume is solid. and for the price being less then a 10th of the price its worth it
I've been playing with Micro Set and Micro Sol, which should address this problem. Model builders use it to apply decals to irregular surfaces, like the wings on a model plane, which have rivets and canvass texture and all kinds of seams and openings.

I'm pretty sure it would work for the honeycomb. I concern would be if it would "melt" too much detail out of the decal. If the decal is a non-starter, it's also an option to paint the whole dial black and burn off the chapter ring, indices, and dial font with a laser.

Obviously, an area open for exploration (Exploration! Get it!?!?)

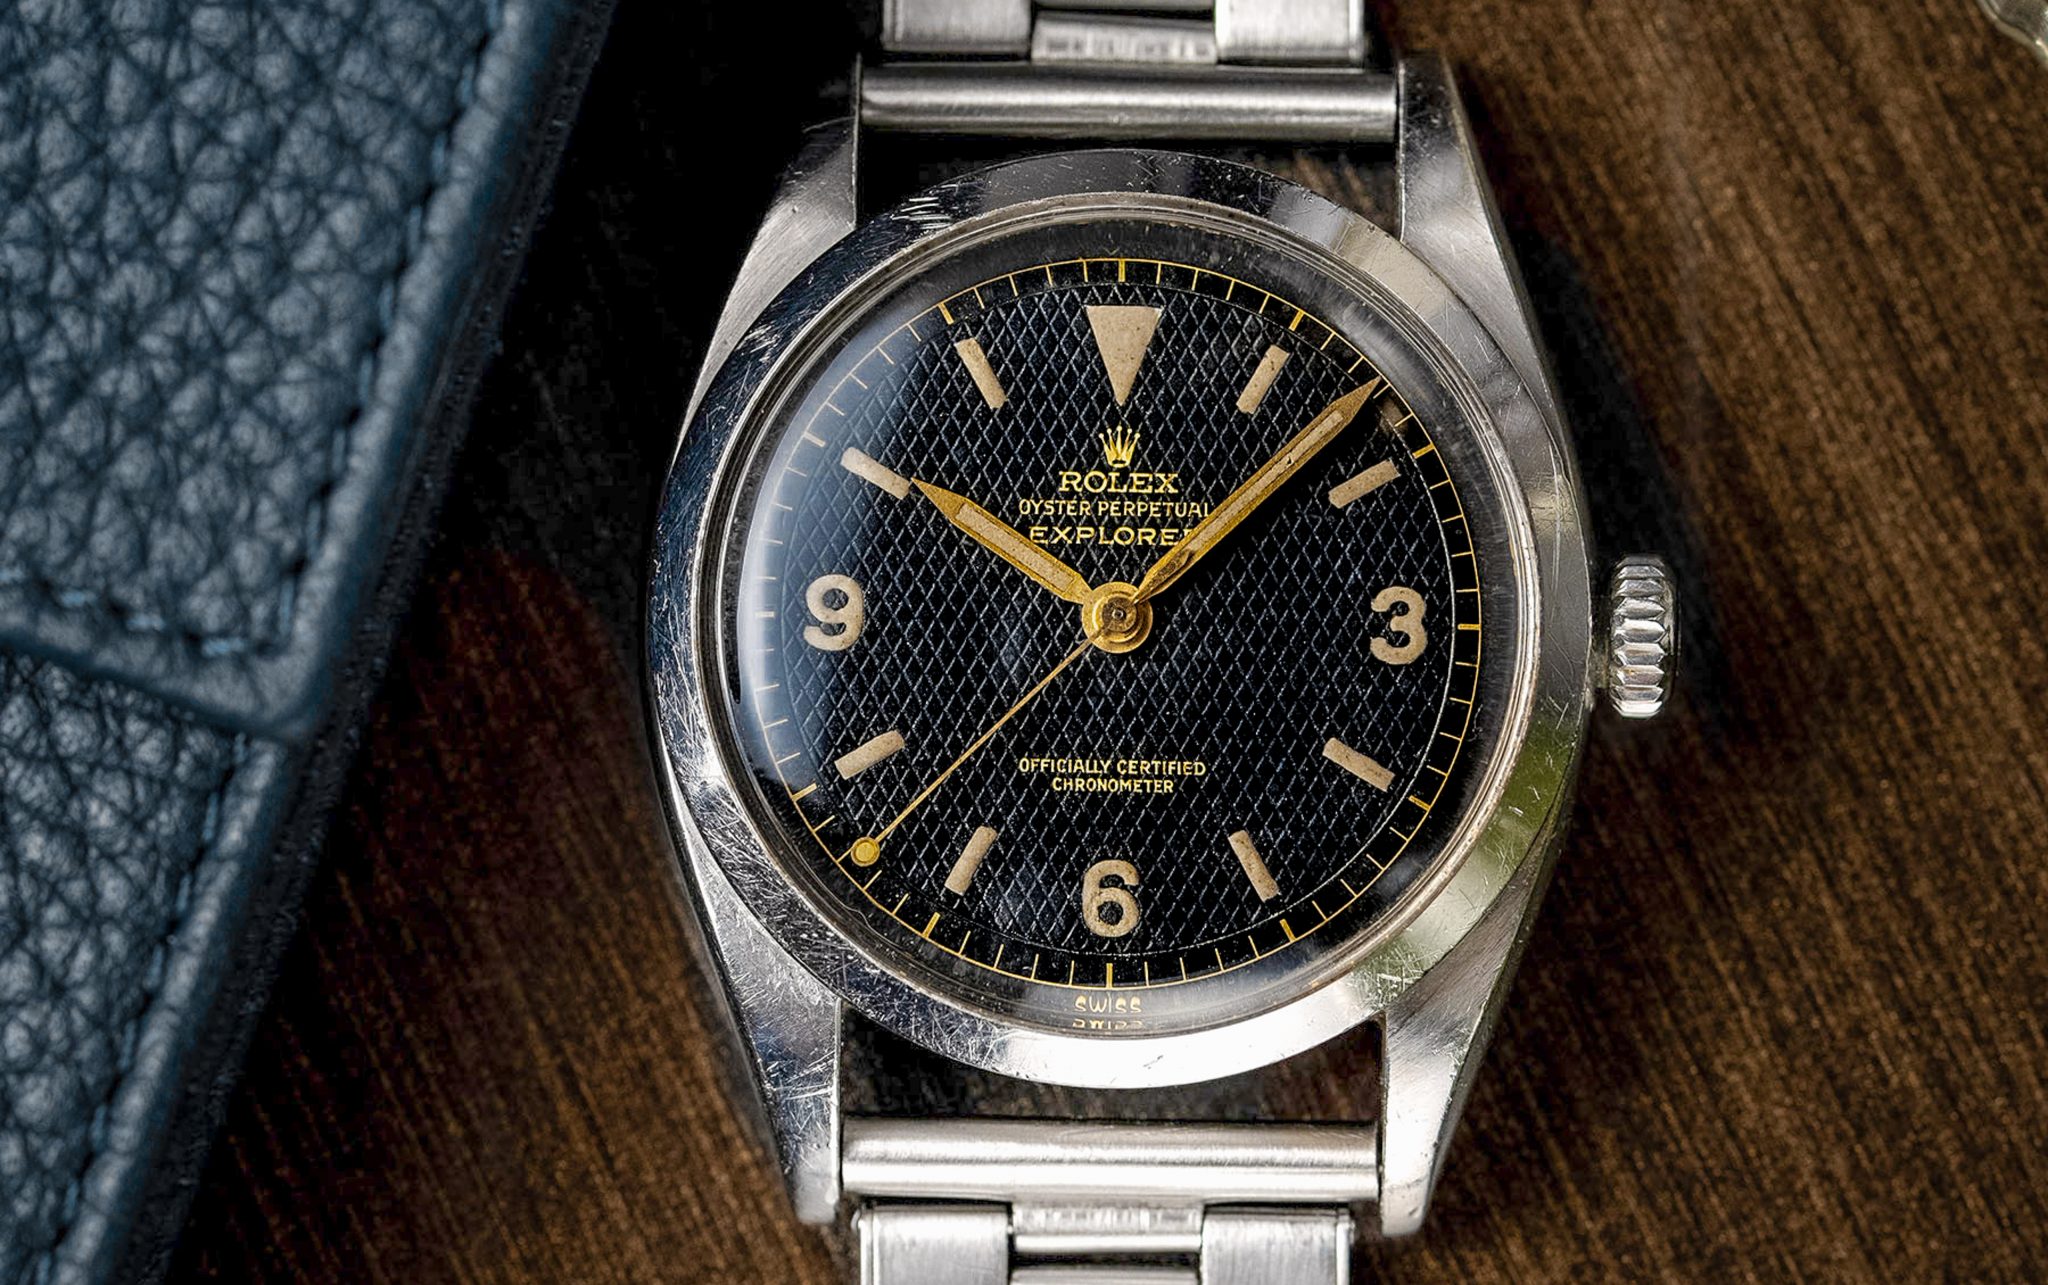
Actually working on 3D printing a jig to use the drag engraver to make the honeycomb pattern on a dial. I need to get the measurements off of a dial, looks like it's 37 lines going each way, and the "diamonds" look to be twice as high as they are wide. They also don't seem to be perfectly centered on the 12:00 index, so maybe there's some other starting point that Rolex used.

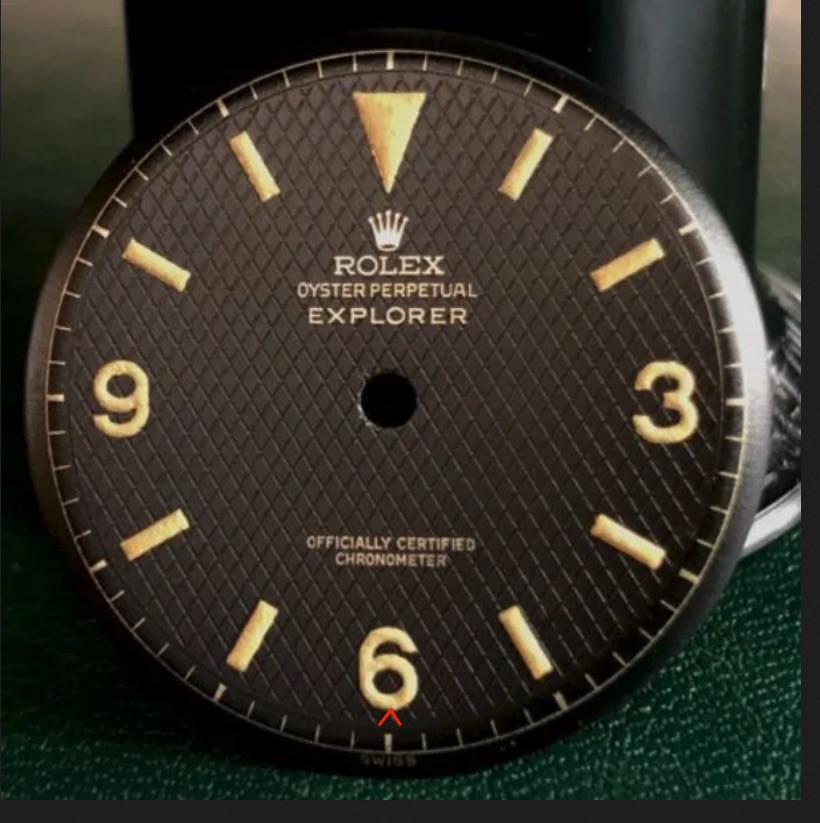
I'm going by this photo:

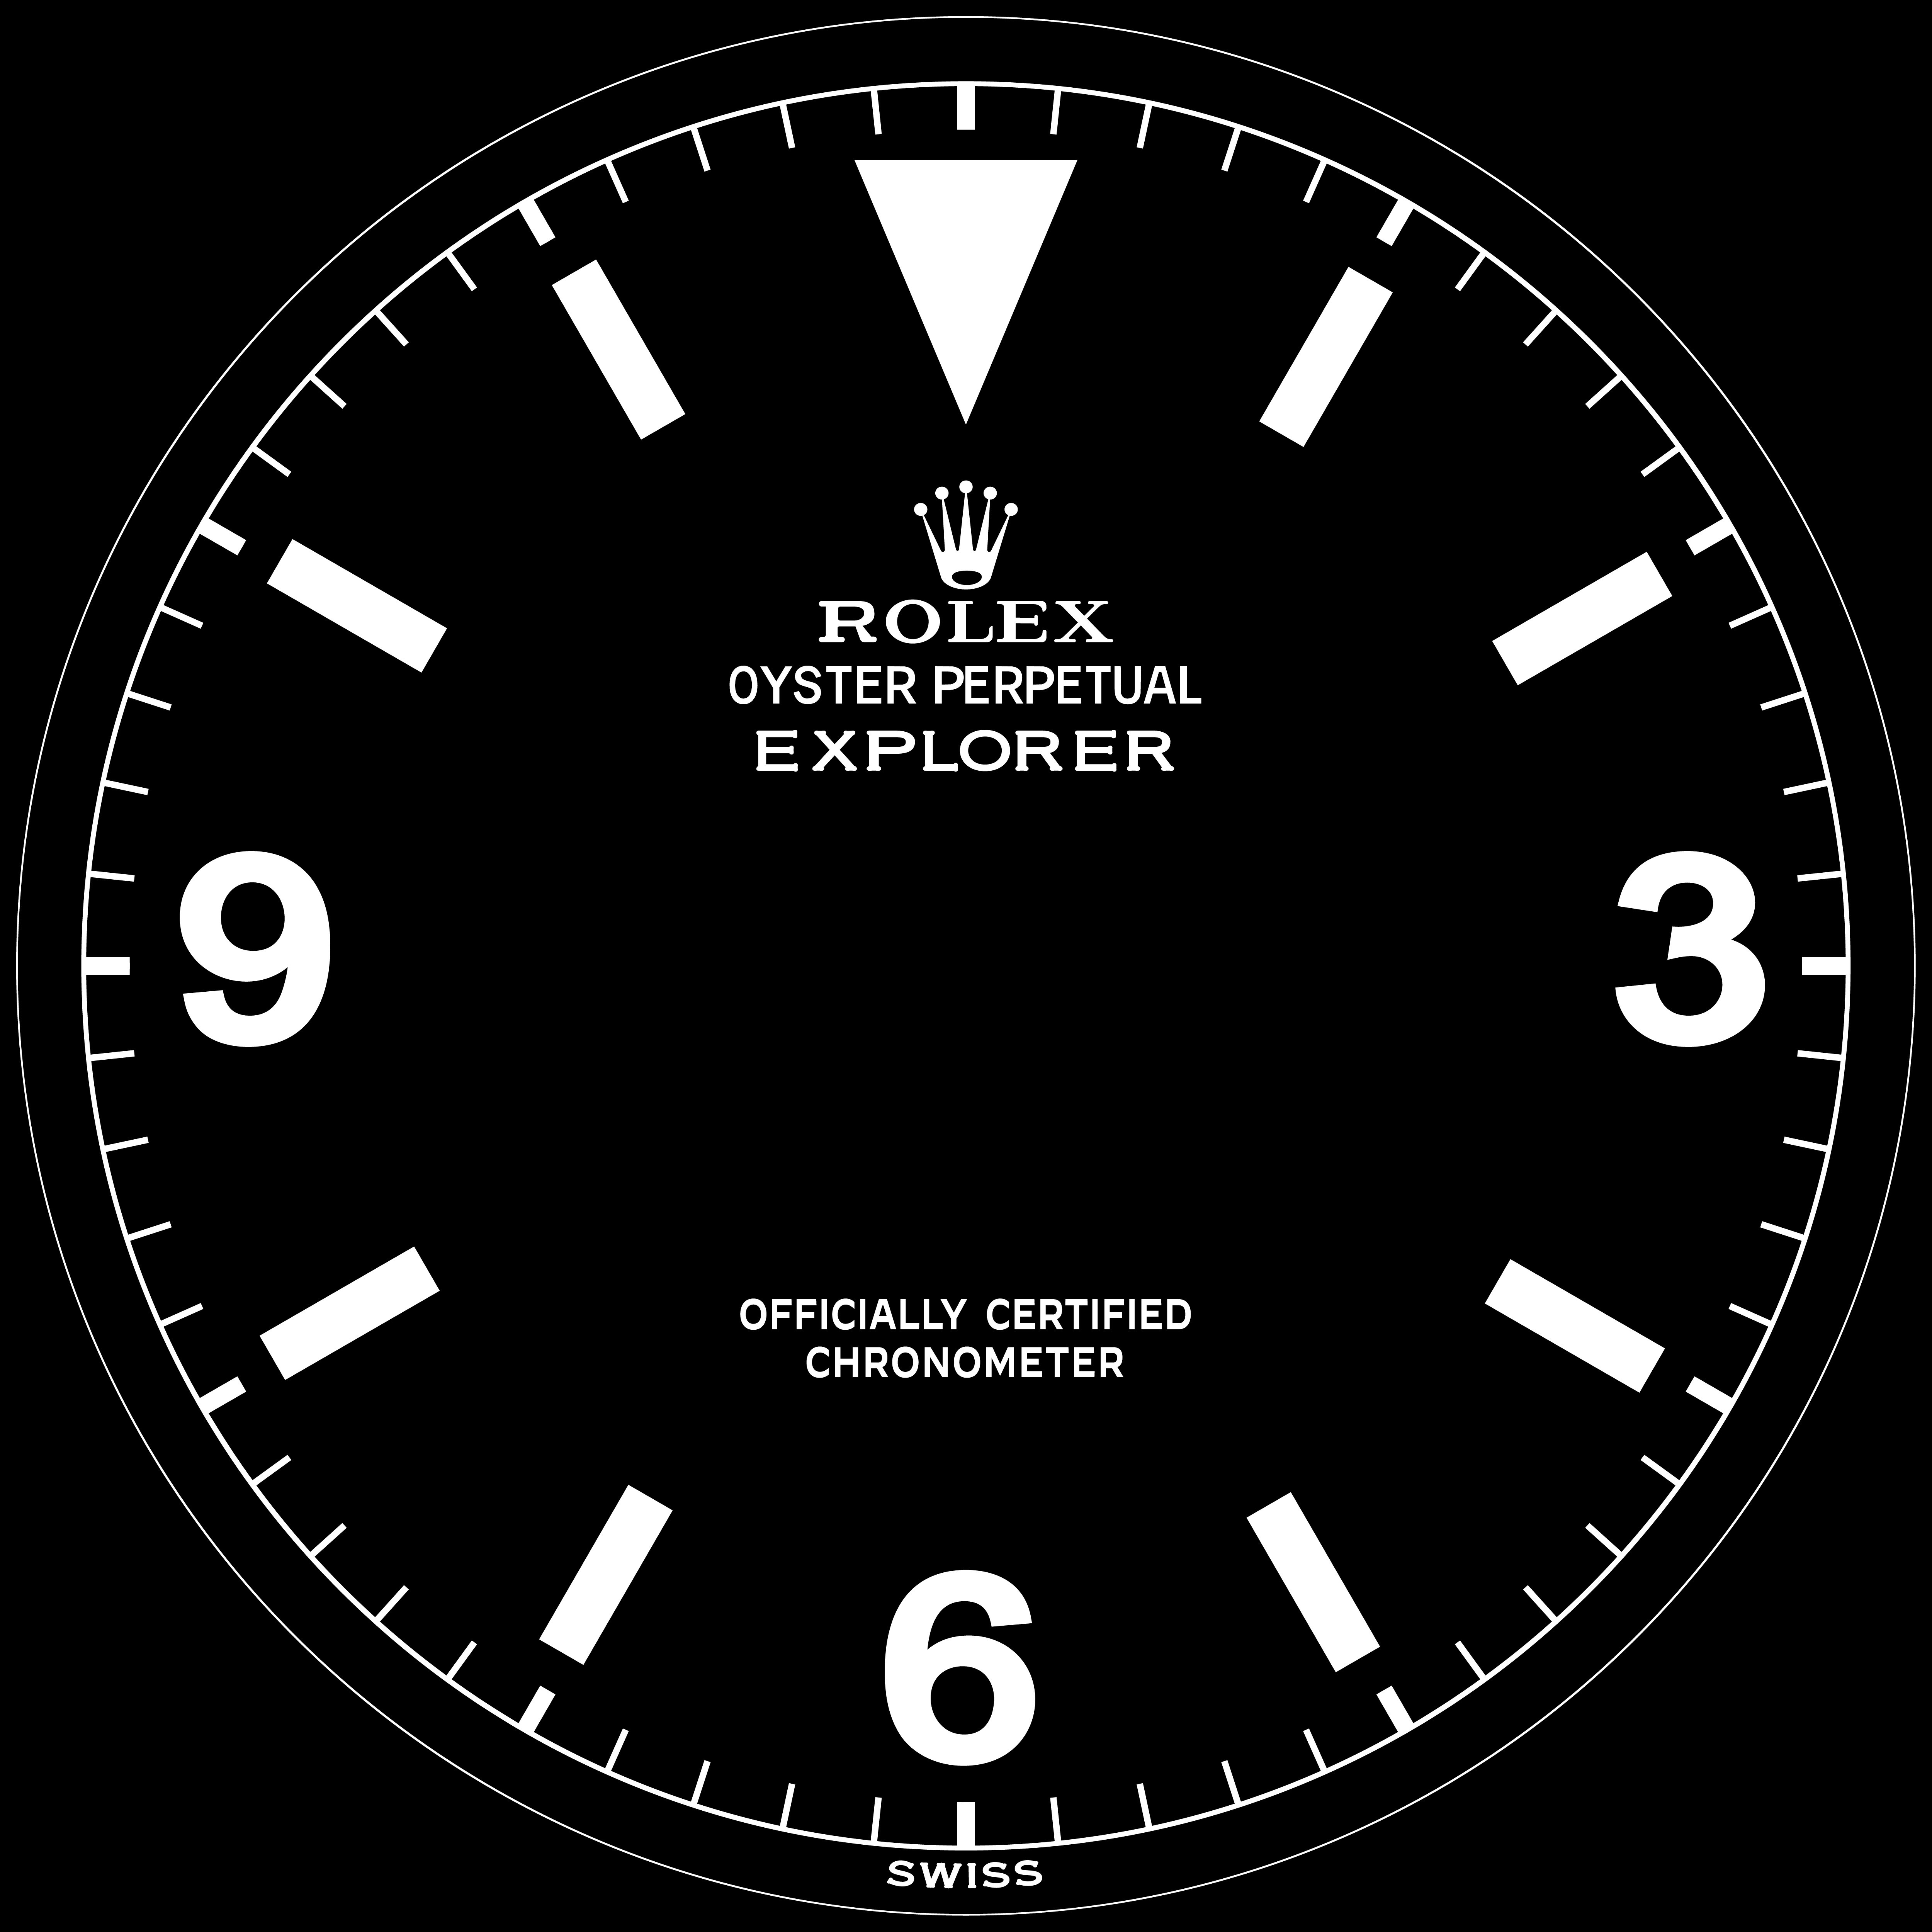
So waffle finish the dial with an engraver, including the circle around the waffling. Then overlay this decal, or if that fails, cut this design with a laser (more accurately, burn away the paint, exposing the brass underneath).


Last edited:

369mafia

Resident Explorer Expert
Patron
Certified
7/7/15
3,602
6,570
113
Canada
I've been playing with Micro Set and Micro Sol, which should address this problem. Model builders use it to apply decals to irregular surfaces, like the wings on a model plane, which have rivets and canvass texture and all kinds of seams and openings.

I'm pretty sure it would work for the honeycomb. I concern would be if it would "melt" too much detail out of the decal. If the decal is a non-starter, it's also an option to paint the whole dial black and burn off the chapter ring, indices, and dial font with a laser.

Obviously, an area open for exploration (Exploration! Get it!?!?)

Actually working on 3D printing a jig to use the drag engraver to make the honeycomb pattern on a dial. I need to get the measurements off of a dial, looks like it's 37 lines going each way, and the "diamonds" look to be twice as high as they are wide. They also don't seem to be perfectly centered on the 12:00 index, so maybe there's some other starting point that Rolex used.

I'm going by this photo:

So waffle finish the dial with an engraver, including the circle around the waffling. Then overlay this decal, or if that fails, cut this design with a laser (more accurately, burn away the paint, exposing the brass underneath).


I like the way youre thinking Can I place my order now ?? 😂
 
Last edited:
  • Like
Reactions: Karbon74

316lad

Renowned Member
8/8/23
917
1,818
93
UK
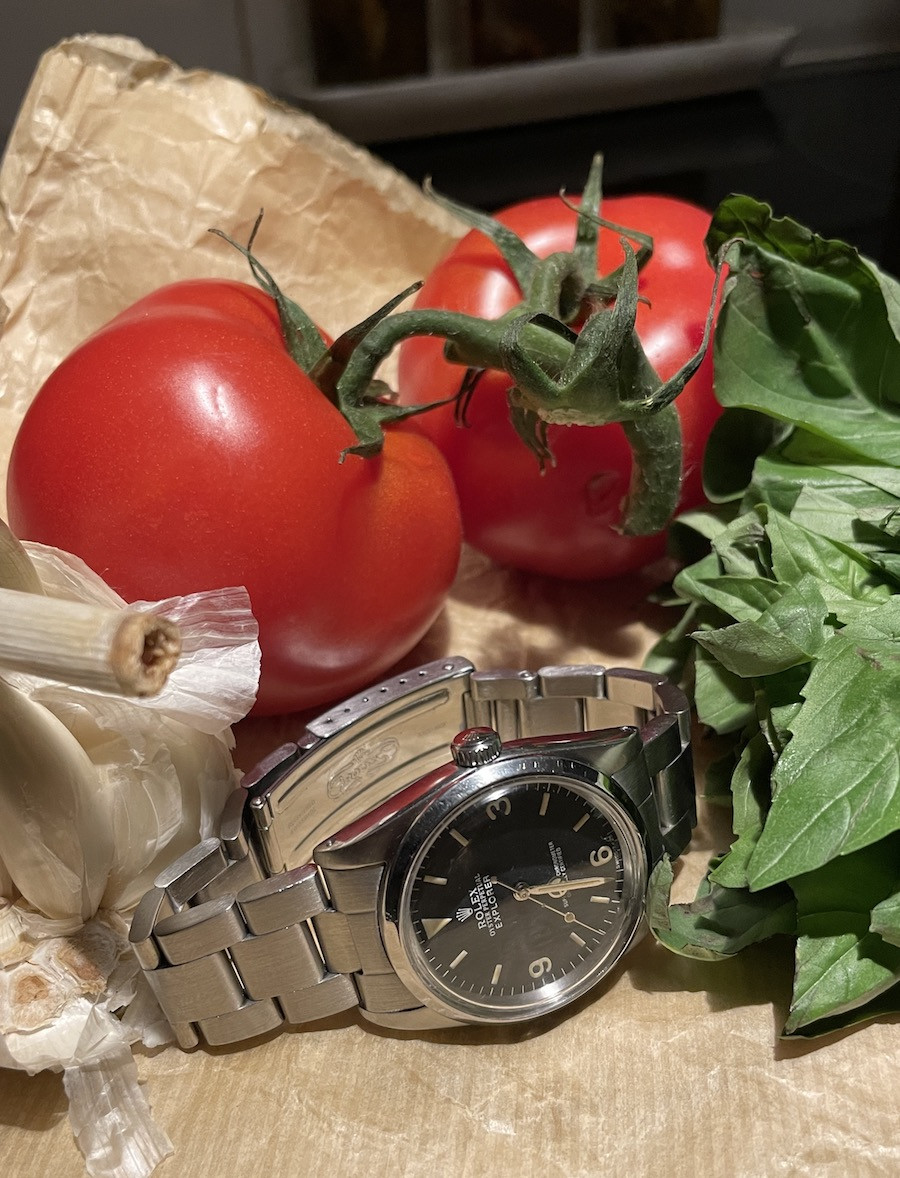
Tomatoes from Belgium, Basil from Kenya, Garlic from the Isle-Of-Wight and a Rolex from, well, you know (Shhh!) . . .

Yep, it's Sunday Evening Kitchen Shot Club. Let's be having ya' !


dpd3672

Putting the "whore" in "horology" since 2023
Patron
Certified
29/5/23
1,787
2,923
113
USA
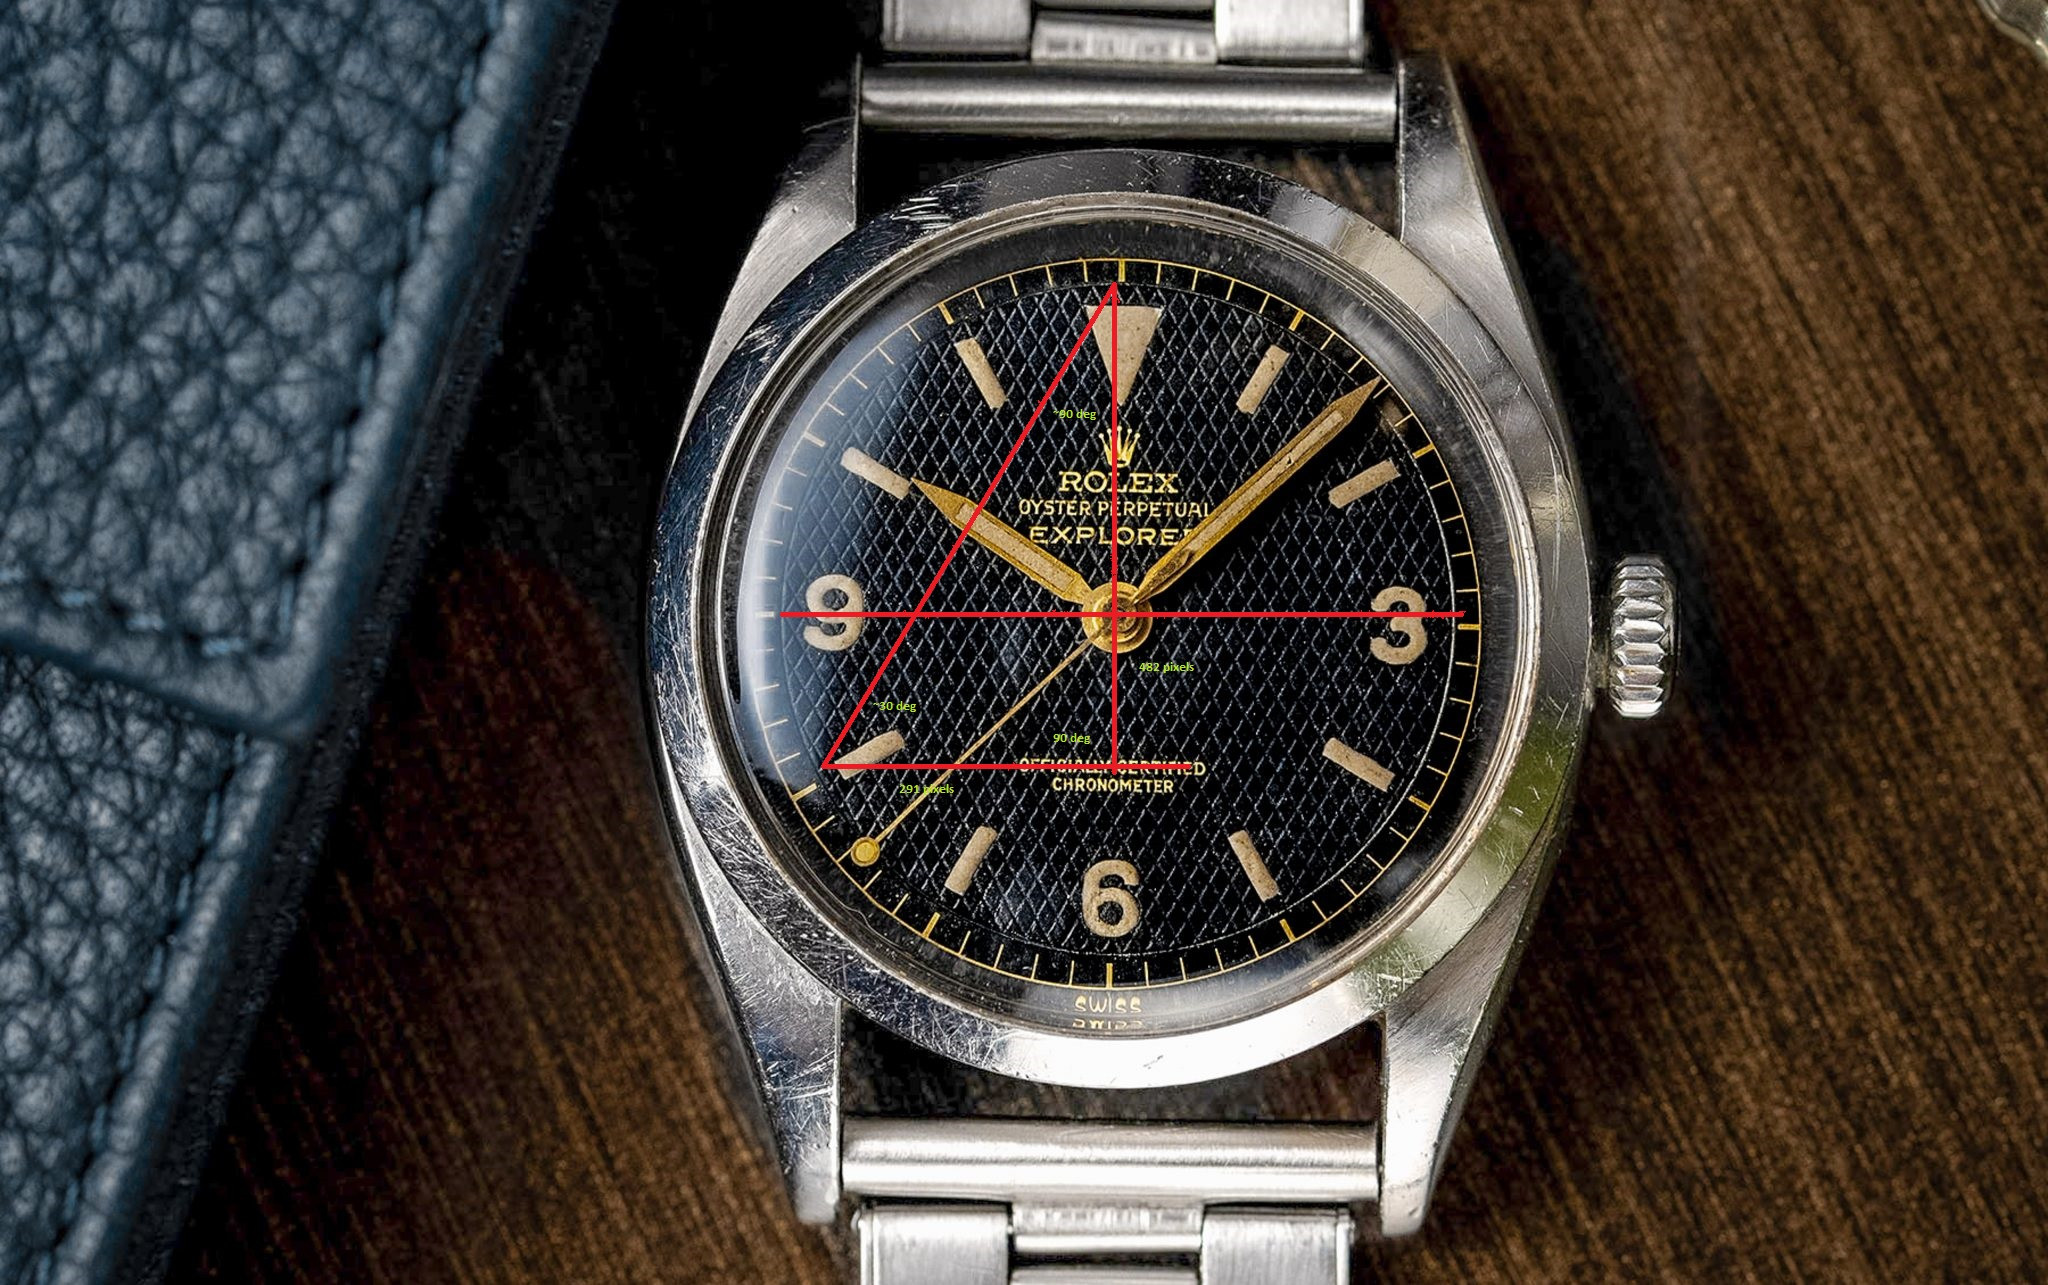
Did some cursory measurements of the drawing, counting pixels and using geometry. It looks like the waffle dials were cut at a 30 degree angle...I was hoping for something more exotic, lol. My calculations are based on pixel counting a medium res photograph, but the numbers were close enough to 30/60/90 that it seems reasonable to assume that's the angles Rolex used.

So now it's just a matter of mathing out the spacing. It looks like 37 lines, equally divided within the textured area. I should have a rough draft of a jig to engrave the lines tonight, knock on wood. With a little luck, I might even knock out a prototype dial to experiment with.

So now I'm off to print out a bunch of 6350 dials to use for practice.

For anyone who wants to check my work...and I take no offense to any challenges, my eyes and what I remember from Sophmore year geometry class are both a little dusty. I marked the intersection of two lines in the pattern and noted the x,y coordinates in Microsoft Paint. Then I drew a horizontal line across the dial, keeping the Y coordinate the same. I then drew a vertical line from another intersection, straight down to meet the line. This would make the angle where "OCC" is written a true 90 degrees. Then, with a nod to Pythagoras, I calculated the hypotenuse, adjacent, and opposite angles. The results were close enough to 30 and 60 as the photo allowed ( 31.121 degrees and 58.879). The variation is likely due to the resolution the photo having me start in the wrong spot, and the dial in the photo is rotated about 20 seconds clockwise, per the line I drew from the 9:00 index horzontally toward the 3:00 index.

A little back of the envelope math confirms...if the dial is rotated counter-clockwise to be completely level to the horizon, it should adjust the angles to be closer to 30/60/90.

Not sure why I'm obsessing about this, lol, maybe it explains why I prefer "Precision" and "Super Precision" dials to the OCC and SCOC, lol.


Last edited:

316lad

Renowned Member
8/8/23
917
1,818
93
UK
Did some cursory measurements of the drawing, counting pixels and using geometry. It looks like the waffle dials were cut at a 30 degree angle...I was hoping for something more exotic, lol. My calculations are based on pixel counting a medium res photograph, but the numbers were close enough to 30/60/90 that it seems reasonable to assume that's the angles Rolex used.

So now it's just a matter of mathing out the spacing. It looks like 37 lines, equally divided within the textured area. I should have a rough draft of a jig to engrave the lines tonight, knock on wood. With a little luck, I might even knock out a prototype dial to experiment with.

So now I'm off to print out a bunch of 6350 dials to use for practice.

For anyone who wants to check my work...and I take no offense to any challenges, my eyes and what I remember from Sophmore year geometry class are both a little dusty. I marked the intersection of two lines in the pattern and noted the x,y coordinates in Microsoft Paint. Then I drew a horizontal line across the dial, keeping the Y coordinate the same. I then drew a vertical line from another intersection, straight down to meet the line. This would make the angle where "OCC" is written a true 90 degrees. Then, with a nod to Pythagoras, I calculated the hypotenuse, adjacent, and opposite angles. The results were close enough to 30 and 60 as the photo allowed ( 31.121 degrees and 58.879). The variation is likely due to the resolution the photo having me start in the wrong spot, and the dial in the photo is rotated about 40 seconds clockwise, per the line I drew from the 9:00 index horzontally toward the 3:00 index.

A little back of the envelope math confirms...if the dial is rotated counter-clockwise to be completely level to the horizon, it should adjust the angles to be closer to 30/60/90.

Not sure why I'm obsessing about this, lol, maybe it explains why I prefer "Precision" and "Super Precision" dials to the OCC and SCOC, lol.


My ADHD condition always makes me look for patterns in things and the honeycomb dial is a real 'fix".

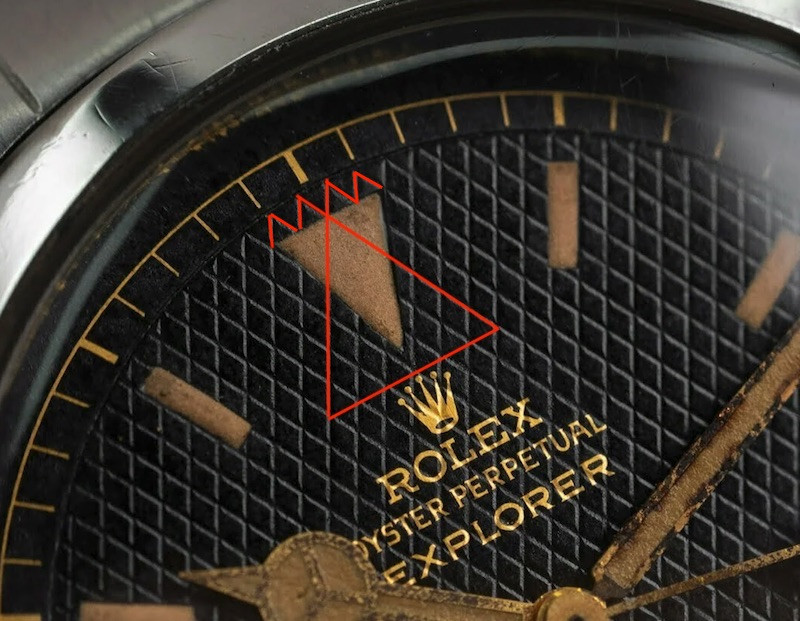
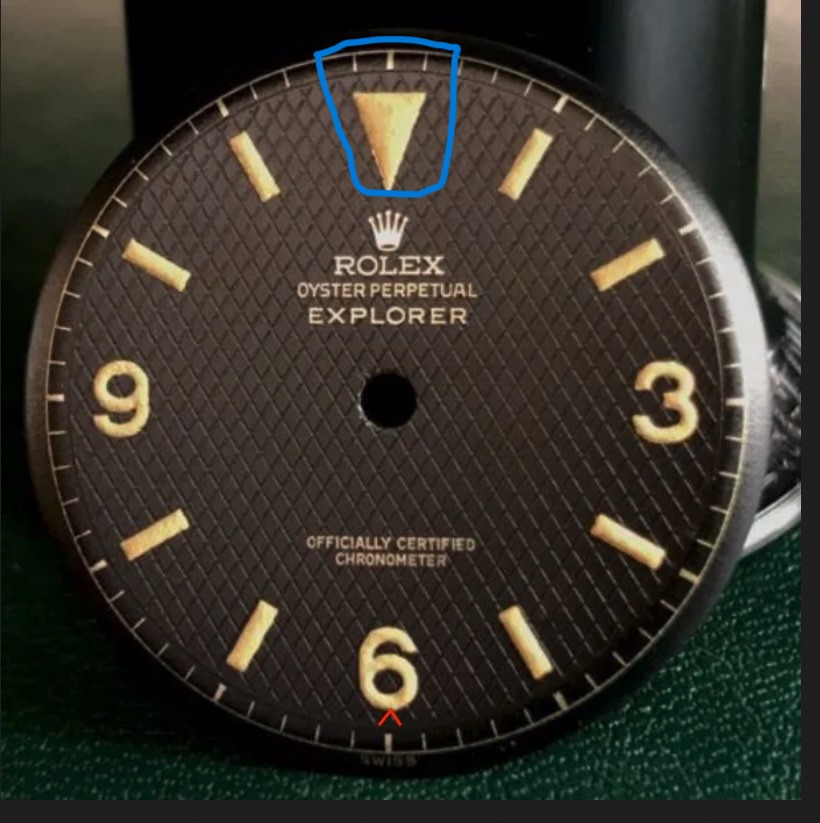
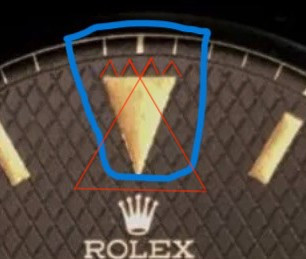
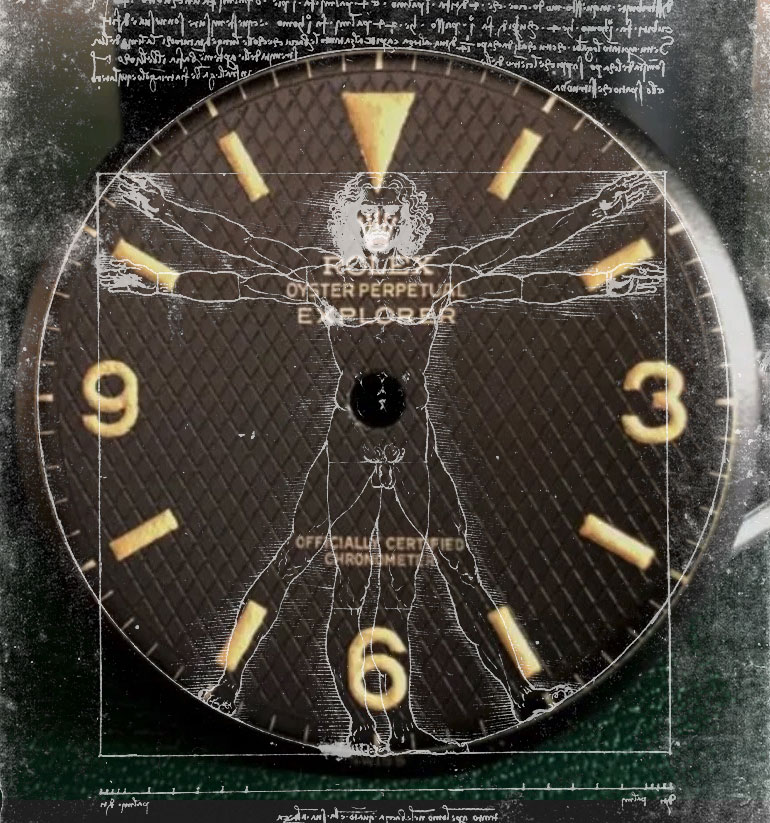
I see the triangle here (see the four little ones that line the top of the 12 indices triangle?) Whichever dial you look at they're always there.

Then look at the centre two that span down to create an isosceles triangle that kisses the top of the centre coronet ball?

That defines the rest of the patterning across the dial.


dpd3672

Putting the "whore" in "horology" since 2023
Patron
Certified
29/5/23
1,787
2,923
113
USA
My ADHD condition always makes me look for patterns in things and the honeycomb dial is a real 'fix".

I see the triangle here (see the four little ones that line the top of the 12 indices triangle?) Whichever dial you look at they're always there.

Then look at the centre two that span down to create an isosceles triangle that kisses the top of the centre coronet ball?

That defines the rest of the patterning across the dial.

Awesome, that actually makes it a lot simpler to lay out the pattern. I wasn't seeing it as symettrical and centered, but it might have been the angle of the photo I was looking at. This project just got quite a bit easier (which is a huge understatement, lol). Also noticed the pattern runs through the gilt lettering, which is kind of a tell on a lot of the aftermarket dials...although that would make the decal transfer a bit more challenging.

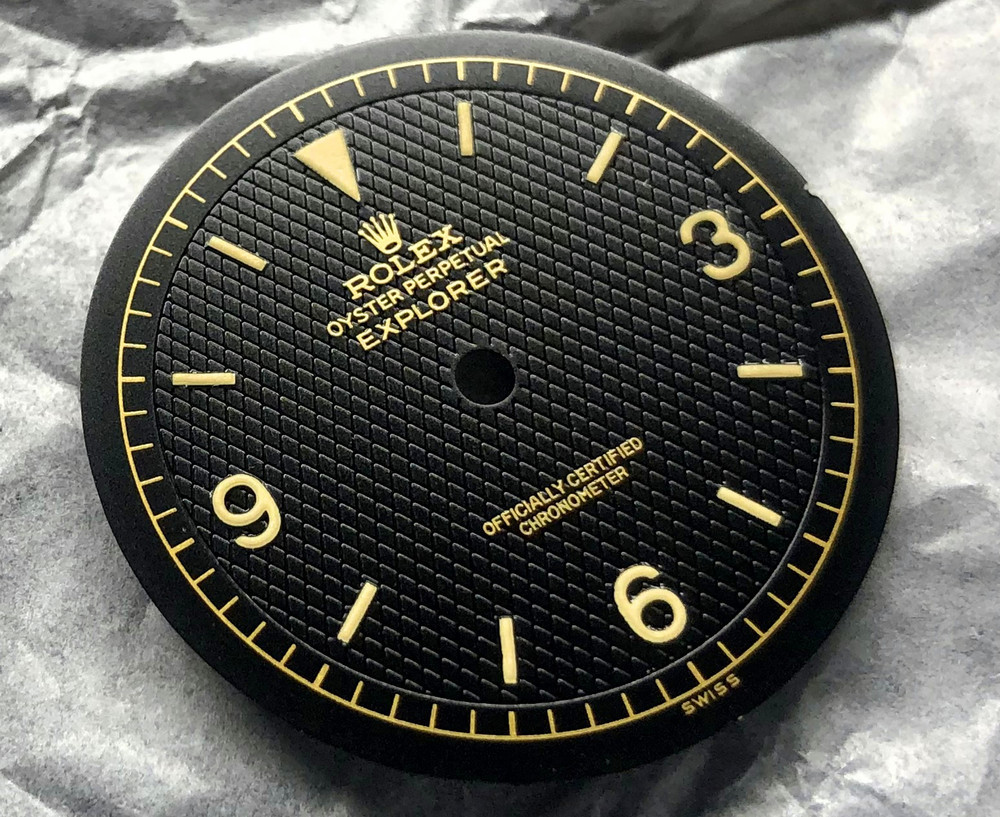
The Raffles waffle dial. Beautifully executed, but you can see the dial fonts are raised above the waffle pattern:

 
Last edited:

316lad

Renowned Member
8/8/23
917
1,818
93
UK
Awesome, that actually makes it a lot simpler to lay out the pattern. I wasn't seeing it as symettrical and centered, but it might have been the angle of the photo I was looking at. This project just got quite a bit easier (which is a huge understatement, lol). Also noticed the pattern runs through the gilt lettering, which is kind of a tell on a lot of the aftermarket dials...although that would make the decal transfer a bit more challenging.
Good.

And to finish up - and this will freak you out a bit - those four little perfect triangles at the top are alone on the dial - there isn't a single other one apart from the one at the base of the "6" (centred of course) at the bottom. Everywhere else on the dial is either a rhombus or incomplete and cut off at one or more of it's sides!

Now that is Rolex perfection at work . . .


dpd3672

Putting the "whore" in "horology" since 2023
Patron
Certified
29/5/23
1,787
2,923
113
USA
Good.

And to finish up - and this will freak you out a bit - those four little perfect triangles at the top are alone on the dial - there isn't a single other one apart from the one at the base of the "6" (centred of course) at the bottom. Everywhere else on the dial is either a rhombus or incomplete and cut off at one or more of it's sides!

Now that is Rolex perfection at work . . .

I think I'll start with a circle, scribed around the perimeter of the textured section, that will give a nice place to start and stop the diagonals. I have to figure out the circumference of the circle surrounding the waffle pattern. I'm guessing probably 25mm on a 27mm Rolex dial, but probably the same on the 29mm dials we know and love.

Then figure out the spacing (hopefully, it's something simple like 1mm, but I suspect it's probably a fraction of that...37 lines across roughly 25mm of dial on the original means about 2/3mm between lines. So 1/3mm on each side of the 6:00 index and work out from there.

Once that's done, I'll try waterslide decals and the blueing method, one of the two should help, although I have doubts on the second if the surface is textured like that. If that fails, the laser has some promise.
 
  • Like
Reactions: 369mafia and 316lad

316lad

Renowned Member
8/8/23
917
1,818
93
UK
Well, if you take the top 4 perfect triangles and the bottom one beneath the 6 and count the number between - that gives you your parameters.
Then all you need are your DIMS; so many rhombuses in so many MM's. Don't worry about the sides - Rolex appeared not to - and they'll end up symetrical along the axis of symmetry anyway.
I used to try and do this in AutoCAD but it gave me too much of a headache so then someone suggested Blender and my real headaches began, but after lots of aneurysms I finally got my head around it.
 
  • Haha
Reactions: dpd3672

316lad

Renowned Member
8/8/23
917
1,818
93
UK
Well, if you take the top 4 perfect triangles and the bottom one beneath the 6 and count the number between - that gives you your parameters.
Then all you need are your DIMS; so many rhombuses in so many MM's. Don't worry about the sides - Rolex appeared not to - and they'll end up symetrical along the axis of symmetry anyway.
I used to try and do this in AutoCAD but it gave me too much of a headache so then someone suggested Blender and my real headaches began, but after lots of aneurysms I finally got my head around it.
Good Luck - and we'll see you towards the end of the week - if you can still speak - and don't forget I'm sending you drawings for my Laser Engraving in the morning - so make time for that before you start bleeding from the ears! :ROFLMAO:
 

316lad

Renowned Member
8/8/23
917
1,818
93
UK
Am I going to have to get the Reddit alignment tool out in a minute?
Basically those top four perfect triangles are the reference for Rolex, cutting the diameter of the dial from the rectangular blank that came off the straight line engine lathe
 

Ukrop

Cult Hero
13/1/24
113
265
63
Canada
Good.

And to finish up - and this will freak you out a bit - those four little perfect triangles at the top are alone on the dial - there isn't a single other one apart from the one at the base of the "6" (centred of course) at the bottom. Everywhere else on the dial is either a rhombus or incomplete and cut off at one or more of it's sides!

Now that is Rolex perfection at work . . .


Perfection indeed