• Tired of adverts on RWI? - Subscribe by clicking HERE and PMing Trailboss for instructions and they will magically go away!

Servicing a VR3235 movement (my first attempt at servicing a movement).

dogwood

I'm Pretty Popular
Patron
Certified
7/9/21
1,902
3,585
113
Canada
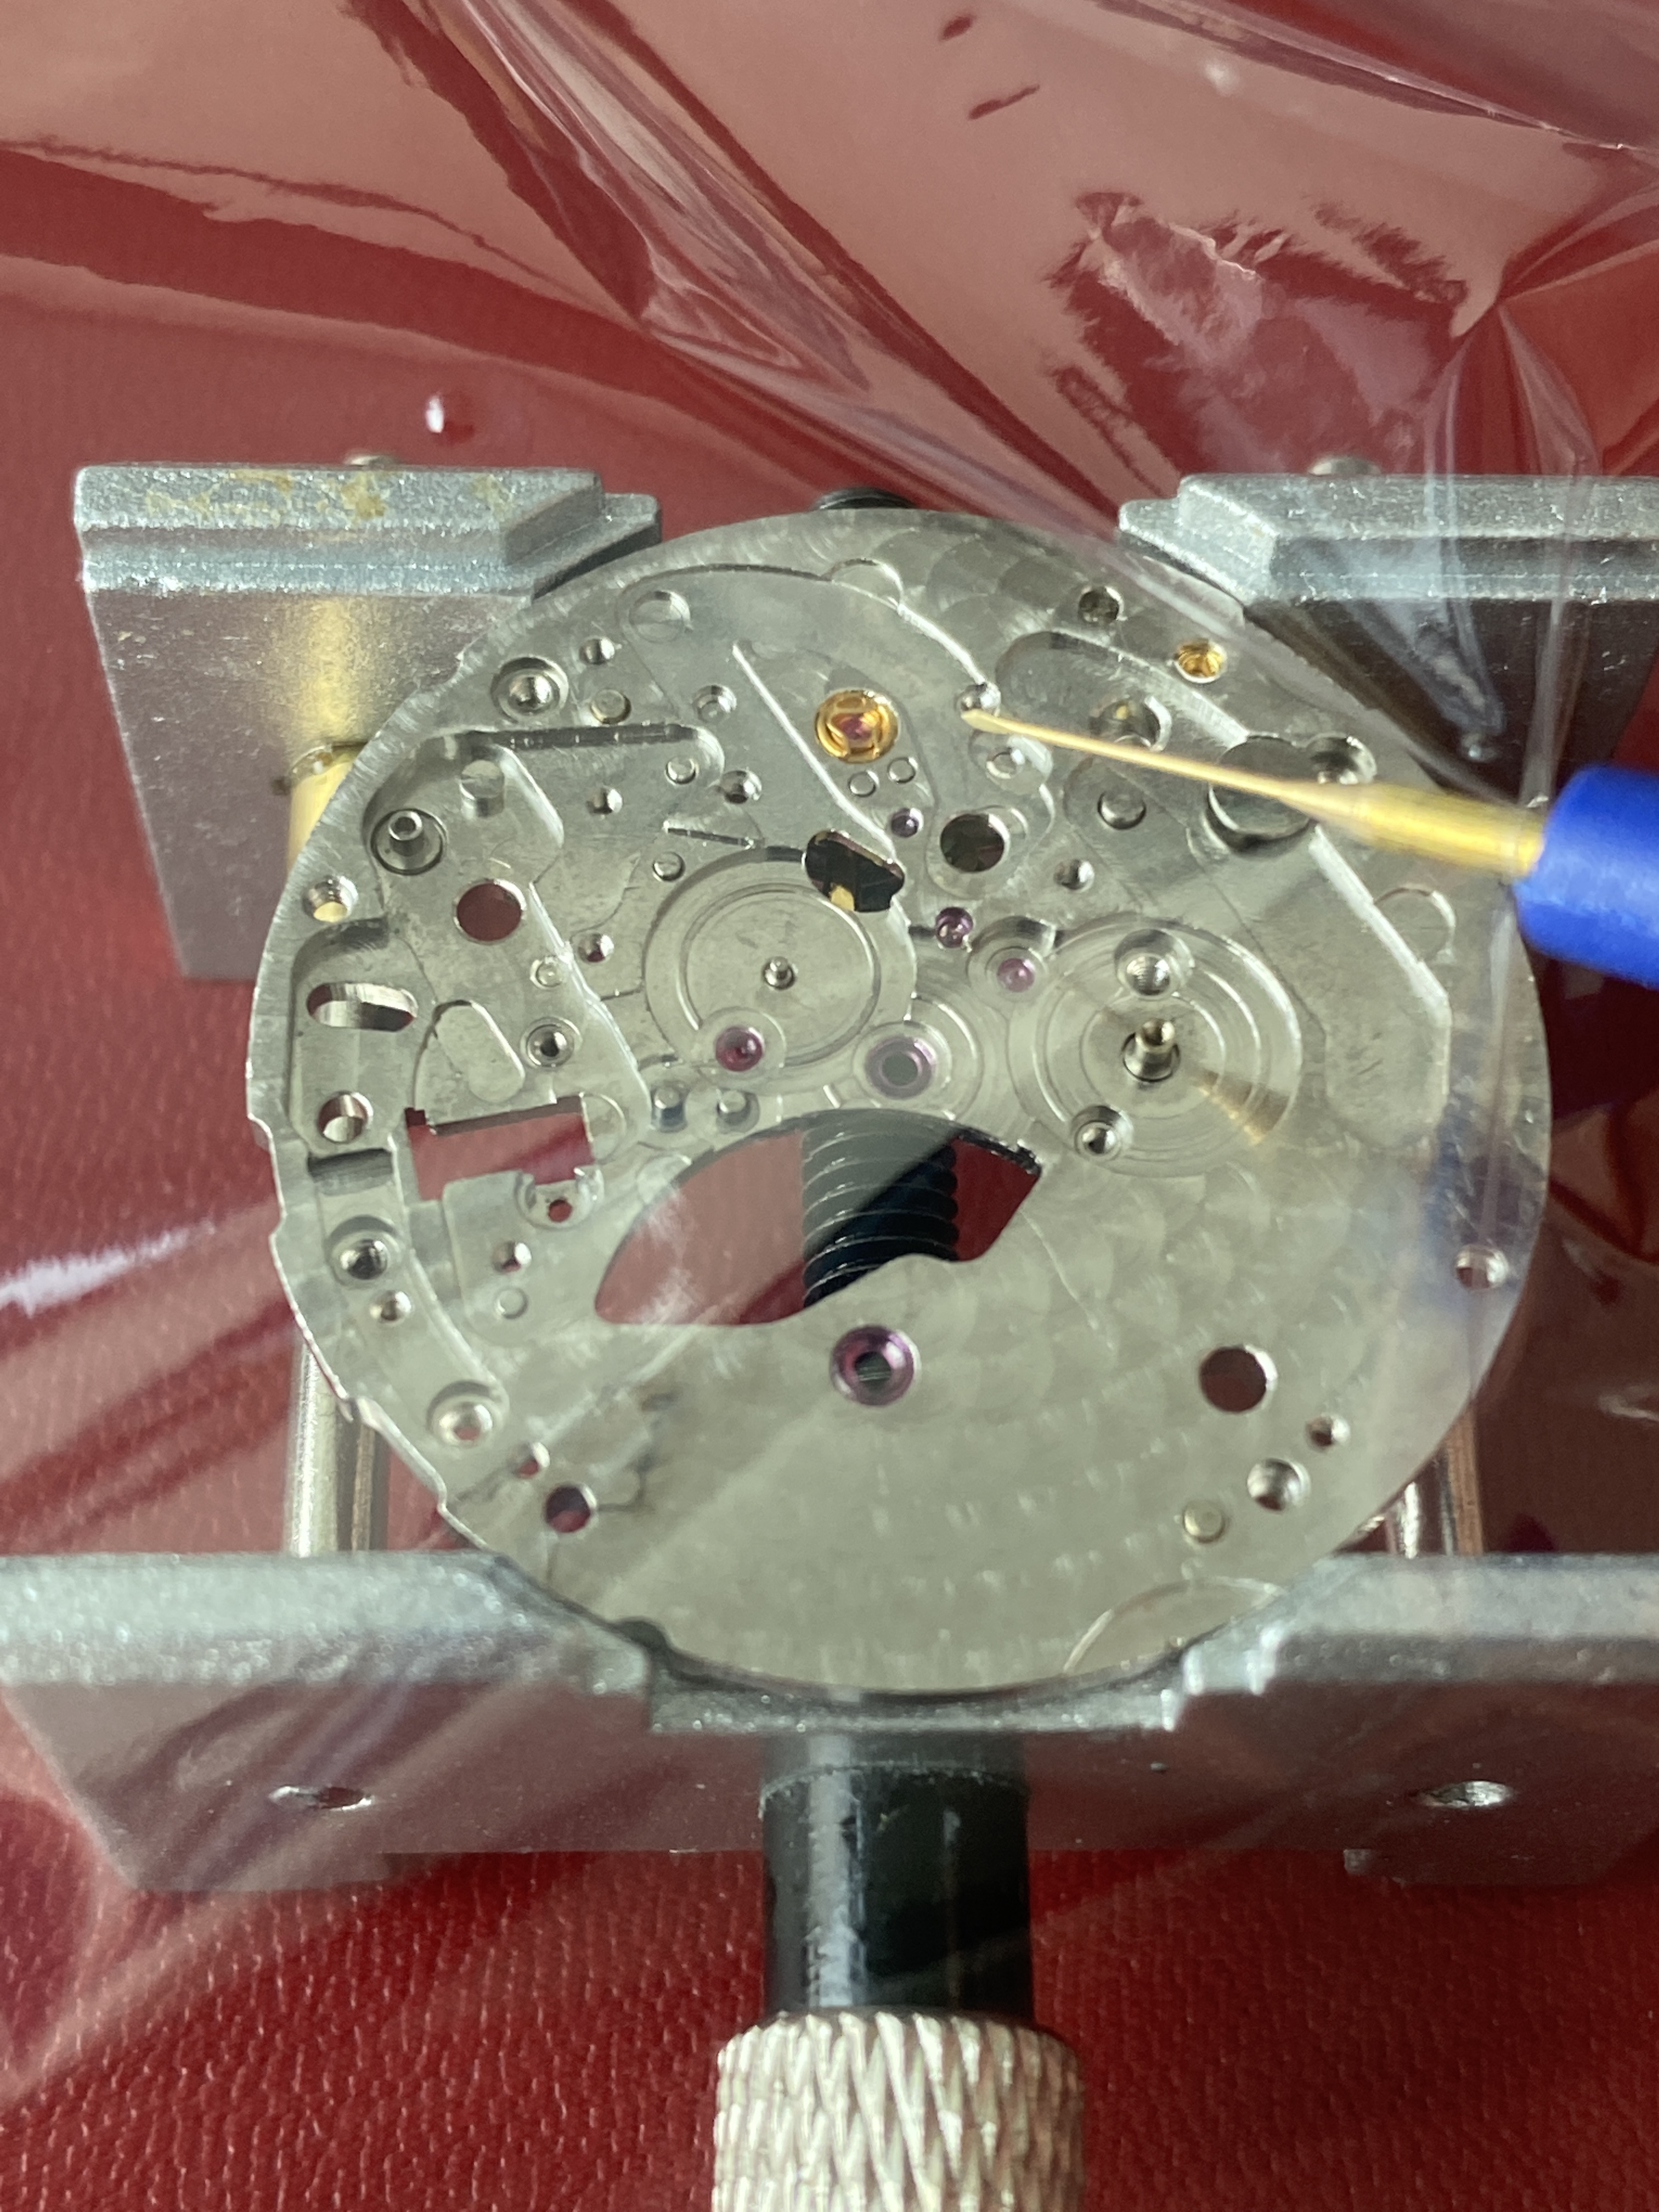
So after struggling to find a watchsmith in Vancouver that would service reps, I decided that I'd try to learn how to do it myself. I enrolled in Mark Lovick's online course and studied my way through the first two levels of the course before being brave enough to try to disassemble a movement. I'd ordered a Unitas 6497 (the movement used in the course) from AliExpress, but it has been stuck in customs for the last two weeks, and I was getting impatient. So rather than continue to wait, I elected to try "servicing" the VR3235 out of my CF DJ41. Note: I put the word "servicing" in scare quotes here because I'm pretty sure that since this is my first attempt, I'm going to leave the movement in worse shape than it was when it left China. Regardless, onwards... Here are some pics and some things that I found harder and easier than I expected.

Things that were easier than I expected:
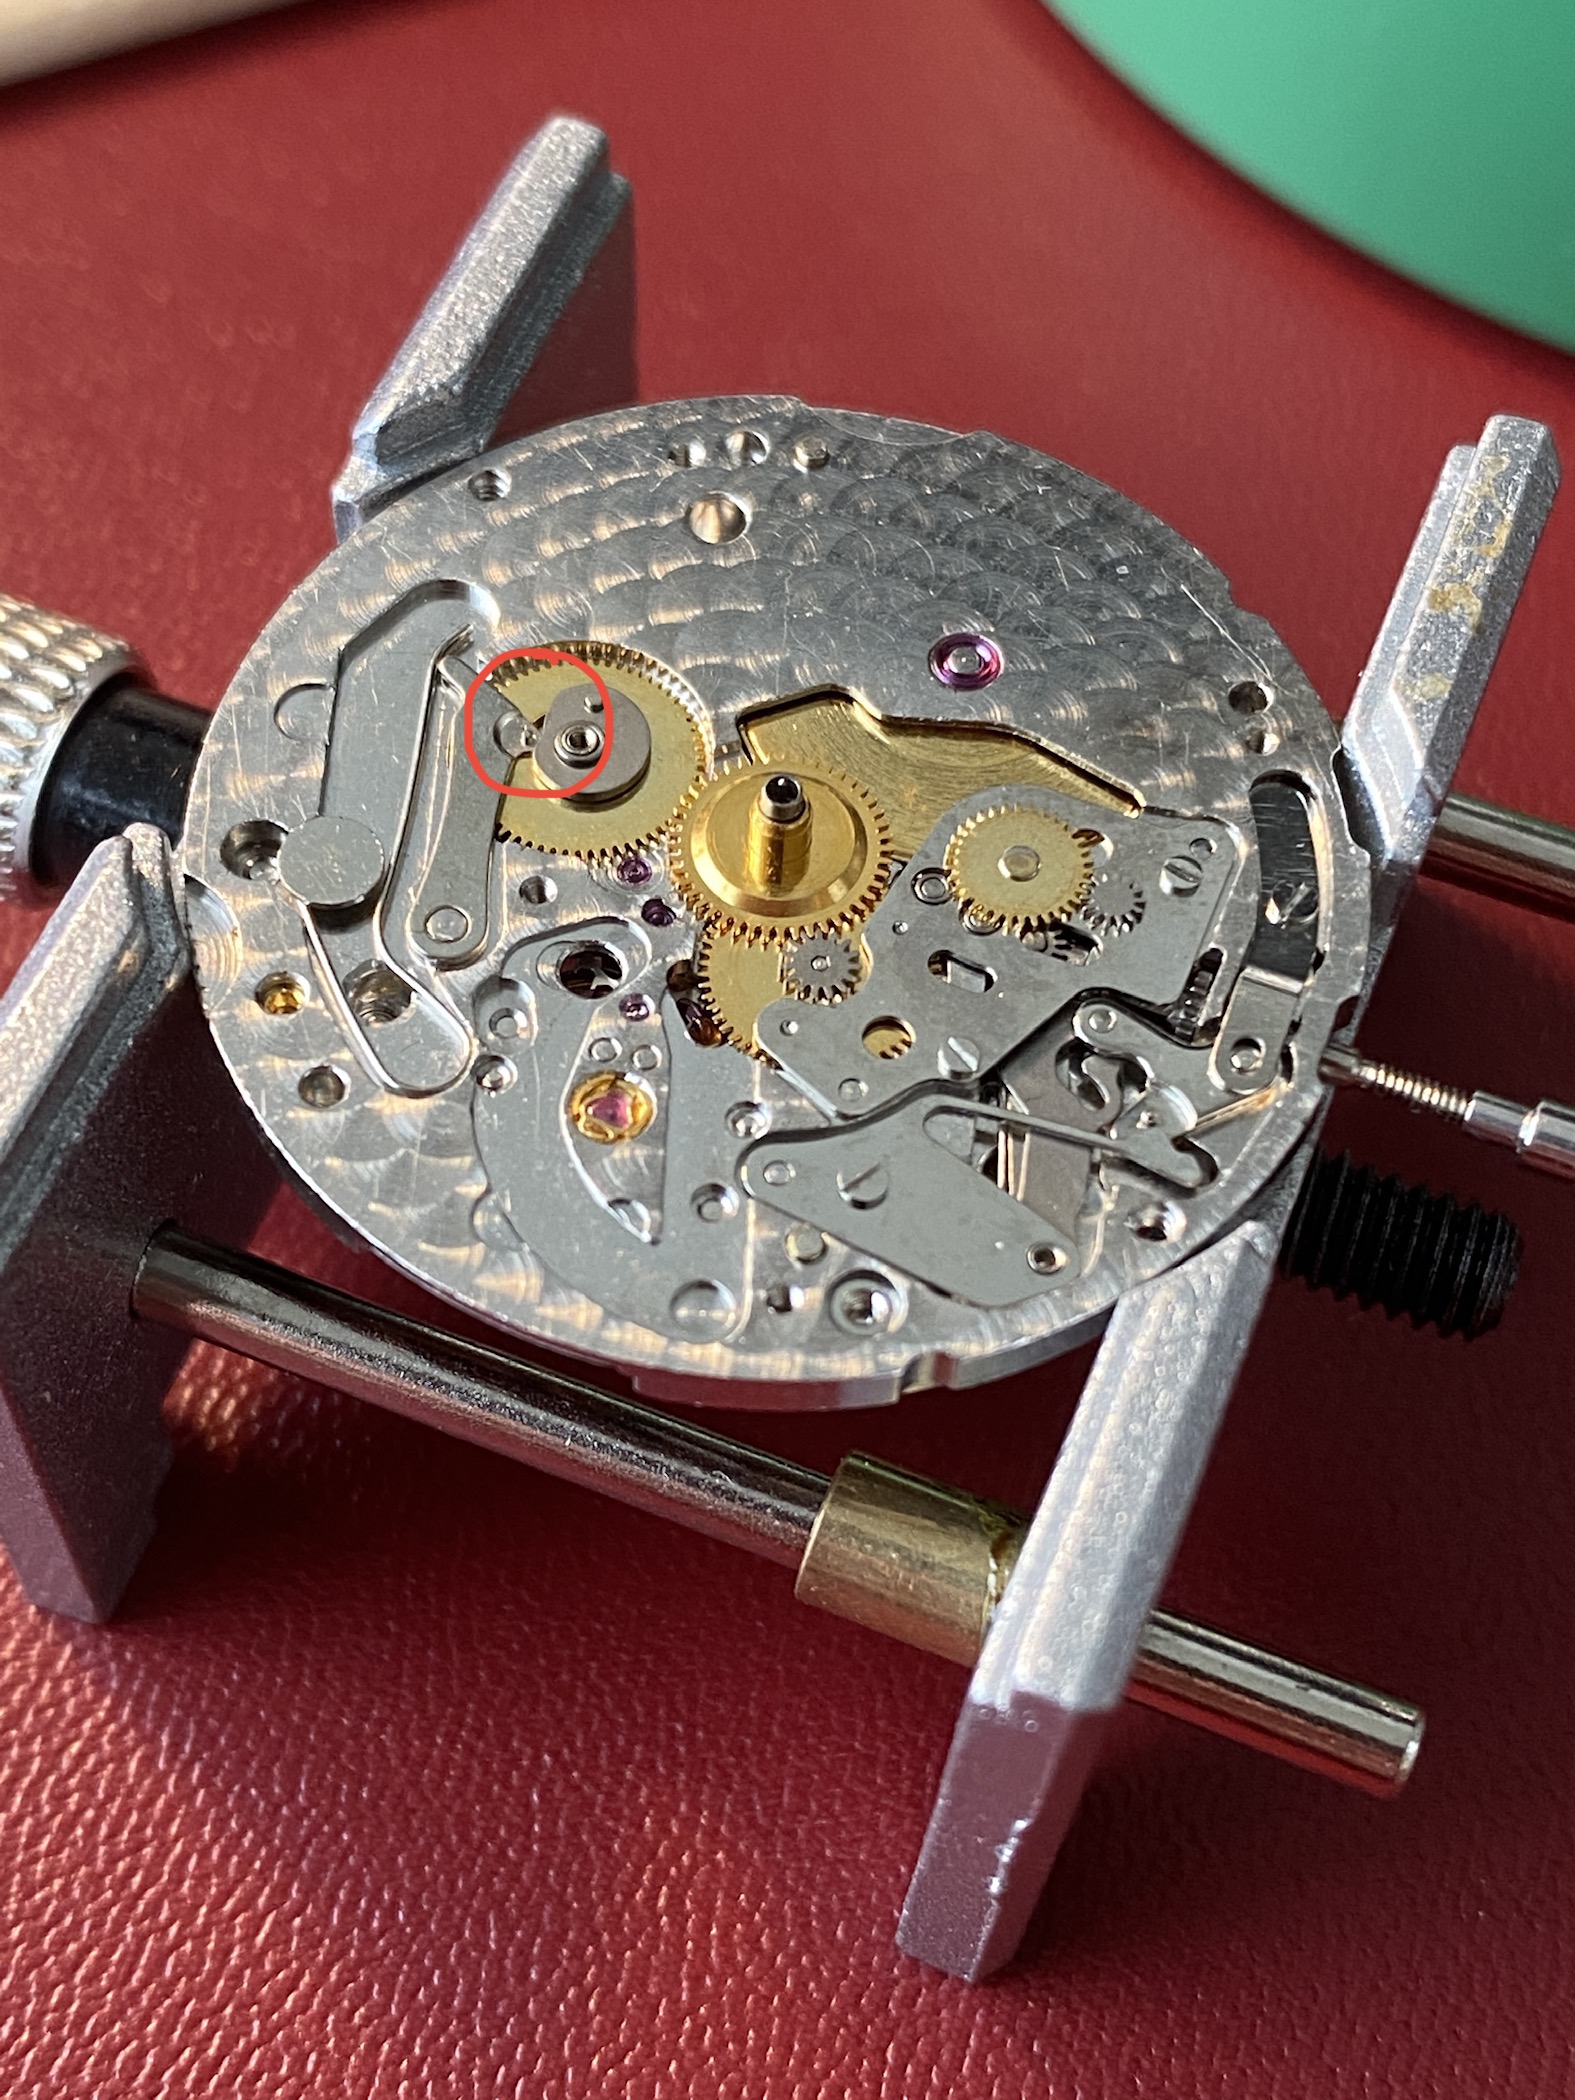
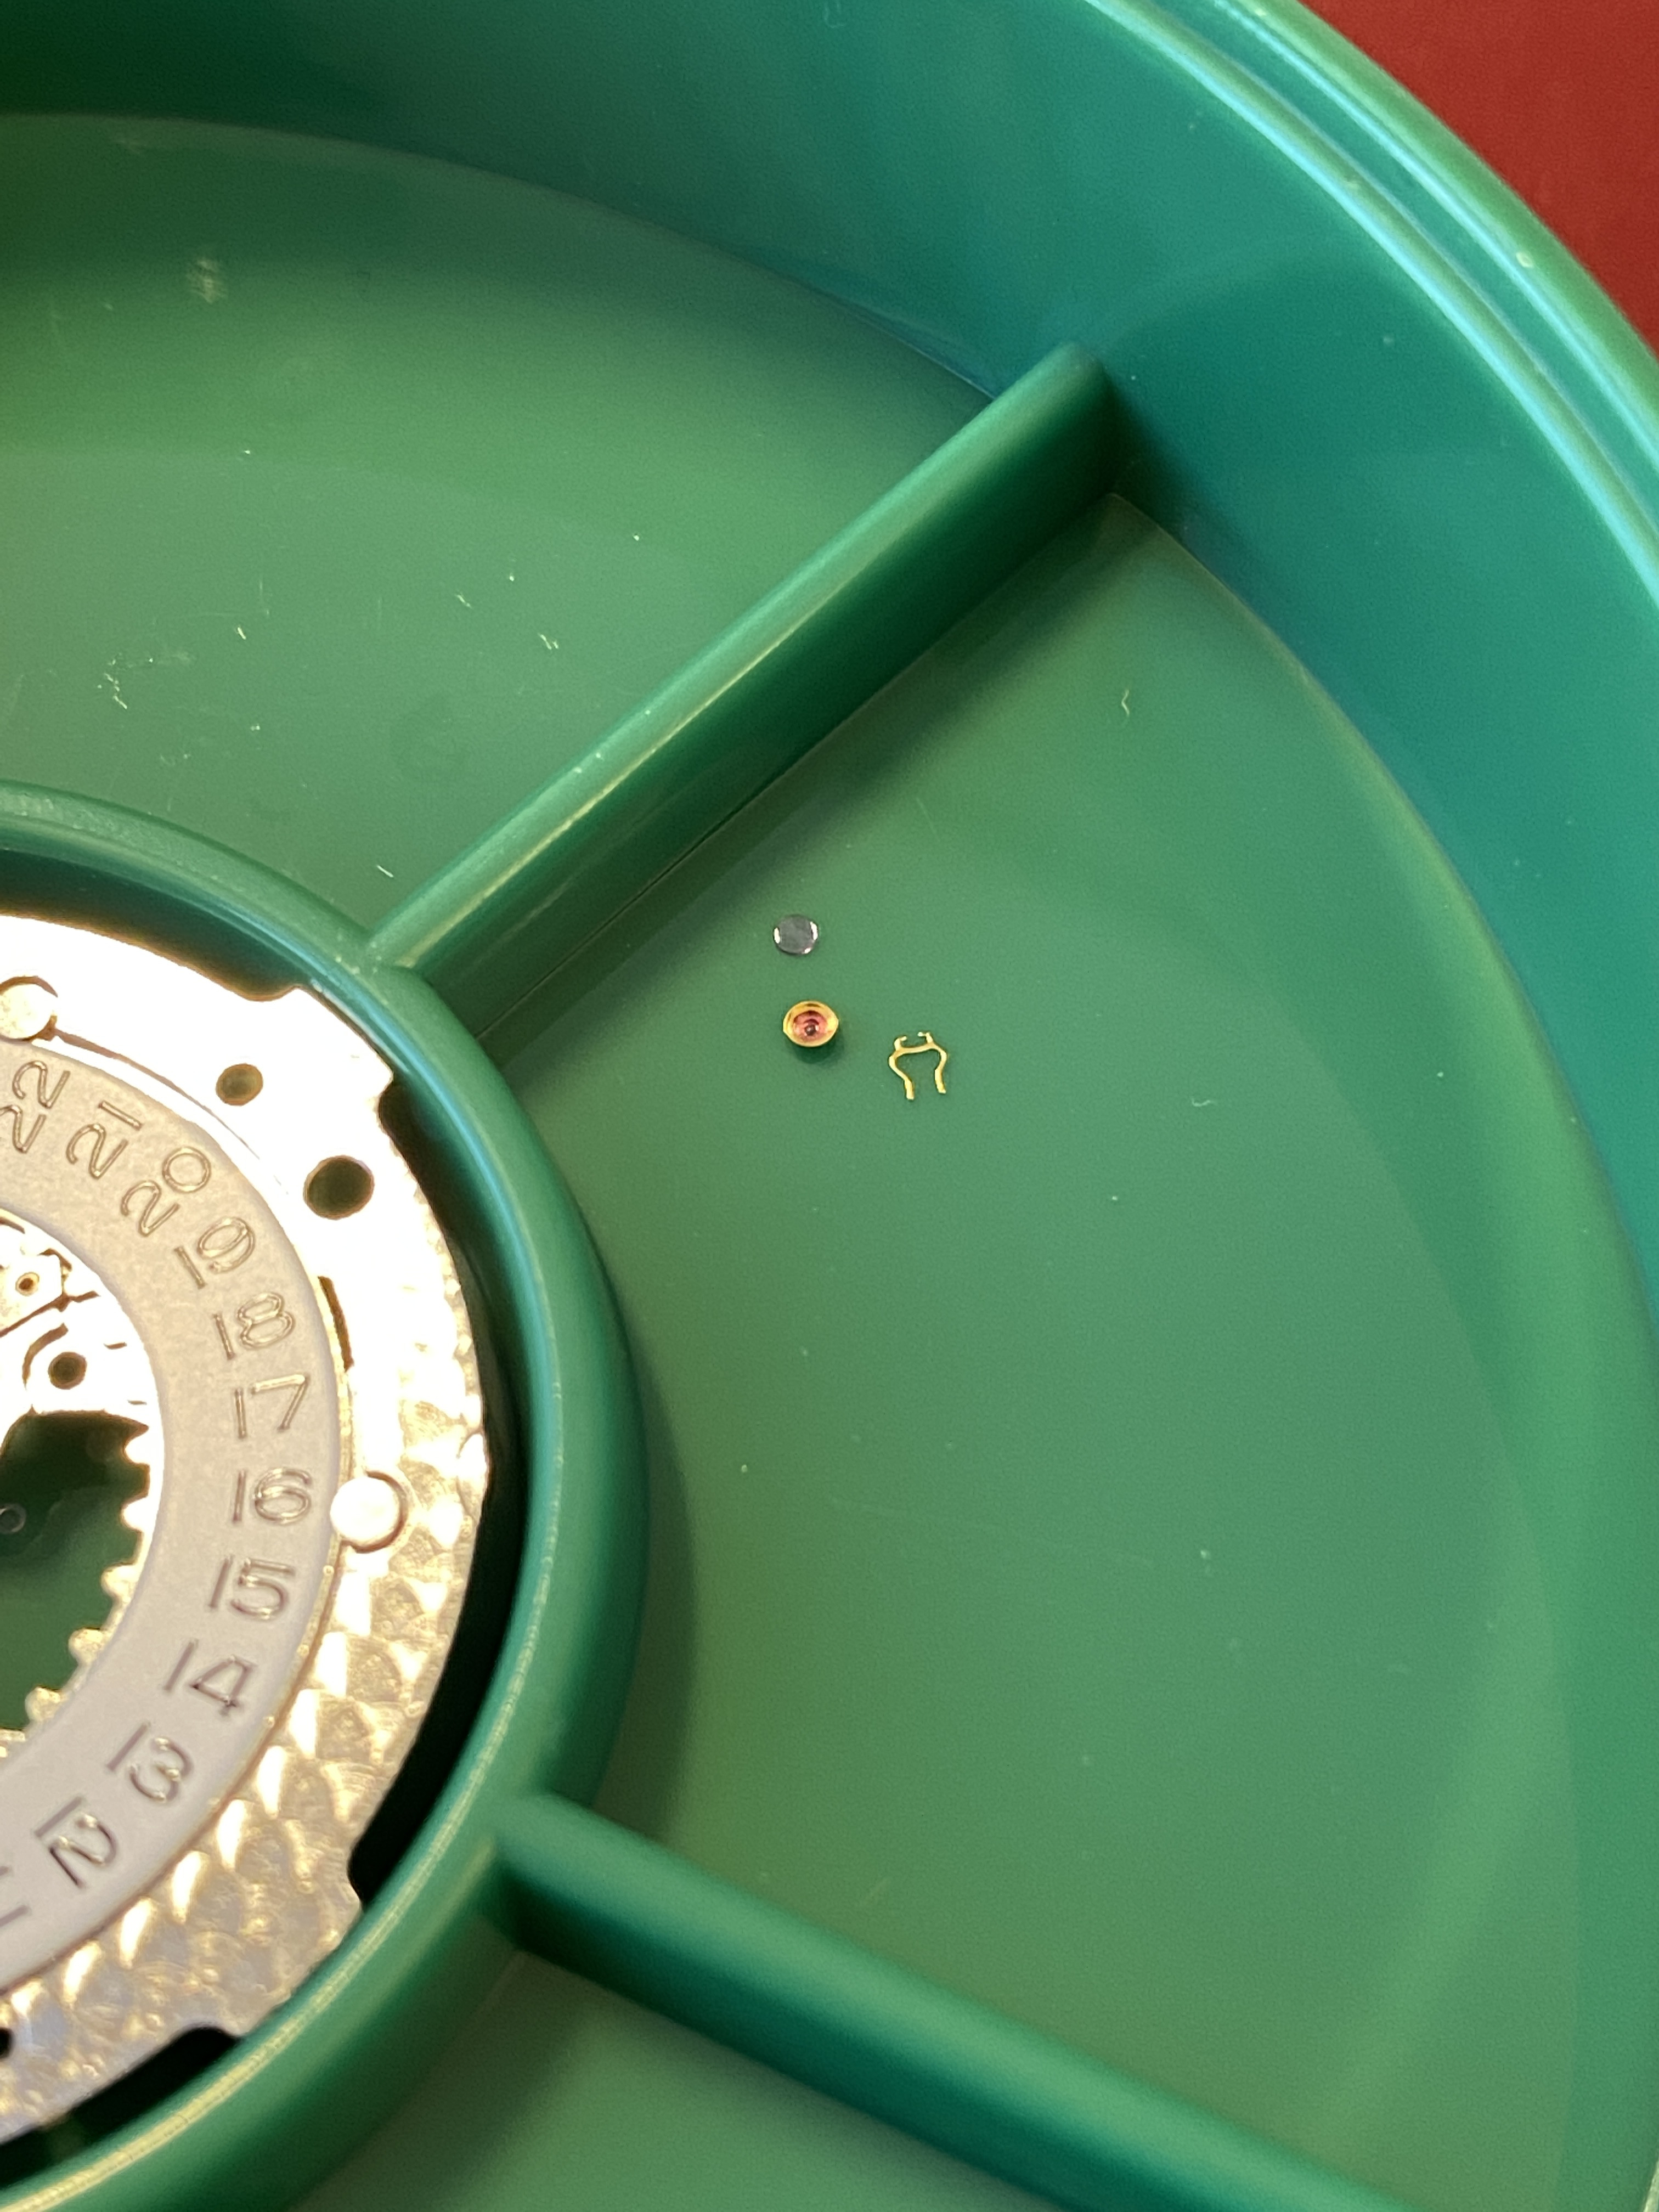
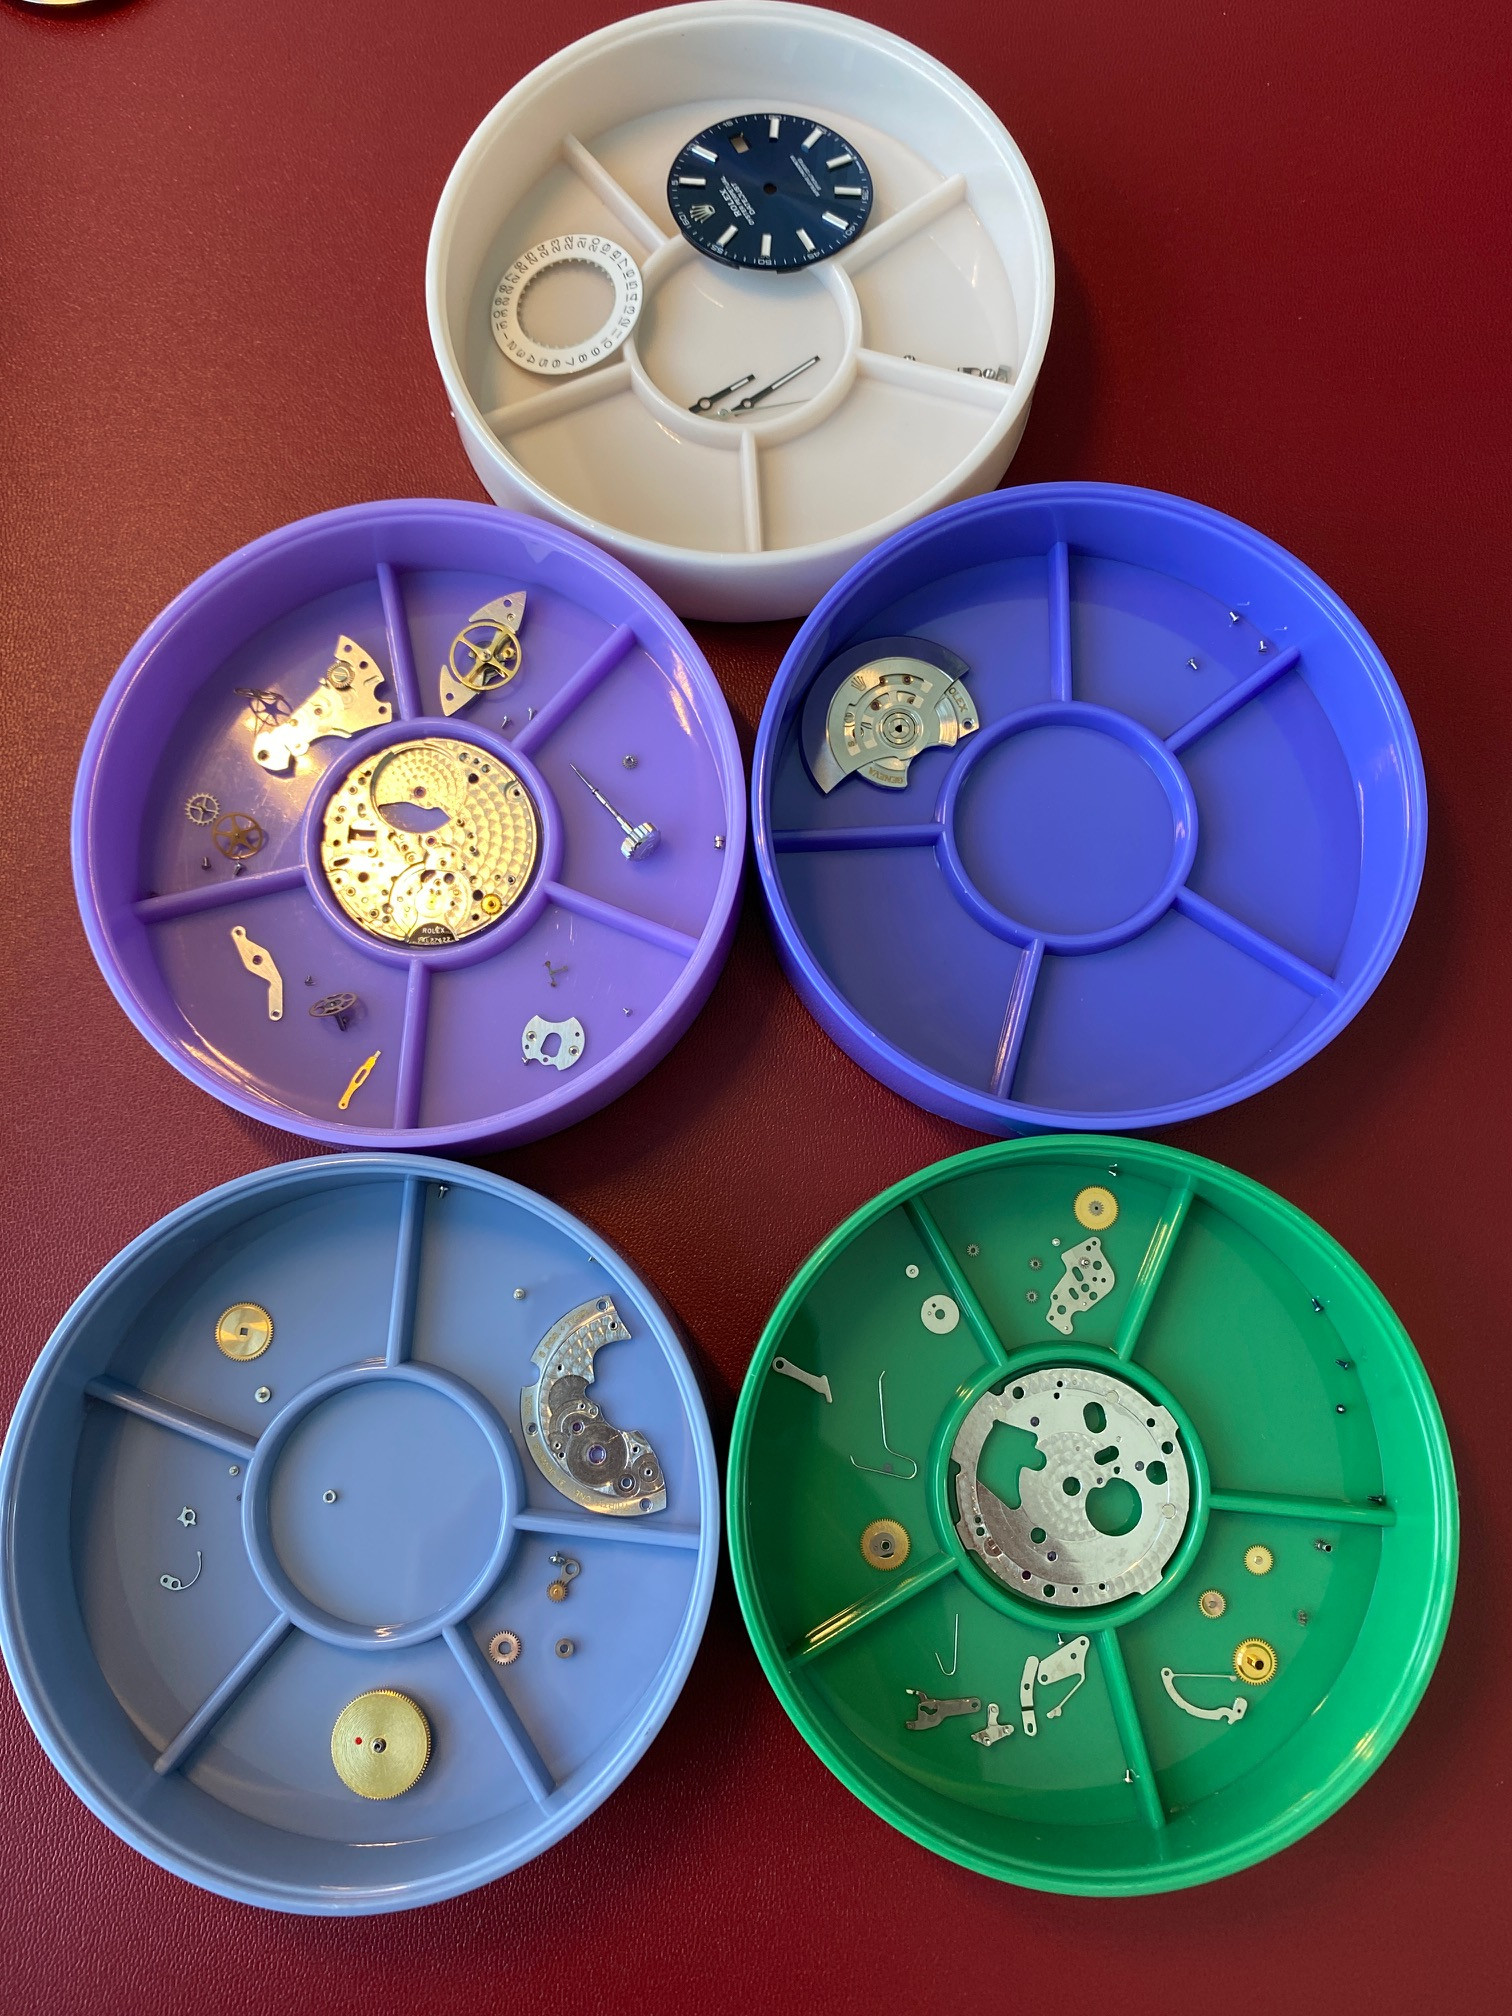
  1. Removing the watch hands was pretty easy. I bough one of those cheap presto tools for hand removal from amazon, and with a layer of plastic to protect the dial, it worked like a charm. I thought this would be way harder.
  2. The disassembly and re-assembly process were actually pretty easy to follow. PsychoTee16 gave me access to some a rolex 3135 movement service manual that he had. And while the VR3235 is pretty different on the balance side, on the dial side and in the keyless works, it's very much like a 3135, so that was really helpful.
Things that were harder than I expected:
  1. Removing the dial from the movement was less intuitive than I expected. I loosened the dial screws on the movement, but the dial didn't come free. There were some places that looked like they'd been put there to insert a screwdriver to pry, but these didn't help (it turns out those slots were to help remove the date plate). I eventually got it when I realized the dial was thinner than I'd expected and that I was trying to pry off too much (i.e. the date plate AND the dial).
  2. Manipulating tiny screws with tweezers is HARD. I managed to launch a 3135-5115 screw (the tiny ones) somewhere into my office when my tweezers slipped and closed. I saw which direction it flew off in, but I was never able to find it. My office is only about 4 square meters and has a hardwood floor, so there aren't many places to hind. But despite an hour on my hands and knees with a low angle light, I couldn't find it. I even tried putting some powerful magnets onto the bottom of my vacuum's cyclone and vacuuming the area and all the nooks and crannies. Still no luck. I had to order a replacement box of screws from Perrin for $100... I figured this was better value than just buying a single replacement screw for $5, since I'd be this isn't gonna be the last tiny screw that I launch across the room.
  3. Getting the yoke spring into place against the yoke, while keeping the yoke in the right place on the sliding pinion. I messed this up the first time and didn't realize it until I was a few more steps down the garden path re-assembling the winding works... I had to disassemble everything and start again.
  4. Screwing in tiny screws... I take an ADHD medication which allows me to concentrate, but gives my hands a bit of shake (think the hand tremors you'd get about a triple espresso). And so it was pretty hard to get screws to start threading because invariably my screwdriver tip was trembling. I kinda got better at this by using two hands and resting both forearms on the desk to steady them.
Tools that were WAY more useful than I thought they'd be:
  1. A set of +2.0 reading glasses... I'm still young enough that I don't need reading glasses, but I bought a pair of +2.0 glasses from the drugstore on the off chance that I'd want something less powerful than my x10 loupes. And, yeah, WOW, these things are amazing. I might go back and get a set of +3.5 glasses now.
  2. Rodico is amazing stuff, and I've been using it way more than I though just to pick up little things and move them around rather than trying to do everything with tweezers (see the point above about accidentally launching a 3135-5115 screw into orbit)
On now for a few pics...
The parts:


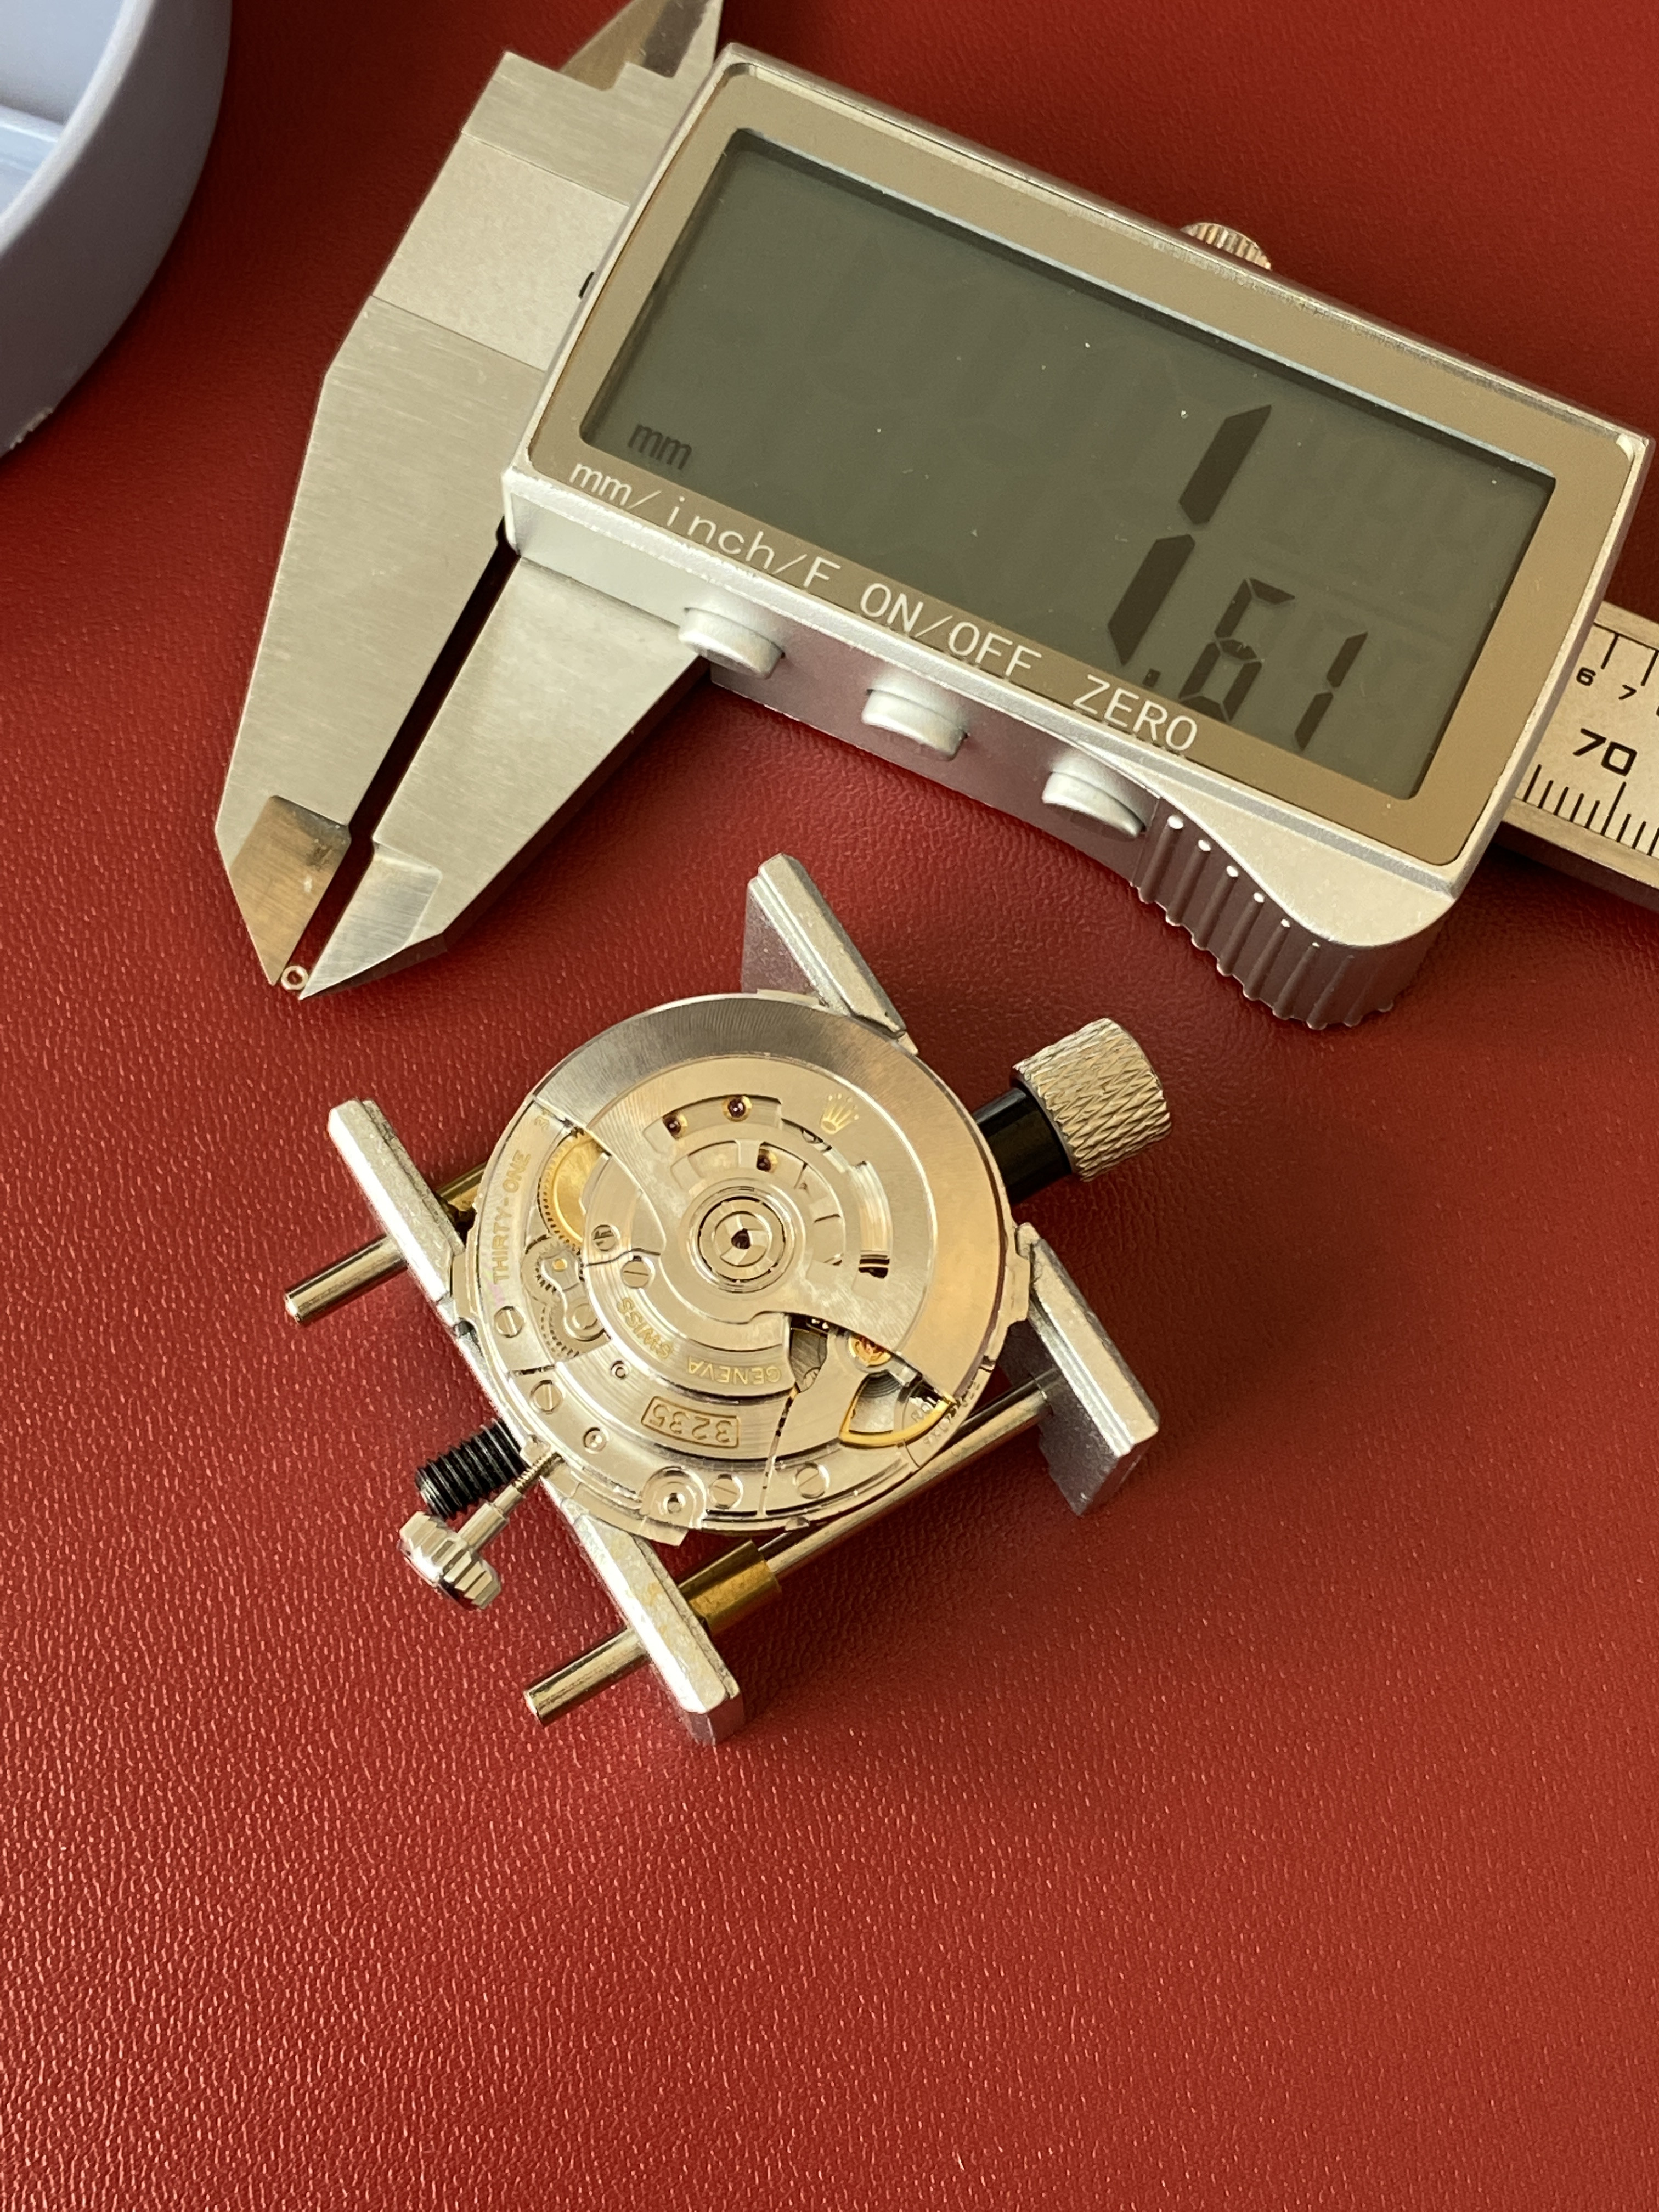
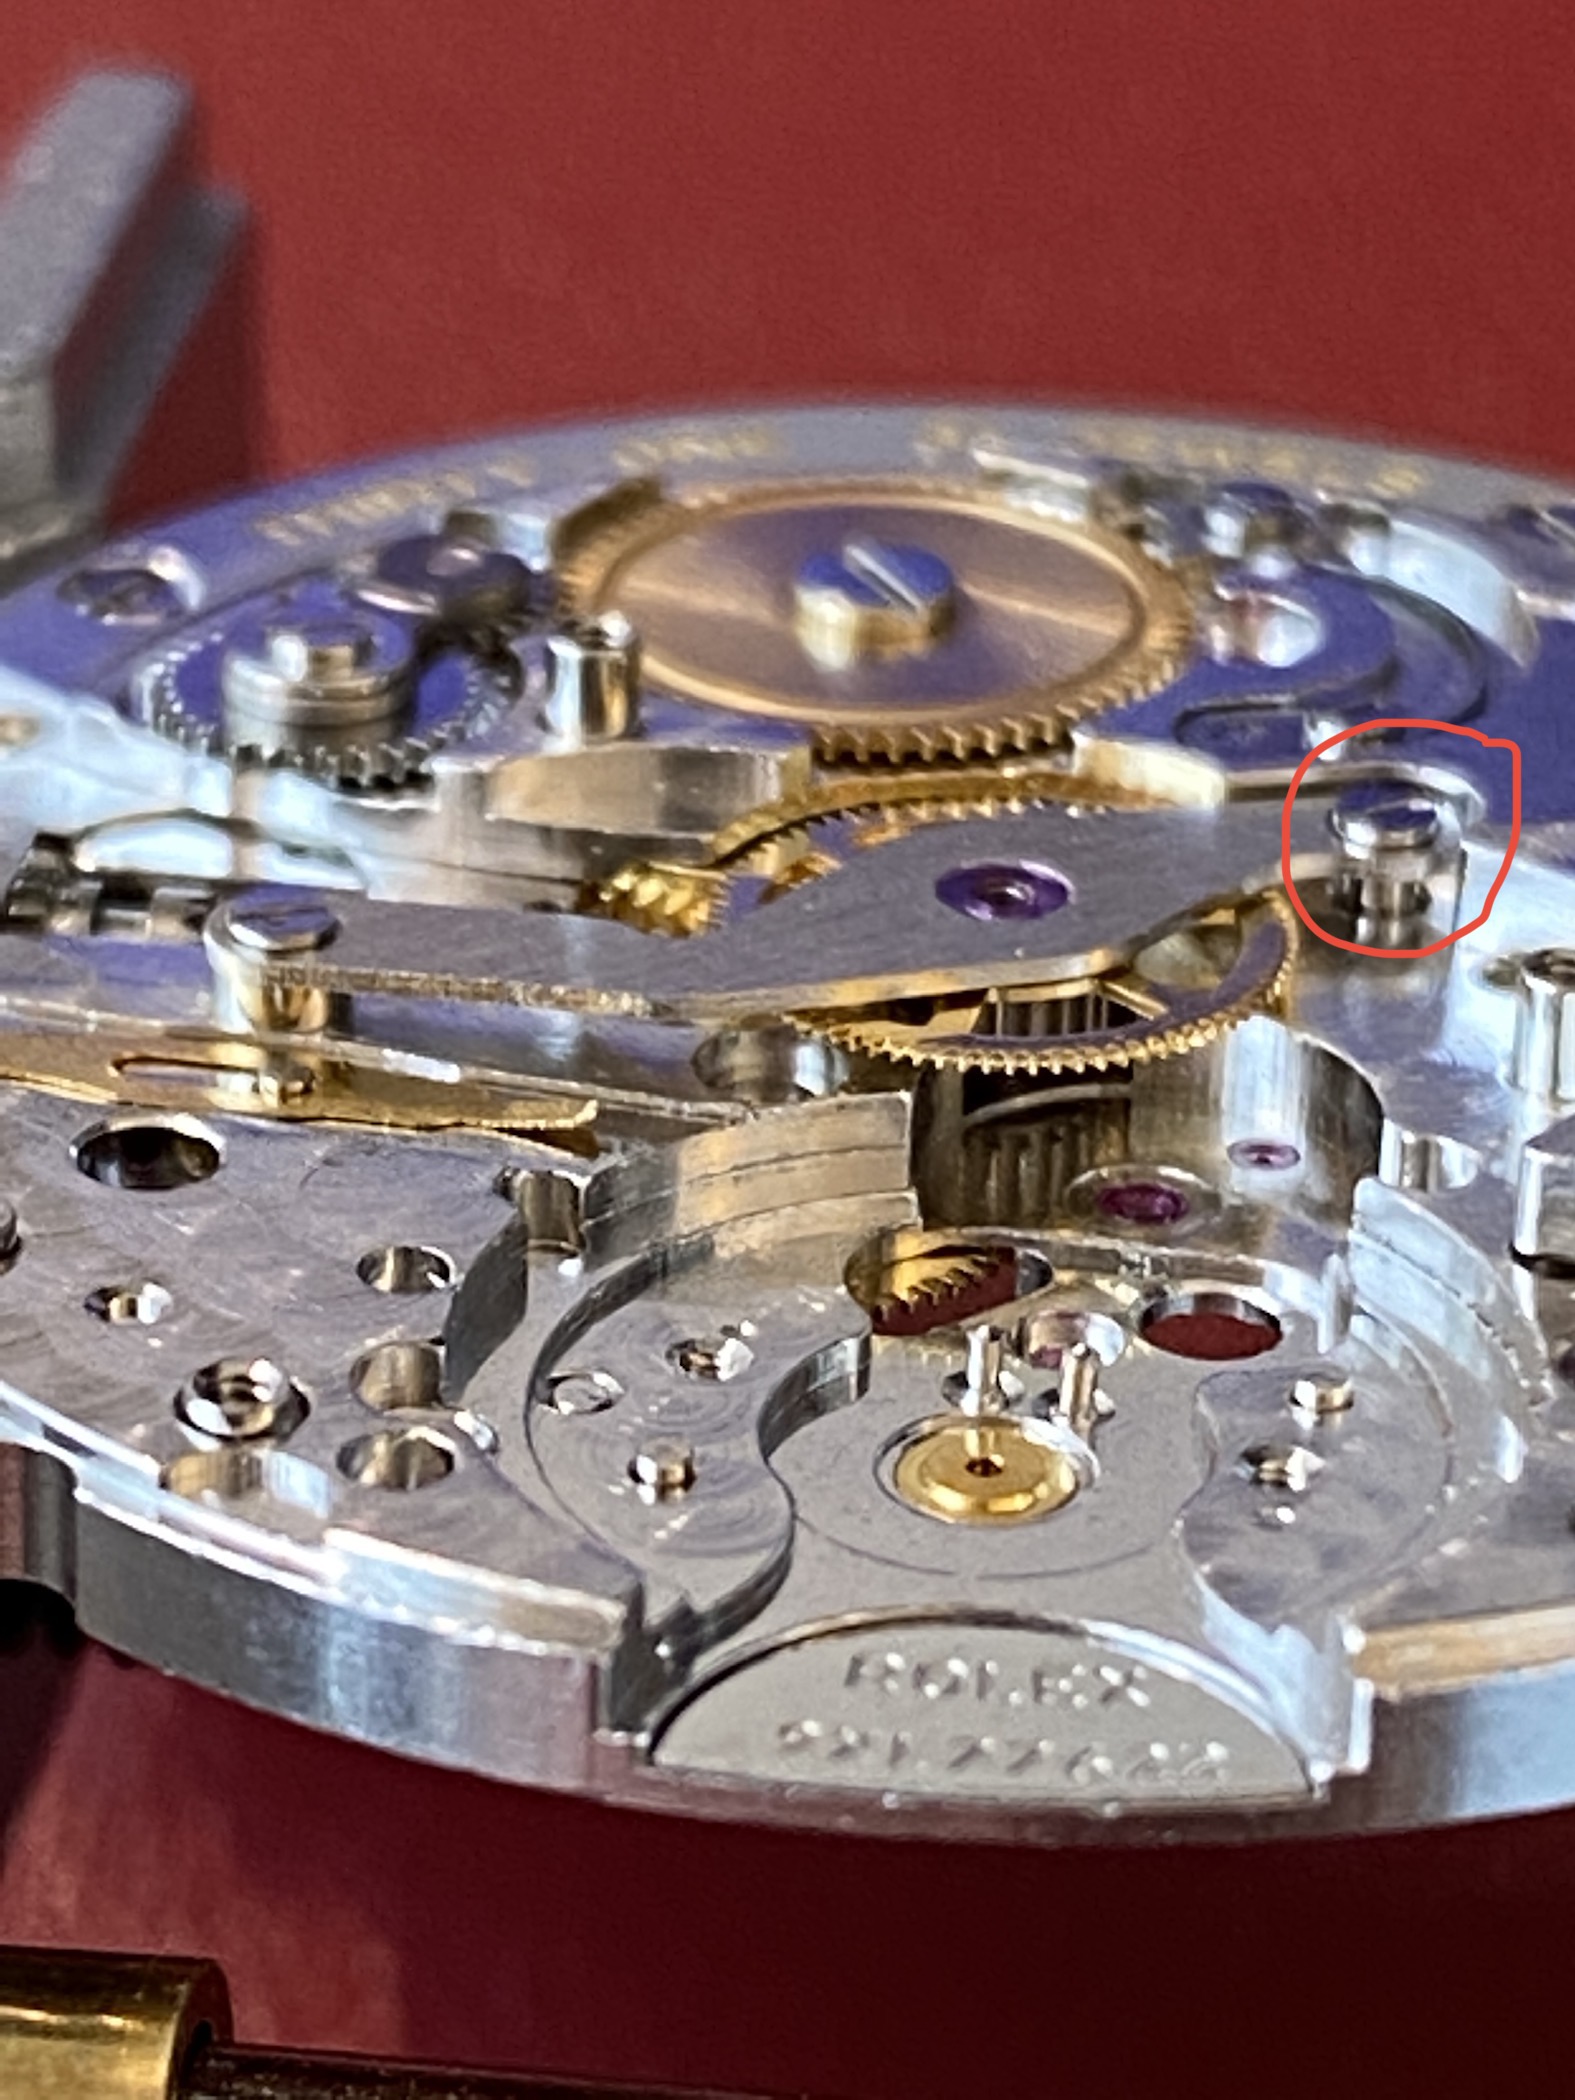
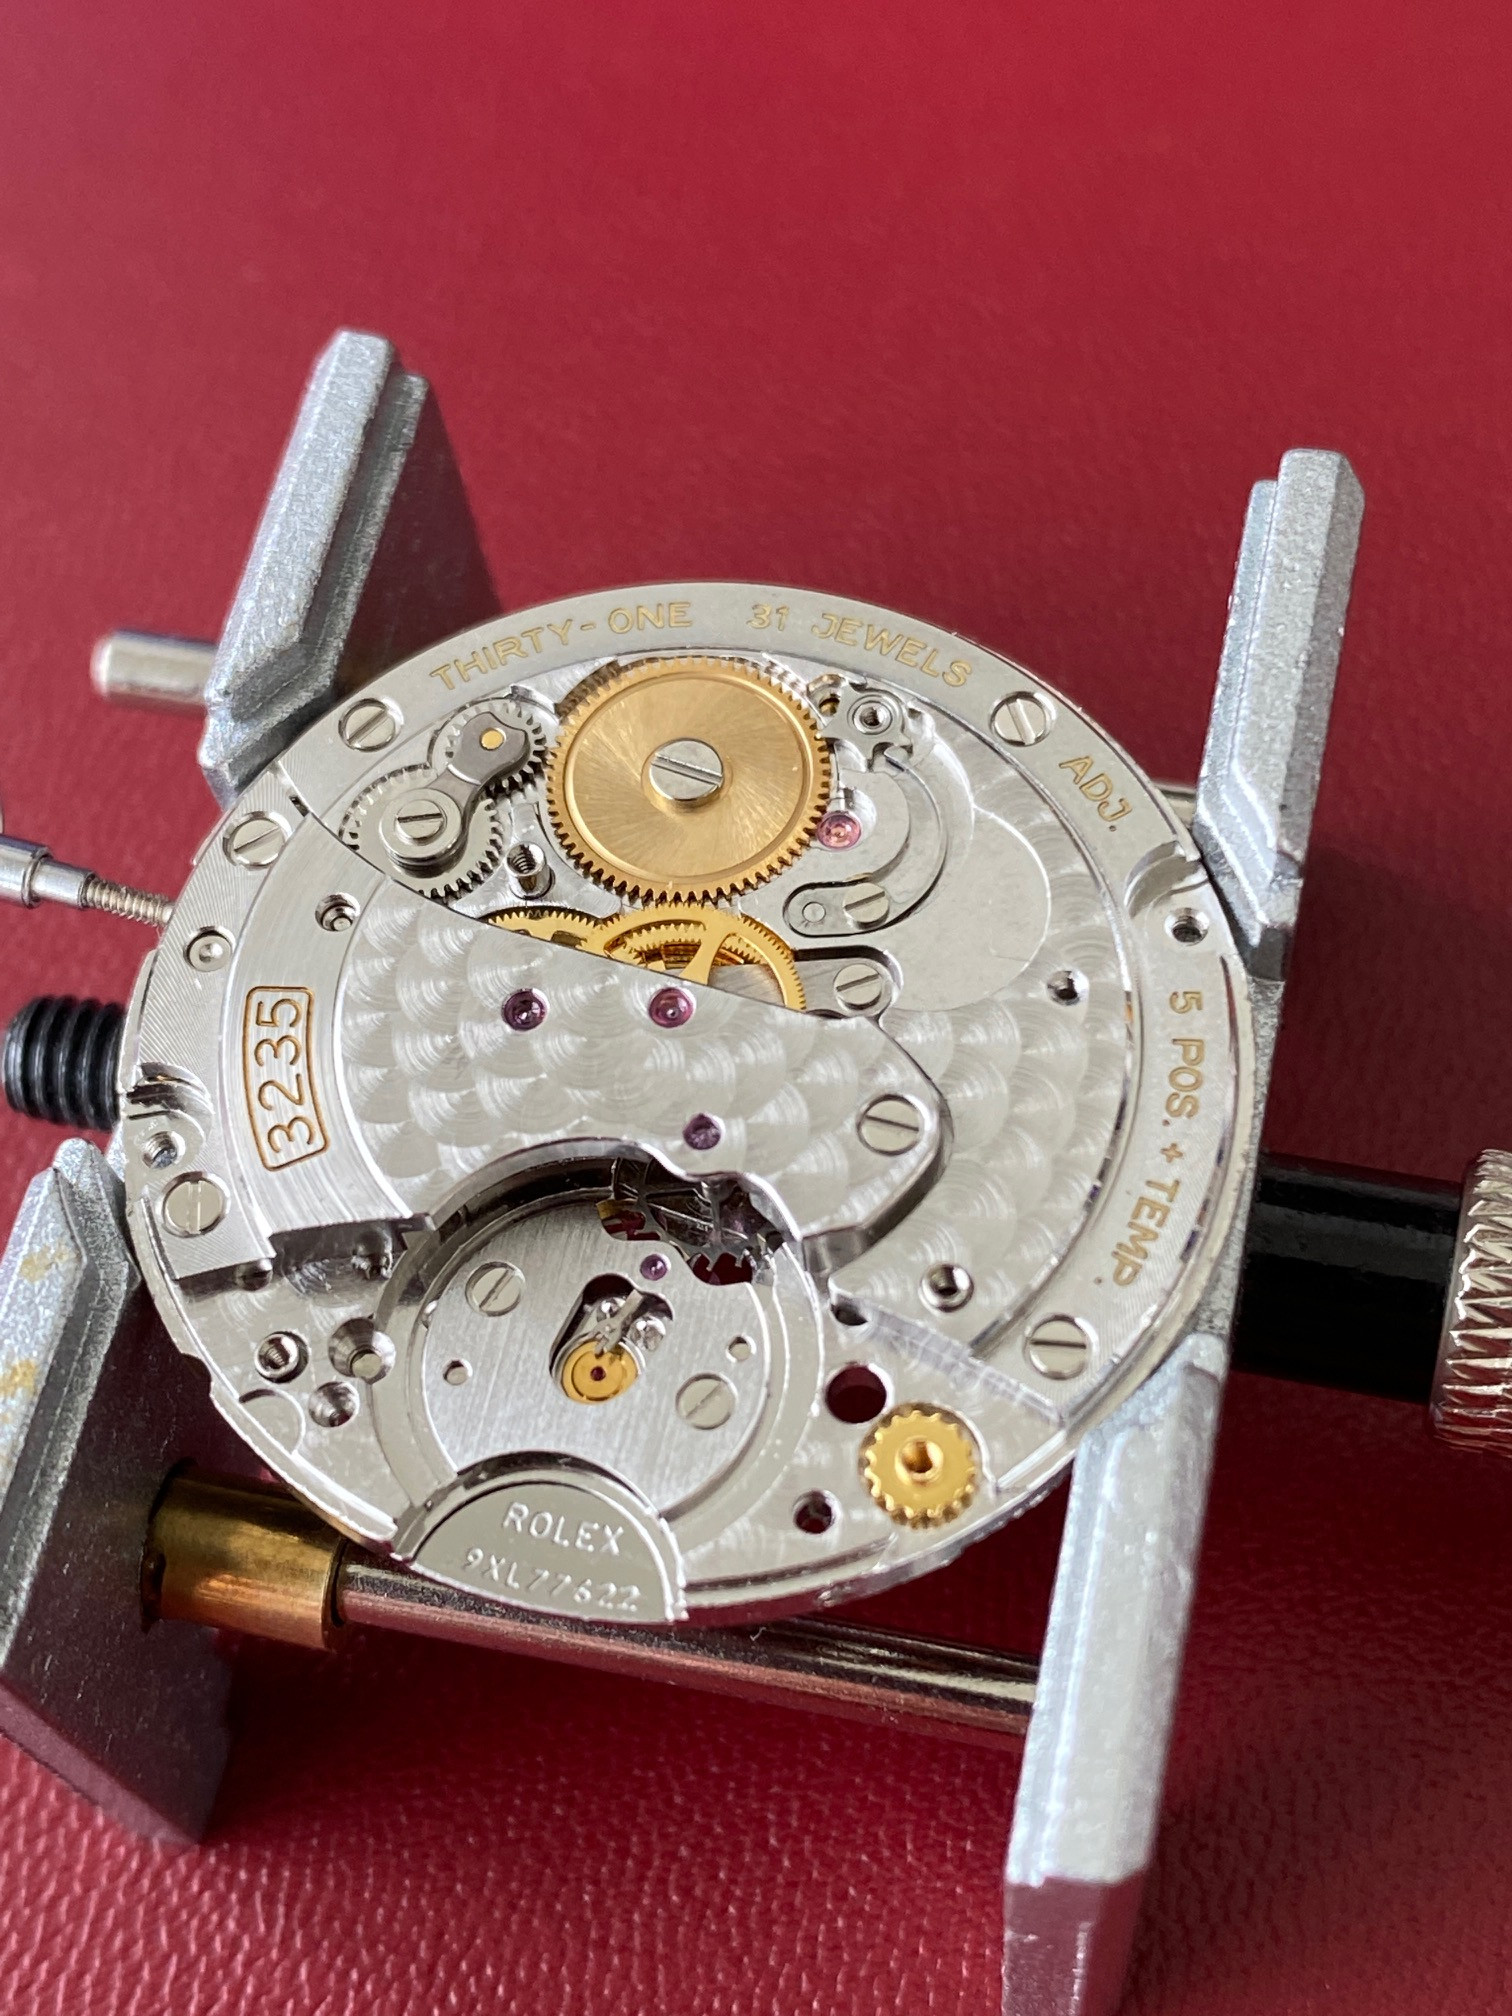
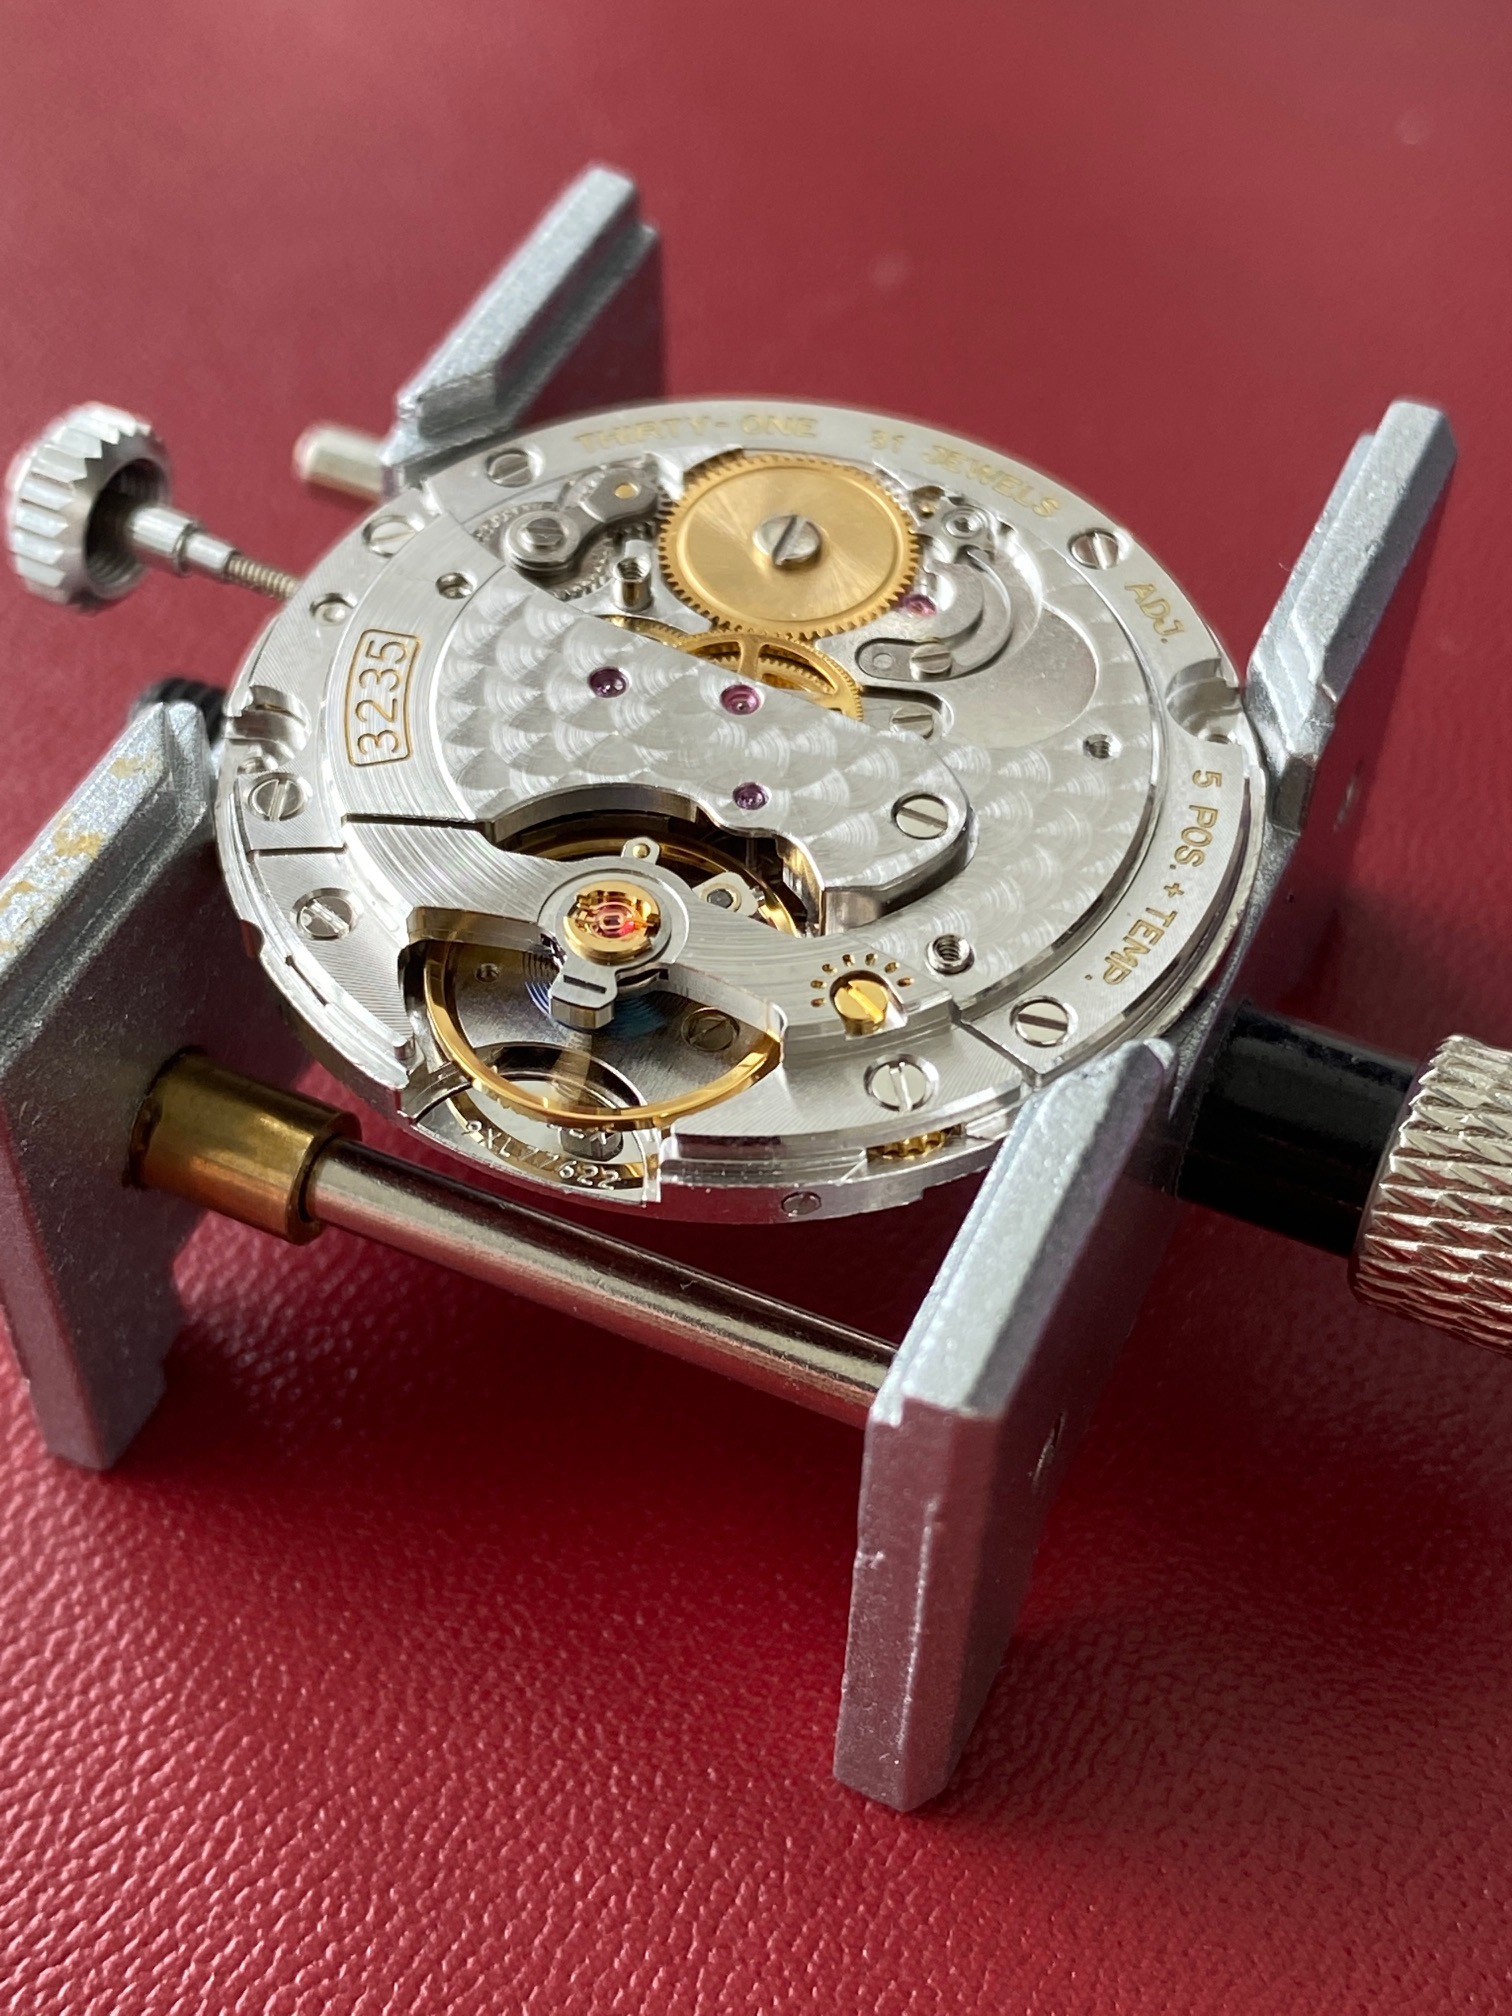
The semi re-assembled movement. Note the missing 3135-5115 screw that should be holding the click down.


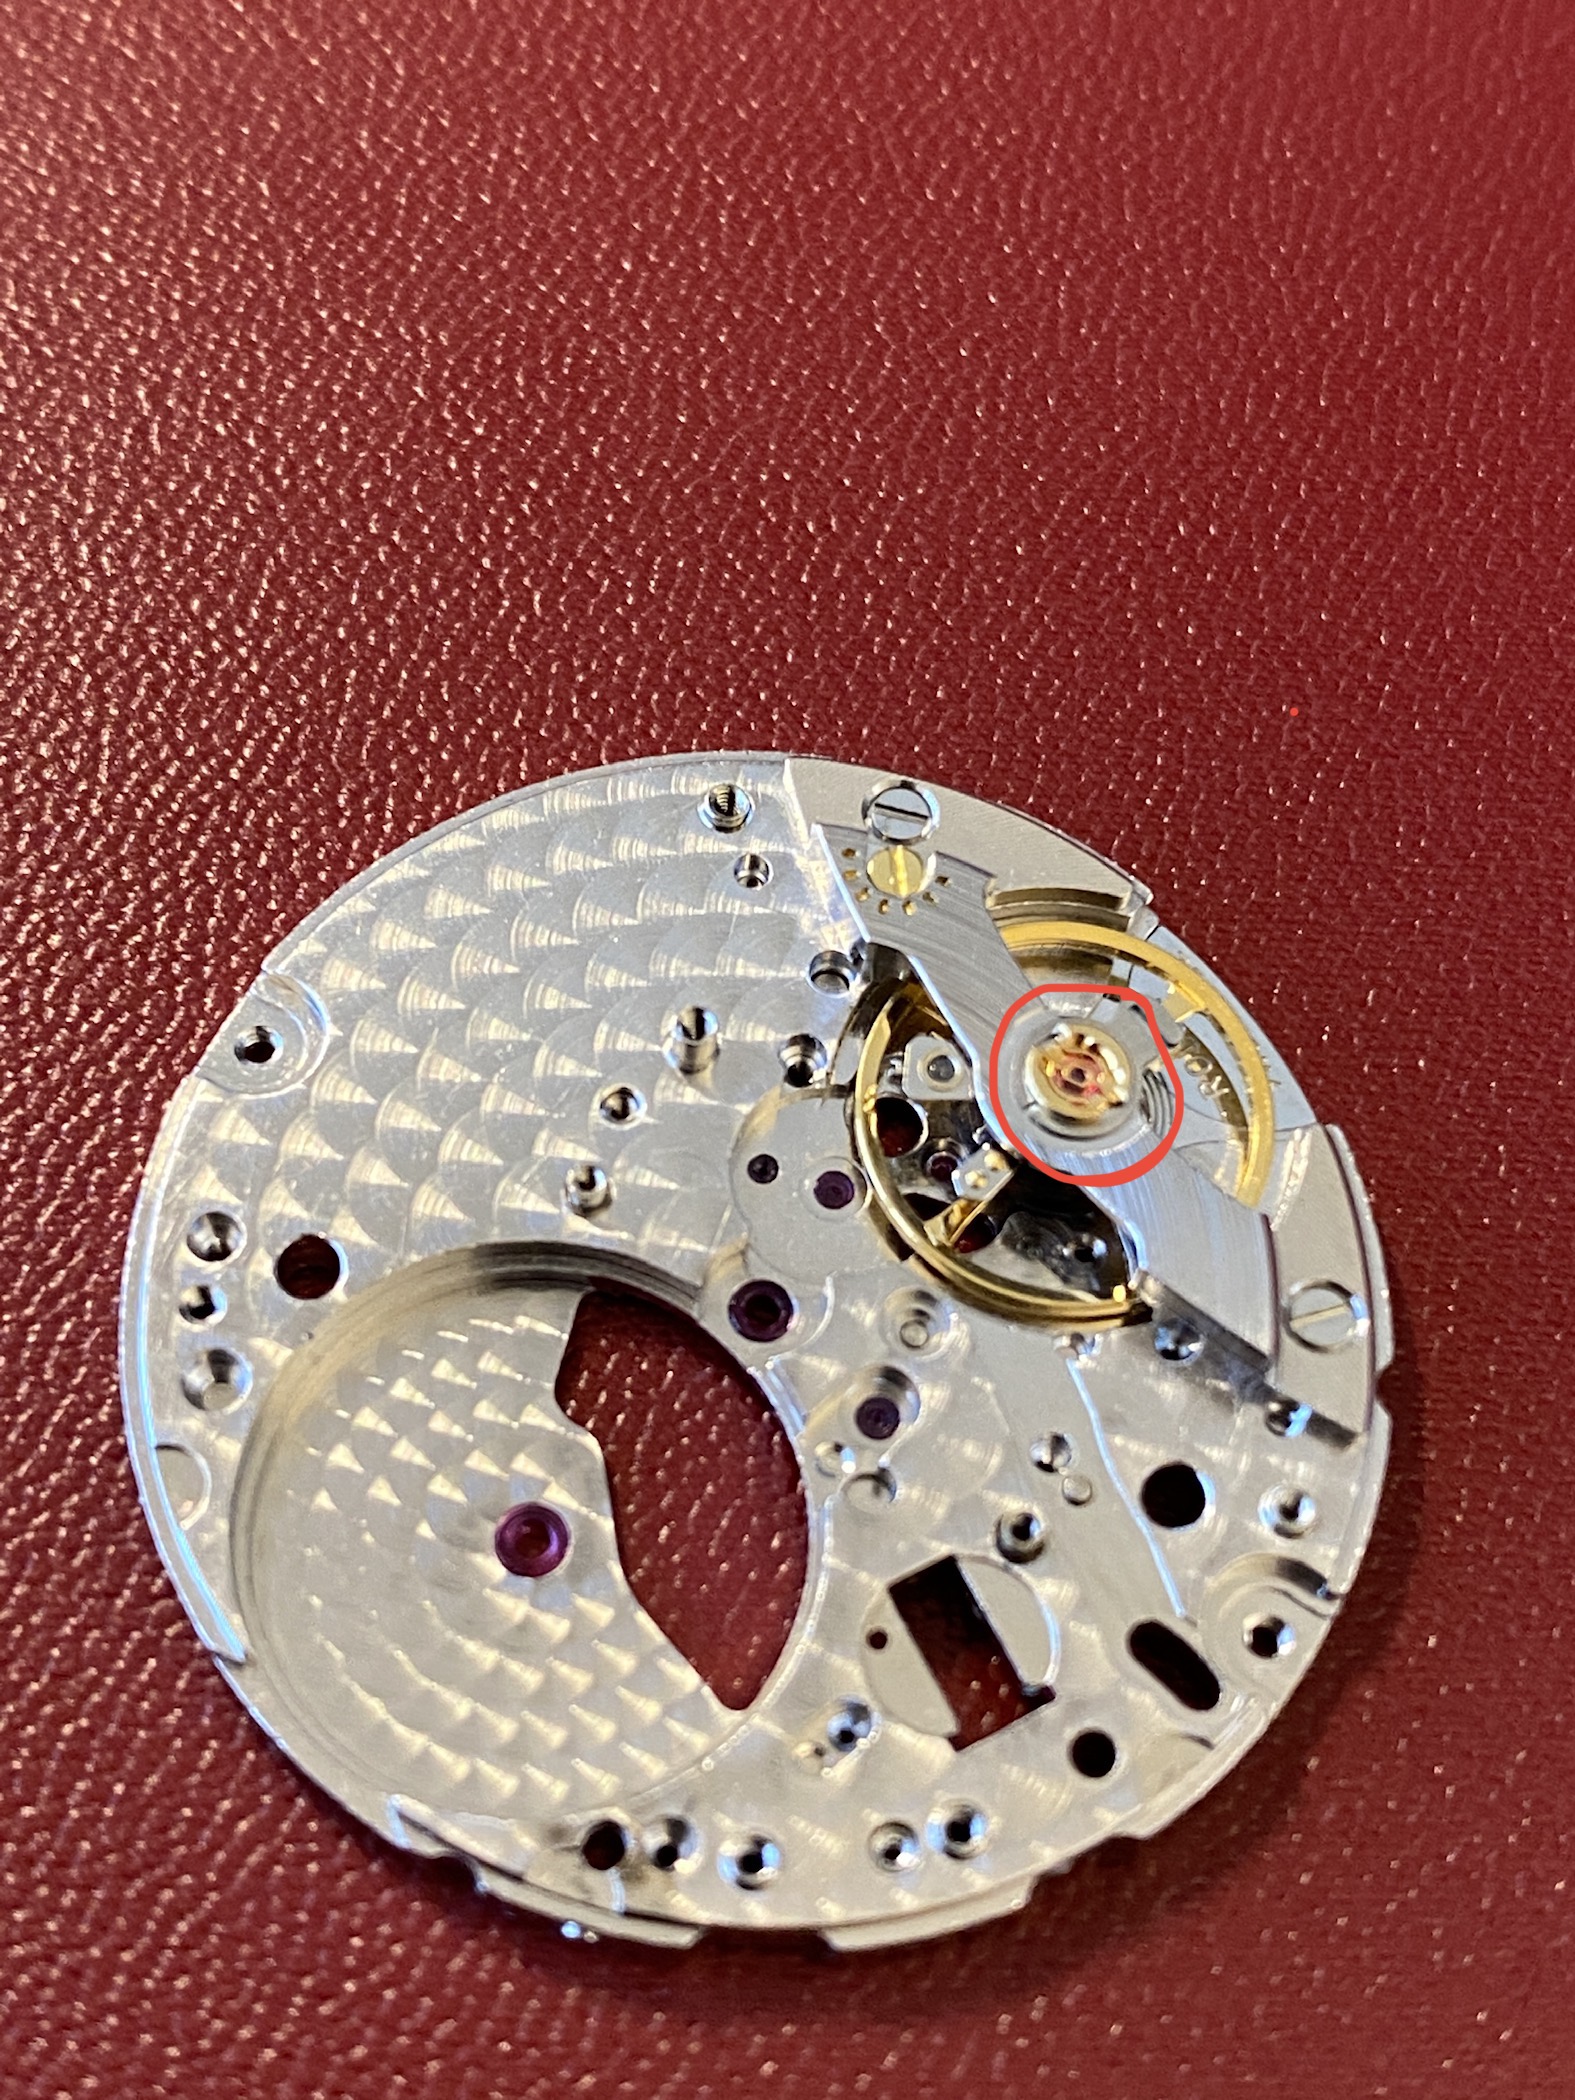
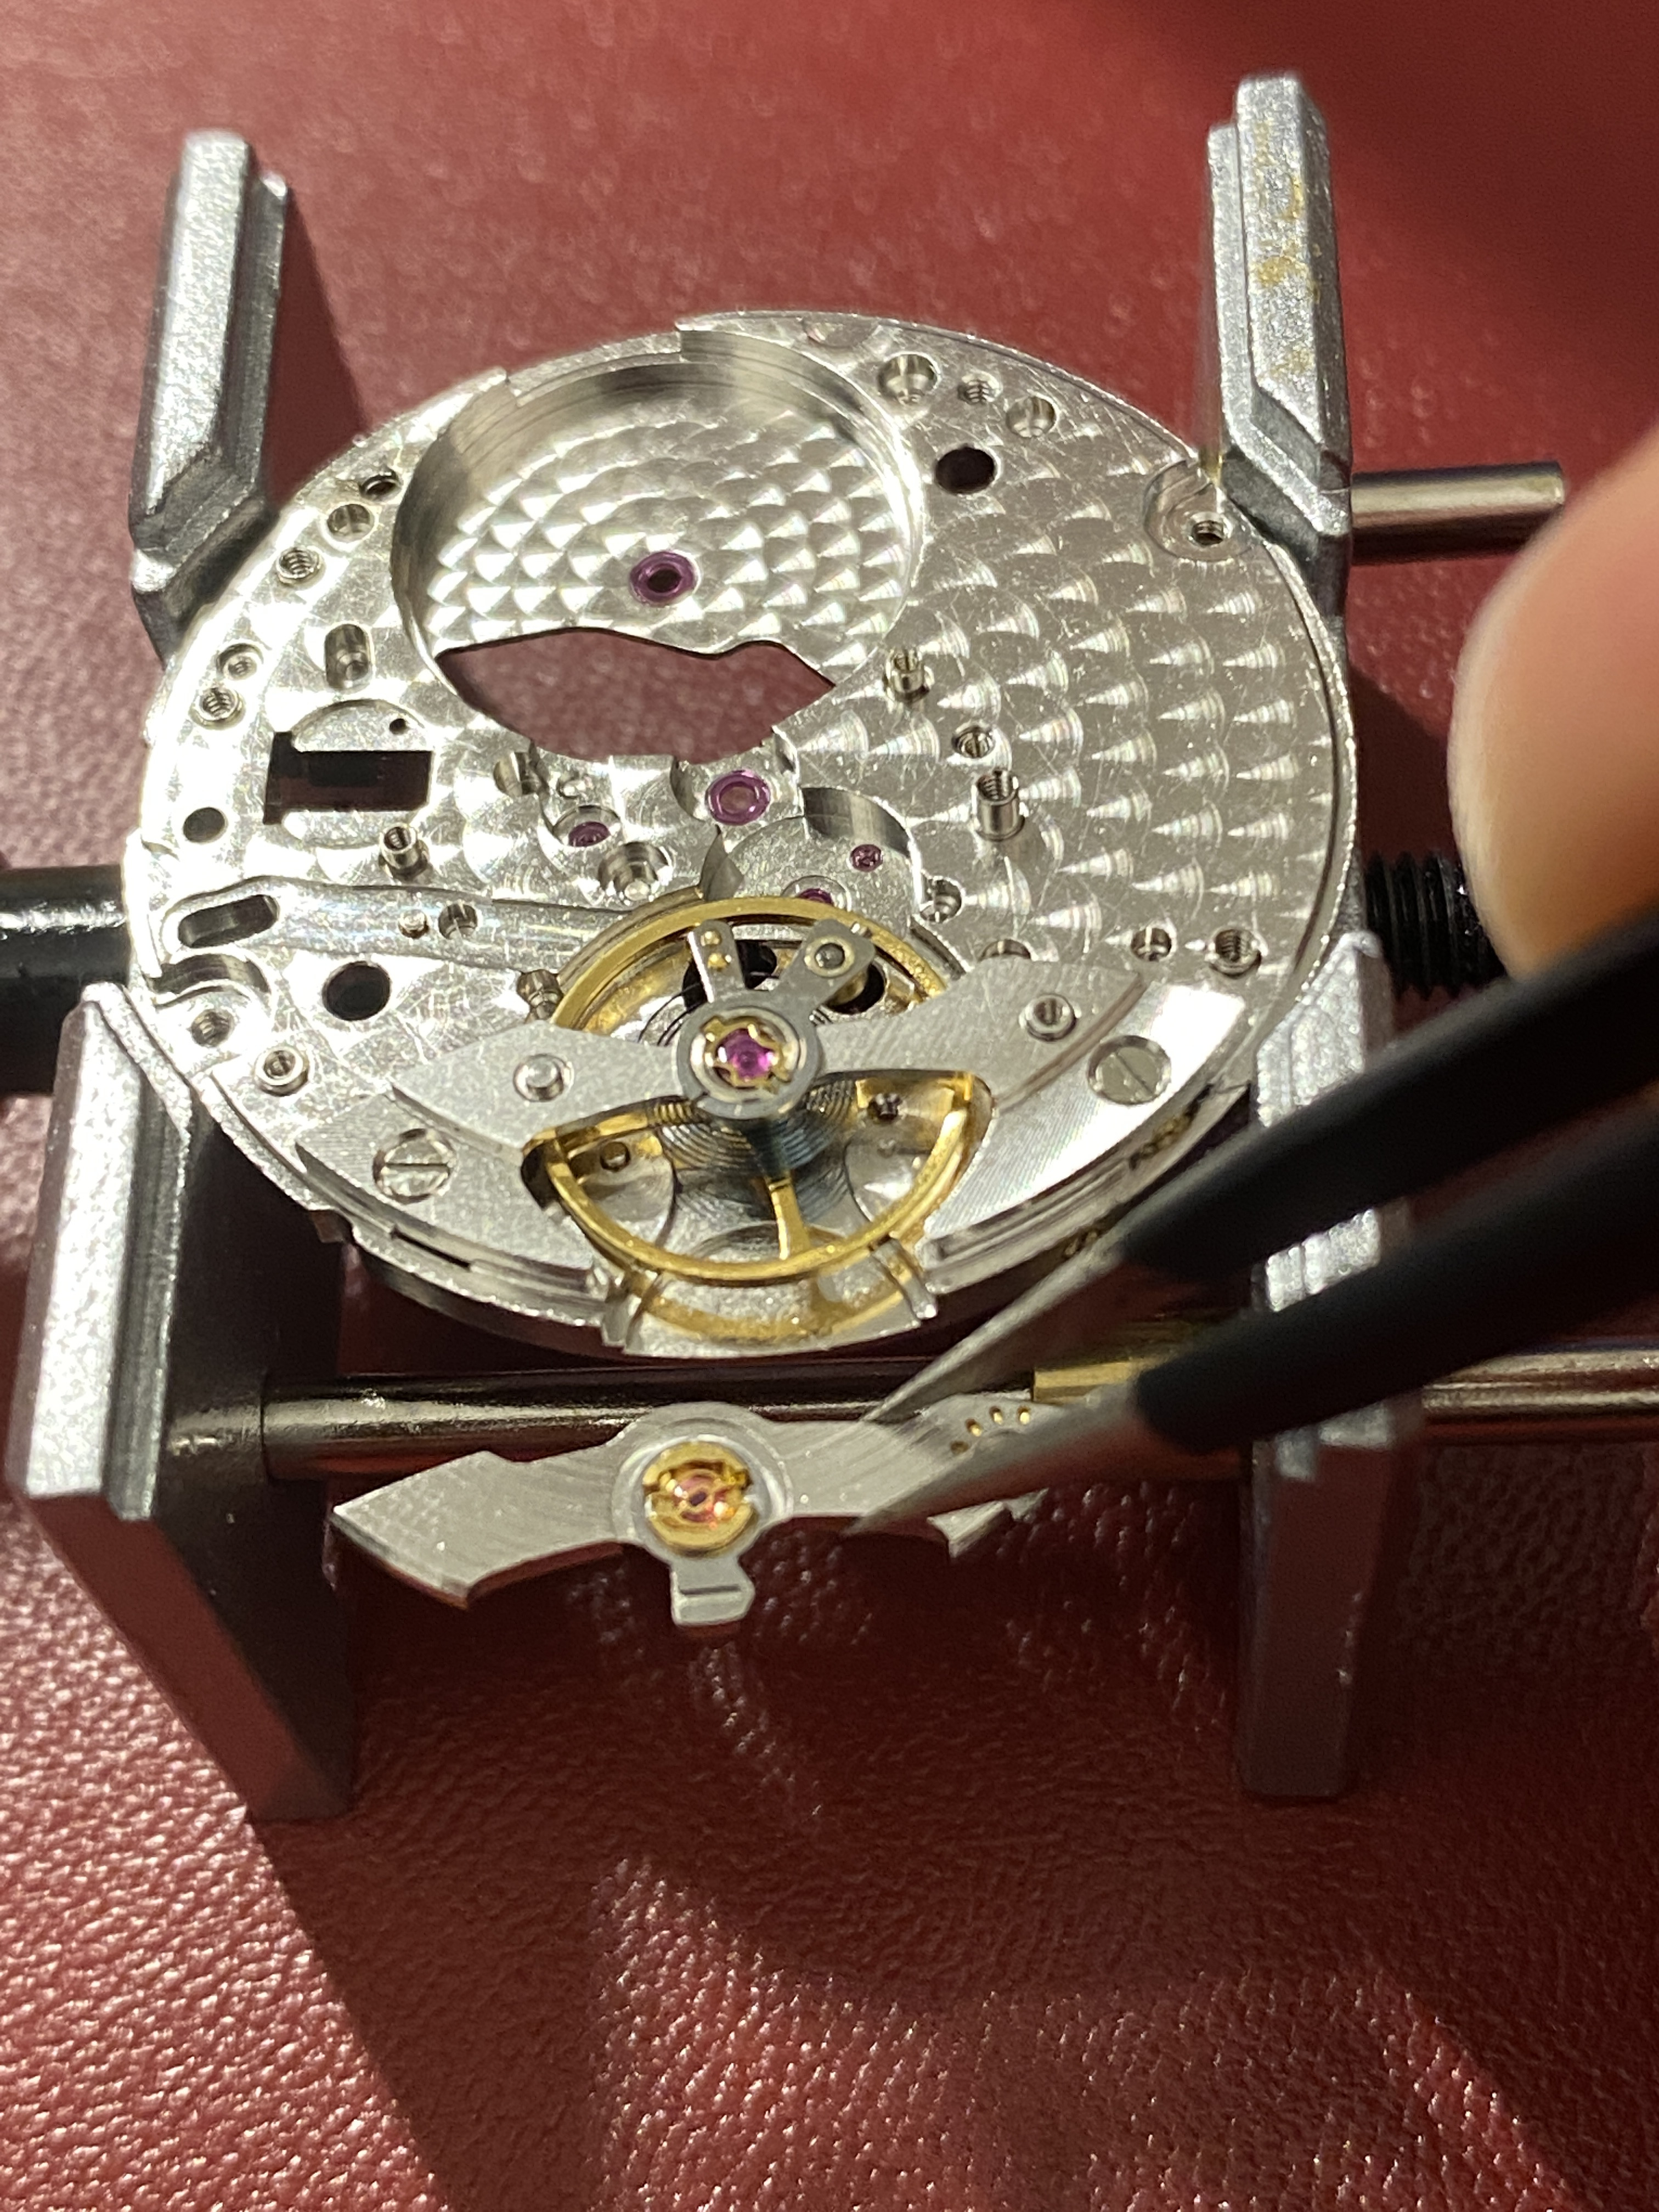
The balance back in and swinging.


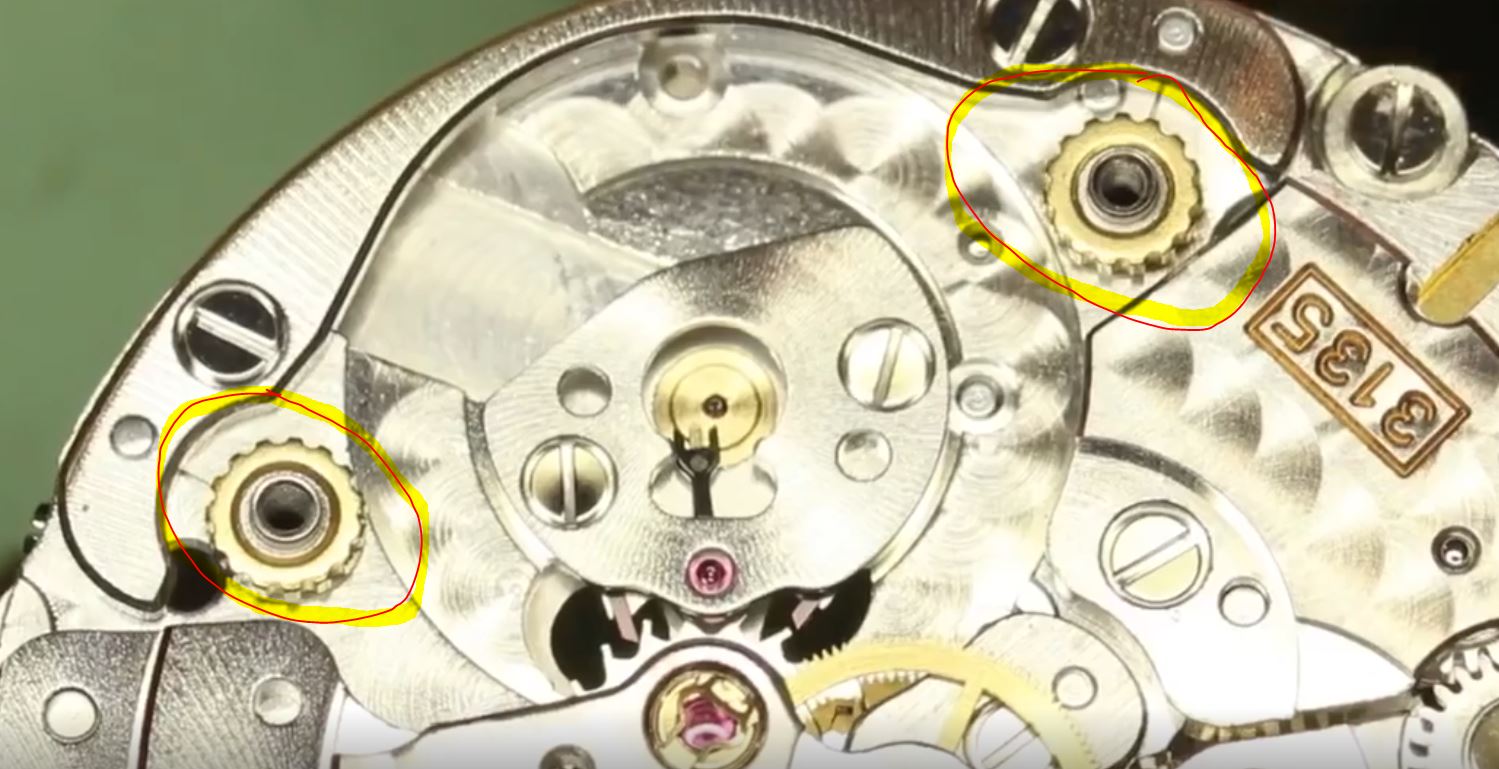
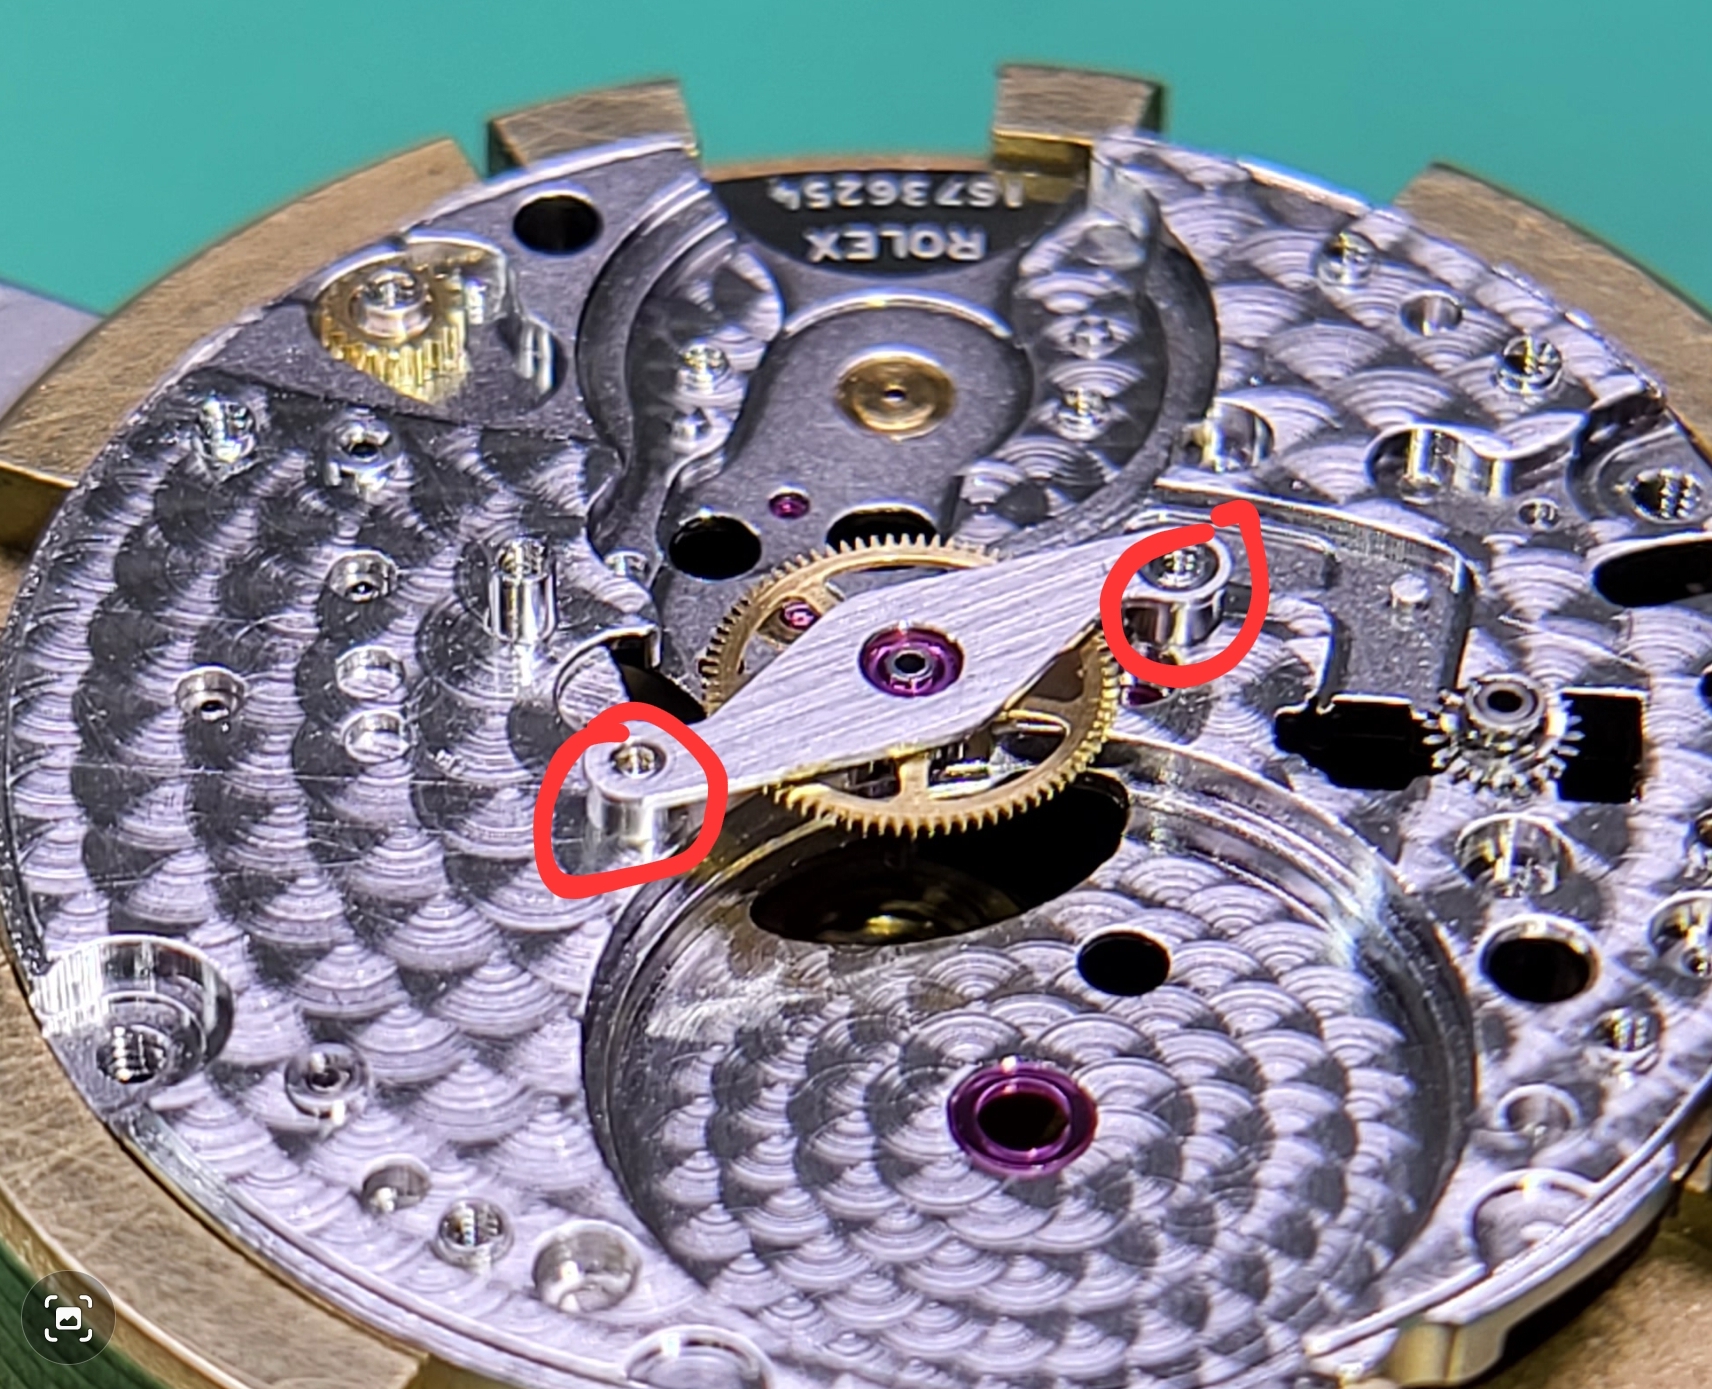
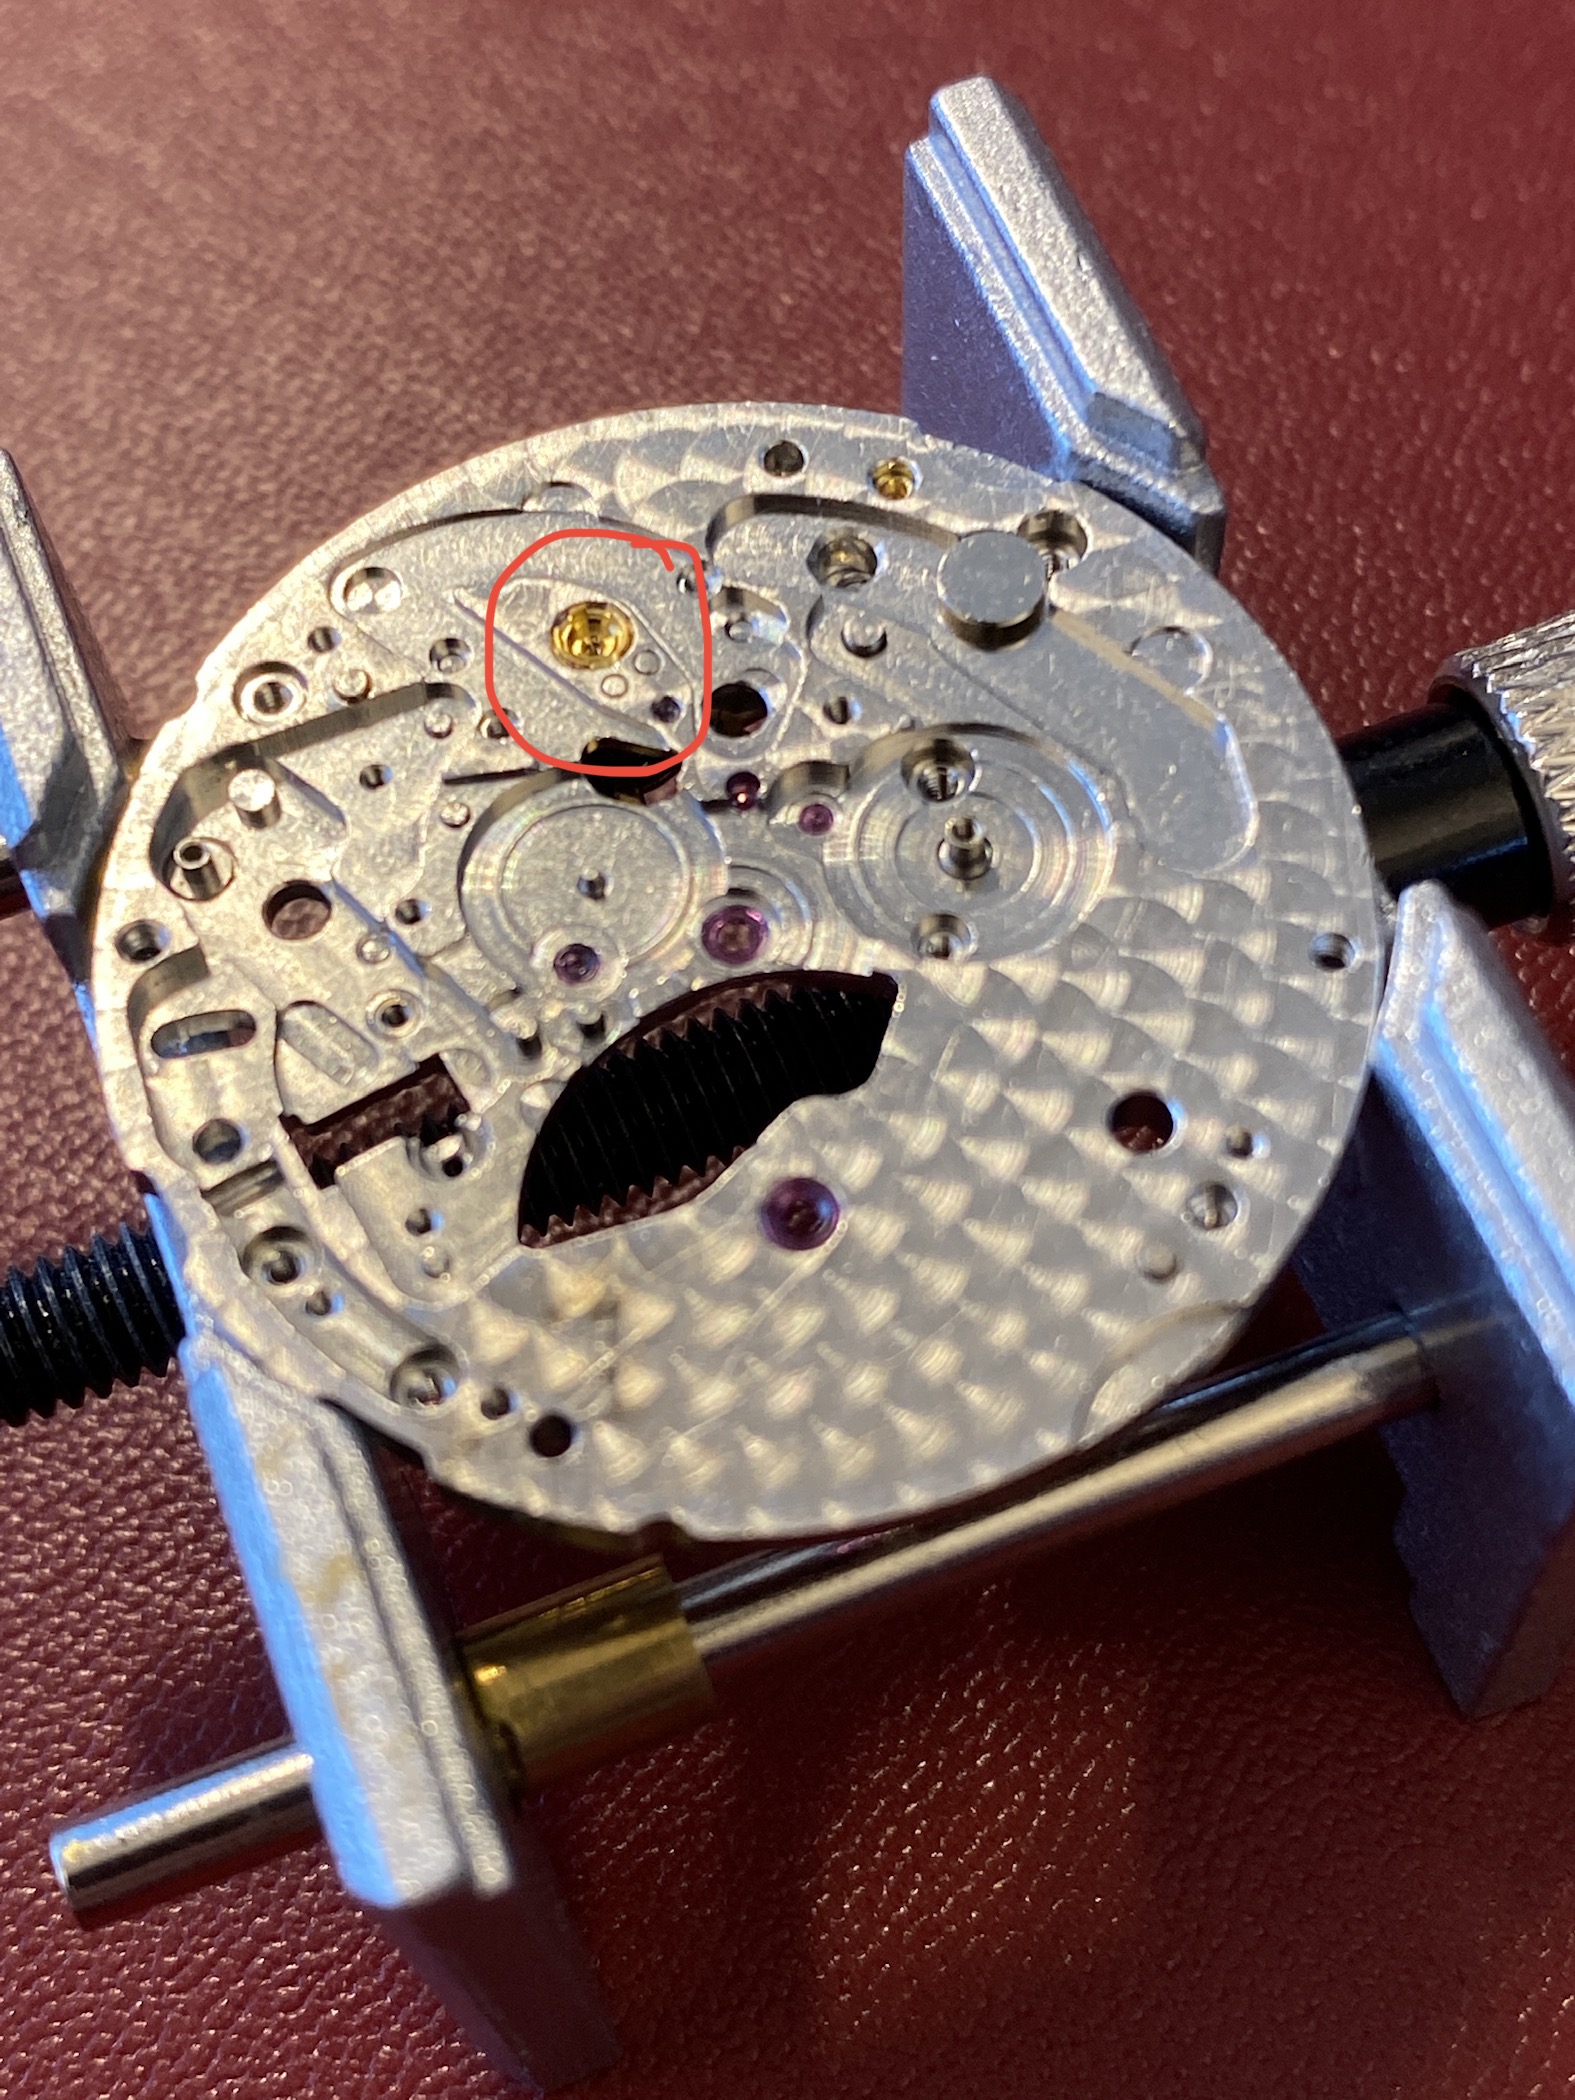
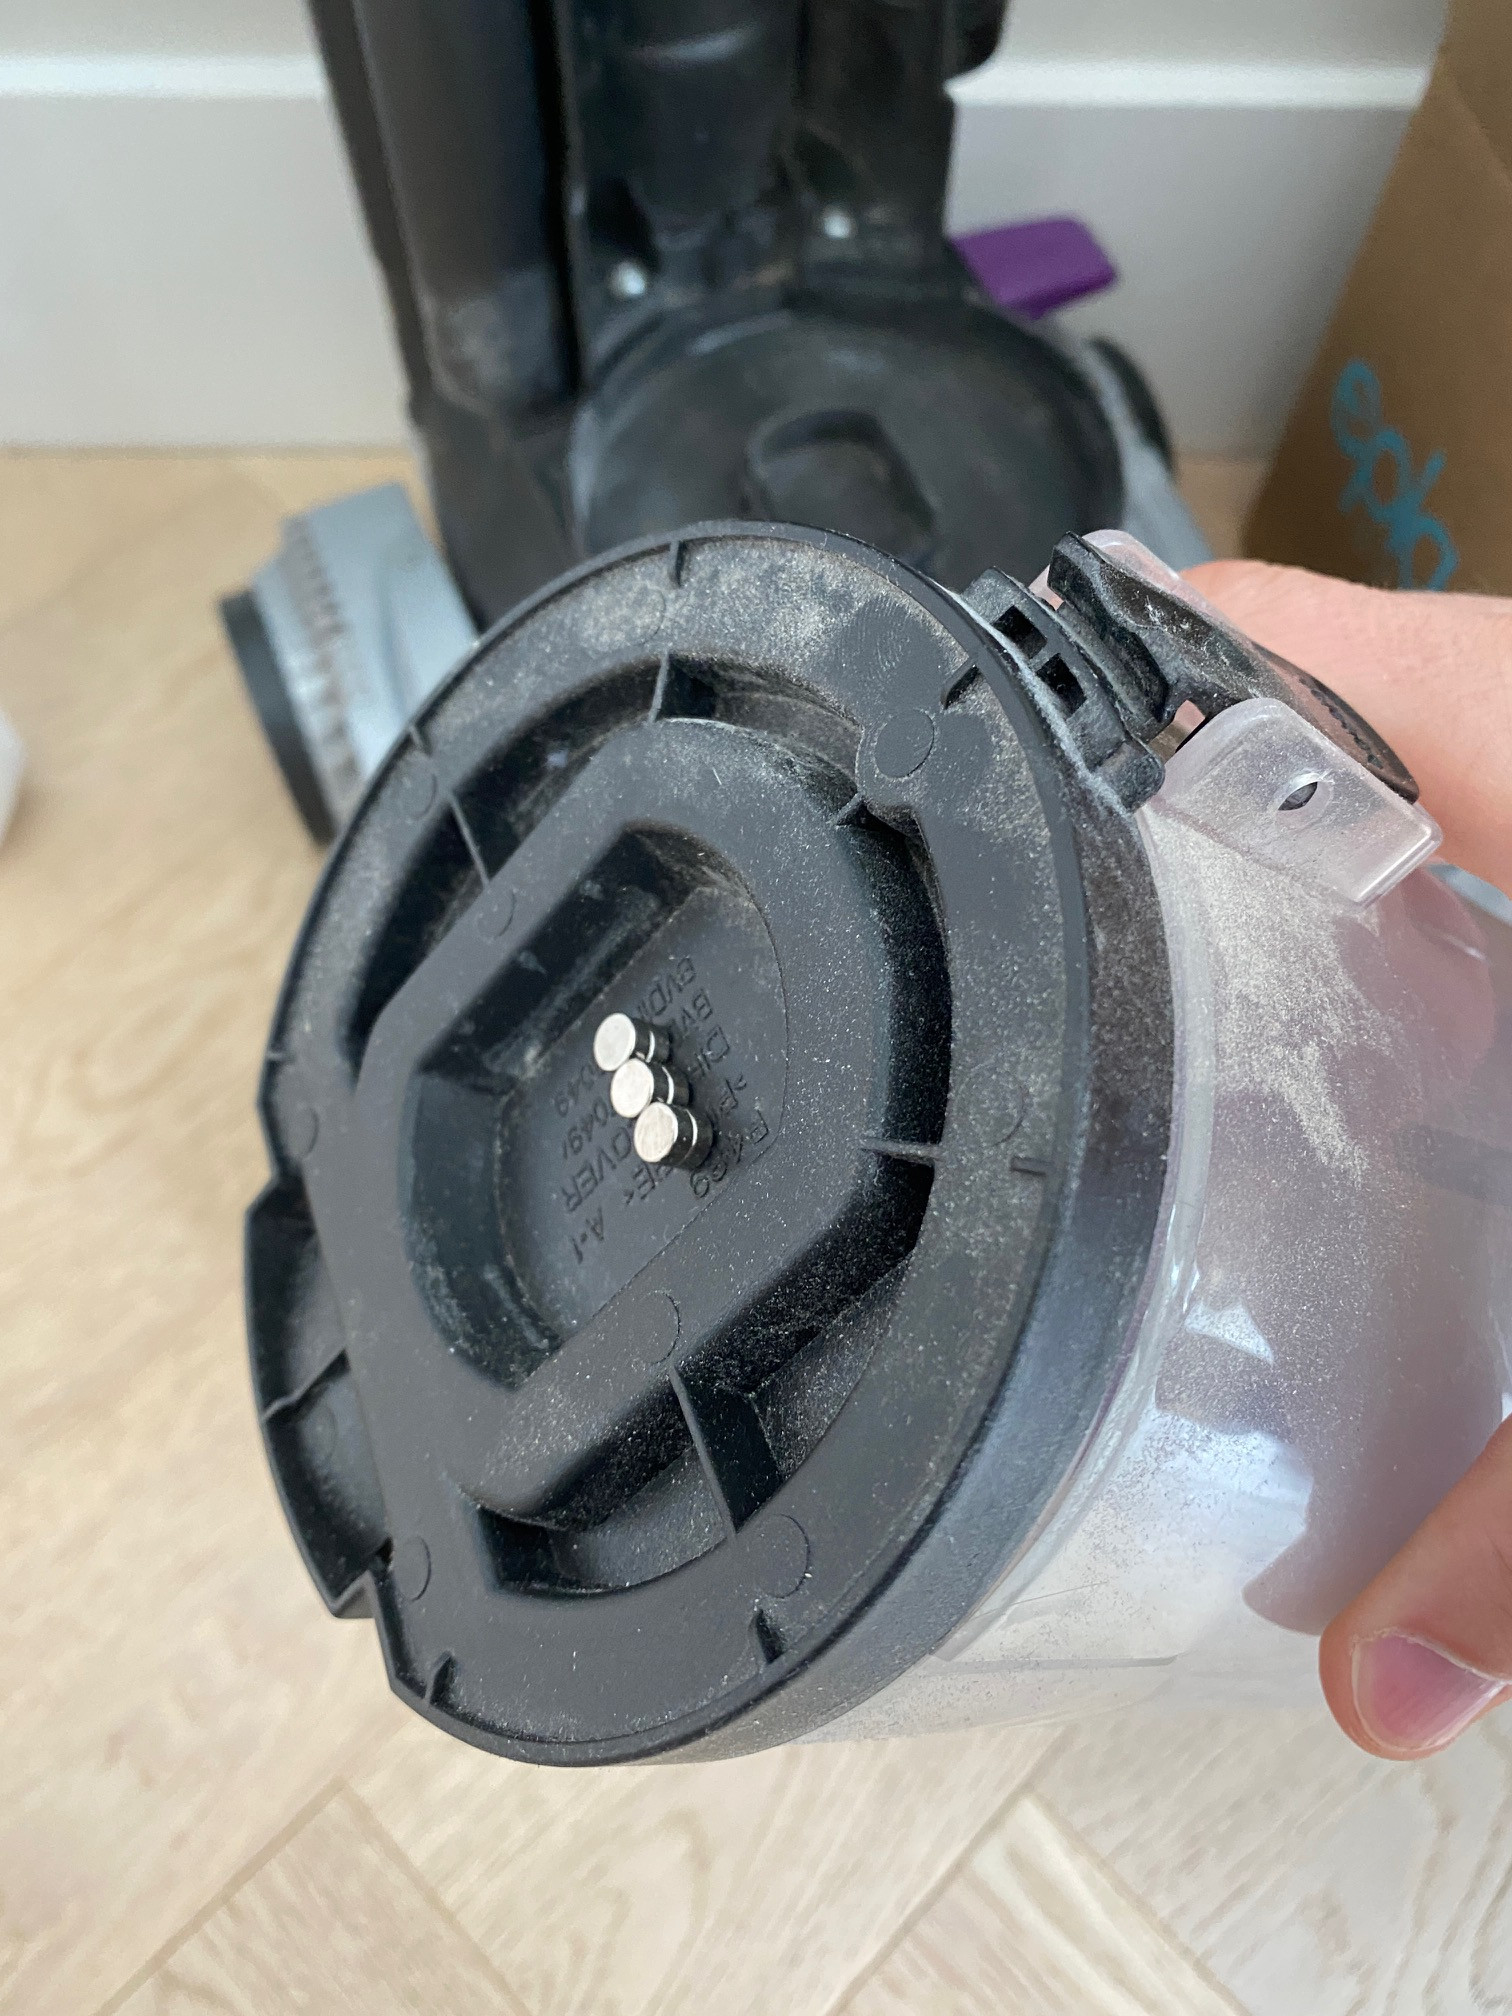
My attempt to trap the missing screw by adding a magnetic trap to my vacuum.


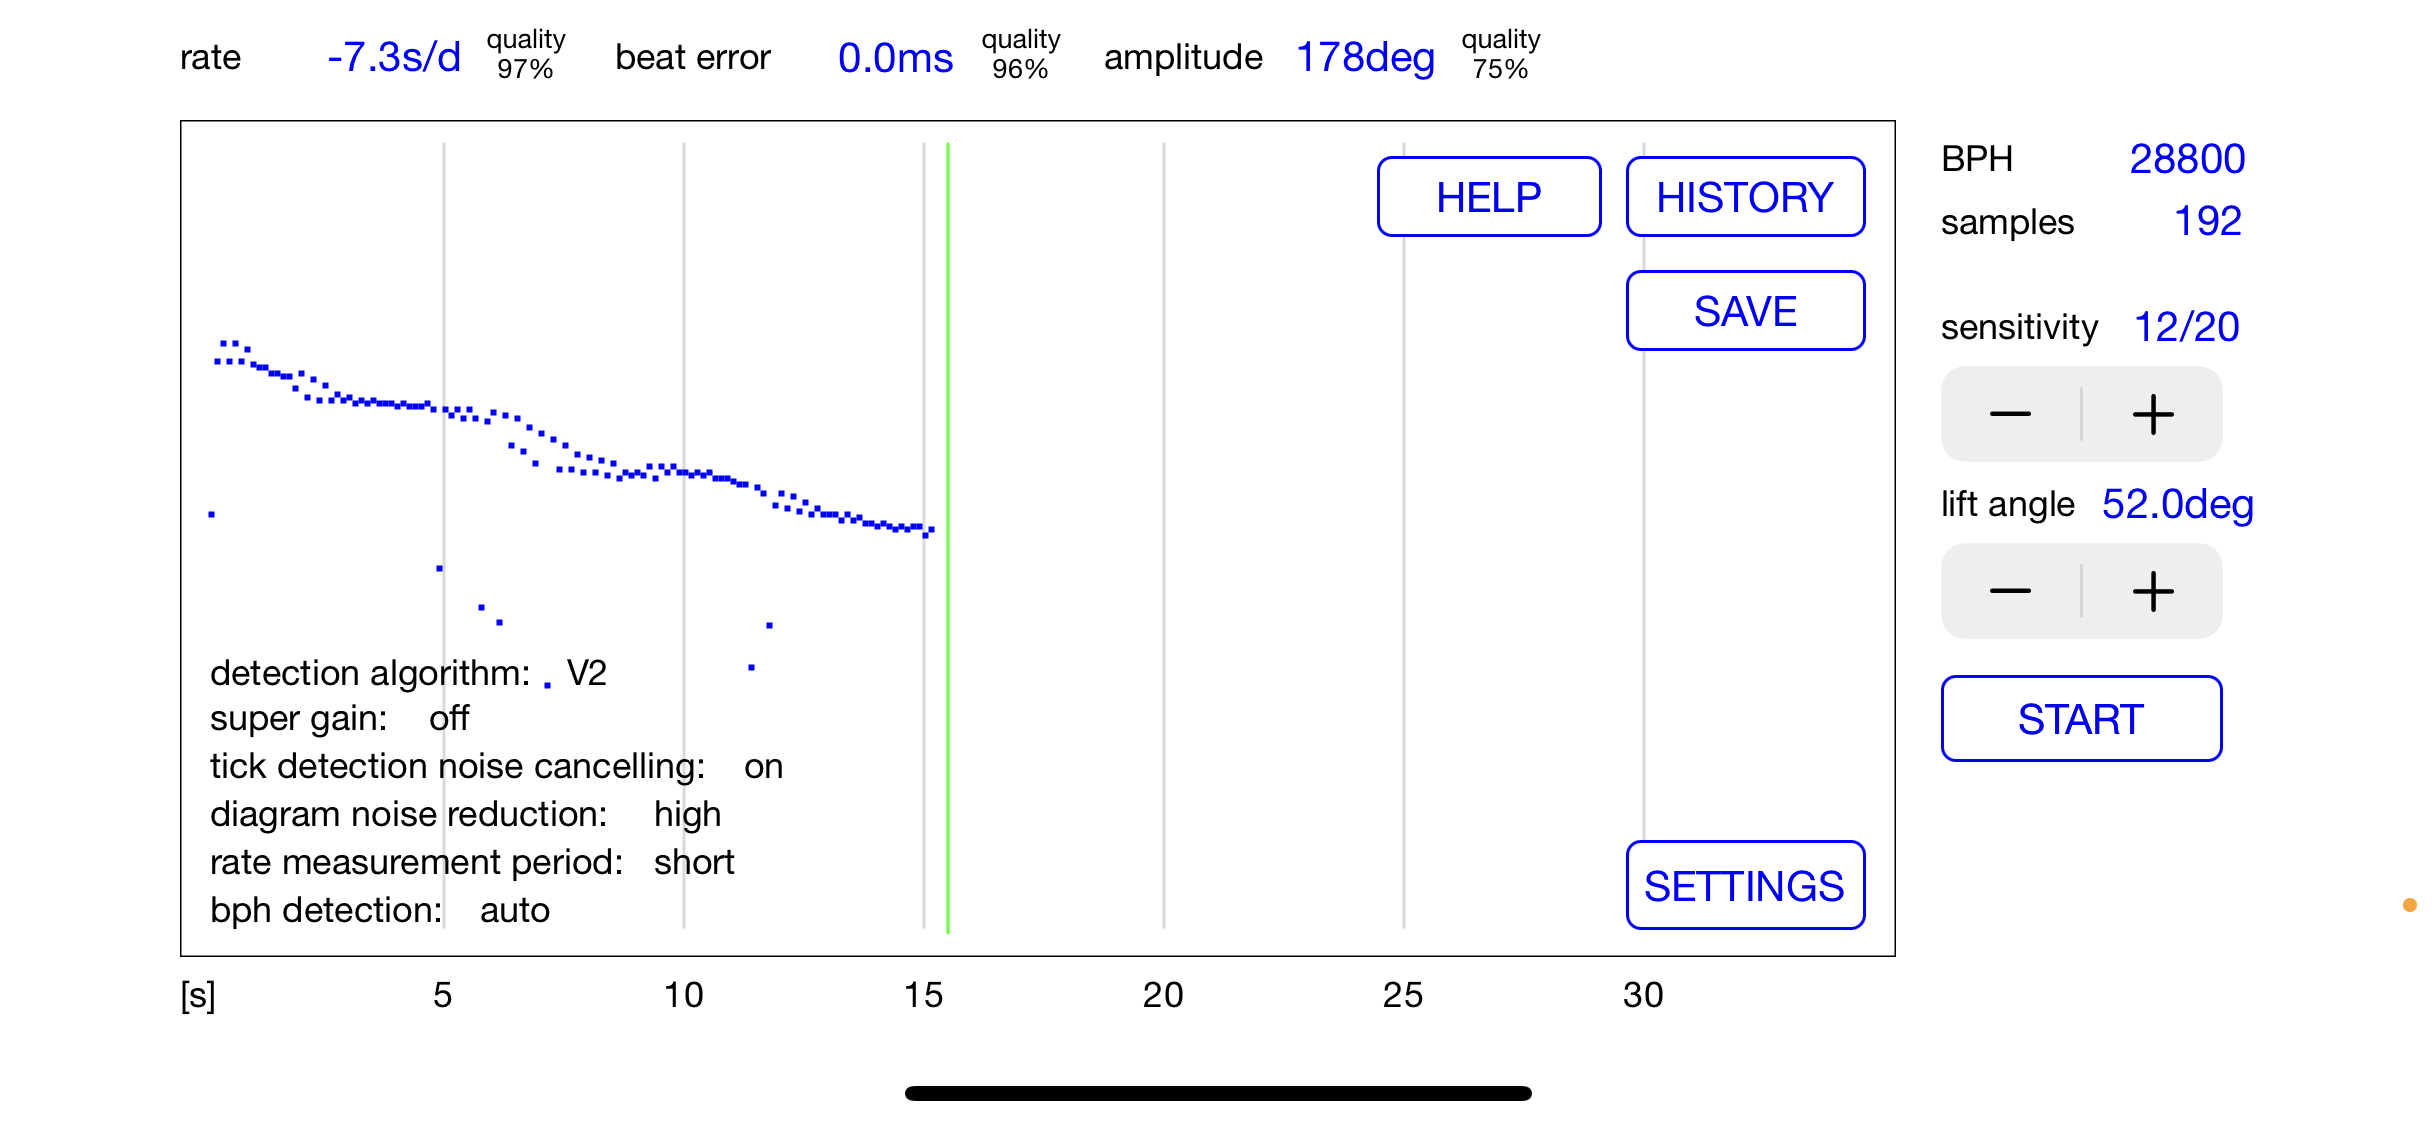
My first attempt at regulating the movement. When it was first re-assembled it was +25s/d, so I'd say getting it to here is technically a step in the right direction. Yes, amplitude is trash, but I'm pretty sure that's because it's not fully wound. I'm waiting for my spare screw to come in to finish the re-assembly, at which point I'll regulate properly.
 

gindiesel

Active Member
12/10/20
208
112
43
Canada
Instead of the magnets, you can use a vacuum hose with a piece of panty hose over the opening. Anything sucked up will stay on the fabric and not go into the machine.

Congrats on taking the plunge. I watch watch service vids on youtube all the time.
 

fatarms

I'm Pretty Popular
Patron
Certified
9/5/12
1,463
2,565
113
In my pants
Instead of the magnets, you can use a vacuum hose with a piece of panty hose over the opening. Anything sucked up will stay on the fabric and not go into the machine.

Congrats on taking the plunge. I watch watch service vids on youtube all the time.

110% agree with this, you don't want to put a magnetized spring back in to the movement. So if you do end up finding it with the magnets, you'll want to demagnetize it a few times.
 

JonasBuskas

Known Member
20/8/10
102
39
28
Nice attempt, how did you clean part, alcohol or ultrasonic bath, did you lub part?
I have the same project in mine
:D
 

dogwood

I'm Pretty Popular
Patron
Certified
7/9/21
1,902
3,585
113
Canada
Nice attempt, how did you clean part, alcohol or ultrasonic bath, did you lub part?
I have the same project in mine
:D

I actually didn’t clean the parts this time around. I have an ultrasonic cleaner (Amazon special). But the little baskets I need are still on order. I’m going to re-do the service once they arrive.

In terms of cleaning fluid i was planning on using naphtha (lighter fluid) for the first two baths, and then alcohol as the final bath. Although I won’t rince the pallet fork or balance in the alcohol since apparently that’s bad for the shellack that secures the impulse and pallet jewels.

I did the lubrication, but so far only with 9010 and D5. I didn’t disassemble the mainspring barrel so didn’t lube that. And I haven’t put the cannon pinion on yet because my molykote DX hasn’t arrived in the mail yet. And I haven’t lubericated the pallet stones yet since the pallet jewel oil hasn’t arrived yet either.

im also not sure about epillame treatment. Mark didn’t cover it in his course, but I’ve read good things about how it really keeps oil in its place. I’d love to hear feedback on that… is it worth it?

I’ll get there… slowly.
 

Plaasbaas

IWC-hoarder and PAM-hunter
Supporter
Certified
4/4/21
2,685
6,124
113
Germany
Thanks for sharing, great attempt. Fearless, lol. Very good pictures, too.

You chose the same path I did, only that I waited for the 6497 to arrive, then did all that
according to Mark's instructions and THEN moved on to other, more difficult calibers :D

Skipped the cleaning part, too, most of the time so far. Don't have one of them fancy machines
and have not yet decided what to use, when I clean a movement manually. I will never do it often
enough to make machinery worthwhile.

Anyway, very good job! Keep it up. :)
 

Enee

Looking Around
19/3/22
2
1
3
How old is the watch that it needed servicing already?
 

dogwood

I'm Pretty Popular
Patron
Certified
7/9/21
1,902
3,585
113
Canada
How old is the watch that it needed servicing already?

The watch was quite new... only a few months. And it didn't need a service. It kept very good time. However, I needed a movement to practice on, and the Unitas 6497 movement that I ordered on AliExpress was (and still is) stuck in customs for some reason. Since the DJ41 was the rep in my collection which got the least wrist time, I figured I would miss it the least if I broke something and had to order a replacement VR3235 movement.

By way of an update: The replacement screws arrived from Perrin a few days ago, and I was able to continue to the re-assembly. However, when I re-assembling the date and motion works, the date quick change wasn't working properly. I partially disassembled the date works so I could see the date yoke moving against the cam. There's a tiny jewel roller on the date yoke which ride around the cam. As I moved the crown, I didn't realize that the second the date quick change would engage, there would be lots of motion and high forces on this little jewel. Without a cover on top of it, it went flying. The jewel is tiny -- like 1.2mm in diameter with a 0.2mm hole. And unlike the screw from earlier that I lost, rubies aren't magnetic. I instantly knew that I needed to order a replacement. So back to Perrin I went and ordered 100 random rolex jewels. I am learning... slowly.
 

dogwood

I'm Pretty Popular
Patron
Certified
7/9/21
1,902
3,585
113
Canada
So I received my package or 100 random jewels from Perrin and was able to get the rest of the movement back together. However... after finishing the assembly, I have one part left over. I'm using the 3135 service manual, and this part isn't anywhere in the manual -- but that's reasonable since this is a VR3235 which is only about half 3135. I can't for the life of me think of where this little bushing / tube should go.

Tagging a few folks here for help: KJ2020 oascom PsychoTee16 Do any of you know what this little part is and where in the movement it goes? I remember it falling out of the movement when I turned it over during the disassembly, so I didn't see where it came from, and I thought it would be obvious when it came time to do re-assembly. I managed to do the entire re-assembly it it was not obviously required anywhere. Feeling a bit sheepish to be honest.
 
  • Like
Reactions: 40mm

Plaasbaas

IWC-hoarder and PAM-hunter
Supporter
Certified
4/4/21
2,685
6,124
113
Germany
I do not really have a clue, but could this come from underneath the balance? The 3135 movement has two similar looking pieces where it screws down on either side.

But maybe my answer is foolish, I don't know, just trying to help.


Oascom

Watchmaker / Modder
Vendor (Watch Repair)
Patron
Certified
19/1/16
4,373
4,955
113
WWW.WATCHMAKERUSA.COM
So I received my package or 100 random jewels from Perrin and was able to get the rest of the movement back together. However... after finishing the assembly, I have one part left over. I'm using the 3135 service manual, and this part isn't anywhere in the manual -- but that's reasonable since this is a VR3235 which is only about half 3135. I can't for the life of me think of where this little bushing / tube should go.

Tagging a few folks here for help: KJ2020 oascom PsychoTee16 Do any of you know what this little part is and where in the movement it goes? I remember it falling out of the movement when I turned it over during the disassembly, so I didn't see where it came from, and I thought it would be obvious when it came time to do re-assembly. I managed to do the entire re-assembly it it was not obviously required anywhere. Feeling a bit sheepish to be honest.
jFqJVY.jpg
jFqxks.jpg

Stud spacer.

Should be two of them. Unfortunately you need to pretty much pull everything apart to install it back.
jFIEgL.jpg
 
Last edited:

dogwood

I'm Pretty Popular
Patron
Certified
7/9/21
1,902
3,585
113
Canada
Stud spacer.

Should be two of them. Unfortunately you need to pretty much pull everything apart to install it back.

Gotcha... Thanks! You are awesome... and yeah, that completely makes sense how I didn't see it was missing since the other one would have held the bridge pretty flat, so I wouldn't have noticed it was missing.

I need to take the whole movement apart again anyway (to clean it -- my cleaning baskets for my ultrasonic cleaner still haven't arrived in the mail). I'm still learning, so the more practice I get the better.

Thanks again!
 

boostin20

Put Some Respect On My Name
8/9/10
4,038
116
0
USA
I actually didn’t clean the parts this time around. I have an ultrasonic cleaner (Amazon special). But the little baskets I need are still on order. I’m going to re-do the service once they arrive.

In terms of cleaning fluid i was planning on using naphtha (lighter fluid) for the first two baths, and then alcohol as the final bath. Although I won’t rince the pallet fork or balance in the alcohol since apparently that’s bad for the shellack that secures the impulse and pallet jewels.

I did the lubrication, but so far only with 9010 and D5. I didn’t disassemble the mainspring barrel so didn’t lube that. And I haven’t put the cannon pinion on yet because my molykote DX hasn’t arrived in the mail yet. And I haven’t lubericated the pallet stones yet since the pallet jewel oil hasn’t arrived yet either.

im also not sure about epillame treatment. Mark didn’t cover it in his course, but I’ve read good things about how it really keeps oil in its place. I’d love to hear feedback on that… is it worth it?

I’ll get there… slowly.

Thanks for posting your journey- I really appreciate it. You’ve inspired me to start watchmaking as a hobby.
 

dogwood

I'm Pretty Popular
Patron
Certified
7/9/21
1,902
3,585
113
Canada
Here’s a pic of where that sneaky little stud spacer was supposed to be. Interestingly the bridge is remarkably level even though only one of the stud spacers is in place.
 
  • Like
Reactions: ccobut and 40mm

ubi

Known Member
9/9/19
162
304
63
Every fantastic journey begins with just a single step. Always happy to see when people try their hand at this stuff! It's difficult at first... But definitely gets easier with repetition. The more familiar you become, the less daunting things get.

Congrats on taking that leap.... The results are very rewarding...
 

dogwood

I'm Pretty Popular
Patron
Certified
7/9/21
1,902
3,585
113
Canada
Every fantastic journey begins with just a single step. Always happy to see when people try their hand at this stuff! It's difficult at first... But definitely gets easier with repetition. The more familiar you become, the less daunting things get.

Congrats on taking that leap.... The results are very rewarding...

Thanks! And yes it was WAY easier to disassemble the movement the second time today. It probably only took me around 30 minutes to get it broken down again. However, this time I decided I was going to wash the movement so I would need to get it fully taken apart, and that meant removing the shock settings. I haven't tried to disassemble the one on the balance bridge yet since it looked a bit more complicated and I figured I'd try the one on the main plate first. The one on the main plate is a Kif style Elastor 3-3 spring (pic below). I managed to unhook the two legs of the spring, but when I tried to hinge it upwards to get at the jewels below, the whole spring came out. This terrified me. The spring is tiny -- like 1.7mm long and maybe 0.05mm thick, AND it's a spring, so it's the kind of thing that is likely to spring away... and I have kind of a history of launching microscopic parts into orbit. I did manage to get all three parts of the shock setting safely into my parts tray. And I did try to re-insert the Kif spring for several hours. I didn't manage to get the spring back into position, BUT I also didn't lose the spring. So I'd call that a win. I also ordered a set of 5 extra Kif Elastor 3-3 springs from Cousins (which only cost £11 plus £3 shipping to Canada), because let's be honest, even if I manage to re-install this one, I am 100% going to lose or break one of these little things before too long. Also it looks like the paraflex springs for the top of the balance bridge aren't easy to purchase (if anybody has a source please let me know). So I'd better get good at these little widgets before I tackle the balance bridge side.
 

WatchSmith.US

-- Watchmaker --
Vendor (Watch Repair)
Patron
Certified
13/3/16
1,289
1,966
113
A good thing about shock springs is that they can be recovered with a magnet. It’s also a good idea to poke a hole through a piece of cling wrap and drape it over the movement when working with jumpy parts. When I remove shock jewel springs I try to hold down or cover the back side with pegwood as I release or replace the arms. They are incredibly springy and can take flight by simply touching them. I have spare kifs but don’t have a source for paraflex unless I get a gen from someone who can get gen parts. It’s a bloody shame the Chinese don’t sell these by the bucket.
 

dogwood

I'm Pretty Popular
Patron
Certified
7/9/21
1,902
3,585
113
Canada
A good thing about shock springs is that they can be recovered with a magnet. It’s also a good idea to poke a hole through a piece of cling wrap and drape it over the movement when working with jumpy parts.

Thanks for this tip! Having cling wrap over the movement and working through it is WAY easier than it sounds. And it’s like having a magic force field to trap escaping parts.
 

Oascom

Watchmaker / Modder
Vendor (Watch Repair)
Patron
Certified
19/1/16
4,373
4,955
113
WWW.WATCHMAKERUSA.COM
Thanks! And yes it was WAY easier to disassemble the movement the second time today. It probably only took me around 30 minutes to get it broken down again. However, this time I decided I was going to wash the movement so I would need to get it fully taken apart, and that meant removing the shock settings. I haven't tried to disassemble the one on the balance bridge yet since it looked a bit more complicated and I figured I'd try the one on the main plate first. The one on the main plate is a Kif style Elastor 3-3 spring (pic below). I managed to unhook the two legs of the spring, but when I tried to hinge it upwards to get at the jewels below, the whole spring came out. This terrified me. The spring is tiny -- like 1.7mm long and maybe 0.05mm thick, AND it's a spring, so it's the kind of thing that is likely to spring away... and I have kind of a history of launching microscopic parts into orbit. I did manage to get all three parts of the shock setting safely into my parts tray. And I did try to re-insert the Kif spring for several hours. I didn't manage to get the spring back into position, BUT I also didn't lose the spring. So I'd call that a win. I also ordered a set of 5 extra Kif Elastor 3-3 springs from Cousins (which only cost £11 plus £3 shipping to Canada), because let's be honest, even if I manage to re-install this one, I am 100% going to lose or break one of these little things before too long. Also it looks like the paraflex springs for the top of the balance bridge aren't easy to purchase (if anybody has a source please let me know). So I'd better get good at these little widgets before I tackle the balance bridge side.
jFdP6W.jpg
jFdC2P.jpg
jFdTuS.jpg


Balance have a fake deco plate. Remove gold screw and lift the deco plate to reveal real spring and jawel.

Good luck!


.
 
Last edited:

dogwood

I'm Pretty Popular
Patron
Certified
7/9/21
1,902
3,585
113
Canada
Balance have a fake deco plate. Remove gold screw and lift the deco plate to reveal real spring and jawel.

Good luck!

.

So sneaky!!!! And it looks like the shock setting under the deco plate is an Incabloc — because of course it would be different from the Kif system used on the other side. Was this movement designed by the same people who designed the NASA Apollo modules — Apollo 13 trying to fit a round command module CO2 scrubber into a square hole on the LEM. But I guess that’s not an issue when you’re in a factory in China with bins of every part you need within reach of your work bench. Lol… and I guess I need the practice on incabloc settings anyway.