I've promised to make this post since before Christmas but I had no time until now. So this is a complete service of a VSF 8500 clone movement in my planet ocean.
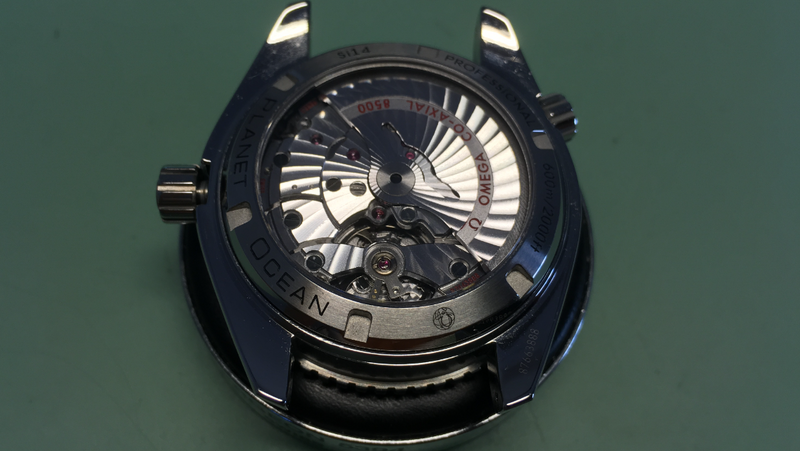
So lets start with opening the caseback.
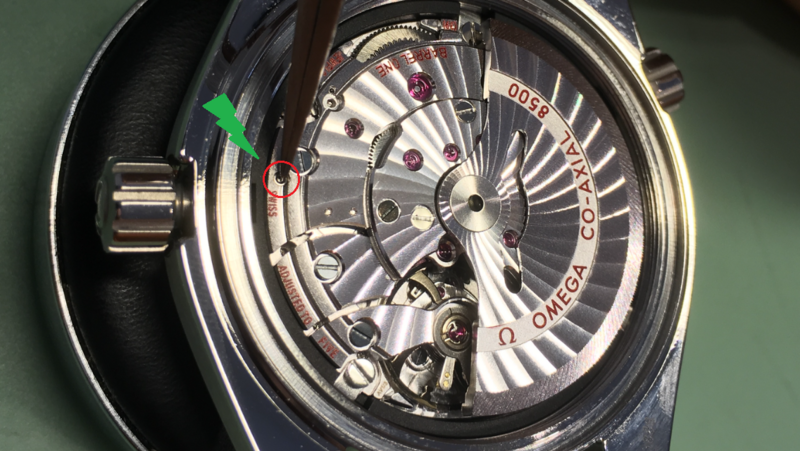
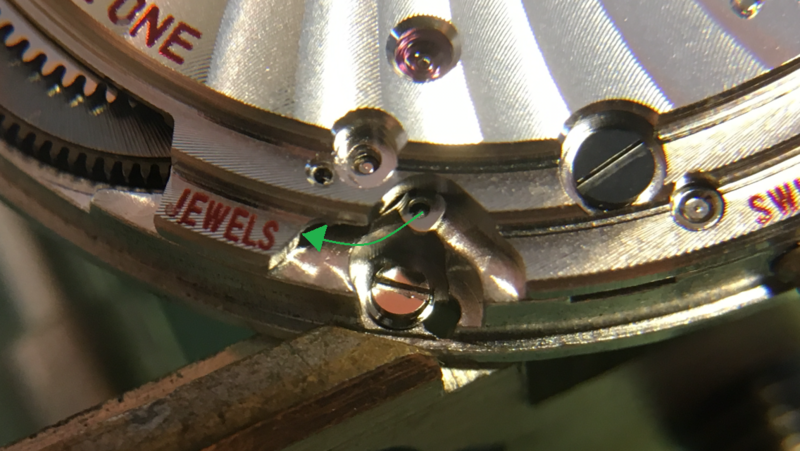
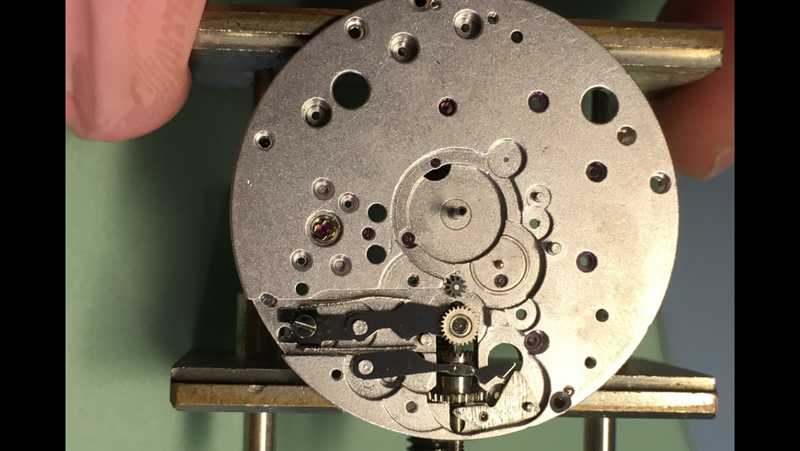
Then release the stem by pushing firm on the lever in the red circle.
It's close to the print SWISS. The first time I tried I was too gentle,
just start that way and apply little more force until the stem are released when pulling the crown.
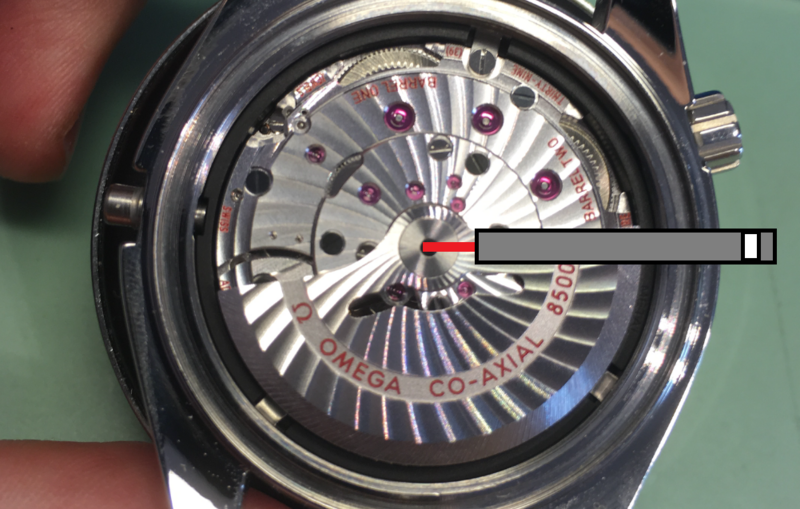
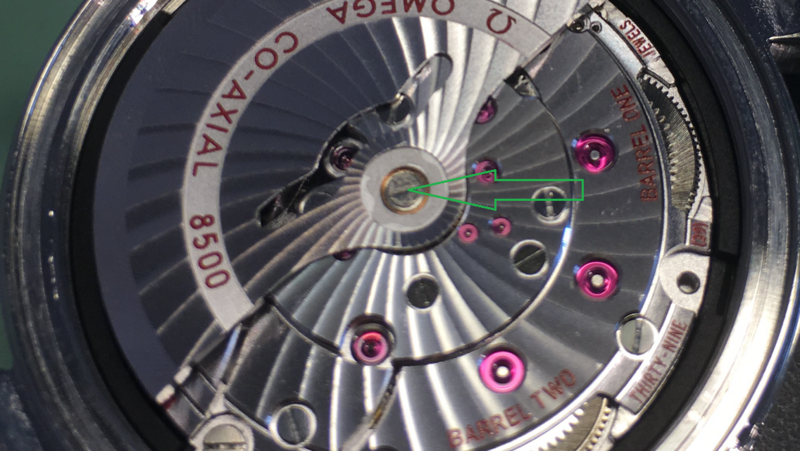
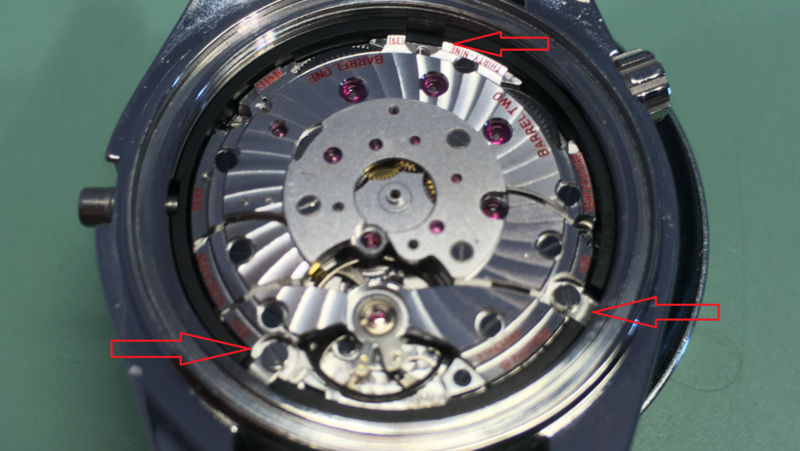
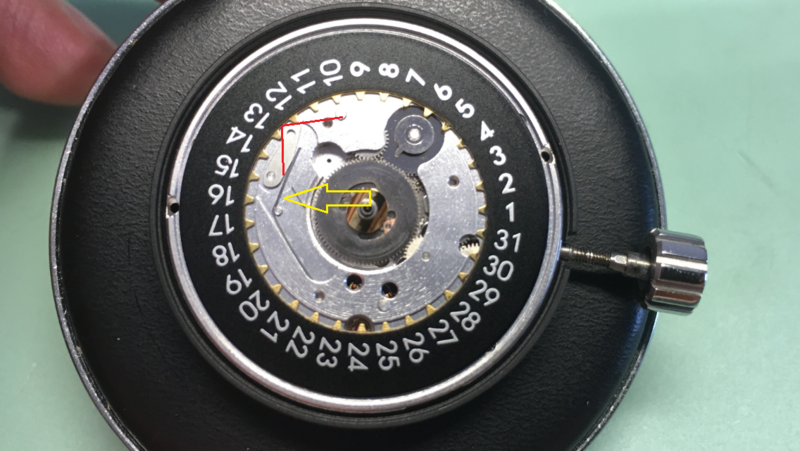
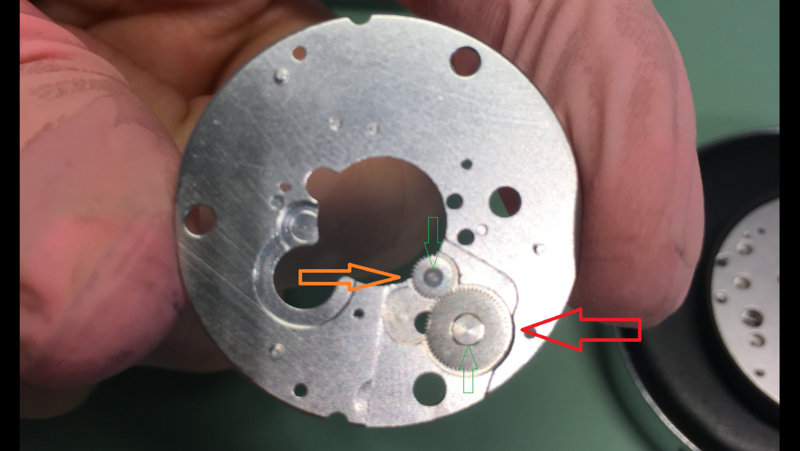
Next up is to remove the rotor. This one is tricky, the construction isn't near the genuine 8500. You have to carfully take a small screwdriver (Bergeon 30009 White) the with of the blade is illustrated in red on the picture. When you are under the washer with the tip just gently wiggle the screwdriver untill it's lose. On to the next picture.
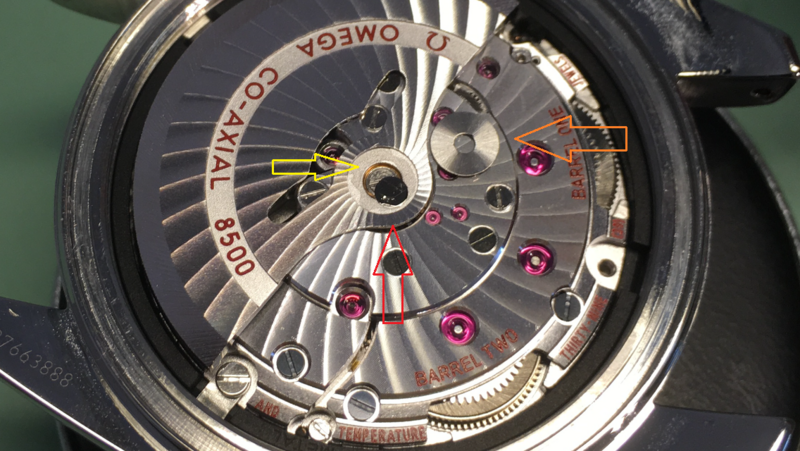
Here the washer is lose (orange arrow) under it we have a tiny mirror/plate (red arrow) that have sticky glue that sits on the rotot screw, just be carefull as this little plate easy stick to the tray or box where you put it under the service.
The yellow arrow show the amount of glue that hold the washer its a bit darker shade of gray.
I think with the chinese QC this would differ alot between the VSF watches with "Super" clone movements. That means some will be easy to remove some quite hard as mine was.
Here it's just a normal rotor screw, probably directly from a A2824-2
Also the rotor bearing seem to be quite similar to a A2824-2.
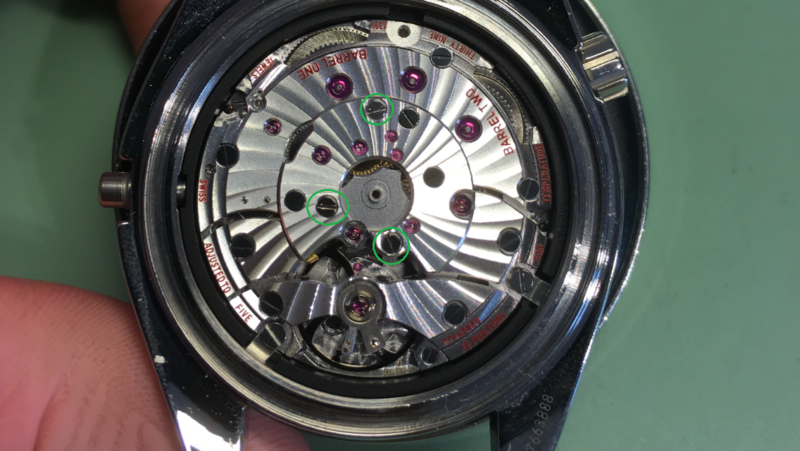
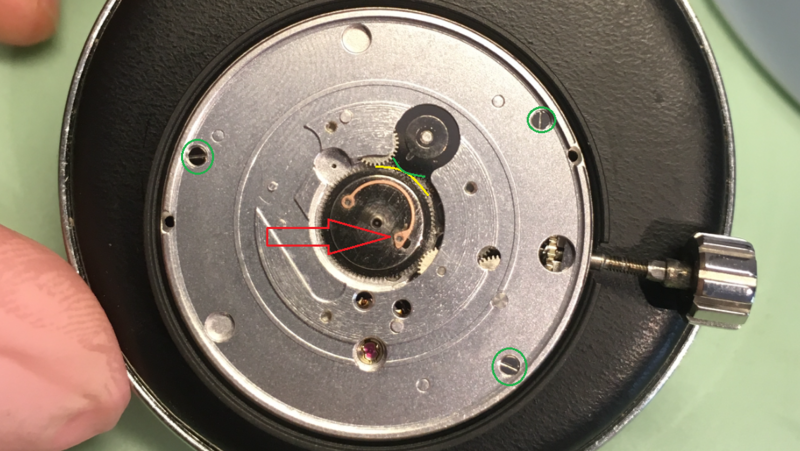
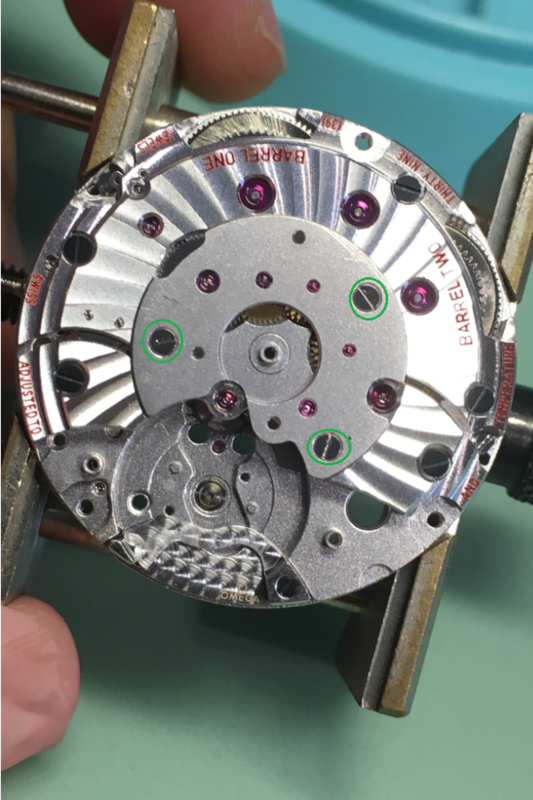
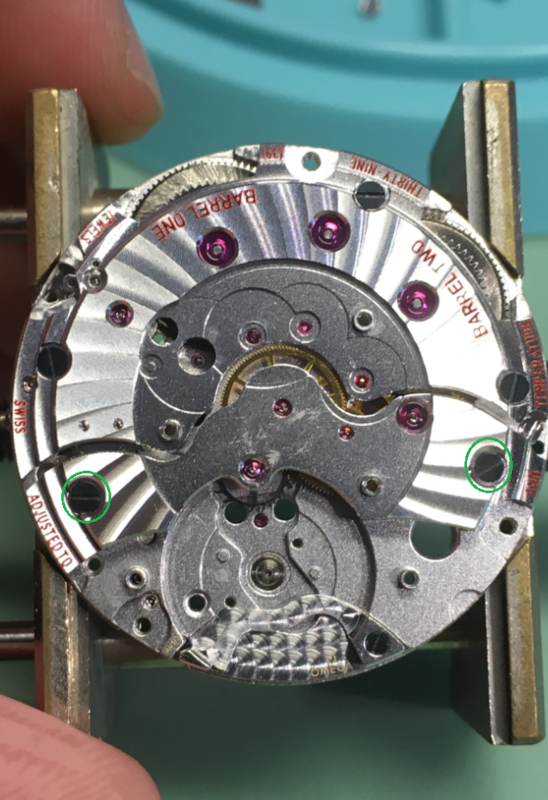
Rotor is removed now on to the autowinding bridge. Here it's very important to just remove
the 3 silver screws marked with green rings in picture. The other black screws are just glued deco screws.
So here are the deco screws. Do not touch them! Also the jewels marked with orange are just decoration so do not put any oil here after the movement is cleaned.
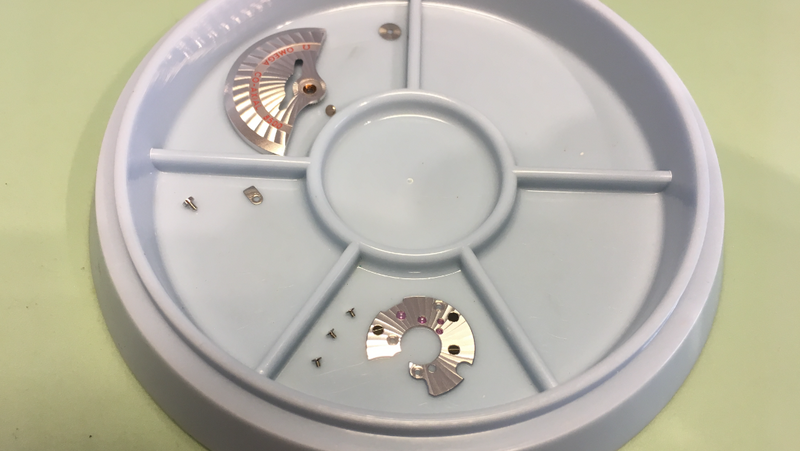
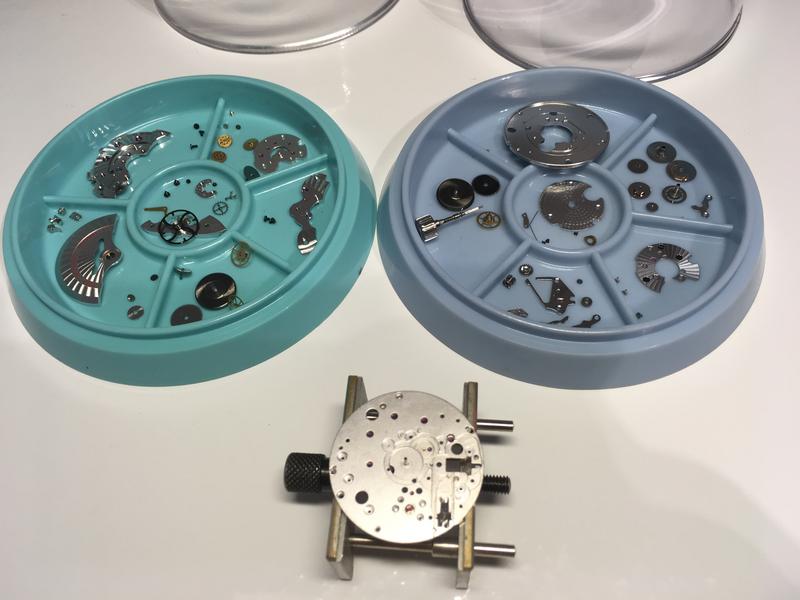
here is the rotor and bridge in the part tray.
Here we now see the real autowinding bridge with the real jewels and hidden screws
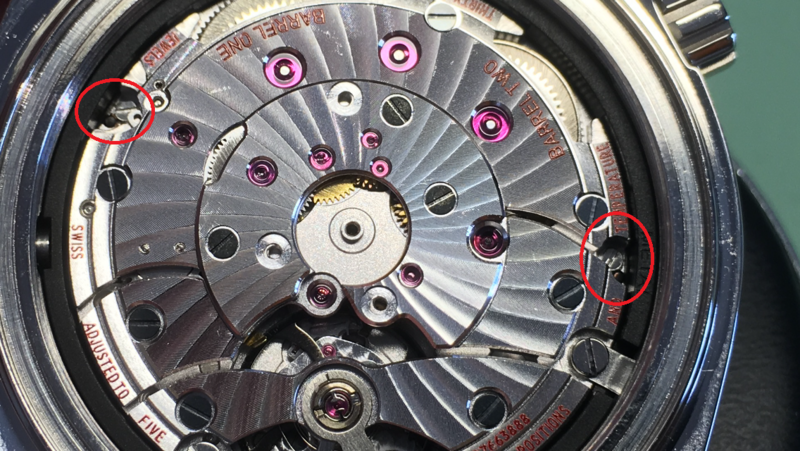
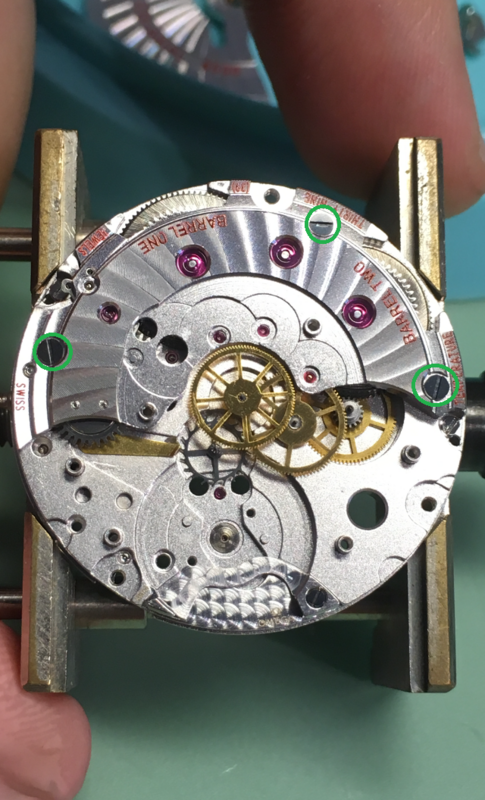
but we leave them for now and remove the movement from the case. Movement screws and tabs
are located by the red arrows, all of them were pretty lose but I'm afraid to tighten them
enough (to Swiss Standard) because if they break it will be trouble find replacement and they
probably get stuck in the mainplate for ever.
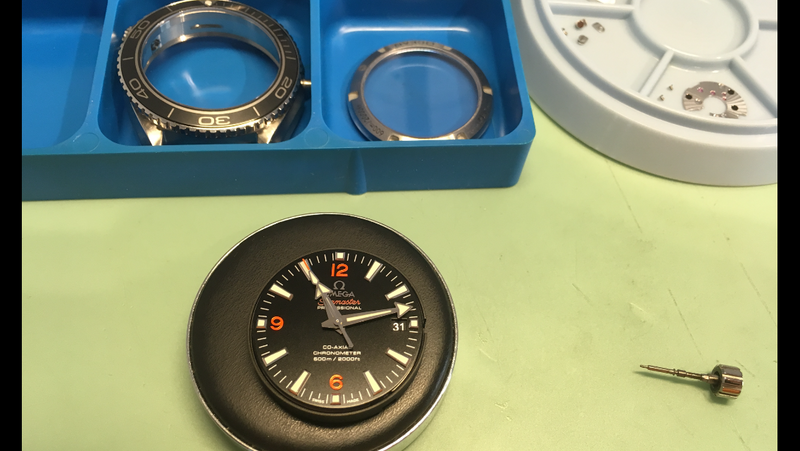
Movement is out, now carfully remove the hands.
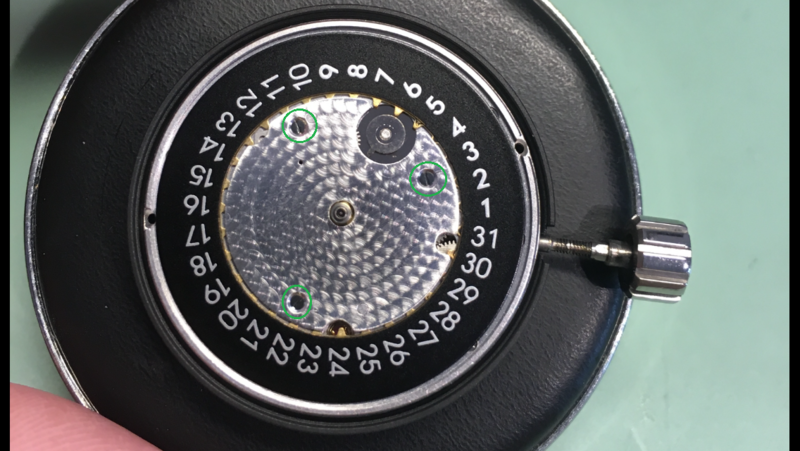
When the hands is removed and put away in saftey turn the dial feet screws about 180 degrees, marked in the red circles and carfylly remove the dial.
The DW is right under the dial so don't push the edge with a sharp screw driver or something like that.
When dial is disassembled you can take away the black movement ring, it's sitting quite tight.
With the dial removed next is the front of the movement. There are 3 black screws they are all quite delicate so be careful not tighten them too hard when putting movement back together.
With the first plate removed we now have the DW lose, just be carefull as the date jumper and jumper spring are under tension and easy fly away.
At the point where the red line touch the jumper it need to be properly oiled to get a smooth date change.
I use HP 1300 or Microgliss D5.
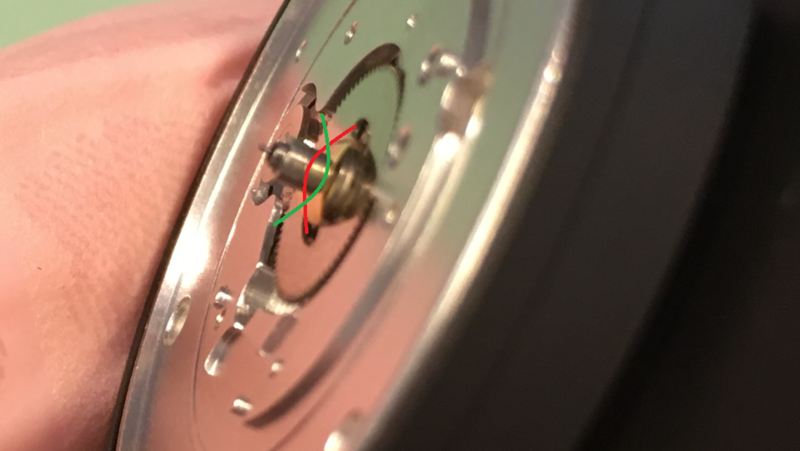
The foil washer on the hour wheel was sad (red) it usualy should be happy so I will put it back as the green line in the picture shows.
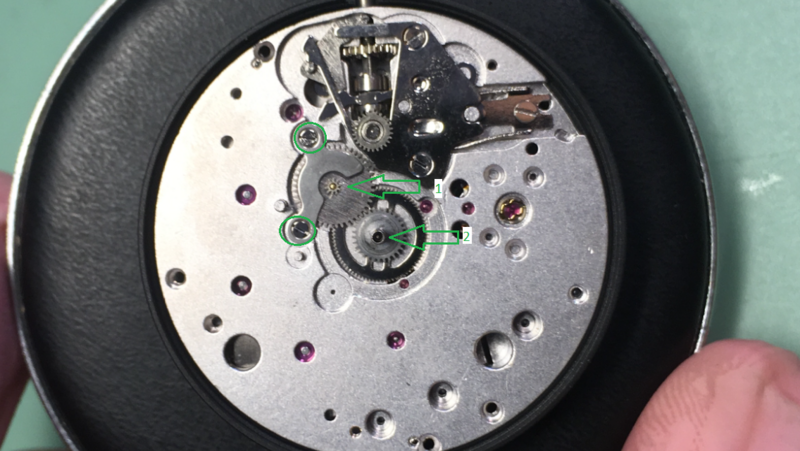
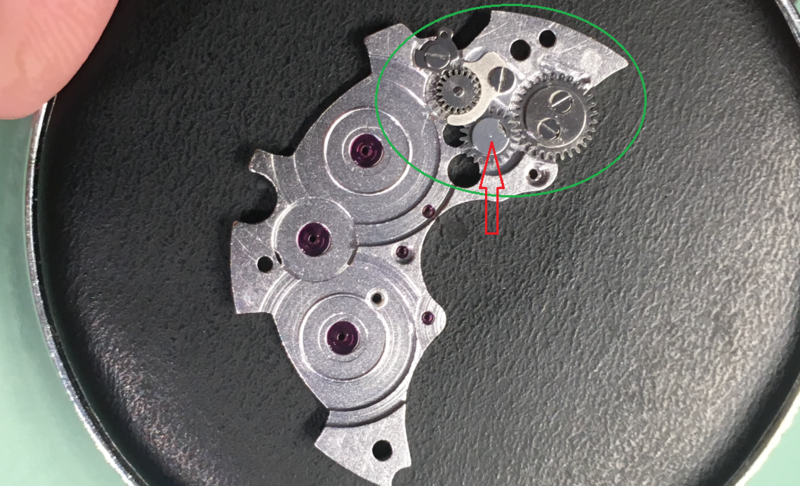
Then I remove the top part of the hour wheel, under it there are the mechanism to jump the hours for date setting it have to be greased and not oiled Moebuis 9504 (synt-a-alube) is the best option. The grease spot is shown by
the red arrow. The gears do not engage (yellow/green lines) as the date jumper finger only engages with the top gear of the hour wheel this is to forward the date when jumping the hours around in date set mode.
Then unscrew the 3 screws on the calender plate.
The calender plate where the DW turn. The area where the DW turn is quite big I may try to modify this to decrease the friction.
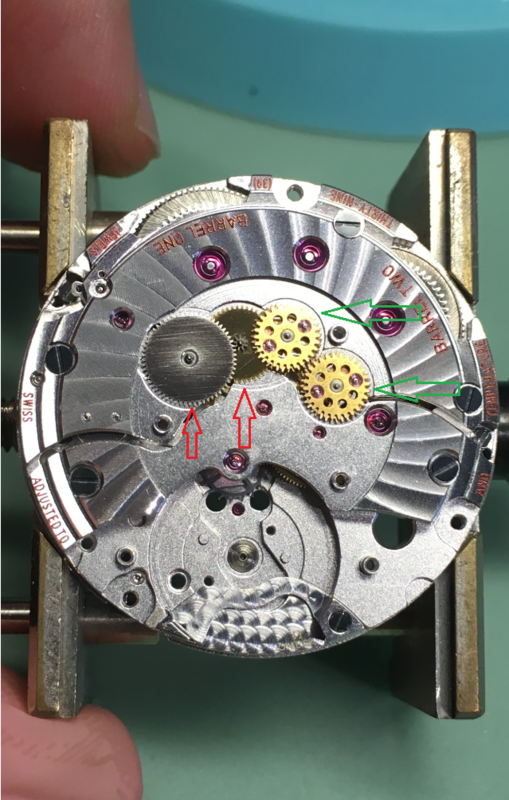
The underside of the calendar plate where the two gears are riveted and can't be removed so they need to be oiled after cleaning. Put small amounts of HP1300 where the thinn green arrows point.

The keyless is a modifyed A7750 and most parts there are a direct swap. Also now the date finger gear and the transport gear can be removed.
The small bridge and the wheels are next to be removed.
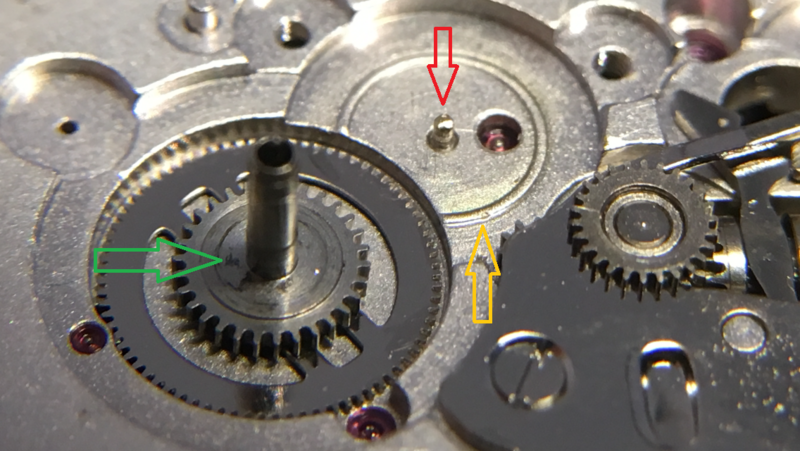
The pillar (red arrow) did not have proper oiling and it have some wear on mine so I will lathe a new one and press in to the mainplate.
The oil is however there in the wrong place (yellow arrow) and I think it's chinese motor oil. The oil is sticky and make the movement worse than if it was dry.
The green arrow shows some dirt where the hourwheel turns over the minute wheel. It will probably all turn much smoother after cleaning and oiling.
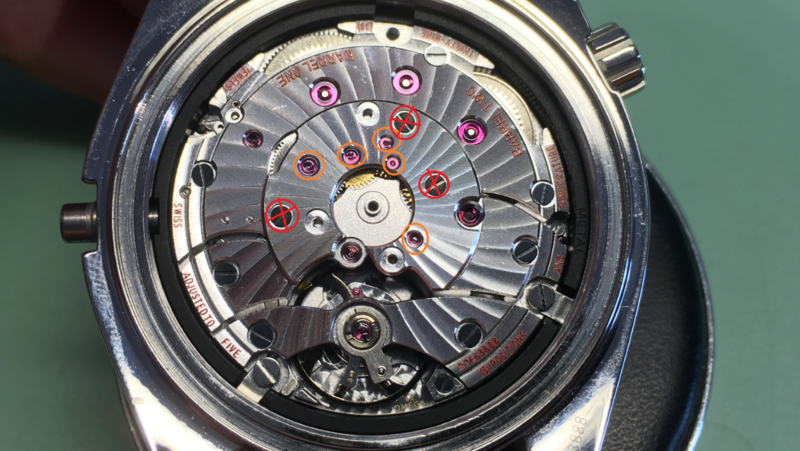
Back to the backside of the movement agail. Now it's time to look at the actual autowinding bridge.
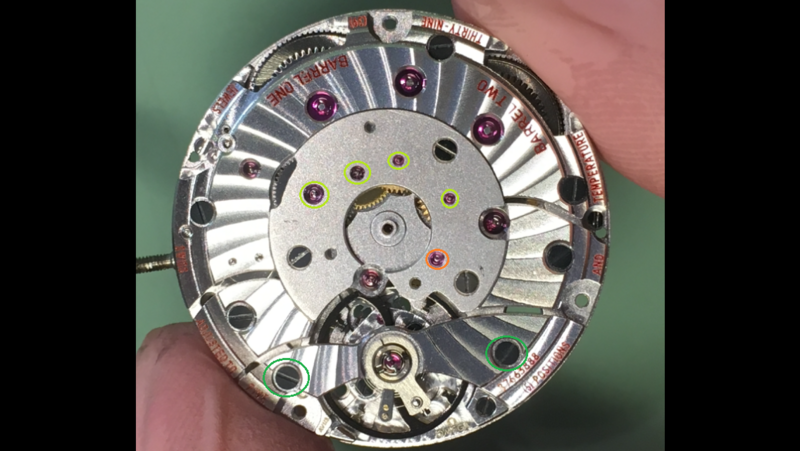
the lime green circles around jewels are the actual jewels but the one marked with orange ist just for show,
it's placed directly under one of the jewels in the deco plate. just to make a more autentic look I think.
Don't remove the autowinding bridge yet I start with the balance bridge.
It's actually easier than on a gen 8500 as it have the normal swiss lever escapement so lift it straight up but gentle.
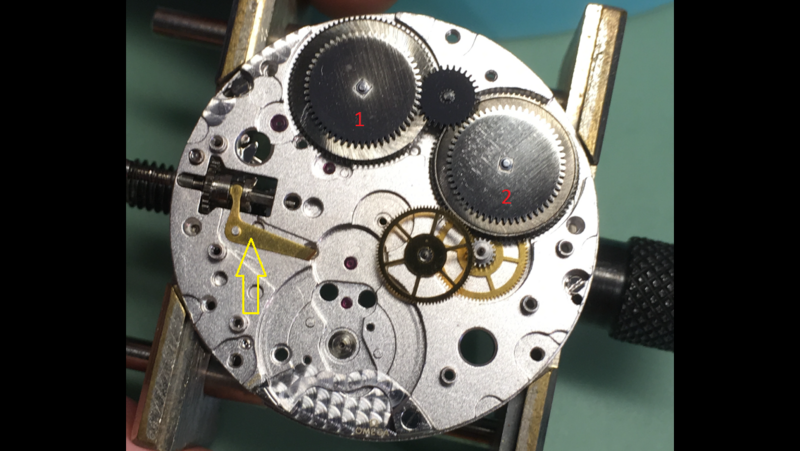
Next remove all mainspring power from the barrels by holding the crown and then push this lever all the way up.
this will make the crown turn so let it slip gently between your fingers until the power is gone from movement.
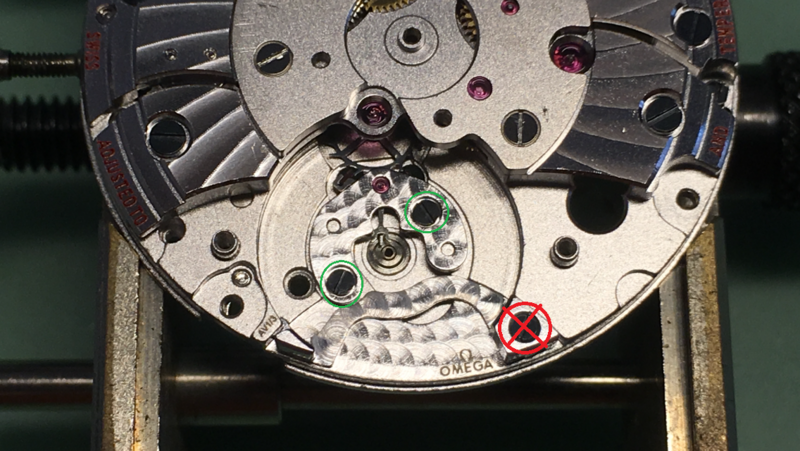
When there is no power in the geartrain its safe to remove the palletfork bridge with the 2 screws (green)
Do not try to remove the deco balancewheel protection. it seems to be glued and you risk to break the screw head. (Red X circle)
Now it's finally time for the autowinding bridge.
here we have 2 A2824-2 reversing wheels and then 2 custom wheels.
Autowinding wheels gone now the geartrain bridge hold by two black screws.
Before removing gears I remove the Barrel bridge.
Underside of barrel bridge where the ratchet for the barrels are located
everything here except the riveted wheel (red arrow) can be removed and cleaned before oiling (HP1300)
The two barrels but be carefull as they look to be the same but they aren't. It seems like one of them have no clutch system so if they are mixed up the autowinding can possibly overwind and break the mainspring or gears. I'll just be on the safe side and mark them with 1 and 2 small x-marks where it can't be seen.
The yellow arrow is the balance stop it had more of the chinese motor oil under it. Yuck!!!

Back on the front for the last dissasembly of the keyless. Here its the same as for any A7750.
Some of the parts was little bent so they will be replaced with new A7750 parts.
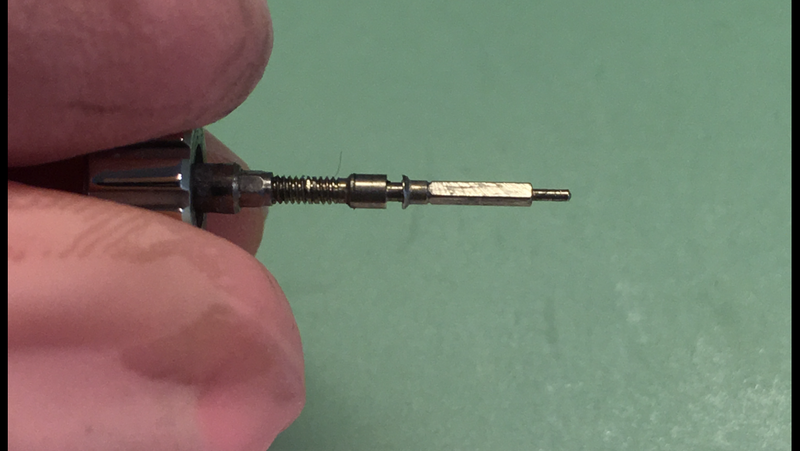
Winding stem is pretty much a normal 7750 made to be able to push it back without pusing the stem lever.
(a small angle after the square part of the stem)
there are probably A7750 stems like this in a bunch of other reps too.
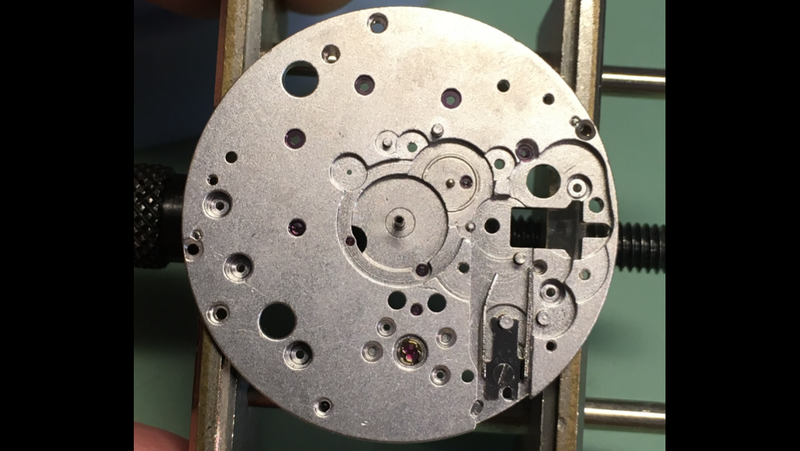
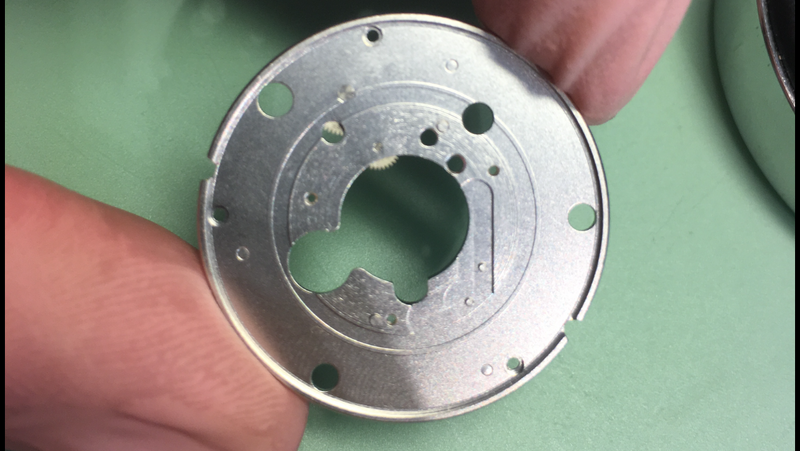
Empty mailplate.
Ready to be put in cleaning baskets. As the movment text isn't engraved and just printed on yo the bridges,
except the rotor I will only clean it on a short program of 5 min in cleaning alcohol ISO propanol. then quick heat dry it for 3-4 min.
I'm abit tierd after all the documentation so I will see when I have time for a update on this but until then take care and let me know if there are any questionmarks.
Cheers
Santre
So lets start with opening the caseback.
Then release the stem by pushing firm on the lever in the red circle.
It's close to the print SWISS. The first time I tried I was too gentle,
just start that way and apply little more force until the stem are released when pulling the crown.
Next up is to remove the rotor. This one is tricky, the construction isn't near the genuine 8500. You have to carfully take a small screwdriver (Bergeon 30009 White) the with of the blade is illustrated in red on the picture. When you are under the washer with the tip just gently wiggle the screwdriver untill it's lose. On to the next picture.
Here the washer is lose (orange arrow) under it we have a tiny mirror/plate (red arrow) that have sticky glue that sits on the rotot screw, just be carefull as this little plate easy stick to the tray or box where you put it under the service.
The yellow arrow show the amount of glue that hold the washer its a bit darker shade of gray.
I think with the chinese QC this would differ alot between the VSF watches with "Super" clone movements. That means some will be easy to remove some quite hard as mine was.
Here it's just a normal rotor screw, probably directly from a A2824-2
Also the rotor bearing seem to be quite similar to a A2824-2.
Rotor is removed now on to the autowinding bridge. Here it's very important to just remove
the 3 silver screws marked with green rings in picture. The other black screws are just glued deco screws.
So here are the deco screws. Do not touch them! Also the jewels marked with orange are just decoration so do not put any oil here after the movement is cleaned.
here is the rotor and bridge in the part tray.
Here we now see the real autowinding bridge with the real jewels and hidden screws
but we leave them for now and remove the movement from the case. Movement screws and tabs
are located by the red arrows, all of them were pretty lose but I'm afraid to tighten them
enough (to Swiss Standard) because if they break it will be trouble find replacement and they
probably get stuck in the mainplate for ever.
Movement is out, now carfully remove the hands.
When the hands is removed and put away in saftey turn the dial feet screws about 180 degrees, marked in the red circles and carfylly remove the dial.
The DW is right under the dial so don't push the edge with a sharp screw driver or something like that.
When dial is disassembled you can take away the black movement ring, it's sitting quite tight.
With the dial removed next is the front of the movement. There are 3 black screws they are all quite delicate so be careful not tighten them too hard when putting movement back together.
With the first plate removed we now have the DW lose, just be carefull as the date jumper and jumper spring are under tension and easy fly away.
At the point where the red line touch the jumper it need to be properly oiled to get a smooth date change.
I use HP 1300 or Microgliss D5.
The foil washer on the hour wheel was sad (red) it usualy should be happy so I will put it back as the green line in the picture shows.
Then I remove the top part of the hour wheel, under it there are the mechanism to jump the hours for date setting it have to be greased and not oiled Moebuis 9504 (synt-a-alube) is the best option. The grease spot is shown by
the red arrow. The gears do not engage (yellow/green lines) as the date jumper finger only engages with the top gear of the hour wheel this is to forward the date when jumping the hours around in date set mode.
Then unscrew the 3 screws on the calender plate.
The calender plate where the DW turn. The area where the DW turn is quite big I may try to modify this to decrease the friction.
The underside of the calendar plate where the two gears are riveted and can't be removed so they need to be oiled after cleaning. Put small amounts of HP1300 where the thinn green arrows point.
The keyless is a modifyed A7750 and most parts there are a direct swap. Also now the date finger gear and the transport gear can be removed.
The small bridge and the wheels are next to be removed.
The pillar (red arrow) did not have proper oiling and it have some wear on mine so I will lathe a new one and press in to the mainplate.
The oil is however there in the wrong place (yellow arrow) and I think it's chinese motor oil. The oil is sticky and make the movement worse than if it was dry.
The green arrow shows some dirt where the hourwheel turns over the minute wheel. It will probably all turn much smoother after cleaning and oiling.
Back to the backside of the movement agail. Now it's time to look at the actual autowinding bridge.
the lime green circles around jewels are the actual jewels but the one marked with orange ist just for show,
it's placed directly under one of the jewels in the deco plate. just to make a more autentic look I think.
Don't remove the autowinding bridge yet I start with the balance bridge.
It's actually easier than on a gen 8500 as it have the normal swiss lever escapement so lift it straight up but gentle.
Next remove all mainspring power from the barrels by holding the crown and then push this lever all the way up.
this will make the crown turn so let it slip gently between your fingers until the power is gone from movement.
When there is no power in the geartrain its safe to remove the palletfork bridge with the 2 screws (green)
Do not try to remove the deco balancewheel protection. it seems to be glued and you risk to break the screw head. (Red X circle)
Now it's finally time for the autowinding bridge.
here we have 2 A2824-2 reversing wheels and then 2 custom wheels.
Autowinding wheels gone now the geartrain bridge hold by two black screws.
Before removing gears I remove the Barrel bridge.
Underside of barrel bridge where the ratchet for the barrels are located
everything here except the riveted wheel (red arrow) can be removed and cleaned before oiling (HP1300)
The two barrels but be carefull as they look to be the same but they aren't. It seems like one of them have no clutch system so if they are mixed up the autowinding can possibly overwind and break the mainspring or gears. I'll just be on the safe side and mark them with 1 and 2 small x-marks where it can't be seen.
The yellow arrow is the balance stop it had more of the chinese motor oil under it. Yuck!!!
Back on the front for the last dissasembly of the keyless. Here its the same as for any A7750.
Some of the parts was little bent so they will be replaced with new A7750 parts.
Winding stem is pretty much a normal 7750 made to be able to push it back without pusing the stem lever.
(a small angle after the square part of the stem)
there are probably A7750 stems like this in a bunch of other reps too.
Empty mailplate.
Ready to be put in cleaning baskets. As the movment text isn't engraved and just printed on yo the bridges,
except the rotor I will only clean it on a short program of 5 min in cleaning alcohol ISO propanol. then quick heat dry it for 3-4 min.
I'm abit tierd after all the documentation so I will see when I have time for a update on this but until then take care and let me know if there are any questionmarks.
Cheers
Santre
Last edited:

