-
Tired of adverts on RWI? - Subscribe by clicking HERE and PMing Trailboss for instructions and they will magically go away!
You are using an out of date browser. It may not display this or other websites correctly.
You should upgrade or use an alternative browser.
You should upgrade or use an alternative browser.
Build a Pressure Tester for 30 Dollars
- Thread starter mucrewbtp
- Start date
Great DIY system, only one thing with the explanation at the beginning. You said that 6 times the pressure was inside the watch, that will only be the case if the watch has a leak in it. If the watch is sealed the pressure inside the watch will stay the same and you won't have bubbles. If there is a leak, the pressure inside the watch will increase and when you are releasing the pressure out of the valve while the watch is underwater the pressure in the watch will start lowering as well.. thus letting out air and you will see bubbles leaving the watch. I'm sure most people probably understood this but just wanted to clarify in case.
- 28/10/15
- 1,886
- 215
- 63
Made one of these a few days ago. I did not trust the shatty gauge on my bike pump to be accurate. I added a decent compressor air guage to my lid.
My lid will not hold much past 2bar. I have tried orings and grease. I can pump it up to 3 bar, but it leaks out slowly. The top seems to deform enough to leak, but flattens enough at 2bar to seal up. This is my theory.
I have sprayed the whole bottle with soapy water while the psi is close to 3bar. Definitely the lid.
I will be buying another bottle to try again. I hang the watch on a bent coat hangar that I have lined with vacuum tubing(automotive).
Rusty chain
Known Member
- 16/4/15
- 150
- 3
- 18
Maybe the added hole weakens the lid. Mine only went up to about 4 bar, but that's fine for me, I only swim.
Preface: I'm not a scientist nor engineer. I'm not certain this is actually doing anything other than compressing the volume of air at the top of your container. It may increase the force of pressure around your watch, but I'm willing to bet its a negligible fraction of the compression of the air.
A quick test to prove me wrong would be to affix a balloon to the bottom of the container, cover the balloon in water and then compress the volume of air at the top. If this works, the balloon should shrink considerably at 1 bar.
A quick test to prove me wrong would be to affix a balloon to the bottom of the container, cover the balloon in water and then compress the volume of air at the top. If this works, the balloon should shrink considerably at 1 bar.
- 28/10/15
- 1,886
- 215
- 63
Preface: I'm not a scientist nor engineer. I'm not certain this is actually doing anything other than compressing the volume of air at the top of your container. It may increase the force of pressure around your watch, but I'm willing to bet its a negligible fraction of the compression of the air.
A quick test to prove me wrong would be to affix a balloon to the bottom of the container, cover the balloon in water and then compress the volume of air at the top. If this works, the balloon should shrink considerably at 1 bar.
It is compressing the air at the top. It is also pressurizing the air inside the watch after it sits a bit at pressure. Then, you release a little bit of air and quickly dunk the watch in the water. I lay mine on its side to dunk it. The pressure in the watch has become greater than that of the water in the container at this point. If the watch leaks, a stream of bubbles will be apparent quickly.
No insult intended, but the principles are sound. It does work.
I have watches that have failed. I repaired the leak. Bad crystal gasket. It no longer leaks. This is the last repaired watch.

Holds 2.5 bar due to rig limits.
Sent from my iPhone using Tapatalk
- 28/10/15
- 1,886
- 215
- 63
Preface: I'm not a scientist nor engineer. I'm not certain this is actually doing anything other than compressing the volume of air at the top of your container. It may increase the force of pressure around your watch, but I'm willing to bet its a negligible fraction of the compression of the air.
A quick test to prove me wrong would be to affix a balloon to the bottom of the container, cover the balloon in water and then compress the volume of air at the top. If this works, the balloon should shrink considerably at 1 bar.
See post above.
Sent from my iPhone using Tapatalk
")
shadoweave
Getting To Know The Place
- 15/7/16
- 31
- 0
- 6
- 28/10/15
- 1,886
- 215
- 63
Planning to waterproofing a 16570. I looked for the Nalgene bottle but it seems that they have switched to copolyester. Will it work as well or I'd better use it to drink?
eBay. Nalgene is written right on the bottle.
Looking for someone in Koh Samui, Thailand. Pm me if you live here.
- 21/11/15
- 3,605
- 10
- 38
very cool cheap system, id suggest a glass jar as they are fairly strong as seen in king of randoms YT with a ~100 PSI vacuum chamber
That's a terrible idea. 100 PSI is only 6.8 bar, a very slight improvement over an old-style Nalgene bottle... and exploding glass will absolutely RUIN your day.
I think this is an Improvement on the Nalgene bottle idea but to each to their own. Hopefully some will find this useful!
First thing I want to say is thanks to DiverDave as he is the one that pointed me to the water filter housing and suggested doing this.
How to build a 10 ATM/100m Watch Water Pressure Tester for $40 (assuming you already have a bicycle pump or an air compressor)
For anyone that hasn't read this entire thread basically it shows you how to build a pressure tester for $30 using a Nalgene Bottle. You can read the whole thread yourself or you can just take my word for it that a) it is a little sketchy and b) you are never going to get more than 3-5 ATM or 50m equivalent with the Nalgene bottle and c) there is always going to be a very real risk that the whole thing is going to blow up on you. On the positive side the method is sound and with a stronger container there is no reason that you can't make a very affordable pressure tester than can withstand 10 atm or an equivalent of 100m of pressure.
There are a few ways you can go about doing this depending on a) what you already have and b) how elaborate you want to get.
The simplest and cheapest way to go is to just buy the following items:
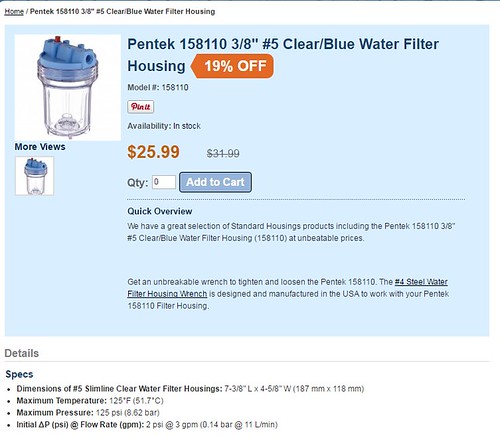
1) Water Filter Housing ($33 Shipped) Here is a link: http://www.water-softeners-filters....-housing.php?gclid=COHw6tC1rNMCFZ2Cswod_HELGg
Everything else can be purchased at Home Depot/Lowes or online at a myriad of places
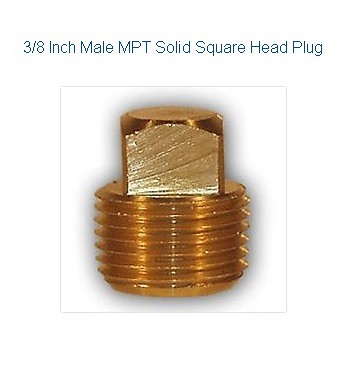
2) 1pc 3/8" npt Plug ($3)
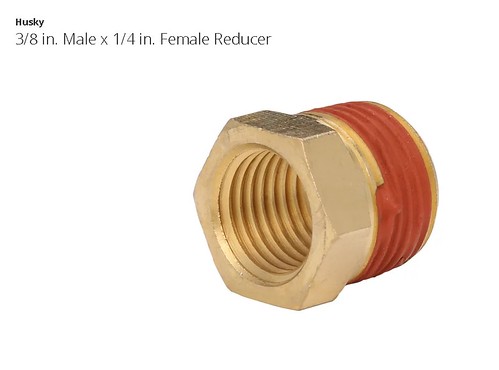
3) 1pc 3/8" male to 1/4"npt female reducer ($3)
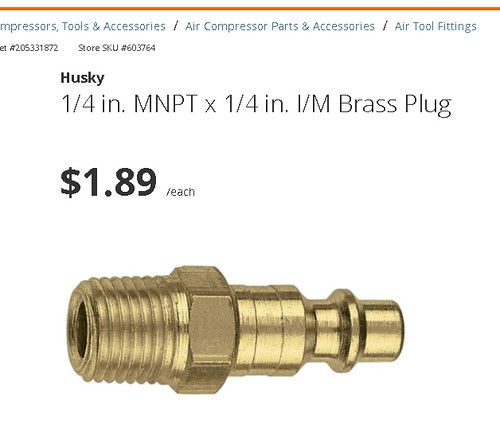
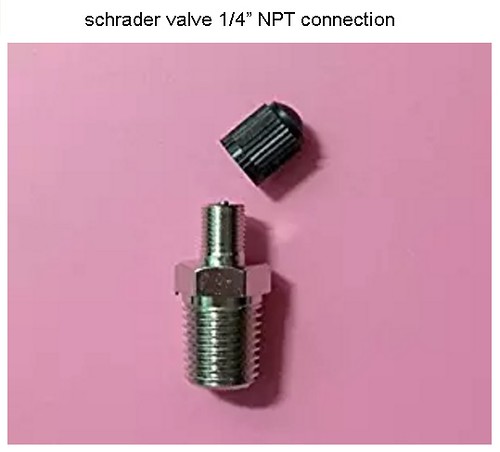
4 ) 1pc 1/4" npt tp Air Compressor fitting or 1pc 1/4" npt to Schrader Valve (Buy the air compressor fitting if you have an air compressor and buy the other one if you are going to use a bicycle pump) - ($2)
Total Cost $40
A quick note on these parts: The female ports on the Water Filter Housing are 3/8 NPT (National Pipe Thread) There are 2 sizes of fittings that are common and you will find at Home Depot/Lowes etc. They are 3/8 NPT and 1/4 NPT. Typically 3/8 are used for Paint sprayers and other uses that require more flow and the 1/4 NPT are used for most Air Tools like Nail guns etc. If you have a compressor you could skip the reducer and buy 3/8 NPT to Air hose connector, but if you are going to a Shrader Valve (bicycle pump valve) you might not be able to find the 3/8 fitting directly to the Shrader Valve. Here is what the necessary parts look like:
Here is the Plug: It doesn't really matter which side you put it on because both ports are open to the container, but you might as well put it into the port labeled "Out"
Here is the reducer. You might be able to avoid using this part, but I bought and used it.
You are going to need one of the following 2 parts. The first one if you have a compressor and the 2nd if you plan on using a bicycle pump:
A MORE Elaborate (and bit more expensive) way:
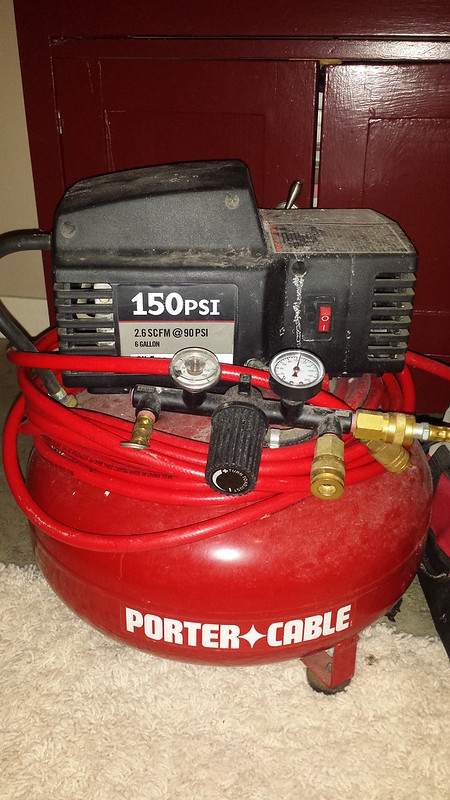
I have a compressor that is about 25 yrs old that works just as good as the day I bought it. FYI (For you young guys) a compressor is a handy thing to have. You are not going to use it every day, but I have used mine many times over the years and I would highly recommend buying one. One like I have is only about $100 and there are MANY uses for them.
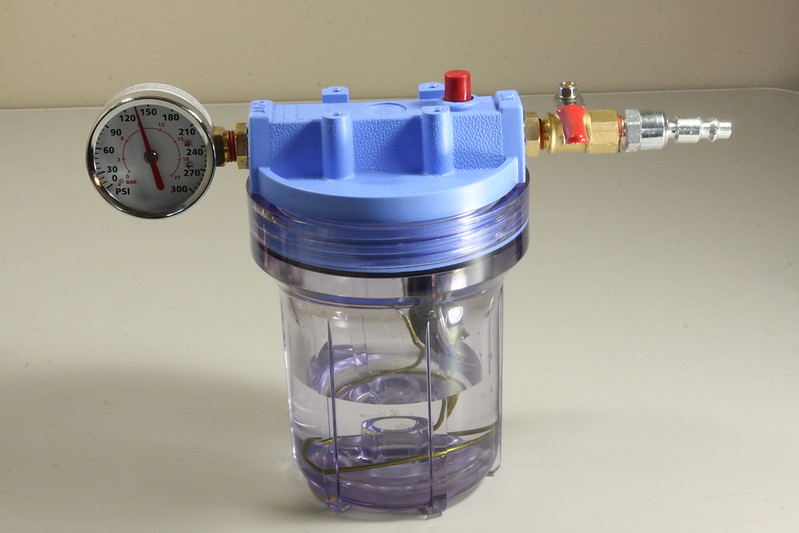
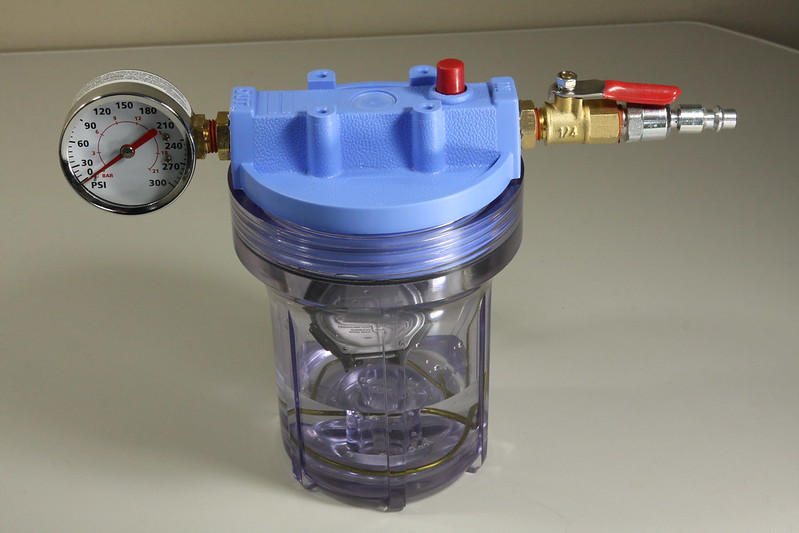
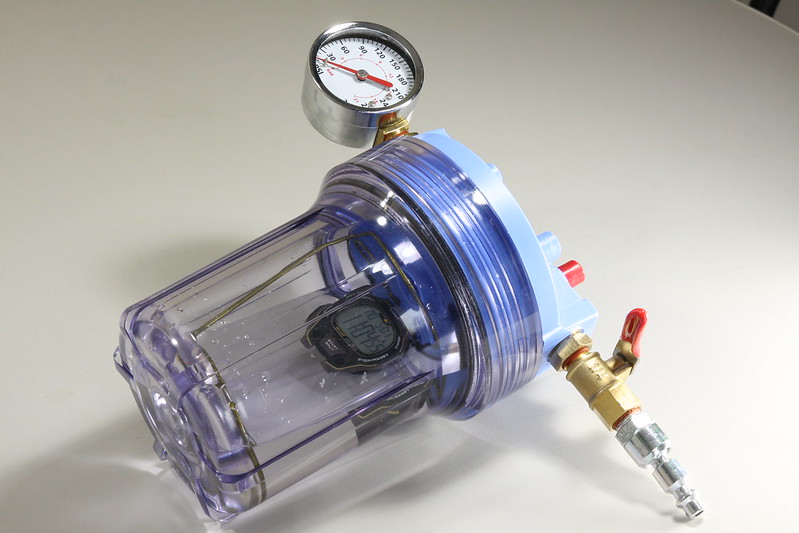
I wanted to be able to disconnect the Tester from the Compressor. If you want to be able to do that you are going to need a Shut off Valve. I also wanted to be able to monitor the pressure inside the vessel with the compressor disconnected so if you want to be able to do that you are going to need a gauge that is not attached to the bicycle pump or compressor. If you want to go this route like I did it is going to cost you about $10 extra, but I thought it was worth it. Here is what you are going to need if you go this route:
1) Water Filter Housing ($33 Shipped)
2) 2 x 3/8" male to 1/4"npt female reducer ($5)
3) 1 Shut off Valve 1/4" NPT ($3)
4) 1 Pressure Gauge 1/4" NPT ($7)
4 ) 1pc 1/4" npt tp Air Compressor fitting or 1pc 1/4" npt to Schrader Valve (Buy the air compressor fitting if you have an air compressor and buy the other one if you are going to use a bicycle pump) - ($2)
Total Cost $50
Here is what mine looks like:
Here are a couple other items you are going to need:
1) PTFE tape (free as I had it, but I did find some for only 79¢)
2) Wrench to tighten the fittings - (Free as I had this)
3) A Bicycle Pump or a Compressor - (Free as I had this)
4) Coat hanger or something else to hang the watch on -(Free as I had this)
5) Pliers to bend the coat hanger -(Free as I had this)
6) Scotch Tape -(Free as I had this)
Procedure:
Assemble the fittings to the Water Filter Housing. It is going to be really obvious what to do here. If you screwed up and got something wrong you will just have to go back and buy a different part. Put the plug or the gauge in the "OUT" port and put the fittings to attach to your compressor or bicycle pump into the "IN" port. If you decide to use a shut off valve this needs to go into the "IN" port on the housing side of your air fittings (see the pic above of my setup) Use reducers as necessary. Once you pressurize the housing you are going to know pretty much right away if it is leaking. If it is leaking you are going to have to go back and put some PTFE tape on the fittings where it is leaking and that will solve your leaks. To test for leaking mix a drop or two of dish soap (Palmolive or Dawn) with about 1 oz water. You can do this in a soda cap or small container. Then just pour the soapy water on your fittings and you will immediately know if you have a leak. If it is leaking you will see bubbles forming and if it is not leaking there will not be any bubbles forming (again this will be really obvious)
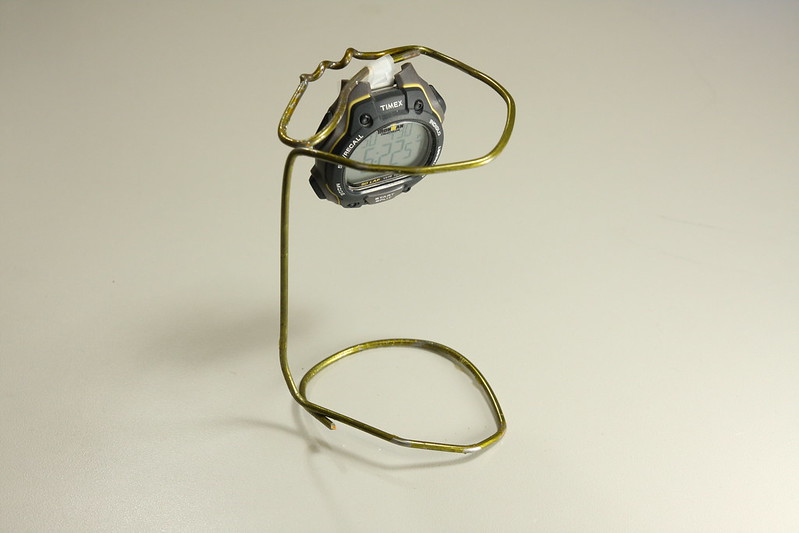
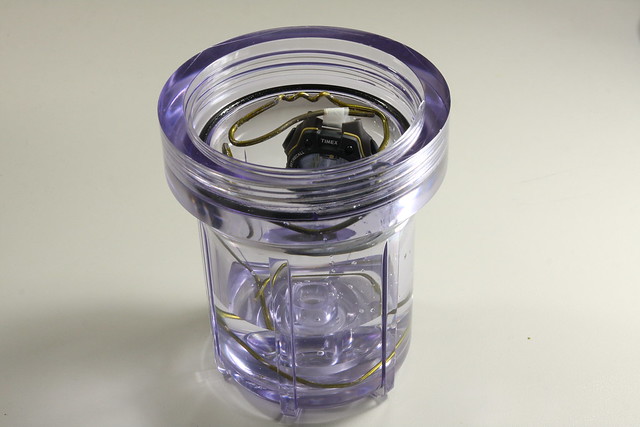
Now that you have your pressure container together you are going to need something to hang your watch on. I took a coat hanger and bent it so I could easily hang a watch on it and so it would not move around in the container. As you can see I made it so it just fits inside the water filter housing. Here is what mine looks like:
And Now on to the testing Steps:
1) Attach watch to stand
2) Fill Water Filter container about 1/3 full of water
3) Drop stand and watch into the water filter container (watch side up so it is not in the water)
4) Attach Housing top (and fittings) onto the body and tighten
5) Pressurize the container to desired pressure
6) Let sit for minimum of 30 minutes at pressure
7) Quickly release pressure from the Water Filter Housing chamber.
- This water filter housing has a pressure release valve built in. It is the little red button on top of the cover. All you have to do is push it down and it will release the pressure from inside the container. If you put a shut off valve in there like I did, you can use that to release the pressure as well.
8) Once the container is depressurized immediately dunk the watch into the water so it is fully submerged. I just rotated the housing onto its side. I made my stand so the watch will just rotate onto the side of the housing and be submerged in water. I guess you might want to wait 5 or 10 seconds before dunking the watch in the water just to be sure the crystal doesn't pop off. If it is going to pop off it will do that pretty quickly and you don't want the watch to be in the water if this happens. The reason the crystal could pop off is if the watch is leaking the pressure inside the case will be greater then the pressure outside the case and if the crystal is not fitted properly (ie it is too lose) it could pop off.
One of two things is going to happen:
a) The watch will be waterproof and in this case you will not see any bubbles escaping from the case of the watch.
b) The watch will have leaked. So what has happened in this case is that at this point inside the case is a higher pressure than outside the case and now the pressure is trying to escape from inside the watch. If you see bubbles, don't worry water will not get inside the watch unless you leave it submerged until all the pressure has escaped. Just remove the watch from the water and remove the case back and go to work on the seals.
Here are some pics of the above procedure:
1) Attach watch to stand
2) Fill Water Filter container about 1/3 to 1/2 full of water. You want the water to be just below the level of the watch.

3) Drop stand and watch into the water filter container (watch side up so it is not in the water)
4) Attach Housing top (and fittings) onto the body and tighten
5) Pressurize the container to desired pressure
6) I used this to pressurize the Water Softener Canister:
7) Let sit for minimum of 30 minutes at pressure
- Nothing really to show here. Hopefully you don't lose any pressure. If you do, you can give it a few pumps or attach back to the compressor. If you are losing pressure you probably should figure out why and fix the problem for the next time.
8) Quickly release pressure from the Water Filter Housing chamber.
Revised---- As some have said it might be wise to release only some of the pressure and then dunk the watch only after knowing that the crystal is not going to pop off

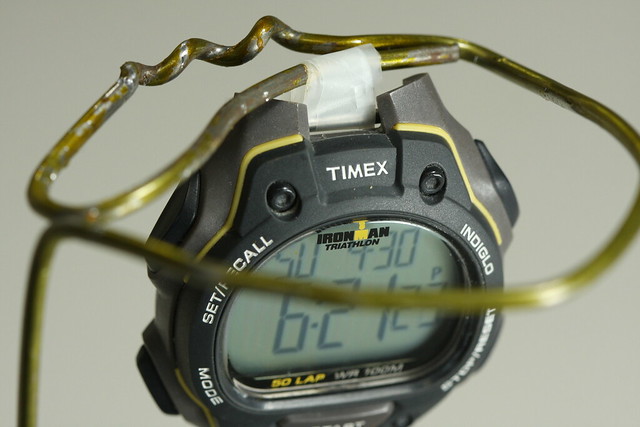
9) Once the container is depressurized immediately dunk the watch into the water so it is fully submerged. Here I have just set the housing on its side. The watch will then sit on the side of the housing sitting in the water.
Here is a close up of what that looks like:
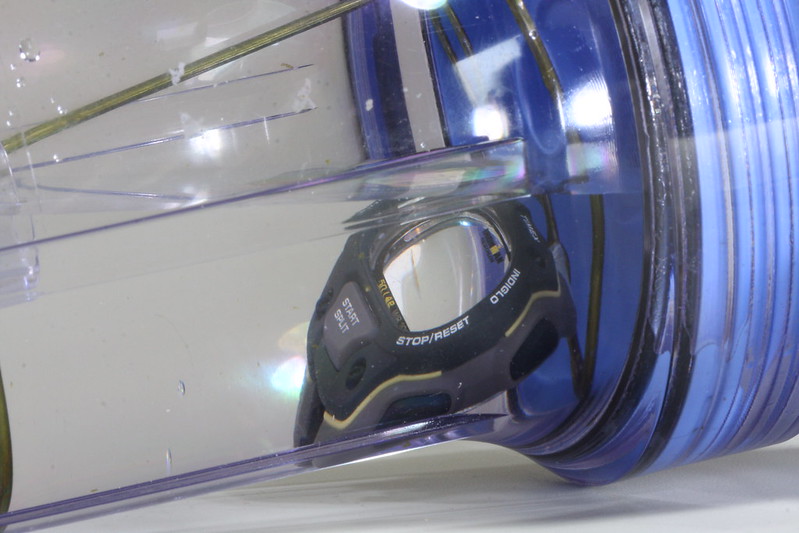
If there are no leaks, it will look like the above pic (no bubbles coming from the case) In a way it is a little disappointing as nothing is happening. LOL
You should be happy to see no bubbles though as this means your watch is safe!
A NOTE about the Pressure and how Safe is this?
You might have noticed that on the picture of the Water Filter Housing it says it has a maximum pressure of 125psi. This is only 125/14.7= 8.5 ATM or 85m. I have a Mechanical Engineering background. Knowing that everything is over designed I looked up "Safety Factor" (this is the term that is used when talking about how much something is "over designed") Here is what is on wiki about this:
"Appropriate design factors are based on several considerations, such as the accuracy of predictions on the imposed loads, strength, wear estimates, and the environmental effects to which the product will be exposed in service; the consequences of engineering failure; and the cost of over-engineering the component to achieve that factor of safety. For example, components whose failure could result in substantial financial loss, serious injury, or death may use a safety factor of four or higher (often ten). Non-critical components generally might have a design factor of two. Risk analysis, failure mode and effects analysis, and other tools are commonly used. Design factors for specific applications are often mandated by law, policy, or industry standards.
Buildings commonly use a factor of safety of 2.0 for each structural member. The value for buildings is relatively low because the loads are well understood and most structures are redundant. Pressure vessels use 3.5 to 4.0"
What does all this mean?
It means that this Water Filter Housing is likely "Over Designed" by a factor of at least 3 so 3 x 125 psi = 450psi. I am not saying that you should routinely take this thing up to 450psi, but I think it is quite safe to go to 150psi (only 1.2 x what it is rated)
Everyone has to decide for themselves what they are comfortable with, but I am comfortable taking this up to 150psi. Why then, do you ask, do my pictures show approximately 132psi or about 9ATM? Well my compressor has a regulator on it that prevents it from going over 150. When I have the regulator maxed out it cuts out just shy of 150psi and after dumping some air into the Water Filter Housing all I have left is about 132 or 135psi. I could buy a different regulator, but I have decided that 9ATM is by far good enough for me.
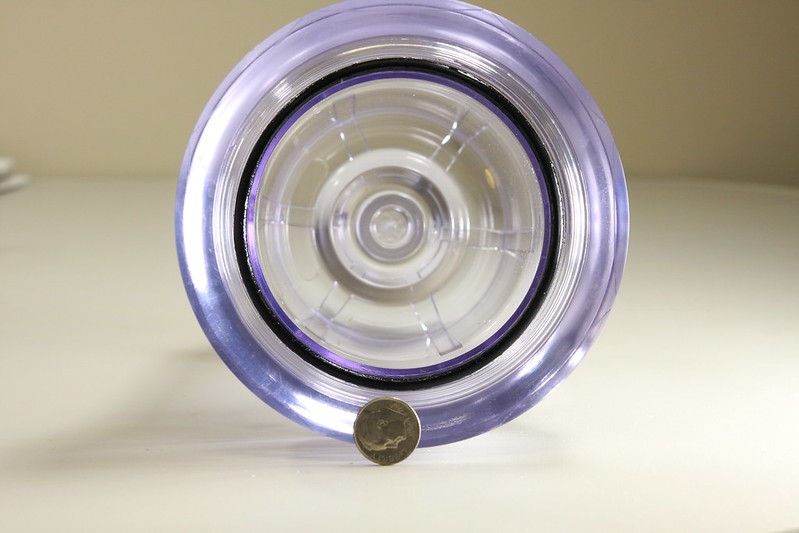
Here is a pic of the housing thickness next to a dime. It is pretty dang thick and a whole lot more "Safe looking" than a Nalgene bottle!
Ok, here is my disclaimer......
If you blow yourself up it is your own fault etc etc. Don't come crying to me....
I hope this was helpful!
First thing I want to say is thanks to DiverDave as he is the one that pointed me to the water filter housing and suggested doing this.
How to build a 10 ATM/100m Watch Water Pressure Tester for $40 (assuming you already have a bicycle pump or an air compressor)
For anyone that hasn't read this entire thread basically it shows you how to build a pressure tester for $30 using a Nalgene Bottle. You can read the whole thread yourself or you can just take my word for it that a) it is a little sketchy and b) you are never going to get more than 3-5 ATM or 50m equivalent with the Nalgene bottle and c) there is always going to be a very real risk that the whole thing is going to blow up on you. On the positive side the method is sound and with a stronger container there is no reason that you can't make a very affordable pressure tester than can withstand 10 atm or an equivalent of 100m of pressure.
There are a few ways you can go about doing this depending on a) what you already have and b) how elaborate you want to get.
The simplest and cheapest way to go is to just buy the following items:
1) Water Filter Housing ($33 Shipped) Here is a link: http://www.water-softeners-filters....-housing.php?gclid=COHw6tC1rNMCFZ2Cswod_HELGg
Everything else can be purchased at Home Depot/Lowes or online at a myriad of places
2) 1pc 3/8" npt Plug ($3)
3) 1pc 3/8" male to 1/4"npt female reducer ($3)
4 ) 1pc 1/4" npt tp Air Compressor fitting or 1pc 1/4" npt to Schrader Valve (Buy the air compressor fitting if you have an air compressor and buy the other one if you are going to use a bicycle pump) - ($2)
Total Cost $40
A quick note on these parts: The female ports on the Water Filter Housing are 3/8 NPT (National Pipe Thread) There are 2 sizes of fittings that are common and you will find at Home Depot/Lowes etc. They are 3/8 NPT and 1/4 NPT. Typically 3/8 are used for Paint sprayers and other uses that require more flow and the 1/4 NPT are used for most Air Tools like Nail guns etc. If you have a compressor you could skip the reducer and buy 3/8 NPT to Air hose connector, but if you are going to a Shrader Valve (bicycle pump valve) you might not be able to find the 3/8 fitting directly to the Shrader Valve. Here is what the necessary parts look like:
Here is the Plug: It doesn't really matter which side you put it on because both ports are open to the container, but you might as well put it into the port labeled "Out"
Here is the reducer. You might be able to avoid using this part, but I bought and used it.
You are going to need one of the following 2 parts. The first one if you have a compressor and the 2nd if you plan on using a bicycle pump:
A MORE Elaborate (and bit more expensive) way:
I have a compressor that is about 25 yrs old that works just as good as the day I bought it. FYI (For you young guys) a compressor is a handy thing to have. You are not going to use it every day, but I have used mine many times over the years and I would highly recommend buying one. One like I have is only about $100 and there are MANY uses for them.
I wanted to be able to disconnect the Tester from the Compressor. If you want to be able to do that you are going to need a Shut off Valve. I also wanted to be able to monitor the pressure inside the vessel with the compressor disconnected so if you want to be able to do that you are going to need a gauge that is not attached to the bicycle pump or compressor. If you want to go this route like I did it is going to cost you about $10 extra, but I thought it was worth it. Here is what you are going to need if you go this route:
1) Water Filter Housing ($33 Shipped)
2) 2 x 3/8" male to 1/4"npt female reducer ($5)
3) 1 Shut off Valve 1/4" NPT ($3)
4) 1 Pressure Gauge 1/4" NPT ($7)
4 ) 1pc 1/4" npt tp Air Compressor fitting or 1pc 1/4" npt to Schrader Valve (Buy the air compressor fitting if you have an air compressor and buy the other one if you are going to use a bicycle pump) - ($2)
Total Cost $50
Here is what mine looks like:
Here are a couple other items you are going to need:
1) PTFE tape (free as I had it, but I did find some for only 79¢)
2) Wrench to tighten the fittings - (Free as I had this)
3) A Bicycle Pump or a Compressor - (Free as I had this)
4) Coat hanger or something else to hang the watch on -(Free as I had this)
5) Pliers to bend the coat hanger -(Free as I had this)
6) Scotch Tape -(Free as I had this)
Procedure:
Assemble the fittings to the Water Filter Housing. It is going to be really obvious what to do here. If you screwed up and got something wrong you will just have to go back and buy a different part. Put the plug or the gauge in the "OUT" port and put the fittings to attach to your compressor or bicycle pump into the "IN" port. If you decide to use a shut off valve this needs to go into the "IN" port on the housing side of your air fittings (see the pic above of my setup) Use reducers as necessary. Once you pressurize the housing you are going to know pretty much right away if it is leaking. If it is leaking you are going to have to go back and put some PTFE tape on the fittings where it is leaking and that will solve your leaks. To test for leaking mix a drop or two of dish soap (Palmolive or Dawn) with about 1 oz water. You can do this in a soda cap or small container. Then just pour the soapy water on your fittings and you will immediately know if you have a leak. If it is leaking you will see bubbles forming and if it is not leaking there will not be any bubbles forming (again this will be really obvious)
Now that you have your pressure container together you are going to need something to hang your watch on. I took a coat hanger and bent it so I could easily hang a watch on it and so it would not move around in the container. As you can see I made it so it just fits inside the water filter housing. Here is what mine looks like:
And Now on to the testing Steps:
1) Attach watch to stand
2) Fill Water Filter container about 1/3 full of water
3) Drop stand and watch into the water filter container (watch side up so it is not in the water)
4) Attach Housing top (and fittings) onto the body and tighten
5) Pressurize the container to desired pressure
6) Let sit for minimum of 30 minutes at pressure
7) Quickly release pressure from the Water Filter Housing chamber.
- This water filter housing has a pressure release valve built in. It is the little red button on top of the cover. All you have to do is push it down and it will release the pressure from inside the container. If you put a shut off valve in there like I did, you can use that to release the pressure as well.
8) Once the container is depressurized immediately dunk the watch into the water so it is fully submerged. I just rotated the housing onto its side. I made my stand so the watch will just rotate onto the side of the housing and be submerged in water. I guess you might want to wait 5 or 10 seconds before dunking the watch in the water just to be sure the crystal doesn't pop off. If it is going to pop off it will do that pretty quickly and you don't want the watch to be in the water if this happens. The reason the crystal could pop off is if the watch is leaking the pressure inside the case will be greater then the pressure outside the case and if the crystal is not fitted properly (ie it is too lose) it could pop off.
One of two things is going to happen:
a) The watch will be waterproof and in this case you will not see any bubbles escaping from the case of the watch.
b) The watch will have leaked. So what has happened in this case is that at this point inside the case is a higher pressure than outside the case and now the pressure is trying to escape from inside the watch. If you see bubbles, don't worry water will not get inside the watch unless you leave it submerged until all the pressure has escaped. Just remove the watch from the water and remove the case back and go to work on the seals.
Here are some pics of the above procedure:
1) Attach watch to stand
2) Fill Water Filter container about 1/3 to 1/2 full of water. You want the water to be just below the level of the watch.
3) Drop stand and watch into the water filter container (watch side up so it is not in the water)
4) Attach Housing top (and fittings) onto the body and tighten
5) Pressurize the container to desired pressure
6) I used this to pressurize the Water Softener Canister:
7) Let sit for minimum of 30 minutes at pressure
- Nothing really to show here. Hopefully you don't lose any pressure. If you do, you can give it a few pumps or attach back to the compressor. If you are losing pressure you probably should figure out why and fix the problem for the next time.
8) Quickly release pressure from the Water Filter Housing chamber.
Revised---- As some have said it might be wise to release only some of the pressure and then dunk the watch only after knowing that the crystal is not going to pop off
9) Once the container is depressurized immediately dunk the watch into the water so it is fully submerged. Here I have just set the housing on its side. The watch will then sit on the side of the housing sitting in the water.
Here is a close up of what that looks like:
If there are no leaks, it will look like the above pic (no bubbles coming from the case) In a way it is a little disappointing as nothing is happening. LOL
You should be happy to see no bubbles though as this means your watch is safe!
A NOTE about the Pressure and how Safe is this?
You might have noticed that on the picture of the Water Filter Housing it says it has a maximum pressure of 125psi. This is only 125/14.7= 8.5 ATM or 85m. I have a Mechanical Engineering background. Knowing that everything is over designed I looked up "Safety Factor" (this is the term that is used when talking about how much something is "over designed") Here is what is on wiki about this:
"Appropriate design factors are based on several considerations, such as the accuracy of predictions on the imposed loads, strength, wear estimates, and the environmental effects to which the product will be exposed in service; the consequences of engineering failure; and the cost of over-engineering the component to achieve that factor of safety. For example, components whose failure could result in substantial financial loss, serious injury, or death may use a safety factor of four or higher (often ten). Non-critical components generally might have a design factor of two. Risk analysis, failure mode and effects analysis, and other tools are commonly used. Design factors for specific applications are often mandated by law, policy, or industry standards.
Buildings commonly use a factor of safety of 2.0 for each structural member. The value for buildings is relatively low because the loads are well understood and most structures are redundant. Pressure vessels use 3.5 to 4.0"
What does all this mean?
It means that this Water Filter Housing is likely "Over Designed" by a factor of at least 3 so 3 x 125 psi = 450psi. I am not saying that you should routinely take this thing up to 450psi, but I think it is quite safe to go to 150psi (only 1.2 x what it is rated)
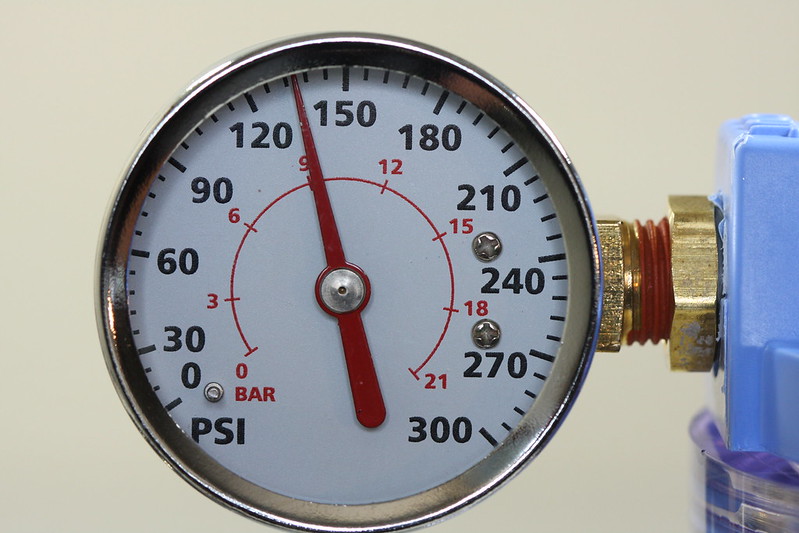
Everyone has to decide for themselves what they are comfortable with, but I am comfortable taking this up to 150psi. Why then, do you ask, do my pictures show approximately 132psi or about 9ATM? Well my compressor has a regulator on it that prevents it from going over 150. When I have the regulator maxed out it cuts out just shy of 150psi and after dumping some air into the Water Filter Housing all I have left is about 132 or 135psi. I could buy a different regulator, but I have decided that 9ATM is by far good enough for me.
Here is a pic of the housing thickness next to a dime. It is pretty dang thick and a whole lot more "Safe looking" than a Nalgene bottle!
Ok, here is my disclaimer......
If you blow yourself up it is your own fault etc etc. Don't come crying to me....
I hope this was helpful!
Nanook, thank you so much for this detailed explanation and idea. I finally receive all my parts today. The filter is extremely heavy duty. There's just no comparison to the flimsy Nalgene bottle. With the Nalgene bottle I couldn't get it beyond 2.5 ATM without the seal leaking. The filter with fittings has no problem holding high pressure. Just need to bend a coat hanger and figure a better way to hang the watch rather than use tape and I'll be ready to test my first watch.
As far as popping the crystal. Why do you need to rapidly release all the pressure. I think that may put undue stress if there is a leak. I believe the original suggestion was to slowly release the pressure and submerge the watch. Keep releasing pressure slowly. If there is a leak you'll still see bubbles and the watch will be safe as long as you bring it out of the water before the pressure has all been released and bubbles stopped.
Sent from my iPhone using Tapatalk