- 13/10/16
- 3,830
- 2,148
- 113
Last week I’ve been thinking about the « Best ways to mod 580 end links for 2mm bars ».
Today I’d like to share what I would call the «Easiest way to drill vintage case lugs for 2mm bars when you’re a city dweller»
So let’s begin with the facts ;
1 - I have a 6538 case with pre-drilled lugs
2 - I live in a city flat with no so much space for huge tools
3 - I dont have a drill press and I dont really have the place for that (see point 2)
4 - I have nice 2mm bars that fit in my 93150 bracelet and 580 end links but not in my 6538 case
And today I have decided to try an unlikely experience ... « drilling » the lugs of the 6538 with only hand grinds.
The best part of this thread is that … IT WORKED PERFECTLY.
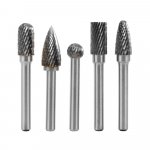
The tools I have used are :
- 1mm diamond grind
- 2mm diamond grind
- 3mm rond grind
And here is a pic of those tolls ... much less bulky than a drill press

The process I used is VERY BASIC.
1mm diamond grind :
I first enlarged the pre-drilling until the grind passes easily through ... by working carefully it is possible to keep the holes in the same axis.
I think it’s best to rotate the file in both directions (rather than going back and forth)
2mm diamond grind :
There you have to be more patient and more applied because you do not want to pass completely through ... the aim being to get a hole of about 1.3 mm and not 2mm.
Always the same method (rotation rather than going back and forth) and it is necessary to stop regularly to control the result with a 2mm springbar ... from the outside.
When the springbar crosses almost completely the lug (it just blocks on the inside face) I changed tools.
3mm round grind :
I gently enlarged the hole from the inside side of the lug with the round file of 3mm ... always checking regularly to stop as soon as the springbar pass freely.
This is the most risky phase because you have to do it at an angle and you have to be very careful, otherwise you risk scratching the opposite lug.
All this process took ame bout 20 minutes to drill 2 lugs ... so it would take 40 minutes for a complete case.
It is probably longer than with a drill press (although ... if one takes into account the time to install the drill press, to fix the box and to align the holes, etc ...) but it is much less risky.
It's quite impossible to ruin your case and as one works gently the steel does not heat and does not harden.
Plus you can do this in « spare time » ... by watching a movie, on public transport (if you have a seat), in a car (if someone else drives), in an hotel room (for business travelers), etc ...
Here are some pictures of the job I did.
still have to drill the 2 remaining lugs and the chamfers of the external face but it is already … not that bad.


And here’s an overview with 2mm springbar in ... rather cool
Cant help but congratulate myself :clap_1:

Today I’d like to share what I would call the «Easiest way to drill vintage case lugs for 2mm bars when you’re a city dweller»
So let’s begin with the facts ;
1 - I have a 6538 case with pre-drilled lugs
2 - I live in a city flat with no so much space for huge tools
3 - I dont have a drill press and I dont really have the place for that (see point 2)
4 - I have nice 2mm bars that fit in my 93150 bracelet and 580 end links but not in my 6538 case
And today I have decided to try an unlikely experience ... « drilling » the lugs of the 6538 with only hand grinds.
The best part of this thread is that … IT WORKED PERFECTLY.
The tools I have used are :
- 1mm diamond grind
- 2mm diamond grind
- 3mm rond grind
And here is a pic of those tolls ... much less bulky than a drill press

The process I used is VERY BASIC.
1mm diamond grind :
I first enlarged the pre-drilling until the grind passes easily through ... by working carefully it is possible to keep the holes in the same axis.
I think it’s best to rotate the file in both directions (rather than going back and forth)
2mm diamond grind :
There you have to be more patient and more applied because you do not want to pass completely through ... the aim being to get a hole of about 1.3 mm and not 2mm.
Always the same method (rotation rather than going back and forth) and it is necessary to stop regularly to control the result with a 2mm springbar ... from the outside.
When the springbar crosses almost completely the lug (it just blocks on the inside face) I changed tools.
3mm round grind :
I gently enlarged the hole from the inside side of the lug with the round file of 3mm ... always checking regularly to stop as soon as the springbar pass freely.
This is the most risky phase because you have to do it at an angle and you have to be very careful, otherwise you risk scratching the opposite lug.
All this process took ame bout 20 minutes to drill 2 lugs ... so it would take 40 minutes for a complete case.
It is probably longer than with a drill press (although ... if one takes into account the time to install the drill press, to fix the box and to align the holes, etc ...) but it is much less risky.
It's quite impossible to ruin your case and as one works gently the steel does not heat and does not harden.
Plus you can do this in « spare time » ... by watching a movie, on public transport (if you have a seat), in a car (if someone else drives), in an hotel room (for business travelers), etc ...
Here are some pictures of the job I did.
still have to drill the 2 remaining lugs and the chamfers of the external face but it is already … not that bad.


And here’s an overview with 2mm springbar in ... rather cool
Cant help but congratulate myself :clap_1: