• Tired of adverts on RWI? - Subscribe by clicking HERE and PMing Trailboss for instructions and they will magically go away!

CERAMIC INSERT REMOVAL GUIDE.

KalKala

Getting To Know The Place
27/11/18
97
31
18
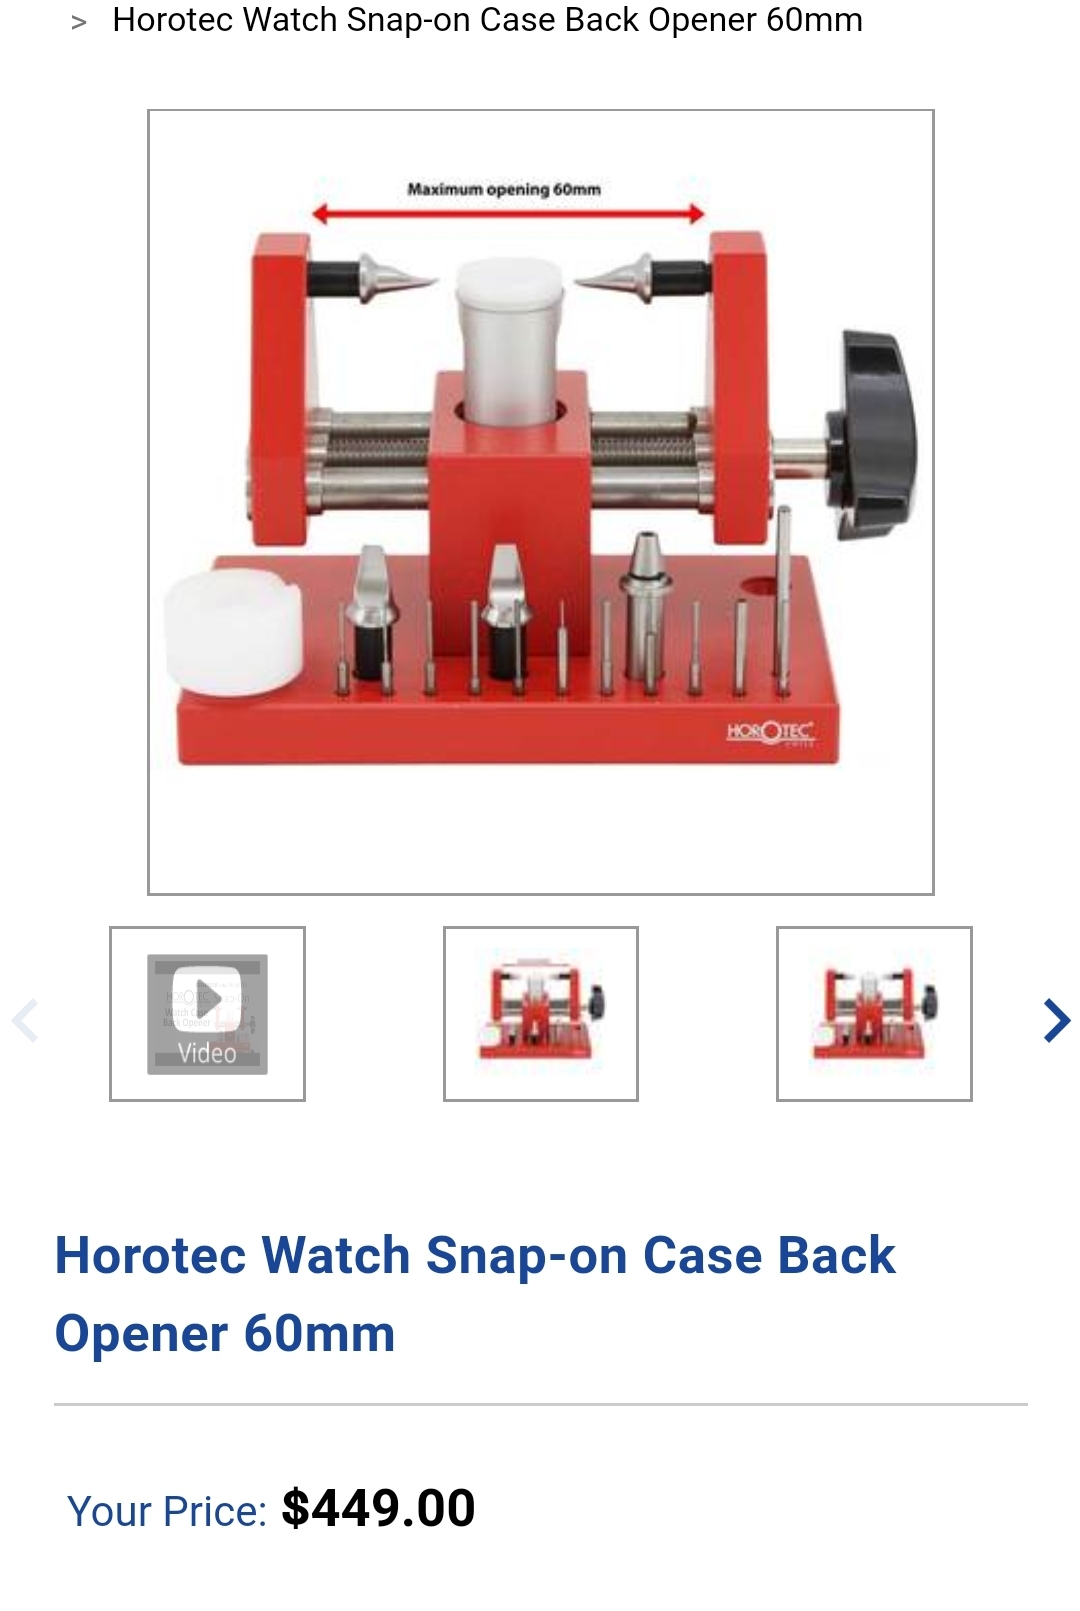
I use hortec tool with bezel removal attachment
I believe that is called the Horotec MSA 07.115-F: I also have the same tool but naturally it's not original (?) even if it comes with a branded box. Yes, besides the replica watches China is also making replicas of the tools used in Horology from the notorious gangs of Bergeon, Horotec, et all. ;)
Now I have to find the MSA 07.115-F attachment replica (!) and it seems not an easy task: any help would be welcome...

Cheers
 

Oascom

Brigged
INMATE
Patron
Certified
19/1/16
4,410
5,073
113
I believe that is called the Horotec MSA 07.115-F: I also have the same tool but naturally it's not original (?) even if it comes with a branded box. Yes, besides the replica watches China is also making replicas of the tools used in Horology from the notorious gangs of Bergeon, Horotec, et all. ;)
Now I have to find the MSA 07.115-F attachment replica (!) and it seems not an easy task: any help would be welcome...

Cheers
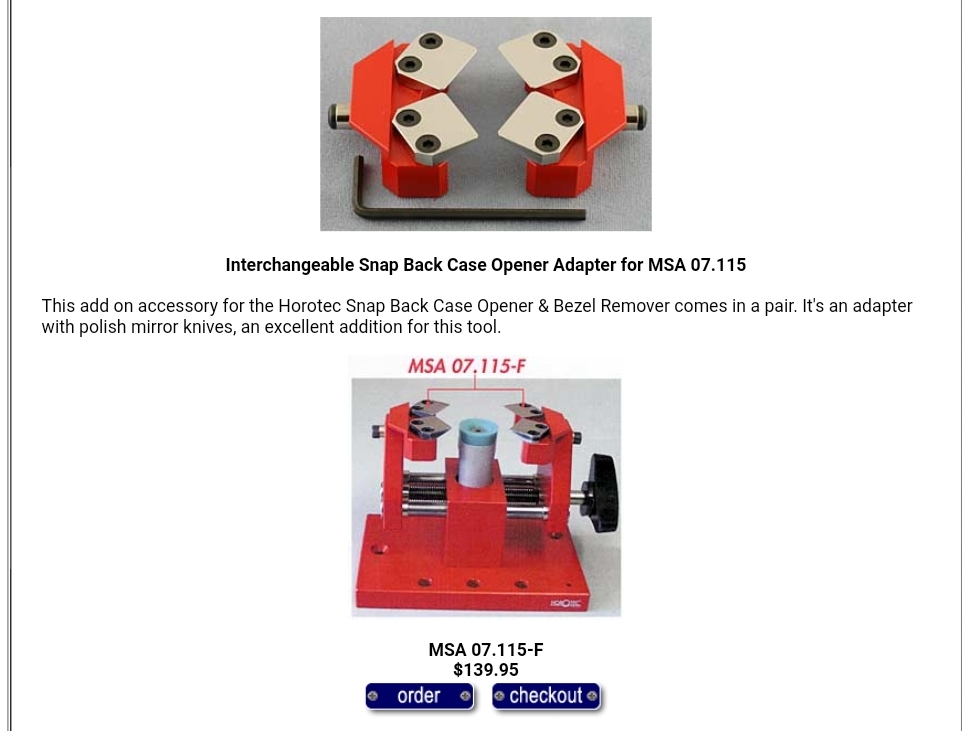
That's the tool and attachment you need to buy separately:
 

Oascom

Brigged
INMATE
Patron
Certified
19/1/16
4,410
5,073
113
I highly recommend buying genuine as the china copy will scratch your case and bezel as the metal is too soft and will deform. Those jaws need to be hardened metal and super Sharp.
 

KalKala

Getting To Know The Place
27/11/18
97
31
18
Yes, I know the Chinese tools are usually crappy, but essentially I would just replace the blades with the original ones, if only I can buy them separately! And I only need these tools very sporadically.
Besides I believe the originals are way overpriced anyway...
 

Oascom

Brigged
INMATE
Patron
Certified
19/1/16
4,410
5,073
113
Yes, I know the Chinese tools are usually crappy, but essentially I would just replace the blades with the original ones, if only I can buy them separately! And I only need these tools very sporadically.
Besides I believe the originals are way overpriced anyway...

Maybe but you get what you pay for it's always cheaper just to copy a design. And much harder and expensive to create something from scratch.

But like you said if someone use it sporadically then yeah no need to buy brand name tools.
 

KalKala

Getting To Know The Place
27/11/18
97
31
18
I'm sorry if somehow I'm now diverting the thread (if you feel we are straying too far, please ignore me): do you use these four blades to remove rotating bezels as well?
Usually you can push on one side of the rotating bezel and using the 'famous' butter knife or something more appropriate on the opposite position you will eventually get the bezel pop out, since these types have some amount of a gap to allow them to rotate that you can exploit...
 

Oascom

Brigged
INMATE
Patron
Certified
19/1/16
4,410
5,073
113
I'm sorry if somehow I'm now diverting the thread (if you feel we are straying too far, please ignore me): do you use these four blades to remove rotating bezels as well?
Usually you can push on one side of the rotating bezel and using the 'famous' butter knife or something more appropriate on the opposite position you will eventually get the bezel pop out, since these types have some amount of a gap to allow them to rotate that you can exploit...

I use those for rotating too. It lift the bezel evenly and had great success with it so far.

I know Rolex use different method (I think someone show it not so far ago in tutorial section)
 

opus42

Getting To Know The Place
22/5/19
86
13
8
Fantastic guide !! Thanks for sharing your obvious wealth of knowledge!!!


Sent from my iPhone using RWI
 
  • Like
Reactions: Oascom

mega12

I'm Pretty Popular
17/10/17
2,530
971
113
After keeping my gen Hulk insert in the drawer for nearly a year, after being rejected by two watch smith to install it, after reading your thread and another one (don’t remember the name of the member) and, most important, after having some beer and whiskey, I was confident enough to try it myself:
insert a gen hulk insert to a gen bezel.

I have to confess, I cracked some ceramic inserts in the past by doing nearly everything wrong... Nothing expensive, so no problem at all. All the other ceramic inserts which I had installed successfully either had a little crack before (which makes it easier to press) or have been glued only.

This time I wanted to be prepared and install my most expensive hulk insert without cracking anything. Therefore, I did everything according to your and the other members recommendation.

1. For removing an insert I’m always using a thin blade knife and push it gently under the metal insert ring. This works quite well for me, so I never tried your way but pretty sure yours work as well.

2. For mounting the insert, I did also adjust two things from your recommendation:
First, I placed the bezel directly on the case (instead of mounting the insert without the bezel being installed). Otherwise I can’t align the triangle to be centered.
Second, I touched the edges of the insert with some WD-40 oil. No clue if this helps or not, but IMO oil makes everything a bit smoother and therefore reduces risk for cracking something...

3. I cut of a little piece of a cheap plastic die according to your recommendation (used a dremel, very simple at all). At the beginning I was struggling which size of the die I should use. There is one die which seem to have exactly the size of the insert and another one which is a bit smaller but seems to fit quite well. I used the bigger one because IMO the more you push the insert on the “outer” sides, the more stable it will be... also just an assumption and not proven by any evidence...

4. I placed the insert according to your recommendation on the bezel, trying to be even on every side, not snapped in before, aligned the triangle (was very tricky everything because due to the oil the insert was moving a lot...).

5. Then I used my fingers and pressed the die onto the bezel and realized that this won’t work (at least for me). It’s too hard to keep a balance with my fingers and steer the correct pressure. Maybe you are more advanced in here but I was too shy ;)

6. Did step number 4 again and then used a cheap crystal press. Placed the watch on it and pressed very gently again with the press. Just pressed it so far, that around 80% of the insert was underneath the rubber of the bezel but the insert was already a bit strong in place and not moving anymore. Then I tried to focus a bit on the 20% where it was not snapped in 100% yet. I still kept the die even on the whole bezel but focused while pushing with the die on the 20% part. And all of a sudden there was a very gentle “click” and it snapped in.

Yeahhhhhhhhhhhh!!!!! Here you go:

e599205c70594f93cd6cd99bc81126c8.jpg


c597528d54209da815854b8815303f5d.jpg


I am so happy!
Many thanks for sharing your post!
This helped me a lot and I am really glad that I did it!!!

I might do a little tutorial with a bluesy insert which needs to be mounted as well and post this experience with more pics if everything works well.

Thanks again for motivating!
 

mega12

I'm Pretty Popular
17/10/17
2,530
971
113
Under some natural light
Clean Factory dial will follow

b003722ecad7175e1402b77f93f57162.jpg

cb0183f9f06b9405665b9ae76bd80656.jpg


Time doesn’t exist, clocks exist
 
  • Like
Reactions: Oascom

Oascom

Brigged
INMATE
Patron
Certified
19/1/16
4,410
5,073
113
Under some natural light
Clean Factory dial will follow

b003722ecad7175e1402b77f93f57162.jpg

cb0183f9f06b9405665b9ae76bd80656.jpg


Time doesn’t exist, clocks exist

Looks amazing mate! I'm glad I could help a little. Yes of course doing it by crystal press / rack is better because you have a even push all around.
I did​ it by hand to demonstrate and also I did it on a rep bezel and insert and those are easier.

Gen inserts I always press witht rack press as those are much tighter fit in.


Ps.... Did your heart stop when you heard that "click" sound at the end ? Haha
 
  • Like
Reactions: KJ2020 and mega12

mega12

I'm Pretty Popular
17/10/17
2,530
971
113
Looks amazing mate! I'm glad I could help a little. Yes of course doing it by crystal press / rack is better because you have a even push all around.
I did​ it by hand to demonstrate and also I did it on a rep bezel and insert and those are easier.

Gen inserts I always press witht rack press as those are much tighter fit in.


Ps.... Did your heart stop when you heard that "click" sound at the end ? Haha

Ah good to know.

My heartbeat increased all the time, that’s why I needed some alcohol before ;)

However, interestingly the final click was so smooth and decent, that I had not a single doubt and was confident that it worked properly. I know exactly what you mean, but this one was really smooth. Maybe because of the oil...


Time doesn’t exist, clocks exist
 
  • Like
Reactions: Oascom

guybythelake

Active Member
13/7/14
350
163
43
What is the process for removing a ceramic GMT Master bezel insert from an ARF?
 

mega12

I'm Pretty Popular
17/10/17
2,530
971
113

It depends...

If you are using a die and hands only to remove the ceramic insert, then yes.

If you are using a knife or whatsoever to push it under the insert metal ring (like I prefer to do), then it’s not going to be the same because the GMT doesn’t have this “insert ring” underneath.

But yes, your process is the same :)
 
  • Like
Reactions: Oascom