Get in touch with MarvellousHi all, is JKF 5513 still available for purchase anywhere today in 2025? I believe the models were first launched in 2016, I am not even sure if the factory still exists. If anyone has info of which TD, I will be grateful. Thanks.
-
Tired of adverts on RWI? - Subscribe by clicking HERE and PMing Trailboss for instructions and they will magically go away!
Building a 5513 - Tutorial
- Thread starter Megahz1
- Start date
riosundoro
Getting To Know The Place
- 10/6/24
- 17
- 9
- 3
Ok i will, thanksGet in touch with Marvellous

Yes of course, you can contact Marvellous replica, he is TD hereHi all, is JKF 5513 still available for purchase anywhere today in 2025? I believe the models were first launched in 2016, I am not even sure if the factory still exists. If anyone has info of which TD, I will be grateful. Thanks.
marvellousreplica <marvellousreplica@gmail.com>
riosundoro
Getting To Know The Place
- 10/6/24
- 17
- 9
- 3
I finally placed an order for 5513 through Steve. Btw, I was wondering about the bracelet quality of this JKF piece, hopefully someone can answer.
- does it use screw or pin to connect links?
- does the whole bracelet feel and weigh like vsf/clean bracelet, or more like $5 replica bracelet? I read somewhere that the links are hollow, not sure which link because they look solid to me.
Thanks...
- does it use screw or pin to connect links?
- does the whole bracelet feel and weigh like vsf/clean bracelet, or more like $5 replica bracelet? I read somewhere that the links are hollow, not sure which link because they look solid to me.
Thanks...
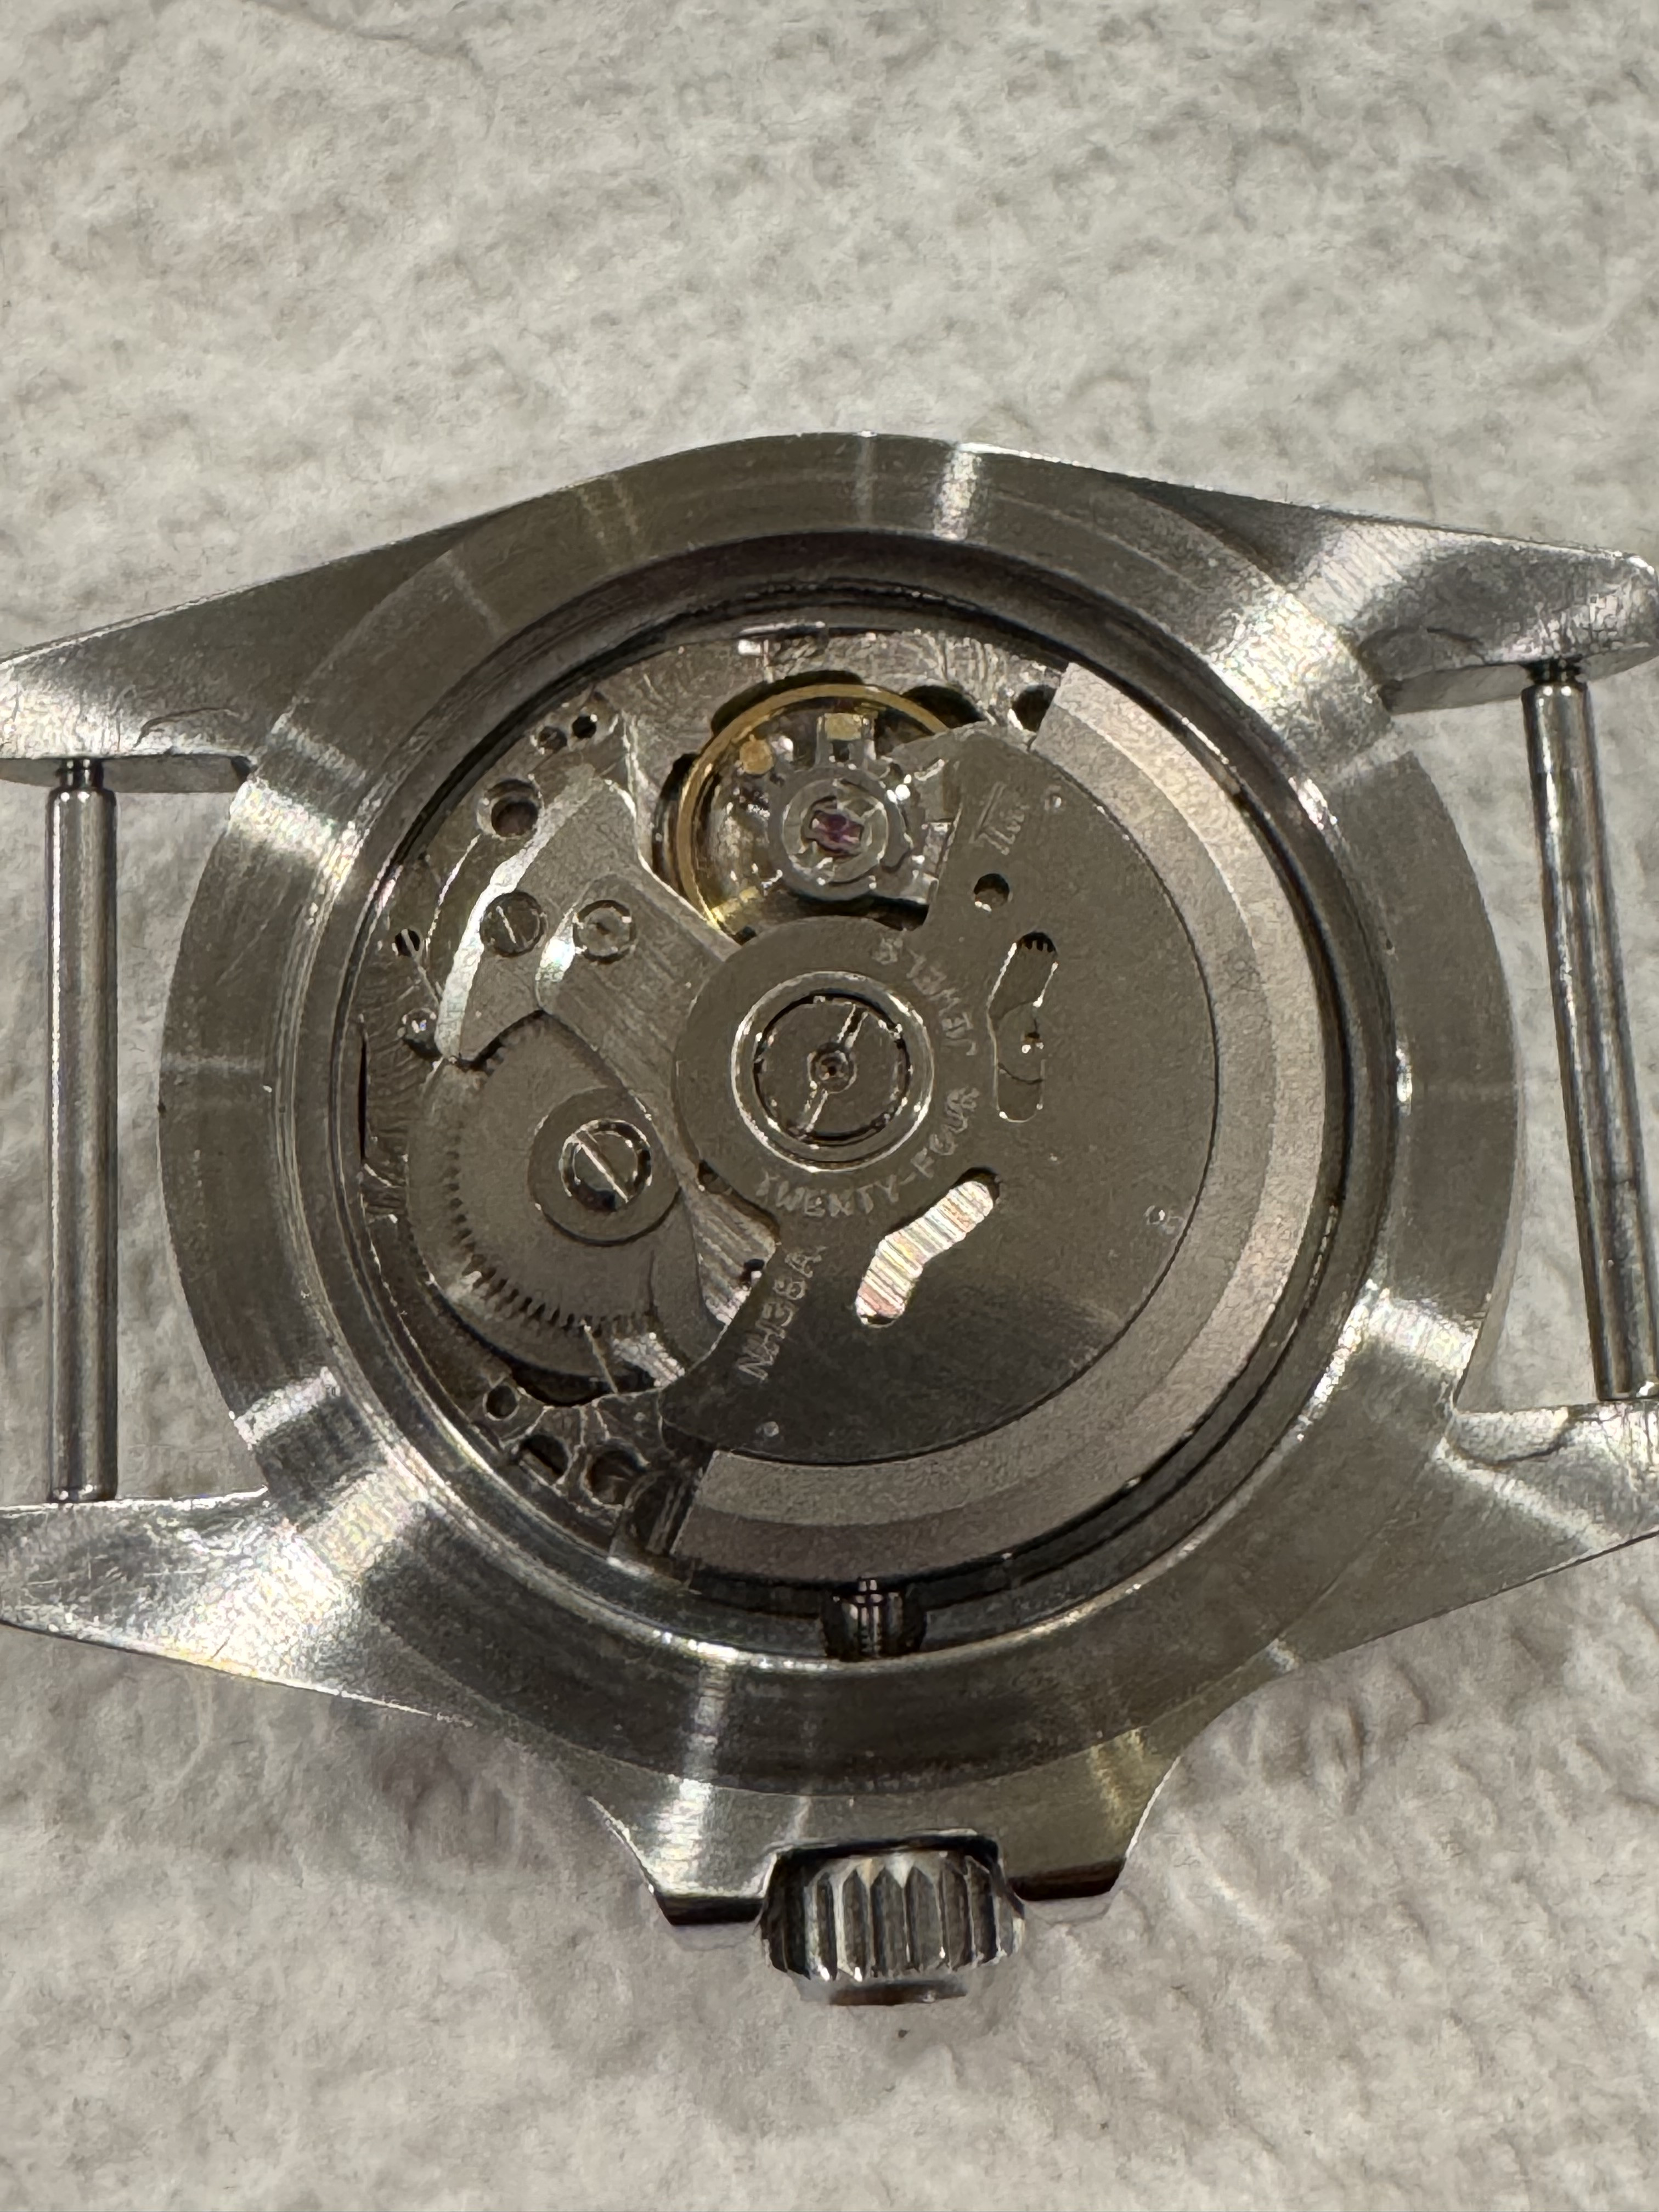
Decided to age it. The final result!Finished my Milk build last week with a 2824 and later messed up the keyless works. Ended up tossing in an NH35 movement instead of the ETA. It took much trial and error and tweaking to get it in perfectly, but is keeping great time.
Thanks! My apologies, I am using the NH38 without a date function. For some reason I have been calling it an NH35, but you are correct. No date.@DeLoMan nice, can we see a shot of the movement in situ please? What did you have to do?
If you swap the nh35 for an nh38 you can loose the date position....
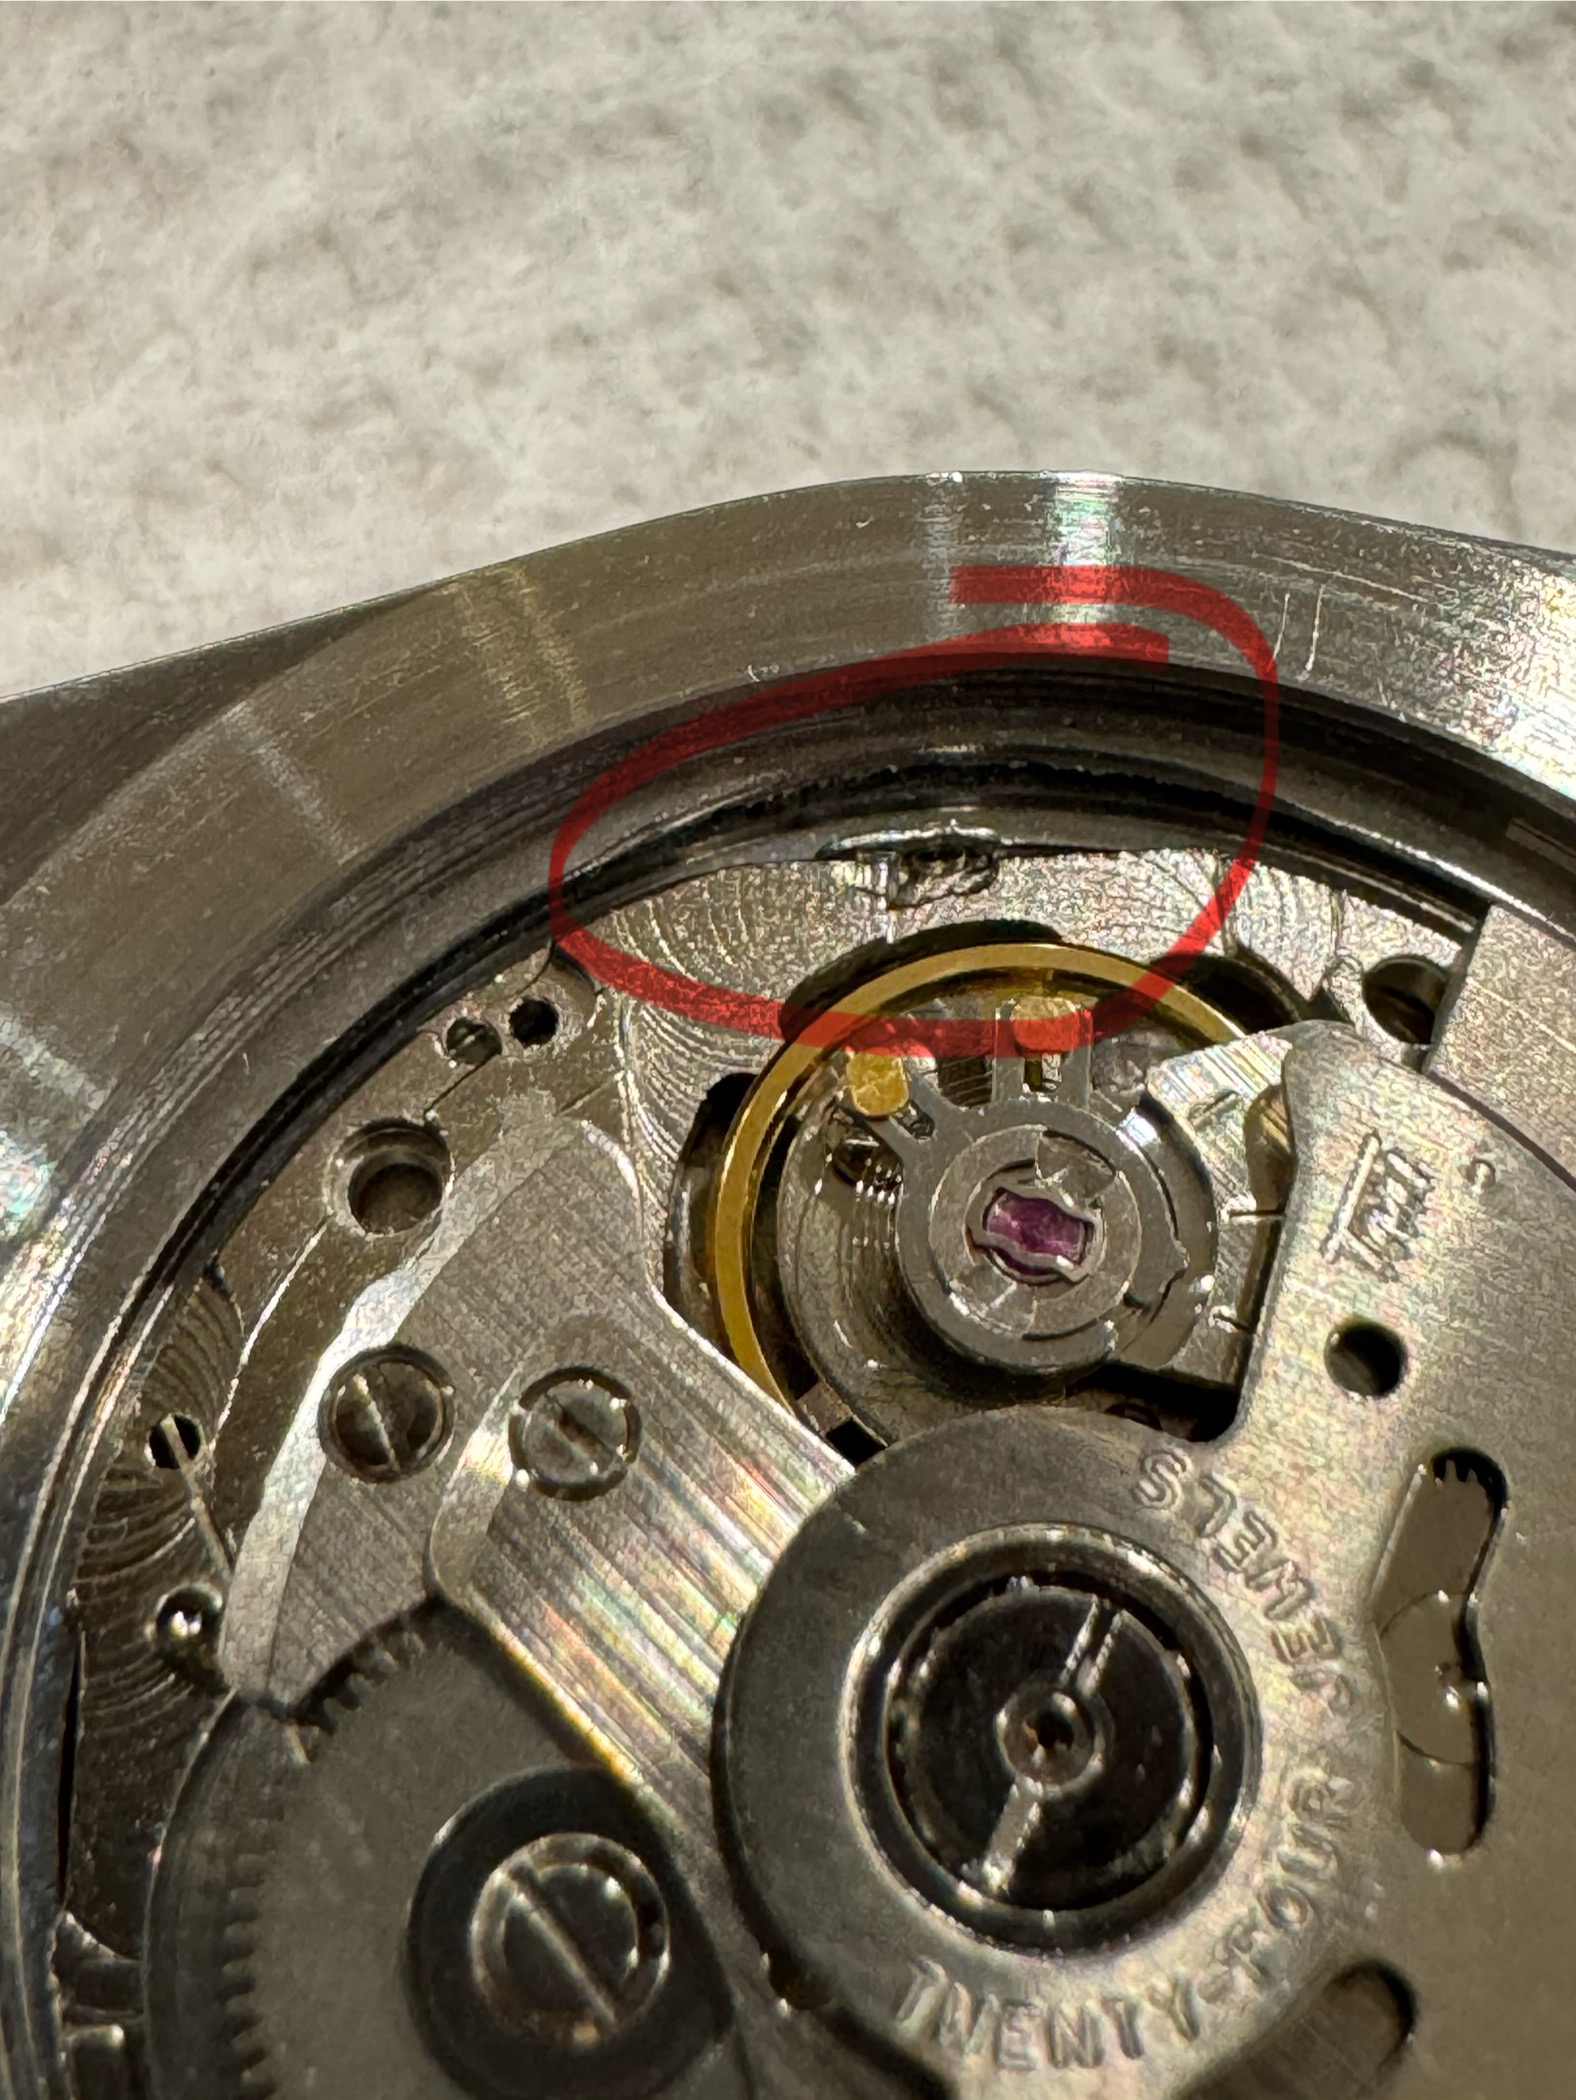
Here’s a view of the movement in situ. I did need to use a movement tab as a small shim to keep the movement where it needed to be in addition to the regular 2 tabs. The shim is in there tight, with a drop of hypocement for added confidence Circled here.
- 14/10/19
- 2,969
- 13,538
- 113
This is a great tip. But isn't that pin a double-headed rivet that must be destroyed to get the bracelet apart?You can do a small wrist mod on the 93150/93250 bracelets by taking the clasp apart and removing the in-built link to get a 4 link per side setup. I’ve done this on a couple of bracelets.
You’ll need to get a spare 18mm friction pin as you may end up destroying the stock one during removal.

That’s exactly what he wrote …This is a great tip. But isn't that pin a double-headed rivet that must be destroyed to get the bracelet apart?

With the gen bracelets I believe this pin is hand made from a single piece of steel, where one side of the rivet is manually shaped by hammer after installation. So it’s destructive access if you want to remove this pin as you have to snip it.This is a great tip. But isn't that pin a double-headed rivet that must be destroyed to get the bracelet apart?
The jkf and arf bracelets I’ve tried this on both had the split pin type where you hammer one end in yourself.
There’s not much of a lip on the rivets head to work with but you can get a small flat head underneath it and lever it up gently.
Jkf came out like butter but the arf was in tight, either way during this process you can still damage the head - hence the suggestion to get a spare..
Something like this.
No, he wrote that during the process one may break the pin, but in my experience with genuine bracelets one must break the pin.That’s exactly what he wrote …
As he mentioned in the reply, there is a key difference here between gen/JKF construction, so my question was valid. Thanks for chipping in though.
I was able to take the pin apart exactly as you described with some flush cut nippers. Thanks again for the guidance.With the gen bracelets I believe this pin is hand made from a single piece of steel, where one side of the rivet is manually shaped by hammer after installation. So it’s destructive access if you want to remove this pin as you have to snip it.
The jkf and arf bracelets I’ve tried this on both had the split pin type where you hammer one end in yourself.
There’s not much of a lip on the rivets head to work with but you can get a small flat head underneath it and lever it up gently.
Jkf came out like butter but the arf was in tight, either way during this process you can still damage the head - hence the suggestion to get a spare..
Something like this.
Question , how did you get the case watertight after counter sinking the crown tube , having trouble wrapping my head around that . Awsome tutorial by the way ! Got me a jk watch on the way can’t wait to dig into itHi everyone,
I have been a long time member of this forum and I have always been reading and gathering informations throughout the years, without giving anything back unfortunately. This tutorial is made to thank all the members of the community which helped me gain some knowledge and hopefully it will help future newbies in the vintage Rolex world.
Disclaimer: I am a hobbyst watchmaker, but I do not consider myself an expert by any means. Take everything as a guideline and always try to understand what you are doing before potentially ruining your watch.
Ok so after the intro we can start with the project!
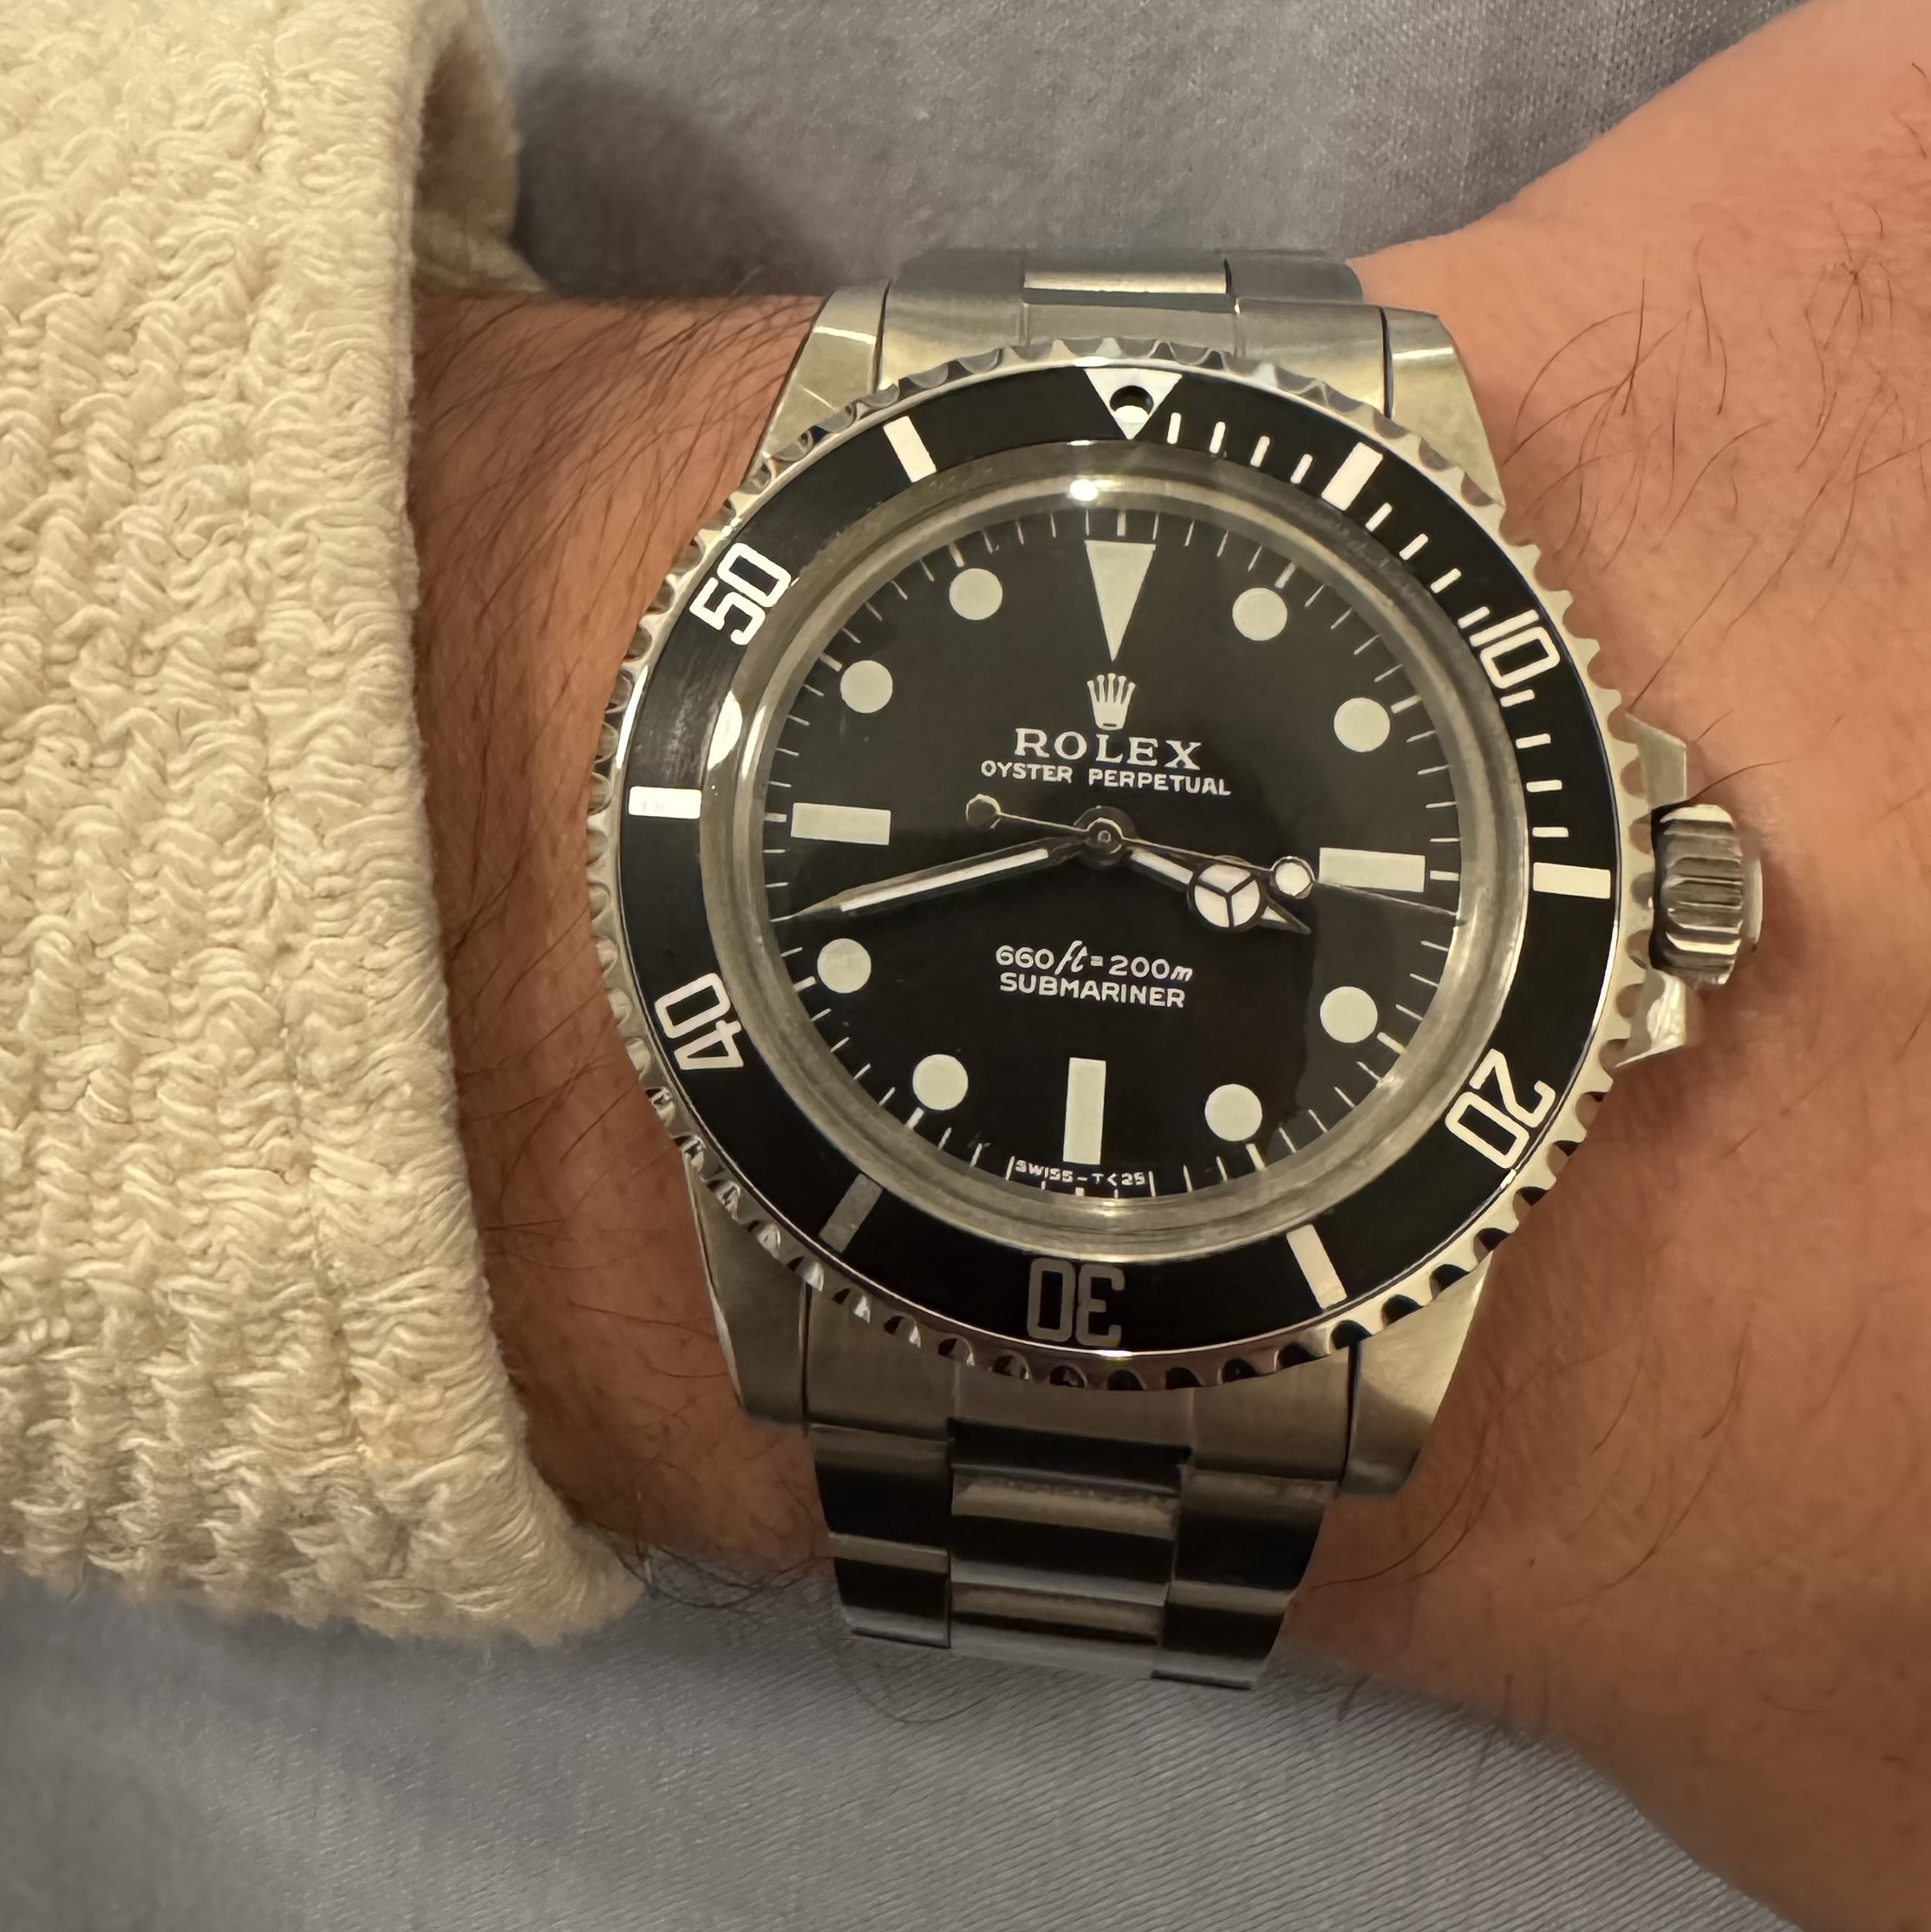
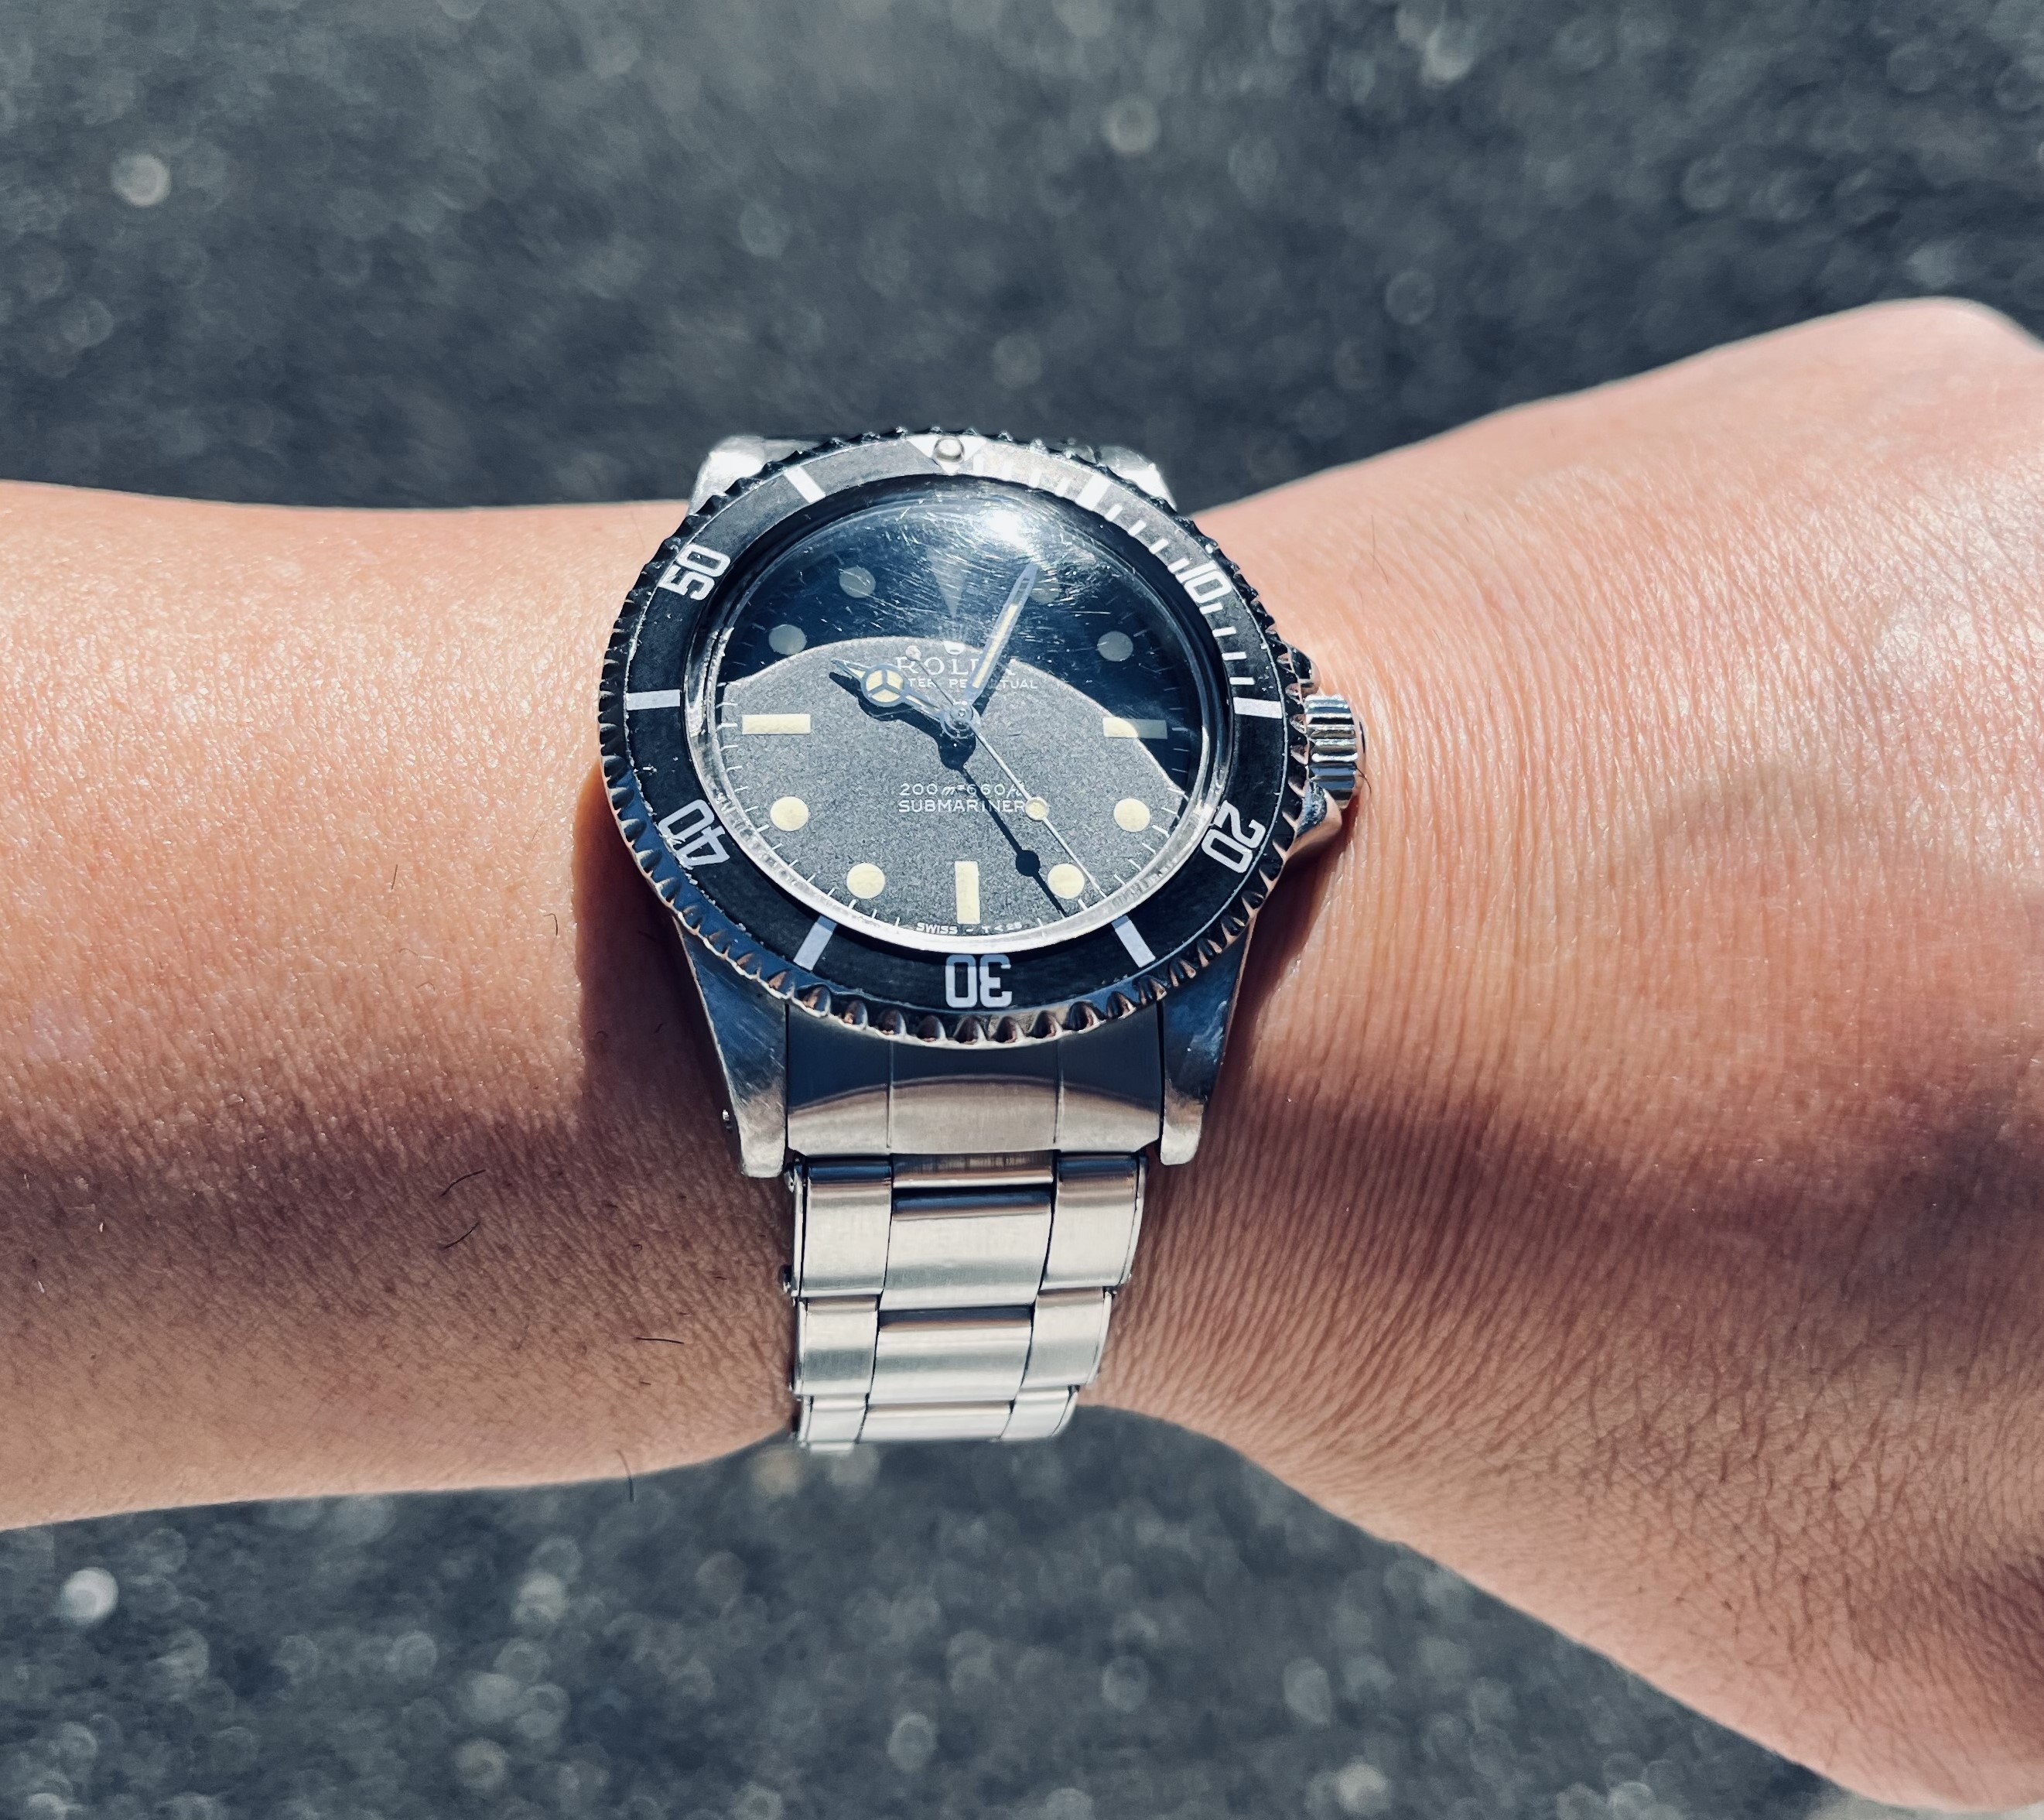
I will build a medium budget 5513 which in my opinion will result in a pretty decent watch for the money. The base I am using is the ever popular JKF 5513 Submariner, sometimes referred as "Cartel". You can get one from any TD (I got mine from Puretime a couple of years ago, but Marvellous is the go to guy for such watch imo).
Do not repeat my error and grab a 21j version since we will be swapping almost everything anyway.
I know that a Viet gen spec build is awesome and will be much closer to gen spec, but I think that with the right reshaping and care, one can get a visually satisfying result even with a JKF case. For anyone wondering, the unchangeable difference between Viet and JKF is the stem height which is different between the two since Viet cases are made for Rolex/2824 movements while JKF uses 21J/2836. What it means is that looking straight to the watch, the Viet crown will be closer to your face than JKF's; while someone is obsessed with this detail, we have to compromise.
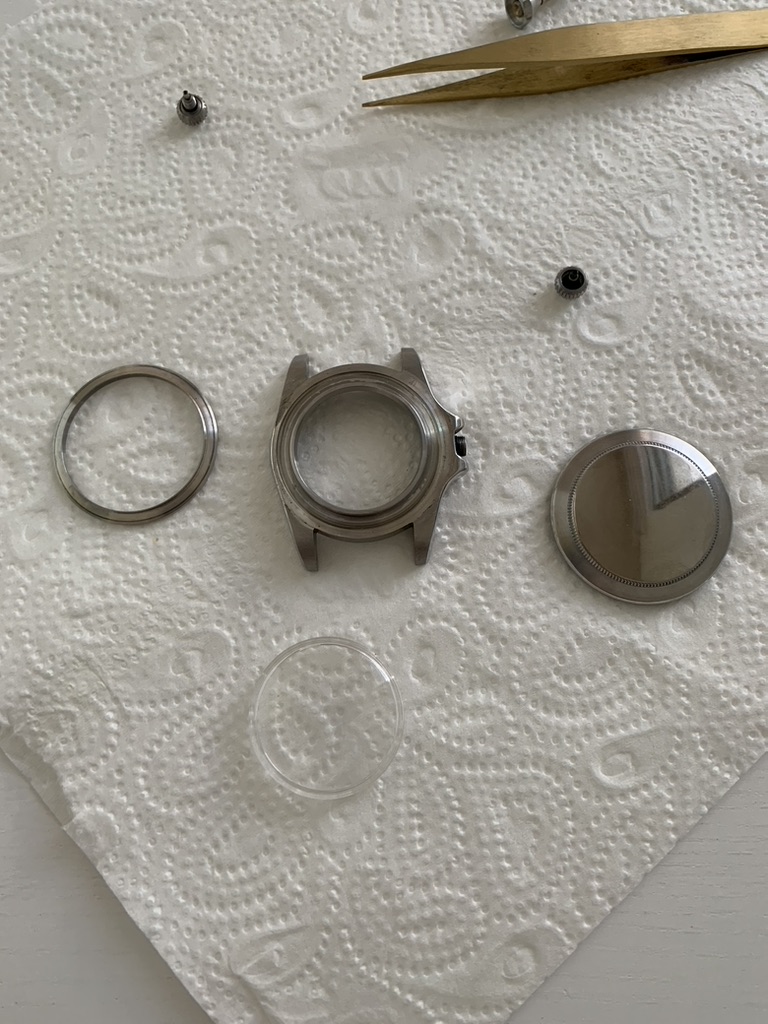
Here is the starting point:
As you can se it is not gracious at all, but with some elbow grease and patience we can make it better. The good thing about this base is that it accepts Gen spec crystal and some other parts.
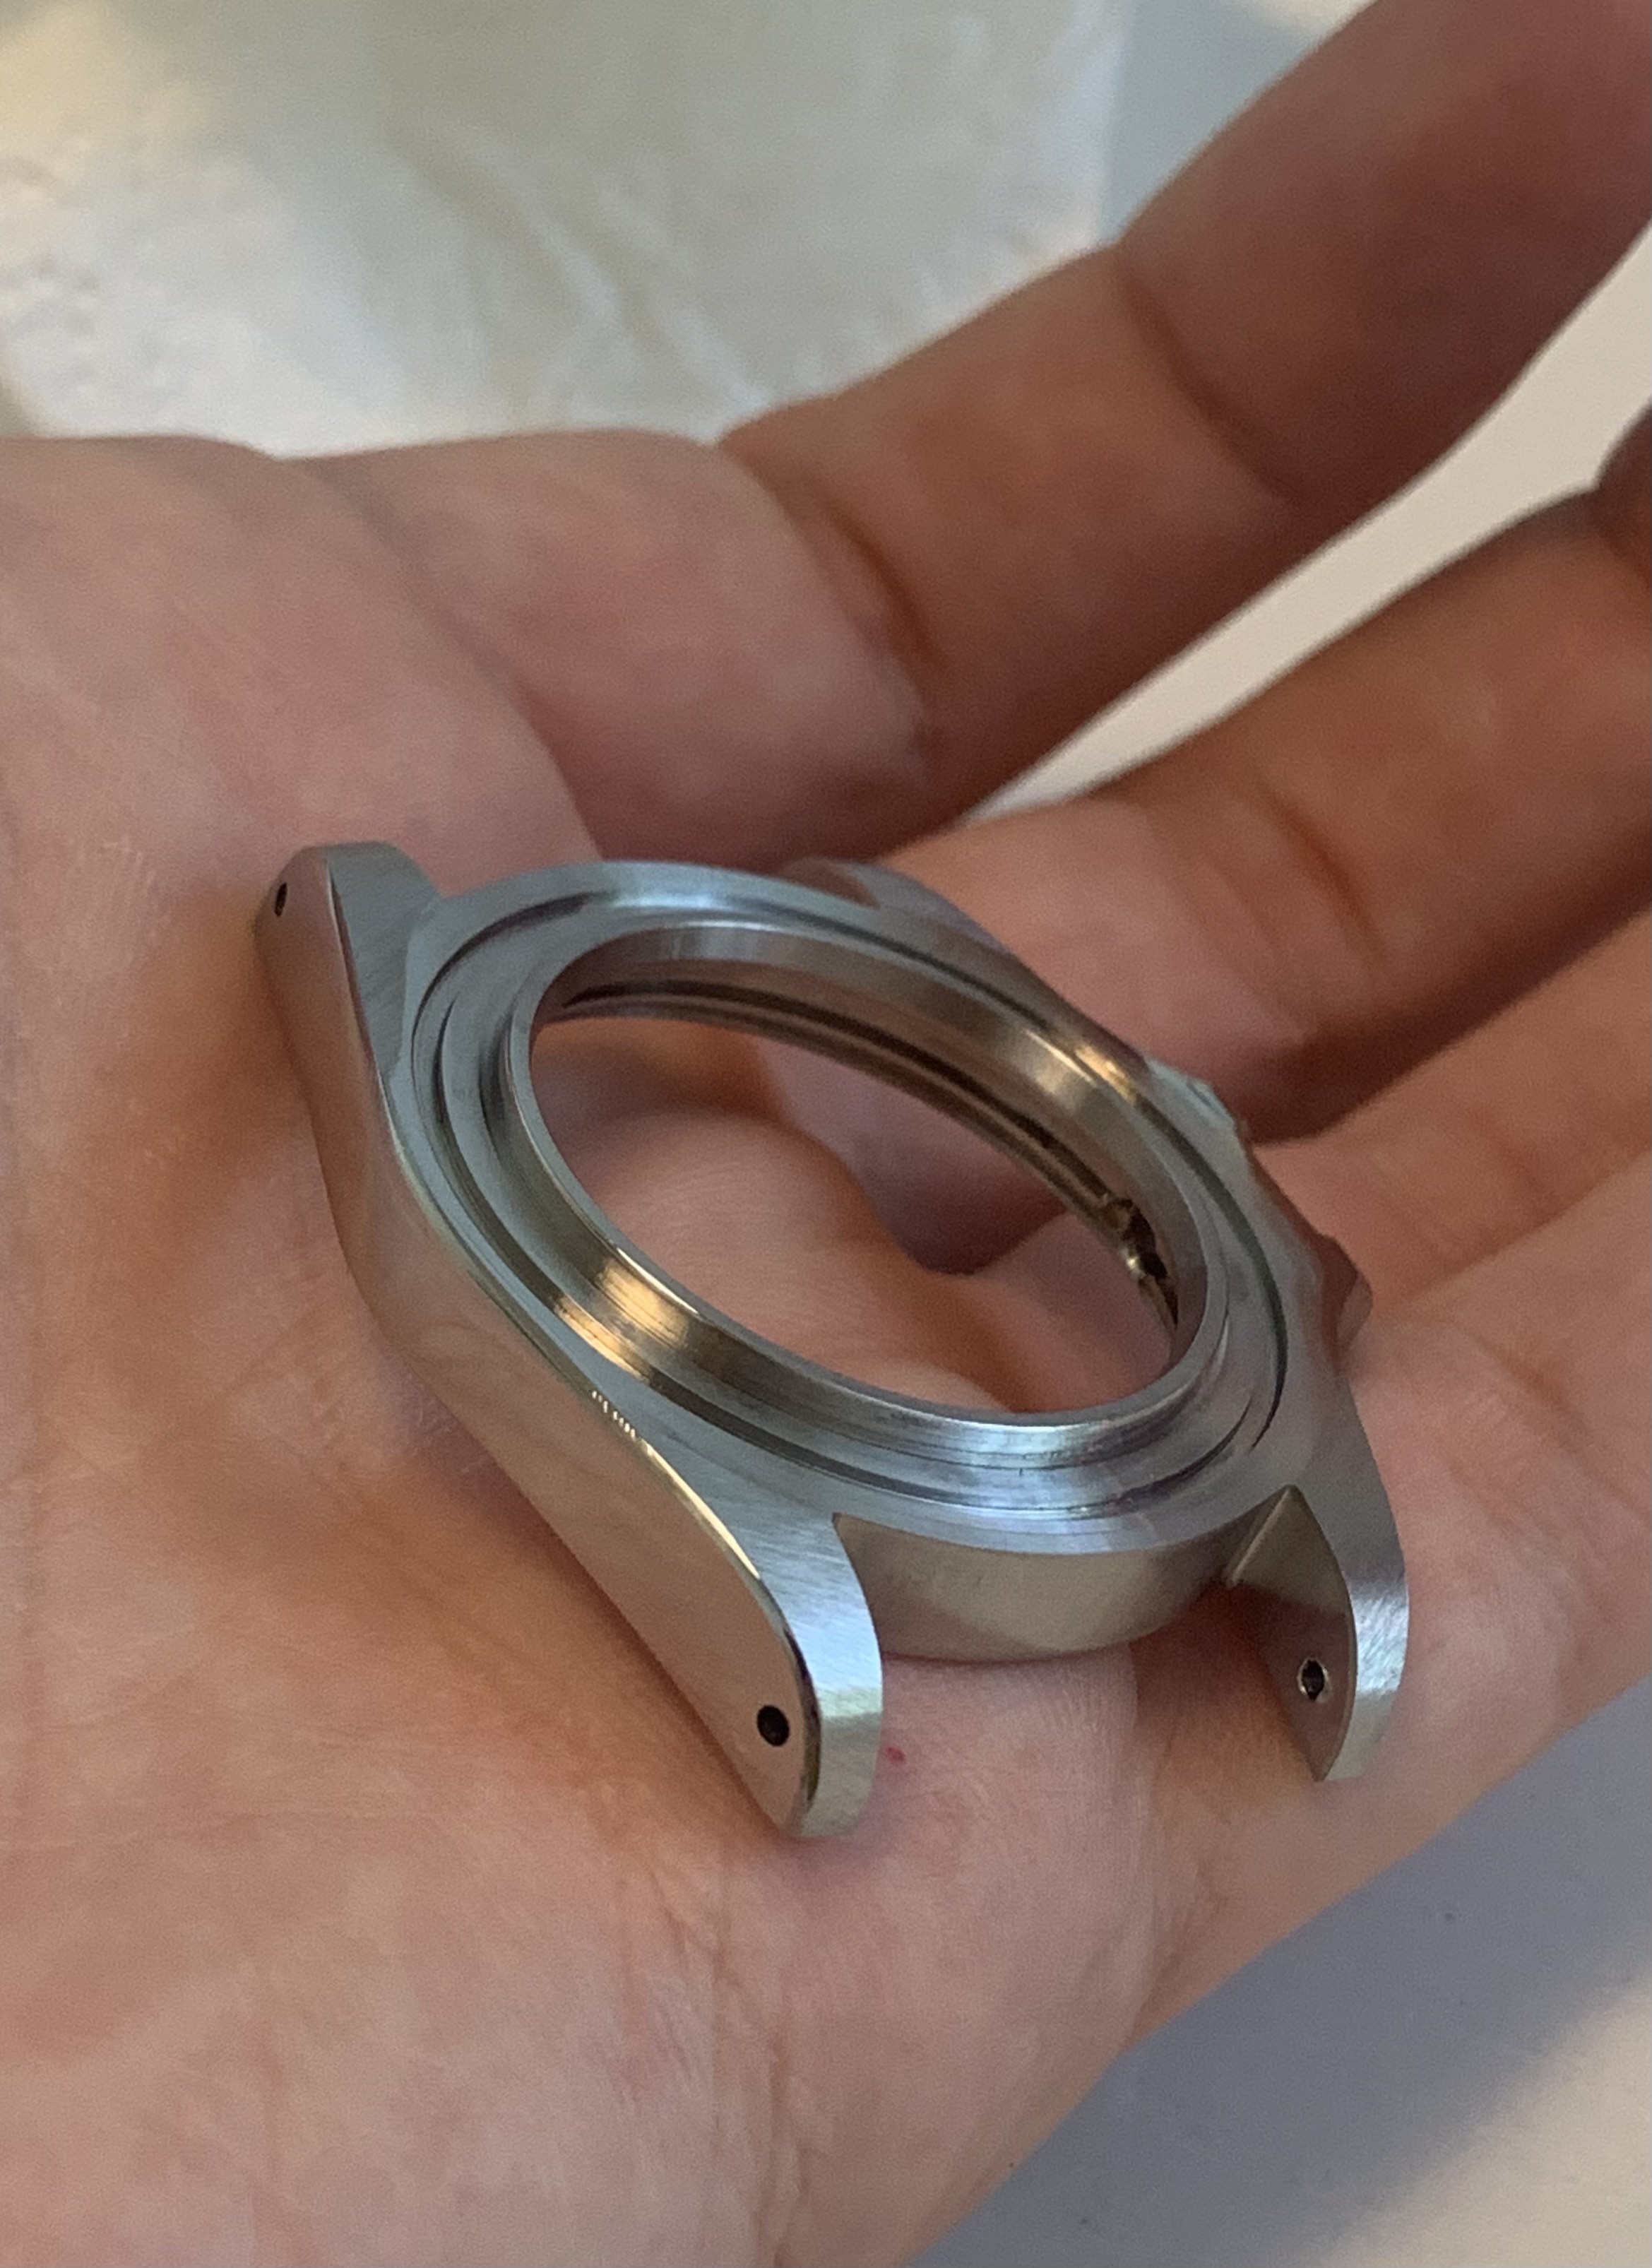
Casework
Let's disassemble the watch! You can follow tutorials on youtube which will show you how the case is constructed, in particular:
To remove the caseback you can use a Bergeon ball which can easily be found here or on similar websites:
https://www.cousinsuk.com/product/suction-grip-ball-065mm-bergeon-swiss
Once completed this step you should have something like this:
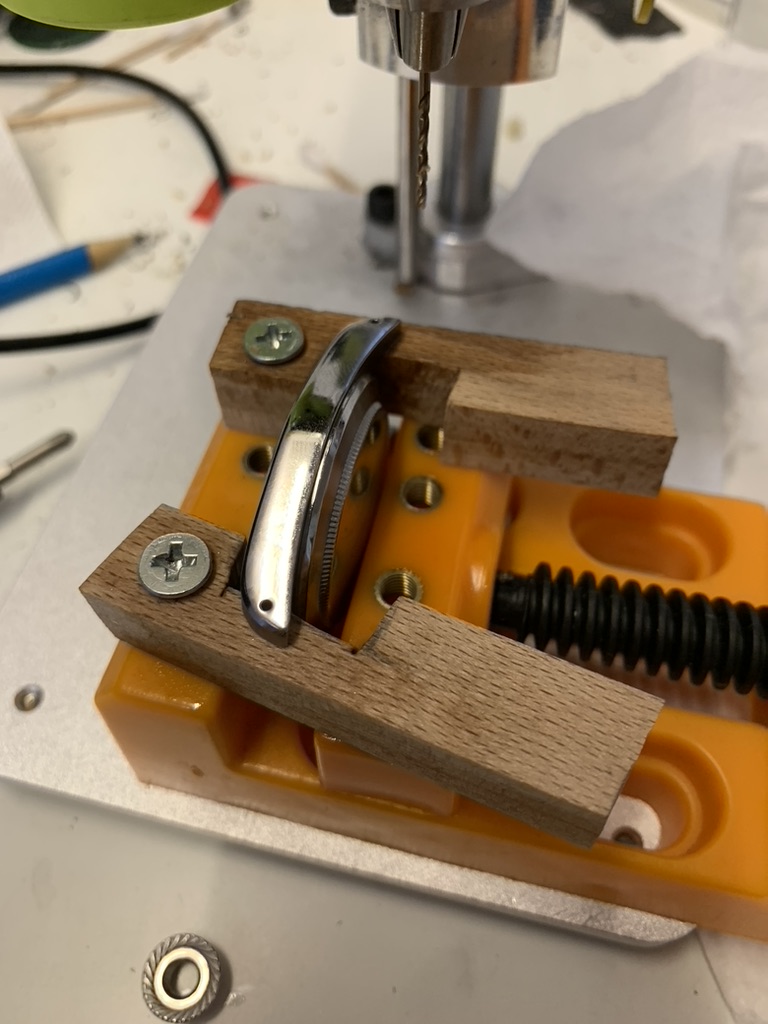
Now we can move to case work, starting from drilling the holes to fit Gen-spec springbars which can be purchased for cheap here:
https://www.cousinsuk.com/product/rolex-assorted-styles-horotec-swiss?code=S52544 Swiss made option from Horotec 2mm
https://www.cousinsuk.com/product/rolex-assorted-styles?code=R19196 10-pack generic 2mm
To do this we will need some 1.3 mm cobalt drill bits; it is very important to use good quality cobalt bits to make the process easy and painless. Do not cheap out on these as they can make the process either a breeze or hell! They can be found on Ebay for a cheap price and are easily recognized as they are goldenish color throughout the bit.
Most people are scared of this step but it is pretty straightforward if your case has pre drilled lugs and if your setup allows you to keep everything aligned. You can use hand drill/dremel (I have done this before), but I really recommend a drill press, even a cheap one. Align everything and use WD40 to keep the bit lubricated. It is useful to check alignment with a 1 mm drill bit, fix the case and then swap with the 1.3 mm bit.
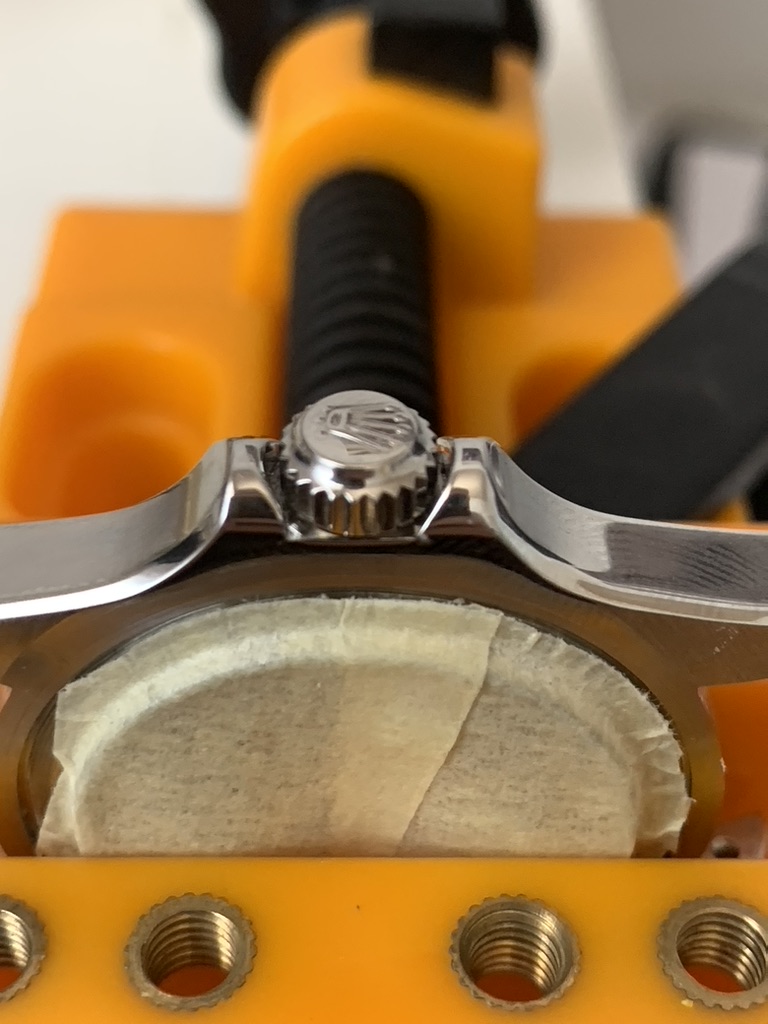
Once done with the drilling it is time to remove the tube from the case. To do so I used a small square file which was pushed in the tube and turned anti-clockwise. It is helpful to heat up the area using a lighter to melt the glue used to keep the tube in place.
Now let's shave the crown guards from the inside to make them more Gen-like. To do this a small flat file was used and the crown was positioned in place to constantly check the result. Go slowly and keep checking until you are satisfied with the result. It is recommended to use a Gen as reference and avoid calipers, you should really eyeball it until you feel it is right as these are old watches and each case is different.
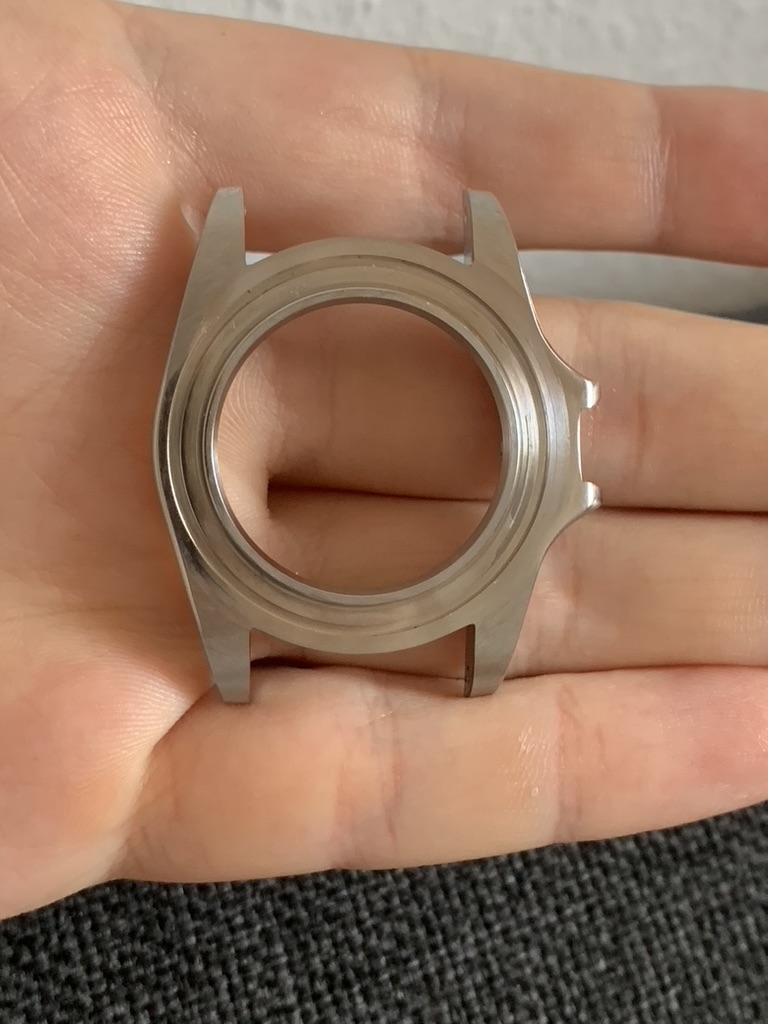
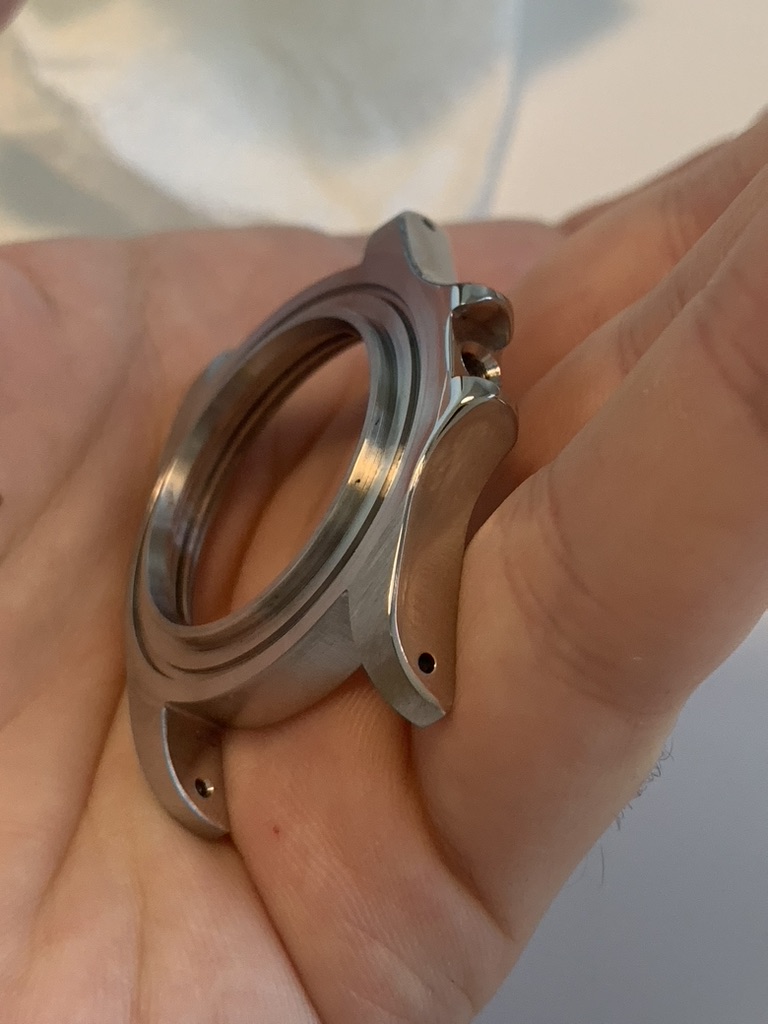
Here you can see the difference (left CG vs right CG).
Now it is time for the reshape of the case. Here a Dremel with sanding drum was used and I tried to shave some material from the outside of the CGs and from the sides of the lugs. Again use a gen picture as reference and try to keep the lugs uniform and flat. It is easy to remove too much material so be careful! If you are not comfortable using a Dremel, you can also opt for a steel file. I used a combination of both.
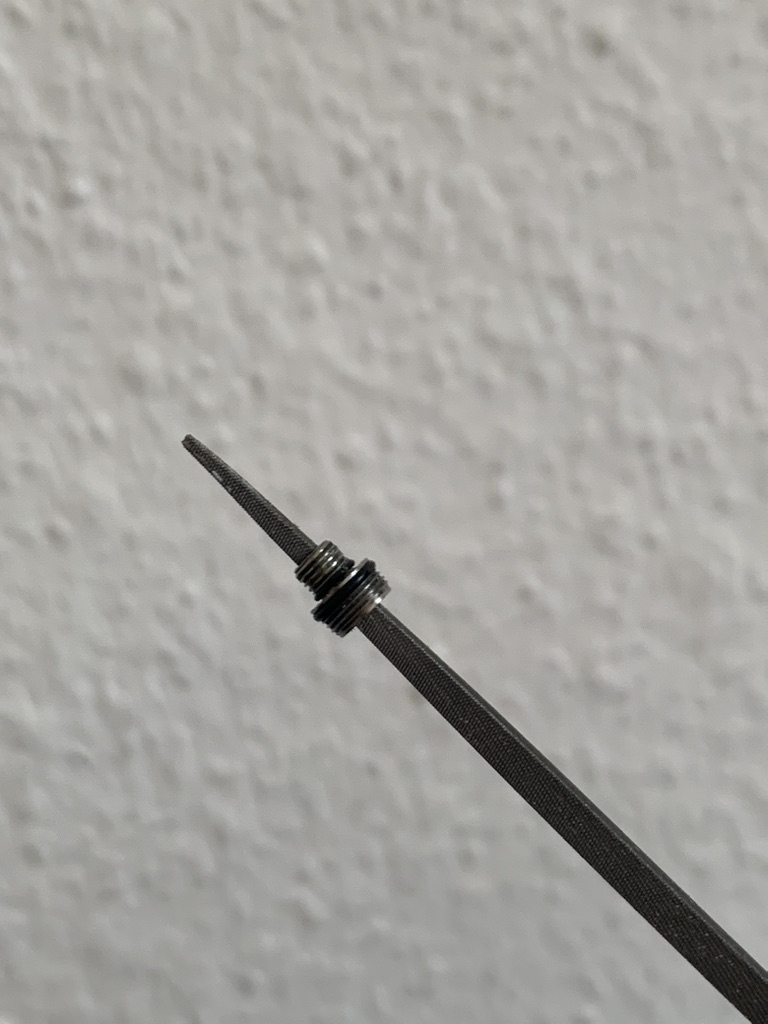
Next step is to install an Athaya 702 (period correct) crown:
http://parts.athayavintage.com/product/aftermarket-702-crown-and-tube/
To do this a retap of the case is needed (at least it was in my case but not always) and you will need a properly sized tap which can be found here:
https://www.cousinsuk.com/product/taps-for-rolex-pendant-tubes Correct size is 3 x 0.35
You can follow some tutorials on youtube:
You do not need to re-drill the hole, just use the tap and be very careful not to brake it inside of the case, use WD40 as lubricant and proceed slowly.
Once done with the tap it is a good idea to try the tube on.
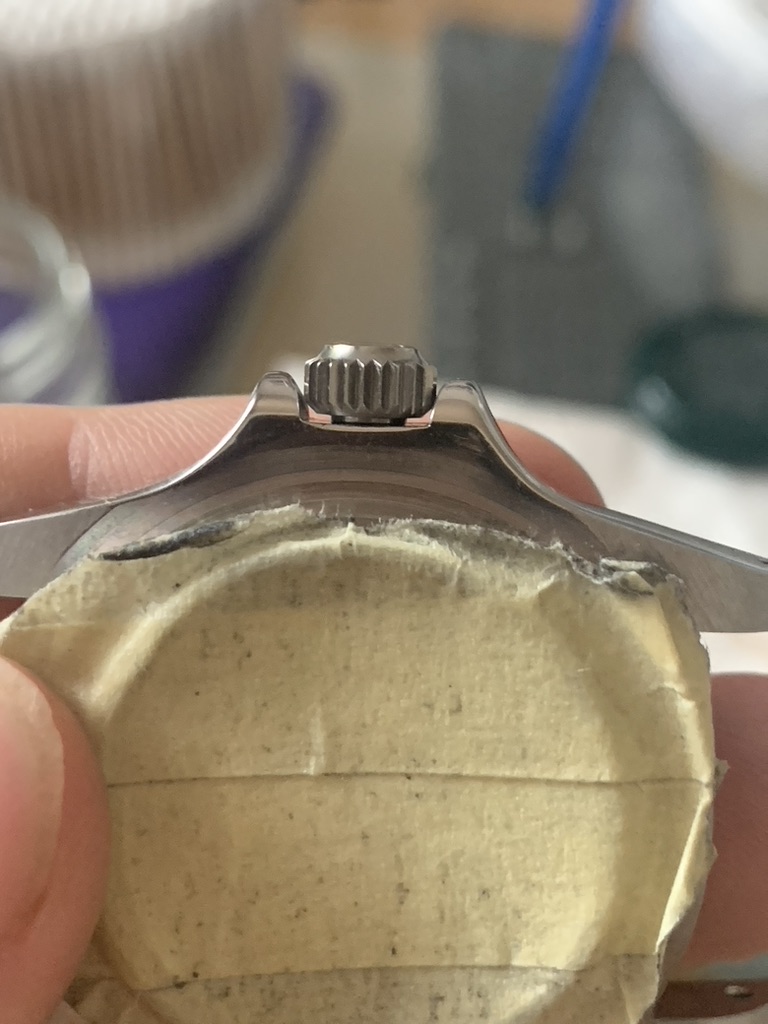
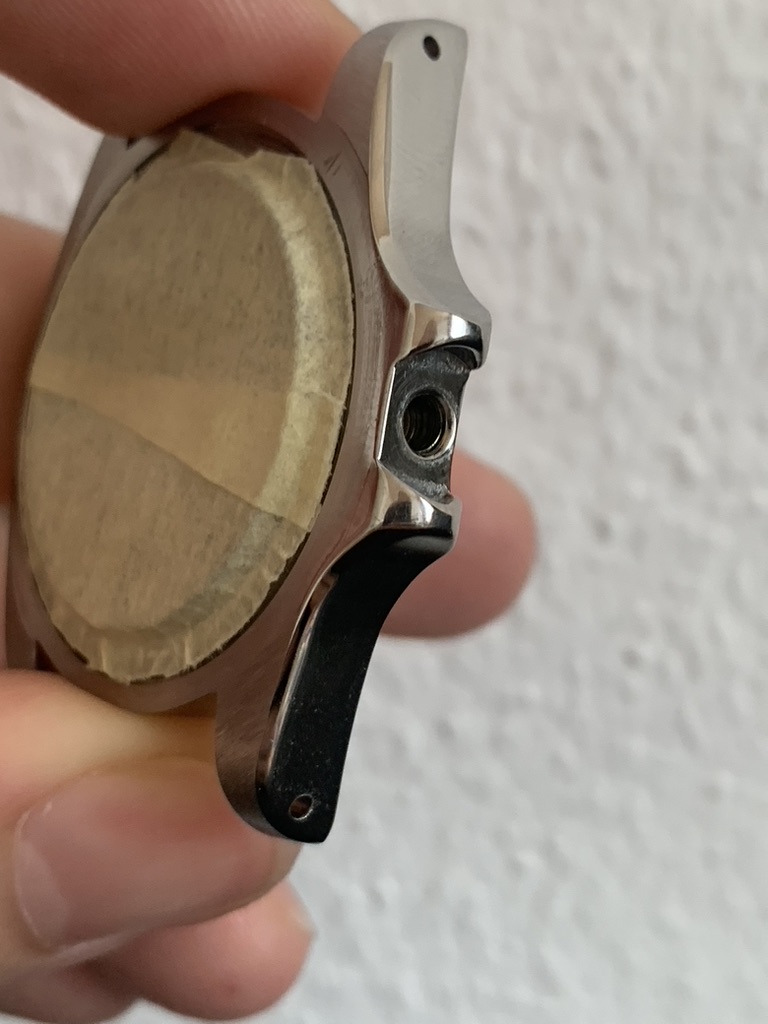
As you can see the tube sticks out and the case needs to be countersunk with a 6mm 90 degrees bit. Again here i recommend using a cobalt bit which can be purchased on ebay for little money.

Keep testing the tube until it is flush with the case and you are satisfied. It should look something like this:
We can now screw on the tube using a little dab of medium strength thread-locker. Unfortunately Athaya's tube is not compatible with the original Rolex spline tool and therefore you need to use the crown to screw the tube in tightly, no big deal.
Finally we can proceed with sanding the case and polishing it accordingly. You can follow some tutorials on youtube and use a Dremel or drill press:
I used Dialux compounds, specifically Green and Gray in order to polish my case. They can be found here:
https://www.cousinsuk.com/product/dialux-rouges?code=P1389
Ah I almost forgot... Chamfers! This is an optional step, but it will make your watch look and feel more luxurious. To do this you need to use a file on top of the lugs, keeping a 45 degree angle and once you are satisfied with the width, polish it using some lapping paper (I used a drill bit and wrapped it in lapping paper to maintain a crisp angle):
https://www.cousinsuk.com/product/film-lapping-3m-261x266x
Again use a gen as reference and at hte end it should look like this:
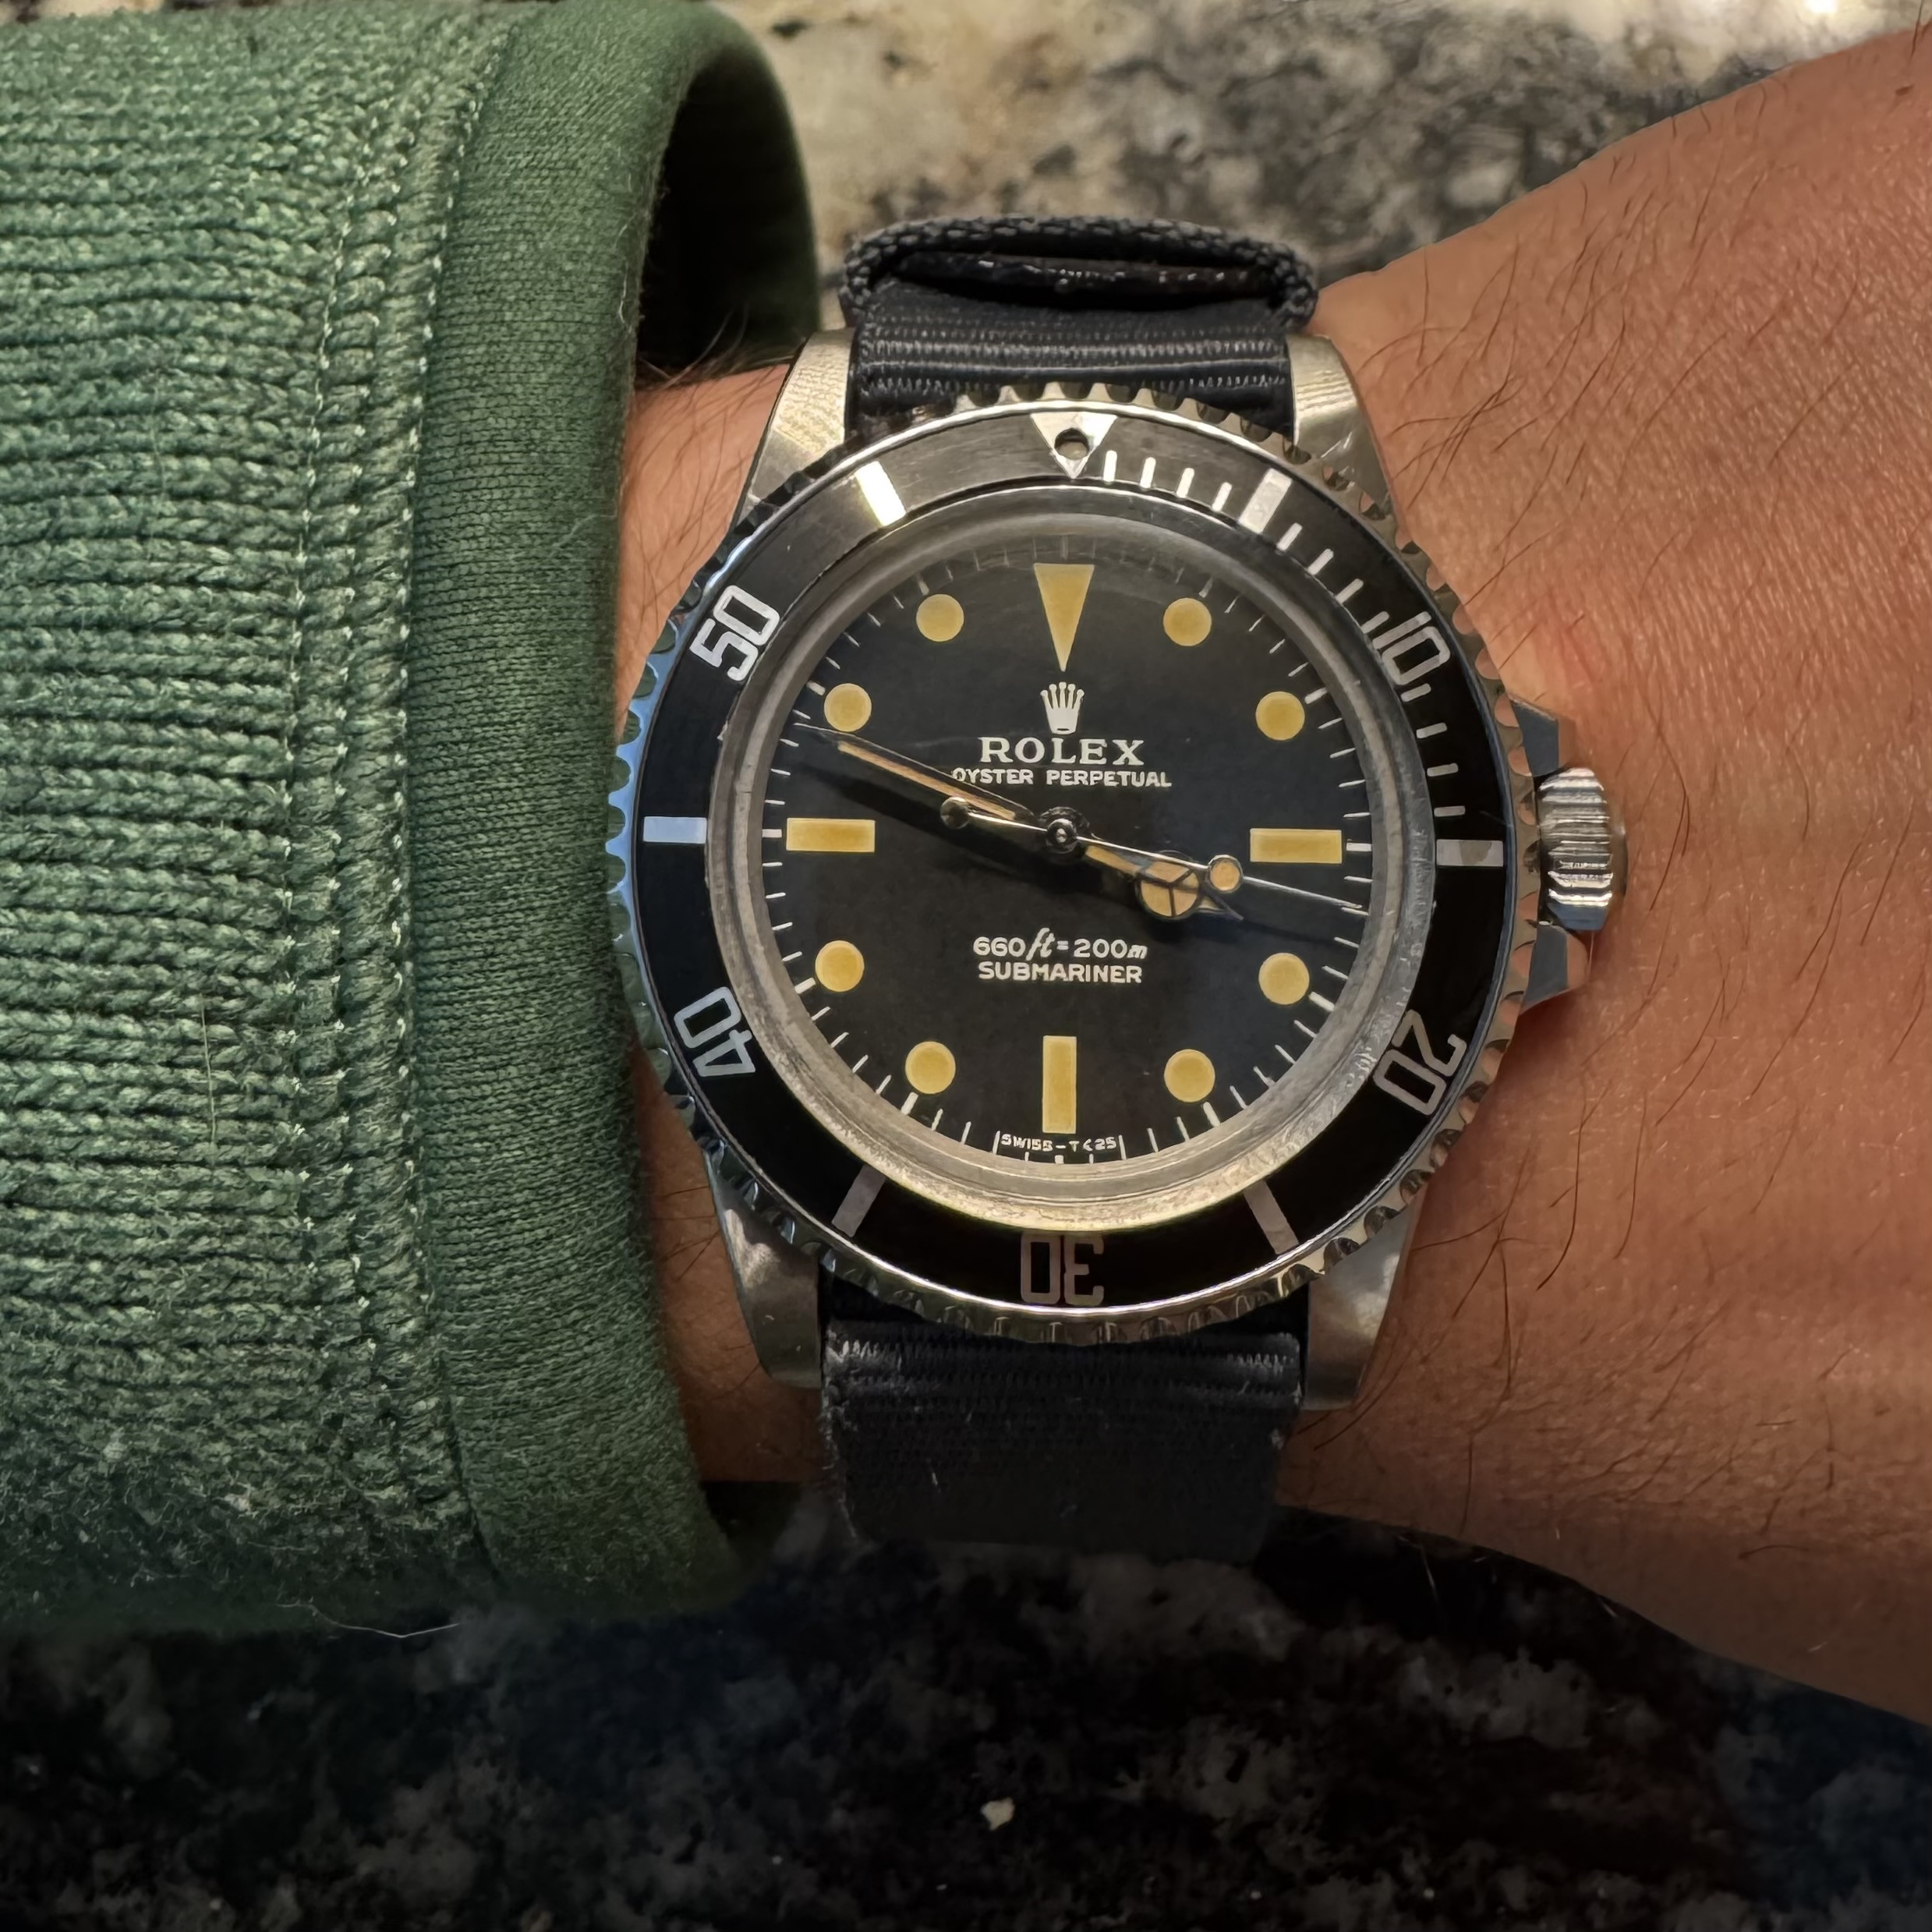
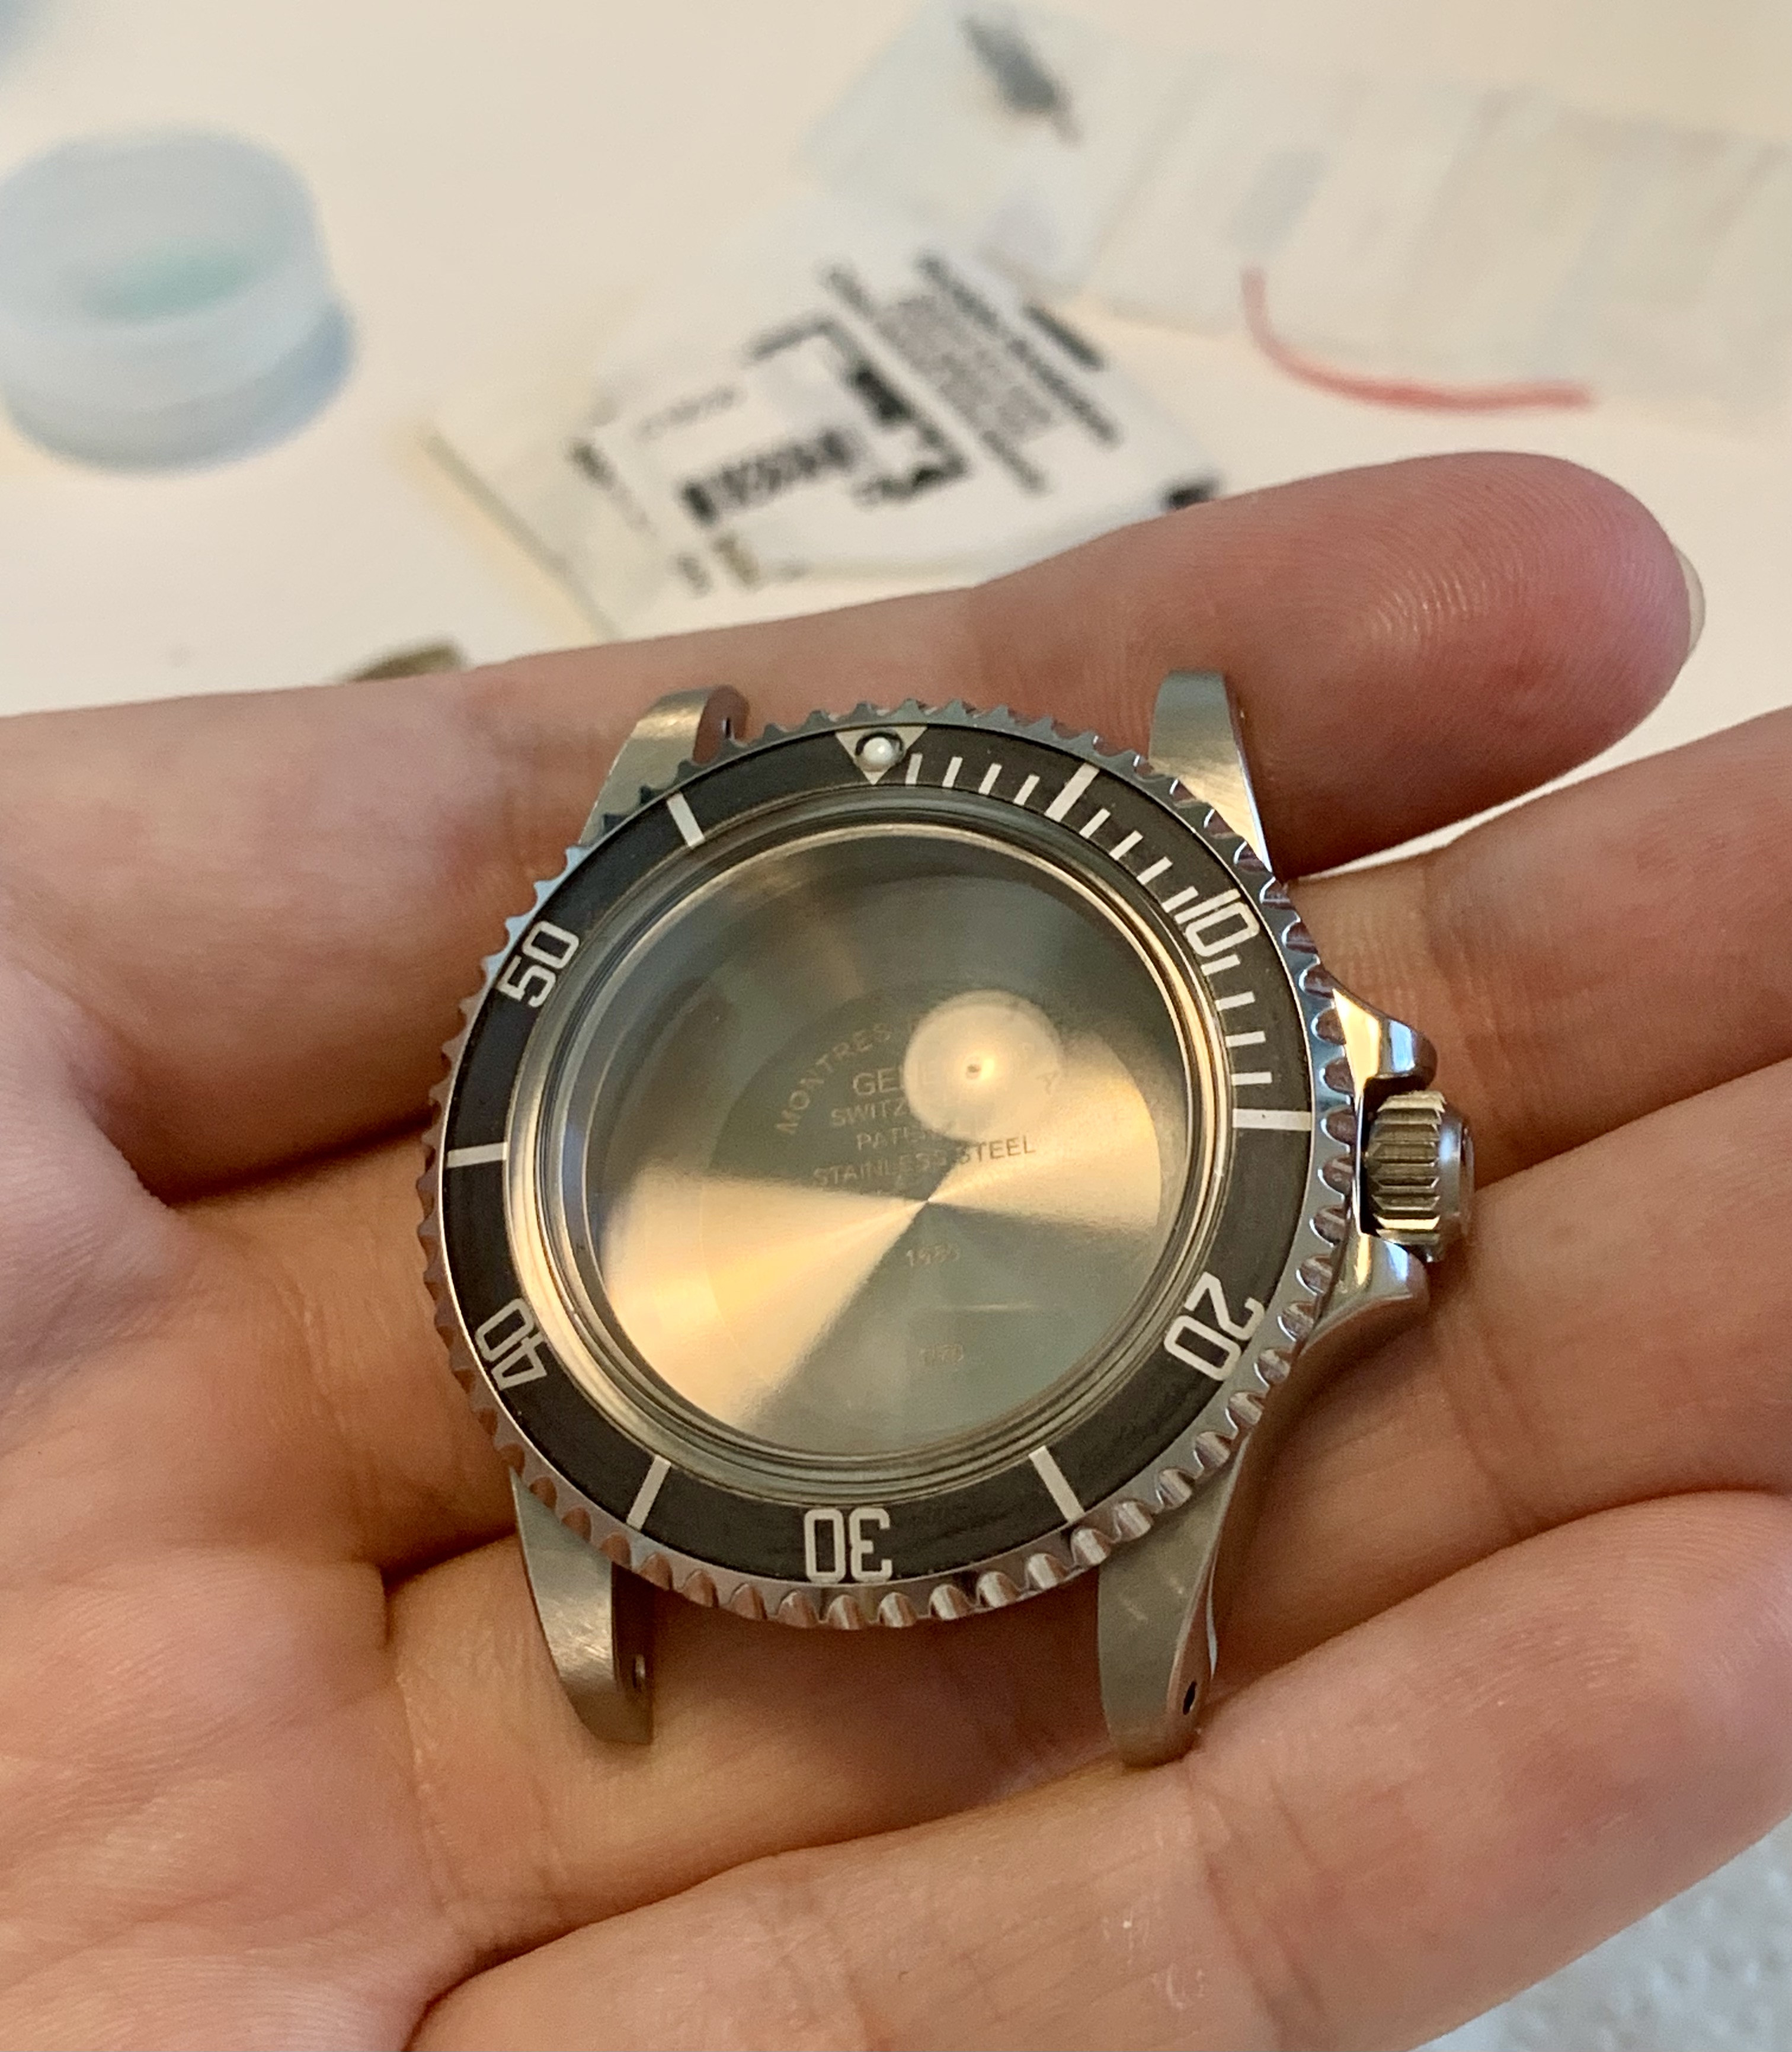
It is now time to age the bezel insert! Firstly I removed it from the ring (it was held with some double sided tape) and I dipped it in bleach. The trick here is to expose it in the sun while in the bleach as the stock insert is very resilient. Once you are satisfied with the result, remove it from the bleach and rinse it. Here a well explained tutorial:
Once done you can glue it back on the ring using some GS hypo cement:
https://www.cousinsuk.com/product/gs-hypo-cement
It should look something like this:

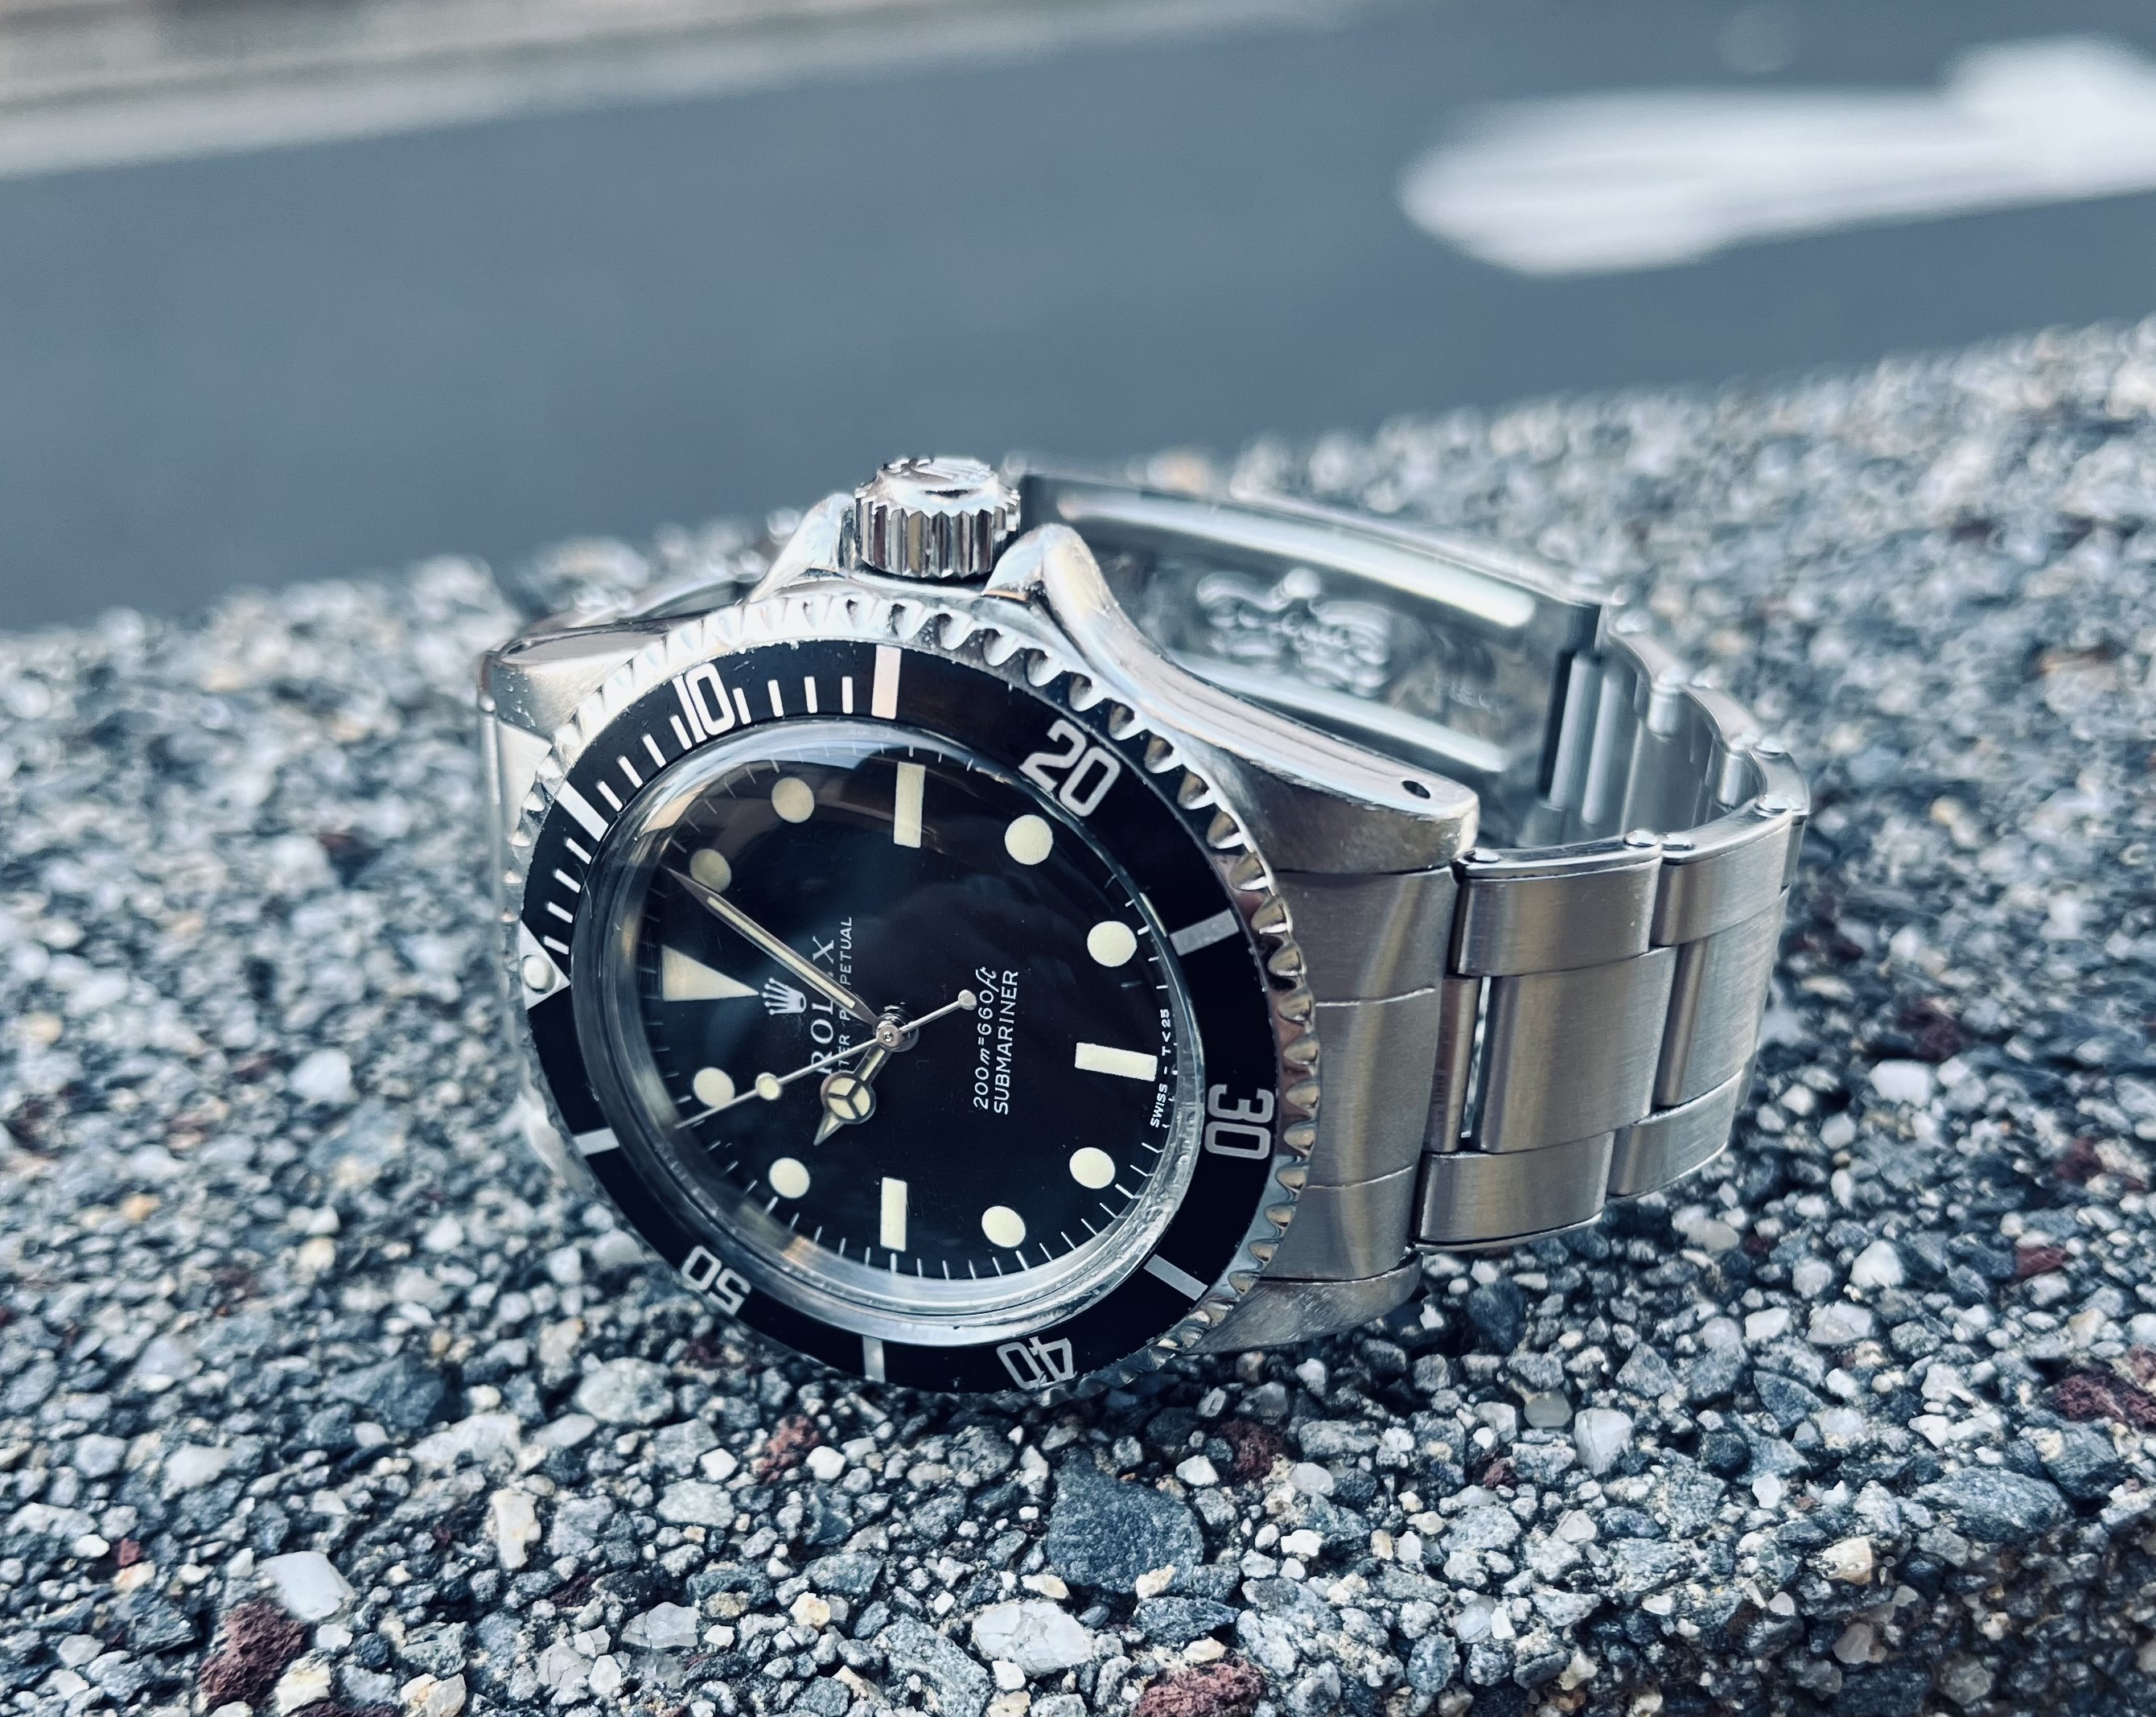
Done with the case! Now let's assemble everything and put a new crystal. I used a XS303.472 by Sternkreuz which can be bought here:
https://www.cousinsuk.com/product/glasses-acrylic-tropic-without-date-lens?code=C19230
To mount it you can follow this tutorial:
https://www.youtube.com/watch?v=_0E8D1YH5WE&t=211s
At the end the case will look like this:
Inner components
Now we move to the inner works. As mentioned before I replaced everything inside the watch.
There is a lot of confusion regarding which low beat movement can be used in the JKF Submariner. The following Swiss ETA movements can be used in the build:
ETA 2846 (Daydate)
ETA 2871 (No date)
ETA 2873 (Date)
ETA 2879 (Daydate)
All of them can be found on ebay for relatively low prices, but will likely need to be serviced. If you are bothered by the ghost crown position, you can buy part "445" for the respective movement. CousinsUK and ebay are a good source for these. A little bit of research does not hurt! http://www.ranfft.de/cgi-bin/bidfun-db.cgi?10&ranfft&2&2uswk
Moving onto the dial I used an Helenarou feet first dial which can be purchased by contacting via email the following store:
https://www.helenarou.com/index.html
Alternatively you can get a pricier dial from one of the following (and many more!):
https://www.rubyswatch.com/
https://www.mochacha.org/
Same goes with hands, I initially purchased my hands from Helenarou, but I have now ordered a set from Raffles which have a curve and are more aesthetically pleasing imo:
https://rafflesdials.com/one-set-of...er-watch-fit-eta-2836-or-2824-for-mens-watch/
I will not cover the part on how to assemble the watch as I think there are plenty of detailed tutorials online for servicing, dial and hands installation and stem removal/cutting.
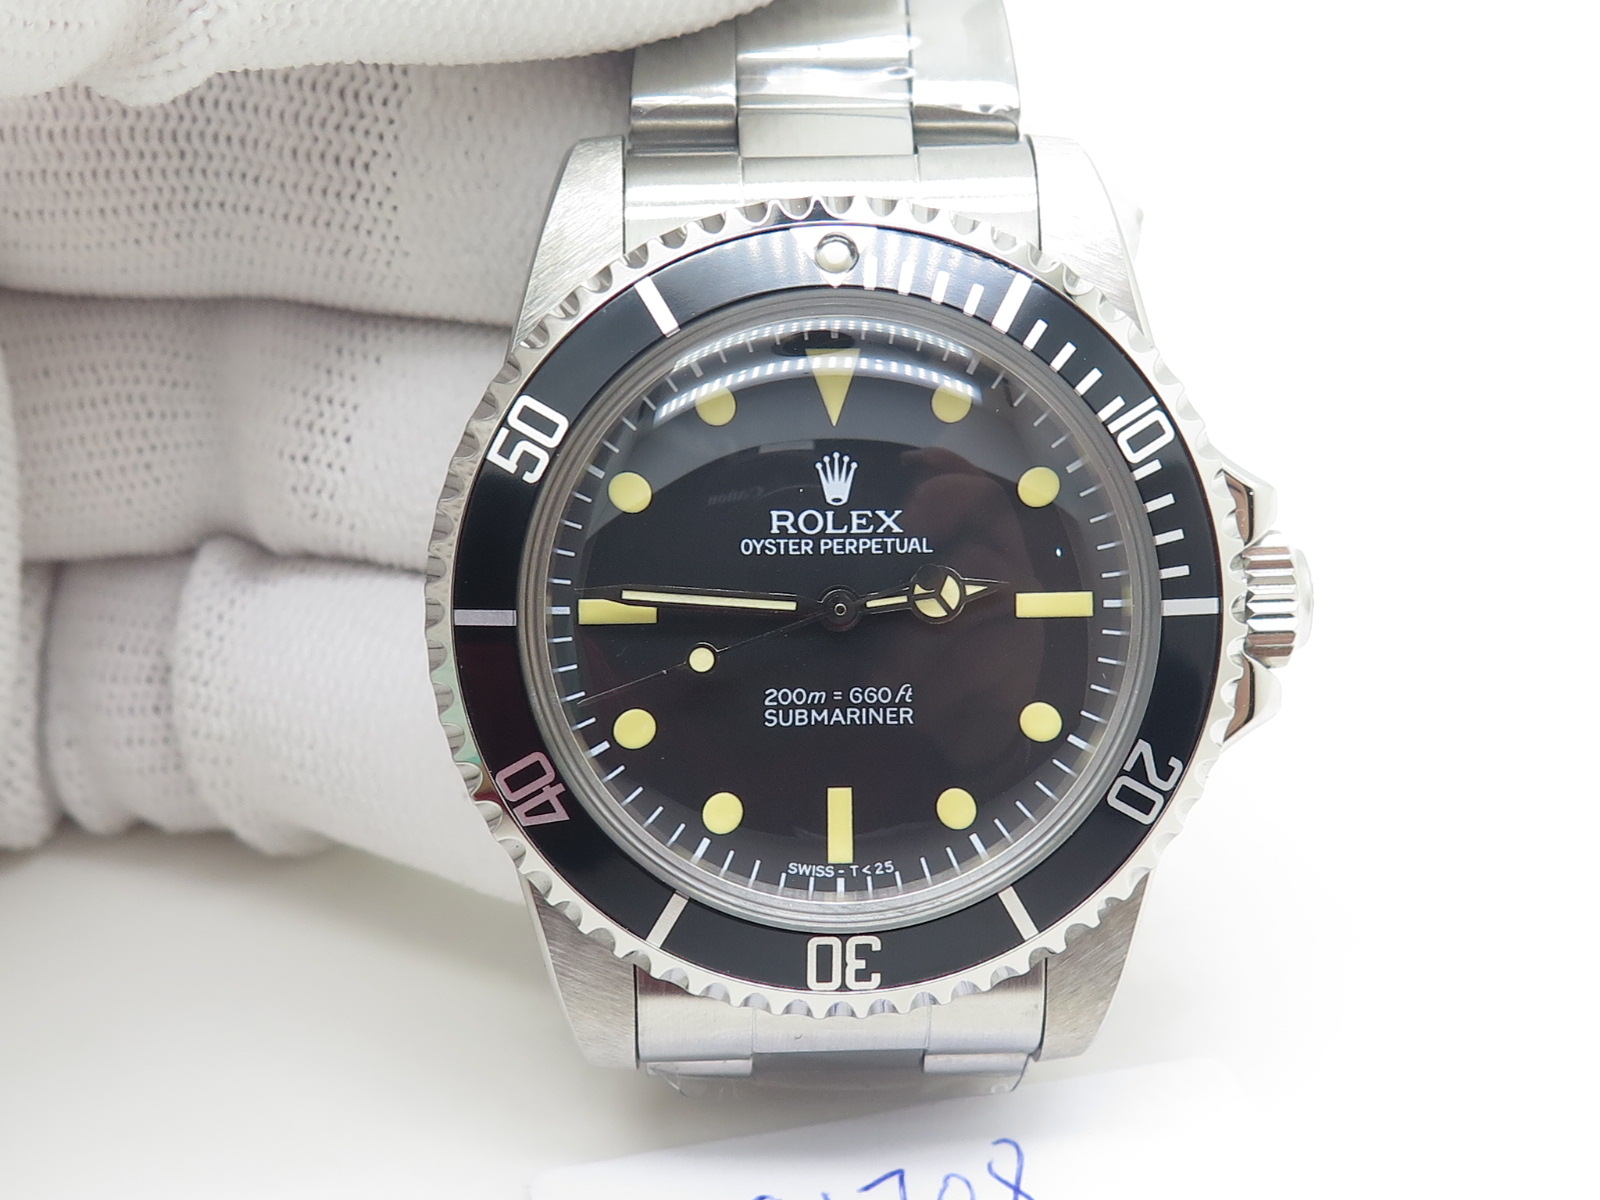
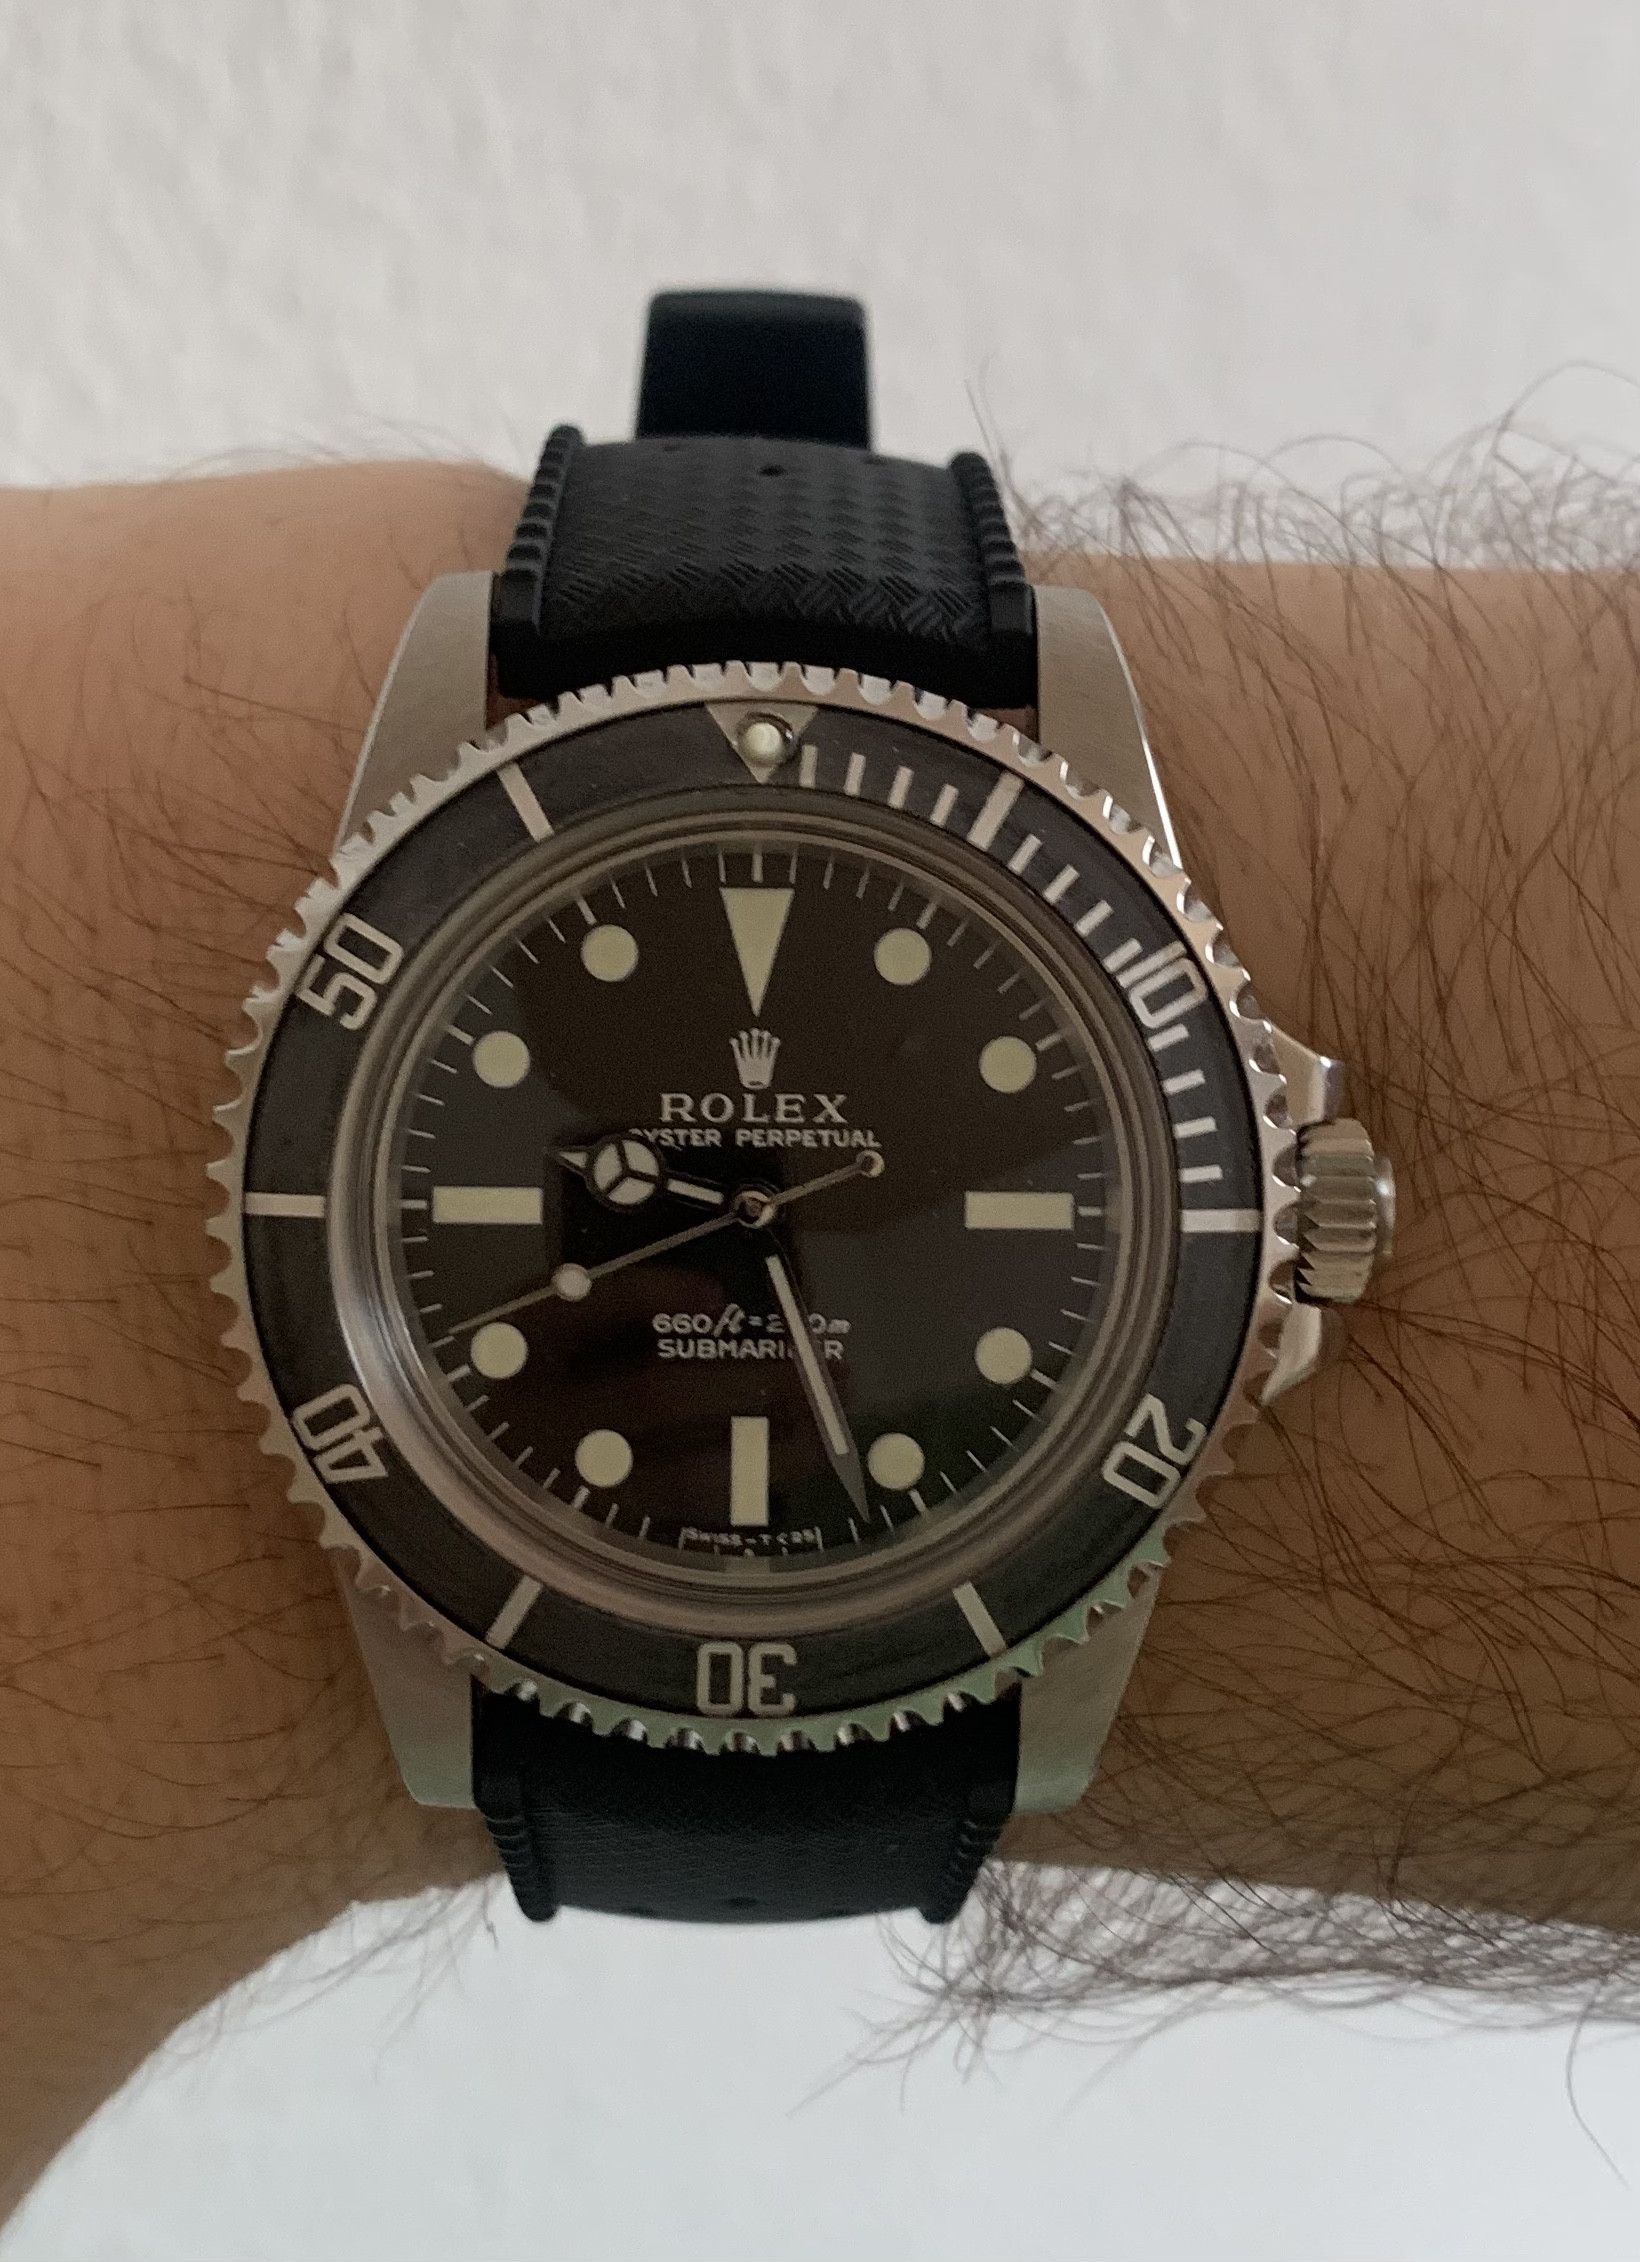
Here is the final result! After some hours of fiddling you should have a decent 5513 in your hands ready to be worn. You can always decide to age the case and dial if you like, but here I am going for a more clean look.
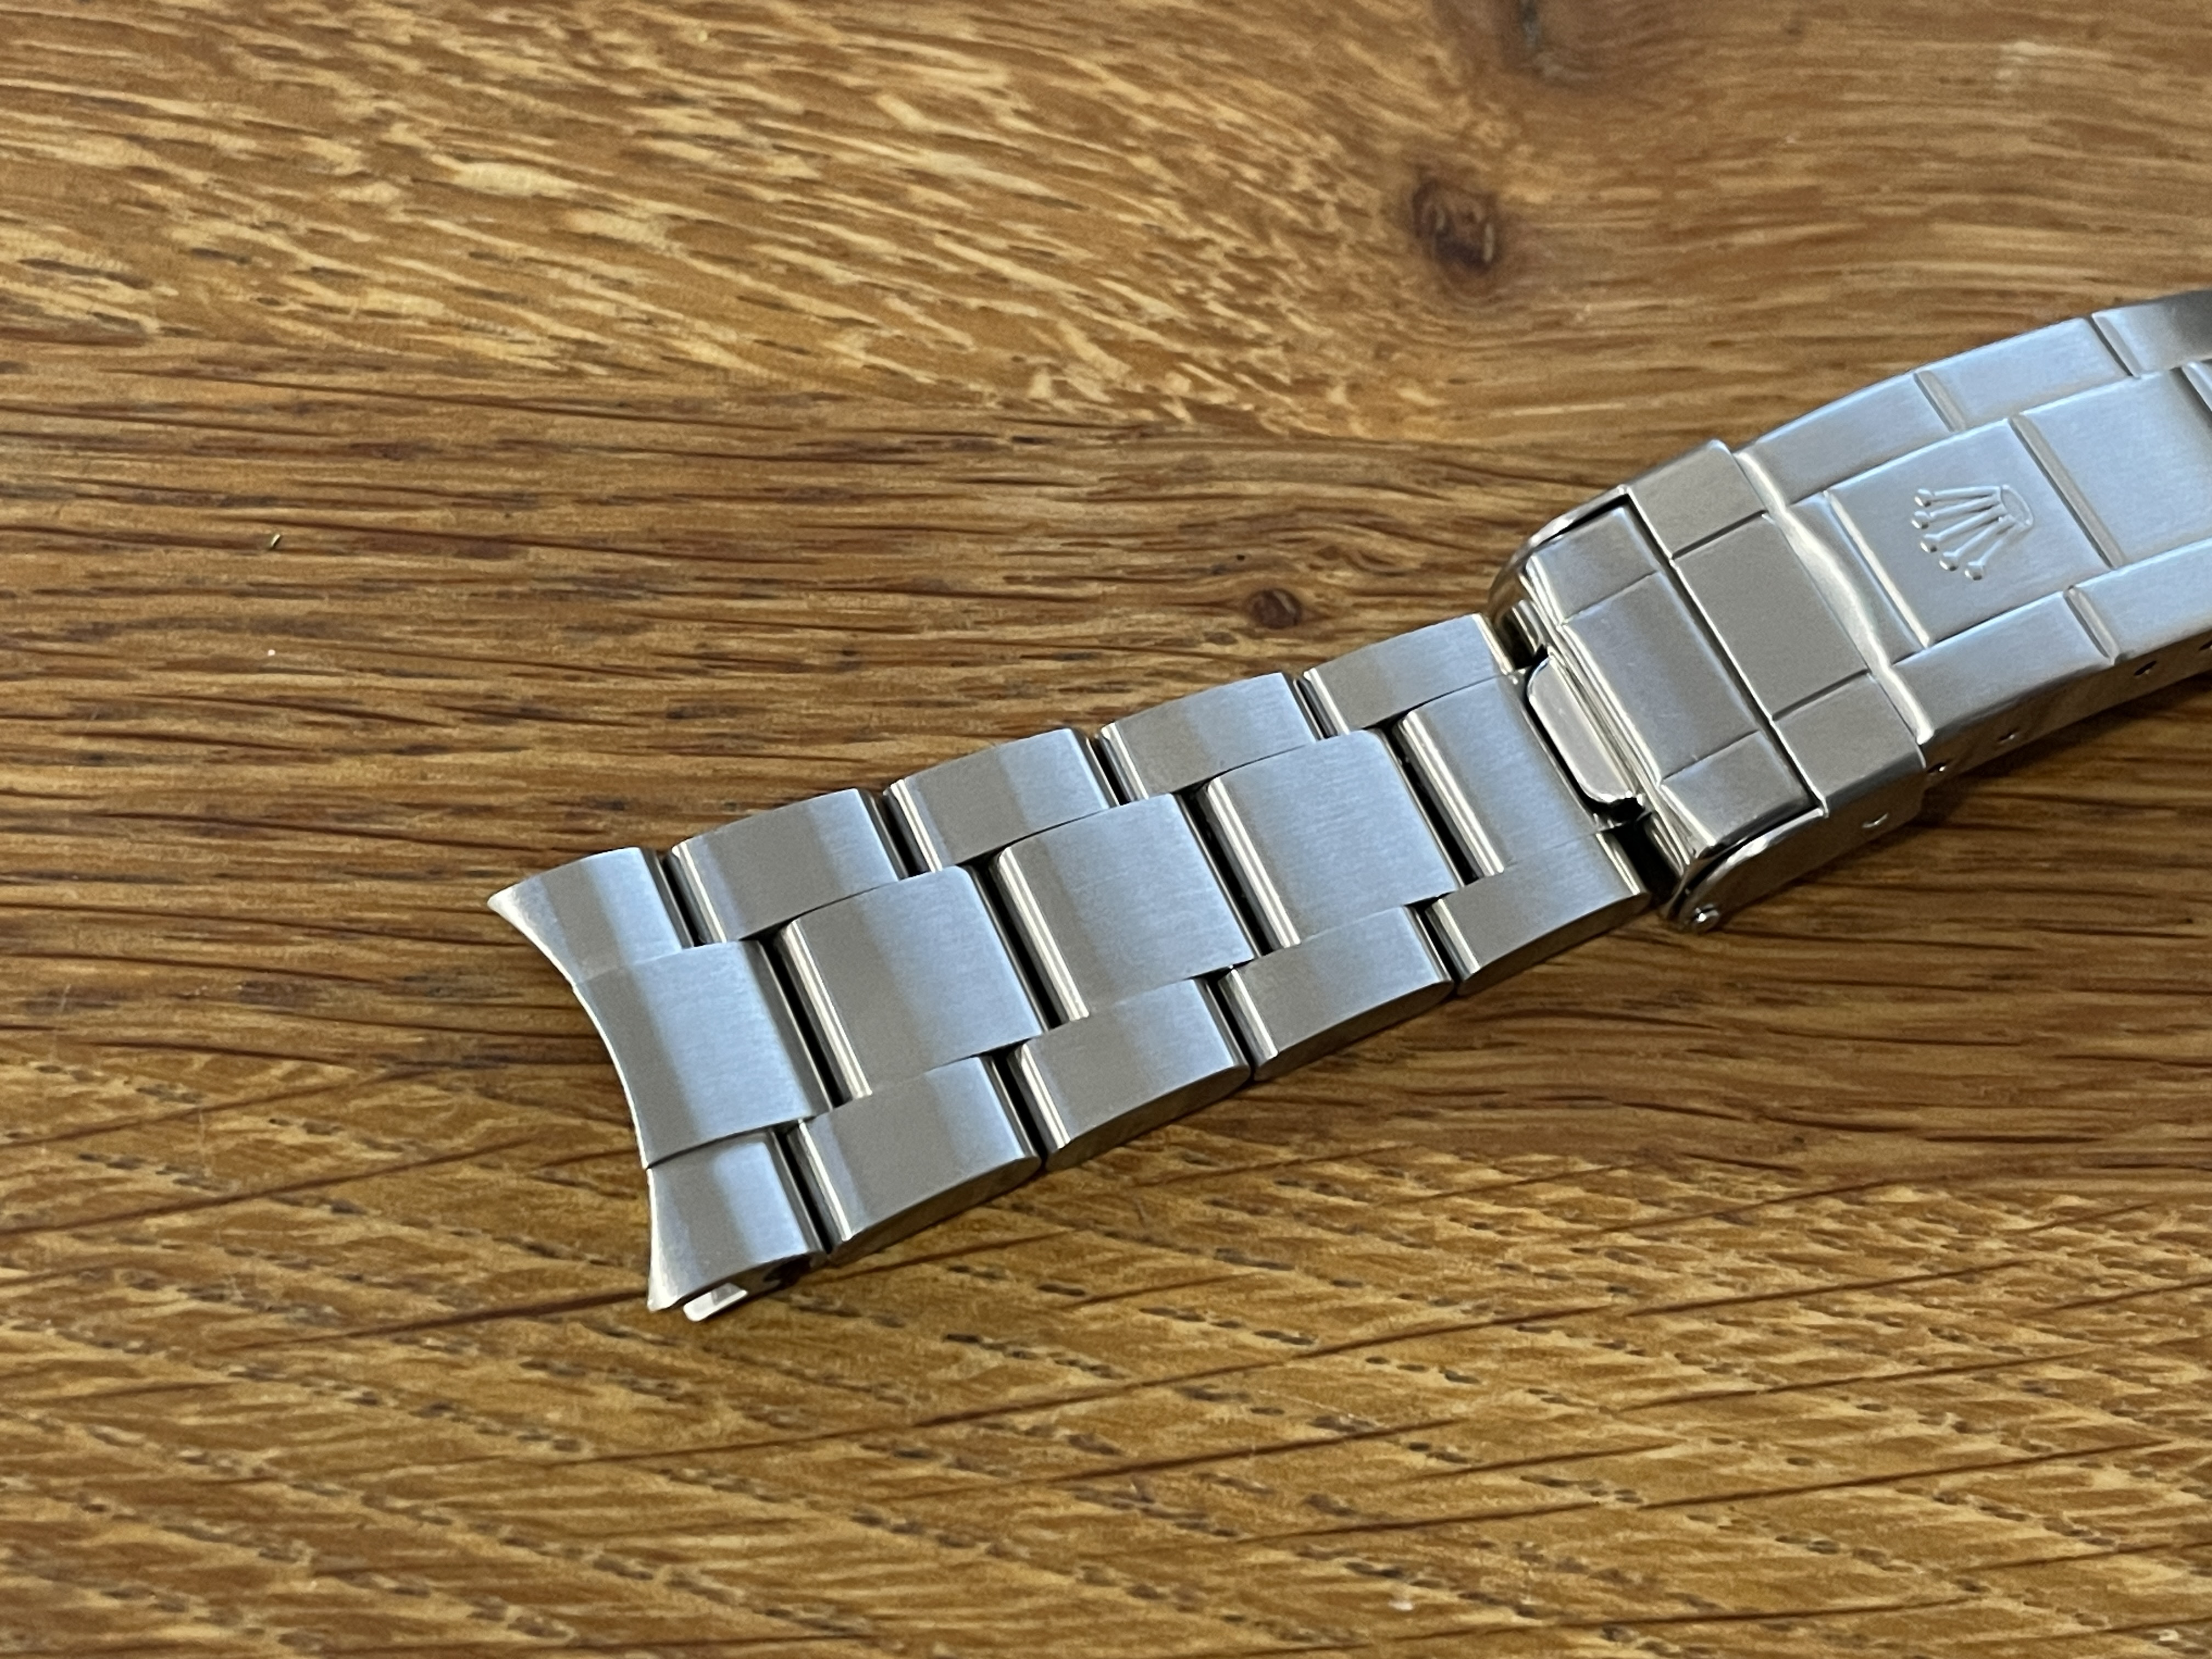
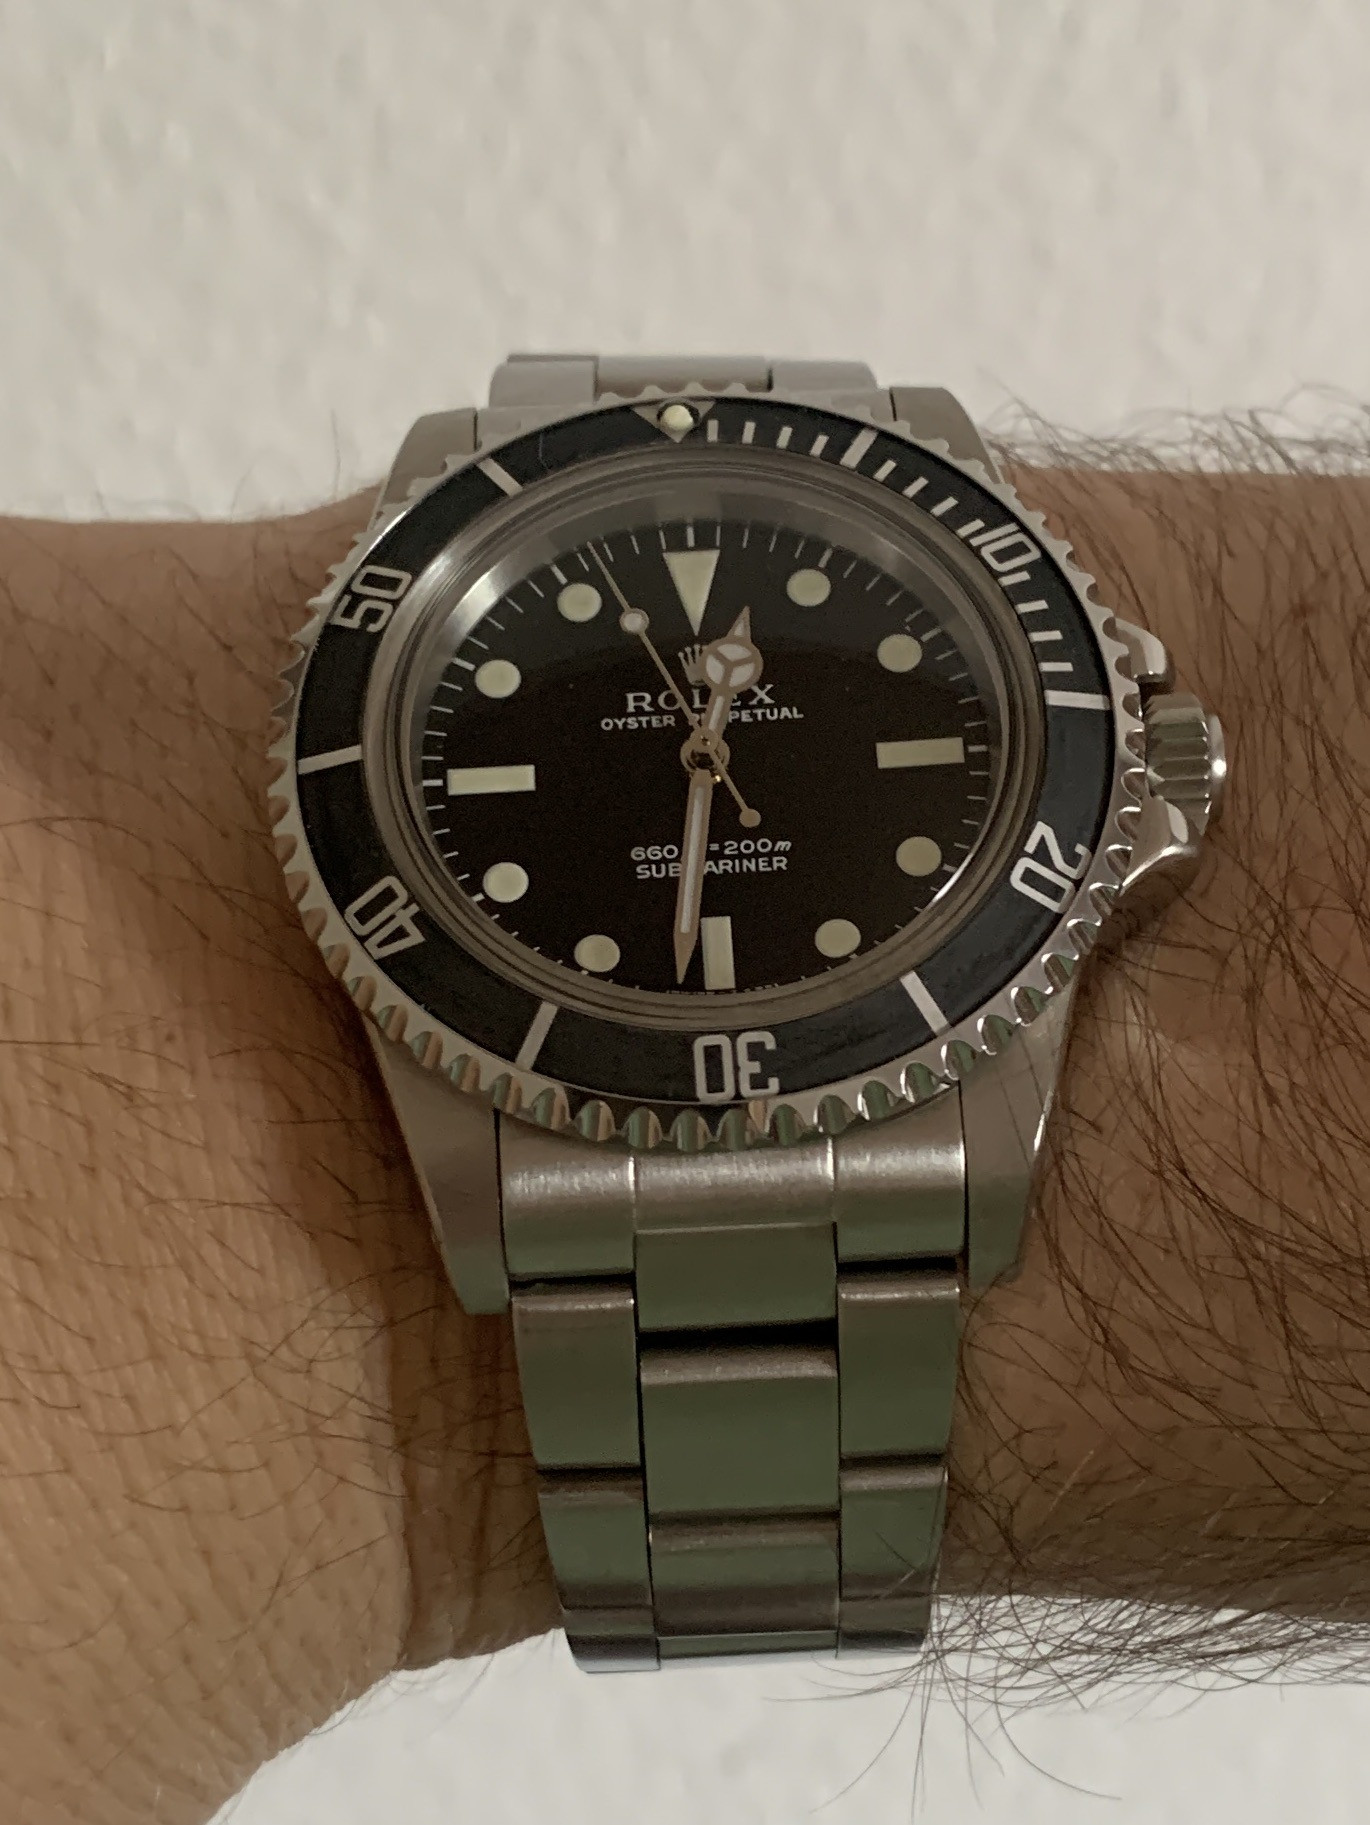
Bracelet
In order to fit the original bracelet you will need to enlarge the endlinks with a round file until a gen-spec springbar can fit through. I personally used a Raffles bracelet which can be bought here:
https://rafflesdials.com/20mm-solid...ogo-for-rolex-5512-5513-1680-16750-1655-1665/
You might have to sand the endlinks to properly fit the bracelet to your case, here is the result:
This is the end of the tutorial! I hope it was useful, especially for people starting in the modding journey. All the information here come from lots and lots of research and I thought it would be useful to agglomerate everything in one source as it might be confusing sometimes. I want to mention again that everything here was my first mod and is by no means perfect, but I think is a good start. Finally I recommend always to do your own research as what works for me might not work for you and viceversa.
Feel free to ask if you need additional info as I am sure that either me or the knowledgeable members in the section can answer.
Good luck with your build!
Sharing this here
This tool is excellent
To use with Heller cutting paste
Cuts like butter with almost no force
Tap perfect for rep tubes. No guarantees for gen tubes
This tool is excellent
To use with Heller cutting paste
Cuts like butter with almost no force
Tap perfect for rep tubes. No guarantees for gen tubes
Yes way better .Thank you for a great tutorial. Just wondering if the quality of the Raffles bracelet is better than the original JKF, or if there is another reason why you chose to use it?
Thnx
Thanks! My apologies, I am using the NH38 without a date function. For some reason I have been calling it an NH35, but you are correct. No date.
Here’s a view of the movement in situ. I did need to use a movement tab as a small shim to keep the movement where it needed to be in addition to the regular 2 tabs. The shim is in there tight, with a drop of hypocement for added confidence Circled here.
I would add a drop of GS on the tab to hold it to the ring so in the event you watch gets knocked around it comes loose and falls into the movement.
there is no wrong way of using a movement clamp lol
ThanksI would add a drop of GS on the tab to hold it to the ring so in the event you watch gets knocked around it comes loose and falls into the movement.
there is no wrong way of using a movement clamp lol
That’s why I wrote “The shim is in there tight, with a drop of hypocement for added confidence”.I would add a drop of GS on the tab to hold it to the ring so in the event you watch gets knocked around it comes loose and falls into the movement.
there is no wrong way of using a movement clamp lol
 Just had to give you a hard time.