• Tired of adverts on RWI? - Subscribe by clicking HERE and PMing Trailboss for instructions and they will magically go away!

First rep build - 6200 or 6538

muggs

Known Member
12/9/19
183
79
28
London
I tried fixing the keyless works - went through the tutorial step by step and it seemed to we working well. Then went to take the stem out and rebuild the watch, tried to put the stem back in after recasing - no dice.

I’ll try again tomorrow.

Plus found that I’d fucked the new minute hand - it won’t go on the pinion. I must have pushed it too hard on the cocktail stick when I was luming it up.

All in all a great days work.

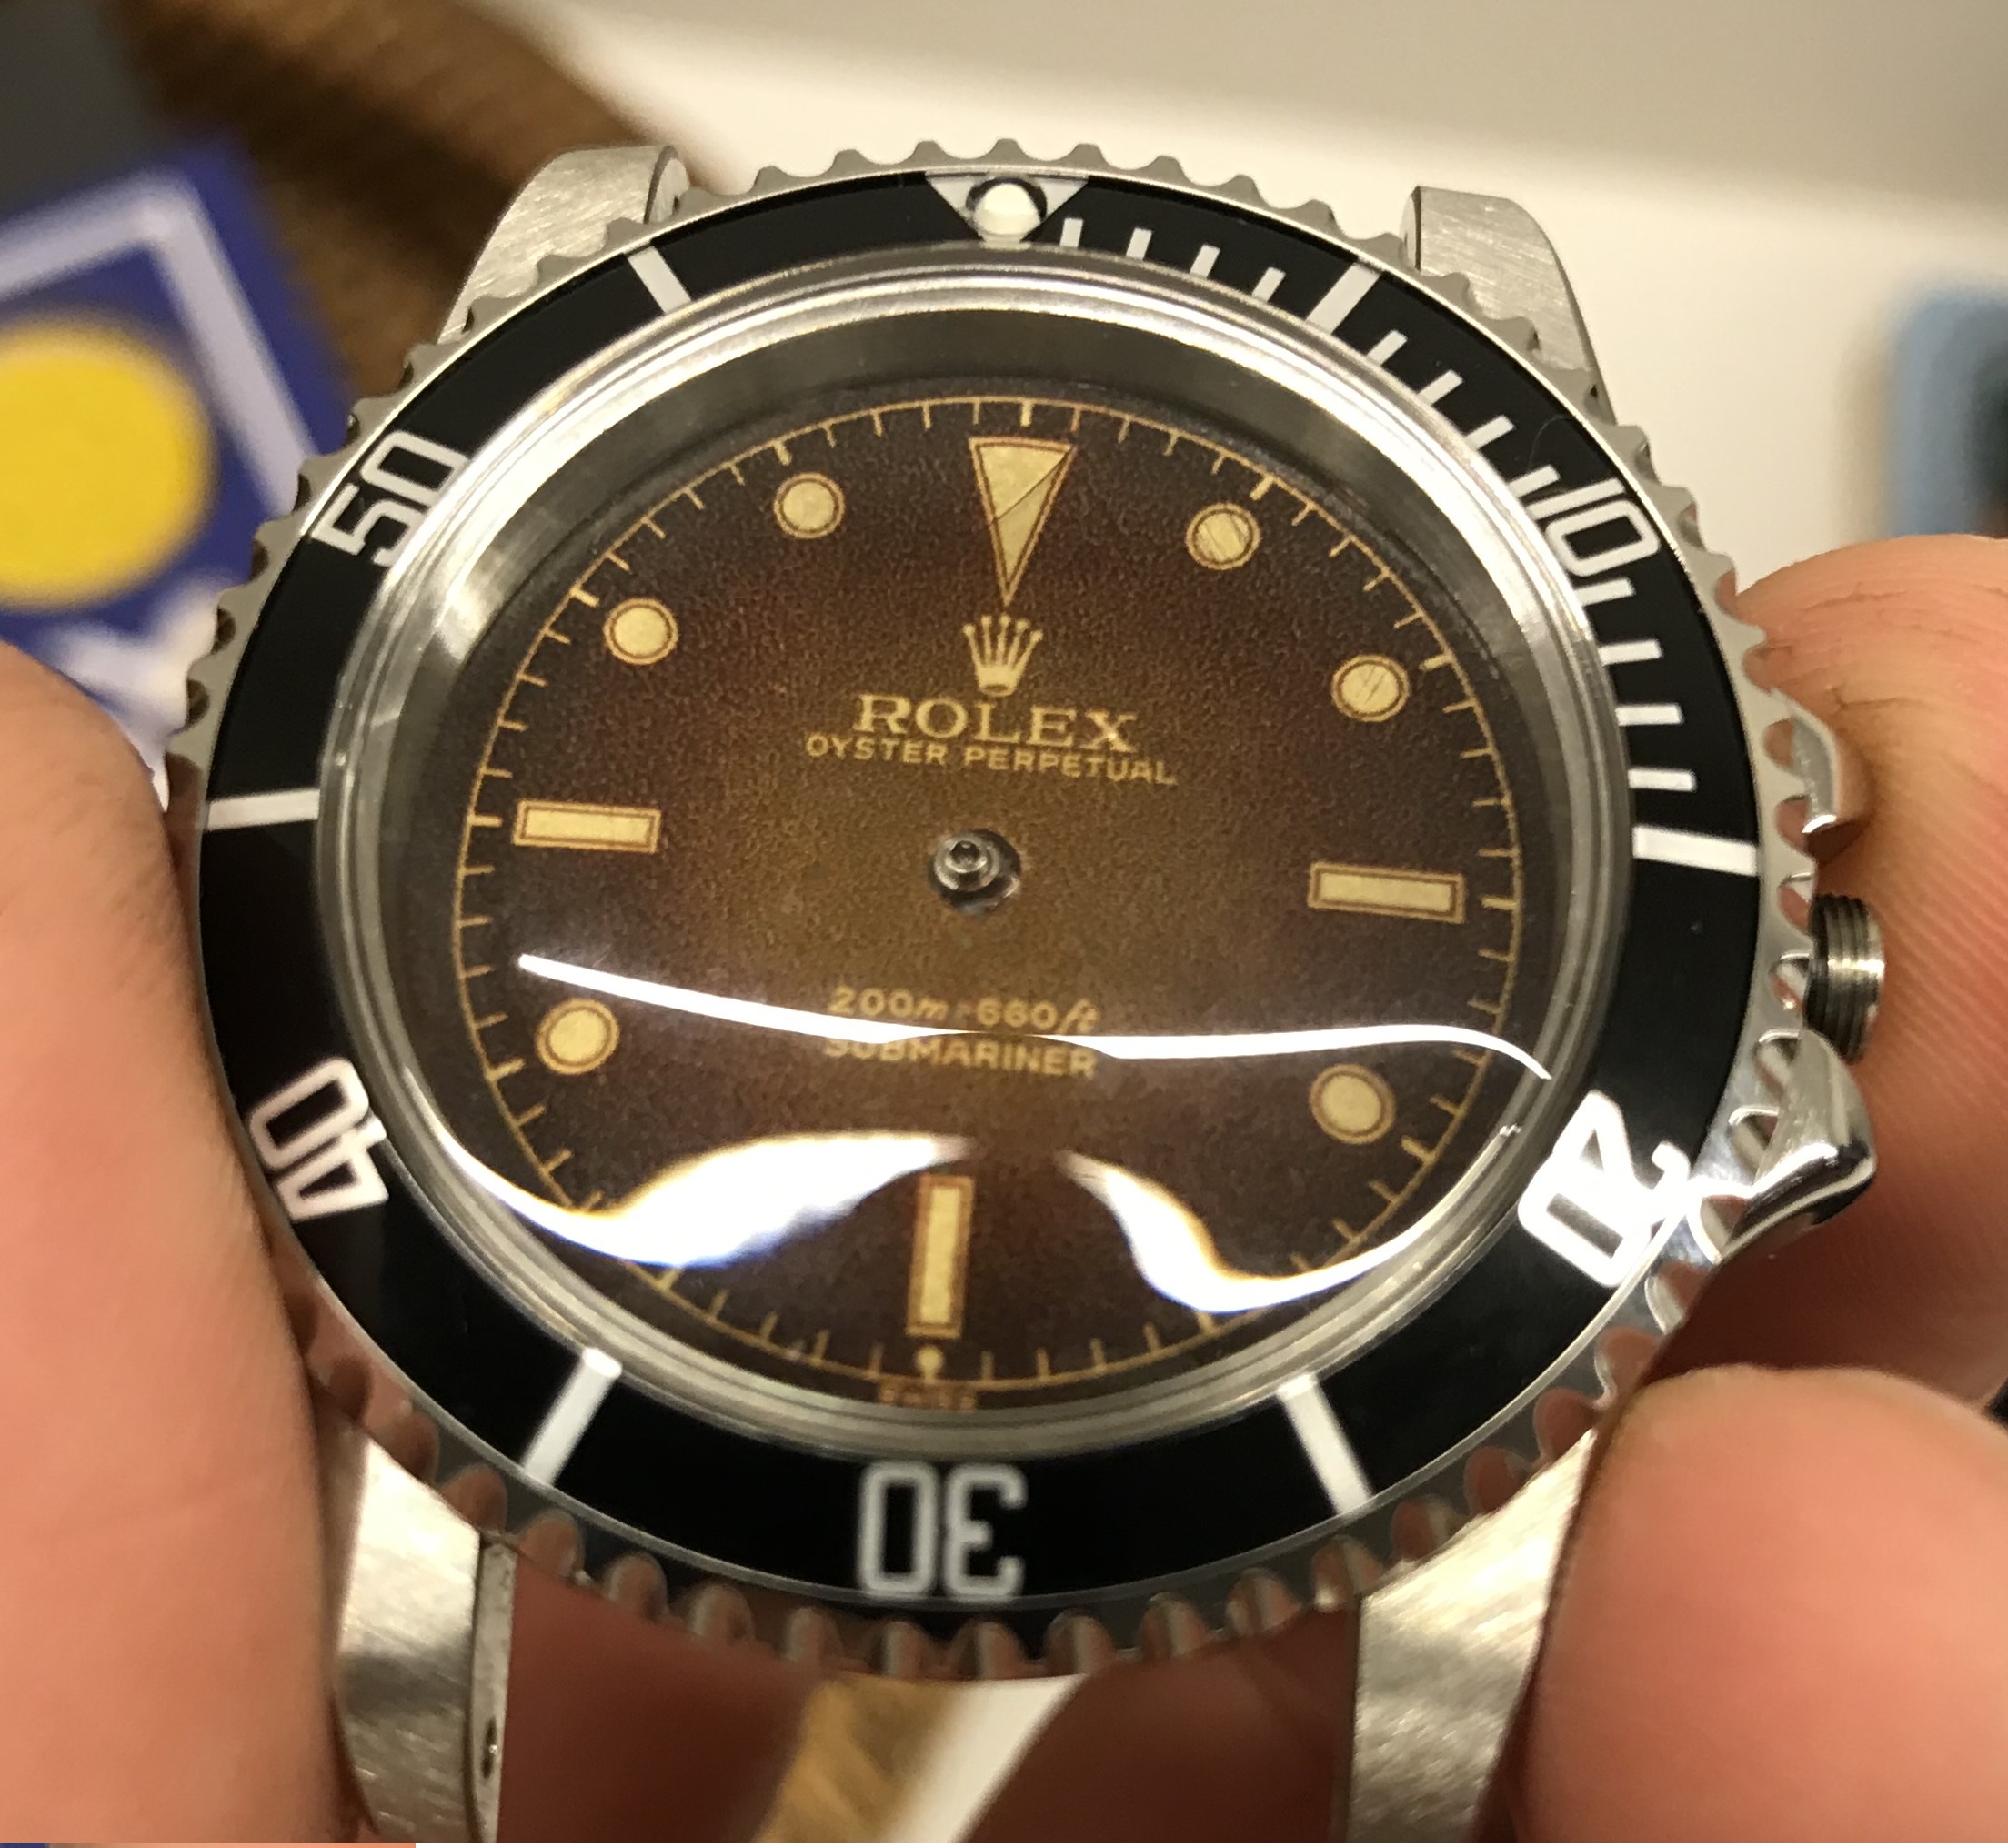
At least I managed to put the new dial on.

[mention]Alhig72 [/mention] - thanks for the advice. So far I’ve only been experimenting with Lume and binder. I’ll see how it goes with some acrylics.

I‘ve nicked some hypodermic needles and syringes from work, they seem to work quite well - I might try filing the needle points down a bit as they were a bit scratchy.
 
Last edited:
  • Like
Reactions: deadpan

muggs

Known Member
12/9/19
183
79
28
London
This is what it’s looking like now.
ac0a2ba3d9d198717e0947c1e39bb405.jpg


Sent from my iPhone using Tapatalk
 

muggs

Known Member
12/9/19
183
79
28
London
Managed to fixe the keyless on the second attempt.

I’m waiting on some parts from Raffles time, but I think I’m finished for the moment.

I’ll keep practicing with luming before I try on a good dial.

Here’s a wrist shot:
af5a560dac4f8bbfd3eac8e256a130ae.jpg


Sent from my iPhone using Tapatalk
 

muggs

Known Member
12/9/19
183
79
28
London
I’ve made a bit more progress on the dial - I think I’ve finally found the best printer settings for the decal, plus I have increased the size of the depth and sub lines which helped too.

Unfortunately I got too excited and sprayed it again before the water had completely dried from underneath and it wrinkled.

It’s strange though as if the light catches some angles it looks like you can see the negative impression of the ink.
57b17fb25d138932cefa7dd98f1e3c8a.jpg

1fb957952ec97e88f675a605efb70374.jpg

8b990439ceda815ffd820e27ff115215.jpg


How are people avoiding dust and bubbles on their dials? Spray booths? Sanding?


Sent from my iPhone using Tapatalk
 

deadpan

Active Member
1/6/19
462
264
0
Over the horizon
I’ve made a bit more progress on the dial - I think I’ve finally found the best printer settings for the decal, plus I have increased the size of the depth and sub lines which helped too.

Unfortunately I got too excited and sprayed it again before the water had completely dried from underneath and it wrinkled.

How are people avoiding dust and bubbles on their dials? Spray booths? Sanding?


Sent from my iPhone using Tapatalk

You might want to ask this over in this thread... https://forum.replica-watch.info/forum/vintage-watches/249254-decal-printed-dial

I’ve avoided dust by (bizarrely) spraying outside in a sheltered area before! Briteling had a good suggestion in spraying in the bathroom after the shower has been running-the water droplets in the air trap the dust and force it to the ground. I always use a very very light dusting of lacquer in multiple passes (building layers) at about arms length; It’s almost dry by the time it hits the dial.
 

deadpan

Active Member
1/6/19
462
264
0
Over the horizon
In terms of sanding, theoretically it would work (like paint on a car). I’ve not tried, but have had success getting a matte dial back to glossy using good old polywatch. BUT...you need to be very careful! I’ve also removed the paint and made an unintended (expensive) sterile dial in this way!
 

muggs

Known Member
12/9/19
183
79
28
London
[mention]deadpan [/mention] - I’ve got a lot of my inspiration from that thread.

I tried again:

e51366df25ee9fd567f64528656eead7.jpg


Unfortunately I forgot to take any photos before; this is my first finished dial.

Initially it was quite lumpy after being sprayed with gloss varnish.

I sanded it back with 1500 and 70000 paper, with a good result and then gave it a wash with some paint and tried to add some dusting with chalk powder. After that I gave it a spray with satin varnish.

The chalk disappeared after the varnish spray.

I then lumed it - I had been very wary of this step.

I have learned a few lessons:

1 I think I need to invest in some Tamaya weathering powders, my daughter’s chalk hasn’t stood up to what I wanted to do.

2 I need to use a less brown Lume colour - there isn’t enough contrast with what I have done and the dial to be aesthetically pleasing.

3 I need to work on the tropicalising. The wash I used (flesh wash) ended up a bit too green. Chestnut Wash next time. I also ended up rubbing some bits off when applying and removing the chalk which has left some scratches.

4 I’m working on a more accurate decal. I’m happy with what my printer is producing, I just need to make the image more gen-like.


Sent from my iPhone using Tapatalk
 
  • Like
Reactions: deadpan

muggs

Known Member
12/9/19
183
79
28
London
I put it all together:

aef5dccd4500939949f4e57a89f9524a.jpg

ead1ba04eb277684e190da34d48c4190.jpg

502d2d8aa2229b346029913540327678.jpg


I need to reduce the size of the dial decal slightly. Currently the minute track is almost at the rehaut (is that the correct terminology?) and you can’t see the “Swiss” at the bottom.

The bezel insert wear is too forced. I’m waiting for some parts to arrive including a better bezel, 6538 hands and blank dials. When they come I’ll have a go at bronzing the bezel and redoing the insert.

Comments and criticism appreciated


Sent from my iPhone using Tapatalk
 

muggs

Known Member
12/9/19
183
79
28
London
So I managed to get a good amount of work done this weekend as I got a green light from my wife. Unfortunately this was because she put my Speedmaster in the washing machine by accident! The case is a bit fucked up and the crown snapped off and filled the case with water.

Fortunately I have the tools to open it up and let it dry. It’s nice to look at this movement:
4862d00d0235a88e7ab58191462d6154.jpg

a1ed471a80561854688942b2d13fb97f.jpg


I didn’t have a crystal remover, so used what I had to hand:
4edcb6b185f8ea036c11881801f3e2ac.jpg

Simple but effective.

Here is the new inset compared to the old:
2b8f6194a3e7b0516bbf8048efdce14d.jpg


I put the assembled case with the bezel and insert into the box of nails, stones etc, then went at it with some 300, 1500 and 7000 sandpaper. I then bleached it for about 15sec, just when the paint started to bleed a bit, this was just to take a bit of the shine off it.

The pip is made with some 5min epoxy. Put various sized drops onto some Perspex and then found the best sized one. Epoxied it on and then drilled out the back. Then lumed. I’ll seal the back with some superglue before I assemble it all.

767b68f68cc1269522d01bcc3ac0b9c4.jpg

Bezel flamed and brushed with a brass brush.

21804766a6855d3d3ccc2dec95312bea.jpg

f0003e35277a715da789896df436753e.jpg


Case polished up with 7000 sandpaper and sterncruz 306 domed crystal.

Altogether:
ed625223160f64ef2d6c5b87ccc9a9e2.jpg

58dabdd9ddd219b2f04ed0aded0162ec.jpg


Comments and criticism welcome.


Sent from my iPhone using Tapatalk
 

p0pperini

patr0n h0arder
Gold Patron
Certified
29/1/19
8,981
30,098
113
UK
Nice work on the project, it’s looking sweet.

But if it was mine, I’d get that Omega movement off to a watchsmith ASAP to be stripped down and serviced. Having been completely waterlogged, I’d seriously doubt it would just dry out and be fine to reassemble! Water will be doing evil stuff inside the movement in no time at all.

Apologies if this is already your intention, or if you plan to do the work yourself - it’s just that the story filled me with horror!


Sent from my iPad using Tapatalk
 

muggs

Known Member
12/9/19
183
79
28
London
[mention]p0pperini [/mention] - it’s off to the Omega man on Tuesday. I’m happy risking £100 Chinese ETA clones with my skills, but not a £3k watch! Hopefully will be in the ultrasonic cleaner in a few days time.


Sent from my iPhone using Tapatalk
 
  • Like
Reactions: p0pperini

chrome72

Renowned Member
7/12/17
512
419
63
Houston TX Baby
muggs for tropicalizing a dial, you can add a later behind your black template and control the degree of tropicalization from there. Here is a 5512 tropical I am working on

vXYkQ.jpg
 
  • Love
Reactions: 369mafia

muggs

Known Member
12/9/19
183
79
28
London
[mention]chrome72 [/mention] thanks for the tip.

Here’s the next dial I’m working on:
3dc88c38dbb5a971e5c81d6f41146580.jpg


Annoyingly with some angles you can’t see the depth, thought it may be the speckled varnish.

ba8c31e68c60056470addab340249248.jpg


Sent from my iPhone using Tapatalk
 

muggs

Known Member
12/9/19
183
79
28
London
I’ve done a bit more work on the case and put the new dial in.

Old and new
9c8c59b8c931ab08b8c8bbebfd815fa3.jpg

a1ecac4682affaf36f4e173d4ff67dd0.jpg

deb7bd1337d59124170a84a05862e09f.jpg


ba5d0e80e353dd35b49bc035e0f5063a.jpg

99864819b8f821ee091a4f47933e983e.jpg

9afd9260963821c70eaaf32c79ef3824.jpg

1252f1d44580b4e74c5ea25921e2e042.jpg

0c6013fd5791f66e66542c8792f45c0b.jpg


I think the Lume is a bit too orangey - I’ll rectify it on the next one.

Next stage will be gold plating and a better more gen like decal.

Comments and criticism welcome.


Sent from my iPhone using Tapatalk
 
  • Like
Reactions: 369mafia

Repowatch

Horology Curious
6/3/22
9
23
3
GER
So I managed to get a good amount of work done this weekend as I got a green light from my wife. Unfortunately this was because she put my Speedmaster in the washing machine by accident! The case is a bit fucked up and the crown snapped off and filled the case with water.

Fortunately I have the tools to open it up and let it dry. It’s nice to look at this movement:
4862d00d0235a88e7ab58191462d6154.jpg

a1ed471a80561854688942b2d13fb97f.jpg


I didn’t have a crystal remover, so used what I had to hand:
4edcb6b185f8ea036c11881801f3e2ac.jpg

Simple but effective.

Here is the new inset compared to the old:
2b8f6194a3e7b0516bbf8048efdce14d.jpg


I put the assembled case with the bezel and insert into the box of nails, stones etc, then went at it with some 300, 1500 and 7000 sandpaper. I then bleached it for about 15sec, just when the paint started to bleed a bit, this was just to take a bit of the shine off it.

The pip is made with some 5min epoxy. Put various sized drops onto some Perspex and then found the best sized one. Epoxied it on and then drilled out the back. Then lumed. I’ll seal the back with some superglue before I assemble it all.

767b68f68cc1269522d01bcc3ac0b9c4.jpg

Bezel flamed and brushed with a brass brush.

21804766a6855d3d3ccc2dec95312bea.jpg

f0003e35277a715da789896df436753e.jpg


Case polished up with 7000 sandpaper and sterncruz 306 domed crystal.

Altogether:
ed625223160f64ef2d6c5b87ccc9a9e2.jpg

58dabdd9ddd219b2f04ed0aded0162ec.jpg


Comments and criticism welcome.


Sent from my iPhone using Tapatalk
This looks so sick!!!
I’m building one by myself right now. And I’m wondering how you get the brass onto the bezel? Just with brushing it? That doesn’t work for me.

I really would appreciate it!
 

muggs

Known Member
12/9/19
183
79
28
London
You need to heat the bezel with a blow torch until it is red hot and then brush it with a brass brush.

It won’t work if you brush it cold.
 
  • Like
Reactions: Repowatch