• Tired of adverts on RWI? - Subscribe by clicking HERE and PMing Trailboss for instructions and they will magically go away!

VSF Submariner VS3235 Gen Parts Installation Project

WatchSmith.US

-- Watchmaker --
Vendor (Watch Repair)
Certified
13/3/16
1,297
2,033
113
Put your lift angle at 55° and you’ll see a bit of amplitude increase. 3235s are not at 52° like other movements.
Freshly lubed pallet stones need to run for awhile to distribute the grease on the escape wheel. You might see SPD changes after 24 hours. Did you epilame the pallet fork and escape wheel?

Congrats on your successes!
 
  • Like
Reactions: brekker0 and AG91

dogwood

I'm Pretty Popular
Patron
Section Moderator
Certified
7/9/21
2,441
5,420
113
Canada
Put your lift angle at 55° and you’ll see a bit of amplitude increase. 3235s are not at 52° like other movements.
Freshly lubed pallet stones need to run for awhile to distribute the grease on the escape wheel. You might see SPD changes after 24 hours. Did you epilame the pallet fork and escape wheel?

Congrats on your successes!

Thanks! This hobby is hecka fun!

I didn’t know the the 3235 was a 55degree lift angle. Good to know. Although since I had the lift angle set to 52degrees for the initial condition measurement it’s still apple to apples. But your point is well taken: the movement is probably healthier (in absolute terms) than my time grapher result suggests.

Also good to know about the run in period for the pallet stones. I didn’t epilame the escape wheel and pallet stones since my bottle of epilame is still on order. The bottle with the mesh cap thingy arrived, but not the actual solution.

Oh, and what does SPD stand for? Speed, Period, Drift?
 
  • Like
Reactions: AG91

WatchSmith.US

-- Watchmaker --
Vendor (Watch Repair)
Certified
13/3/16
1,297
2,033
113
Seconds per day.
After running awhile it’s not a bad idea to re-lube the pallets. If you have a microscope you can really see how the escapement looks after lubrication.
Keep up the good work!
 
  • Like
Reactions: AG91

AG91

Known Member
Supporter
Certified
7/3/22
118
33
28
just wow! is the finish very different on the bridges? keep us updated!
 

dogwood

I'm Pretty Popular
Patron
Section Moderator
Certified
7/9/21
2,441
5,420
113
Canada
just wow! is the finish very different on the bridges? keep us updated!

The finish of the moving parts and bridges is very hard to distinguish with the naked eye or even with +2 reading glasses. But with my digital microscope the difference is night and day. The finish quality on the gen parts is x10 better than on the VSF parts. This doesn't make a functional difference, but you can certainly see why a VS movement costs $200 to $300, and a gen movement costs thousands. There's no doubt that the CNC milling machines that Rolex uses are far better maintained than the ones used to make the VS movement. Also, the Rolex machinists clearly have spent many hours getting the cutting speeds & feels perfect so that the machined surface finish on the gen parts is never marked by unbroken metal chips. In the manufacture of CNC parts, the way to make things cheaply is to:
  1. Run the machines with higher speeds & feeds. This allows you to cut the part in less time, but gives you a worse finish on the parts since the tools are running at a non-optimal chip load. This can cause metal chips to not break into short sections, rather the cut metal forms long spiral shapes. These long spirals wrap around the cutting tool and get dragged across the part that's being machined scratching up the surface finish on the part. Running at ideal speeds and feels means that chips break up and can be carried away from the work piece by the flood coolant.
  2. Run the machines for longer periods between calibrations. This means that there will be larger spindle runout on the cutter, which decreases surface finish quality. And, it means that there will be more x, y, and z dimensional variation between parts, so fitment of parts will be less consistent.
  3. Run lower quality cutting tools in the machines for longer. The cutters uses are almost certainly carbide, but higher priced carbide tools will have special coatings which help them resist wear for longer. Also, running tooling for longer between replacements, means that parts are often machined using tools which don't have as sharp an edge. This causes chips not to break properly and can cause the cutting tool to chatter as it cuts reducing surface finish quality of the part.
Running a CNC machine shop isn't cheap, and implementing best practices can easily double or triple the cost of a part. But if the part is still technically "in specification" and it works... that's what we're getting with reps. If the part is made with the utmost care in a high end machine shop where price isn't a leading driver, that's when you get gen parts.
 
  • Like
Reactions: Karbon74 and AG91

WatchSmith.US

-- Watchmaker --
Vendor (Watch Repair)
Certified
13/3/16
1,297
2,033
113
What’s kind of sad is that the manufacturer of VS movements (Dandong) doesn’t offer a super high grade version of the 3135. They have what it takes to do it. And they should do a free sprung balance as well. Many say that’s beyond their capabilities but I think anything is possible.
 

wmass

Getting To Know The Place
17/4/22
73
23
8
What’s kind of sad is that the manufacturer of VS movements (Dandong) doesn’t offer a super high grade version of the 3135. They have what it takes to do it. And they should do a free sprung balance as well. Many say that’s beyond their capabilities but I think anything is possible.

great point, i expected to see "standard" "elabore" and "top" versions of these clones as well
 
  • Like
Reactions: Jackster

Klocklind123

Known Member
17/2/09
157
14
18
Thanks a lot for the VERY nice pictures and how You did the build:)

Regarding finish of a movement it IS the finishing that cost the most in a movement!

The Patek Philippe 324 movement ( the basic PP movement!) is WAY better finished than the Rolex.

But PP is more expensive.

The reason to buy a Rolex is not the finish of movement !
 
  • Like
Reactions: AG91 and dogwood

Tigerb78

Getting To Know The Place
5/4/16
16
1
3
In an effort to expand my watch "smith" skills, I decided it would be a fun project to order some gen parts for my VS3235 movement and see if I could install them without hurting myself (other than my wallet), and see if the movement was any better off for the trouble. The parts I decided to swap for gen were:
  1. Crown Wheel (part no. 3235-213)
  2. Balance Bridge (part no. 3235-120)
  3. Balance Complete (part no. 3235-432)
My reasons for doing these three parts specifically were that I'd read in Logixa amazing teardown thread that the crown wheel on the VS3235 could have some issue due to the spring washer rubbing and producing metal shavings that would damage the movement long term. As for the balance complete and the balance bridge; those I decided to swap to gen because I wanted to see how well I could regulate the movement using the microstella nuts as opposed to using the regulation arm on the stock VS3235.

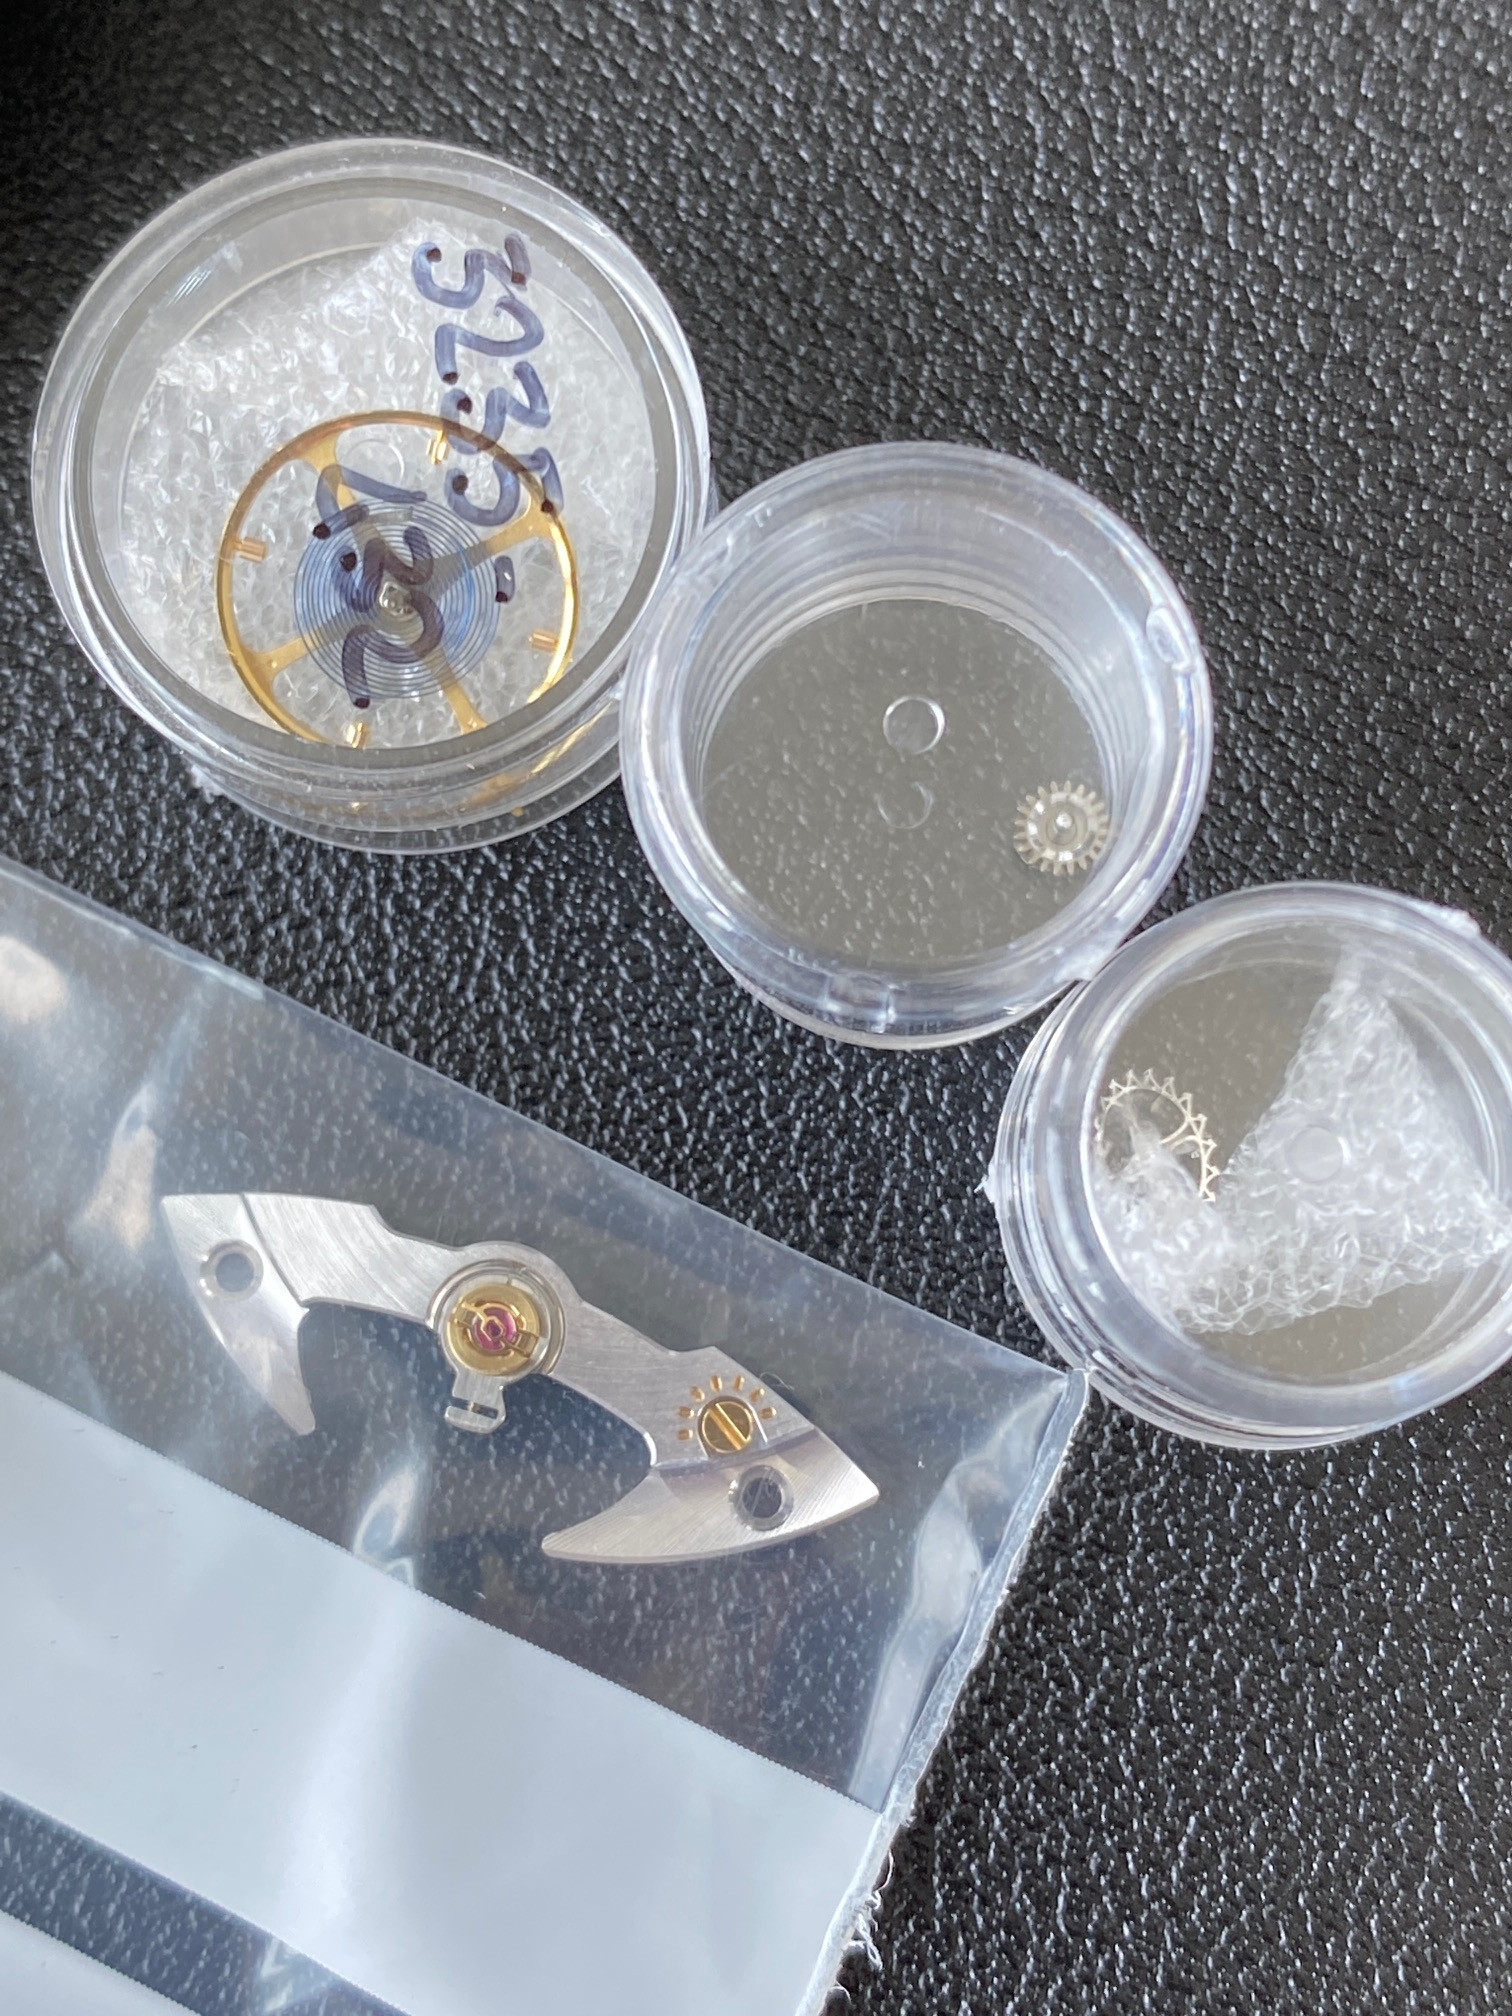
So, here's a pic of the gen parts.

And just to get a baseline of the movement's health, here's what it looks like on the timegrapher *before* I've installed any of the new gen parts.
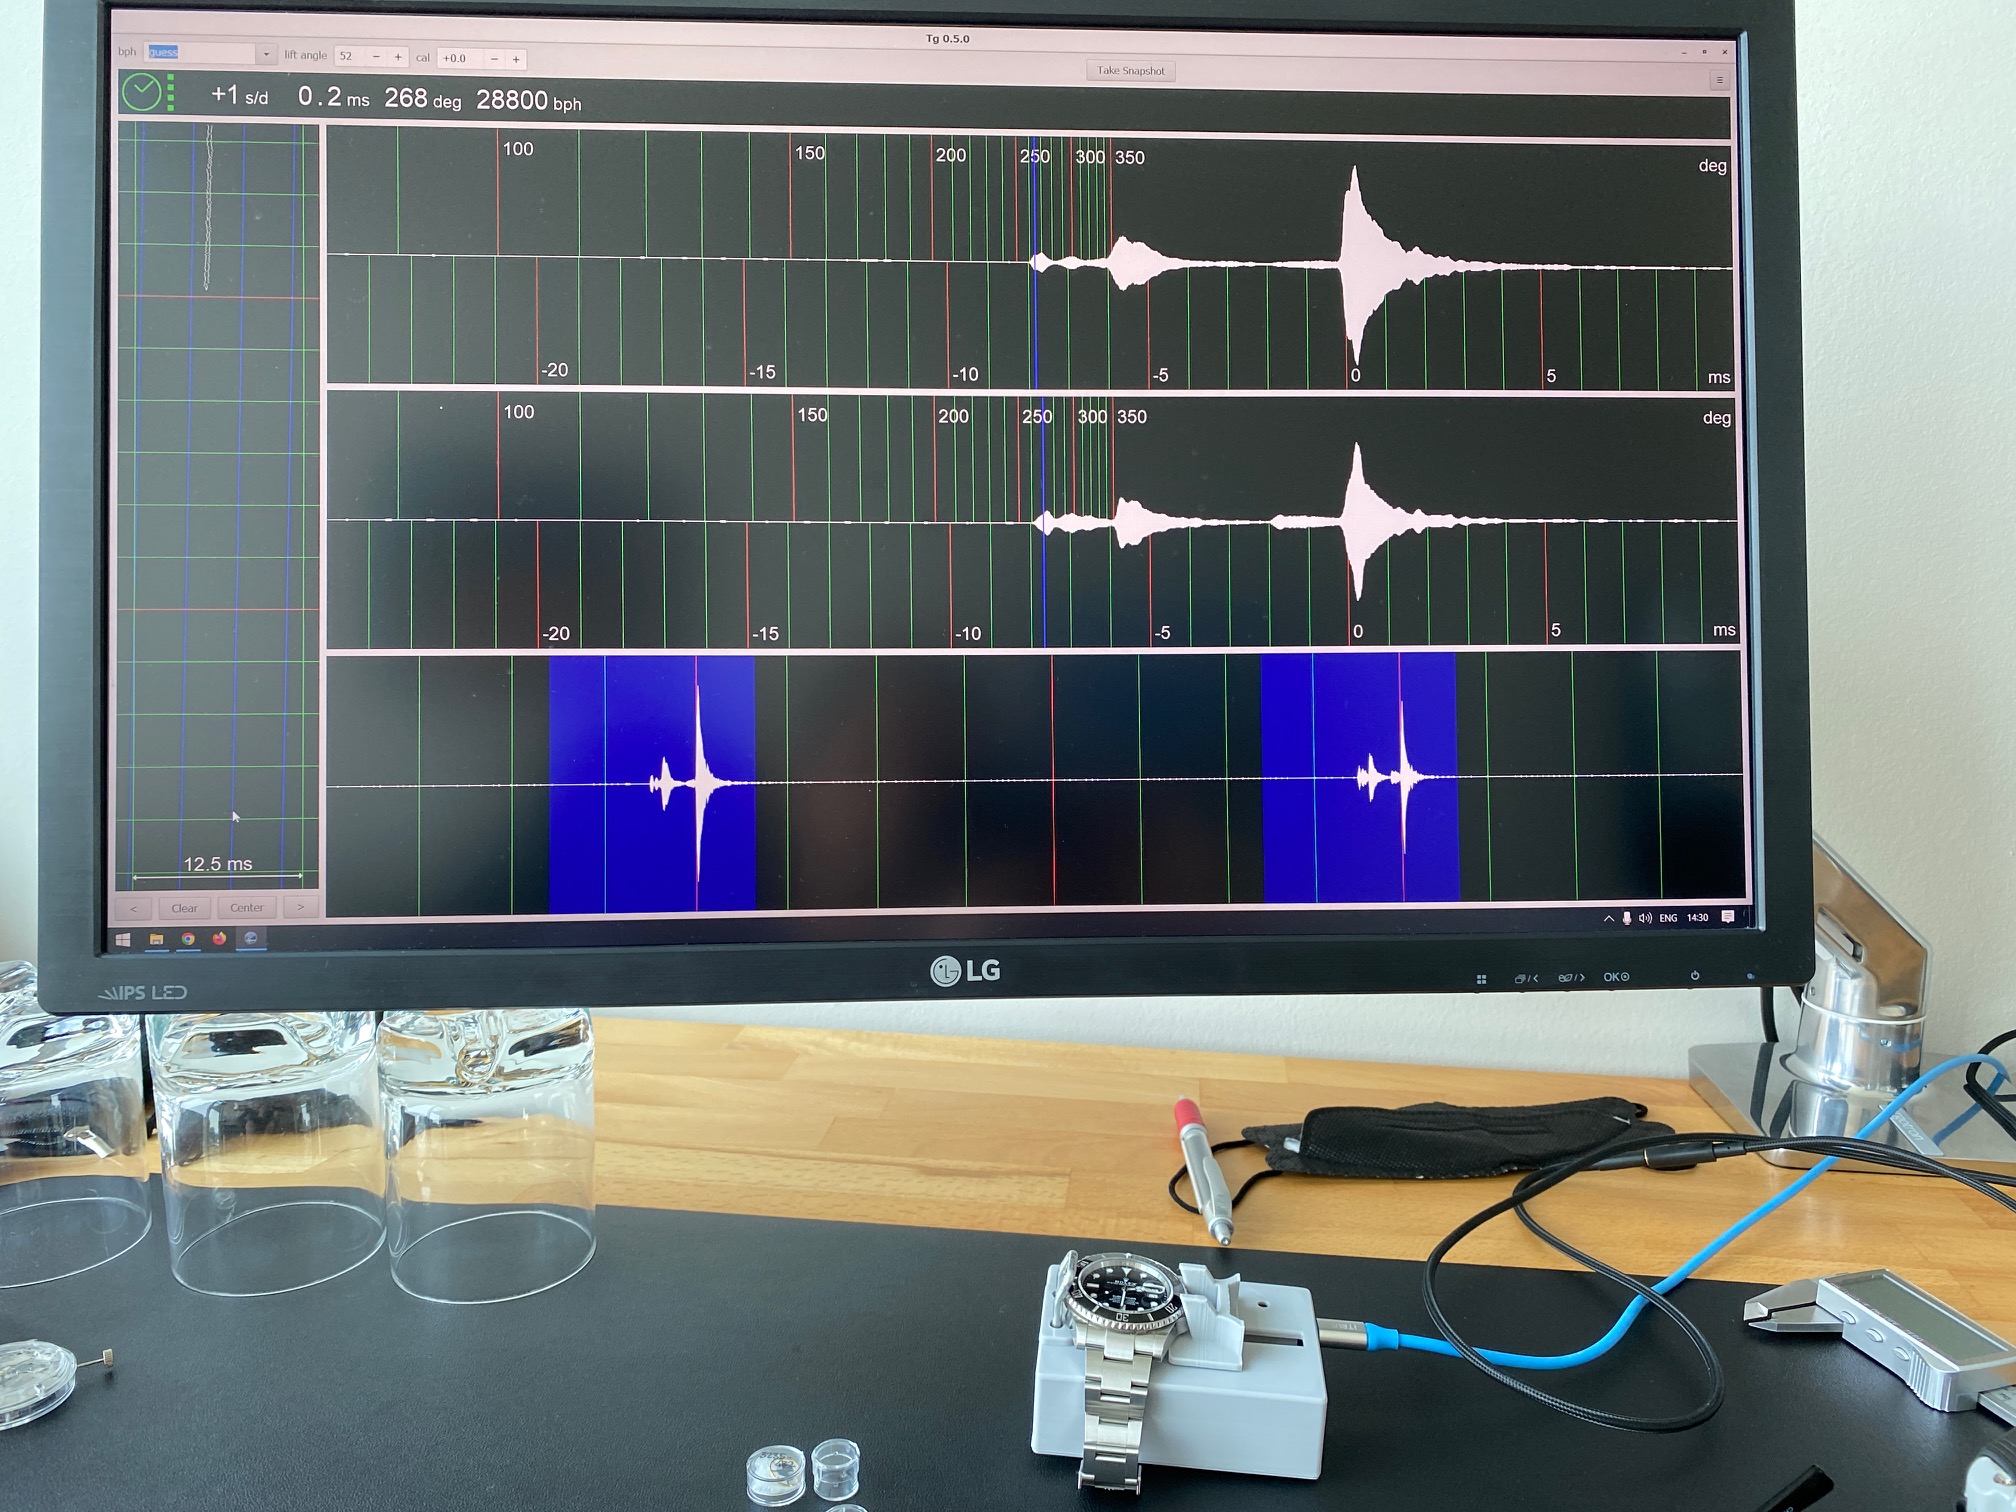

If you were a normal person, you'd look at that timegrapher result, and say "if it ain't broke, don't fix it"... fortunately, in this community we are not normal. And that's how I began to disassemble a perfectly good watch to install expensive genuine parts into a watch that clearly didn't need them to function. Onwards!

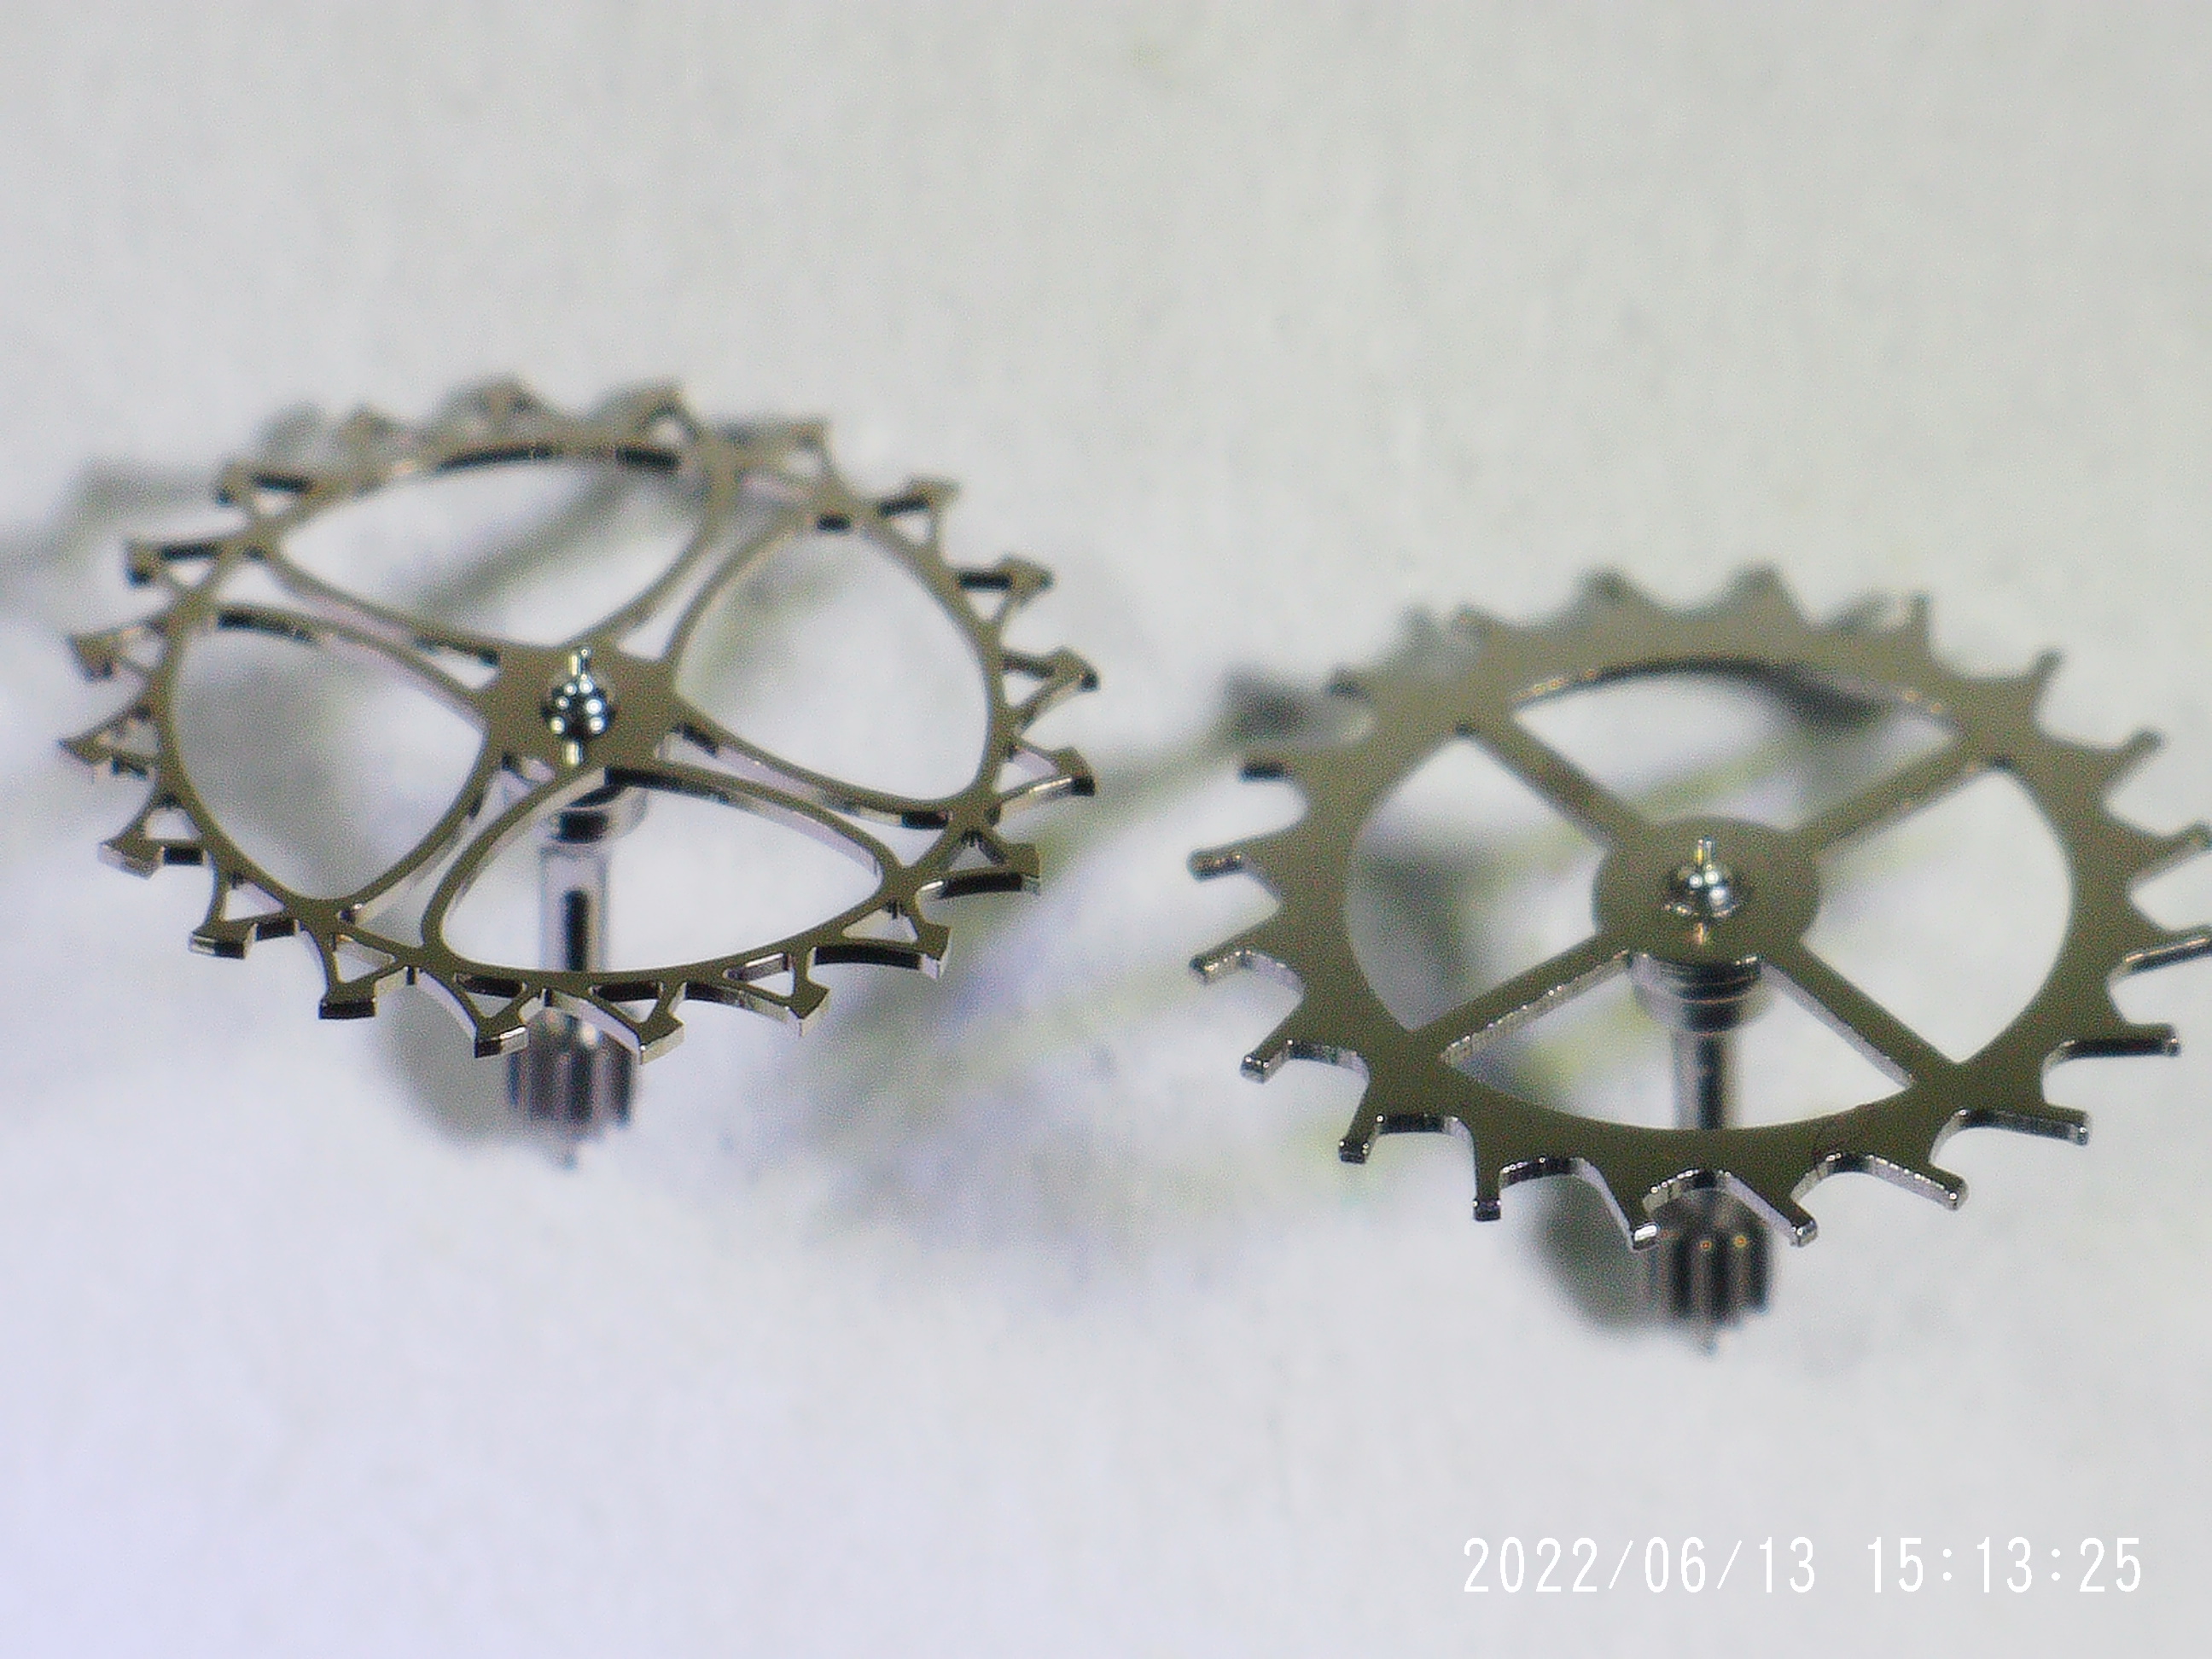
After taking the movement out of the case and removing the automatic mechanism, balance, and main train bridge, I was able to access the bit of the watch that I was planning on replacing. First up was the escape wheel. The gen version is beautifully skeletonized. Here's a pic of the Gen and VS versions under my digital microscope. There's a real difference in the finish quality (and maybe a difference in geometry -- more on this in a minute).

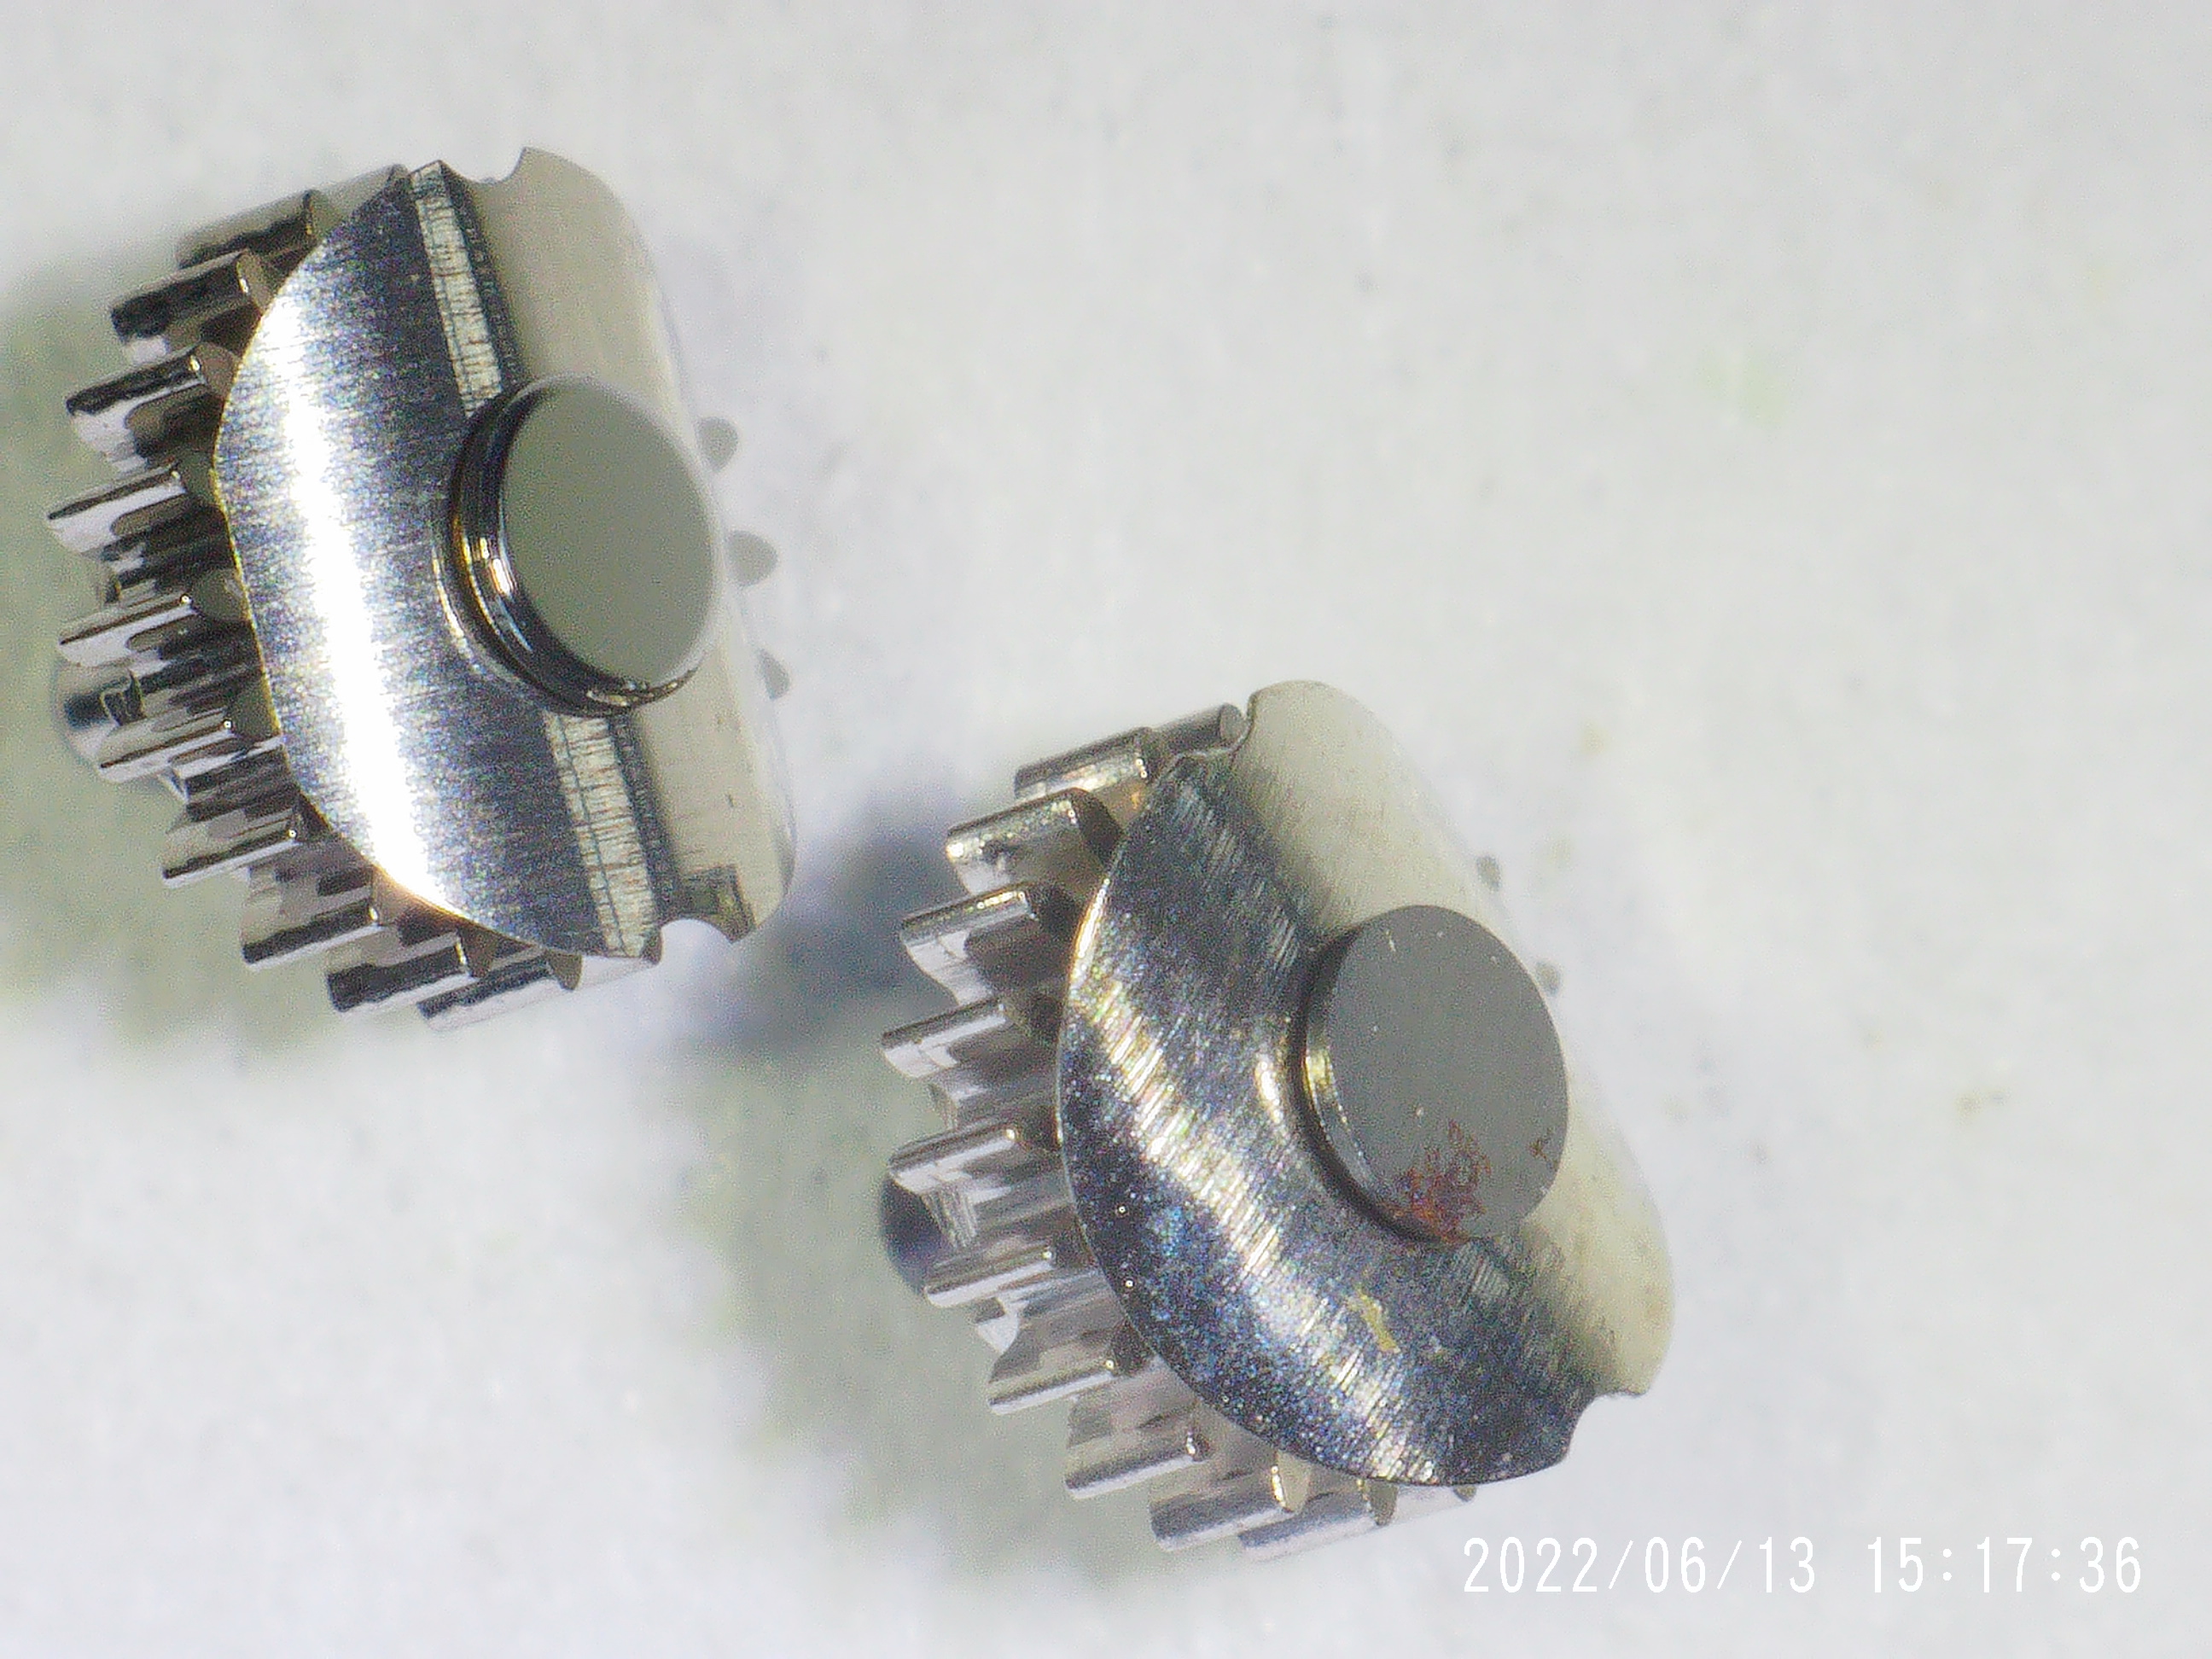
The crown wheel is also accessible from under the main train bridge. The difference here between the gen and the VS parts is more subtle. It's basically impossible to tell the two parts from one another without the aid of magnification. But under magnification, it's possible to see that the gen part has a much nicer finish.

The install of the crown wheel was very straight forward. I simply dropped it into place and was done. It was the same story for the escape wheel. I took out the old one, and put in the new one, re-assembled the train of wheels and then re-installed the train bridge. The train bridge went into place without any trouble and I screwed everything back down. Although when I got the pallet fork re-installed it didn't seem like the VS pallet fork and the gen escape wheel were playing that nicely with eachother. I put a little wind onto the main spring to see if I could manually actuate the pallet fork, but it looks like the VS pallet fork isn't quite right for locking and unlocking the gen escape wheel. For those who've done something like this before, did you need to replace both the escape wheel AND the pallet fork with a Gen in order for it to work?

Next was the balance and balance bridge. I'd read that sometimes that balance bridge won't quite sit properly on the VS mainplate's centering pins, and that sometimes you need to broach the holes on the gen bridge. I tried without broaching, and while *slightly* tighter than the stock balance bridge, the gen bridge fit without the need for any broaching.
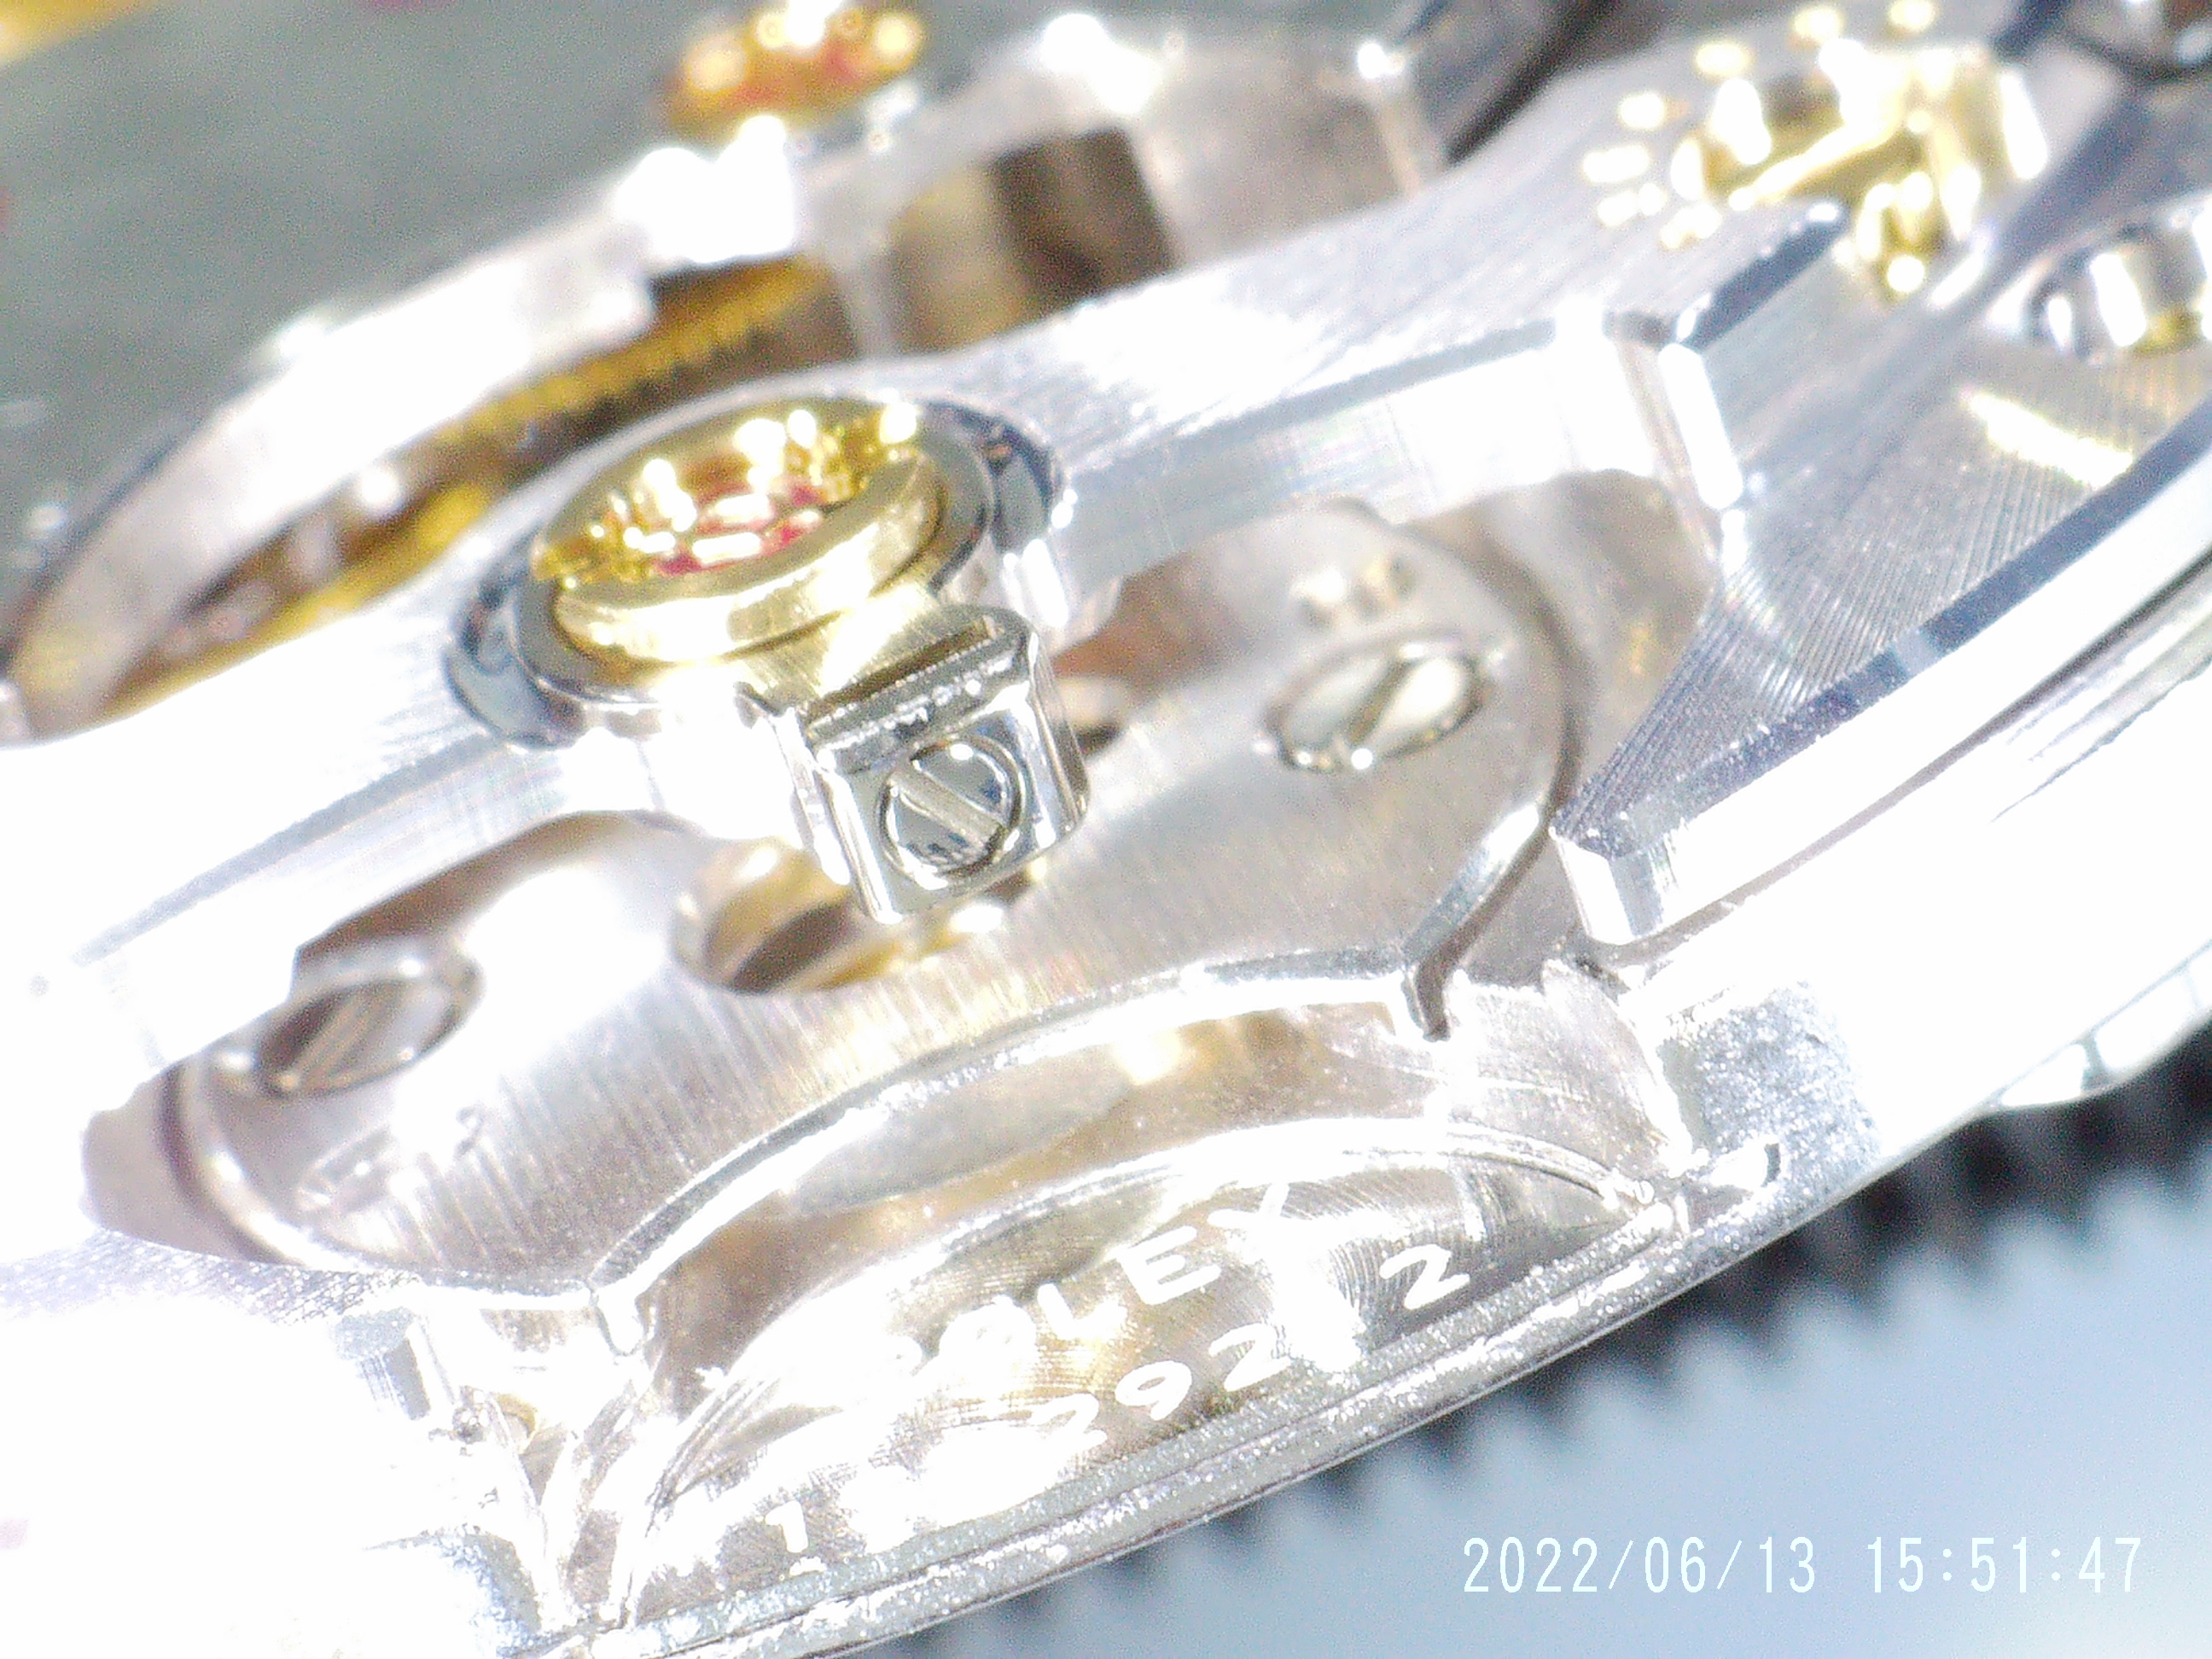

With the knowledge that the balance bridge would fit onto the main plate, I decided I'd try to connect my balance complete with the balance bridge. This was really hard. Is there a tool or jig that would make this easier? I was using two pairs of tweezers; one to hold the bridge, and one to grab the little anchor thingy on the end of the hairspring, then I'd try to move the hairspring anchor thingy into the slot on the balance bridge's hairspring stud. I managed to do this once, but then I needed to somehow change tools to get a screwdriver to tighten the hairspring stud screw. While I was doing so, the anchor thingy came out of the stud slot. My arms were getting a bit tired at this point so I called it a day. If anybody has any suggestions on how to make this process a bit easier I'd love to hear.

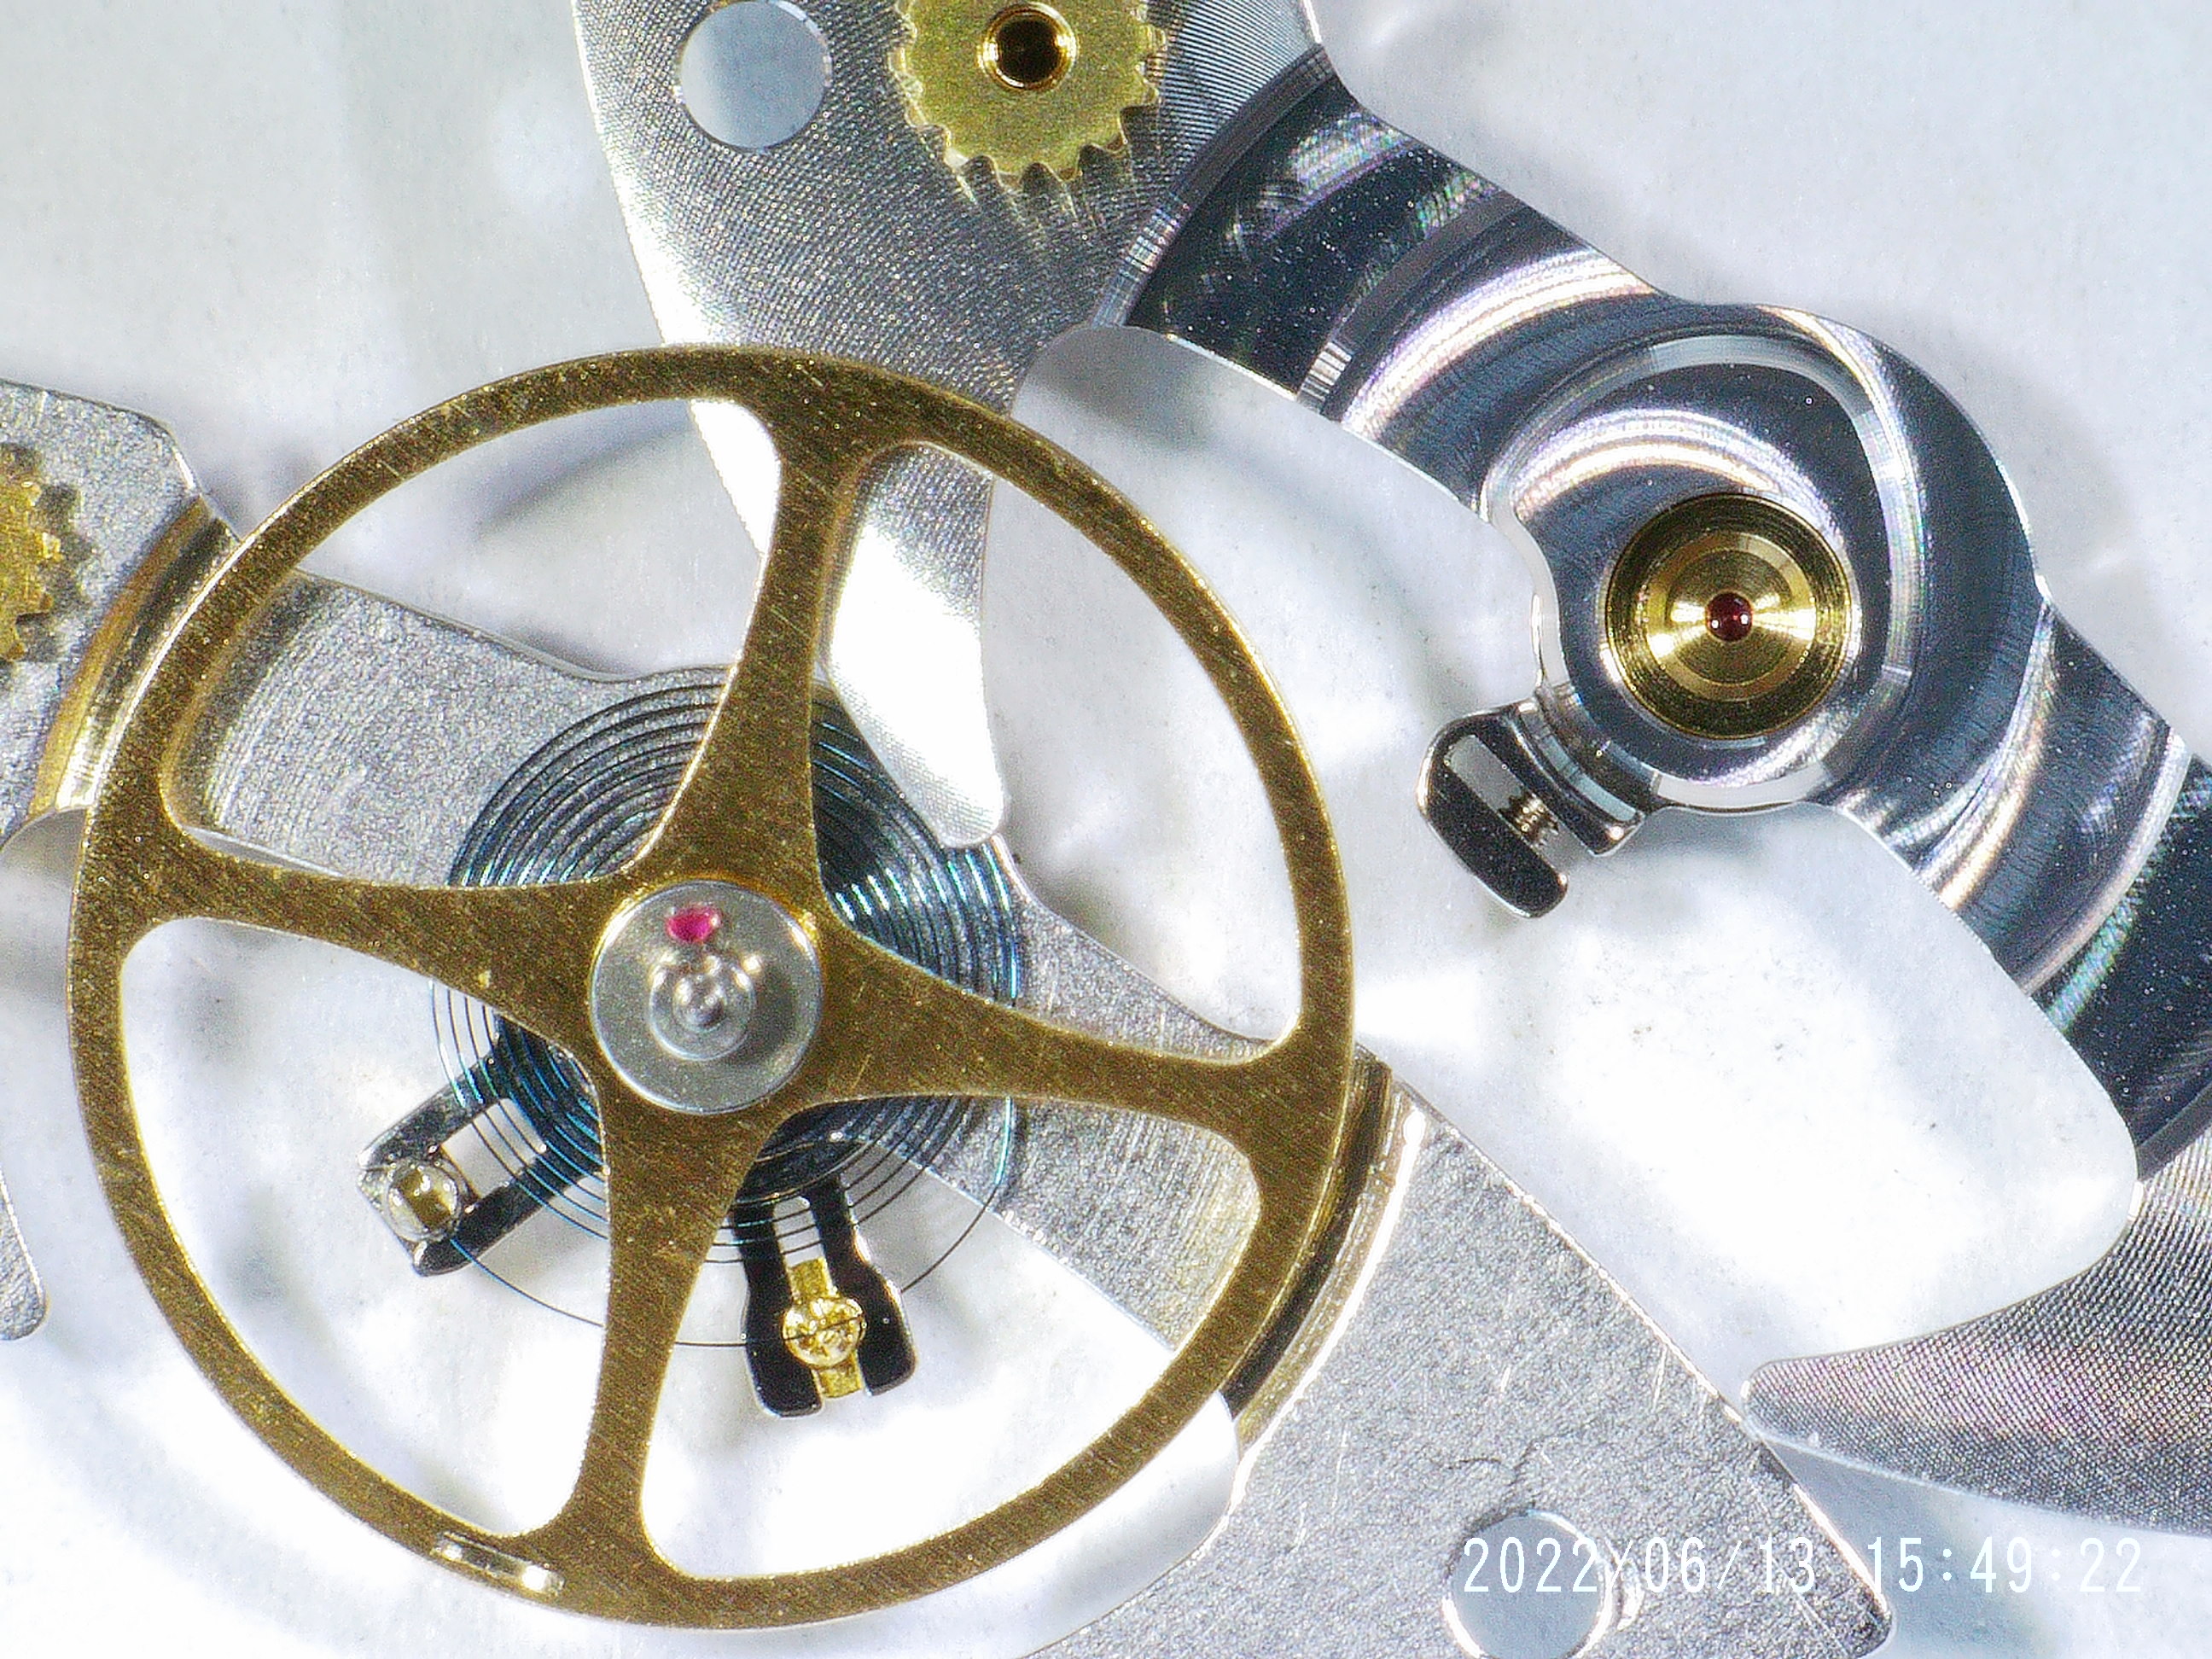
And finally, a pic comparing the gen balance bridge with the VS balance bridge + balance complete. There really is a difference in finish quality at high magnification.
great stuff. where did you buy the gen parts?
 

Polov

Getting To Know The Place
7/2/17
24
2
3
Hi, just to say thank you for sharing your work on this movement.

Awesome looks, and the macro pic showing the difference between gen part and VS are so relevant !

The looks is really nice with the gen bridge and escape wheel so beautiful too ! I totally understand why you wanted to change these.

Would like to have update on the time graph nlw that the grease and movement have worked : )

Thanks again and wish you the best for the futur
 
  • Like
Reactions: dogwood

dogwood

I'm Pretty Popular
Patron
Section Moderator
Certified
7/9/21
2,441
5,420
113
Canada
Hi, just to say thank you for sharing your work on this movement.

Awesome looks, and the macro pic showing the difference between gen part and VS are so relevant !

The looks is really nice with the gen bridge and escape wheel so beautiful too ! I totally understand why you wanted to change these.

Would like to have update on the time graph nlw that the grease and movement have worked : )

Thanks again and wish you the best for the futur
I’ll put this watch on my time grapher later today (I’m out at the moment). I’m also curious how stable it has remained over the past few months.
 

John Wick

Getting To Know The Place
11/2/23
47
22
8
Italy
Also can you give us an insight of how much did this mod cost you somehow?
Of course you saved on labour by DIY (again, outstanding job!), but you mentioned expensive gen parts... what are the price ranges for your country?
 

dogwood

I'm Pretty Popular
Patron
Section Moderator
Certified
7/9/21
2,441
5,420
113
Canada
Also can you give us an insight of how much did this mod cost you somehow?
Of course you saved on labour by DIY (again, outstanding job!), but you mentioned expensive gen parts... what are the price ranges for your country?
I actually bought my gen parts from a company in Italy called rarecollections.it I don’t know if they’re the best vendor for gen parts, but they were we here I sourced the parts for this project.
 

Jason171912

Getting To Know The Place
30/5/23
15
6
3
San Jose
Really interested in this project!
I’m building a DJ36mm. Would like to do the same for the movement. Will you sold the movement or offer a gen parts upgrade service?
 

dogwood

I'm Pretty Popular
Patron
Section Moderator
Certified
7/9/21
2,441
5,420
113
Canada
Really interested in this project!
I’m building a DJ36mm. Would like to do the same for the movement. Will you sold the movement or offer a gen parts upgrade service?
I'm glad you enjoyed reading about this project. And to be clear, I'm not a vendor / service provider here on RWI. I'm just a retired engineer who started tinkering with watches in his free time. But if you're interested in learning how to do this kind of project yourself, I'd be happy to answer any questions.
 

Jason171912

Getting To Know The Place
30/5/23
15
6
3
San Jose
I'm glad you enjoyed reading about this project. And to be clear, I'm not a vendor / service provider here on RWI. I'm just a retired engineer who started tinkering with watches in his free time. But if you're interested in learning how to do this kind of project yourself, I'd be happy to answer any questions.
Are you still wearing the VS3235 movement with gen parts? Is it working well? I’ve found the vendor you recommended on ebay, I think the gen parts are quite expensive. How much does it cost for your gen parts? I can still afford for the gen parts but my main concern is idk who can help me to install it.
 

dogwood

I'm Pretty Popular
Patron
Section Moderator
Certified
7/9/21
2,441
5,420
113
Canada
Are you still wearing the VS3235 movement with gen parts? Is it working well? I’ve found the vendor you recommended on ebay, I think the gen parts are quite expensive. How much does it cost for your gen parts? I can still afford for the gen parts but my main concern is idk who can help me to install it.
Yes, I’m still wearing the watch that I did in this project. It runs beautifully. It’s probably the best time-keeping watch in my collection; I think it drifts by at most 1-2s/day. Gen parts are expensive, but they do perform better than rep parts.

In terms of the install, swapping in a new balance complete and a new pallet fork / escape wheel is pretty straight forward. Here’s what you’d need to do:

  1. Remove the bracelet
  2. Remove the caseback (use a rubber ball or wad of sticky tape)
  3. Remove the rotor (you’ll need a special triangular screw driver for this, it costs about $15 on AliExpress)
  4. Remove the automatic module (three 1.4mm screws).
  5. Let the power out of the mainspring by holding the crown in your fingers as a break and blocking the click spring.
  6. Remove the old balance (two 14.4mm screws).
  7. Remove the pallet fork bridge (two 1.2mm screws). And remove the old pallet fork.
  8. Remove the train bridge (three 1.4mm screws) and then remove the old escape wheel.
  9. Install the new escape wheel.
  10. Reinstall the train bridge (three 1.4mm screws). Make sure the train wheels spin freely before you tighten down the screws.
  11. Install the new pallet fork.
  12. Reinstall the old pallet bridge (two 1.2mm screws).
  13. Wind the main spring a little bit and make sure the pallet fork snaps back and forth nicely when you nudge it.
  14. Install the new balance complete (two 1.4mm screws). Make sure the impulse jewel is on the correct side of the pallet fork — the balance won’t swing freely if you get this wrong, if you got it wrong, take the balance out and try again.
  15. Wind up the mainspring and check the timing of the watch on a time grapher (a time grapher app will work if you have a quiet room).
  16. Let the mainspring energy out again using the crown brake and click spring trick like you did in step 5. And then reinstall the automatic works (three 1.4mm screws).
  17. Reinstall the rotor using the special screw driver).
  18. Screw on the caseback.
  19. Reattach the bracelet.
 

Jason171912

Getting To Know The Place
30/5/23
15
6
3
San Jose
Yes, I’m still wearing the watch that I did in this project. It runs beautifully. It’s probably the best time-keeping watch in my collection; I think it drifts by at most 1-2s/day. Gen parts are expensive, but they do perform better than rep parts.

In terms of the install, swapping in a new balance complete and a new pallet fork / escape wheel is pretty straight forward. Here’s what you’d need to do:

  1. Remove the bracelet
  2. Remove the caseback (use a rubber ball or wad of sticky tape)
  3. Remove the rotor (you’ll need a special triangular screw driver for this, it costs about $15 on AliExpress)
  4. Remove the automatic module (three 1.4mm screws).
  5. Let the power out of the mainspring by holding the crown in your fingers as a break and blocking the click spring.
  6. Remove the old balance (two 14.4mm screws).
  7. Remove the pallet fork bridge (two 1.2mm screws). And remove the old pallet fork.
  8. Remove the train bridge (three 1.4mm screws) and then remove the old escape wheel.
  9. Install the new escape wheel.
  10. Reinstall the train bridge (three 1.4mm screws). Make sure the train wheels spin freely before you tighten down the screws.
  11. Install the new pallet fork.
  12. Reinstall the old pallet bridge (two 1.2mm screws).
  13. Wind the main spring a little bit and make sure the pallet fork snaps back and forth nicely when you nudge it.
  14. Install the new balance complete (two 1.4mm screws). Make sure the impulse jewel is on the correct side of the pallet fork — the balance won’t swing freely if you get this wrong, if you got it wrong, take the balance out and try again.
  15. Wind up the mainspring and check the timing of the watch on a time grapher (a time grapher app will work if you have a quiet room).
  16. Let the mainspring energy out again using the crown brake and click spring trick like you did in step 5. And then reinstall the automatic works (three 1.4mm screws).
  17. Reinstall the rotor using the special screw driver).
  18. Screw on the caseback.
  19. Reattach the bracelet.
Appreciate for the very detail in the process. Do I need to remove the hands and dial?