• Tired of adverts on RWI? - Subscribe by clicking HERE and PMing Trailboss for instructions and they will magically go away!

Servicing a ZF AP 15400 Clone 3120 Movement

dogwood

I'm Pretty Popular
Patron
Section Moderator
Certified
7/9/21
2,351
5,034
113
Canada
You're doing God's work mate. What a journal. We need more guys like you on this forum! 👍

It seems that the clone 3120 is difficult to play with. Are there any advantages going with going with this watch compared to Miyota versions?

How's the build quality of this movement compared to VR 3135 which is a decent clone movement.

Glad you found the thread useful. Once I got used to the movement I’d say the 3120 is actually pretty easy to service other than the lack of a balance end-shake adjustment screw. But the vr3235 has a fake end shake adjuster, so it’s a wash.

In terms of build quality, it’s pretty good. The auto module looks a bit strange compared to the rolex calibers I’ve worked on… but it seems to work well. I’d say it’s on par with the build quality of VR movements and maybe just behind VS. there are things I like about the 3120 more than the noob 4130, eg the 4130 shock settings aren’t that easy to service due to being shallow. I’m not sure if this is a design or build difference, but it’s an observation.

The Geneva striping and pearlage are great on all of these movements to be honest (vr, vs, noob, and this zf).

No real advantage of going with this over the miyota other than wanting a rep that’s more gen like. I’m keen to get my hands on the new AP 15500 clone movement since it has the quick date change, whereas the 3120 is like the miyota in being a slow change.
 

SuperLory

Well-Known Repist
22/10/15
8,455
5,046
113
You're doing God's work mate. What a journal. We need more guys like you on this forum! 👍

It seems that the clone 3120 is difficult to play with. Are there any advantages going with going with this watch compared to Miyota versions?

How's the build quality of this movement compared to VR 3135 which is a decent clone movement.
lowbeat being a big one I guess
 
  • Like
Reactions: dogwood

j21

wawaweewa
Supporter
Certified
16/1/21
2,266
2,693
113
EU
Congratulations for sharing such knowledge to the community, Great thread and write up, and amazingly useful for everyone of us that owns this movement

👏
 

WatchNoobs

Getting To Know The Place
1/9/22
74
67
18
amazing post! I am actually planning to do the same, I have a ZF 15400 and I am plannign to a dial swap, while doing it im gonna just service the movement myself. Fingers crossed, first time doing it.
 

P..DR..D

Legendary Member
Staff member
Moderator Sales
Certified
12/1/21
23,338
24,125
113
Éire
It's posts like this that make me just stop and go WOW.

I can only imagine the sense of joy & pride you feel completing such a job, so bravo & thank you for sharing with the community.

Can you PM me your details so you can practice on all my watches to, I really don't mind ;)

Happy Friday Sir, have a great one

☘️
 
  • Like
Reactions: dogwood

Oascom

Respected Member
DO NOT TRADE WITH ME
Patron
Certified
19/1/16
4,408
5,066
113
Update: After letting the parts dry under the saran wrap dust cover for an hour, I got to work on the re-assembly. This started with the two sock settings (mercifully there's no shock setting for the escape wheel like there is on the N4130). The two sock settings were much easier to work with than the ones on the N4130 or the VR3235 (or maybe I'm getting better at assembling these tiny bastards). Regardless, I managed to get the two shock settings assembled. I did the balance bridge one first, and I used the mainplate as a jig to hold the balance in place. I figured it would be easier to assemble the setting if if wasn't under tension, so by doing the bridge side first, the balance staff would hang down into the empty setting on the mainplate and allow me to work without upward pressure on the cap jewel. After this was complete, I removed the balance, and worked on the setting in the main plate.

Next was doing an epilame treatment for the keyless works and the automatic module parts. I'm not sure if this is required or recommended, but I'm just kind of cribbing my way along based on what is says to do in the Rolex 3135 movement service manual. This is also the logic I'm using for which lubricants to use in which places as I re-assemble.

After the epilame was done, I stared re-assembling the keyless works. I started with the yoke and the screw to secure it. I lubricated here with moebius 9415 grease (this grease has a blue dye so it's sometimes visible in the pics). Then I flipped the movement over and installed the stem, winding pinion and sliding pinion. These were also all lubricated with 9415. The 3120 movement has a nice design for this part of the assembly, the mainplate has a slot cut into it, so you can skewer the two pinions on the stem and then place it into the movement and then slide the stem further into its slot. On the rolex caliblers I've worked on, you have to kinda hold the pinion in place on the mainplate and skewer it in place which is more delicate a procedure.

With the yoke, stem, and pinions in place, I flipped the movement again, and installed the setting lever spring. This was a really easy procedure compared to the explosive U-shaped springs found on rolex calibers. All the metal to metal slider surfaces and gently lubricated with 9415.

Then it was on to the setting lever. I was worried that this would be tricky since it's held in place by a screw that threads in from the other side of the movement. But it turns out, that the setting lever, once in place, is held nicely against its pivot by the setting level spring and yoke spring. So there's no danger of it falling away when you flip the movement to secure the setting lever screw from the other side.

Next was getting all the setting wheels and date quick set wheels back into place. This was pretty straight forward, and made sure to lubricate any columns with 9415 if they had pinions that spun on them. But I used D-5 to lubricate the riveted gear pivots. I'm not sure if this was the correct method, but I figured I wanted an oil to get into the bushing on these parts since I couldn't access them directly with grease.

The it was on to the date change mechanism. Here is used D-5 since I figured there is some fast motion when the date jumps at midnight (well technically it jumps half way because it starts changing at 11pm and gets half way before jumping at 12 midnight). I figured an oil would be better for this type of movement.

Then I flipped the movement over and installed the minute pinion and the minute pinion bridge. This is where I messed up the order on the disassembly because I removed these parts before removing the cannon pinion / motion works. I lubricated these parts as though they were the parts of a rolex 3135 movement. I'm not sure this was correct, but the design looks very similar in principal, so I'm hoping that D5 in the places I'd put it on a 3135 will work here.

Next I flipped the movement back over to the dial side, and installed the setting intermediate wheel, the hour wheel, and the date intermediate wheel. Here I lubricated with D-5.

And now my back is a little sore, so I think I'll take a walk outside and get some fresh air. Once again, thanks for following along.


zIiHTY.jpg

Good job, it's time to upgrade your oilers now :p
 
  • Like
Reactions: dogwood

dogwood

I'm Pretty Popular
Patron
Section Moderator
Certified
7/9/21
2,351
5,034
113
Canada
It's a neverending story;p
I’m very familiar with the N+1 formula for calculating the optimal number of an object to own. E.g. the optimal number of reps to own can be calculated by using N+1 where N is the number of reps you currently own.

But for tools on my bench, while N+1 applies for the quantity of different tools, I feel like there’s a different formula at play for the quality of each tool: Q+1… where Q is the quality of my current tool.
 

Oascom

Respected Member
DO NOT TRADE WITH ME
Patron
Certified
19/1/16
4,408
5,066
113
The tool upgrade ladder is a wonderful one 😅
It's a neverending story;p
I’m very familiar with the N+1 formula for calculating the optimal number of an object to own. E.g. the optimal number of reps to own can be calculated by using N+1 where N is the number of reps you currently own.

But for tools on my bench, while N+1 applies for the quantity of different tools, I feel like there’s a different formula at play for the quality of each tool: Q+1… where Q is the quality of my current tool.

This is a good fairly cheap upgrade


Those are very nice and what I'm using currently:

 
Last edited:
  • Like
Reactions: dogwood

dogwood

I'm Pretty Popular
Patron
Section Moderator
Certified
7/9/21
2,351
5,034
113
Canada
It's a neverending story;p


This is a good fairly cheap upgrade


Those are very nice and what I'm using currently:

So much tool candy!!! Q+1 🥹😍🤩
 

Caril

Known Member
16/8/22
108
88
28
Portugal
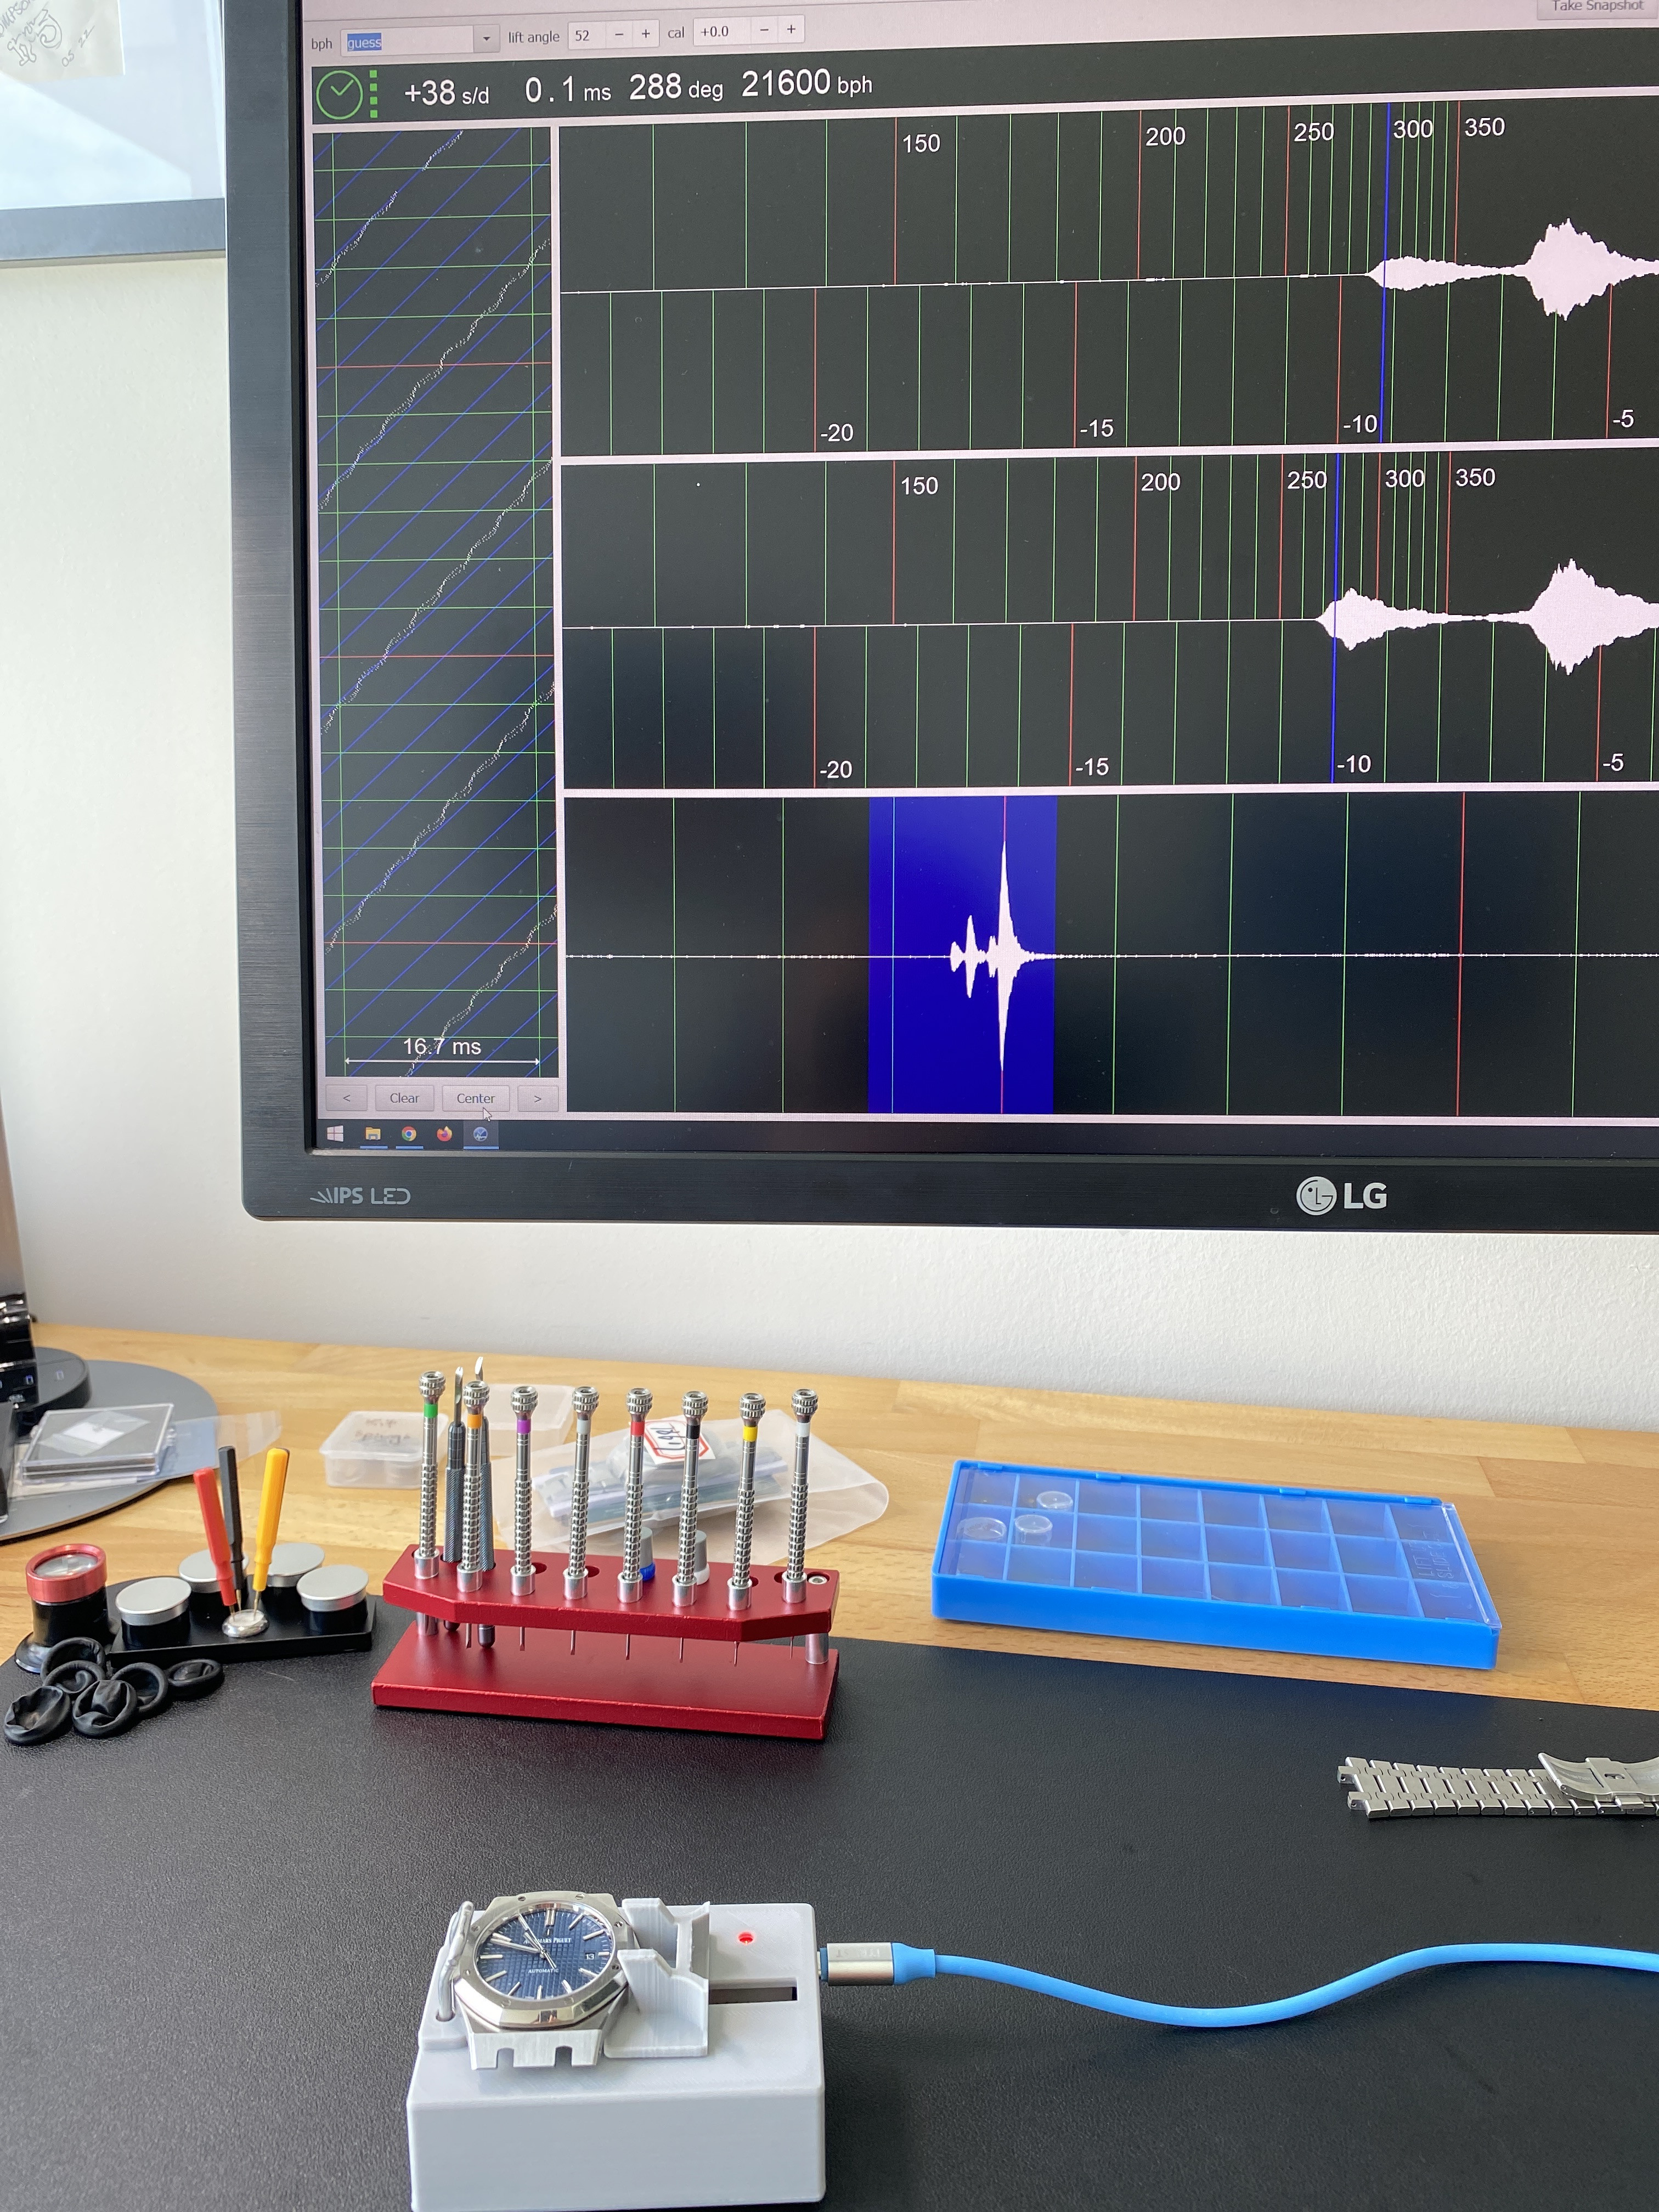
Ok, here we go… here is the baseline performance of the movement *before* I’ve done anything to it.

zIjahp.jpg


At the very least, it needs to be regulated. But that ripple / wave in the time grapher is telling me that there’s something funky going on with the escape wheel — as in, as the escape wheel turns through 360 degrees, on one side it runs fast and on the other it runs slower.

Wow, a very interesting and informative thread, thanks!
Also, a motivation to learn how to "dapple" with movements.

A beginner's question - how is it called, and how to get a "good enough", "watch measurement device" like the one used here?
Is it based on a microphone?
Is there an app for it? Could magnetic fields on a phone /diy mic magnetize the movement?
 

dogwood

I'm Pretty Popular
Patron
Section Moderator
Certified
7/9/21
2,351
5,034
113
Canada
Wow, a very interesting and informative thread, thanks!
Also, a motivation to learn how to "dapple" with movements.

A beginner's question - how is it called, and how to get a "good enough", "watch measurement device" like the one used here?
Is it based on a microphone?
Is there an app for it? Could magnetic fields on a phone /diy mic magnetize the movement?
The software for PC is free, it’s called TG0.5.0

The usb mic and amp can be bought on AliExpress for $30. Just search for PC timegrapher mic on AliExpress.

There is no risk of magnetizing the movement with the mic.
 
  • Like
Reactions: Caril

Procurator

Strawcruncher
Certified
15/1/20
2,711
6,206
113
SEA
I’ve been reading all your “journal“ threads and Im at a loss for words.
You call yourself a beginner, but you obviously have a knack for watchmaking and I am very jelous you are way over the pond and I cant take you out for beers n stuff.

Thank you very much for sharing your experiments, your knowledge and skill and your journey. It is indeed very informative and useful.

Keep doin, whatcha doin, this is exactly my kind of reading.
Thanks Thank You GIF by BLKBOK
 
  • Like
Reactions: dogwood

dogwood

I'm Pretty Popular
Patron
Section Moderator
Certified
7/9/21
2,351
5,034
113
Canada
I’ve been reading all your “journal“ threads and Im at a loss for words.
You call yourself a beginner, but you obviously have a knack for watchmaking and I am very jelous you are way over the pond and I cant take you out for beers n stuff.

Thank you very much for sharing your experiments, your knowledge and skill and your journey. It is indeed very informative and useful.

Keep doin, whatcha doin, this is exactly my kind of reading.
Thanks Thank You GIF by BLKBOK
I'm glad my threads are helpful, or failed that, entertaining ;)
 
  • Like
Reactions: Procurator

KJ2020

Time Traveler
Supporter
12/3/18
34,659
66,745
113
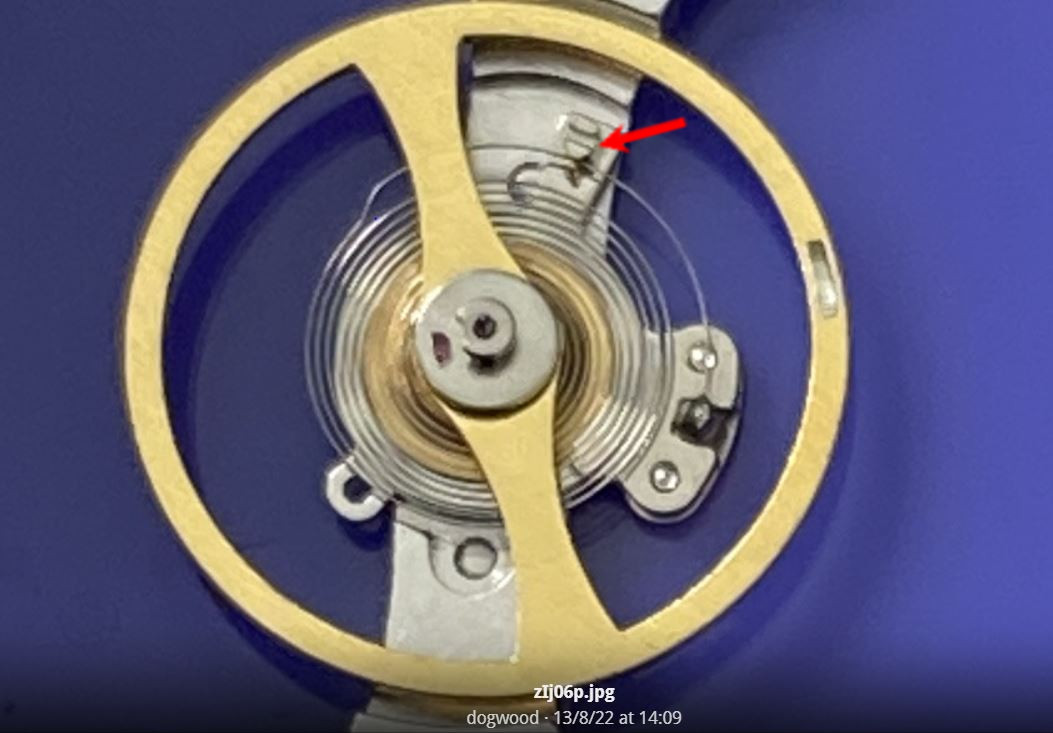
Very nice work bro. I noticed in your pics of the balance the hairspring had popped out of the regulator pin arms. Did you ever reseat it?

zEKg7L.jpg


Good job figuring out how to move the regulator!
 
Last edited:

KJ2020

Time Traveler
Supporter
12/3/18
34,659
66,745
113
Such a great looking watch!
 
Last edited:

dogwood

I'm Pretty Popular
Patron
Section Moderator
Certified
7/9/21
2,351
5,034
113
Canada
Very nice work bro. I noticed in your pics of the balance the hairspring had popped out of the regulator pin arms. Did you ever reseat it?

zEKg7L.jpg


Good job figuring out how to move the regulator!

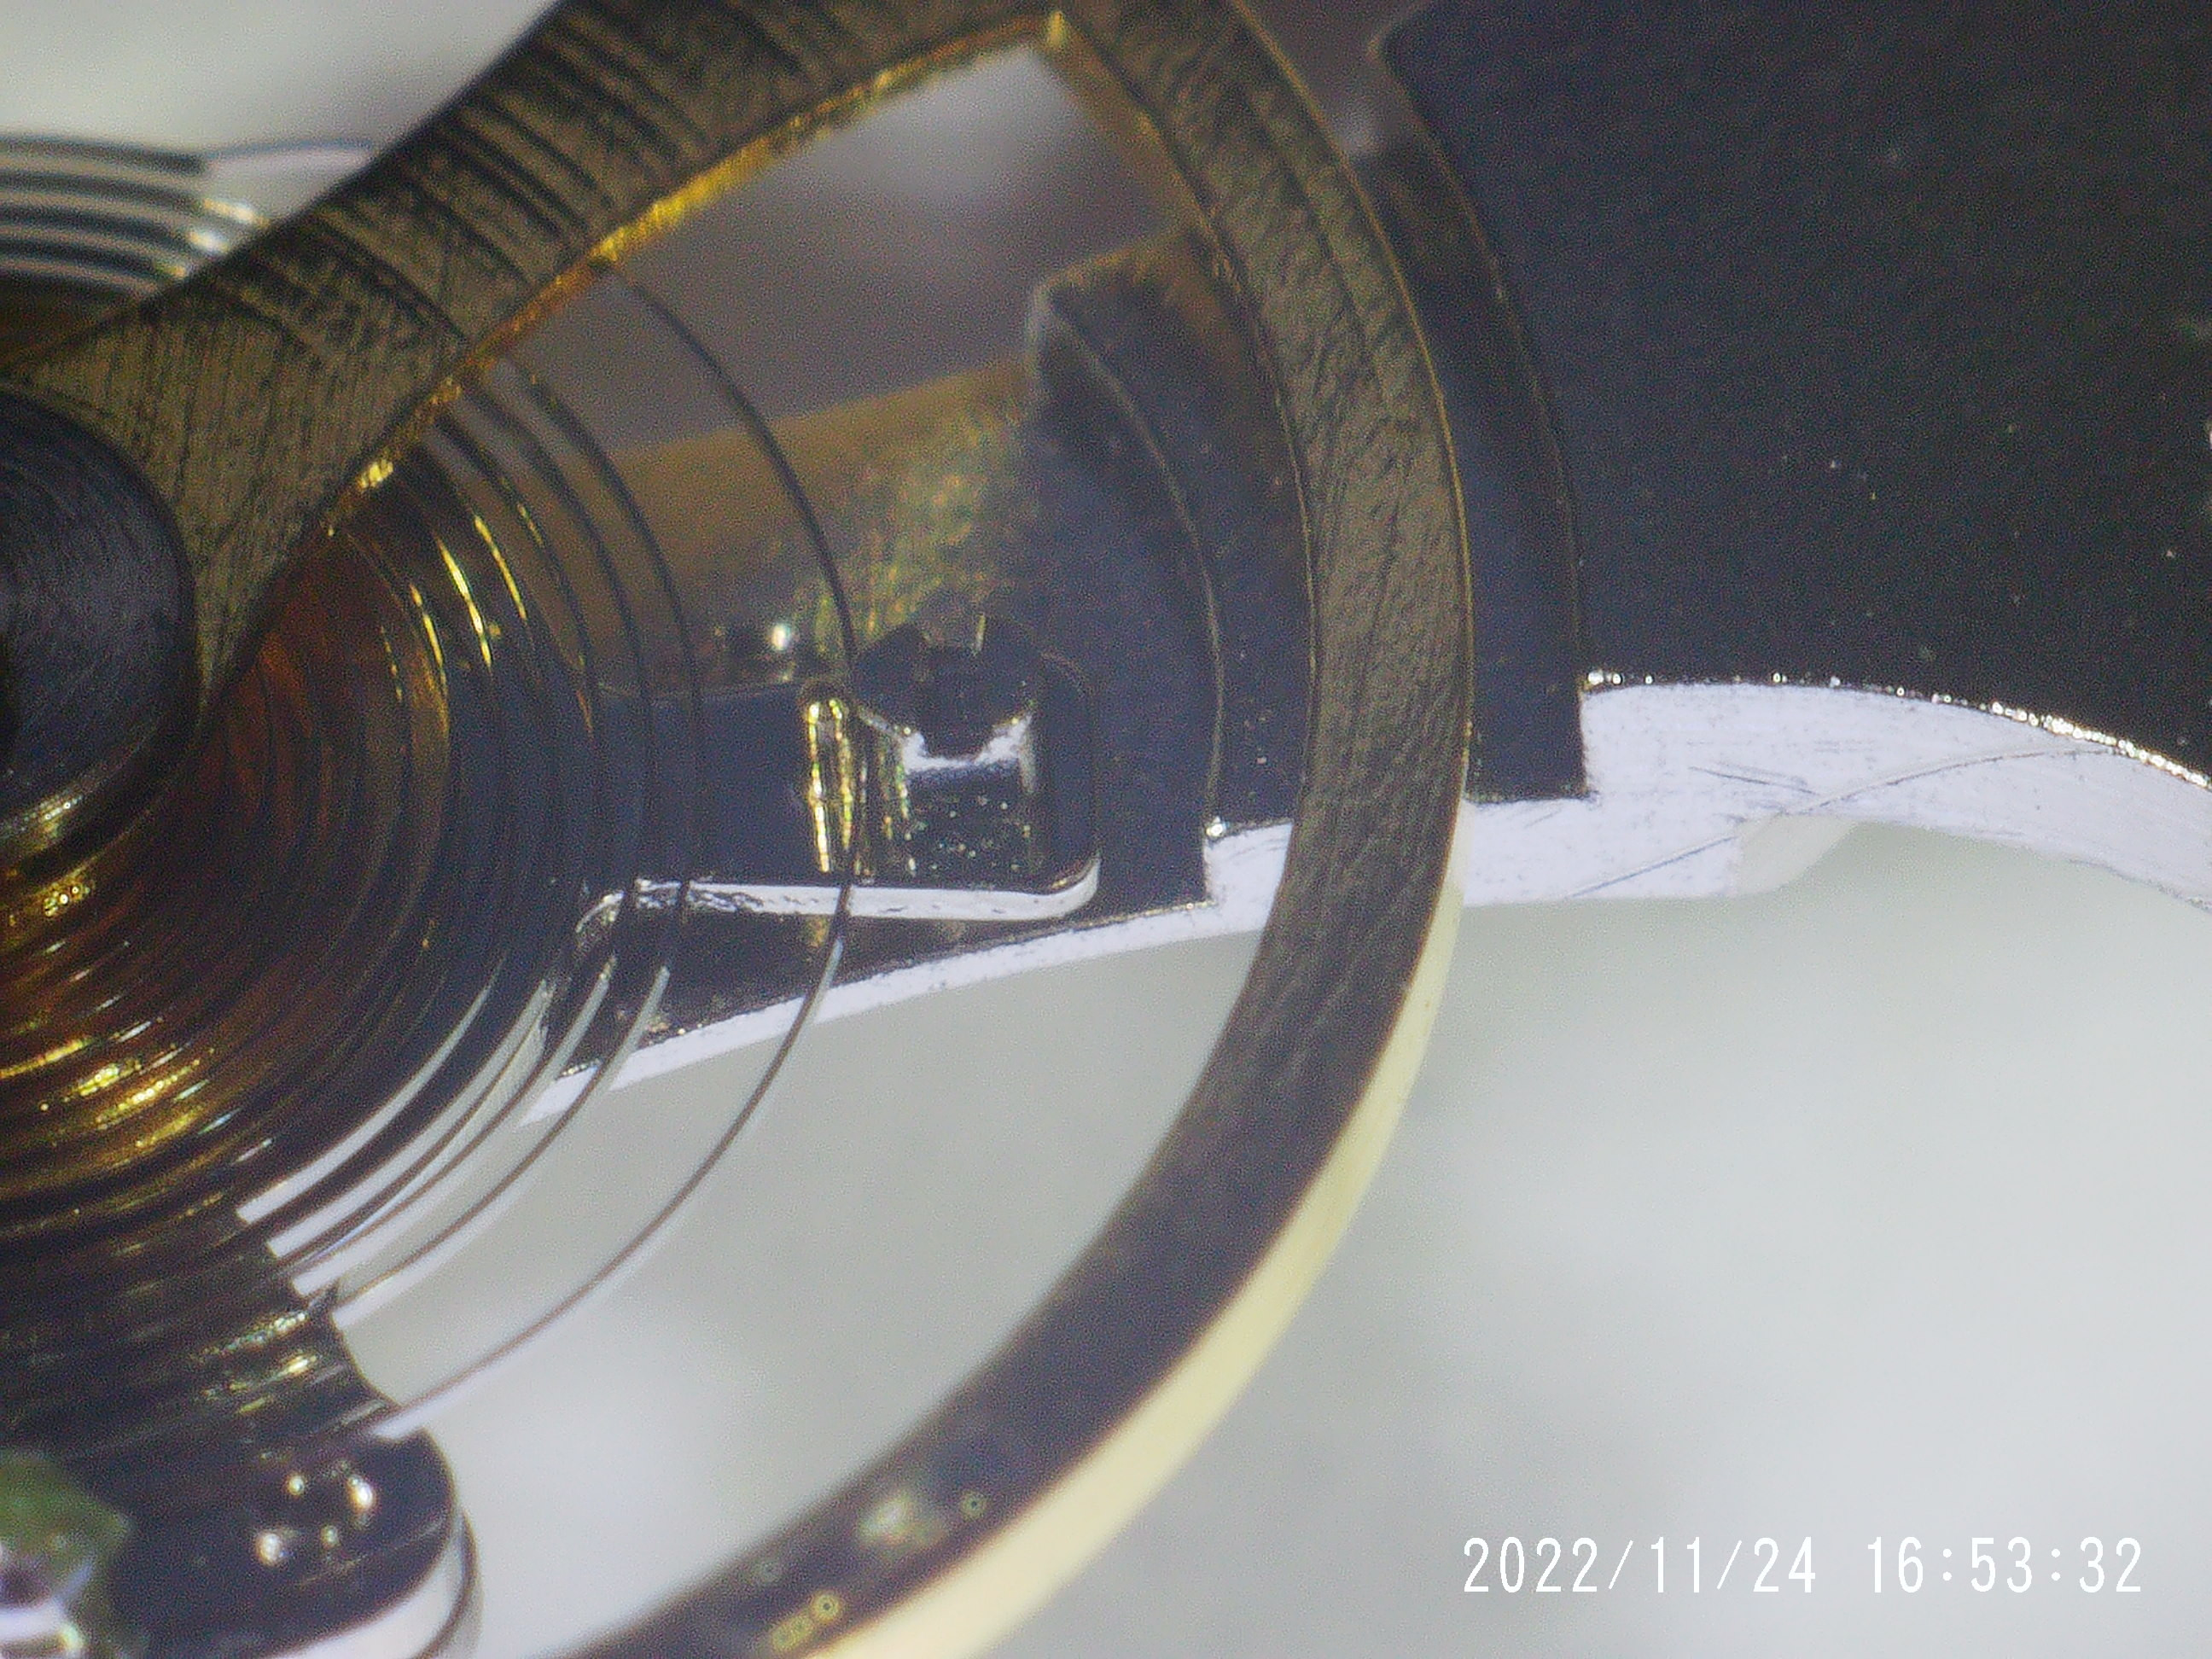
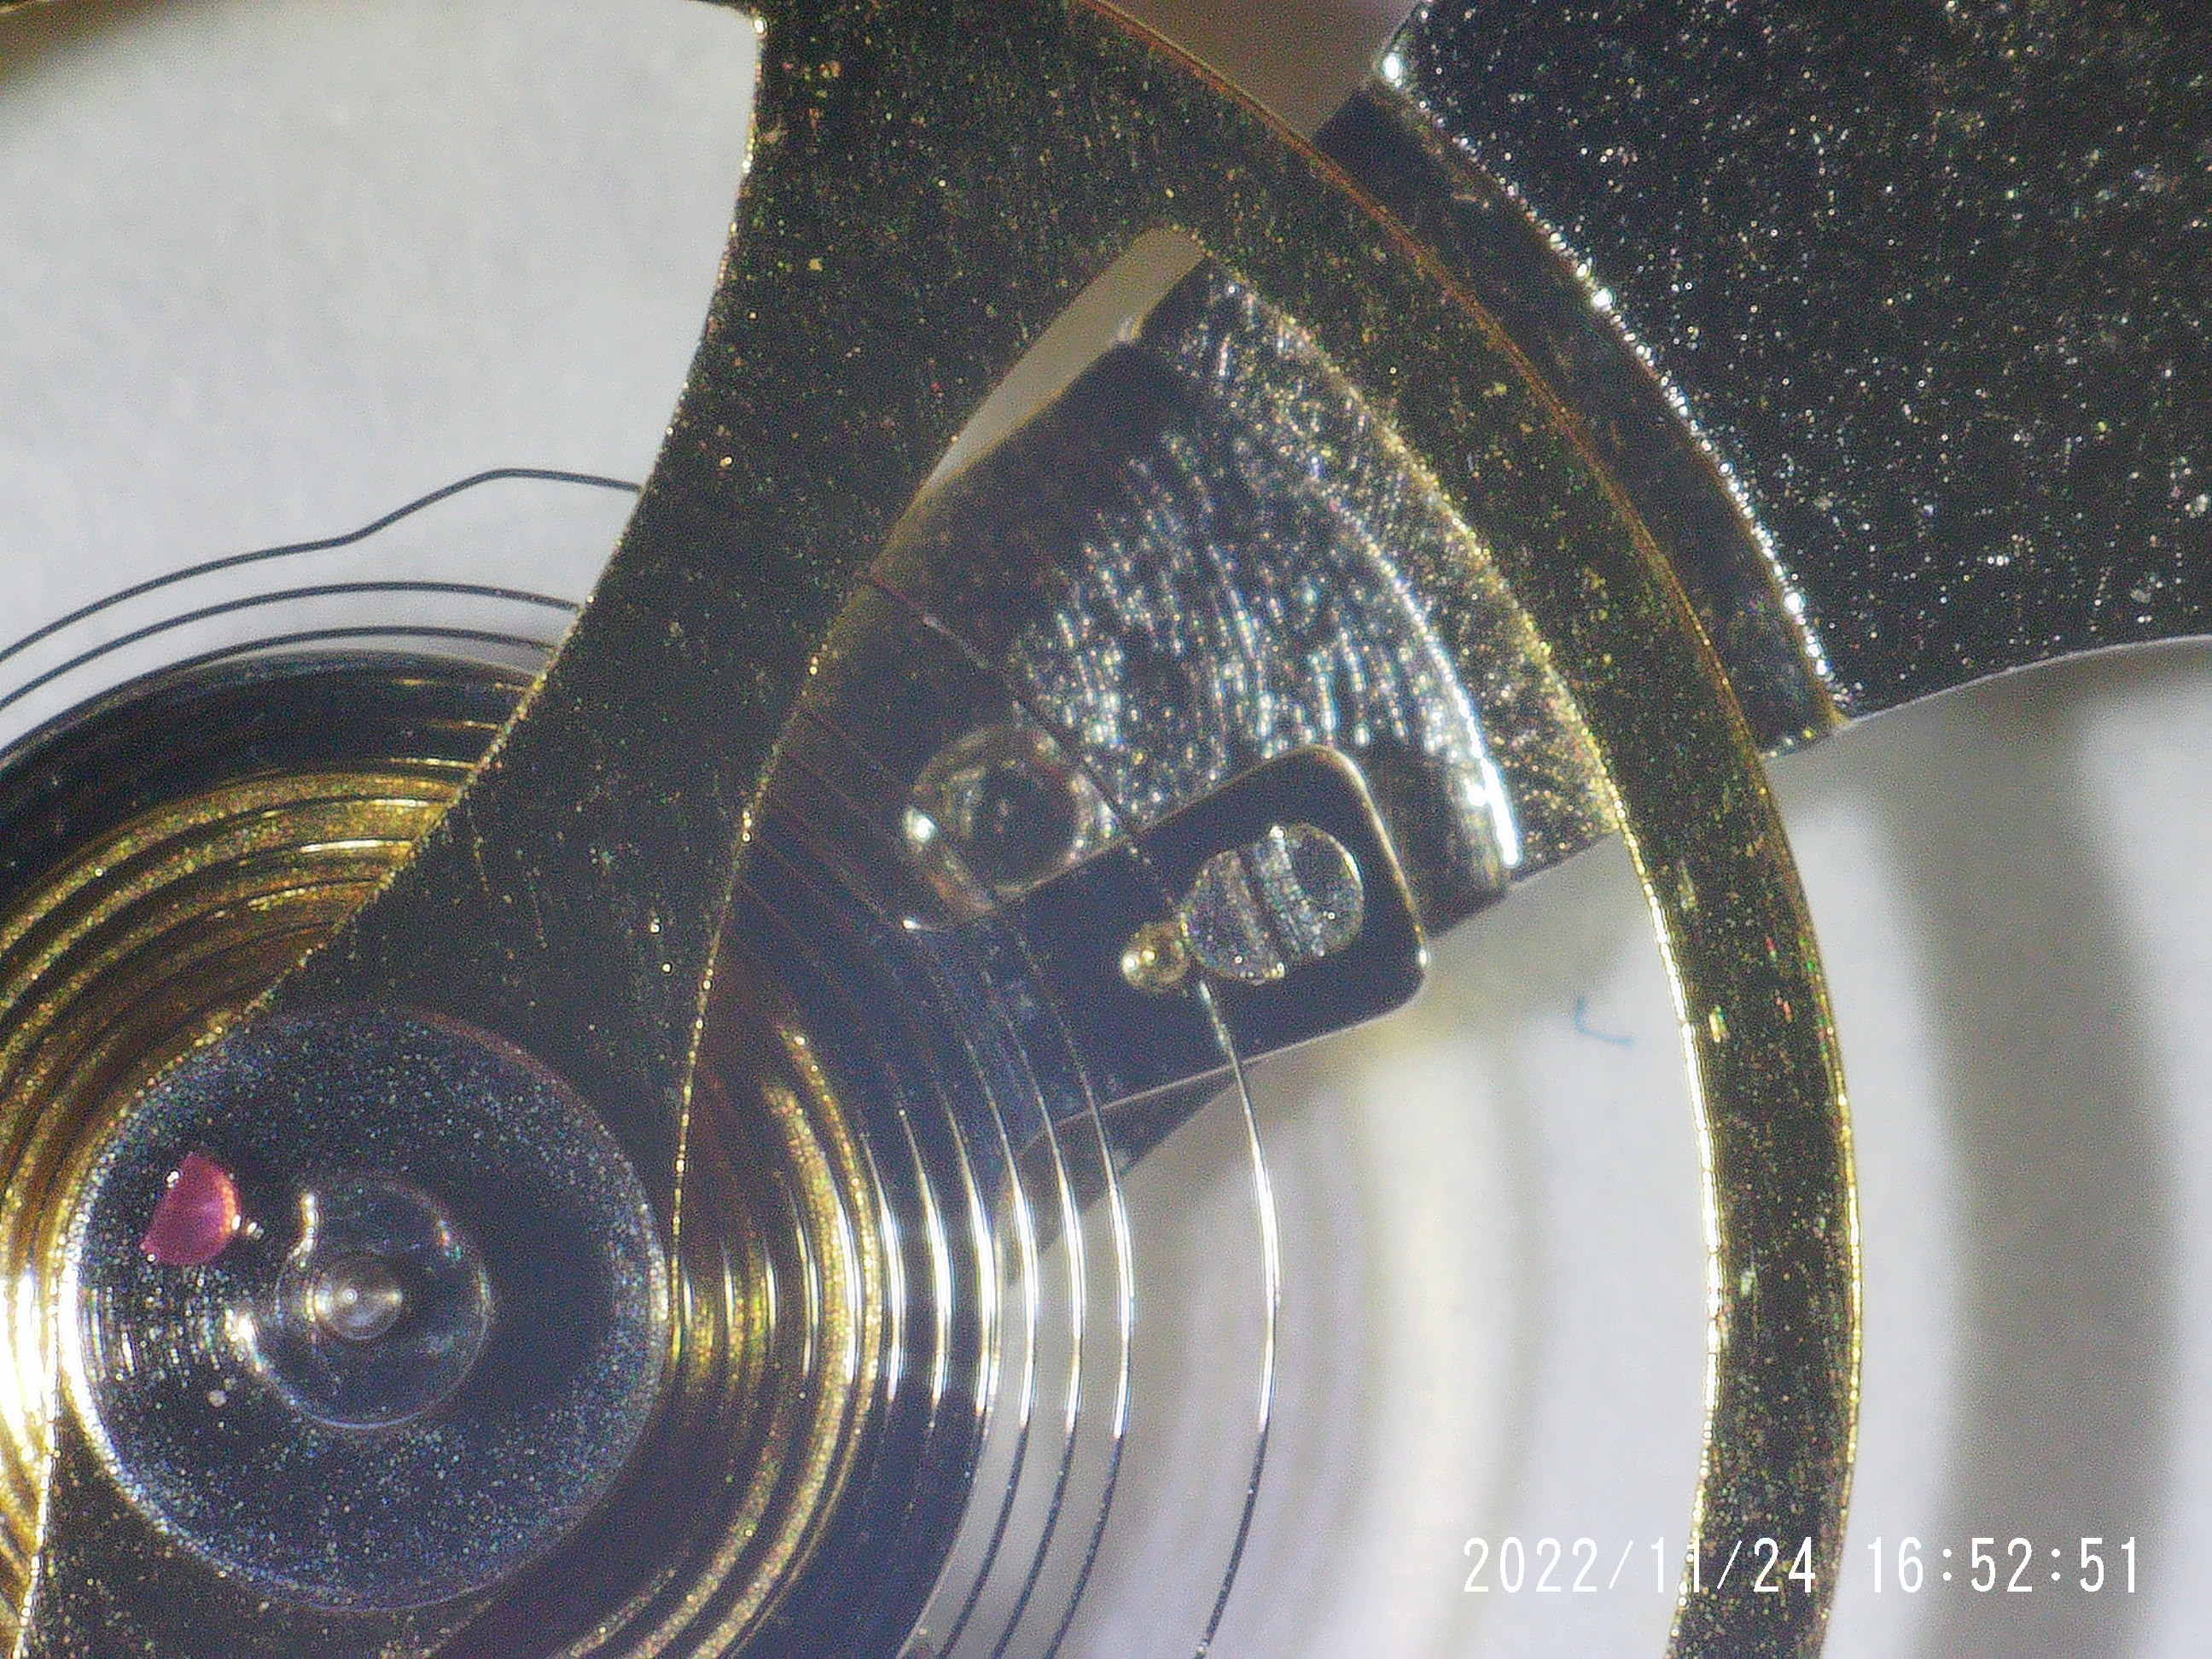
You made me second guess myself for a second, and as it turns out, I have that movement in pieces on my bench at the moment for another project. Although it looks like the hairspring isn't between the regulator pins, the one pin has a slot so it can be rotated. Here are a couple of microscope pics to show the system.


And yeah the regulator is pretty sneaky...
 
  • Like
Reactions: KJ2020

KJ2020

Time Traveler
Supporter
12/3/18
34,659
66,745
113
You made me second guess myself for a second, and as it turns out, I have that movement in pieces on my bench at the moment for another project. Although it looks like the hairspring isn't between the regulator pins, the one pin has a slot so it can be rotated. Here are a couple of microscope pics to show the system.


And yeah the regulator is pretty sneaky...
Nice arrangement - looks like it can't pop out.