• Tired of adverts on RWI? - Subscribe by clicking HERE and PMing Trailboss for instructions and they will magically go away!

Project "RWI Raffle Win"... a 1675 Build

chubbychaser911

Active Member
31/10/19
405
112
43
p0pperini I know right. Maybe the board glitched. Or I'm confabulating something else. But I think I saw someone post on this thread today by the name of @thefetishist and his status was BANNED. I was like woah what the heck. And his comment on this thread seemed appropriate and not flaming at all. So he would have made that comment and in a few hours had been banned. His comment no longer shows up on this thread.
 

p0pperini

patr0n h0arder
Gold Patron
Certified
29/1/19
8,989
30,172
113
UK
p0pperini I know right. Maybe the board glitched. Or I'm confabulating something else. But I think I saw someone post on this thread today by the name of @thefetishist and his status was BANNED. I was like woah what the heck. And his comment on this thread seemed appropriate and not flaming at all. So he would have made that comment and in a few hours had been banned. His comment no longer shows up on this thread.
Strange indeed, and that (memorable) username does vaguely ring a bell...
 

p0pperini

patr0n h0arder
Gold Patron
Certified
29/1/19
8,989
30,172
113
UK
PROGRESS!!!!

Haha that fooled you. ;) Progress by me? No chance...

So, perhaps some of you saw on another thread how I took a really nice film-free decal printed dial and then ruined it by spraying it with lacquer on the advice of another member who didn't realise which technique I was using. LOL and all that. Anyway, it's all part of the fun. So I sanded the dial back to brass again - and in the process, discovered how bloody robust the baked-on film-free decal ink is. Damn, it's hard!

In the meantime another member asked if I had done an OCC 1675 dial. I haven't, but when I went to check example pics, I decided I WANT ONE IN MY GMT. So, this weekend I've been working on it.

1k9VJ.jpg


This has taken me most of the weekend, working from scratch, using dial references from HQ Milton photos. I got the first test prints done this afternoon and it needs some more tweaking - the serifs on the GMT-MASTER text are too fine to show up when printed, even at 1200 dpi. So I need to employ a (very) little exaggeration to get it looking right.
 

Redheart

Active Member
17/5/19
463
530
93
PROGRESS!!!!

Haha that fooled you. ;) Progress by me? No chance...

So, perhaps some of you saw on another thread how I took a really nice film-free decal printed dial and then ruined it by spraying it with lacquer on the advice of another member who didn't realise which technique I was using. LOL and all that. Anyway, it's all part of the fun. So I sanded the dial back to brass again - and in the process, discovered how bloody robust the baked-on film-free decal ink is. Damn, it's hard!

In the meantime another member asked if I had done an OCC 1675 dial. I haven't, but when I went to check example pics, I decided I WANT ONE IN MY GMT. So, this weekend I've been working on it.

1k9VJ.jpg


This has taken me most of the weekend, working from scratch, using dial references from HQ Milton photos. I got the first test prints done this afternoon and it needs some more tweaking - the serifs on the GMT-MASTER text are too fine to show up when printed, even at 1200 dpi. So I need to employ a (very) little exaggeration to get it looking right.

That is mighty nice dial P0ppe! But I thought the early 1675 were PCG, and your case is SCG. Anyway that would makes it pretty unique ^^
 

p0pperini

patr0n h0arder
Gold Patron
Certified
29/1/19
8,989
30,172
113
UK
That is mighty nice dial P0ppe! But I thought the early 1675 were PCG, and your case is SCG. Anyway that would makes it pretty unique ^^
Hmm, I did wonder whether the dial/CG combo would be "off" were I to combine them. That being the case (see what I did there...), I may hold this dial design over for another project - I have a cartel watch that I was planning to try out some CG shaping on.

I have a vietnam dial incoming that might end up being used in this project - but before I do that, I'll try printing the first dial design again, once I've spent a little more time refining it. I spent less time on the artwork for the Tritium gilt dial, and it could definitely be a lot better.
 

Solution6

Watchmaker
Vendor (Watch Repair)
Gold Patron
Certified
14/8/19
518
567
93
London, UK
Followed in your footsteps and after much tinkering I ended up with this guy here :) Still some work to do but wanted to have it on my wrist for a bit first.

(just in case anyone wonders - that's not lume, it's just black tea)

 
  • Like
Reactions: p0pperini

p0pperini

patr0n h0arder
Gold Patron
Certified
29/1/19
8,989
30,172
113
UK
Followed in your footsteps and after much tinkering I ended up with this guy here :) Still some work to do but wanted to have it on my wrist for a bit first.

(just in case anyone wonders - that's not lume, it's just black tea)
Bravo sir, that looks GREAT!

I wonder how many finished projects are going to be posted here, before I finish mine... :)
 
Last edited:
  • Like
Reactions: Solution6

itgoes211

Active Member
10/4/19
373
188
43
PROGRESS!!!!

Haha that fooled you. ;) Progress by me? No chance...

So, perhaps some of you saw on another thread how I took a really nice film-free decal printed dial and then ruined it by spraying it with lacquer on the advice of another member who didn't realise which technique I was using. LOL and all that. Anyway, it's all part of the fun. So I sanded the dial back to brass again - and in the process, discovered how bloody robust the baked-on film-free decal ink is. Damn, it's hard!

In the meantime another member asked if I had done an OCC 1675 dial. I haven't, but when I went to check example pics, I decided I WANT ONE IN MY GMT. So, this weekend I've been working on it.

1k9VJ.jpg


This has taken me most of the weekend, working from scratch, using dial references from HQ Milton photos. I got the first test prints done this afternoon and it needs some more tweaking - the serifs on the GMT-MASTER text are too fine to show up when printed, even at 1200 dpi. So I need to employ a (very) little exaggeration to get it looking right.

p0pperini : this looks really crisp! Very nice work. I saw your file and print dpis comment - very nice as well. I just picked up a 4800dpi printer and have had some luck with clean prints and exploring vector files. I’m still tweaking the settings to get it better. I’ve made tons of dial files if you’d like to try - some really good, some not so much. But I’m happy to share if you’d like some thing for this project - this is a great thread and you’ve put a lot of time into the work and sharing for everyone, so it’s really appreciated. PM me if you are in interested is looking at any of my files. I’m also happy to try to print something for you with the new 4800dpi printer it that would help you with this. Cheers
 

p0pperini

patr0n h0arder
Gold Patron
Certified
29/1/19
8,989
30,172
113
UK
this looks really crisp! Very nice work. I saw your file and print dpis comment - very nice as well. I just picked up a 4800dpi printer and have had some luck with clean prints and exploring vector files. I’m still tweaking the settings to get it better. I’ve made tons of dial files if you’d like to try - some really good, some not so much. But I’m happy to share if you’d like some thing for this project - this is a great thread and you’ve put a lot of time into the work and sharing for everyone, so it’s really appreciated. PM me if you are in interested is looking at any of my files. I’m also happy to try to print something for you with the new 4800dpi printer it that would help you with this. Cheers
Hey itgoes211. Thanks for your kind words and the offer of files, but I’m quite happy making me own, cheers. My background being in art and graphic design, it’s important to me to generate my own artwork, and I really enjoy the process of studying the original dials. But again, your offer is appreciated, as is the offer to print a dial for me. What I’d be interested in is knowing the details of which printer you have! :) I’ve already bought two printers while on this quest for decent dial prints...
 

Watchpocketguide42

Horology Curious
1/1/20
19
10
3
UK
itgoes211 as someone following all decal printing threads on the forum, I would be also interested to know which printer have you bought :)
I just managed to print one set of dials at work before our offices closed down - puts an enormous pressure on me to apply decals without ability to print more if anything would go wrong :D
 

itgoes211

Active Member
10/4/19
373
188
43
This latest printer is the Canon Pixma ix6820. ~$160 US on A-zon. Plus it prints large 11x17 inch photos I read. (I’m hedging in case in-style watch sizes continue to increase at the same rate as over the past 5 years... lol).

I’ve gone through about 6 printers so far including laser and inkjet trying to find the best resolution. From my limited research, Canon and specifically this model seem to be ahead of the pack for non-professional use, especially for the price. I’m still testing it out and trying to dial in the settings. Variables appear to include: file type, file size, dpi settings in the program as well as in the file and the printer, and compatibility between the program and the printer driver. I also read an article that provided a formula for calculating the best resolution based on these parameters. Interestingly, it mentioned that Canon and HP have different dpi calculations that you need to account for in your settings. It was too complicated for my simple mind and I lost interest about half way through. Anyway, I could find it again if anyone wants it...

One thing i did learn is that the printer head must be clean, clean, clean. I had another Canon pixma that printed Great resolution at first and after a few months it started to go fuzzy and I couldn’t figure out why the same files were not as good as previous prints of them. Then I cleaned the printer head, which corrected about 80-90% of the issue, not good enough. A new printer head was almost the same cost as a new printer, so that was my excuse to try out this pixma ix6820. I had also refilled with non-OEM ink, which might have also been a factor.

Other people here here have mentioned that the correct ink is important. My limited research seems to agree with this position. But I haven’t yet learned which ink is better, so for now I’m sticking with the OEM ink that came with the printer.

Super long answer to a to a simple question, apologies. I’d be interested to know if anyone else has found a printer with which they are impressed with the output and resolution....

cheers
 

p0pperini

patr0n h0arder
Gold Patron
Certified
29/1/19
8,989
30,172
113
UK
This latest printer is the Canon Pixma ix6820. ~$160 US on A-zon. Plus it prints large 11x17 inch photos I read.
Cheers for the info itgoes211. I have the Canon ip8750 A3+ inkjet which prints (allegedly) at 9600 x 2400 - but I haven’t been overly impressed with the results from it. If I do any more inkjet printing I’ll have to spend more time experimenting with the output settings. However, I’ve moved over to the film-free printing method and that requires laser printing, so for now I’m making the best of this 1200 dpi Samsung laser, which is producing far better results than the Canon did.

I’d love to see some prints from your Canon though - it will be interesting to see how they compare to what I was getting.
 

Watchpocketguide42

Horology Curious
1/1/20
19
10
3
UK
itgoes211 thanks for a such detailed reply. I didn't realised there are so many important variables at stake. The more I dive into this, the more I think that the only way to achieve the best results is to own a printer at home. But then me, as p0pperini trying the film free decals, so it's only laser printer for us.
 

p0pperini

patr0n h0arder
Gold Patron
Certified
29/1/19
8,989
30,172
113
UK
This DIY dial lark is trying my patience. This morning - 3 for 0. First one, everything worked fine, the dial looked lovely, it got its first bake, and then when I removed the film a random bit of the print that hadn't glued on properly came away. The baking adheres the ink strong enough to require it to be sanded off. So I sanded it off, cleaned the blank thoroughly with alcohol, and applied another decal... and before I even got it aligned on the dial I could see imperfections in the print. Third attempt, and the again the print I'd chosen had similar issues (the sort that's impossible to see on the decal until the brass is shining through it).

So, time for lunch and some deep breathing.
 
  • Like
Reactions: KJ2020

Watchpocketguide42

Horology Curious
1/1/20
19
10
3
UK
p0pperini I had a go at film free decals this weekend. As mentioned before, I had only three correct size prints and bunch of prints with dial size off by 2mm (printer scaling). I destroyed the best print by overcooking it, second came out alright but print quality is not the best (not much can be done until this virus thing will blow over).

I have used a movement spacer as a dial stand which helps when positioning the decal as it's not flat with the surface.
I would cut the decal with 5mm or so margin, soak it in warm water for a bit longer and would carefully holding on the corners remove the paper. Then I would apply clear decal onto the dial. I found this gives you much more flexibility in terms of positioning.

I am not sure why, but if I bake the dial the way sunny advised in the instructions, the paint start to pop and flake. So, I am not sure if my dials are bulletproof, however, I need to try to polish the gild bits with cape cod, try some solution to darken and enrich the colour (saw somewhere on the forum someone using oil), apply the lume, of course.

EDIT:
Forgot to mentioned, obviously you need to remove movement spacer before putting the dial in the oven!
 
Last edited:
  • Like
Reactions: p0pperini

p0pperini

patr0n h0arder
Gold Patron
Certified
29/1/19
8,989
30,172
113
UK
Hey Watchpocketguide42, I'm not having any trouble with moving/aligning the decal, but thanks for your thoughts. It's interesting to hear how other decal dial dudes are dealing with the process.

I apply the decal with the dial fixed to a custom holder I made from a sheet of plastic card with holes for the dial feet (not relevant here as they're clipped, so it's blu-tacked on), with the quarters marked on the card to make accurate alignment easier. I find that the backing paper slips off easily if I put the decal in the water and then spend 30 secs or so applying the glue to the dial. The dial has to be well degreased with isopropyl alcohol or lighter fluid first, otherwise the glue pools unevenly. Removing the decal from the water I place it on the dial, then remove the paper, and then do the fine-tuning of position.

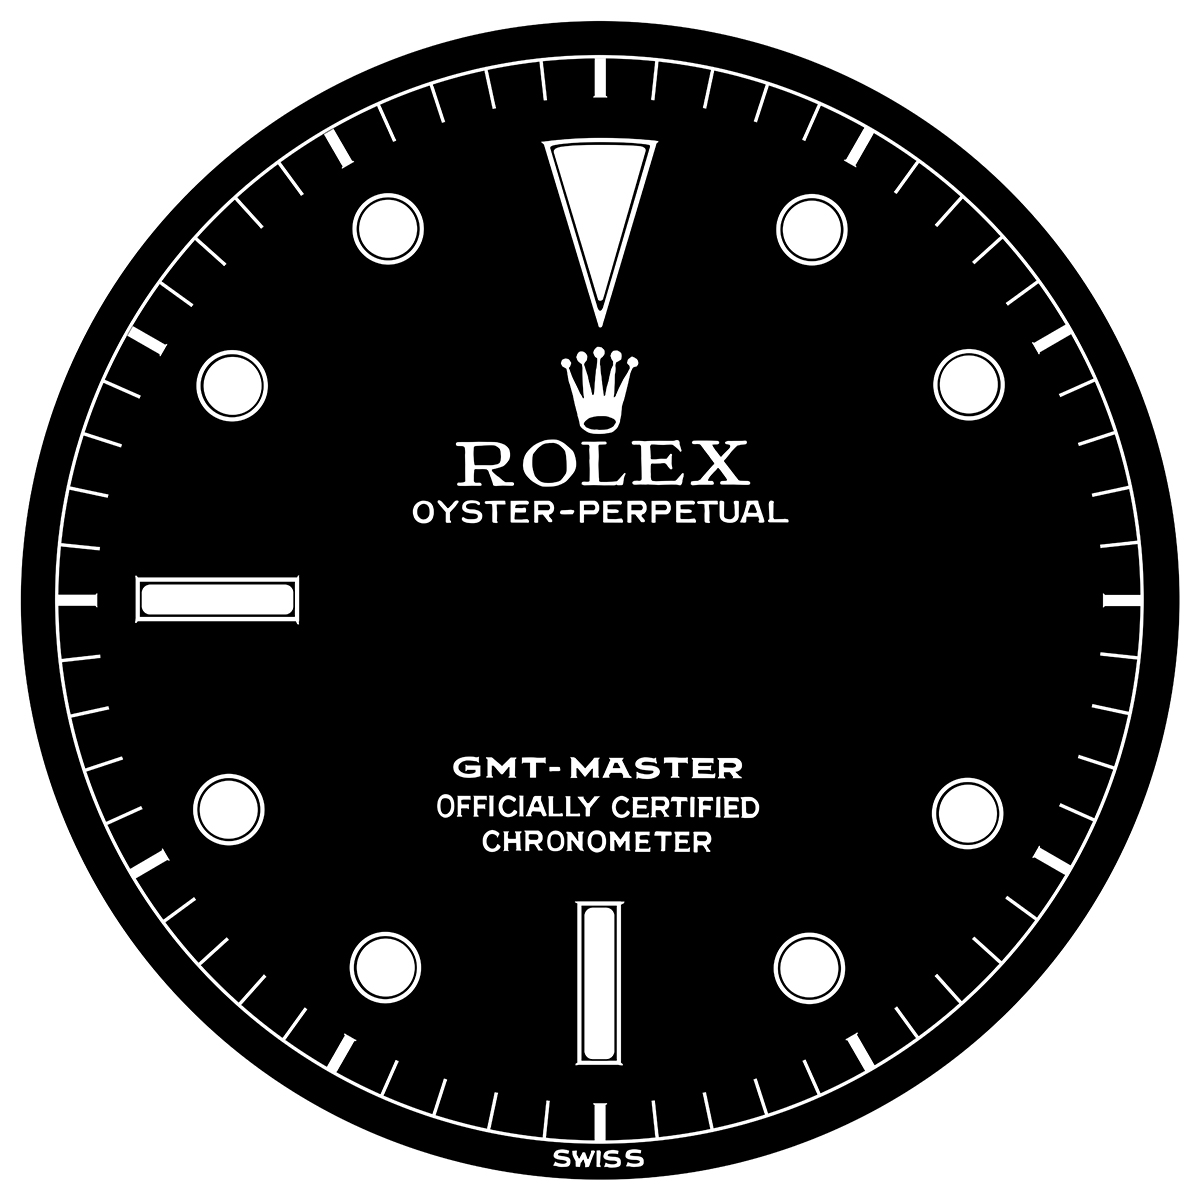
I've tried different borders when I cut round the decal, too much border and it can stick to whatever the dial is resting on and make it harder to position. On the latest I cut the film with about 3mm border all round - but I think I'll increase that as what I found is during the first bake the film curls and can lift the edge of the decal off the dial (you can see this happened at the 11 mark on the dial below).

For baking, I transfer the dial to a small piece of stainless steel sheet, about 4mm thick. I bake the dial in a fan over at about 110 deg for 12 minutes. Then I did the second bake at 220 for 15 mins, to give the decal a really good chance to bake onto the dial.

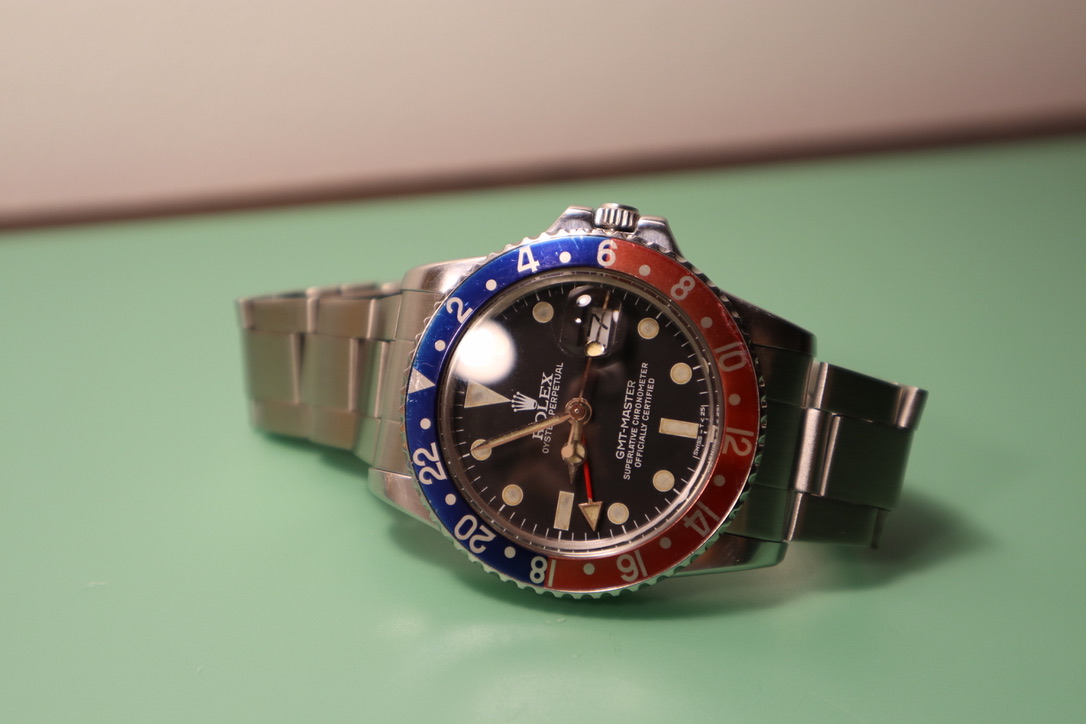
So, I had a successful session yesterday, but having almost okayed this one for use, my critical faculties kicked back in and I had to conclude there were too many compromises with the dial.

9puhp.jpg


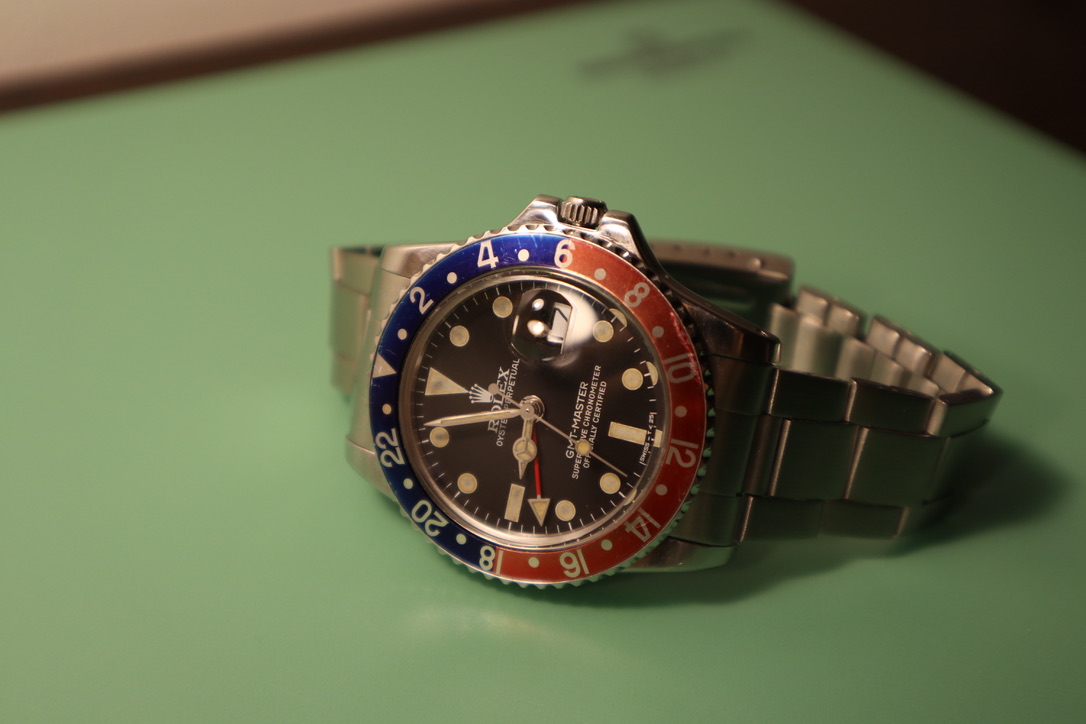
I've taken this pic from an angle which shows that there's very faint horizontal inconsistency to the black which to me screams "photocopier"! :) This isn't visible from other angles, but it bugs the hell out of me and I know it's not happening on every print I make, so this decal has to come off. But I also might try stacking two decals on top of each other, to completely eradicate this.

Also, and even more importantly, I added a very small stroke to everything on the artwork, in order to bold it up a bit, as some of the fine text was breaking up a little. But this needs further refinement and selective use, as it's caused some of the other elements (like the chapter ticks and crown) to get too fat. So back to the artwork I go...

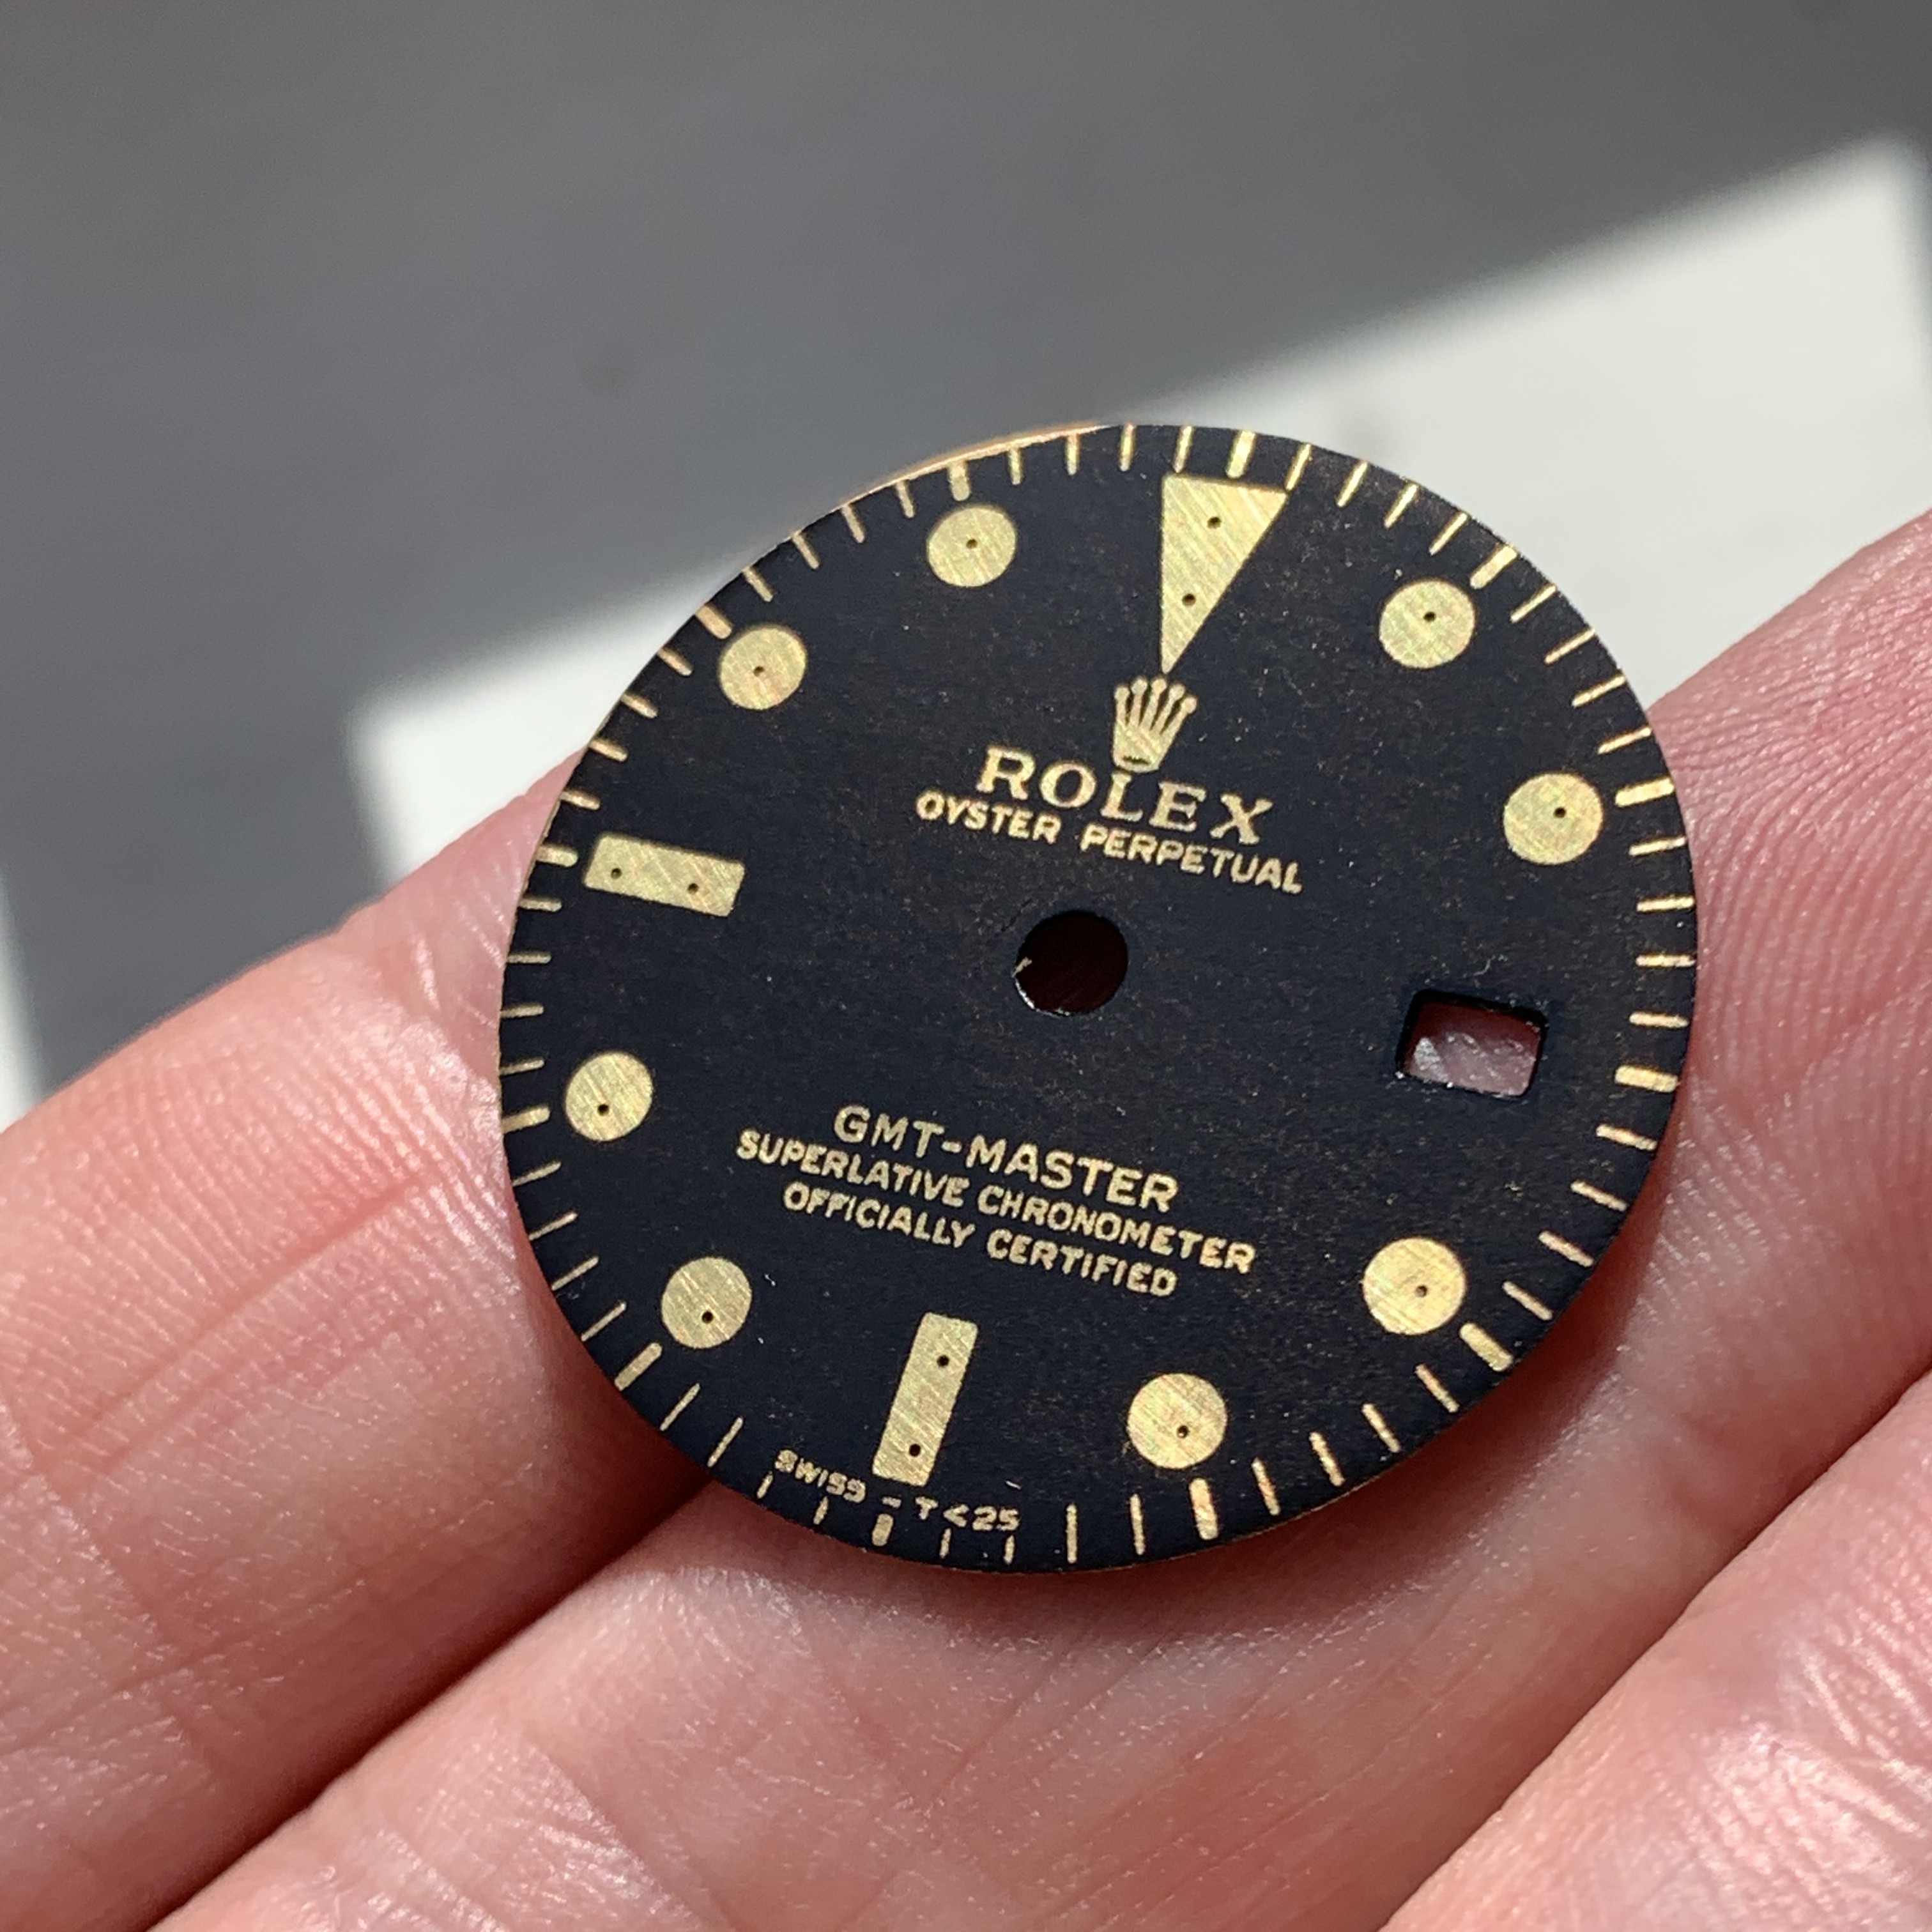
Something to note: After the first bake, I was alarmed/disappointed to see some micro air bubbles had formed under the decal, which didn't seem to be there before I put it in the oven. However, on the hunch that the ink will go "liquid" while baking onto the dial, I decided to do the second bake anyway and see what happened. And the second bake eradicated them! Which is handy to know.
 
  • Like
Reactions: Watchpocketguide42

Kalmine64

Active Member
Patron
Certified
21/9/19
450
378
63
EU
Hi all, I am almost sure I saw the answer somewhere but cannot find dit sorry if already treated...

I was wondering if the "crownartcustom" insert, notably the fuschia one, fits into Milk's bezel without too much modding?

Thanks a lot, and very interesting post by the way
 

lboyin

Horology Curious
29/8/13
7
1
3
Canada
Mine required some light sanding to fit, ~15 mins or so of work.

Milk's insert also required some sanding, I spend an hour or so, but it was taking it slow in the beginning.

abf91673174244b6dc54c5b8841d232f.jpg


Sent from my HD1900 using Tapatalk
 

p0pperini

patr0n h0arder
Gold Patron
Certified
29/1/19
8,989
30,172
113
UK
I was wondering if the "crownartcustom" insert, notably the fuschia one, fits into Milk's bezel without too much modding?

Thanks a lot, and very interesting post by the way
As a side note to the replies about Milk's bezel and insert fit - my case set came with yodog's bezel, and Milk's inserts fit it without any modifications. I'm guessing that the crownartcustom inserts are gen spec too, so as lboyin says all gen spec inserts need sanding. Milk told me he planned to alter the spec of his bezel to make it the correct size for inserts, but I don't know whether he's done so yet.

Glad you're enjoying the thread!