• Tired of adverts on RWI? - Subscribe by clicking HERE and PMing Trailboss for instructions and they will magically go away!

Changing a rep Yacht-Master 116622 bezel insert

Yacht-Monster

The entertainer previously known as Roughwatch
Certified
7/6/21
1,169
916
113
The Eternal Winter
Hi all,

Apologies if this has been covered, I searched quite some time but couldn't find an answer. I'm thinking of changing the insert in my Noob 116622 and was wondering if it's like removing an insert on a gen metal insert Rolex as found here https://www.youtube.com/watch?v=nKYQk03uVu0

Any advice is greatly appreciated.

Thanks
 

KJ2020

Time Traveler
Patron
Supporter
12/3/18
37,209
78,537
113
Requesting assistance from KJ2020 and other similar knowledgeable types please 👍

Bro remove it just like a 6 digit Sub or GMT bezel

6-digit Sub crystal and bezel swap

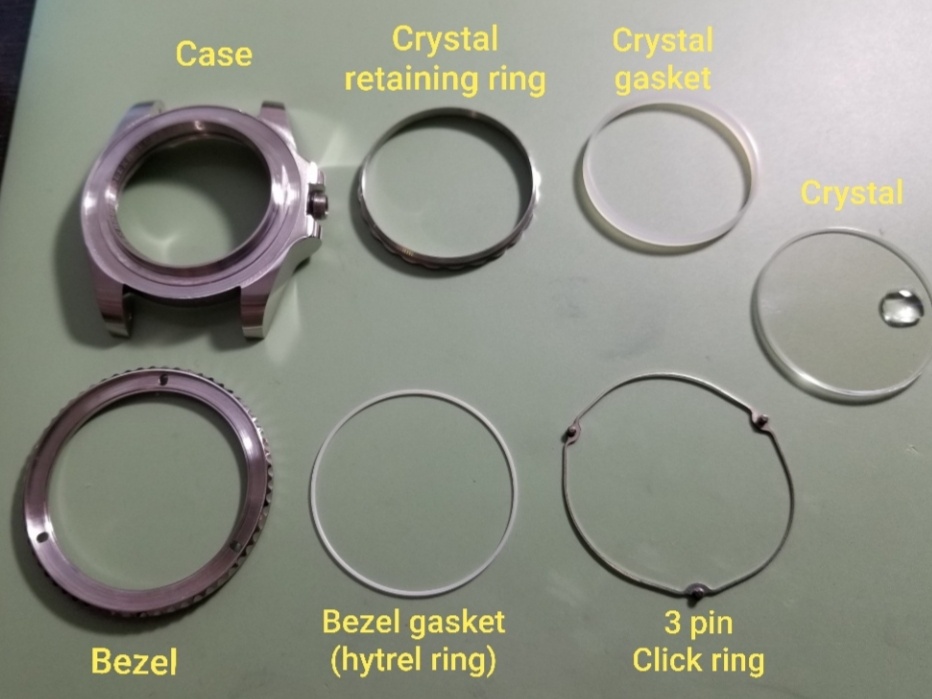
The Yachti insert is attached with double-sided tape which will probably just be goo by now. There is a 3 pin click ring like a GMT under the bezel but no tension ring (large washer). The crystal retaining ring has 40 scallops (24 in GMT) so all three click ring pin oval bases can't go in a scallop at once. D'oh. Put the click ring on the case with two pin oval bases inside scallops and the other one between scallops but flush with the case well. Then press the bezel back on. Careful with the bezel gasket as usual. Last, align and seat the insert. With only one 3M double sided tape ring, the stock Noob insert sits too low in the bezel well. With two tape rings, the insert sits extremely close to level with the bezel rim but very slightly above - like 0.1mm or 1/6th of the insert thickness. I always test this fitment in a 15 degree arc with a cut one layer piece, then two and choose the best result. It was no contest that two layers were needed on the stock insert replacement. I despise an obviously sunken insert.

Good luck, I'm here if you need any help. Pic is from a Noob GMT, but parts are the same.

ZVvlSb.jpg
 
Last edited:

Yacht-Monster

The entertainer previously known as Roughwatch
Certified
7/6/21
1,169
916
113
The Eternal Winter
Bro remove it just like a 6 digit Sub or GMT bezel

https://forum.replica-watch.info/for...ystal-swap-diy

The Yachti insert is attached with double-sided tape which will probably just be goo by now. There is a 3 pin click ring like a GMT under the bezel but no tension ring (large washer). The crystal retaining ring has 40 scallops (24 in GMT) so all three click ring pin oval bases can't go in a scallop at once. D'oh. Put the click ring on the case with two pin oval bases inside scallops and the other one between scallops but flush with the case well. Then press the bezel back on. Careful with the bezel gasket as usual. Last, align and seat the insert. With only one 3M double sided tape ring, the stock Noob insert sits too low in the bezel well. With two tape rings, the insert sits extremely close to level with the bezel rim but very slightly above - like 0.1mm or 1/6th of the insert thickness. I always test this fitment in a 15 degree arc with a cut one layer piece, then two and choose the best result. It was no contest that two layers were needed on the stock insert replacement. I despise an obviously sunken insert.

Good luck, I'm here if you need any help. Pic is from a Noob GMT, but parts are the same.

Absolute legend mate. I really appreciate your advice. Thanks.
 
  • Like
Reactions: KJ2020

Alan Bourdillion Traherne

Renowned Member
6/3/21
747
753
93
CONUS
I swapped my BPF YM bezel insert (stainless) for a black ceramic one from Raffles Dials. It did not fit exactly and I did have to do some careful shaving using fine grit sandpaper (it was a while ago and can't remember the details.) I just kept shaving rotationally every 1/8" or so and then seeing how it fit. Eventually it was a very snug fit and I then pressed it in with a bezel press. So far so good, nice snug fit and the YM looks great! Just make sure you have your alignment correct and you're good to go.
 

Yacht-Monster

The entertainer previously known as Roughwatch
Certified
7/6/21
1,169
916
113
The Eternal Winter
I swapped my BPF YM bezel insert (stainless) for a black ceramic one from Raffles Dials. It did not fit exactly and I did have to do some careful shaving using fine grit sandpaper (it was a while ago and can't remember the details.) I just kept shaving rotationally every 1/8" or so and then seeing how it fit. Eventually it was a very snug fit and I then pressed it in with a bezel press. So far so good, nice snug fit and the YM looks great! Just make sure you have your alignment correct and you're good to go.

Thanks mate, this is handy to know. Cheers.
 

petrichor

Getting To Know The Place
23/5/23
15
7
3
UK
I swapped my BPF YM bezel insert (stainless) for a black ceramic one from Raffles Dials. It did not fit exactly and I did have to do some careful shaving using fine grit sandpaper (it was a while ago and can't remember the details.) I just kept shaving rotationally every 1/8" or so and then seeing how it fit. Eventually it was a very snug fit and I then pressed it in with a bezel press. So far so good, nice snug fit and the YM looks great! Just make sure you have your alignment correct and you're good to go.
Hi, do you have any photos of the ss YM with the ceramic insert?
 

GorgeousGeorge

Do not accept unsolicited offers
2/7/24
5
0
1
I swapped my BPF YM bezel insert (stainless) for a black ceramic one from Raffles Dials. It did not fit exactly and I did have to do some careful shaving using fine grit sandpaper (it was a while ago and can't remember the details.) I just kept shaving rotationally every 1/8" or so and then seeing how it fit. Eventually it was a very snug fit and I then pressed it in with a bezel press. So far so good, nice snug fit and the YM looks great! Just make sure you have your alignment correct and you're good to go.
I would also like to take a look at the end result please.
 

petrichor

Getting To Know The Place
23/5/23
15
7
3
UK
I swapped my BPF YM bezel insert (stainless) for a black ceramic one from Raffles Dials. It did not fit exactly and I did have to do some careful shaving using fine grit sandpaper (it was a while ago and can't remember the details.) I just kept shaving rotationally every 1/8" or so and then seeing how it fit. Eventually it was a very snug fit and I then pressed it in with a bezel press. So far so good, nice snug fit and the YM looks great! Just make sure you have your alignment correct and you're good to go.
Bump to see the end result!