-
Tired of adverts on RWI? - Subscribe by clicking HERE and PMing Trailboss for instructions and they will magically go away!
You are using an out of date browser. It may not display this or other websites correctly.
You should upgrade or use an alternative browser.
You should upgrade or use an alternative browser.
CF Pepsi picture leaks BLRO
- Thread starter wolfiqar
- Start date
dont watch me
To win a battle, fight as if you're already dead.
- 1/8/17
- 1,959
- 761
- 113
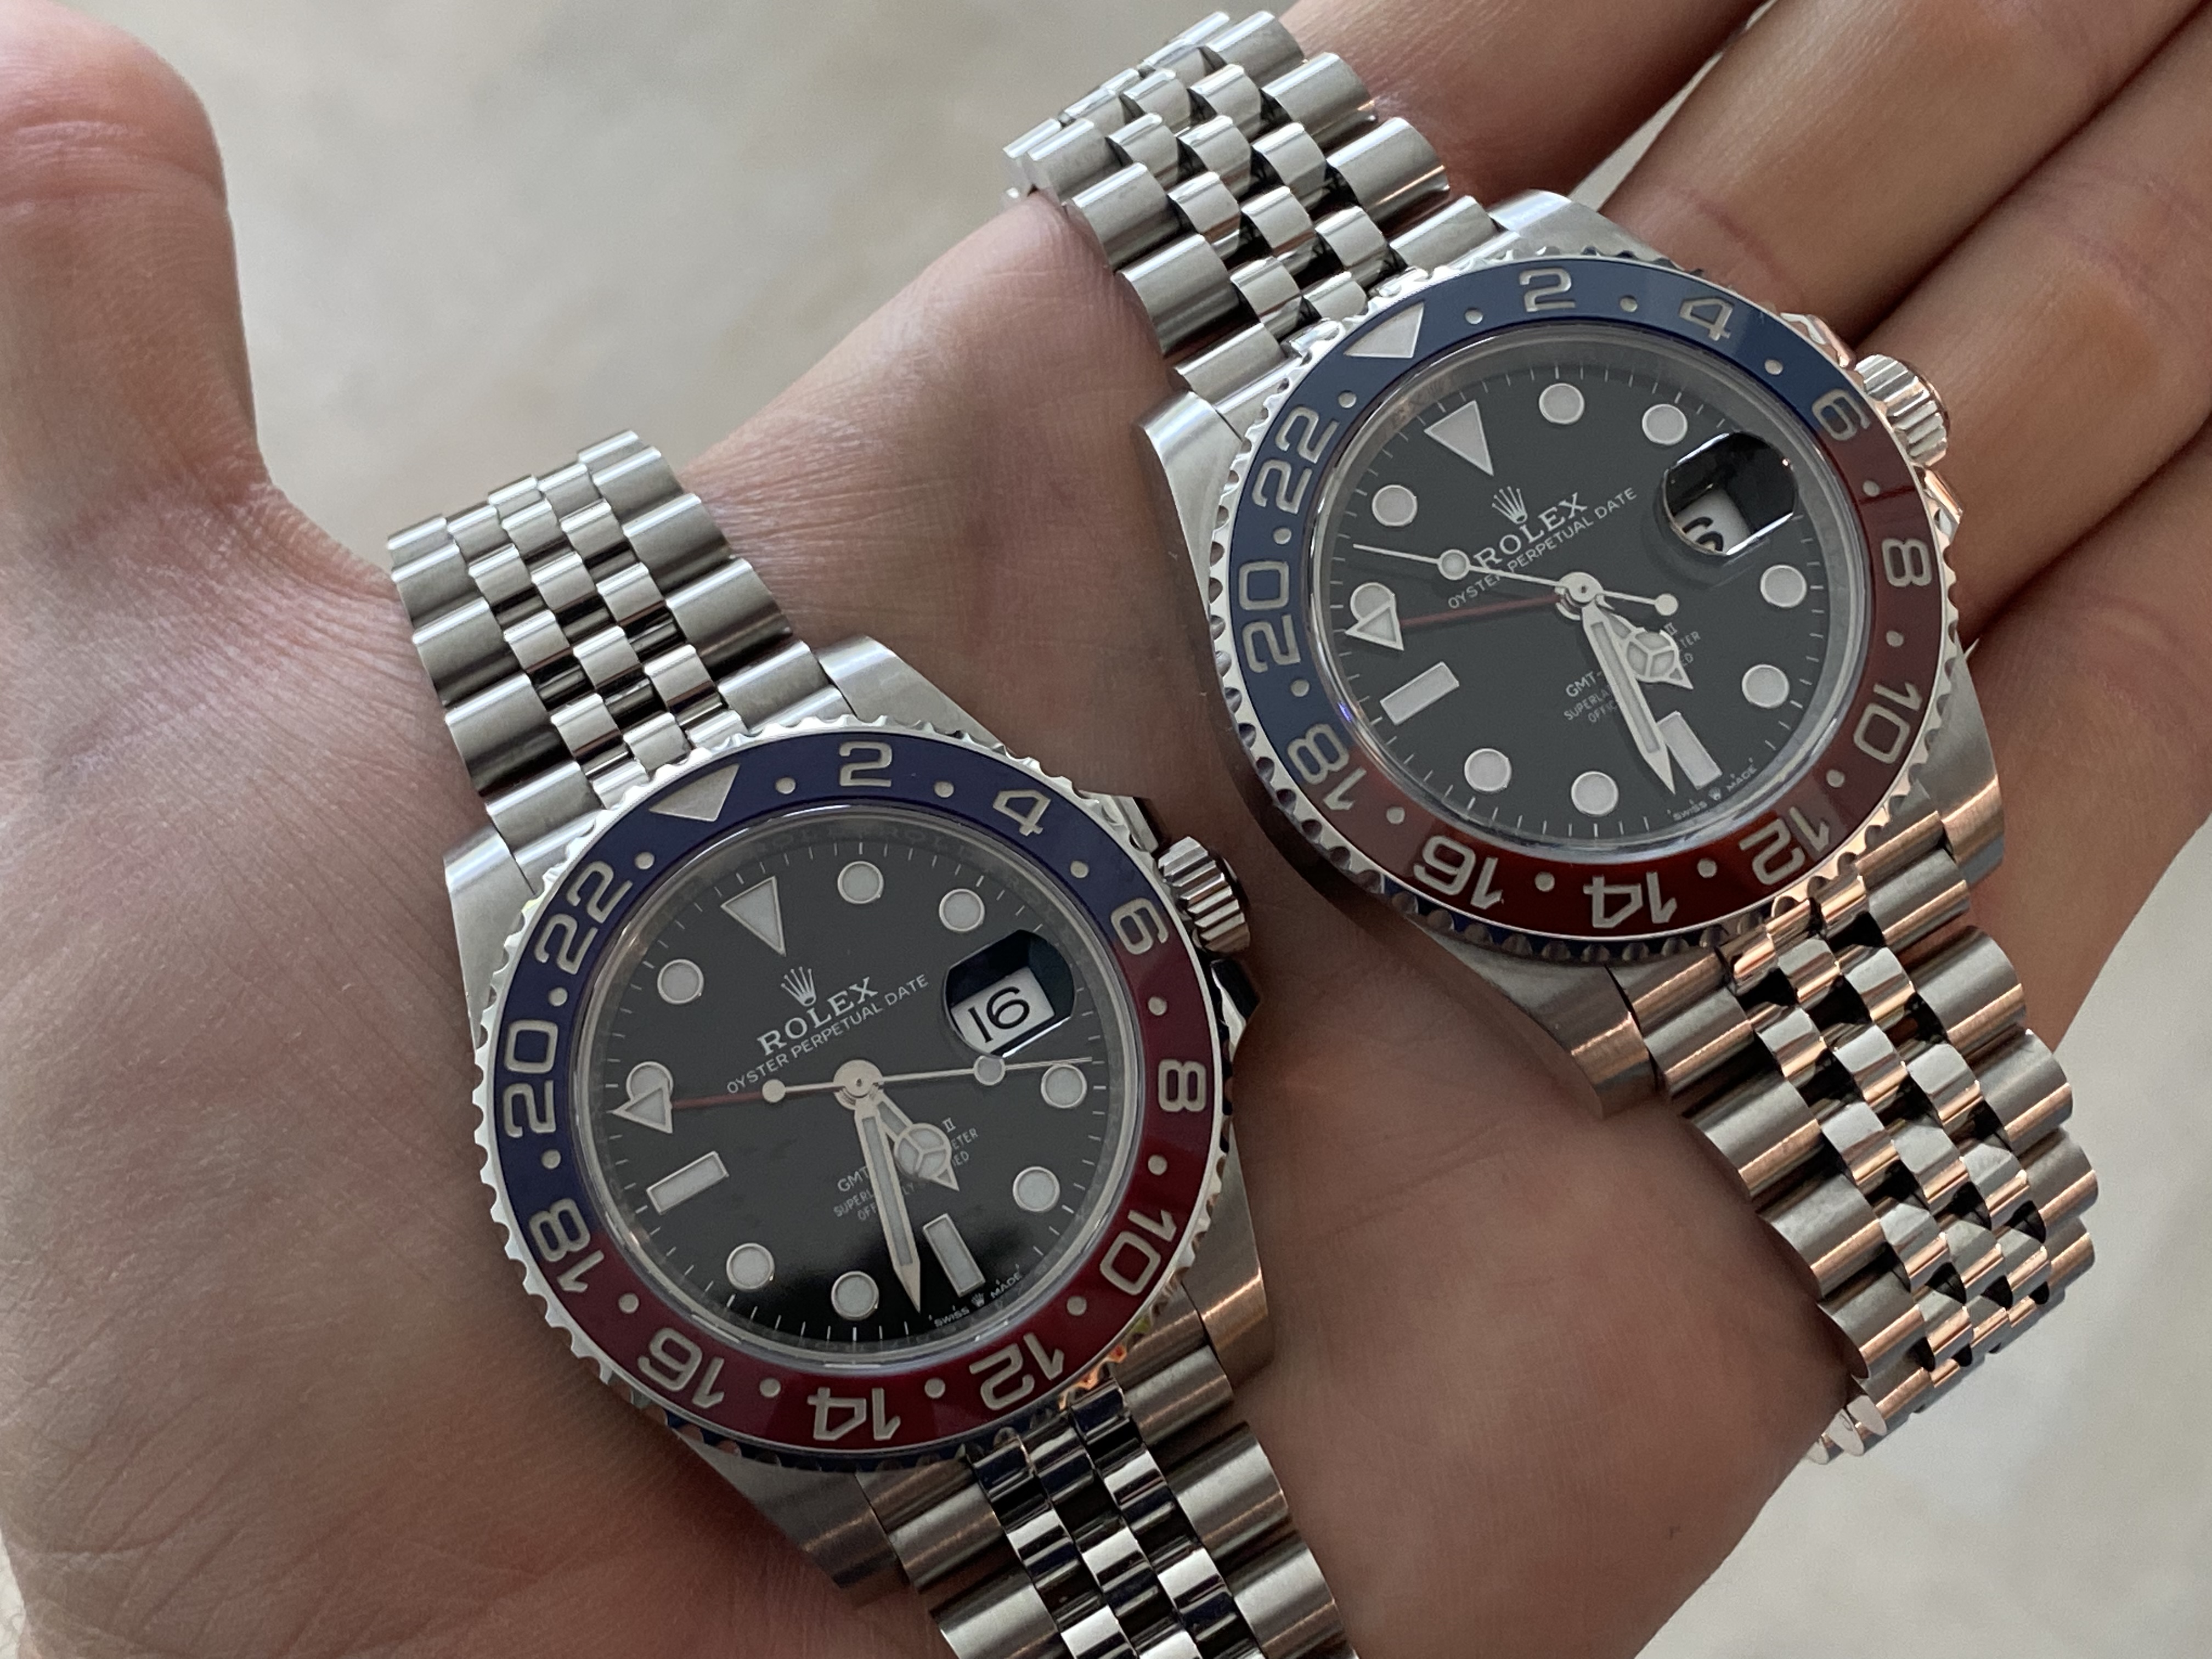
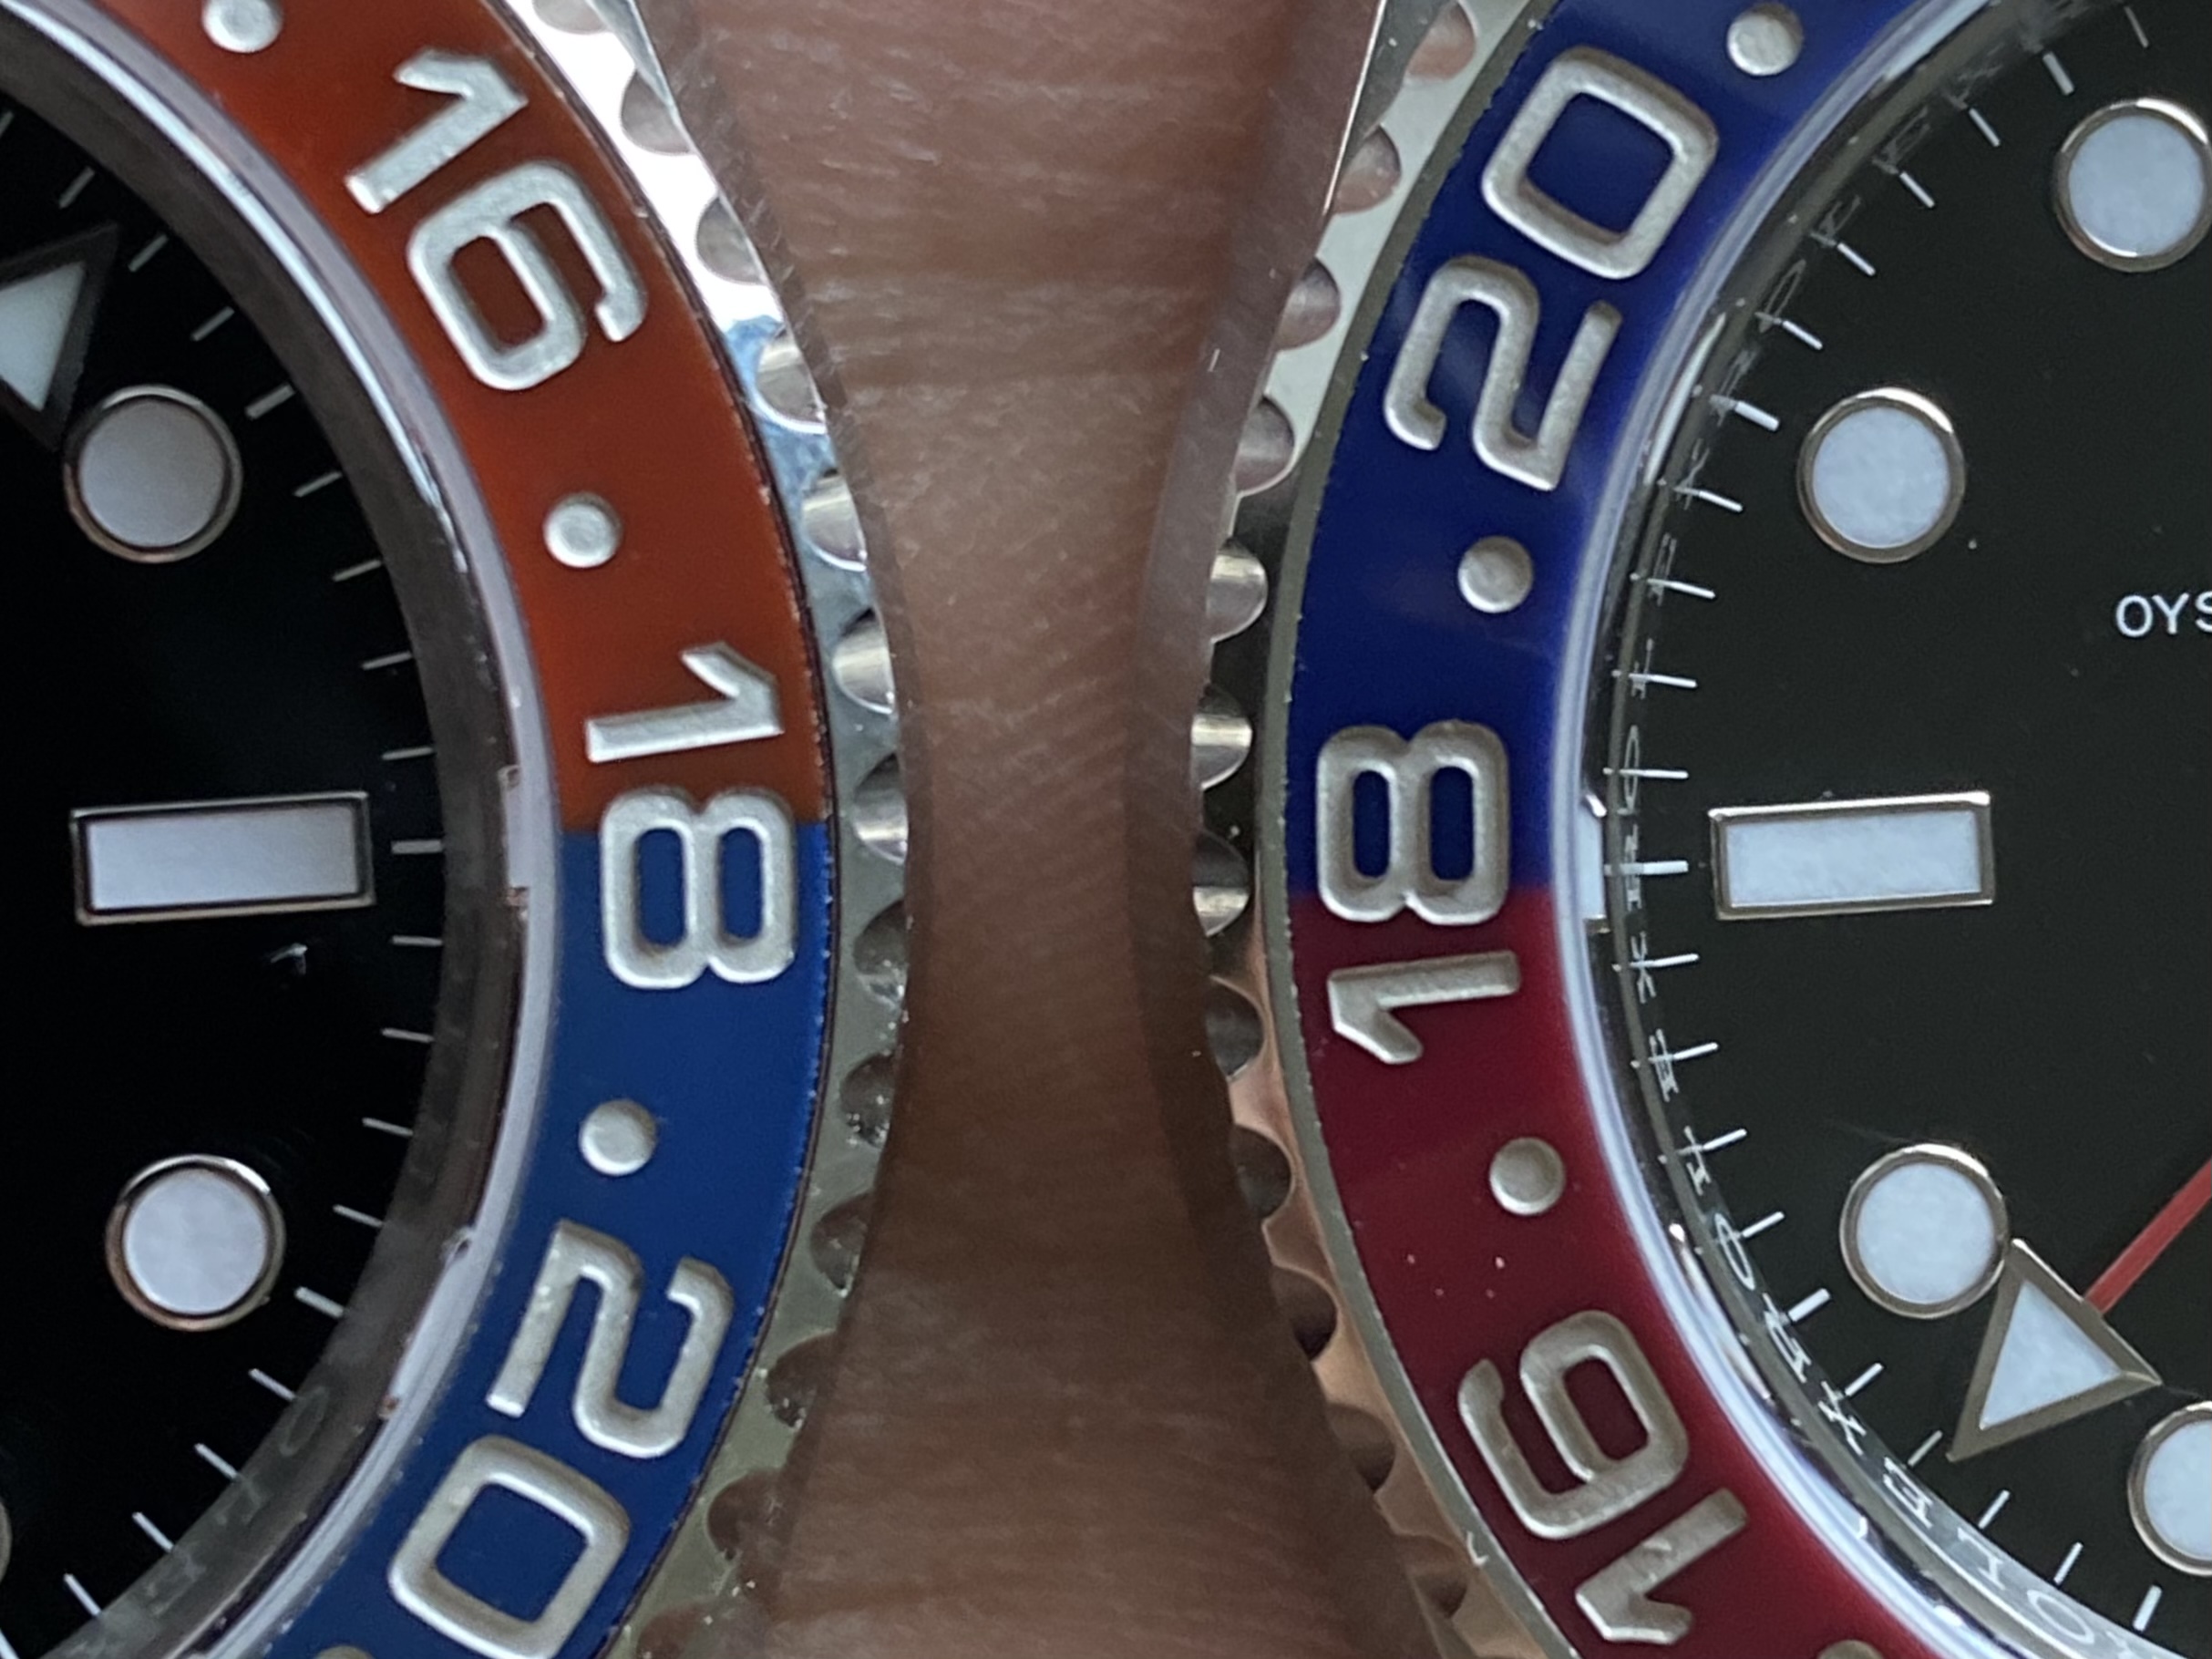
Here some pictures of the GEN vs REP.
IMO, when the REP is on the wrist it feels sturdy, does a great job and is actually difficult to tell apart.
However, next to the GEN the insert, the lugs and other details are falling short.
The key with this insert is the lighting and under some conditions they look very similar.
Pardon my poor skills when taking pictures!
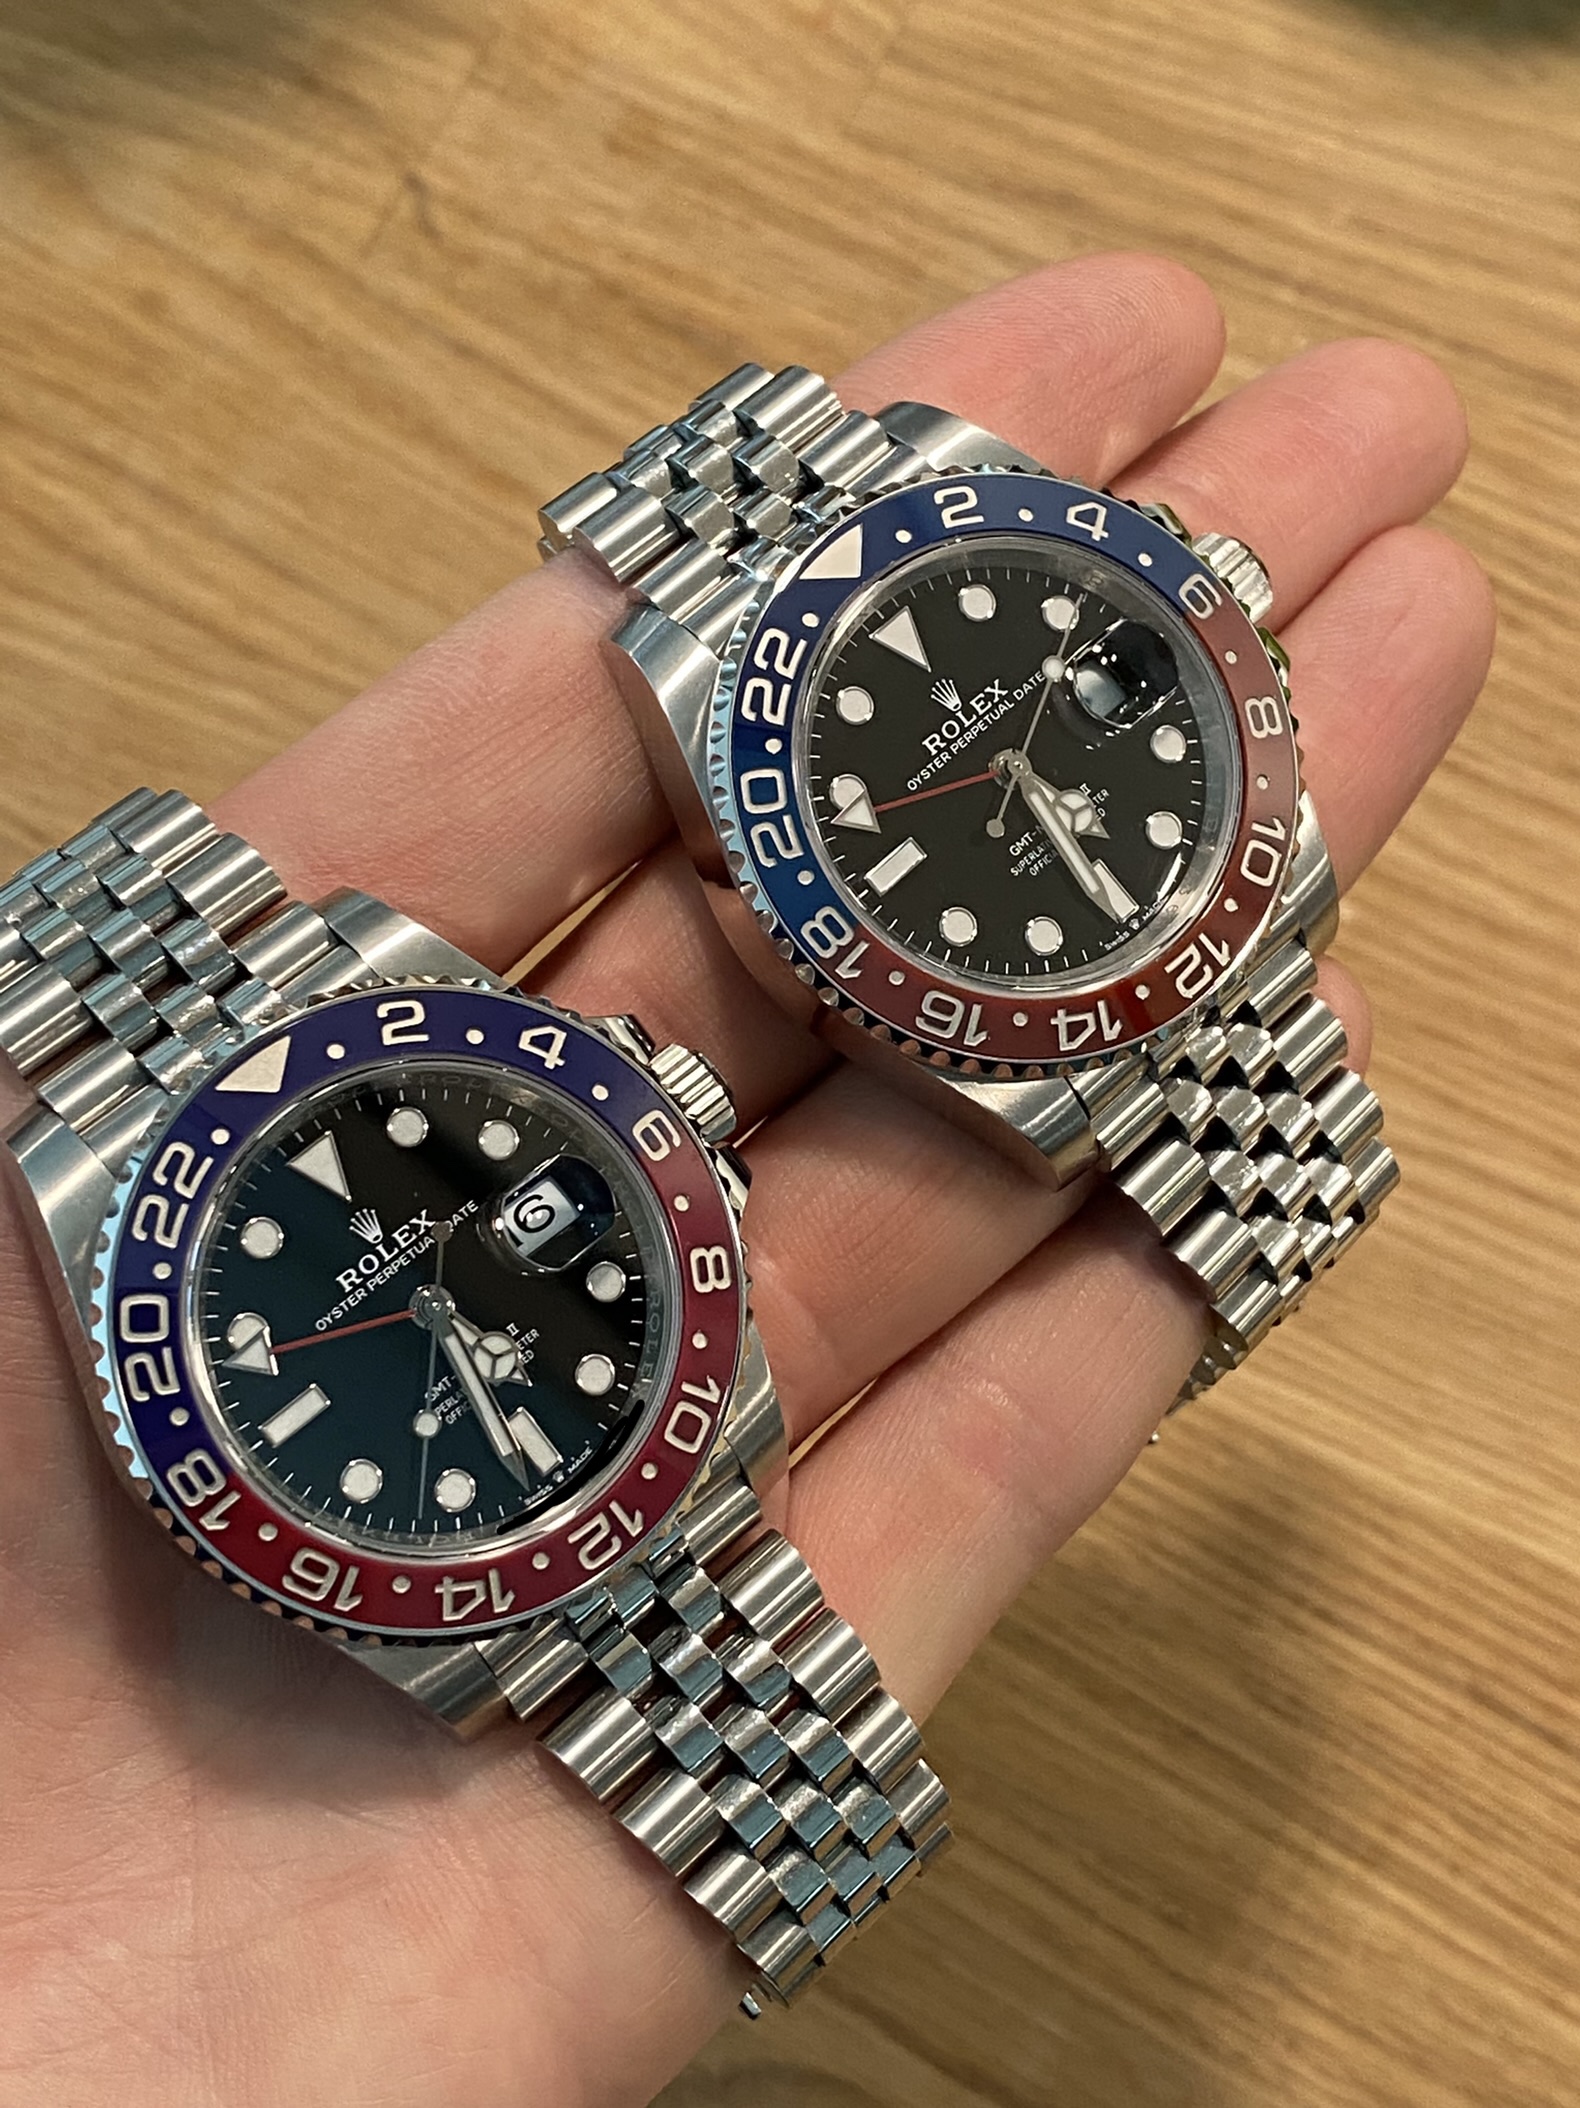
GEN left, CF right
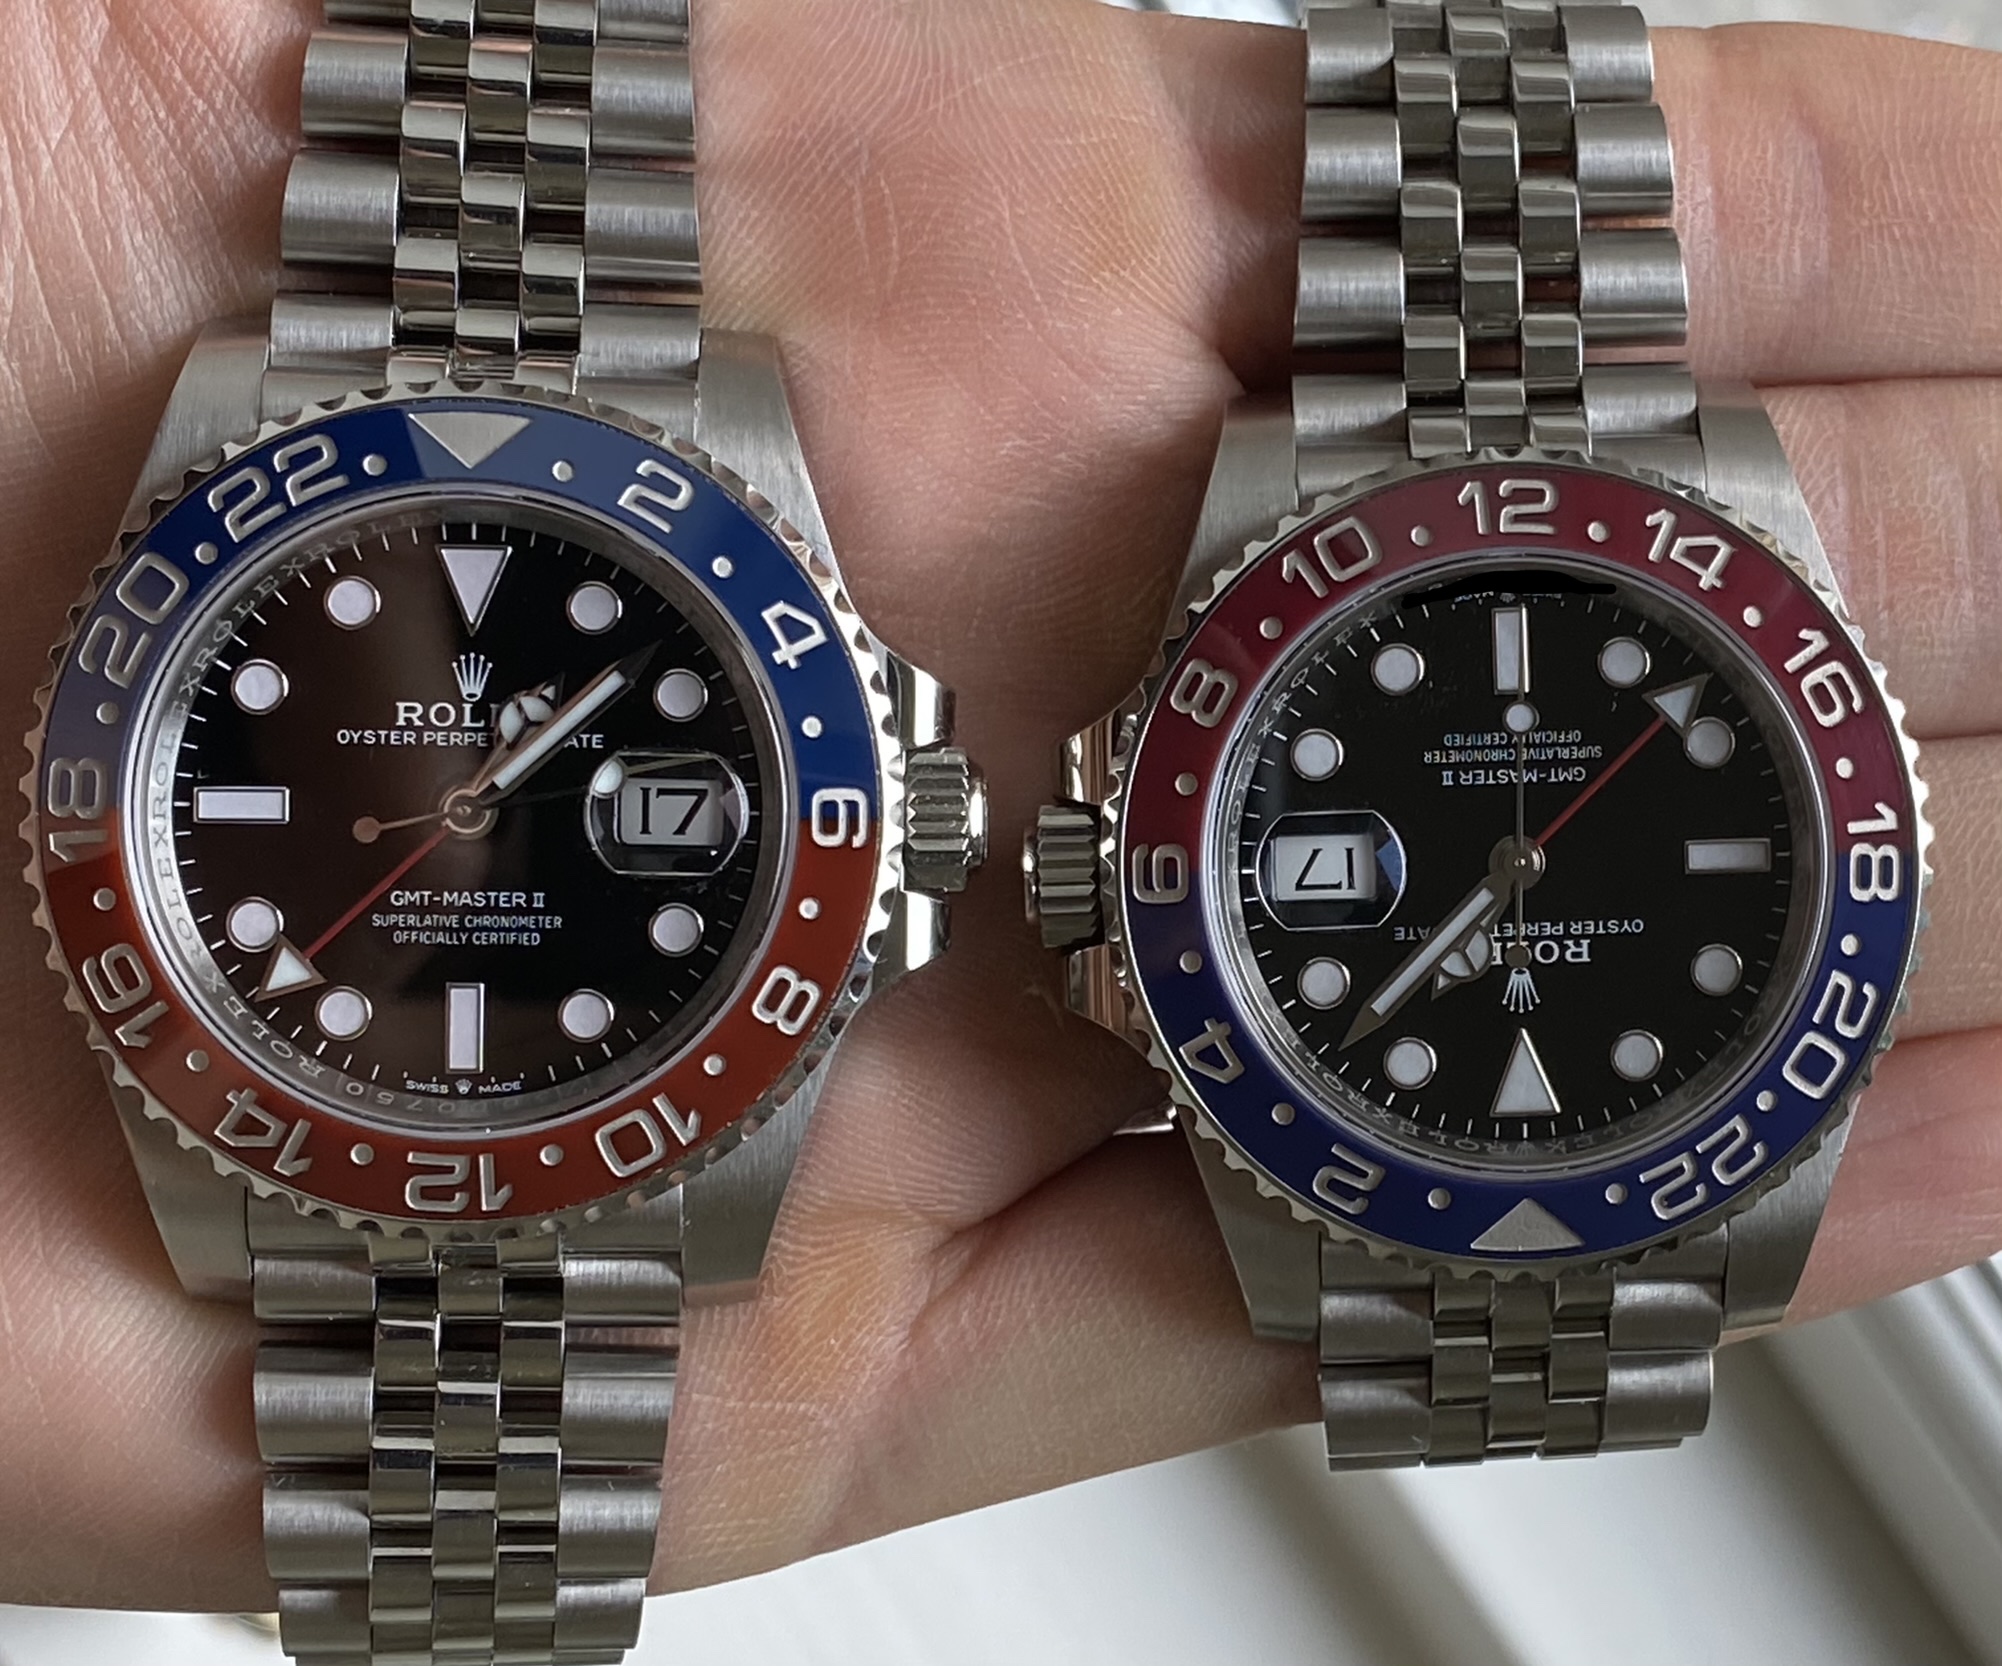
CF left, GEN right
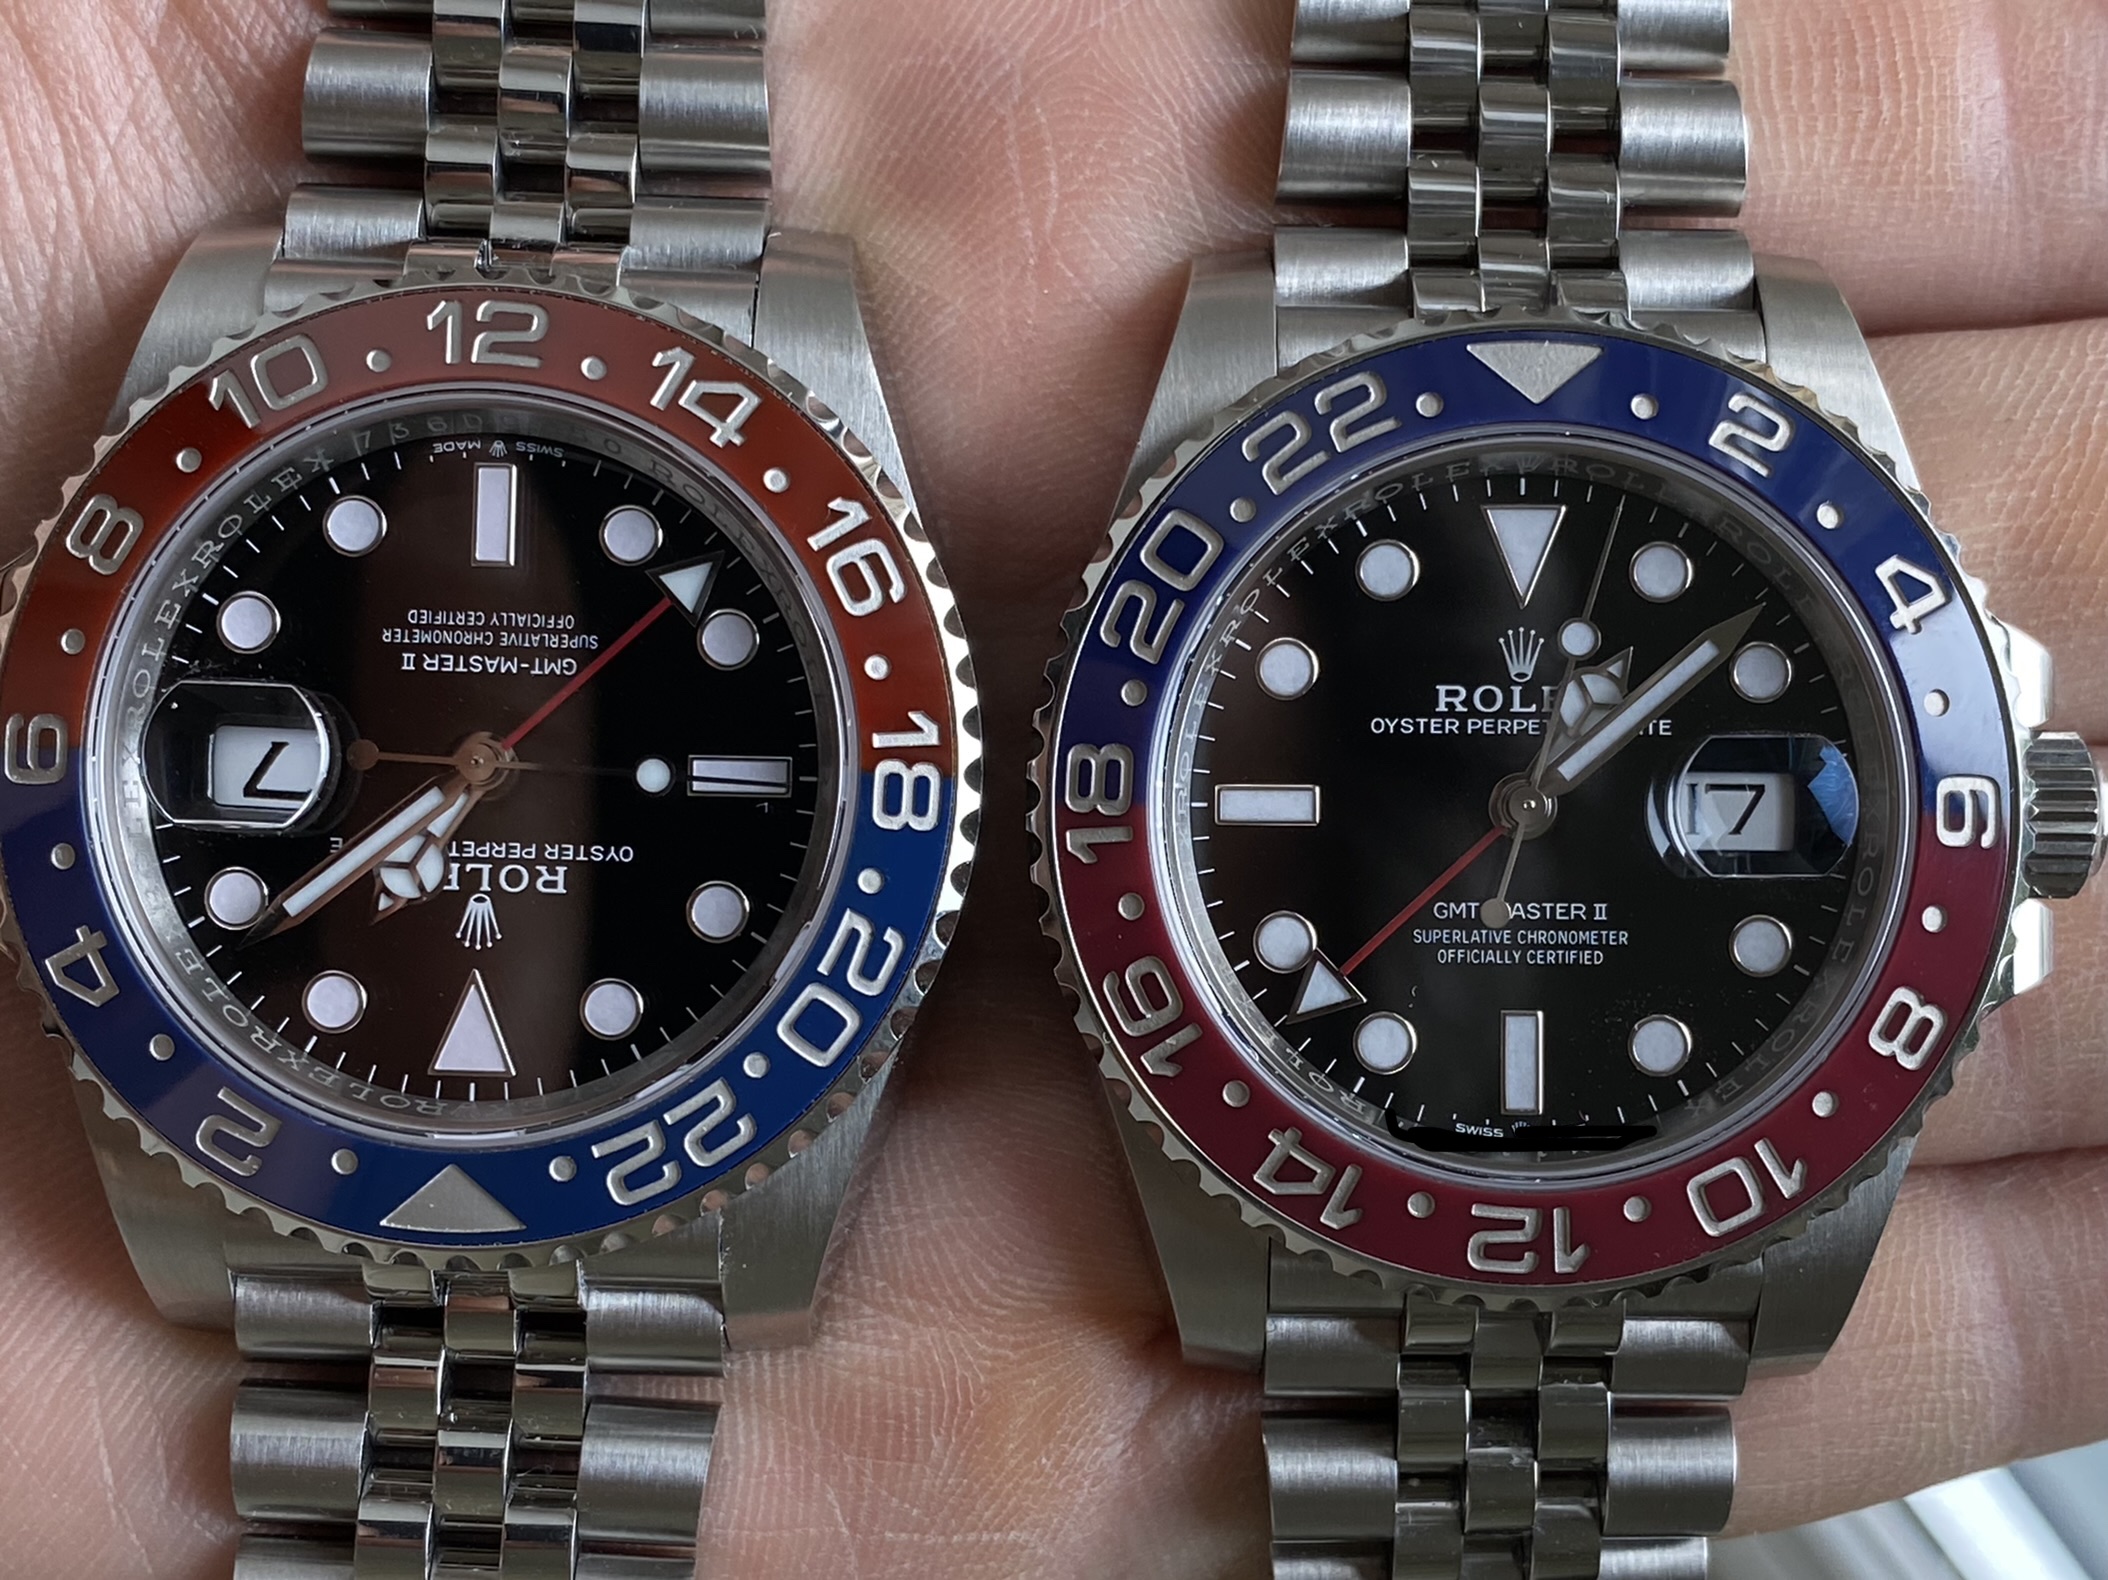
CF left, GEN right
GEN left, CF right
CF left, GEN right
Sent from my iPhone using Tapatalk
IMO, when the REP is on the wrist it feels sturdy, does a great job and is actually difficult to tell apart.
However, next to the GEN the insert, the lugs and other details are falling short.
The key with this insert is the lighting and under some conditions they look very similar.
Pardon my poor skills when taking pictures!
GEN left, CF right
CF left, GEN right
CF left, GEN right
GEN left, CF right
CF left, GEN right
Sent from my iPhone using Tapatalk
Last edited:
- 12/3/18
- 37,544
- 80,340
- 113
I think one of the hard part is to polish up the lip after sanding. What kind of buffing wheel did you use? Since the scallops are brushed finish, it is important not to let the polishing wax touch them.
You don't need to buff it on a wheel if you use higher grit sandpaper to finish it off. With 7000 grit paper you can very nearly get away with no polishing at all. Two to three minutes with a tiny piece of Cape Cod pad will finish it perfectly.
Here some pictures of the GEN vs REP.
IMO, when the REP is on the wrist it feels sturdy, does a great job and is actually difficult to tell apart.
However, next to the GEN the insert, the lugs and other details are falling short.
The key with this insert is the lighting and under some conditions they look very similar.
Pardon my poor skills when taking pictures!
Sent from my iPhone using Tapatalk
oh noooo, all of the flaws were fine with me but now after a look at this photos i see only fat lugs on my CF and cannot unsee it LOL, anyway thanks for taking the time to do this photos.
now i most likely will need to sell my CF Pepsi and wait for the next Pepsi rep with closer to gen case.
masterpiece777
Renowned Member
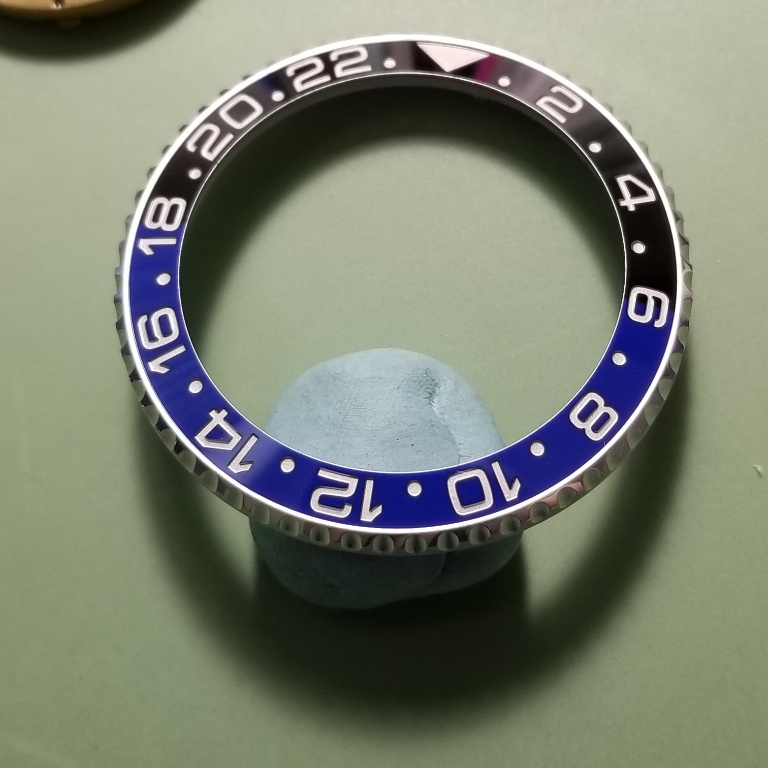
Here is a short explanation on how I did the lip with my poor English:
1) Remove the bezel… you can use a good knife with a good blade( french Laguiole knife :thumbsupbut protect the lug with some tape. I use the yellow watch protective tape, thin and resistant !
I put my knife blade into a small plastic bag to increase the protection of the bezel from scratches.
The bezel on the CF Pepsi is very easy to remove, you don’t need too much force. Once removed, you will see that the bezel retaining gasket is qualitative and strong, good thing !
2) Remove the ceramic insert… this insert is one of the thinnest I have seen !!! Bear in mind that you will have to take you time and to be very careful if you don’t want to cryTAKE THE TIME YOU NEED TO DO THAT !!! Use a thin cutter blade or a scalpel.
Just gently push the tip of the blade just below the insert, so you will work between the bezel and the insert.
The insert is fitted with a strong 3M double side tape.
The goal will be to gradually penetrate under the insert while turning ... slowly, you will see the insert rise and thus you can start to cut the tape ... if it should take you half an hour, it is ok ! Imagine the drama if you break the insert!
3) Sand the bezel to create the lip. At least I think it is the easiest part of the whole process. Unfortunately I could go only until a 2500 sandpaper…so I started with the 2000, then 2500. It’s enough in my case. Put the bezel upside down on a very flat surface and on a very flat sandpaper (new)
Start to rotate the bezel on the paper then to the left then to the right, in all possible directions so that the material removal is as uniform as possible. Position your fingers well on the bezel also so that the pressure exerted is the best balanced. Do the same with the 2500 paper until you have a homogeneous and smooth surface. It's good, now we have to give the shine. In my case, I used a Dremel with Dialux gray polishing paste. I only did a very light polishing so as not to round off the edges of the lip too much. Finally a little touch with Capcode and that's it!
4) Reinstall the bezel. Put the white gasket into the bezel groove, then the bezel washer with the 3 pins into the small hole of the bezel, very easy ! Just put the watch on the table, and press the bezel by hands with the good pressure it’s a very easy job again.
5) Reinstall the insert.
I did not used again the brand new 3M double-sided tape i had left because it adds more thickness and the bezel is lower now ;-). I used a very strong two-component glue that I applied in small drops with a toothpick on the bezel. I then put the insert back in, aligning it properly ... the insert was not aligned at all from the maker ! Drying time between 1 hour and 2 hours, and I can now appreciate this pretty watch. Thanks for reading and I hope it helped dear members !
Great review and really nice result!
Thanks for sharing
What glue did you used and have any advice how to get the best alignement?
Sent from the RWI App
oh noooo, all of the flaws were fine with me but now after a look at this photos i see only fat lugs on my CF and cannot unsee it LOL, anyway thanks for taking the time to do this photos.
now i most likely will need to sell my CF Pepsi and wait for the next Pepsi rep with closer to gen case.
I had convinced myself to get over the flaws and literally was about to place an order but now seeing gen vs rep I cannot get over the lugs and wrong color insert :cry2::cry2::cry2:
Finally got mine. The so called doo doo insert looks fine to me, obviously next to gen it may not match but again Rolex made a few versions and what are the chances of crossing another pepsi! I’ve seen one or two in the flesh since it’s release a few years back.
Overall very nice quality watch but need to decide if it’s for me.
I’m comparing to a Batman 116710 ARF, must say the pepsi looks a tiny bit slimmer but my eyes suck and again not bothering me the slightest as overall it’s a nice rep and I buy for me, not for the hype or whatever.


Slight bump? Impossible to see by naked eye, I had to zoom in majorly to maybe see something.
Overall very nice quality watch but need to decide if it’s for me.
I’m comparing to a Batman 116710 ARF, must say the pepsi looks a tiny bit slimmer but my eyes suck and again not bothering me the slightest as overall it’s a nice rep and I buy for me, not for the hype or whatever.


Slight bump? Impossible to see by naked eye, I had to zoom in majorly to maybe see something.
I had convinced myself to get over the flaws and literally was about to place an order but now seeing gen vs rep I cannot get over the lugs and wrong color insert :cry2::cry2::cry2:
insert is very good the best on the market, it is very unlikely to have better than this CF anytime soon.
insert is very good the best on the market, it is very unlikely to have better than this CF anytime soon.
The insert has already been updated
- 2/5/16
- 1,760
- 1,211
- 113
That insert is gold, just look at those engraved numbers and how the light reflects around them. We´ve never had it quite this good, since, never. A little difference in hue color against gen will not stop me from wearing mine. Eagerly waiting.... 
If anyone has a spare CF jubilee link for sale please send me a PM. I have the ez link unlatched and it just barely fits.
Yeah it's a joke tbh... on mine I received 4 removable links. Mine doesn't fit really... going to have to buy a whole bracelet I think. Or find some very slim wristed people on here...
Yeah it's a joke tbh... on mine I received 4 removable links. Mine doesn't fit really... going to have to buy a whole bracelet I think. Or find some very slim wristed people on here...
If you end up ordering a bracelet to harvest links, I’ll go in on it with you.
Likewise if I find a source, I’ll keep you in mind bro.
dont watch me
To win a battle, fight as if you're already dead.
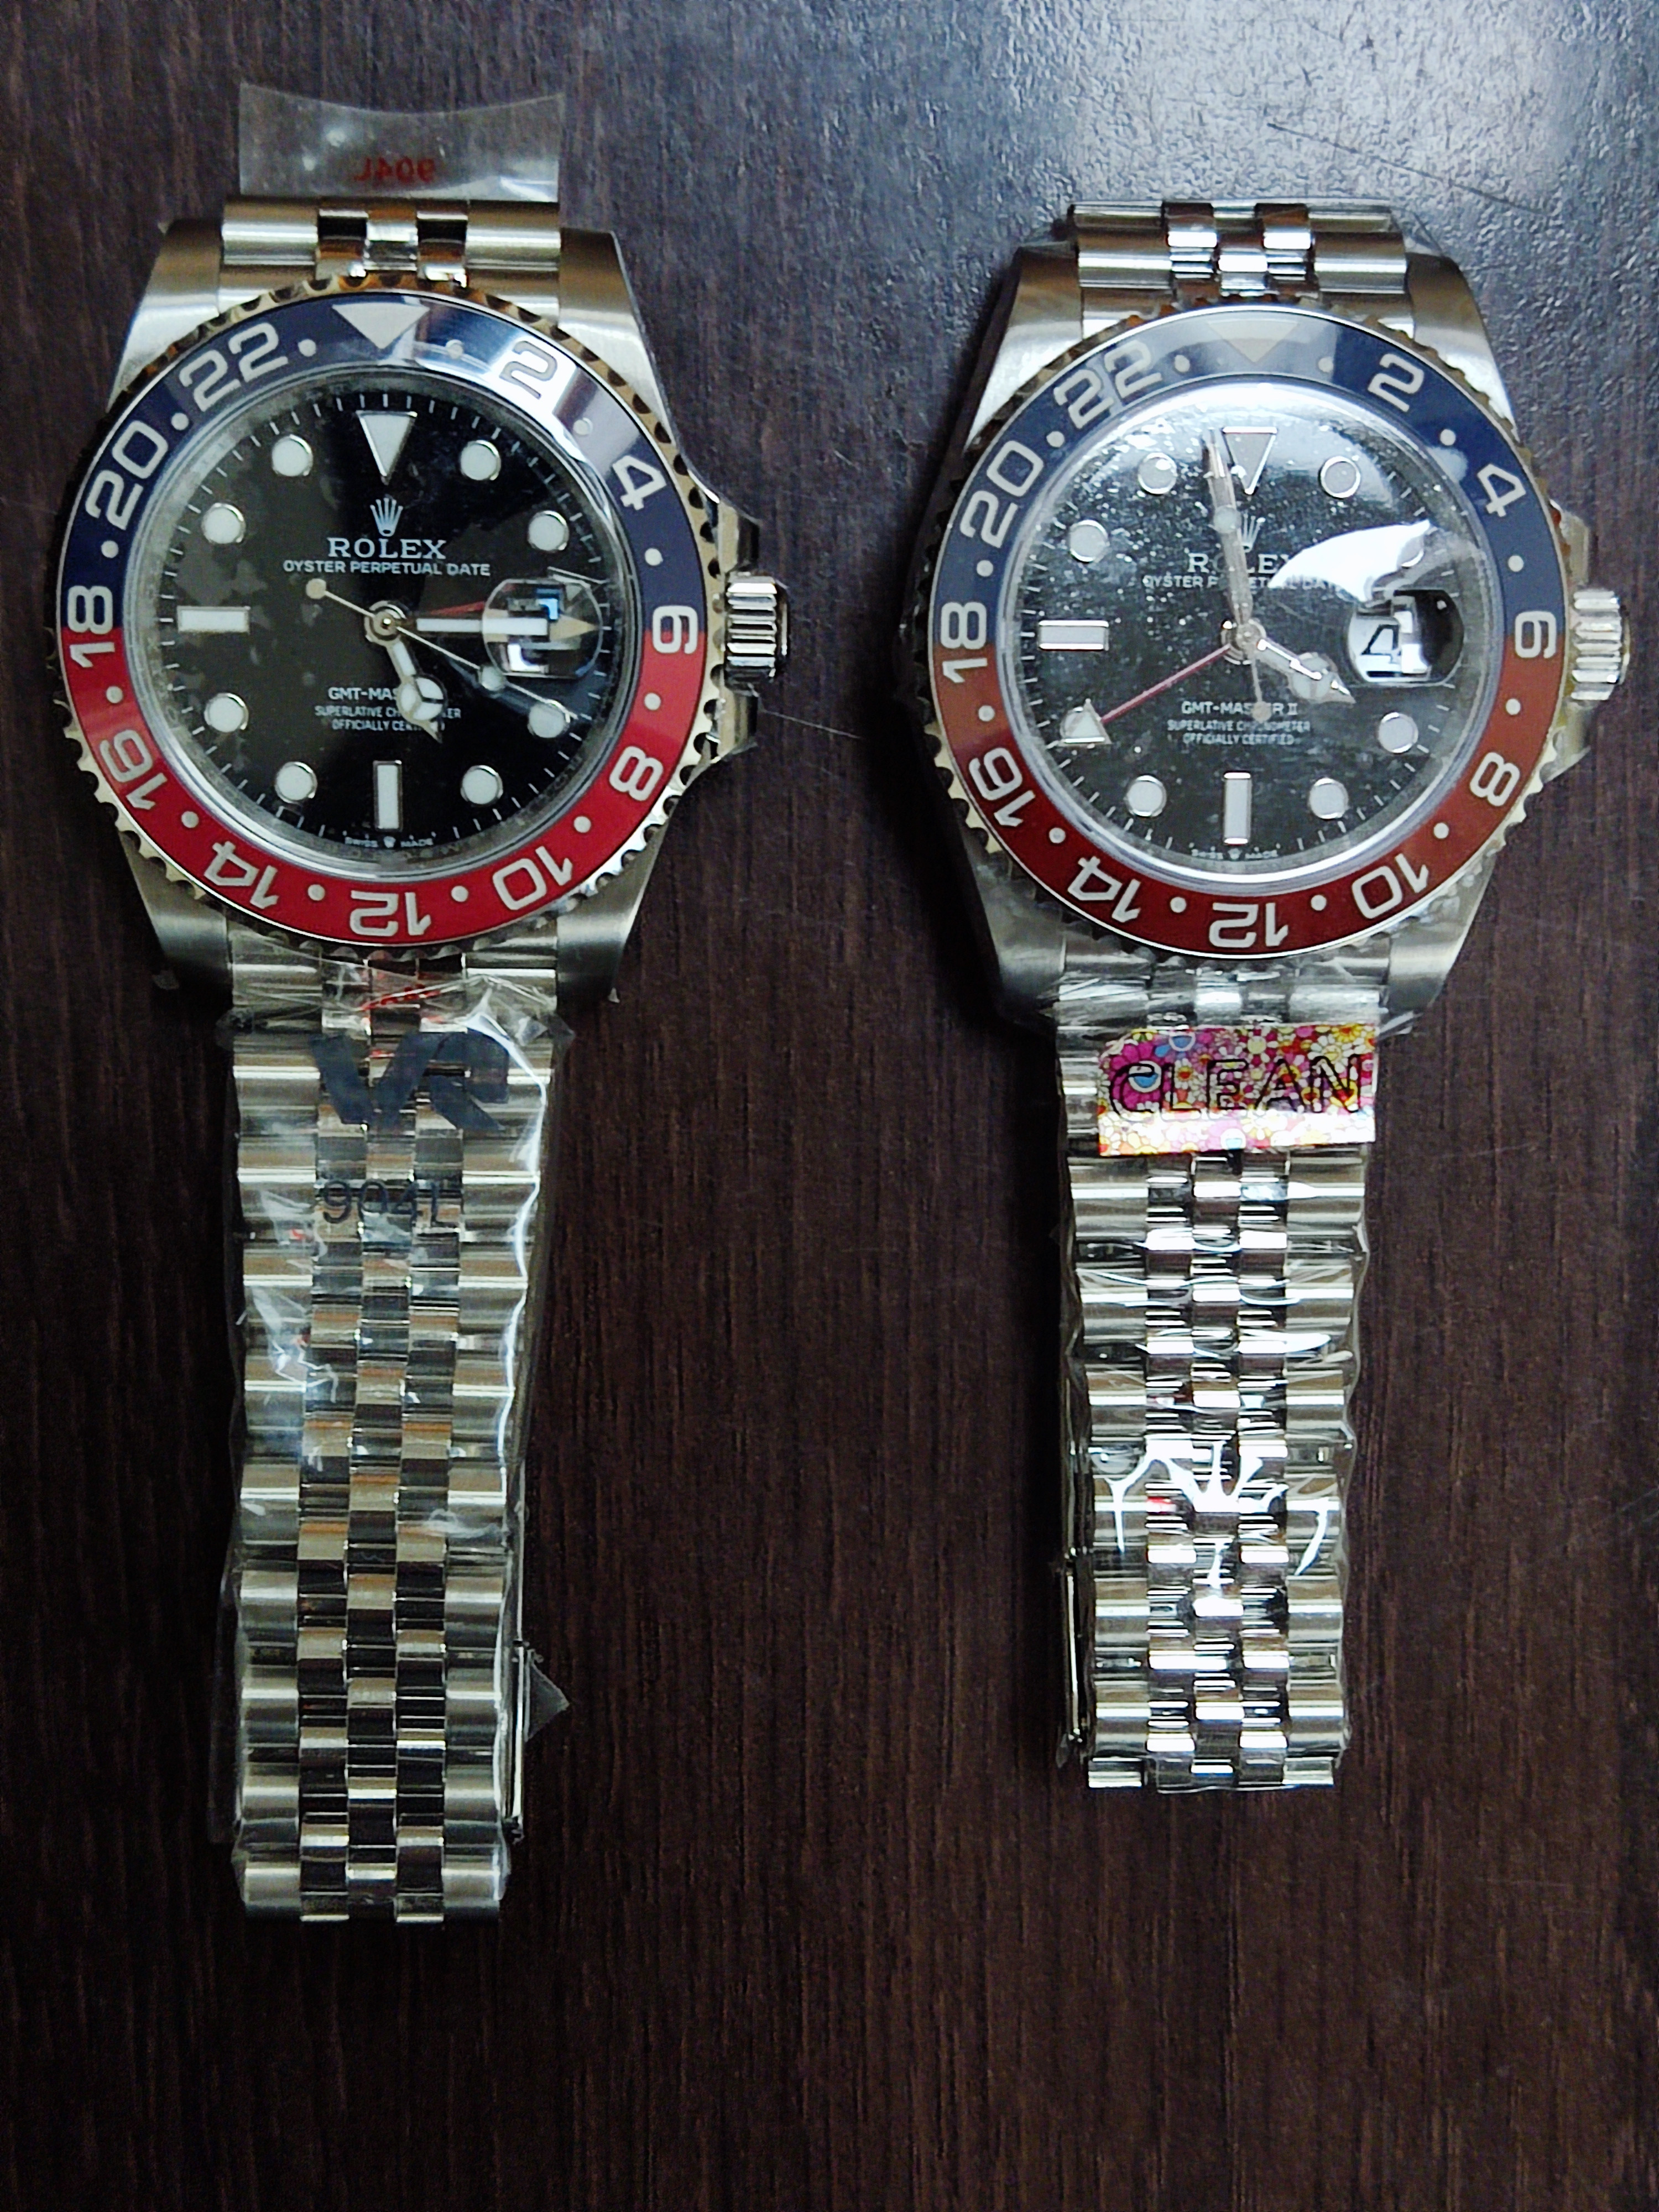
Right so I ordered 2 pepsi jubilees. 1 VRF max and 1 CF. The plan is to pick the best one for myself. All I've been thinking about since I made the order was how am I going to mod the lip of the CF if I do prefer that one. Will I try do it myself or shall I just take it to a jewellers and let them deal with it for me. I know what I'm like. Il end up ruining the thing so my heart was set on taking it to a jewellers. Anyway I also ordered some 3mm double sided tape from eBay and a knife for the bezel just incase I did want to try do it myself. So I received my watches yesterday and I easily preferred the CF. So I gave the VRF to a friend as a gift. ( Which he loved) I was surprised to see that ther was a slight lip on the CF. So I thought maybe ther was no need for the mod yet. That I should wear it as it is and maybe do it next time if I decide to change the crystal or something. Anyway I got home later on in the night which was about a hour ago and had a itch that was telling me to try pop the bezel off. So I stuck abit of electrical tape on the end of the knife and gave it a try. To my surprise it popped off pretty easily. I felt so much relief then. Then the insert come off really easily aswel. For that I literally just gently removed it with my finger nail Lol. So now this is where I am.
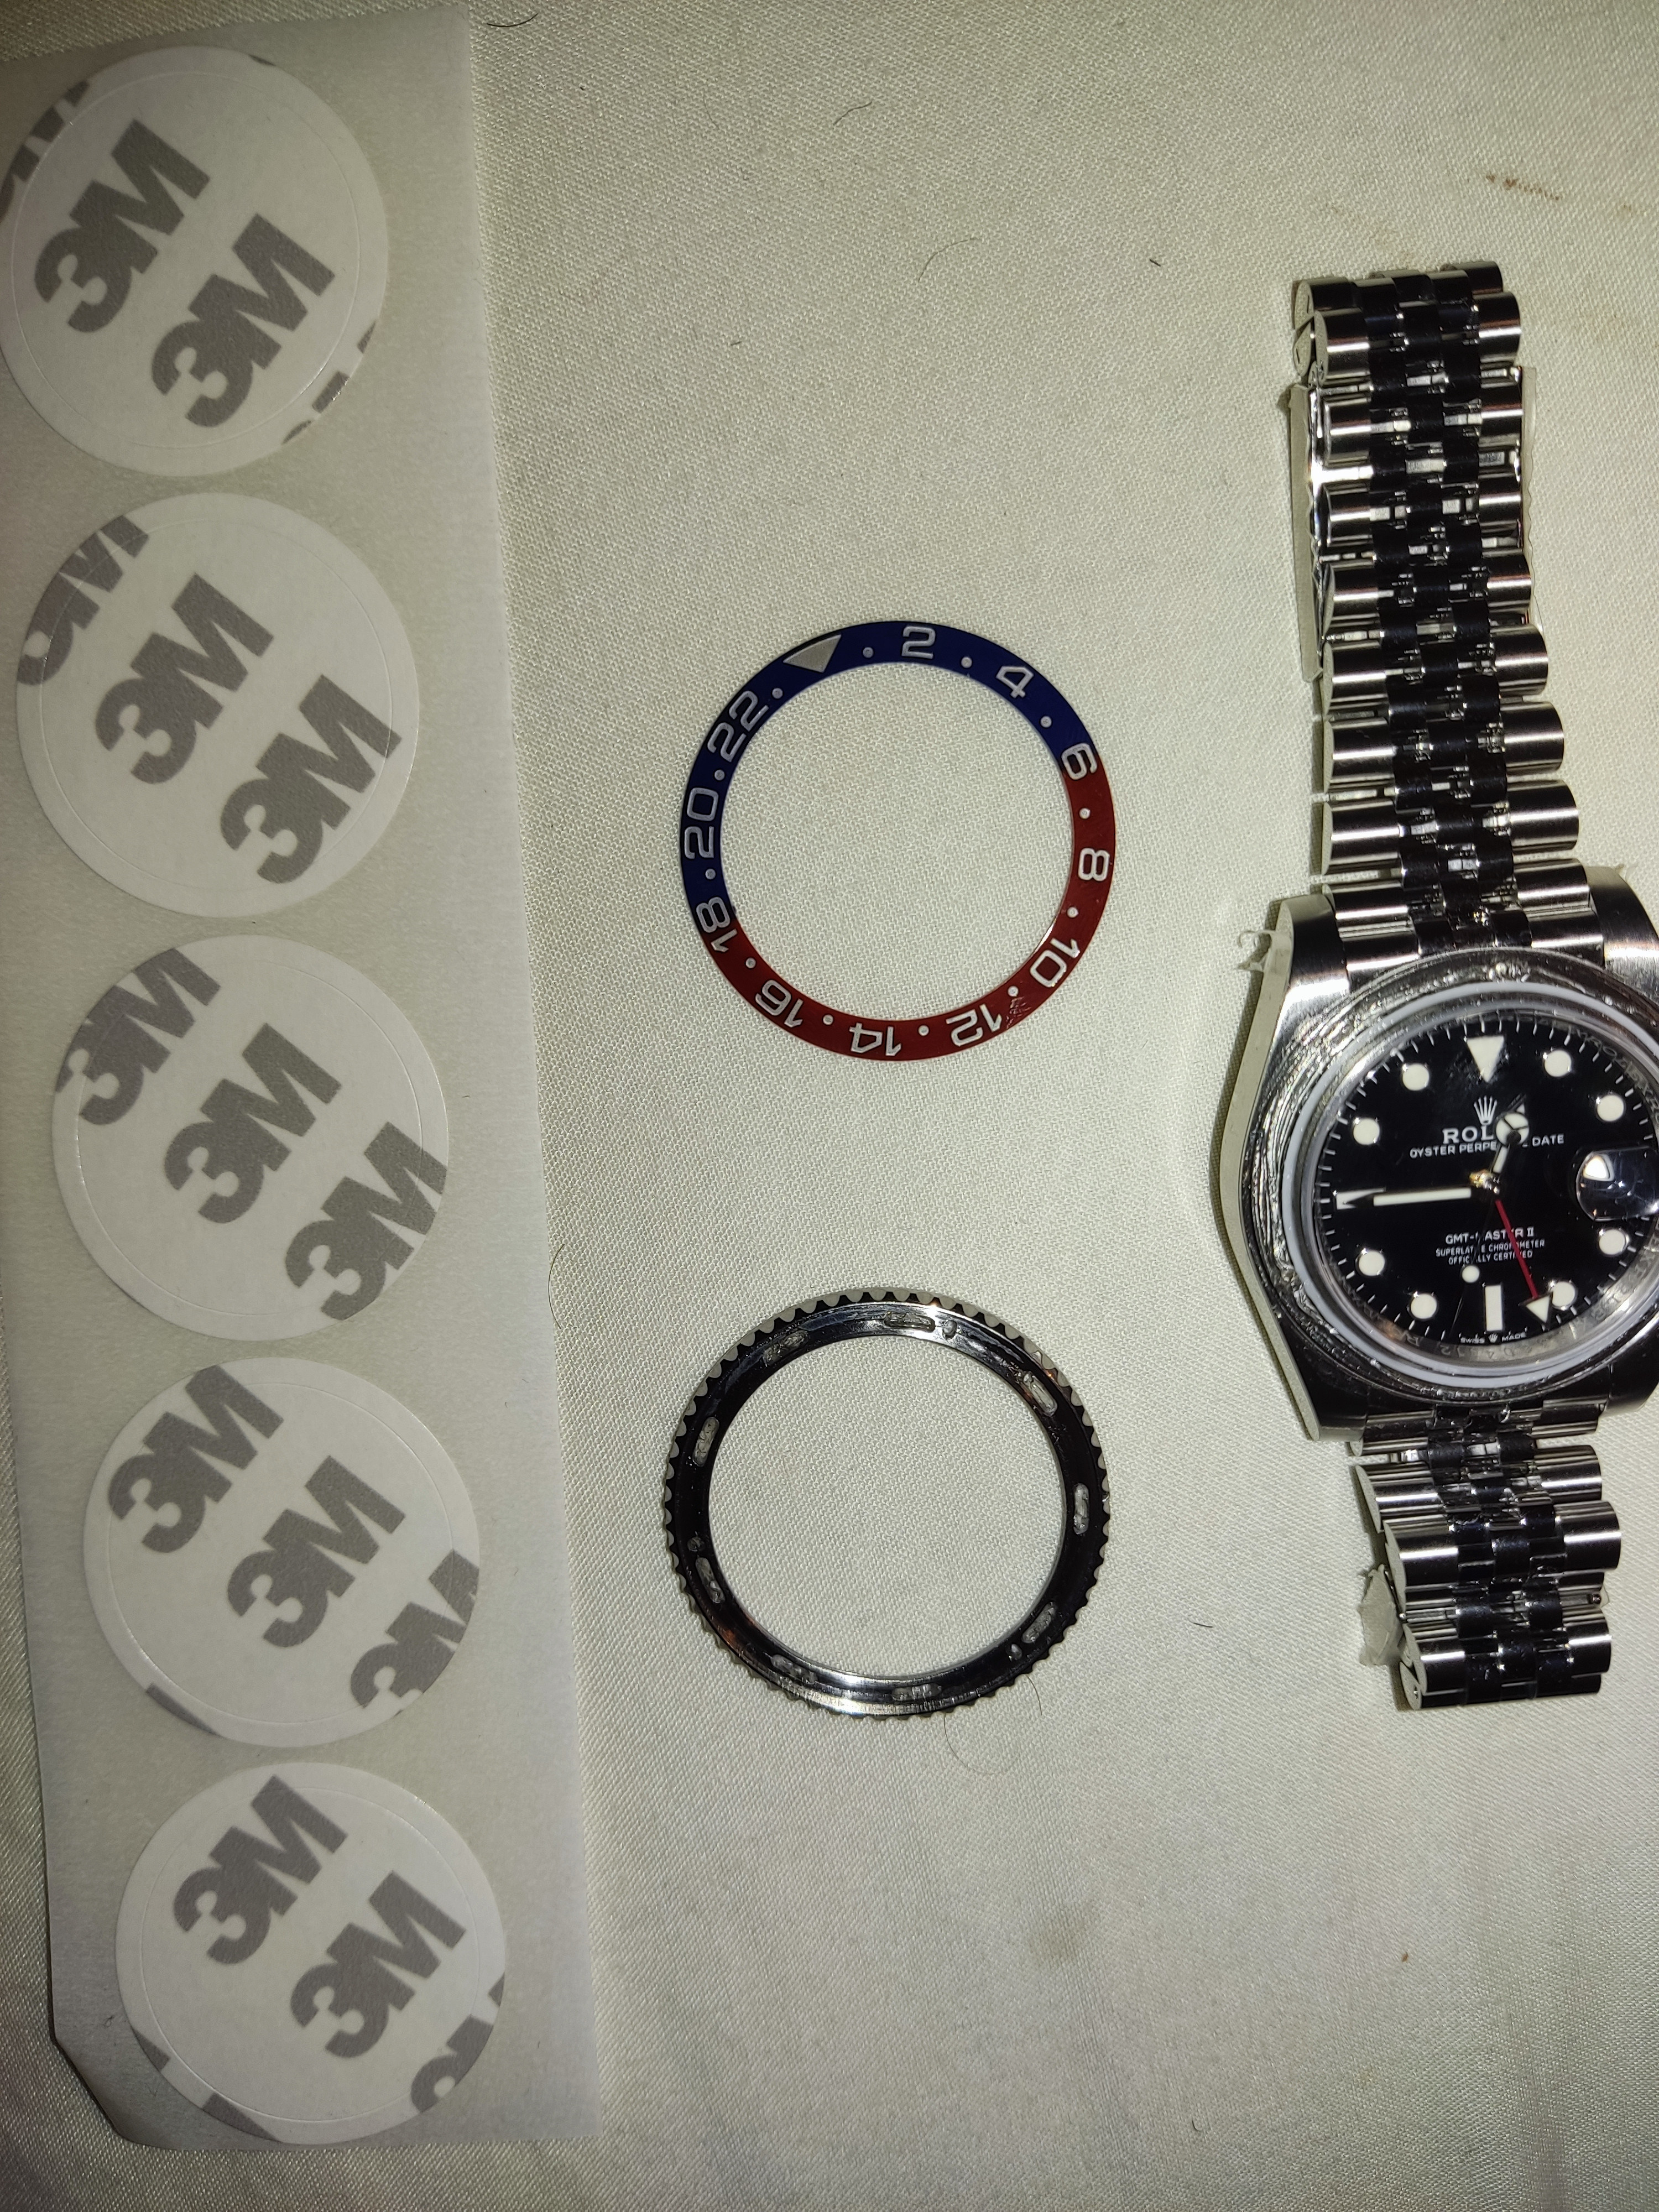
I'm getting sandpaper tomorrow and some polish and finishing it off. I've never ever modded a watch before in my life so I'm pretty happy with this so far. Just thought I'd share it with you guys incase some of yous wanted to try but never had the courage. Im the clumsiest guy ever sometimes and a expert at ruining things that was perfectly fine. But this was just too easy

I'm getting sandpaper tomorrow and some polish and finishing it off. I've never ever modded a watch before in my life so I'm pretty happy with this so far. Just thought I'd share it with you guys incase some of yous wanted to try but never had the courage. Im the clumsiest guy ever sometimes and a expert at ruining things that was perfectly fine. But this was just too easy
butler182
Renowned Member
- 14/12/20
- 650
- 688
- 93
Anyway I also ordered some 3mm double sided tape from eBay......
Would you mind sharing the link to the 3M double sided tape you ordered from ebay?
- 12/3/18
- 37,544
- 80,340
- 113
[/url]
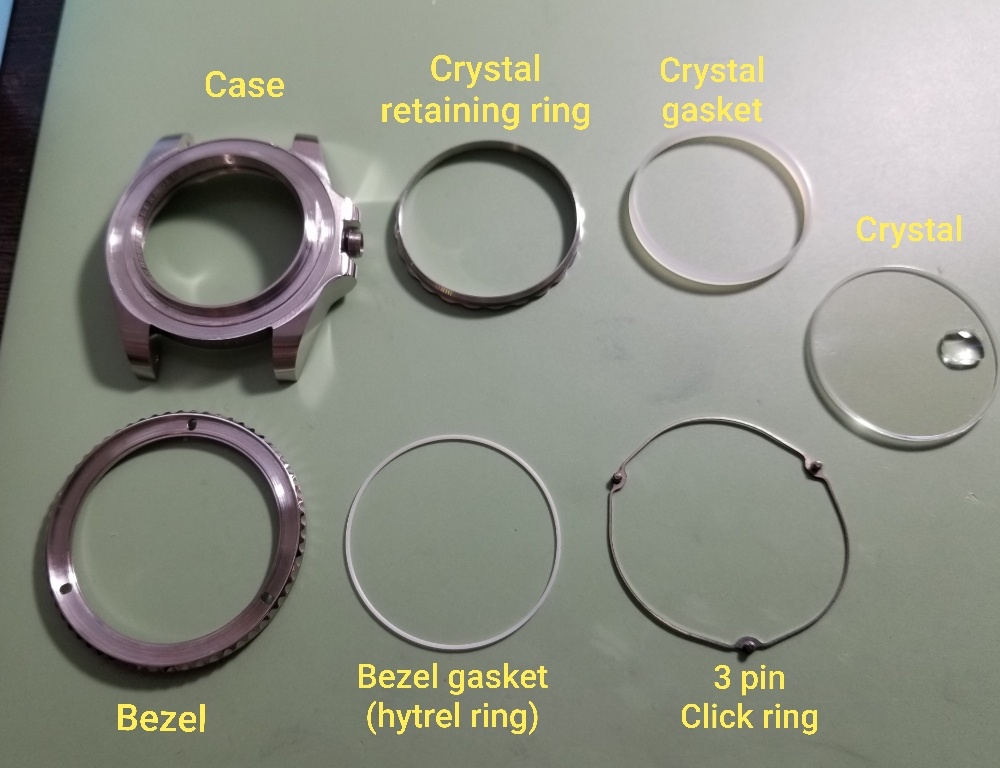
After you sand your bezel and clean off all the debris, make sure you carefully remove your bezel gasket (hytrel ring) from your crystal retaining ring.
Observe and maintain its orientation top to bottom and insert it into the bezel groove so it will keep that orientation when you press the bezel back onto the crystal retaining ring. Do not try to put the bezel back onto the watch without doing this step first.
dont watch me
To win a battle, fight as if you're already dead.
Would you mind sharing the link to the 3M double sided tape you ordered from ebay?
https://www.ebay.co.uk/itm/ADHESIVE...=p2349624.m2548.l6249&mkrid=710-127635-2958-0

