-
Tired of adverts on RWI? - Subscribe by clicking HERE and PMing Trailboss for instructions and they will magically go away!
You are using an out of date browser. It may not display this or other websites correctly.
You should upgrade or use an alternative browser.
You should upgrade or use an alternative browser.
Will there be an improved version of PAM 364?
- Thread starter pamfan
- Start date
Yes, I have already gotten me one.
I'm probably just anal about the issues...which are eating me up lately.
Am thinking about getting some DIY done to give the pearl a hair bit more recess, shaping the equilateral triangle to 'bubble-like' triangle and getting a tiny cap for the canon pinion or to file down the excess rim that above the minute hand.
Has anyone done any DIY mods so far?
Sigh......buy a Gen if they bother you that much. ; )
+1 You're not enjoying this hobby nearly as well as you should.
Well, I guess everyone has a different opinion.
I find that the most rewarding part is not simply purchasing the rep. It is about carrying out some little tweaks here and there during one's free time. I have had a few enhancement projects and have achieved some very desirable results. It gives great joy and satisfaction by doing so.
Needless to say, if the Factories were to release newer versions, it'll be much more straightforward.
Hmmm.. I think I'll start with a Dremel tool to work on giving the pearl a slight recessed look.")
I find that the most rewarding part is not simply purchasing the rep. It is about carrying out some little tweaks here and there during one's free time. I have had a few enhancement projects and have achieved some very desirable results. It gives great joy and satisfaction by doing so.
Needless to say, if the Factories were to release newer versions, it'll be much more straightforward.
Hmmm.. I think I'll start with a Dremel tool to work on giving the pearl a slight recessed look.
Well, I guess everyone has a different opinion.
I find that the most rewarding part is not simply purchasing the rep. It is about carrying out some little tweaks here and there during one's free time. I have had a few enhancement projects and have achieved some very desirable results. It gives great joy and satisfaction by doing so.
Needless to say, if the Factories were to release newer versions, it'll be much more straightforward.
Hmmm.. I think I'll start with a Dremel tool to work on giving the pearl a slight recessed look.
Of course, not everyone is as skilled as you say. You say you get enjoyment to modding reps. Some of us get enjoyment by being able to get such high quality reps OTB and only have to worry about which straps to get for them. Only popular reps such as the PAM111, PAM243, PAM312/320/359, PAM372 and PAM382 have had more than 2 versions. The PAM364, while a very solid super rep (I have one so I can attest to the quality of replication), would not be that popular due to the flooding of submersible reps in recent memory. Please do share your work as obviously this is something you like to do. Even tutorials on how to do the most basic of mods would be helpful.
Moderators, please do chine in. Am I allowed to post pics of some small mods on my reps here?
go ahead mate, as long as no services are offered. if you want to post a tutorial, there's a section for it too.
Before I begin with the actual content (cosmetic mods), please let me state that I am in no way an expert in modding reps. I am just a regular rep collector who enjoys using my free time to up the level of personal enjoyment through doing some hands-on stuff on already very excellently built reps.
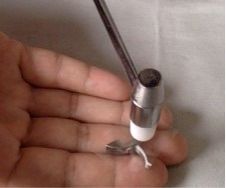
I’d like to start off with my first mini enhancement project, which is an aesthetic enhancement on “The CG Pin that sticks out ever so slightly”.
Here’s how the position of the CG usually looks like when it comes through your door:
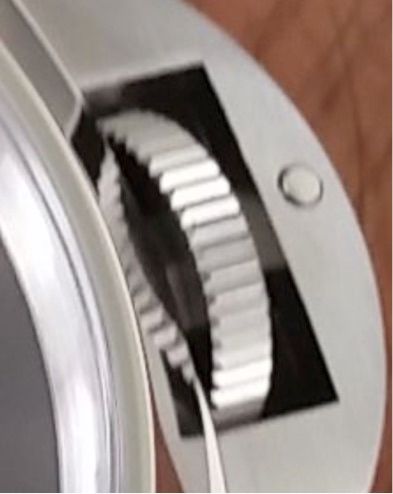
Notice how the CG Pin sticks up by a fraction of a millimeter and the itsy-bitsy awkward gap (circumference) when it is seated in the CG pinhole. Depending on the PAM models one looks at, the CG Pins are always either in brushed or polished finish (Direct reference to the pics of the Gen model would be best way to determine the rightful type of finish).
What I used:
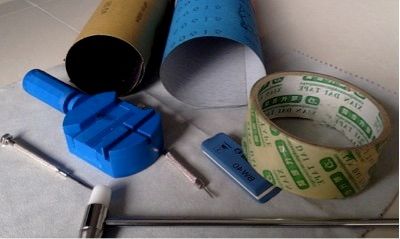
Apart from the sandpapers that need specifications, I think most of the items needs no introduction?
i) A piece of 150Cw grit strength sand paper (meant for sanding down metal surfaces)
ii) A piece of P400 grit strength sand paper (meant for sanding down wood)
Please note that you should avoid using the sandpapers and the ink eraser if you are seeking to retain the polished finish on your CG Pin.
The steps I took:
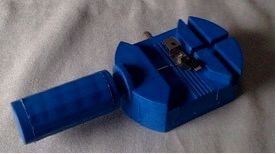
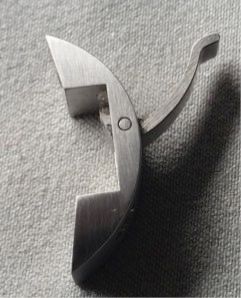
i) Remove CG Pin from CG using the watch pin pusher/remover tool from the bottom side of the CG
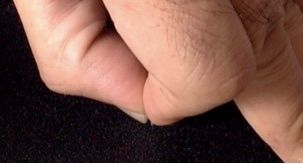
ii) With the CG Pin fully removed from the CG, use the hammer with the steel side, to hammer down gently on the topside of the CG Pin. By the way, my fingers were used to pinch the CG Pin while I hammered away
iii) Stop when you see a concentric ‘mushroom head’ formed on the CG Pin. Don’t worry about the rounded topside on the CG Pin for now
iv) With the CG Pin pinched in your fingers and the 150 Cw grit strength sandpaper placed on a flat surface, sand the topside of the CG Pin in only one direction, very slowly. Note: Do not apply too much pressure and do not sand away the edges of the mushroom head on the CG Pin. Check repeatedly with each sanding stroke you make. A coarse-grained in a uniform direction is the desired outcome (If you have a loupe, use it to check).
v) Switch to the P400 sandpaper to give it a finer finish in the same uniform direction
vi) Finish off with the Ink Eraser for an even finer finish in the same uniform direction
At the end of carrying out the above steps, the CG Pin would spot a brushed finish effect and a slight ‘mushroom head’.
i) Next, using your fingers, push the CG Pin back into the CG to as much as your fingers can do. Remember to adjust the grain on the CG Pin to flow with the grain on the CG
ii) With the CG Pin still half sticking out, paste a piece of scotch tape over it, which should also be enough to cover the top surface of the CG
iii) Hammer lightly on the CG Pin down using first the metal side of the hammer, which is served to flatten the mushroom head, then switch to the plastic side for finishing touches. I would recommend hammering the CG Pin with the CG being held in your hand
iv) Cease hammering when CG Pin appears to be flushed with the top surface of the CG
v) Remove scotch tape and you’re done.
vi) Repeat above steps if flushed surface is not at an ideal placed.
Pic of the modified CG Pin:
Oh and by the way, when this mini project was completed, the CG lever operation became tighter and had more snap to it.
To retain a polished finish or a DLC finish on the CG Pin, small adjustments to above approach will be necessary. Happy exploring!
I hope you guys enjoyed this mini DIY thread. Should you decide to give it a go on your babies, please don’t hold me responsible if you mess up your CG or CG pins.
I'll get more complex mods posted as I go along and when I can afford the time. This thread has taken more time than I had expected.
Many thanks to the moderators at RWI for generously letting out a space for me to put this thread out.
Have a great day! Cheers!
I’d like to start off with my first mini enhancement project, which is an aesthetic enhancement on “The CG Pin that sticks out ever so slightly”.
Here’s how the position of the CG usually looks like when it comes through your door:
Notice how the CG Pin sticks up by a fraction of a millimeter and the itsy-bitsy awkward gap (circumference) when it is seated in the CG pinhole. Depending on the PAM models one looks at, the CG Pins are always either in brushed or polished finish (Direct reference to the pics of the Gen model would be best way to determine the rightful type of finish).
What I used:
Apart from the sandpapers that need specifications, I think most of the items needs no introduction?
i) A piece of 150Cw grit strength sand paper (meant for sanding down metal surfaces)
ii) A piece of P400 grit strength sand paper (meant for sanding down wood)
Please note that you should avoid using the sandpapers and the ink eraser if you are seeking to retain the polished finish on your CG Pin.
The steps I took:
i) Remove CG Pin from CG using the watch pin pusher/remover tool from the bottom side of the CG
ii) With the CG Pin fully removed from the CG, use the hammer with the steel side, to hammer down gently on the topside of the CG Pin. By the way, my fingers were used to pinch the CG Pin while I hammered away
iii) Stop when you see a concentric ‘mushroom head’ formed on the CG Pin. Don’t worry about the rounded topside on the CG Pin for now
iv) With the CG Pin pinched in your fingers and the 150 Cw grit strength sandpaper placed on a flat surface, sand the topside of the CG Pin in only one direction, very slowly. Note: Do not apply too much pressure and do not sand away the edges of the mushroom head on the CG Pin. Check repeatedly with each sanding stroke you make. A coarse-grained in a uniform direction is the desired outcome (If you have a loupe, use it to check).
v) Switch to the P400 sandpaper to give it a finer finish in the same uniform direction
vi) Finish off with the Ink Eraser for an even finer finish in the same uniform direction
At the end of carrying out the above steps, the CG Pin would spot a brushed finish effect and a slight ‘mushroom head’.
i) Next, using your fingers, push the CG Pin back into the CG to as much as your fingers can do. Remember to adjust the grain on the CG Pin to flow with the grain on the CG
ii) With the CG Pin still half sticking out, paste a piece of scotch tape over it, which should also be enough to cover the top surface of the CG
iii) Hammer lightly on the CG Pin down using first the metal side of the hammer, which is served to flatten the mushroom head, then switch to the plastic side for finishing touches. I would recommend hammering the CG Pin with the CG being held in your hand
iv) Cease hammering when CG Pin appears to be flushed with the top surface of the CG
v) Remove scotch tape and you’re done.
vi) Repeat above steps if flushed surface is not at an ideal placed.
Pic of the modified CG Pin:
Oh and by the way, when this mini project was completed, the CG lever operation became tighter and had more snap to it.
To retain a polished finish or a DLC finish on the CG Pin, small adjustments to above approach will be necessary. Happy exploring!
I hope you guys enjoyed this mini DIY thread. Should you decide to give it a go on your babies, please don’t hold me responsible if you mess up your CG or CG pins.
I'll get more complex mods posted as I go along and when I can afford the time. This thread has taken more time than I had expected.
Many thanks to the moderators at RWI for generously letting out a space for me to put this thread out.
Have a great day! Cheers!
- 18/1/11
- 19,846
- 423
- 83
Hi ALE, just wanted clarify if you were seeking for me to cut out this thread and to post it in another section?
I think it is better to copy by yourself this post and start a new thread in PAM Section
ALE