- 17/8/22
- 4
- 5
- 3
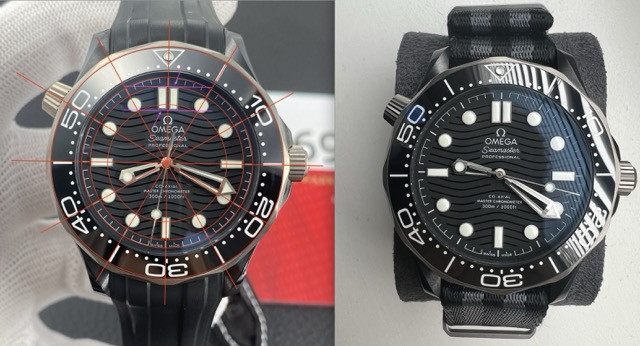
So, everything started with a missed defect on the QC sent from my TD. It was obvious, but I was so focused on the alignment of the hour markers, and in a rush to get the new watch that I missed that one stick on the 12-hour marker was not aligned with the other. I saw it after I GLed for shipping, but I was trying to lie to myself, thinking it was only the camera's position or the picture's alignment. But no, it was a misalignment.
The watch arrived, and even when it was not obvious, it kept bothering me, so I contacted the TD and explained the situation; he offered me the option to ship a new dial for free if I assumed the cost of the dial. I felt responsible for missing this during the QC, so I agreed to pay 38 USD for a new dial.
The dial arrived a few weeks later, and it took me a few extra weeks to gain the courage to open the case back. I had never worked with a mechanical watch before, and I took this as the beginning of a hobby I like very much, so I ordered a few materials from Aliexpress just in preparation. Once I had everything with me, I started.
I hope this helps others who, like me, would like to start with the hobby and explore our reps more deeply.
Main Lessons Learned:
- The stem crown needs to be in the outer position before removing it; I removed it from the inner position and screwed all the stem holding mechanisms, it was fun to fix it, but I panicked a lot when I could put the stem back.
- Be patient; don't force things. When I couldn't put the stem back, I could have damaged the keyless work mechanism by forcing the release pin; thankfully, nothing bad happened.
- There are a lot of decorative screws in the omega VSF movement, be careful that not all the screws can be removed.
- Great explanation to fix a common stem issue on omega VSFs: https://forum.replica-watch.info/th...he-vsf-8500-clone-movement-pic-heavy.7529859/
- Great explanation to assemble the keyless works that I screwed up; nothing was broken, so was easy to put things back,
- Case back opener, I used simply a rubber ball from aliexpress.
- Hands remover, https://www.aliexpress.com/item/100...order_list.order_list_main.217.20991802LECLmi
- Universal movement holder from aliexpress
- Screw set from Aliexpress, made the mistake of buying the cheapest ones, and they don't work. Please don't spend money on them. I recommend these ones, got them from a recommendation from a watch builder on youtube https://www.aliexpress.com/item/100...order_list.order_list_main.132.20991802LECLmi
- Tweezers, I found very good ones, at least for me as a beginner, are good quality, I will trash the cheap ones I also got from Aliexpress, these are the good ones: https://www.aliexpress.com/item/100...order_list.order_list_main.108.20991802LECLmi
- 5x loupe from aliexpress, https://www.aliexpress.com/item/100...order_list.order_list_main.102.20991802LECLmi
- Removed the case back with the rubber ball.
- Place the crown in the outer position, then with the smallest screw, press the release pin (see picture below) and remove the steam from the watch.
- Remove the movement from the case and place it on the movement holder.
- Now, we can remove the hands and dial from the movement. For the hands, removal is very straightforward; protect the dial with plastic to avoid scratches. Removing the dial was a little more complicated, as I thought the pins were locked to the movement. To my surprise, the movement was just stuck with double-sided tape, with a plastic tweezer just had to force the dial out. It took me a while to figure this out.
- Now, we can remove the decorative automatic wheel, I tough it was necessary to do as I wasn´t sure of the extent of the damage I made, but now I think it was unnecessary to remove it; anyway, I will explain how I did it: There is a snowflake shape plastic that is glued to the center of the wheel; from the side with a flat screw, push and separate the piece.
- Beneath the snowflake plastic, there is an unconventional screw that has two dents on the perimeter; this can be removed using a tweezer, placing the point of the tweezer on each dent and rotating the tweezer, and the piece will unscrew.
- Next, we can remove the automatic wheel, and we'll be able to see the ETA2824-2 movement beneath the decoration.
- Unscrew the rest of the plastic pieces, including the decorative balance bridge. Then, you can see the entire ETA movement. You can see the scratches caused by me trying to force the release pin when I was trying to put the stem back.
- Now, to fix the keyless work damaged by me, as you can see by removing the stem from the inner position, I released the clutch lever from its normal position (engaged with the clutch) and pushed the set lever out of position. I had to disassemble the whole keyless mechanism and assembly it back again (see this video that was gold for me as explain step by step what needs to be done )
- With that fixed, it's time to put everything back together. I started by reinstalling the decorative movement and gluing the snowflake in place (also gluing back the decorative screws I broke).
- Then I moved to the new dial. I thoroughly cleaned the case and the dial and used alcohol wipes and Rodico to remove the dust particles. To place the dial back on the movement, the two feet did not match, so I had to bend them slightly to match. Hands reinstall was straightforward.
