Ok so i've read every one of Bonesey's threads and even asked some stupid questions... thanks again man, and decided to try my own vintage build. Whats the worst that could happen right?!? I wanted to go for the, "watch fell off while diving and stayed on the bottom of e ocean for a few years before someone found it and then wore it again" look.
Picked up a few things to get started...
-Silix donor watch here http://www.silix-prime.co/index.php?main_page=product_info&cPath=116_205_214&products_id=2103
-Real bond strap (not the nato most people call a "bond)
-vintage lume
-paint
-brushes
-laquer
-files
-oiler
-scotchbright
-chissel
-duct tape
-metal polish
-gloves
I do have some artistic background so that helps... lets get started.
I didn't take a lot of pictures durring the process because i was focused and scared at the same time so , sorry. I have never dissassembled a watch before so you don't want to know how that went and you all know how to do it better than me so i'll spare you that part. Once I had it all apart I got started.
Dial: I used a water wash of brown , green , and yellow to start adding some aging/color. Once it was dry I added some texture by flicking clear laquer off of a toothbrush. I then touched up the lume , but not too much. Vintage lume shouldn't be perfect ( good thing since i've never done it before ). Surprisingly has a pretty good lume to it now
Hands: I touched up the hands with some yellow and brown paint and then dryed it with a blowtorch... yea.... i really did. Came out pretty good I think.
dial pics:

-

Bezel insert: Chiped out the pearl to simulate years of wear and not replacing it. sanded and filed it untill I was happy, easy as that.
Case: now , i noticed all of you say that you "soften" the case... .yea... I didn't do that. I beat the hell out of it. Filed it, sanded it, repolished it, and beat on it some more. These things are very tough! The silix case is predrilled and I do plan on makeing the holes bigger but that will be a project for another day (not to mention a reason to buy a drill press).
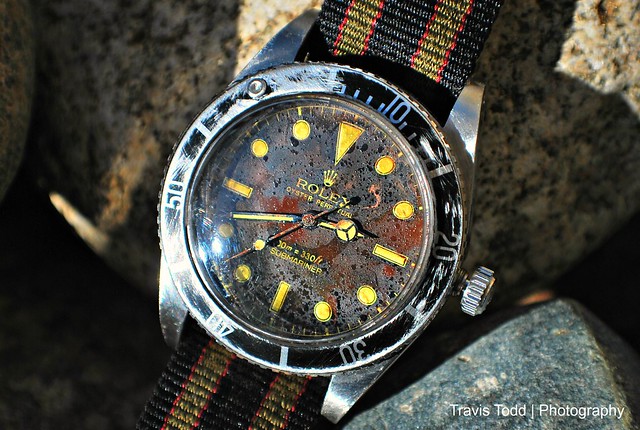
Ok so here is the final product! I think it came out pretty well for my first shot. I will definetly be doing some more of these. Maybe a Pam? Tell me what you think, honestly. It was hard to get the colors of the dial since they change color depending on angle. But I got it back together and it freaking WORKS , im more excited about that") ...
...
-

-

Picked up a few things to get started...
-Silix donor watch here http://www.silix-prime.co/index.php?main_page=product_info&cPath=116_205_214&products_id=2103
-Real bond strap (not the nato most people call a "bond)
-vintage lume
-paint
-brushes
-laquer
-files
-oiler
-scotchbright
-chissel
-duct tape
-metal polish
-gloves
I do have some artistic background so that helps... lets get started.
I didn't take a lot of pictures durring the process because i was focused and scared at the same time so , sorry. I have never dissassembled a watch before so you don't want to know how that went and you all know how to do it better than me so i'll spare you that part. Once I had it all apart I got started.
Dial: I used a water wash of brown , green , and yellow to start adding some aging/color. Once it was dry I added some texture by flicking clear laquer off of a toothbrush. I then touched up the lume , but not too much. Vintage lume shouldn't be perfect ( good thing since i've never done it before ). Surprisingly has a pretty good lume to it now
Hands: I touched up the hands with some yellow and brown paint and then dryed it with a blowtorch... yea.... i really did. Came out pretty good I think.
dial pics:
-
Bezel insert: Chiped out the pearl to simulate years of wear and not replacing it. sanded and filed it untill I was happy, easy as that.
Case: now , i noticed all of you say that you "soften" the case... .yea... I didn't do that. I beat the hell out of it. Filed it, sanded it, repolished it, and beat on it some more. These things are very tough! The silix case is predrilled and I do plan on makeing the holes bigger but that will be a project for another day (not to mention a reason to buy a drill press).
Ok so here is the final product! I think it came out pretty well for my first shot. I will definetly be doing some more of these. Maybe a Pam? Tell me what you think, honestly. It was hard to get the colors of the dial since they change color depending on angle. But I got it back together and it freaking WORKS , im more excited about that
...
-
-


