It's inevitable that when I get a new watch I start taking things apart. Some times with regret but I honestly just HAVE TO mod stuff. I for one believe that many reps are capable of serving the same function as their genuine counter parts. So I built a testing rig that allows me to test up to 20 ATM (200 meters or 660 feet). I love the idea of having a dive watch I can actually dive in and it's a bonus when your replica can test to the depth the genuine will go.
Tonight I was rebuilding a Ceramic Sub and lubing it and retesting it for water resistance when curiosity compelled me to pull out the Ferrari California Flyback Chrono and lube the gaskets and test it too. I opened it up and lubed the case back, then the crown gasket, but when it came to the pushers I had no clue how to get them out. (Honestly I didnt even know whether or not they had gaskets.)
I did the traditional method of testing first by pumping the chamber to 10 ATM (the genuine FER00030 is rated at 100 Meters) and let the watch sit for five minutes before submerging it.
For those who don't know how testing is done, the cylinder is filled half way with water. The watch hangs above the water and the chamber is closed and then pressure is applied via a pump. The theory is that if the watch has any leaks that air pressure will force more air into the watch case raising the pressure inside the watch. This is why it is necessary to wait about 5 minutes to allow time for the watch to pressurize. Once the time has elapsed, you then push a rod that lowers the watch into the water submerging it. You then slowly release the pressure which reduces pressure in the chamber. If the watch has a leak then air from inside the watch will flow out and you will see a little stream of bubbles indicating the location of the leak. Since the pressure is greater in the watch than in the chamber there is no danger of water flowing back into the watch, so long as you pull the watch out of the water before the pressure equalizes (ie you get to zero on the pressure gauge).
The only bubbles I saw came from primarily the pushers but I have learned over time that this can be misleading. One downside to the traditional method of testing is that when you pressurize the air in the chamber it pressurizes all the air, the air under the bezel, in the links, inside the spring bars, etc. So when pressure is released, bubbles naturally come from all these areas. A true leak though is indicated by a steady stream of bubble, in most cases, so it can get a little confusing.
I have found out through trial and error that there seems a better more reliable way to test the watch case, and this involves removing the movement, sealing it up, and then dunking it in the water and raising the pressure. I did this once with a watch that had a leak at the crystal gasket. At 3 ATM I could see water flooding into the watch case with every stroke of the pump! So it would seem a valid way to test your watch case to depth and I now use this method along with the original method to test every watch. I test all my watches to depth first looking for obvious leaks without the movement and if water stays out as I raise pressure I take it up to the max, then let it sit submerged for about 30 minutes. I use a mag-light to look for water in the case while it is submerged and if after 30 minutes it is dry, I release the pressure, remove it, install the movement and then close it back up and test it the traditional way. The last test is to ensure you don't have a pinched gasket or debris or some other issue that will compromise water resistance.
So, for those who are curious, yes this watch tested to 100 meters, the same depth the genuine watch is rated to. And here is how you seal up a Ferrari Chrono (or any Pam Chrono I would assume). I will include some California watch porn at the end.
First remove the straps and then the case back. You will need a Panerai 45mm case back tool or a screw ball. Amazingly the screw ball works like a champ on this case, $8 vs $40 for a case back die. Whodathunkit.
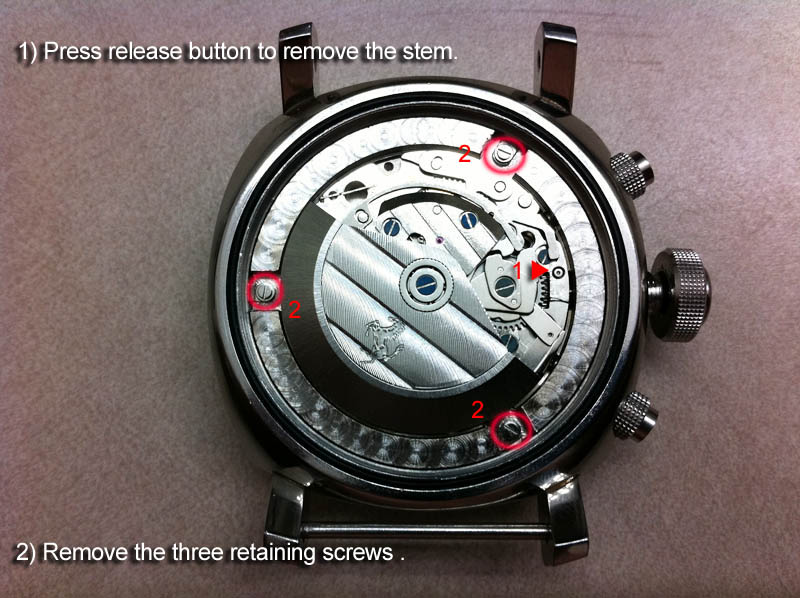
Once the case back is off, release the stem and pull the crown out. Then remove the three screws and retainers to remove the movement from the case. You can just flip the case over keeping a couple fingers presed to the back of the movement, then lift the case off and the movement will be in your hand. Place movent in a safe place.
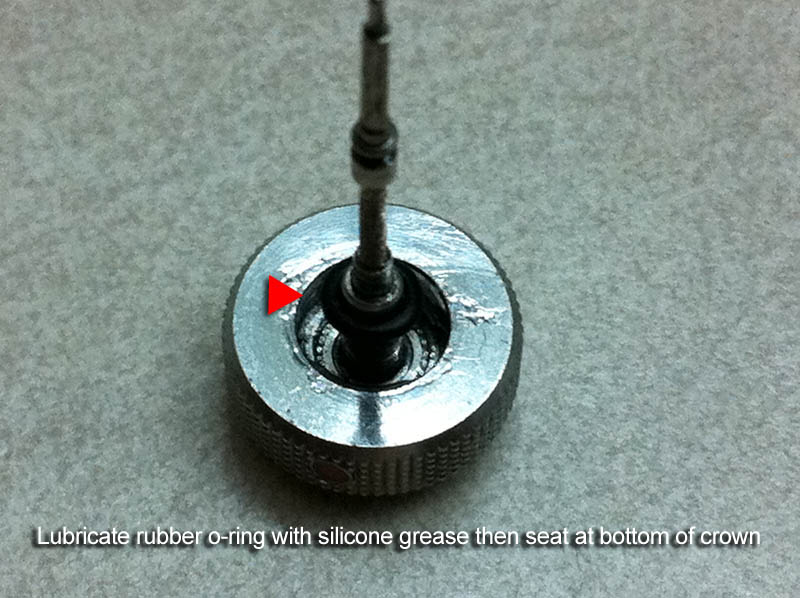
I started with the crown: there is a small rubber o-ring located in the crown, I pulled it up a bit on the shaft so I could lube both sides of it, I also lubed inside the crown to cover the threads, then seat the o-ring back down to the bottom of the crown. I use a very small artist brush to apply the silcone grease.
In this picture the case back gasket is lubed already. You want to lube the gasket on both sides or apply grease to the channel, then insert the gasket and spread some silicone on to the top of the gasket with a brush.
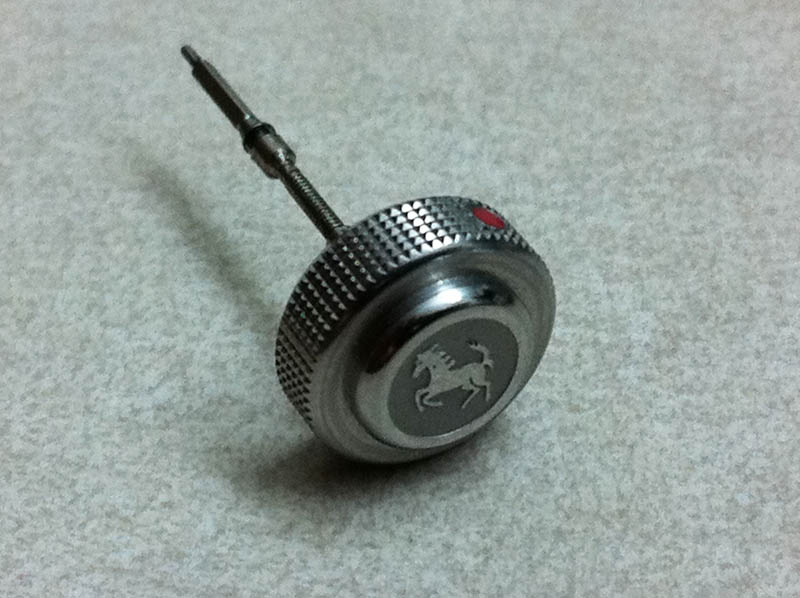
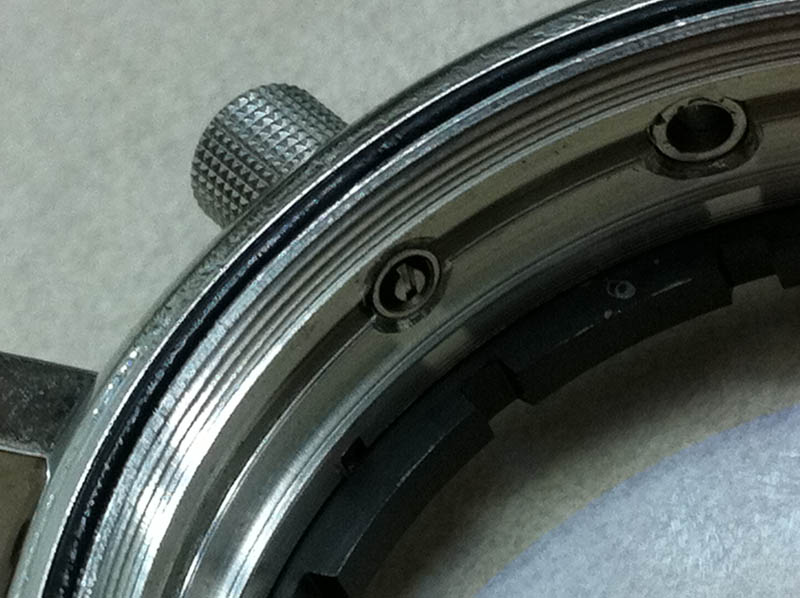
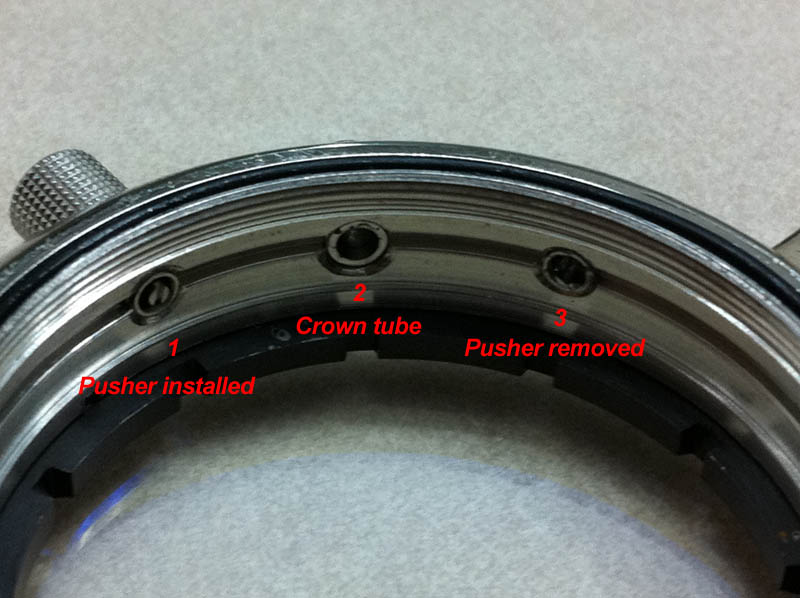
Crown tube is to the right and an assembled pusher is on the left. The crown tube also has a gasket inside the outer end of the tube. Lube this gasket as well.
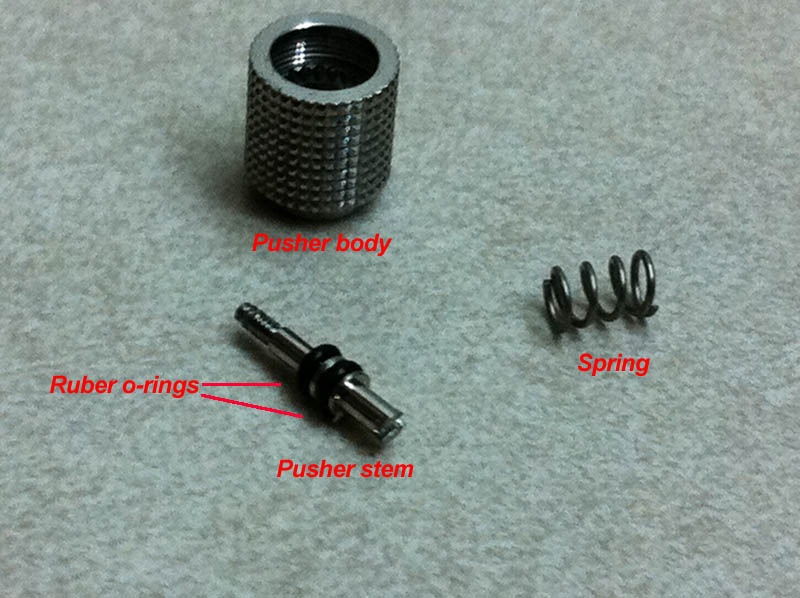
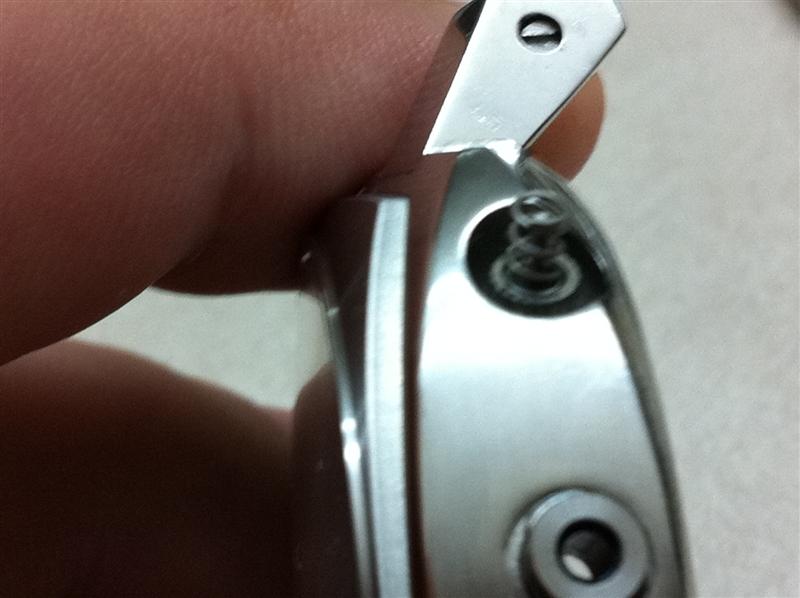
You will need a screw driver to unscrew the pusher shaft (stem), it needs to be turned counter clockwise. Use two fingers on the outside of the pusher to hold it while you unscrew the stem. There is a small spring inside the pusher cap, so becareful not to drop it.
Pusher after removal. Note the two little orings on the pusher stem. You will want to lubricate these, and it wont hurt to have some extra grease between the gaskets as an aditional barrier.
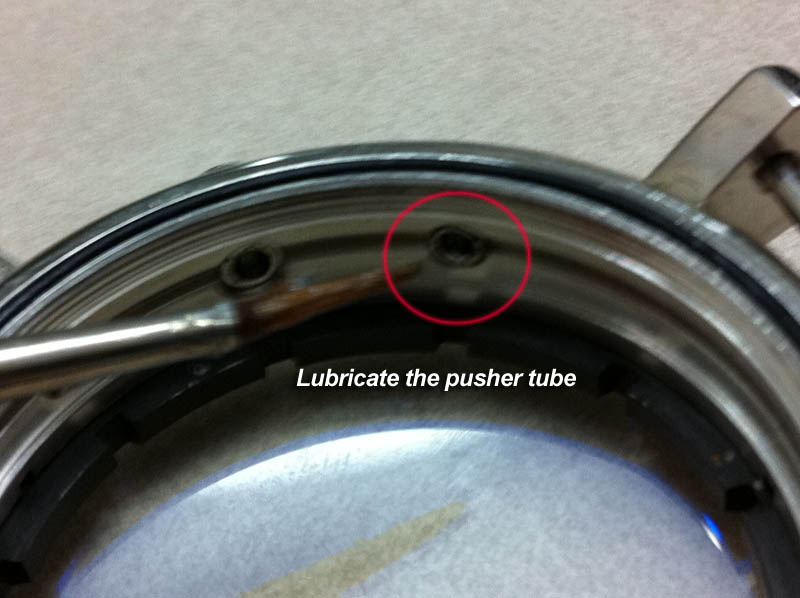
Next lubricate the stem tube for the pusher.
Reinsert the lubed pusher stem. Sorry about the crappy image, these were all taken with my iPhone.
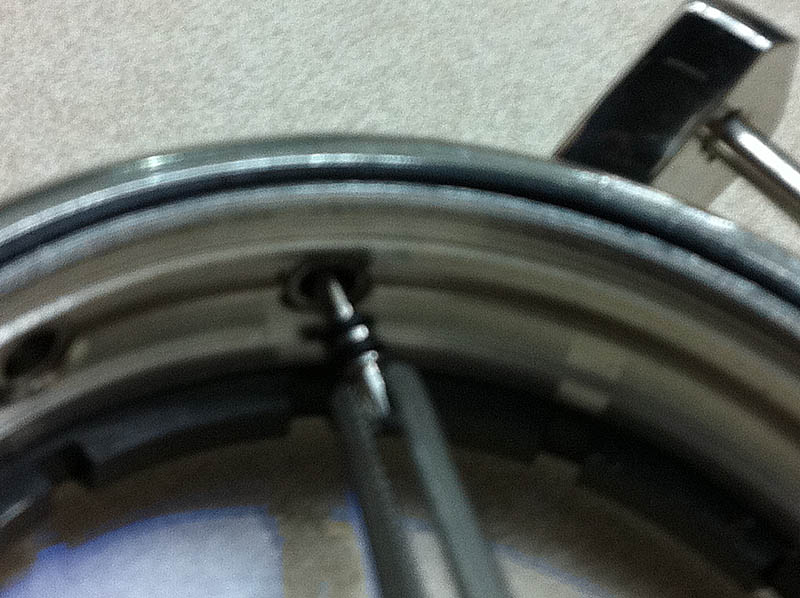
Pusher stem inserted.
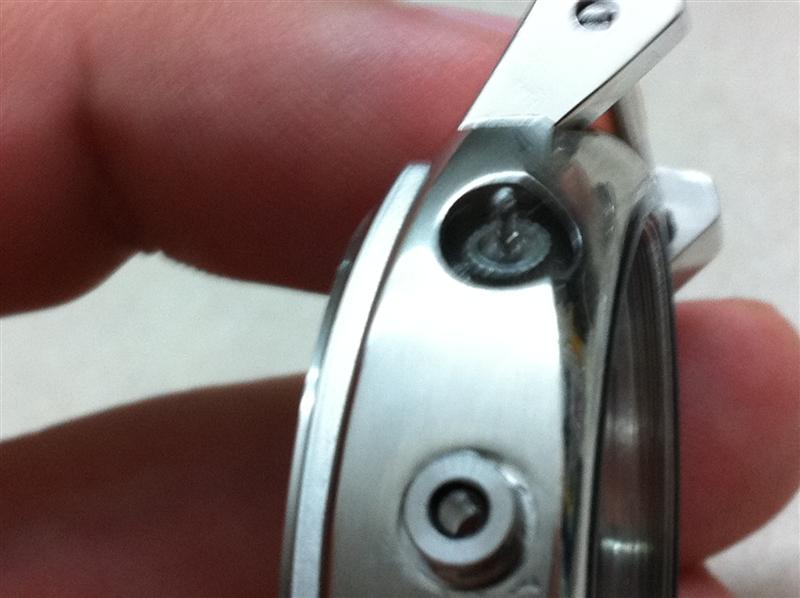
(Note that you can see the crown tube gasket inside and at the end of the tube below. As mentioed above you will want to grease this one too).
Install spring onto outside of pusher stem.
Now palce the pusher cap onto the end of the stem and hold in place wile you screw the stem clockwise from inside the case. Once tight you can do the other side.
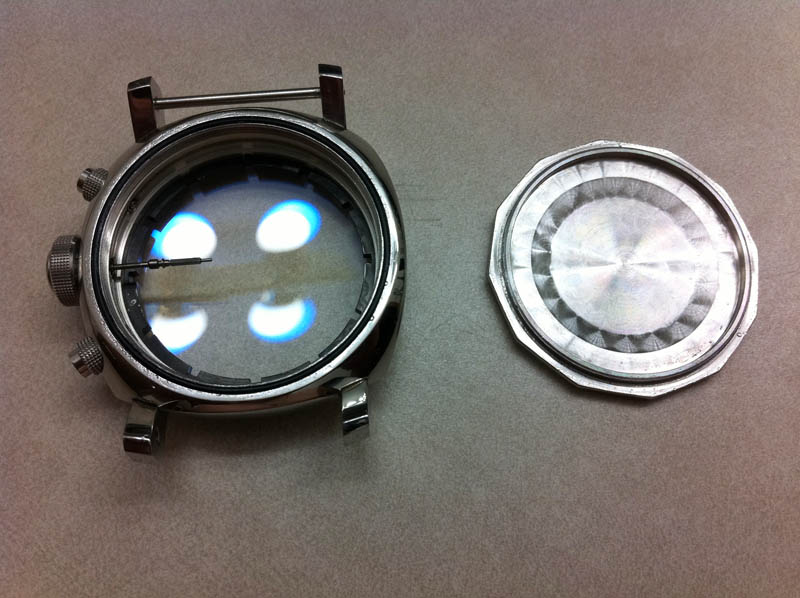
Case with pushers installed, and crown stem installed. All gaskets lubed, and ready to close up and test.
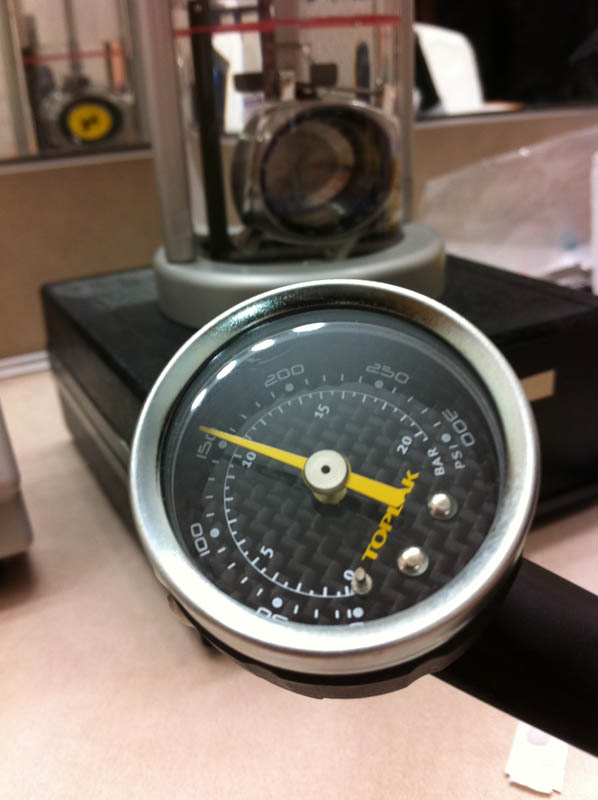
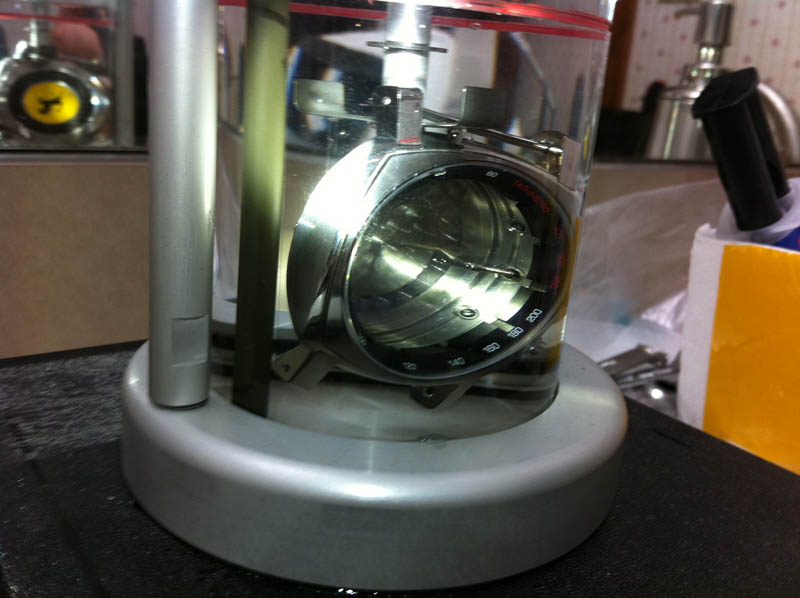
Case submerged and chamber pressurized to 10 ATM.
The beauty of testing this way is that it is very easy to see if water is entering the case and from where (pushers or crown or case back or crystal). Another bonus is you will know at what pressure a leak developes if water does start to enter the case.
After thirty minutes, still dry as a bone. Sweet!
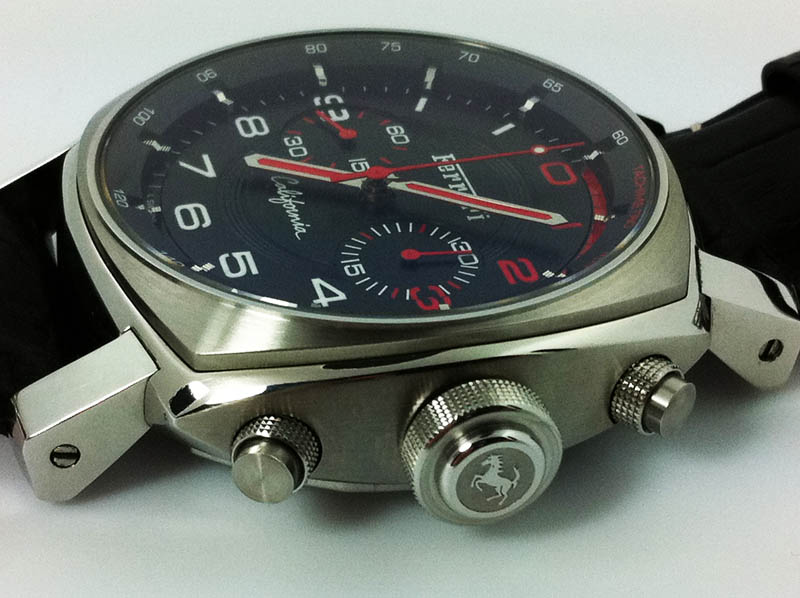
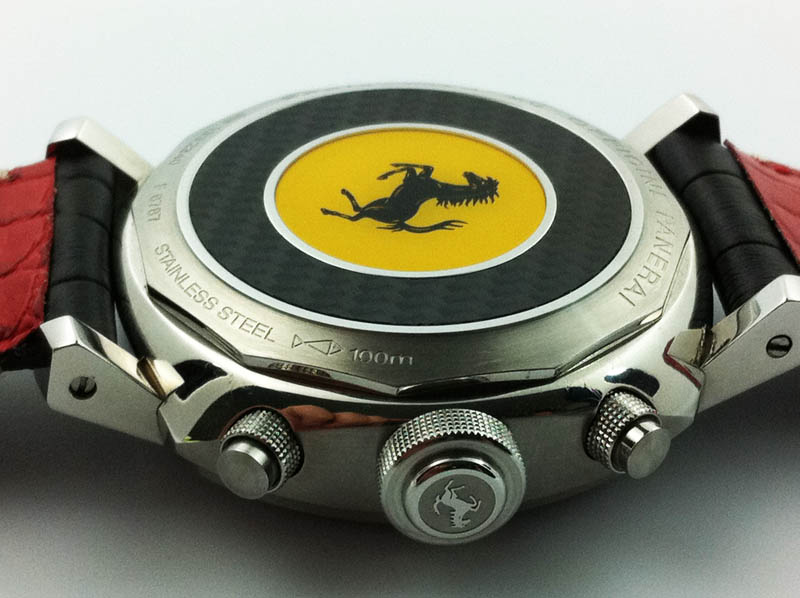
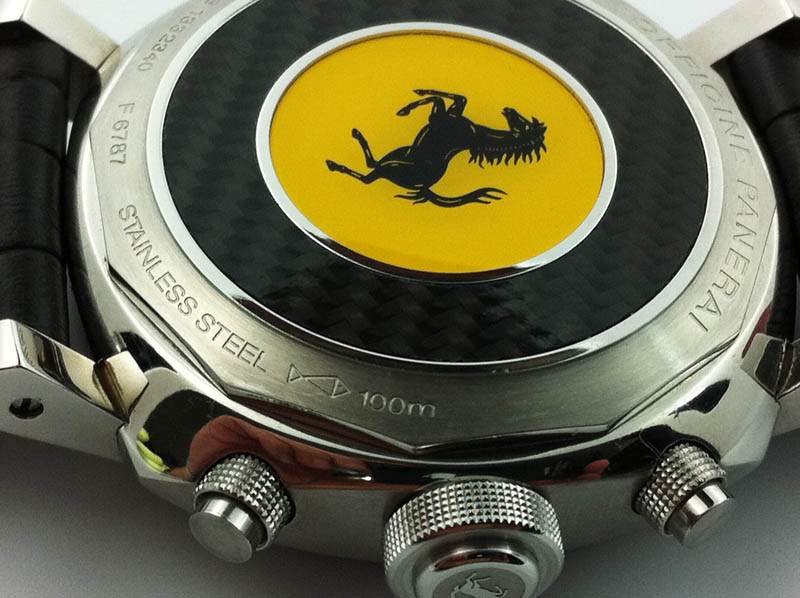
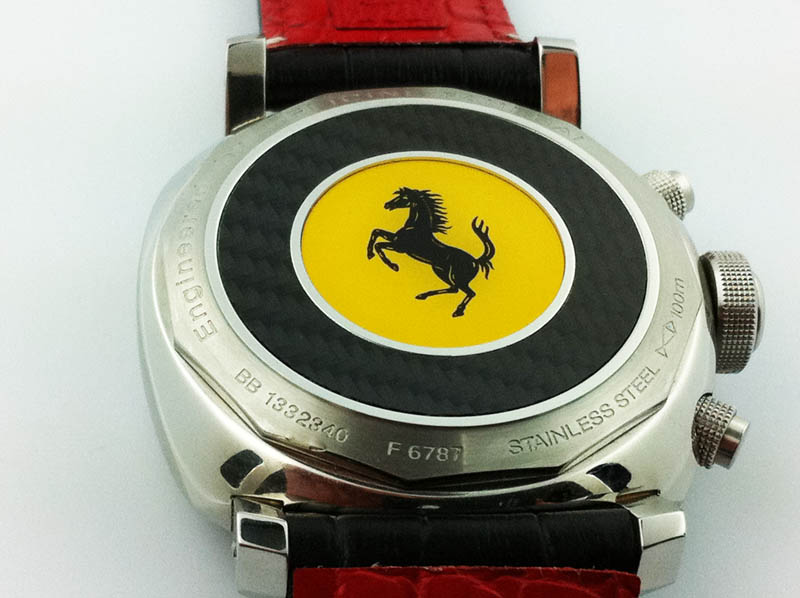
And now for some porn.
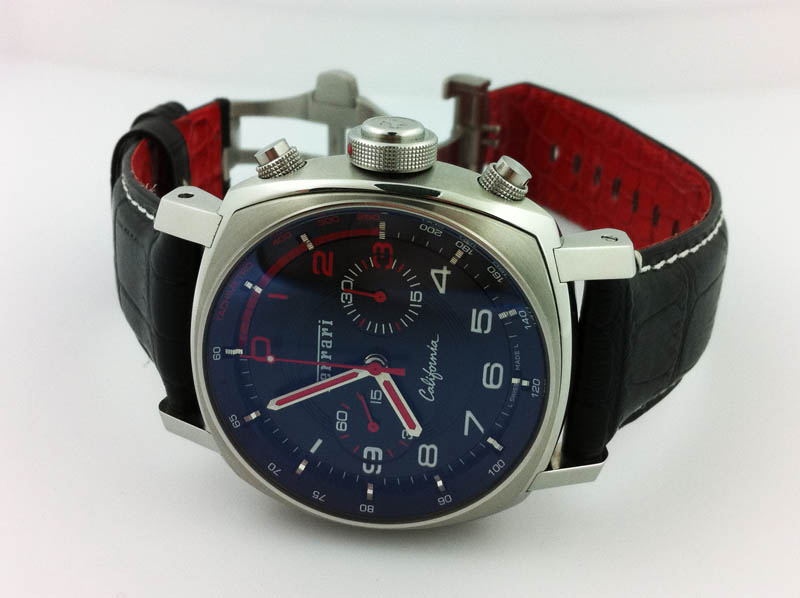

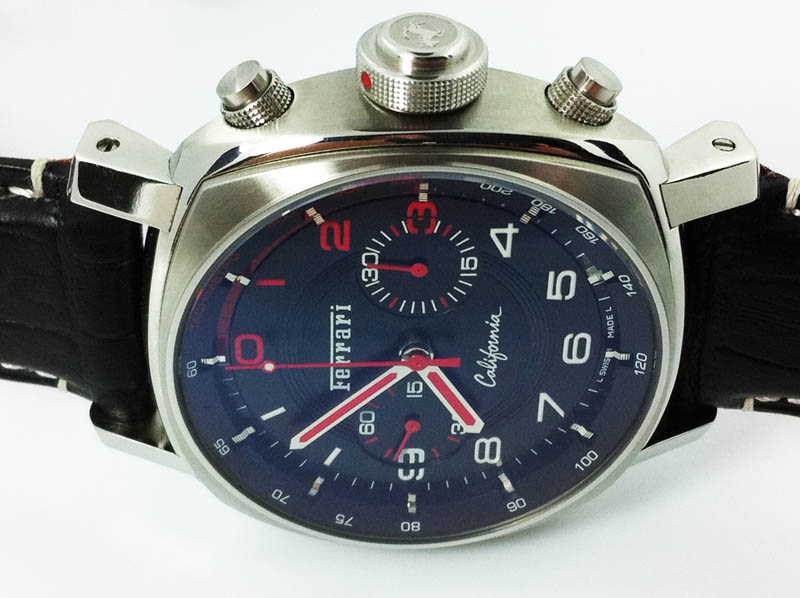
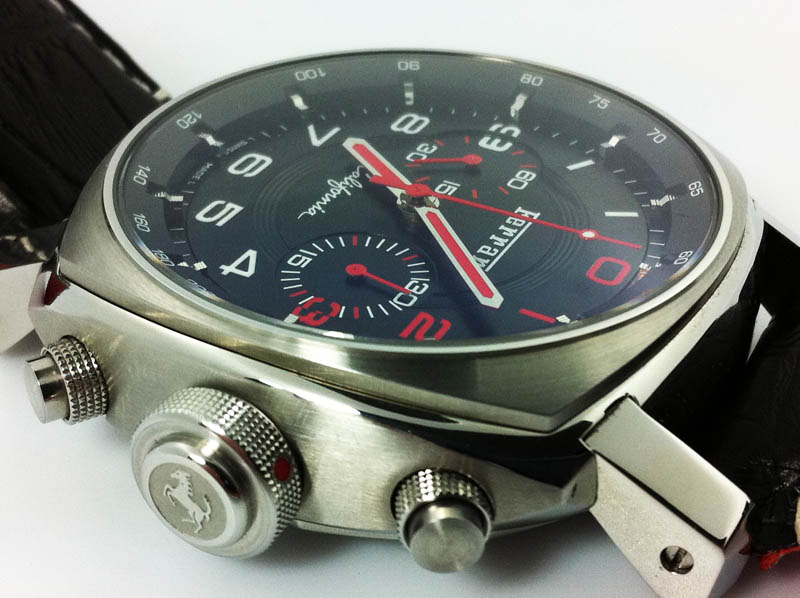
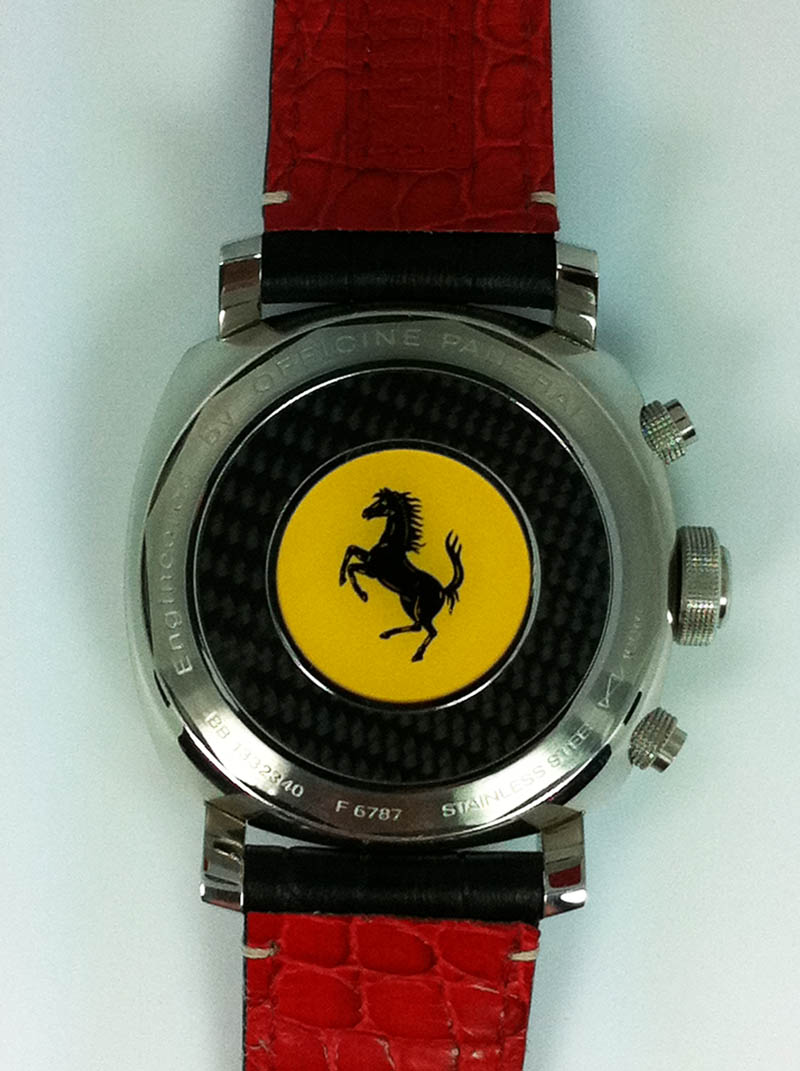

Thanks to Mark and Jamie from Timesshop for the killer watch.
FER00030
Sapphire Crystal
A7750 Chrono Movement
Tonight I was rebuilding a Ceramic Sub and lubing it and retesting it for water resistance when curiosity compelled me to pull out the Ferrari California Flyback Chrono and lube the gaskets and test it too. I opened it up and lubed the case back, then the crown gasket, but when it came to the pushers I had no clue how to get them out. (Honestly I didnt even know whether or not they had gaskets.)
I did the traditional method of testing first by pumping the chamber to 10 ATM (the genuine FER00030 is rated at 100 Meters) and let the watch sit for five minutes before submerging it.
For those who don't know how testing is done, the cylinder is filled half way with water. The watch hangs above the water and the chamber is closed and then pressure is applied via a pump. The theory is that if the watch has any leaks that air pressure will force more air into the watch case raising the pressure inside the watch. This is why it is necessary to wait about 5 minutes to allow time for the watch to pressurize. Once the time has elapsed, you then push a rod that lowers the watch into the water submerging it. You then slowly release the pressure which reduces pressure in the chamber. If the watch has a leak then air from inside the watch will flow out and you will see a little stream of bubbles indicating the location of the leak. Since the pressure is greater in the watch than in the chamber there is no danger of water flowing back into the watch, so long as you pull the watch out of the water before the pressure equalizes (ie you get to zero on the pressure gauge).
The only bubbles I saw came from primarily the pushers but I have learned over time that this can be misleading. One downside to the traditional method of testing is that when you pressurize the air in the chamber it pressurizes all the air, the air under the bezel, in the links, inside the spring bars, etc. So when pressure is released, bubbles naturally come from all these areas. A true leak though is indicated by a steady stream of bubble, in most cases, so it can get a little confusing.
I have found out through trial and error that there seems a better more reliable way to test the watch case, and this involves removing the movement, sealing it up, and then dunking it in the water and raising the pressure. I did this once with a watch that had a leak at the crystal gasket. At 3 ATM I could see water flooding into the watch case with every stroke of the pump! So it would seem a valid way to test your watch case to depth and I now use this method along with the original method to test every watch. I test all my watches to depth first looking for obvious leaks without the movement and if water stays out as I raise pressure I take it up to the max, then let it sit submerged for about 30 minutes. I use a mag-light to look for water in the case while it is submerged and if after 30 minutes it is dry, I release the pressure, remove it, install the movement and then close it back up and test it the traditional way. The last test is to ensure you don't have a pinched gasket or debris or some other issue that will compromise water resistance.
So, for those who are curious, yes this watch tested to 100 meters, the same depth the genuine watch is rated to. And here is how you seal up a Ferrari Chrono (or any Pam Chrono I would assume). I will include some California watch porn at the end.
First remove the straps and then the case back. You will need a Panerai 45mm case back tool or a screw ball. Amazingly the screw ball works like a champ on this case, $8 vs $40 for a case back die. Whodathunkit.
Once the case back is off, release the stem and pull the crown out. Then remove the three screws and retainers to remove the movement from the case. You can just flip the case over keeping a couple fingers presed to the back of the movement, then lift the case off and the movement will be in your hand. Place movent in a safe place.
I started with the crown: there is a small rubber o-ring located in the crown, I pulled it up a bit on the shaft so I could lube both sides of it, I also lubed inside the crown to cover the threads, then seat the o-ring back down to the bottom of the crown. I use a very small artist brush to apply the silcone grease.
In this picture the case back gasket is lubed already. You want to lube the gasket on both sides or apply grease to the channel, then insert the gasket and spread some silicone on to the top of the gasket with a brush.
Crown tube is to the right and an assembled pusher is on the left. The crown tube also has a gasket inside the outer end of the tube. Lube this gasket as well.
You will need a screw driver to unscrew the pusher shaft (stem), it needs to be turned counter clockwise. Use two fingers on the outside of the pusher to hold it while you unscrew the stem. There is a small spring inside the pusher cap, so becareful not to drop it.
Pusher after removal. Note the two little orings on the pusher stem. You will want to lubricate these, and it wont hurt to have some extra grease between the gaskets as an aditional barrier.
Next lubricate the stem tube for the pusher.
Reinsert the lubed pusher stem. Sorry about the crappy image, these were all taken with my iPhone.
Pusher stem inserted.
(Note that you can see the crown tube gasket inside and at the end of the tube below. As mentioed above you will want to grease this one too).
Install spring onto outside of pusher stem.
Now palce the pusher cap onto the end of the stem and hold in place wile you screw the stem clockwise from inside the case. Once tight you can do the other side.
Case with pushers installed, and crown stem installed. All gaskets lubed, and ready to close up and test.
Case submerged and chamber pressurized to 10 ATM.
The beauty of testing this way is that it is very easy to see if water is entering the case and from where (pushers or crown or case back or crystal). Another bonus is you will know at what pressure a leak developes if water does start to enter the case.
After thirty minutes, still dry as a bone. Sweet!
And now for some porn.
Thanks to Mark and Jamie from Timesshop for the killer watch.
FER00030
Sapphire Crystal
A7750 Chrono Movement
")