-
Tired of adverts on RWI? - Subscribe by clicking HERE and PMing Trailboss for instructions and they will magically go away!
You are using an out of date browser. It may not display this or other websites correctly.
You should upgrade or use an alternative browser.
You should upgrade or use an alternative browser.
My (Novel?) Bracelet Lubrication Method
- Thread starter bechtolb
- Start date

Great to hear it went well, and thanks for confirming no issues with including clasp. Slowly building the knowledge base!Just did my Seamaster and boy what a difference. Everything went just as described by OP. Silky smooth. I did the clasp too and it worked fine although it seems to need way more cleaning as a lot more residual grease remains.
As a bracelet-feeling-enthusiast, this is such a great thread to read!
Since I don’t have a vacuum pump and don’t intend to get one for now, I had the following idea, and I wanted to ask in this round what you think about it. I have a sous vide device for the kitchen. Of course, it won’t be able to create the same pressure as such a pump, but it might have a similar effect. What do you think?
Since I don’t have a vacuum pump and don’t intend to get one for now, I had the following idea, and I wanted to ask in this round what you think about it. I have a sous vide device for the kitchen. Of course, it won’t be able to create the same pressure as such a pump, but it might have a similar effect. What do you think?
Gear Update for anyone trying to replicate this method: @bechtolb
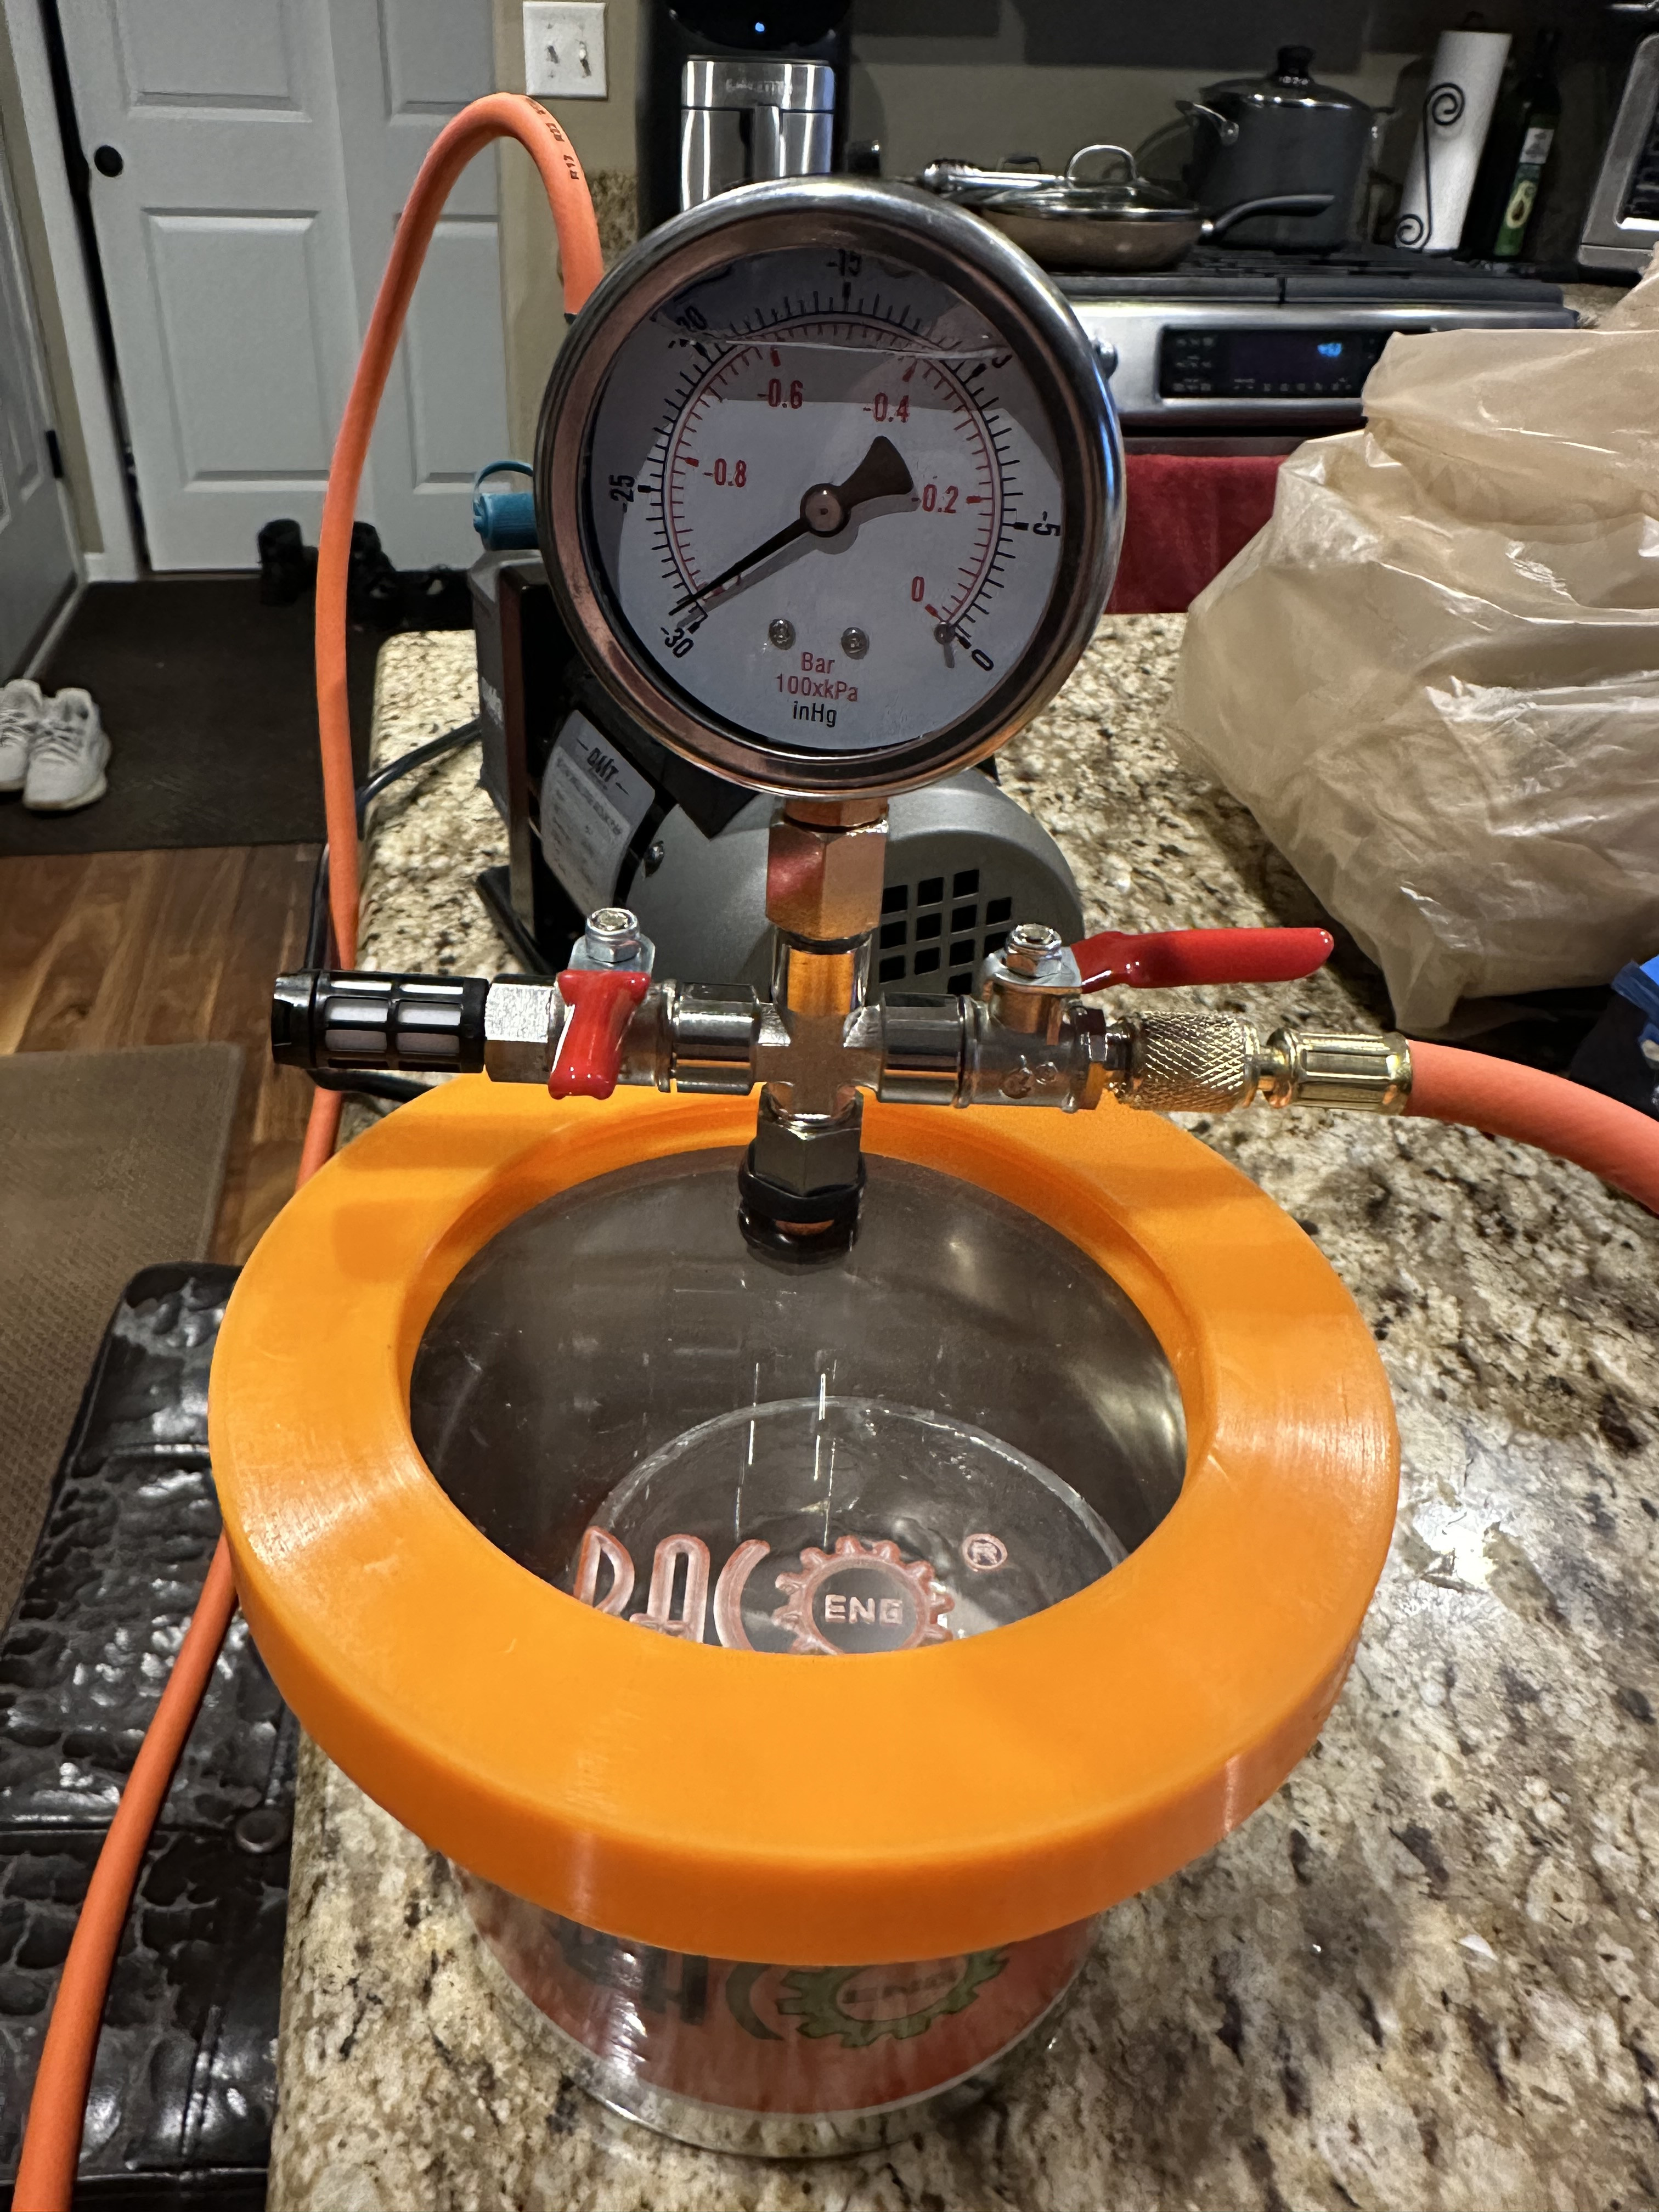
So I was doing research trying to find a solution for a vacuum chamber situation with a more compact footprint (to avoid my wife immediately throwing the equipment out of the house after one use due to clutter, of course ).
).
I ended up ordering a pretty compact self contained epoxy resin degassing chamber that claims to achieve 97% vacuum for less than 50 bucks shipped on Amazon. Looks to be about the size of an extra tall toaster oven. Normally used for artwork made using epoxy resin (as an added bonus maybe I’ll one day disassemble a rep watch into components and make wall art ).
).
I figured the viscosity of the grease/iso. alcohol mixture would be thinner than epoxy resin, so a decent bet this could achieve similar vacuum chamber % results.
For those interested, I will report back at the end of the week after I get it delivered and set up.
So I was doing research trying to find a solution for a vacuum chamber situation with a more compact footprint (to avoid my wife immediately throwing the equipment out of the house after one use due to clutter, of course
).I ended up ordering a pretty compact self contained epoxy resin degassing chamber that claims to achieve 97% vacuum for less than 50 bucks shipped on Amazon. Looks to be about the size of an extra tall toaster oven. Normally used for artwork made using epoxy resin (as an added bonus maybe I’ll one day disassemble a rep watch into components and make wall art
).I figured the viscosity of the grease/iso. alcohol mixture would be thinner than epoxy resin, so a decent bet this could achieve similar vacuum chamber % results.
For those interested, I will report back at the end of the week after I get it delivered and set up.
Last edited:
My set up which worked great two times now consists of a £1 tupperware and a hand pump that I bought to do brake flushes for £10. They are connected via a normal hose+some bluetac around the hole I drilled on the lid of the container.Gear Update for anyone trying to replicate this method: @bechtolb
So I was doing research trying to find a solution for a vacuum chamber situation with a more compact footprint (to avoid my wife immediately throwing the equipment out of the house after one use due to clutter, of course
I ended up ordering a pretty compact self contained epoxy resin degassing chamber that claims to achieve 97% vacuum for less than 50 bucks shipped on Amazon. Looks to be about the size of an extra tall toaster oven. Normally used for artwork made using epoxy resin (as an added bonus maybe I’ll one day disassemble a rep watch into components and make wall art
I figured the viscosity of the grease/iso. alcohol mixture would be thinner than epoxy resin, so a decent bet this could achieve similar vacuum chamber % results.
For those interested, I will report back at the end of the week after I get it delivered and set up.
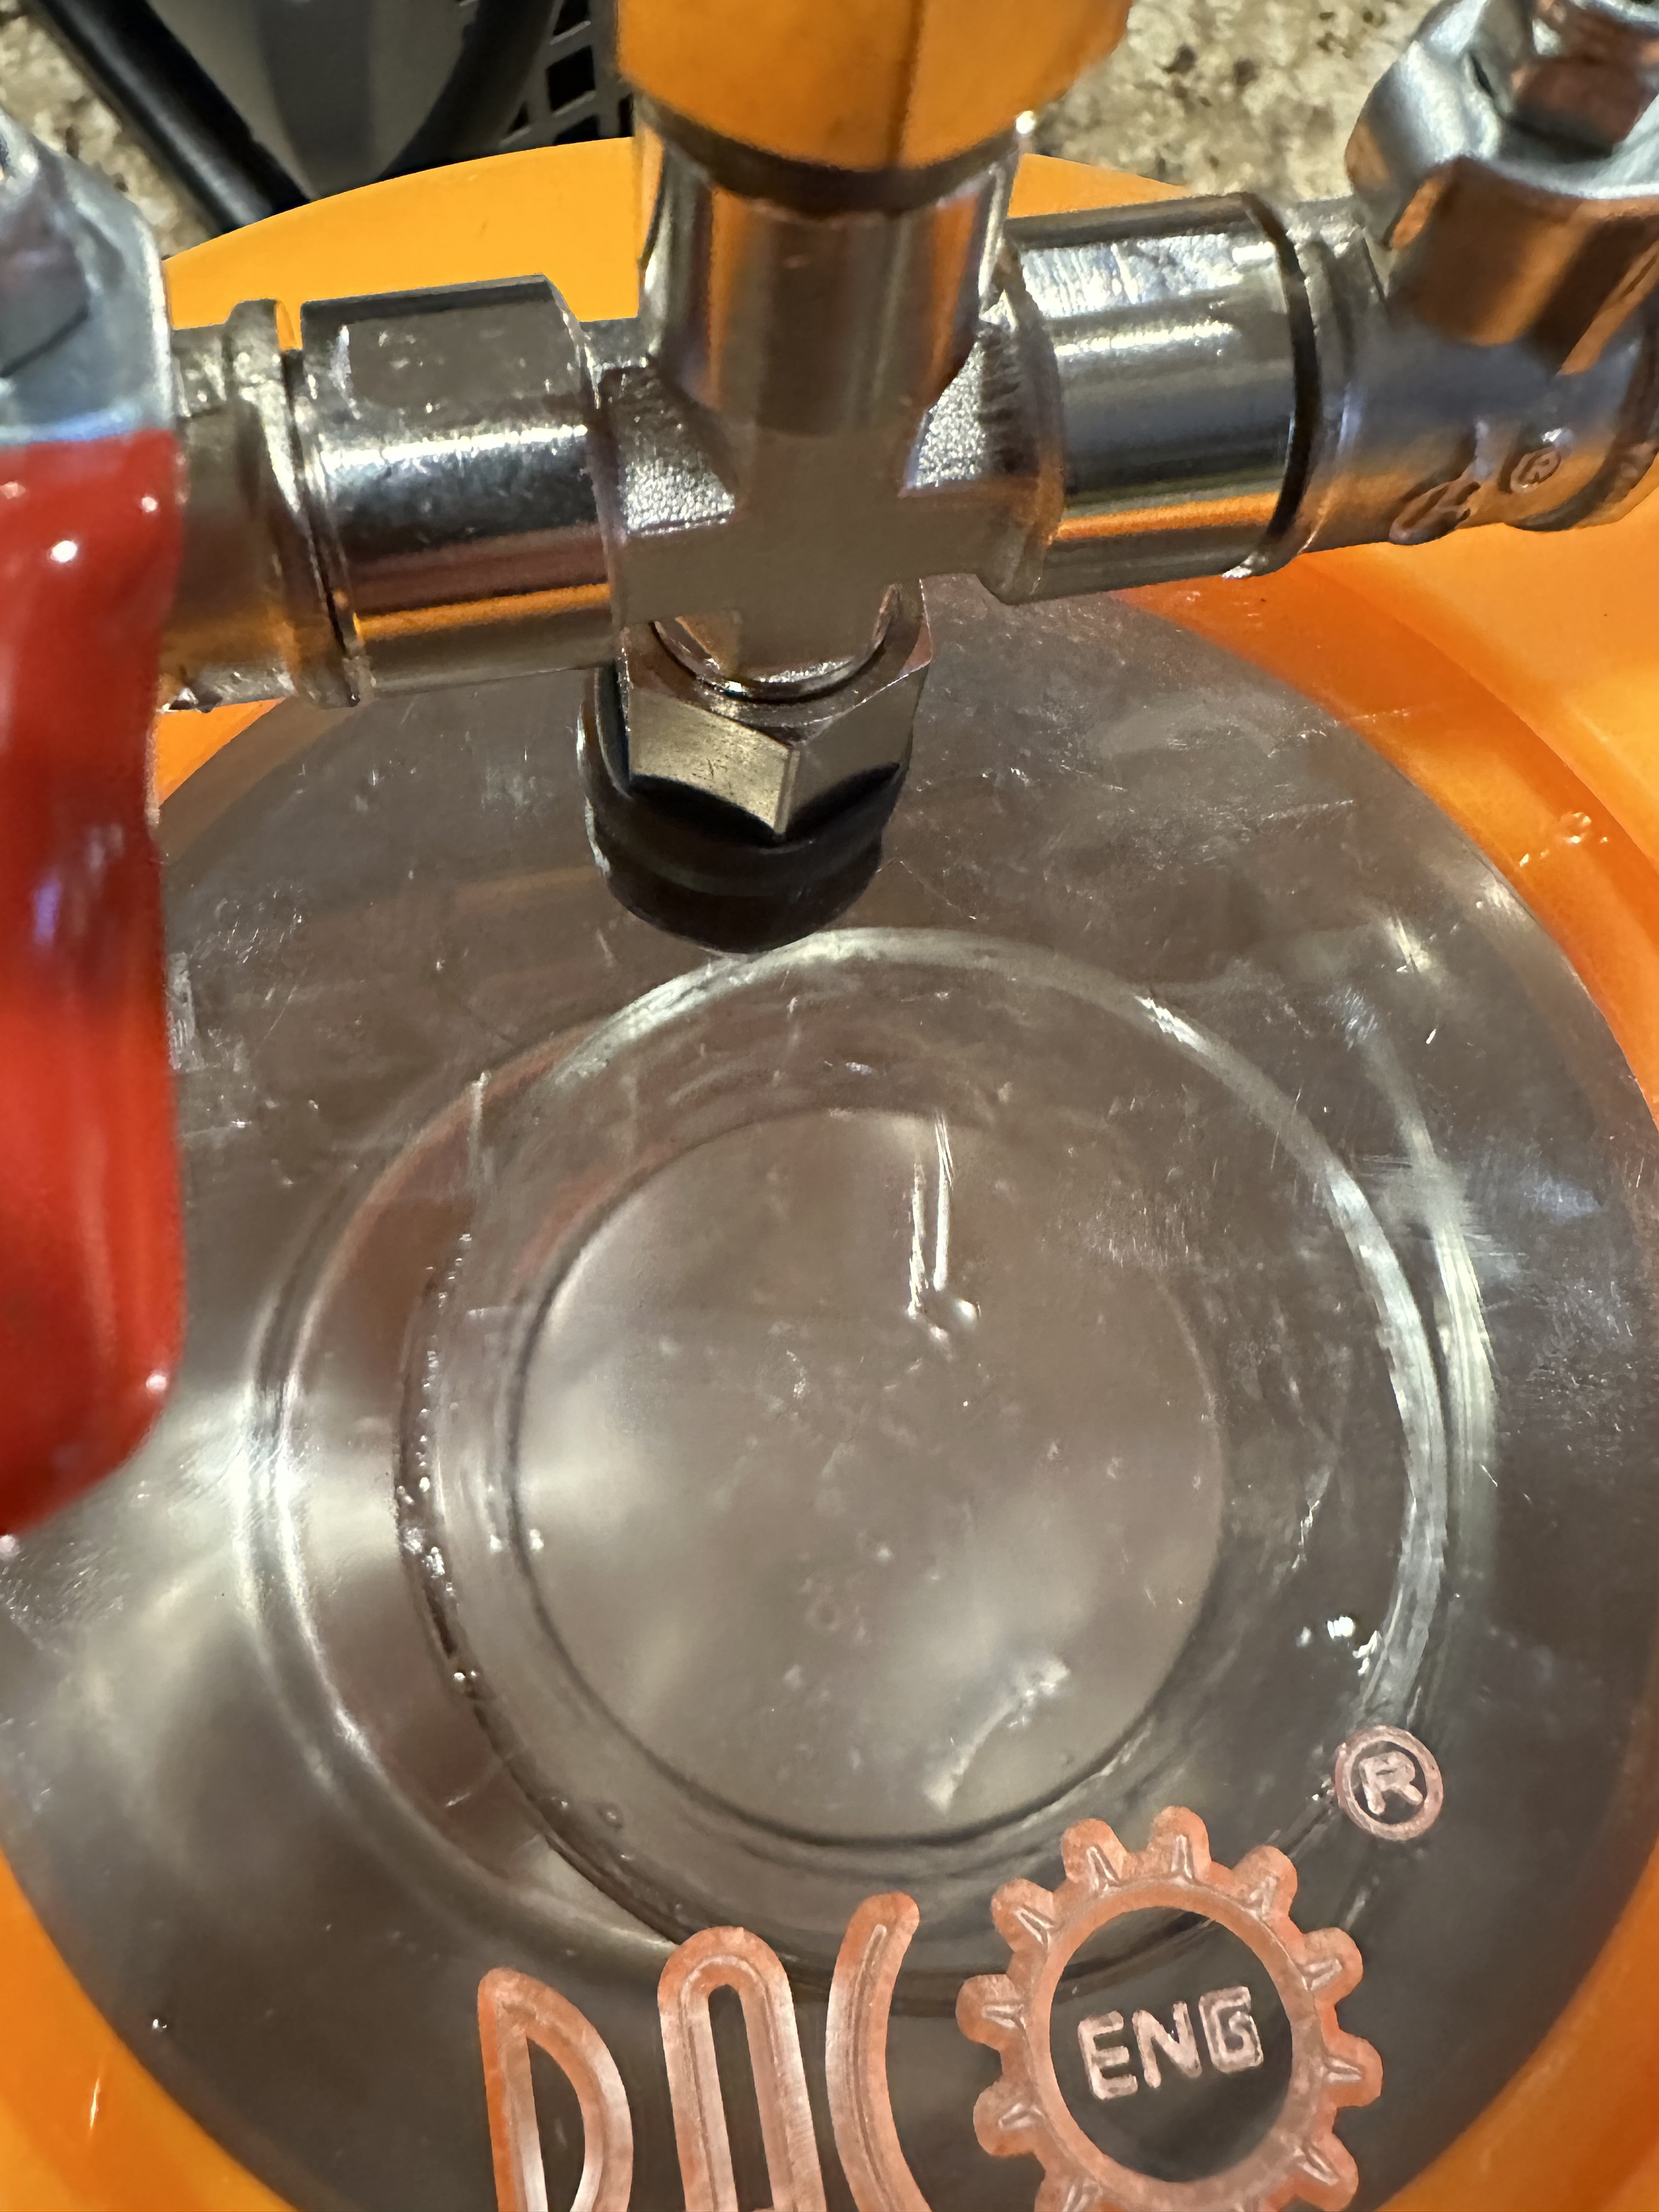
Easily fits in the drawer with the rest of the watch making equipment...
Have you tried using your food vacuum sealer yet? I was thinking about doing the same thing and would like to know if you have succeeded.Did anyone try this with a food saver type vacuum sealer? I have the hose attachment for a mason jar. I wonder if it provides enough suction?
I didnt. I ordered a vac pump that attaches to my air compressor. Just need to make the container and fittings.Have you tried using your food vacuum sealer yet? I was thinking about doing the same thing and would like to know if you have succeeded.
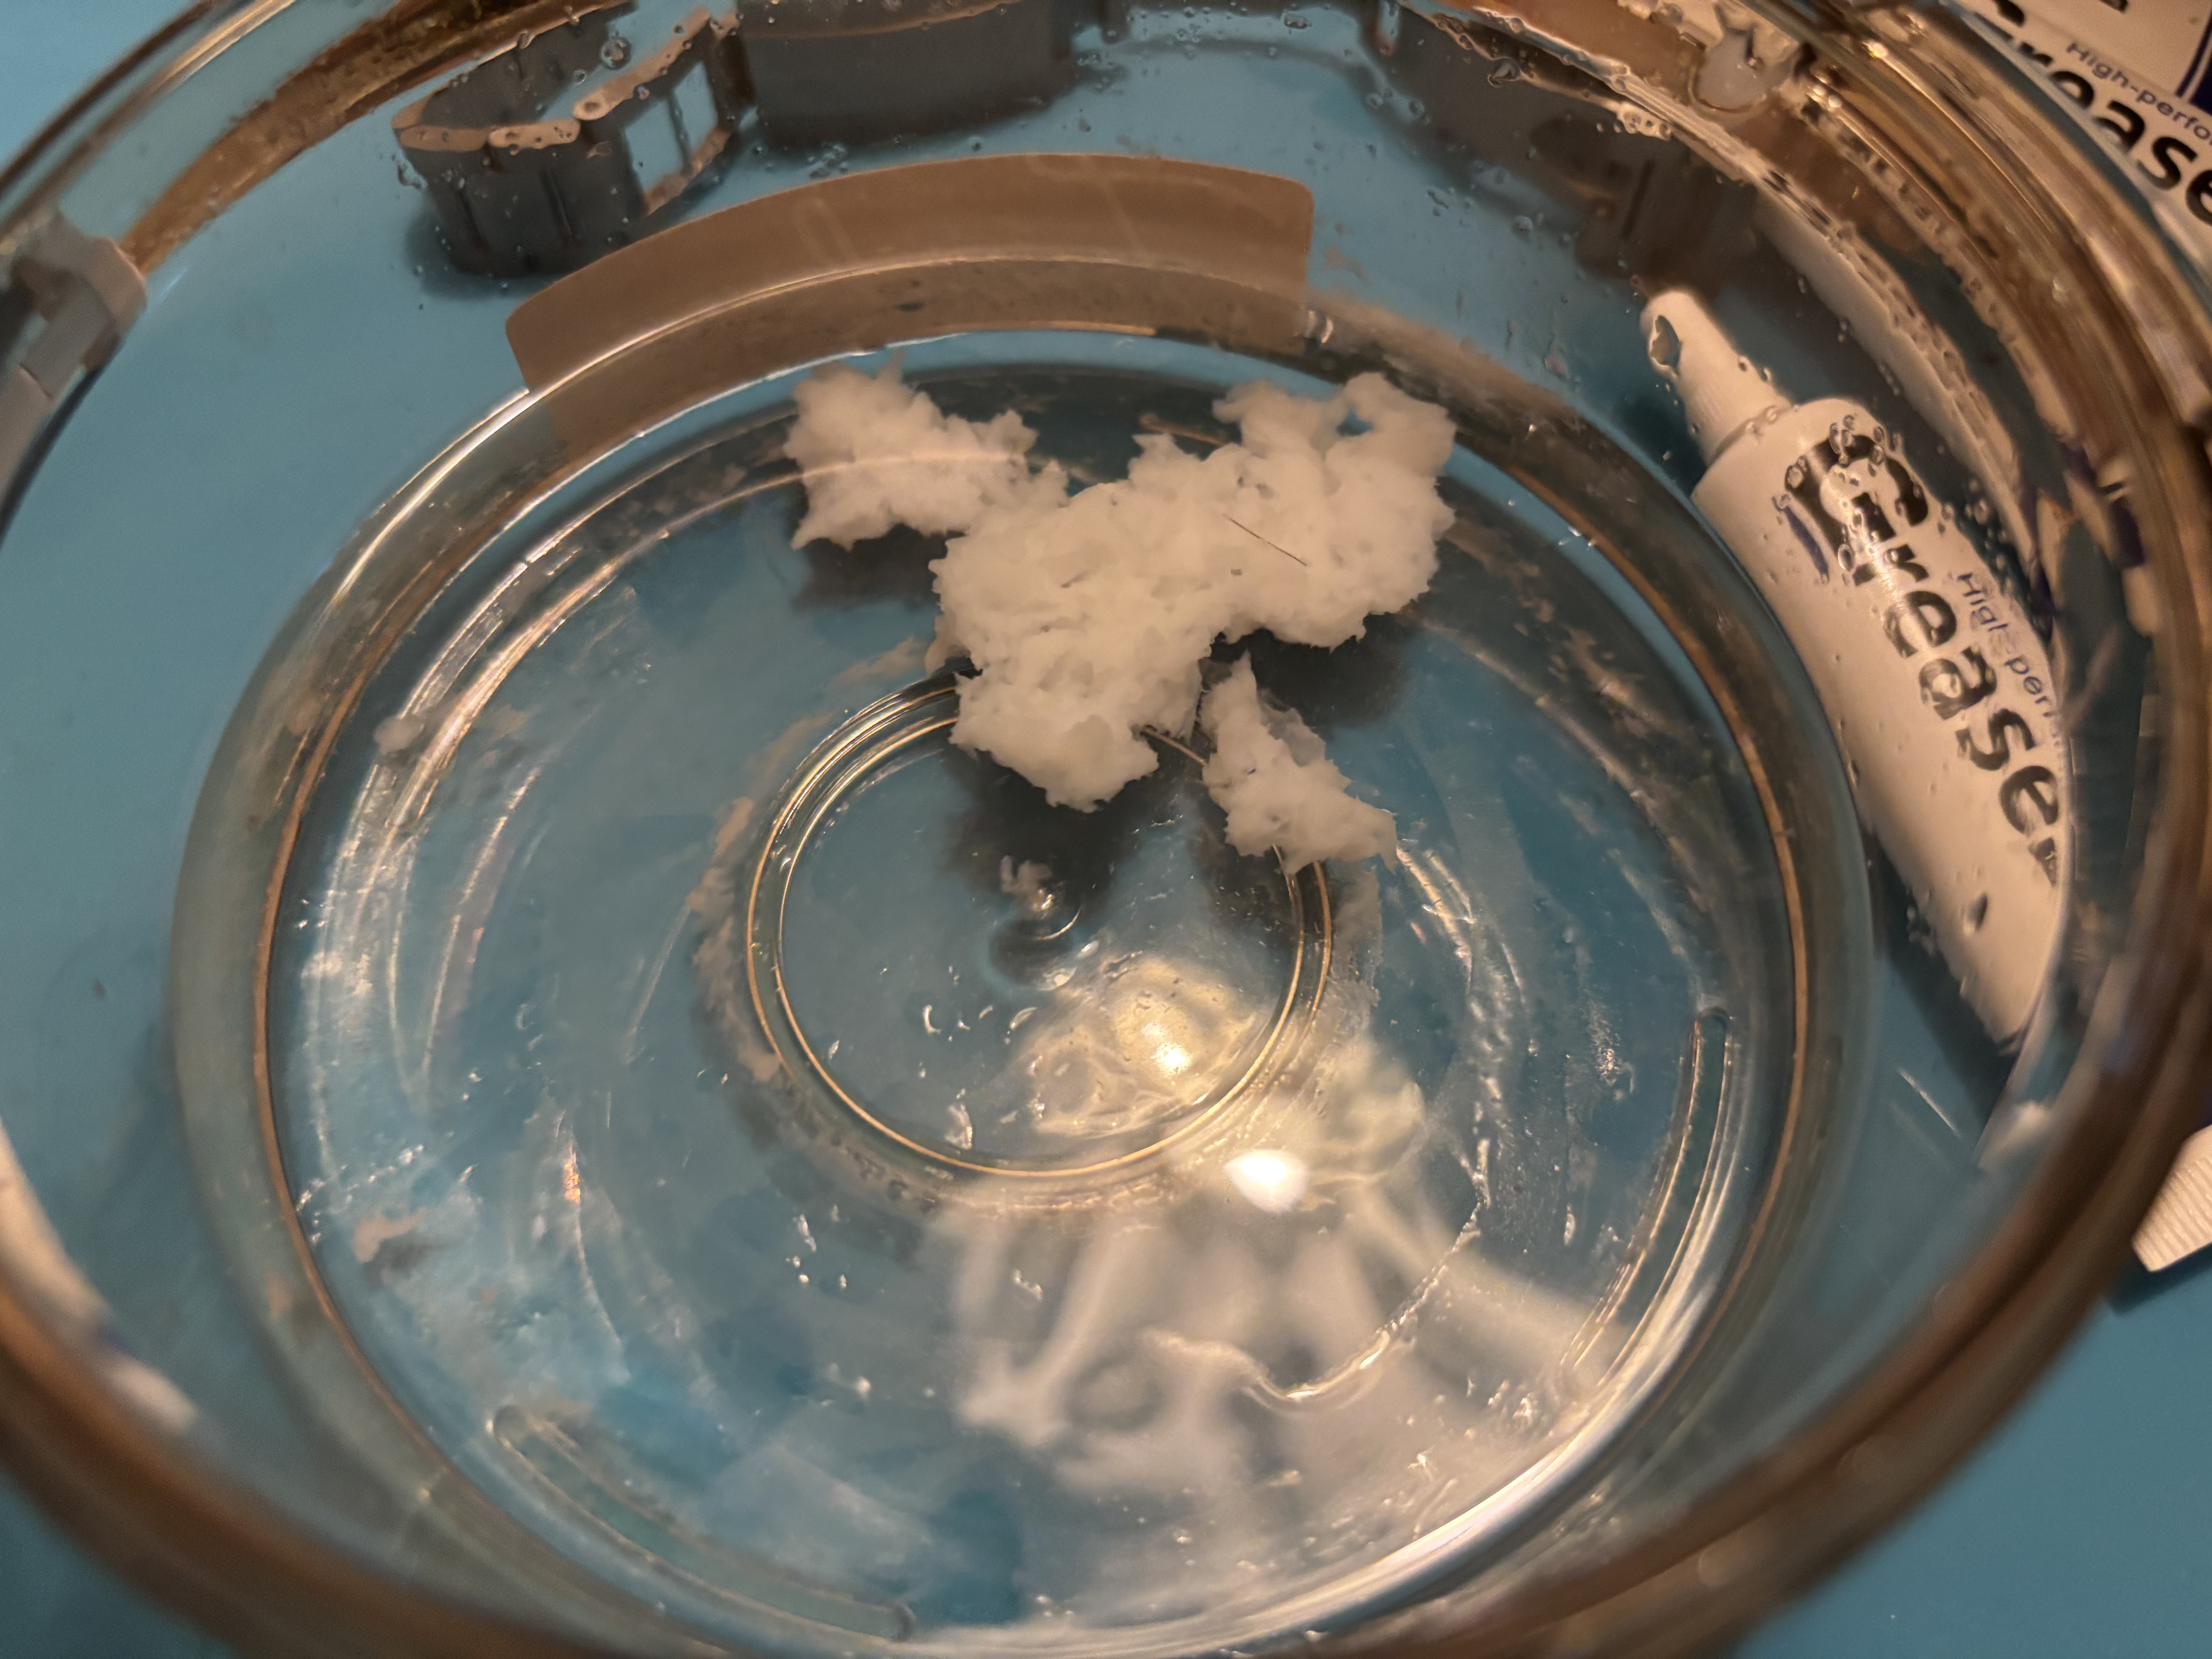
I've tried using 96% ethyl alcohol (commonly available around here to clean wounds) and what was sold to me as silicone grease.
Apparently, silicone grease and ethyl alcohol don't mix.
I've used a food vacuum box - It's small, light and very simple to use.
It takes just a few seconds to cycle pressure on and off several times, which im sure will help the mixture to penetrate all cavities.
The silicone grease and ethyl alcohol after shaking - No signs of mixing..
Am I interpreting the photo correctly that the bracelet is submerged in the alcohol, then you've added a bit of grease (the white clump)? If so, the mixture is backwards - there should be almost entirely grease, then just a tiny bit of alcohol stirred in to reduce the viscosity of the grease to something close to honey. Apologies if I've misinterpreted anything. For one tube of grease that size, I'd estimate something on the order of a teaspoon of alcohol would be needed, maybe less. That's one of the reasons smaller containers are better, since it requires less of the mixture to fully submerge the bracelet. You may still be able to submerge yours if you remove the clasp (which I recommend anyway) and lay the two halves flat on the bottom. I'll be curious to see if you're able to achieve vacuum with that setup. You'll know if you've gotten full vacuum if the mixture bubbles continuously. Hope that helps!Ill soon try with Isopropyl alcohol.
Yes, you're interpreting the photos correctly. I've added the alcohol (lots of it) first.
My idea was to cover the bracelet sideways, then add enough grease, expecting it would dissolve.
Ill try with less volume in the container, maybe with a round object there to remove volume.
Ill try with smaller proportions of alcohol.
Still, I think either the ethanol or my grease isn't the best to get thinned grease.
Great ideia of yours, and a bit of fun DIY tinkering ;(
Yeah the grease and alcohol don't really like being mixed. Usually takes me a few minutes of mixing with a popsicle stick to get them combined. Good luck, my friend!
I used this method around the time you first posted this, but I replaced the silicone grease with bike chain dry lubricant. It's already mixed with alcohol. You just pour it in, turn the chamber on, and let it do its thing.
Once done ,let the dry lubricant solidify. And then wash the outside with dish soap and get all the dry lubricant off.
In theory this should prevent dust or grime sticking to the dry lubricant. White lightning is the brand I use
Thank you, btw!
Once done ,let the dry lubricant solidify. And then wash the outside with dish soap and get all the dry lubricant off.
In theory this should prevent dust or grime sticking to the dry lubricant. White lightning is the brand I use
Thank you, btw!
Very interesting! Thanks for sharing. I will have to give that a shot and compare the results to the grease. Did you find that it made an appreciable difference in the feel of the bracelet?I used this method around the time you first posted this, but I replaced the silicone grease with bike chain dry lubricant. It's already mixed with alcohol. You just pour it in, turn the chamber on, and let it do its thing.
Once done ,let the dry lubricant solidify. And then wash the outside with dish soap and get all the dry lubricant off.
In theory this should prevent dust or grime sticking to the dry lubricant. White lightning is the brand I use
Thank you, btw!
Yes please keep refining this forever, I literally gasped out loud like 5 times reading this thread! This is so weird and cool and creative and exciting. Can’t wait to try it, think I’ll try my food saver and see if it works but I’ll have to buy an ultrasonic cleaner first. Thank you so much for sharing this!Very interesting! Thanks for sharing. I will have to give that a shot and compare the results to the grease. Did you find that it made an appreciable difference in the feel of the bracelet?
TonyMonatana44
Active Member
- 3/10/23
- 366
- 386
- 63
Great write up OP. I admire your effort and out-of-the-box thinking.
Reading this thread and all the comments, i think it's being blown out of proportion. Genuine bracelets are better fitted because of the screws/screw holes being better quality and better machined than the reps. If you shine a light and take a loop you can see a shit ton of debris and dirtiness inside the screw holes of the bracelets on the reps. It's because most of these parts that are put together are kept in places where hygiene and cleanliness are non-existant. The parts are probably kept stacked on one another in a box somewhere in the open, and dirt/particles gather. The parts are also more than likely not cleaned thoroughly after they're machined, which makes it a nightmare when put together.
The vacuum and grease is all fine. If you want to do that method it more than likely works as the OP confirmed. However, that seems a little bit like overkill to me. I've too been obsessing over the feel of the rep bracelets ever since owning genuine Oysters and Jubilees. I've tried everything from WD40 (don't judge) to J&J Baby Oil to Mobil 1 fully synthetic 5W-10 motor oil. They all worked great for about 2-3 weeks until dirt got inside and glued to the oil, or until it dried up.
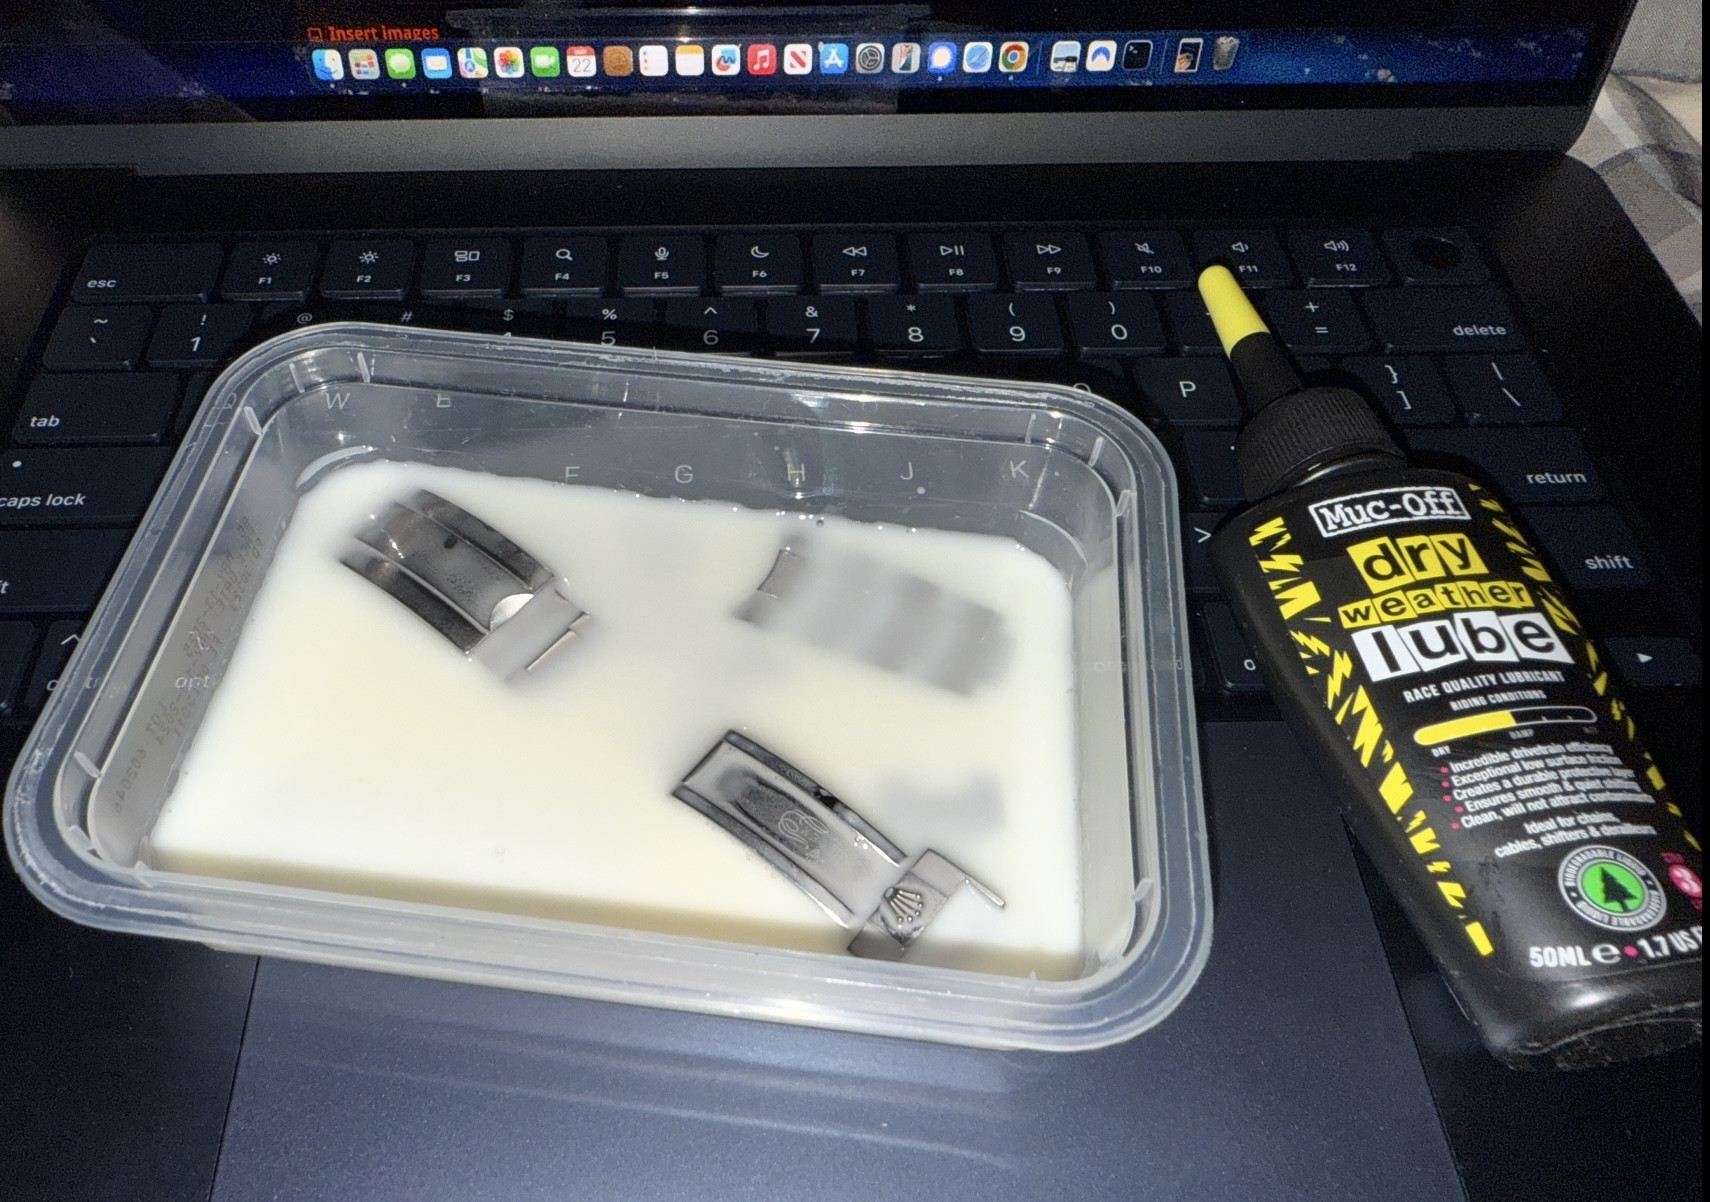
I don't want to derail this thread, but a solution i've been using on every single rep bracelet has worked wonders, and all it costs is about $9.40. Most oils stay wet and that attracts dirt & dust & debris over time. Some oils will dry out as well due to your body heat and environment. One day while in my garage I came upon some dry lube that I used for my motorcycle chains. It wasn't made for jewelry and might've been even a little bit harsh with it's chemicals inside, but I decided to use it anyways. It worked for a few days. So I decided to go online and search up some dry lube oils. I came across "Muc-off" dry lube (it's not 100% dry, it's "damp", so in between dry and wet).
Bought a small bottle to test on a brand new VSF Rep which also sounded and felt like complete shit when it arrived. Used the lube and to this day (1 year & 7 months later) it still feels the same. I will be re-lubing it just for the sake of keeping it the best condition possible. Here is what I do:
-take apart every single removable part on the bracelet (remove all screws)
-use dish soap (i use Dawn Dish soap, the apple scent because I like the way it smells) and wash the parts under hot water. Once I clean the outside of the parts, I then pour a good amount on the part and move it around so that the dishsoap seeps into the cracks. Wash it all off and use a microfiber towel to dry.
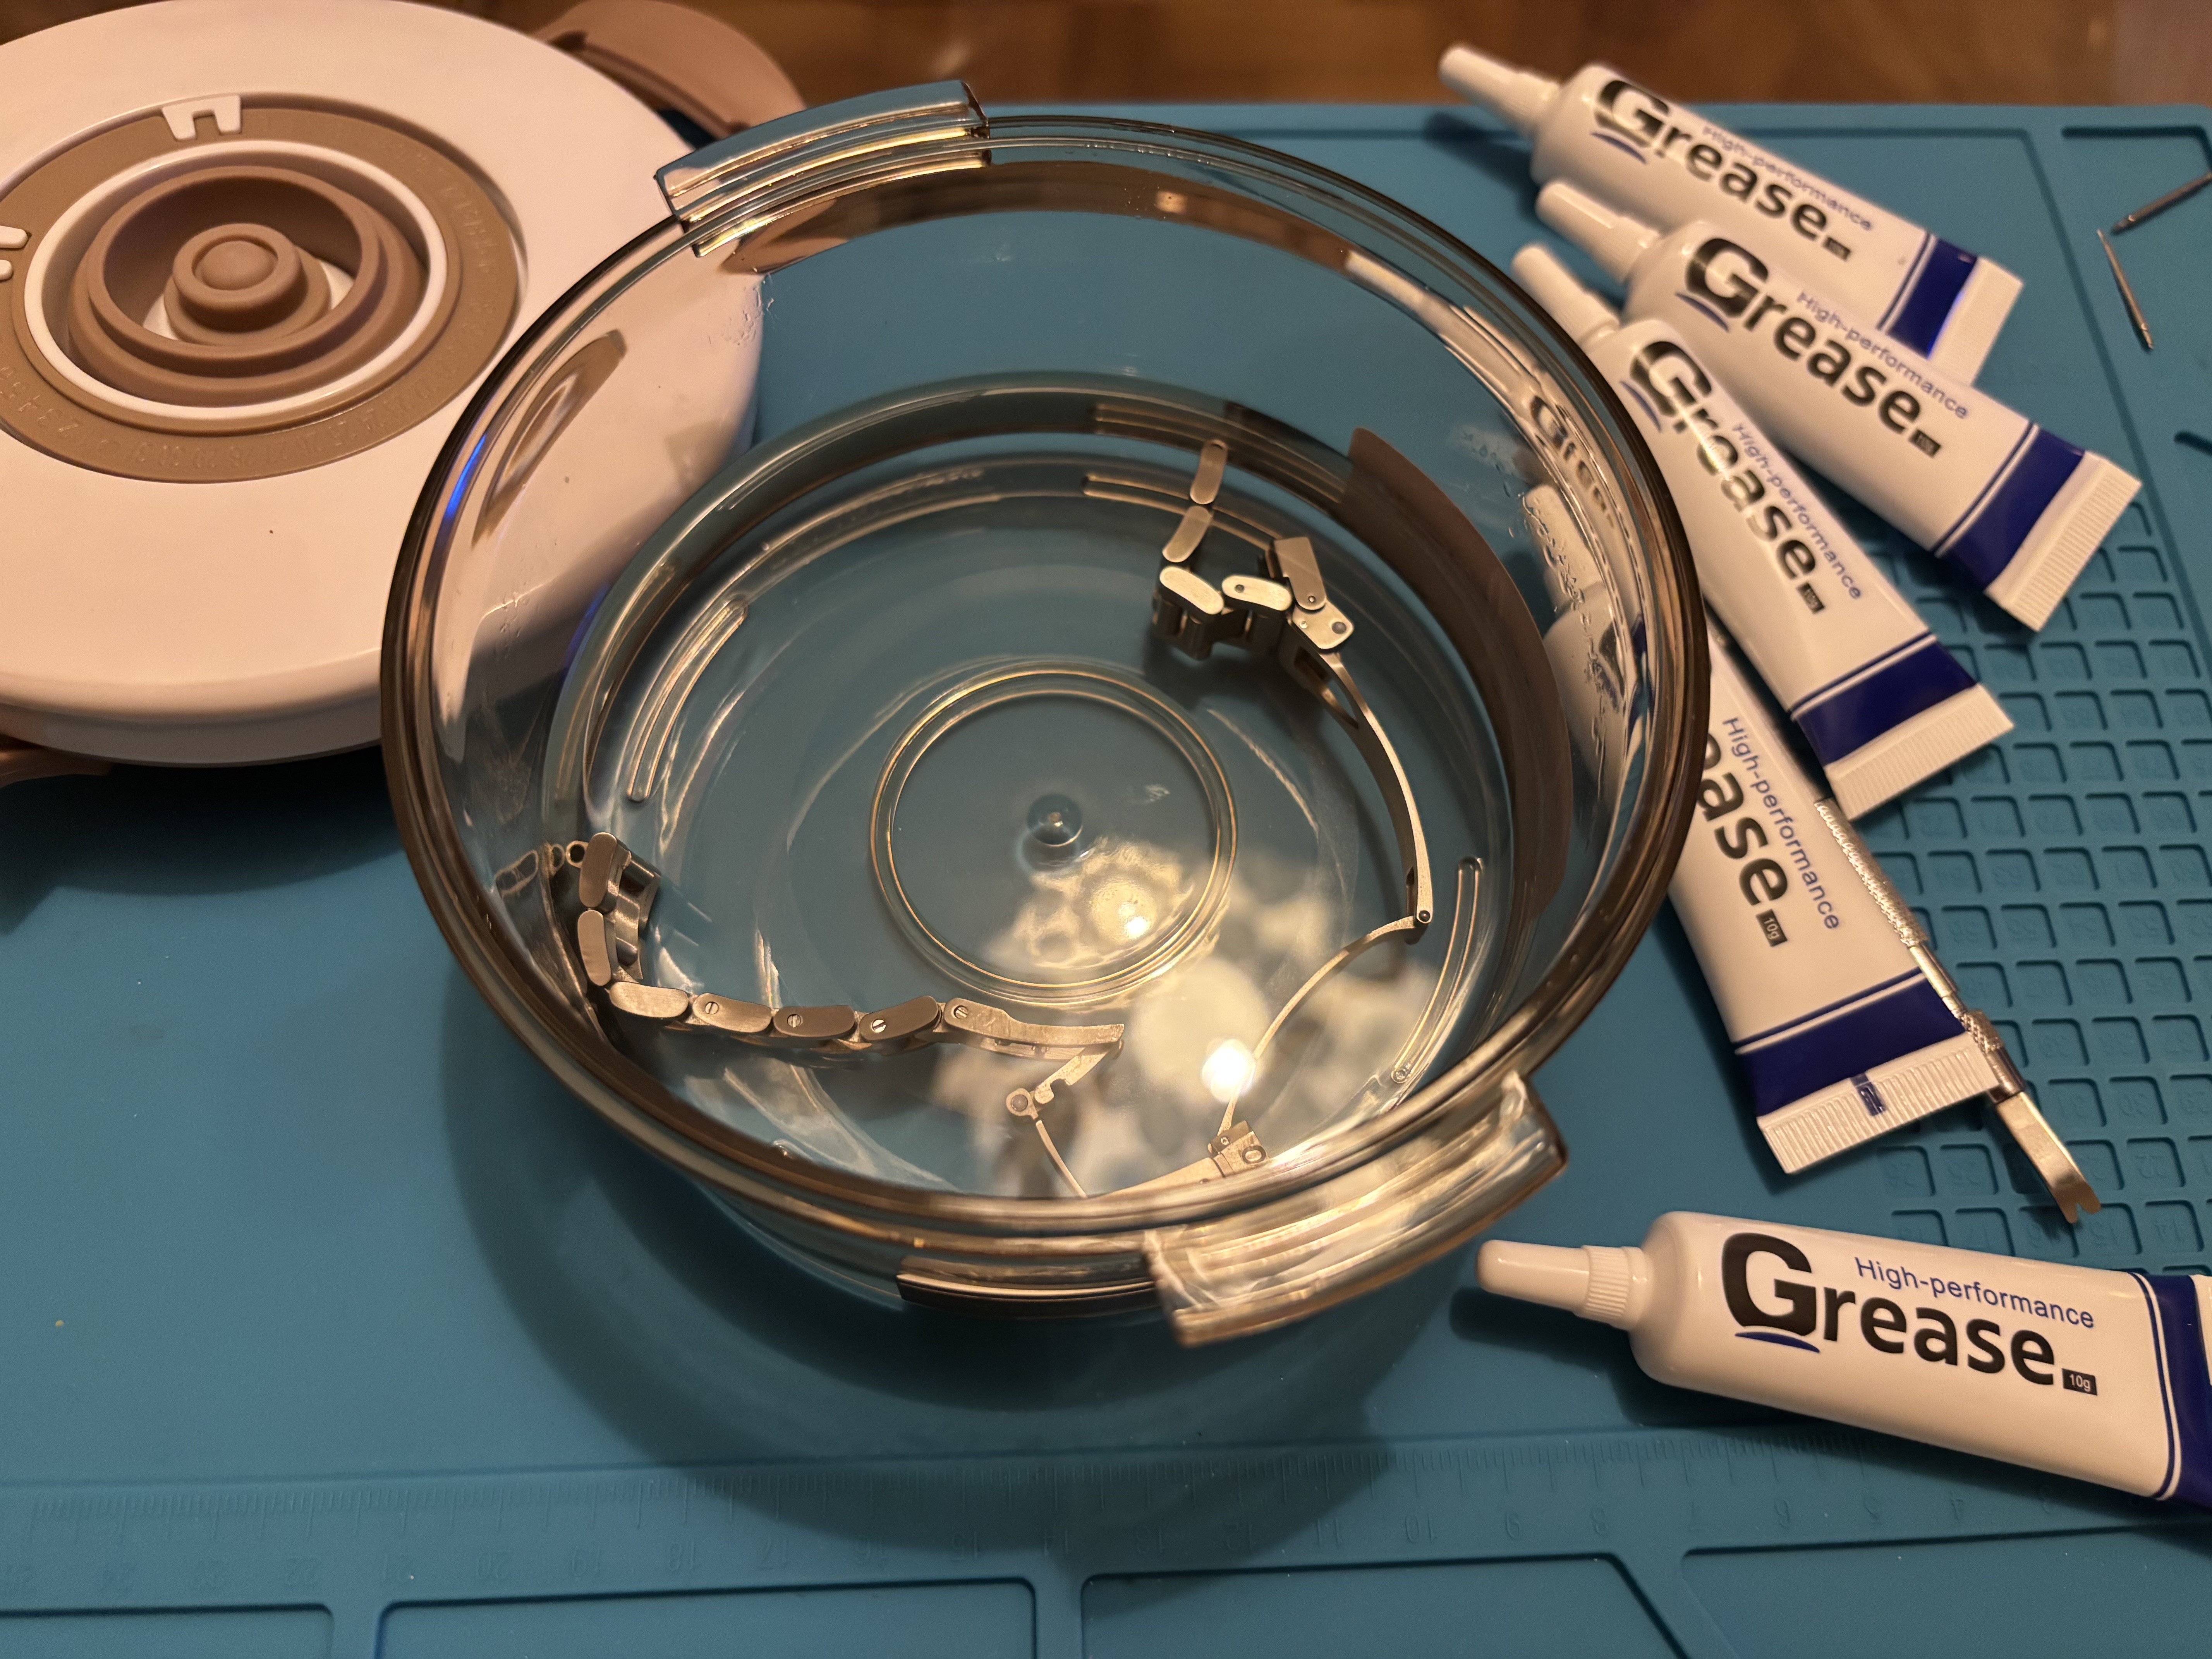
-place the screws, and all the bracelet parts inside of a plastic or glass tupperware container with isopropyl alcohol. Let it sit for about 10 minutes. Try moving the parts around one by one so that the isopropyl alcohol gets into all the cracks and crevices.
-next place all of the parts into a small plastic or glass container and pour in the dry lube. I like to keep mine sitting for 24 hours but you don't really have to. The dry lube is super thin, so it won't take a lot of time. I like to swoosh the dry lube around in the container every hour or so, so it works its way into all the places it needs to go into.
-I then take out the parts and put them one by one into a plastic ziplock bag. I pour in the dry lube from the container and close the baggy up. I put the bracelet together (just the actual bracelet bits, with the screws) and then move the bracelet back and forth mimicking the movement it would make if I were wearing it. This is the important part so that it sits properly.
-Once I do that to all parts, I then only wash the bracelet off with warm water quickly and wipe it down. That's it.
You can try it for your self. $10 for the bottle is nothing, and should make your bracelet feel like the real deal for a year or more like mine have. I've done this to Oyster and Jubilee bracelets, and it's the same outcome everytime. It's amazing and the effort shows when it's done. I am doing the treatment on my VSF Starbucks that just came in today. Hope this helps, and if anyone has any questions feel free to reach out.
(Again - not to derail OP's thread, but wanted to add in the method I use. If my method doesn't work, definitely try OP's).
Reading this thread and all the comments, i think it's being blown out of proportion. Genuine bracelets are better fitted because of the screws/screw holes being better quality and better machined than the reps. If you shine a light and take a loop you can see a shit ton of debris and dirtiness inside the screw holes of the bracelets on the reps. It's because most of these parts that are put together are kept in places where hygiene and cleanliness are non-existant. The parts are probably kept stacked on one another in a box somewhere in the open, and dirt/particles gather. The parts are also more than likely not cleaned thoroughly after they're machined, which makes it a nightmare when put together.
The vacuum and grease is all fine. If you want to do that method it more than likely works as the OP confirmed. However, that seems a little bit like overkill to me. I've too been obsessing over the feel of the rep bracelets ever since owning genuine Oysters and Jubilees. I've tried everything from WD40 (don't judge) to J&J Baby Oil to Mobil 1 fully synthetic 5W-10 motor oil. They all worked great for about 2-3 weeks until dirt got inside and glued to the oil, or until it dried up.
I don't want to derail this thread, but a solution i've been using on every single rep bracelet has worked wonders, and all it costs is about $9.40. Most oils stay wet and that attracts dirt & dust & debris over time. Some oils will dry out as well due to your body heat and environment. One day while in my garage I came upon some dry lube that I used for my motorcycle chains. It wasn't made for jewelry and might've been even a little bit harsh with it's chemicals inside, but I decided to use it anyways. It worked for a few days. So I decided to go online and search up some dry lube oils. I came across "Muc-off" dry lube (it's not 100% dry, it's "damp", so in between dry and wet).
Bought a small bottle to test on a brand new VSF Rep which also sounded and felt like complete shit when it arrived. Used the lube and to this day (1 year & 7 months later) it still feels the same. I will be re-lubing it just for the sake of keeping it the best condition possible. Here is what I do:
-take apart every single removable part on the bracelet (remove all screws)
-use dish soap (i use Dawn Dish soap, the apple scent because I like the way it smells) and wash the parts under hot water. Once I clean the outside of the parts, I then pour a good amount on the part and move it around so that the dishsoap seeps into the cracks. Wash it all off and use a microfiber towel to dry.
-place the screws, and all the bracelet parts inside of a plastic or glass tupperware container with isopropyl alcohol. Let it sit for about 10 minutes. Try moving the parts around one by one so that the isopropyl alcohol gets into all the cracks and crevices.
-next place all of the parts into a small plastic or glass container and pour in the dry lube. I like to keep mine sitting for 24 hours but you don't really have to. The dry lube is super thin, so it won't take a lot of time. I like to swoosh the dry lube around in the container every hour or so, so it works its way into all the places it needs to go into.
-I then take out the parts and put them one by one into a plastic ziplock bag. I pour in the dry lube from the container and close the baggy up. I put the bracelet together (just the actual bracelet bits, with the screws) and then move the bracelet back and forth mimicking the movement it would make if I were wearing it. This is the important part so that it sits properly.
-Once I do that to all parts, I then only wash the bracelet off with warm water quickly and wipe it down. That's it.
You can try it for your self. $10 for the bottle is nothing, and should make your bracelet feel like the real deal for a year or more like mine have. I've done this to Oyster and Jubilee bracelets, and it's the same outcome everytime. It's amazing and the effort shows when it's done. I am doing the treatment on my VSF Starbucks that just came in today. Hope this helps, and if anyone has any questions feel free to reach out.
(Again - not to derail OP's thread, but wanted to add in the method I use. If my method doesn't work, definitely try OP's).
I’m surprised you don’t start with an ultrasonic bath- I thought that was the gold standard of cleaning.Great write up OP. I admire your effort and out-of-the-box thinking.
Reading this thread and all the comments, i think it's being blown out of proportion. Genuine bracelets are better fitted because of the screws/screw holes being better quality and better machined than the reps. If you shine a light and take a loop you can see a shit ton of debris and dirtiness inside the screw holes of the bracelets on the reps. It's because most of these parts that are put together are kept in places where hygiene and cleanliness are non-existant. The parts are probably kept stacked on one another in a box somewhere in the open, and dirt/particles gather. The parts are also more than likely not cleaned thoroughly after they're machined, which makes it a nightmare when put together.
The vacuum and grease is all fine. If you want to do that method it more than likely works as the OP confirmed. However, that seems a little bit like overkill to me. I've too been obsessing over the feel of the rep bracelets ever since owning genuine Oysters and Jubilees. I've tried everything from WD40 (don't judge) to J&J Baby Oil to Mobil 1 fully synthetic 5W-10 motor oil. They all worked great for about 2-3 weeks until dirt got inside and glued to the oil, or until it dried up.
I don't want to derail this thread, but a solution i've been using on every single rep bracelet has worked wonders, and all it costs is about $9.40. Most oils stay wet and that attracts dirt & dust & debris over time. Some oils will dry out as well due to your body heat and environment. One day while in my garage I came upon some dry lube that I used for my motorcycle chains. It wasn't made for jewelry and might've been even a little bit harsh with it's chemicals inside, but I decided to use it anyways. It worked for a few days. So I decided to go online and search up some dry lube oils. I came across "Muc-off" dry lube (it's not 100% dry, it's "damp", so in between dry and wet).
Bought a small bottle to test on a brand new VSF Rep which also sounded and felt like complete shit when it arrived. Used the lube and to this day (1 year & 7 months later) it still feels the same. I will be re-lubing it just for the sake of keeping it the best condition possible. Here is what I do:
-take apart every single removable part on the bracelet (remove all screws)
-use dish soap (i use Dawn Dish soap, the apple scent because I like the way it smells) and wash the parts under hot water. Once I clean the outside of the parts, I then pour a good amount on the part and move it around so that the dishsoap seeps into the cracks. Wash it all off and use a microfiber towel to dry.
-place the screws, and all the bracelet parts inside of a plastic or glass tupperware container with isopropyl alcohol. Let it sit for about 10 minutes. Try moving the parts around one by one so that the isopropyl alcohol gets into all the cracks and crevices.
-next place all of the parts into a small plastic or glass container and pour in the dry lube. I like to keep mine sitting for 24 hours but you don't really have to. The dry lube is super thin, so it won't take a lot of time. I like to swoosh the dry lube around in the container every hour or so, so it works its way into all the places it needs to go into.
-I then take out the parts and put them one by one into a plastic ziplock bag. I pour in the dry lube from the container and close the baggy up. I put the bracelet together (just the actual bracelet bits, with the screws) and then move the bracelet back and forth mimicking the movement it would make if I were wearing it. This is the important part so that it sits properly.
-Once I do that to all parts, I then only wash the bracelet off with warm water quickly and wipe it down. That's it.
You can try it for your self. $10 for the bottle is nothing, and should make your bracelet feel like the real deal for a year or more like mine have. I've done this to Oyster and Jubilee bracelets, and it's the same outcome everytime. It's amazing and the effort shows when it's done. I am doing the treatment on my VSF Starbucks that just came in today. Hope this helps, and if anyone has any questions feel free to reach out.
(Again - not to derail OP's thread, but wanted to add in the method I use. If my method doesn't work, definitely try OP's).
Also
‘ I like to swoosh the dry lube around in the container every hour or so, so it works its way into all the places it needs to go into.’ All I hear is Chris Rock’s voice saying ‘let that tussin work into that bone’ lol