- 18/1/11
- 19,846
- 424
- 83
BRUSHING AND POLISHING TO REPAIR DAMAGED BEZELS
The purpose of this Thread is to show some systems or treatments to repair the brushed or polished surface of a damaged or scratched bezel.
This Thread has its origin in other Thread started by fitipaldi (member of this forum), where he asked for a solution to repair two AP damaged bezels. I answered to fitipaldi with a system to do it. Then guru posted his interesting system with some complaints about it. This guru’s post inspired me the second system (Guru-Ale system) that I’m showing on this Thread. I answered to guru showing this second system like a possible solution to his problems. Guru liked this new system, and then, he encouraged me to prepare this specific Thread. I will explain the two systems in this Thread with a lot of revisions, new details, modifications, updates, and instructions concerning the sandpapers to be used. Besides, at the end of this Thread I will show a system to achieve a mirror finish polished surface.
BEZELS SUITABLE FOR TREATMENT
These treatments are suitable for metallic bezels (SS, Ti, Tungsten, Bronze, Aluminium, Gold, Silver…) which the upper surface is flat and they are not plated or coated (AP, Hublots, PP, Jacob&Co…). Even you can repair, if you are careful, rubber bezels with fine grain sandpapers.
If the bezel was plated or coated, firstly you could repair it by brushing or polishing the bezel surface, but, after the treatment, you will have to send the bezel to a specialist for a new plating or coating like the original.
ATTENTION: IF THE DAMAGED BEZEL HAS SOME POLISHED SIDE (other than upper surface), YOU MUST POLISHING THIS SIDE BEFORE BRUSHING THE UPPER SURFACE. AND THEN START THE BRUSHING.
TECHNIQUE AND BRUSHING MEANS
The technique to employ is a kind of the called “Lapping”.
We will use like means for brushing the sandpaper of the higher possible quality, with different grain sizes, depending on the finish grade we need, and the type of bezel damages.
SANDPAPER TYPES
We must employ the higher possible quality of sandpaper. You would need at least sandpaper Wet & Dry type (3M Wetordry) and with the abrading particles of Aluminium Oxide (corundum).
There are many “Grit sizes” or grain sizes of abrasive particles.
A number is used to identify the sandpaper Grit size. The more high is the number the smaller is the abrasive particle, and therefore less rough the finish.
There are several different established standards for Grit size.The most common are the United States CAMI (Coated Abrasive Manufacturers Institute) and the European FEPA (Federation of European Producers of Abrasives) also called "P" grade.
Usually, the number for European standard is preceded for a “P”, for example: P400, P600, P800…
But the USA standard is written just with the number: 400, 600, 800…
Unfortunately the same number at the two standards doesn’t correspond at the same Grit size. Thus, there are always identification problems.
At the top of the scale the two scale numbers are similar, but at the bottom the two scale numbers are more and more different.
In order to clarify the Grit size that we are going to speak about, you can find below a conversion Table with the equivalences of both standards and the size in microns (millionth of a meter) of the abrasive particles.
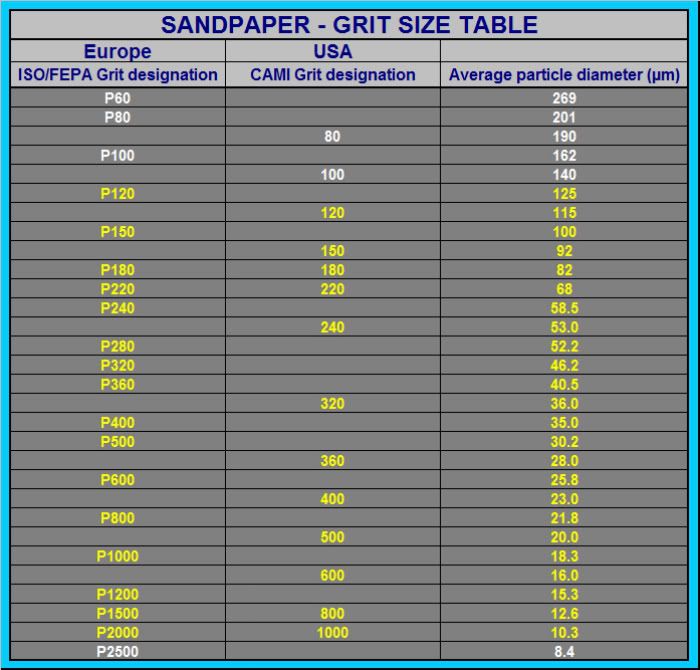
Before start a brushing repairing treatment you must determine the final Grit size you need.
That is a comparison work. Firstly, you have to brush any metallic surface with certain sandpaper and compare the result with the finish of the bezel that you want repairing.
If the result on the metallic surface is more rough than bezel finish, you must employ a higher number of Grit size. Otherwise, if the brushing of the metallic surface is less rough than the bezel finish you must employ a lower number of Grit size.
In case you have doubts, my advice is employing always a less rough finish.
Normally, the Grit size brushing you could find in watches comes from P180 to P800 of European FEPA scale (180-500 in USA CAMI scale).
For an AP bezel, you could start the test with P360-P500 and check the results.
Once you have determined the Grit size suitable for your bezel you know already the sandpaper you have to use.
You can find all these sandpapers in size 9” x 11”
HOW TO REPAIR VERY DAMAGED BEZELS
If your bezel has deep scratches, besides the final Grit size for definitive finish, you must also employ two sandpapers of lower numbers (more rough).
You have to start the treatment with a preliminary roughed down made by the two lower Grit size sandpapers. This process aids to eliminate the deep scratches faster and more easily. Besides, this system helps to prevent “clogging” of the sandpaper.
For example: if your bezel is P500 Grit size you could start brushing with P240 or P280, then brushing with P360 and finally with P500.
Now, I’m going to shown the two systems to make the brushing.
1- BRUSHING SYSTEM “A”
This is a system which needs more carpentry abilities but less manual abilities and patience.
ADVICE: The most important is the UNIFORMITY and the DIRECTION ALIGNMENT of brushing
You have to build a simple device with MDF board (about 22mm thickness). Following the instructions and dimensions indicated on PIC 1. This simple device will ASSURE THE UNIFORMITY AND DIRECTION ALIGNMENT OF THE BRUSHING
This device consists of:
- A kind of GUIDE, made of MDF, which becomes a sandpaper lane, which works as a guide for a straight brushing
- A BEZEL SUPPORT made of MDF. In this bezel support you must stick a double side adhesive tape (with thin support, no foam support) to stick and fix the bezel with it, as you can see on PIC 1.
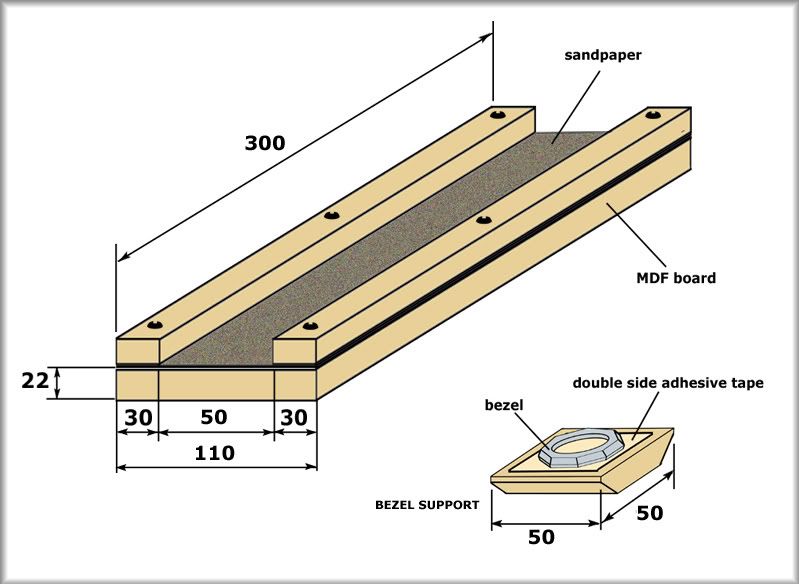
PIC 1 - BRUSHING DEVICE FOR SYSTEM “A”- THE BEZEL SUPPORT
THE BEZEL SUPPORT MUST GLIDE SMOOTHLY (but without excessive play) INTO THE MDF GUIDE with the sandpaper lane. PLEASE ASSURE THIS SUBJECT BEFORE STARTING BRUSHING
When you stick the bezel in the bezel support, BE SURE THAT THE DIRECTION OF THE BRUSHING ALIGNMENT IS PARALLEL TO THE SIDE OF THE BEZEL SUPPORT WHICH SLIDES FOR THE MDF GUIDES.
In the MDF guide THE SANDPAPER MUST BE COMPLETELY FLAT AND TIGHT.
Once you have all prepared, you can start the brushing.
If your bezel is very damaged and, therefore, YOU ARE GOING TO USE SEVERAL GRIT SIZES, START WITH THE LOWER NUMBER (MORE ROUGH) AND ONCE YOU HAVE FINISH CHANGE TO THE FOLLOWING ONE. UNTIL FINISHING WITH THE FINAL GRIT SIZE SUITABLE FOR THE DAMAGED BEZEL.
You have to apply on the sandpaper some quantity of light machine oil to make easier and softer the brushing (If you have not success with oil, you can try dry brushing)
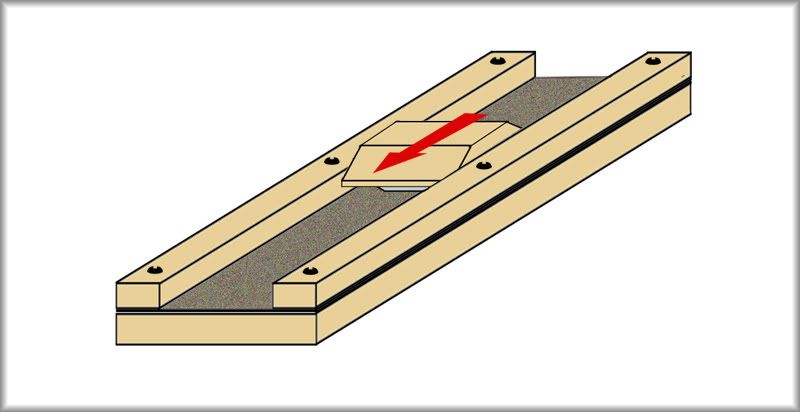
PIC 2 – BRUSHING PROCESS IN SYSTEM “A”
You must place the MDF piece with the stuck bezel face down, about 1cm from the beginning of the sandpaper lane, and move it, gliding smoothly, following the showed arrow (PIC 2).
YOU MUST TAKE THE SUPPORT, WITH YOUR FINGERS, AS INDICATED IN PIC 3 AND GLIDE SLOWLY AND SOFTLY, WITHOUT VERY STRONG PUSHING, AND ALWAYS IN THE SAME DIRECTION until 1-2 cm before the end of the sandpaper. DON’T RETURN BY THE SAME WAY BRUSHING. JUST LIFT UP THE SUPPORT WITH THE BEZEL AND START AGAIN THE BRUSHING AT THE BEGINING.
VERY IMPORTANT- BE SURE THE BEZEL IS ALWAYS IN CONTACT WITH THE SANDPAPER IN ITS ENTIRETY. DON’T ALLOW THAT SUPPORT TURNS FORWARD OR BACK WHEN YOU ARE SLIDING IT (SIDES PIC 3), TO NOT BRUSH THE EDGE OF THE BEZEL. YOU CAN FIND IN THE CENTER OF PIC 3 THE CORRECT WORKING WAY AND ON THE RIGHT AND THE LEFT THE WRONG WAYS.
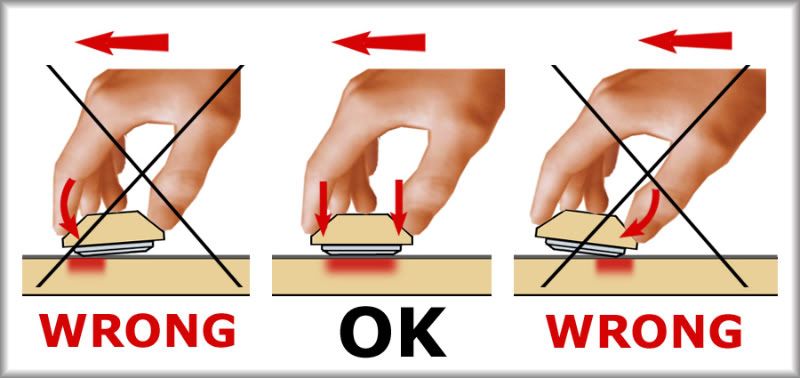
PIC 3 – CORRECT AND WRONG WAYS FOR BRUSHING
For the first Grit size (more rough) you must repeat this process until you see that the scratches are completely come out. You have to brush the minimum necessary possible in order to reduce the bezel thickness as few as possible.
Clean the bezel with an absorbent paper towel roll (kitchen roll) after each sandpaper treatment. Or even, during treatment if you think it is very dirty, mainly with the first (more rough) sandpaper.
For the following Grit sizes, you must continue just until you achieve a uniform brushing finish (no more).
You can change the last sandpaper for a new one to make cleaner the last finish.
Clean the bezel in soapy water and dry it with clean paper roll.
2- BRUSHING “Guru-Ale” SYSTEM
As I have commented above, this is a modification of the system used by guru, employing the bezel support of my first system. That is why I call it “Guru-Ale” system.
This system is easier to start than the system “A” above indicated, and it needs less carpentry abilities, but you will need more ability, patience, care and attention for brushing.
Now, is time to choose by yourself. For me, I would prefer the “Guru-Ale” system. But, if you have carpenter abilities perhaps would be better the other system.
ADVICE: The most important is the UNIFORMITY and the DIRECTION ALIGNMENT of brushing
You must to prepare, with MDF board and two F Cramps, a device as indicated in PIC 4
This simple device will ASSURE THE UNIFORMITY AND DIRECTION ALIGNMENT OF THE BRUSHING, IF JUST DURING BRUSHING YOU ARE SURE THAT THE BEZEL SUPPORT ALWAYS GLIDES CLOSE TO THE WOOD GUIDE.
This device consists of:
- A GUIDE, for straight brushing, made of MDF, which press and fix the sandpaper over a MDF board or flat table. PIC 4
- A BEZEL SUPPORT made of MDF. In this bezel support you must stick a double side adhesive tape (with thin tape, no foam support) to stick and fix the bezel with it, as you can see on PIC 4.
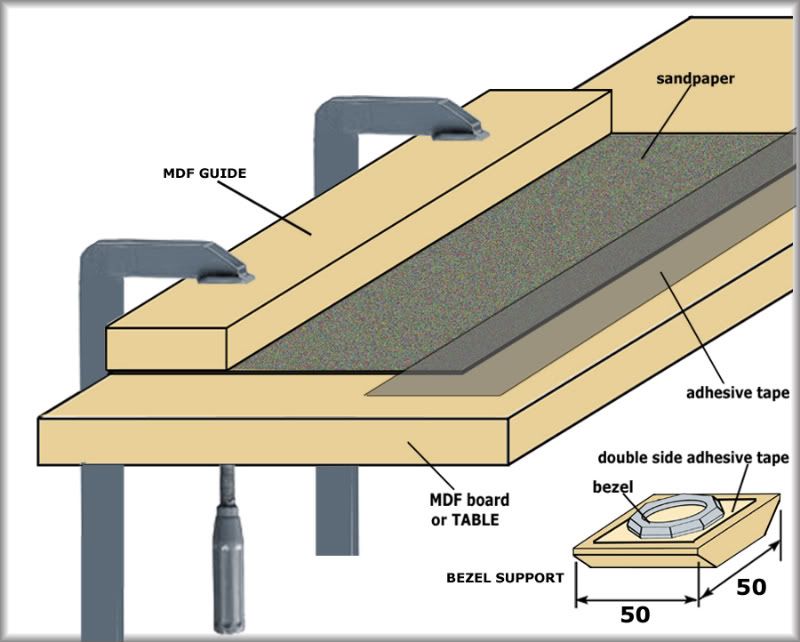
PIC 4 - BRUSHING DEVICE FOR SYSTEM “Guru-Ale”- BEZEL SUPPORT
When you stick the bezel in the bezel support, BE SURE THAT THE DIRECTION OF THE BRUSHING ALIGNMENT IS PARALLEL TO THE SIDE OF THE BEZEL SUPPORT which glides close to the MDF guide.
THE BEZEL SUPPORT MUST GLIDE ALWAYS CLOSE TO THE MDF GUIDE. IN ORDER TO ASSURE THE UNIFORMITY AND DIRECTION ALIGNMENT OF THE BRUSHING
THE SURFACE OF THE BASE BOARD OR TABLE MUST BE VERY FLAT AND HARD AND THE SANDPAPER MUST BE COMPLETELY FLAT AND TIGHT. In order to assure these important conditions, you must apply a STRONG ADHESIVE TAPE at the end of the sandpaper (PIC 4).
Once you have all prepared, you can start the brushing.
If your bezel is very damaged and, therefore, YOU ARE GOING TO USE SEVERAL GRIT SIZES, START WITH THE LOWER NUMBER (MORE ROUGH) AND ONCE YOU HAVE FINISH CHANGE TO THE FOLLOWING ONE. UNTIL FINISHING WITH THE GRIT SIZE SUITABLE FOR THE DAMAGED BEZEL.
You have to apply on the sandpaper some quantity of light machine oil to make easier and softer the brushing (If you have not success with oil, you can try dry brushing
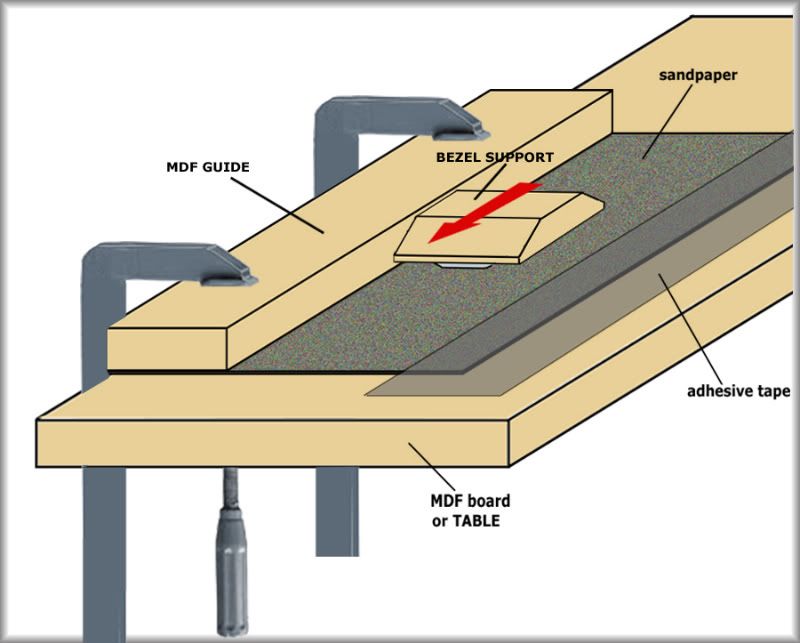
PIC 5 – BRUSHING PROCESS IN SYSTEM “Guru-Ale”
You must place the MDF piece with the stuck bezel face down, about 1cm from the beginning of the sandpaper lane, and move it, gliding smoothly, following the showed arrow (PIC 5).
YOU MUST TAKE THE SUPPORT, WITH YOUR FINGERS, AS INDICATED IN PIC3 AND GLIDE SLOWLY AND SOFTLY, WITHOUT VERY STRONG PUSHING, AND ALWAYS IN THE SAME DIRECTION until 1-2 cm before the end of the sandpaper. DON’T RETURN BY THE SAME WAY BRUSHING. JUST LIFT UP THE SUPPORT WITH THE BEZEL AND START AGAIN THE BRUSHING AT THE BEGINING.
VERY IMPORTANT- BE SURE THE BEZEL IS ALWAYS IN CONTACT WITH THE SANDPAPER IN ITS ENTIRETY. DON’T ALLOW THAT SUPPORT TURNS FORWARD OR BACK WHEN YOU ARE SLIDING IT (SIDES PIC 3), TO NOT BRUSH THE EDGE OF THE BEZEL. YOU CAN FIND IN THE CENTER OF PIC 3 THE CORRECT WORKING WAY AND ON THE RIGHT AND THE LEFT THE WRONG WAYS.
For the first Grit size (more rough) you must repeat this process until you see that the scratches are completely come out. You have to brush the minimum necessary possible in order to reduce the bezel thickness as few as possible.
Clean the bezel with an absorbent paper towel roll (kitchen roll) after each sandpaper treatment. Or even, during treatment if you think it is very dirty, mainly with the first (more rough) sandpaper.
For the following Grit sizes, you must continue just until you achieve a uniform brushing finish (no more).
You can change the last sandpaper for a new one to make cleaner the last finish.
Clean the bezel in soapy water and dry it with clean paper roll.
In this system, the device can be placed over a table with flat board (very good marble or crystal ) or it is better to use an auxiliary MDF board to not damage the table. PICS 6 & 7.
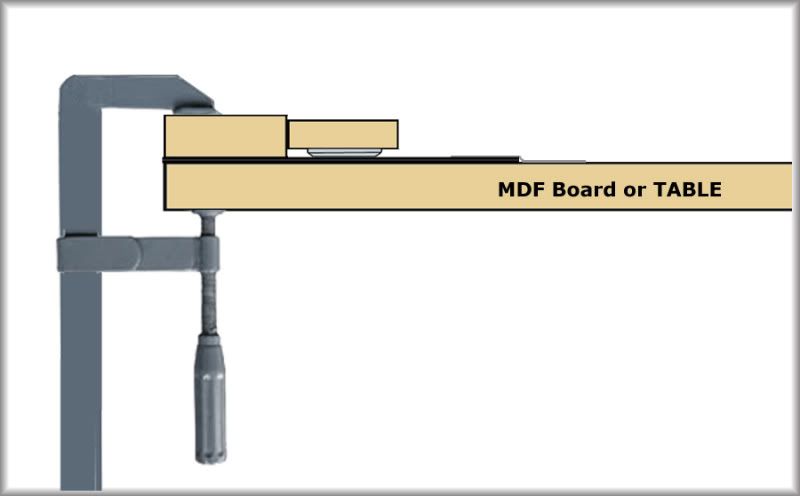
PIC 6 – BRUSHING DIRECTLY IN TABLE OR MDF BOARD
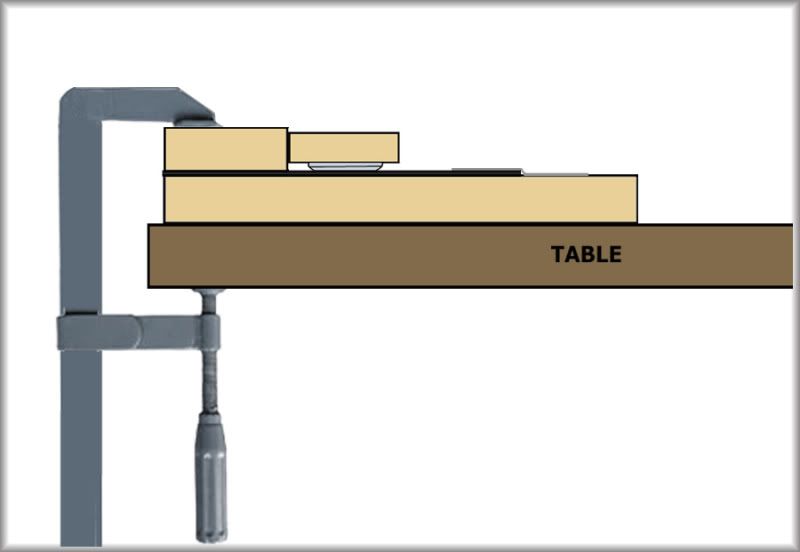
PIC 7 – BRUSHING WITH AUXILIARY MDF BOARD
And now, I will show the system to achieve a mirror finsh polishing.
3- MIRROR FINISH POLISHING SYSTEM FOR BEZELS
Sometimes the bezel has a MIRROR POLISHED upper surface. In this case we could achieve a high-grade polishing, mirror finish, by a double treatment:
- Firstly- BRUSH THE BEZEL BY ONE SYSTEM OF ABOVE MENTIONED.
Start brushing with sandpaper P400, and continue successively with P600, P800, P1000, P1500 and finally P2000. If the bezel is not very damaged you could start with P600, P800 or P1000 directly.
After brushing clean the bezel with paper towel roll.
With sandpaper P2000 is already almost polished. But is not yet like a mirror.
Clean the bezel with paper roll with some soapy water (to remove oil). Clean well the bezel holes. Then, dry it with a clean paper roll.
- Second- MAKE A “LAPPING” TO ACHIEVE MIRROR FINISH. PIC 8
Take a thick (over 6mm) glass surface of a size about 30x30 cm
Put a layer of polishing paste over the glass surface.
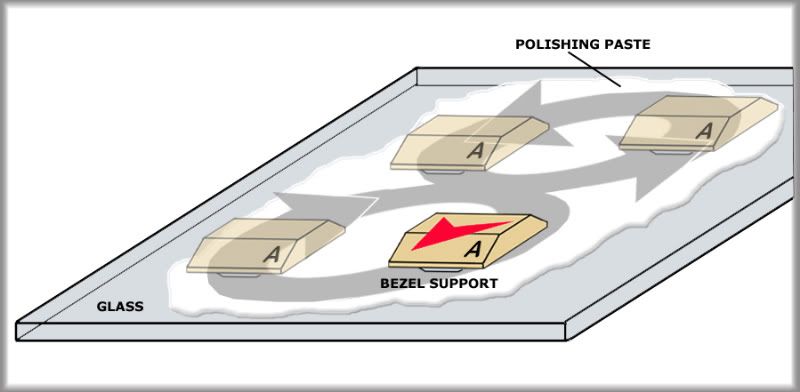
PIC 8 – POLISHING (MIRROR FINISH) OF THE BEZEL
Place the support bezel, with the stuck bezel face down, on the glass surface over the polishing paste.
Start “lapping” making movements in the shape of a big “8” as indicated in PIC 8.
When the bezel support is moved, it must not follow the “8” shape like a car in a road, don’t turn it, it must remain always parallel showing the same face to you. See PIC 8, during polishing, the side marked “A” in the bezel support must always be looking ahead.
You have finished the polishing treatment when the surface of the bezel has a mirror finish.
Clean the bezel in water and dry it.
WARNING: THESE SYSTEMS ARE SUITABLE TO REPAIR ALMOST ALL BEZELS. BUT THESE SYTEMS FOR BRUSHING AND POLISHING REQUIRE SOME EXPERIENCE IN HANDYCRAFT AND BRICOLAGE. IF YOU HAVE NOT DO-IT-YOURSELF ABILITIES DON’T START A TREATMENT WITH A BEZEL LIKE THE SHOWN IN THIS THREAD.
This Thread is open. I remain waiting for your comments, suggestions, corrections… and mainly for your experiences and results, in order to share them with all RWI people.
It would be very appreciated, some informations about the Grit sizes you have used for a concrete watch…some interesting variations…improvements…even experiments
As always, I hope to have been useful and helpful with this Thread.
Many thanks for your kind attention
ALE7575
The purpose of this Thread is to show some systems or treatments to repair the brushed or polished surface of a damaged or scratched bezel.
This Thread has its origin in other Thread started by fitipaldi (member of this forum), where he asked for a solution to repair two AP damaged bezels. I answered to fitipaldi with a system to do it. Then guru posted his interesting system with some complaints about it. This guru’s post inspired me the second system (Guru-Ale system) that I’m showing on this Thread. I answered to guru showing this second system like a possible solution to his problems. Guru liked this new system, and then, he encouraged me to prepare this specific Thread. I will explain the two systems in this Thread with a lot of revisions, new details, modifications, updates, and instructions concerning the sandpapers to be used. Besides, at the end of this Thread I will show a system to achieve a mirror finish polished surface.
BEZELS SUITABLE FOR TREATMENT
These treatments are suitable for metallic bezels (SS, Ti, Tungsten, Bronze, Aluminium, Gold, Silver…) which the upper surface is flat and they are not plated or coated (AP, Hublots, PP, Jacob&Co…). Even you can repair, if you are careful, rubber bezels with fine grain sandpapers.
If the bezel was plated or coated, firstly you could repair it by brushing or polishing the bezel surface, but, after the treatment, you will have to send the bezel to a specialist for a new plating or coating like the original.
ATTENTION: IF THE DAMAGED BEZEL HAS SOME POLISHED SIDE (other than upper surface), YOU MUST POLISHING THIS SIDE BEFORE BRUSHING THE UPPER SURFACE. AND THEN START THE BRUSHING.
TECHNIQUE AND BRUSHING MEANS
The technique to employ is a kind of the called “Lapping”.
We will use like means for brushing the sandpaper of the higher possible quality, with different grain sizes, depending on the finish grade we need, and the type of bezel damages.
SANDPAPER TYPES
We must employ the higher possible quality of sandpaper. You would need at least sandpaper Wet & Dry type (3M Wetordry) and with the abrading particles of Aluminium Oxide (corundum).
There are many “Grit sizes” or grain sizes of abrasive particles.
A number is used to identify the sandpaper Grit size. The more high is the number the smaller is the abrasive particle, and therefore less rough the finish.
There are several different established standards for Grit size.The most common are the United States CAMI (Coated Abrasive Manufacturers Institute) and the European FEPA (Federation of European Producers of Abrasives) also called "P" grade.
Usually, the number for European standard is preceded for a “P”, for example: P400, P600, P800…
But the USA standard is written just with the number: 400, 600, 800…
Unfortunately the same number at the two standards doesn’t correspond at the same Grit size. Thus, there are always identification problems.
At the top of the scale the two scale numbers are similar, but at the bottom the two scale numbers are more and more different.
In order to clarify the Grit size that we are going to speak about, you can find below a conversion Table with the equivalences of both standards and the size in microns (millionth of a meter) of the abrasive particles.

Before start a brushing repairing treatment you must determine the final Grit size you need.
That is a comparison work. Firstly, you have to brush any metallic surface with certain sandpaper and compare the result with the finish of the bezel that you want repairing.
If the result on the metallic surface is more rough than bezel finish, you must employ a higher number of Grit size. Otherwise, if the brushing of the metallic surface is less rough than the bezel finish you must employ a lower number of Grit size.
In case you have doubts, my advice is employing always a less rough finish.
Normally, the Grit size brushing you could find in watches comes from P180 to P800 of European FEPA scale (180-500 in USA CAMI scale).
For an AP bezel, you could start the test with P360-P500 and check the results.
Once you have determined the Grit size suitable for your bezel you know already the sandpaper you have to use.
You can find all these sandpapers in size 9” x 11”
HOW TO REPAIR VERY DAMAGED BEZELS
If your bezel has deep scratches, besides the final Grit size for definitive finish, you must also employ two sandpapers of lower numbers (more rough).
You have to start the treatment with a preliminary roughed down made by the two lower Grit size sandpapers. This process aids to eliminate the deep scratches faster and more easily. Besides, this system helps to prevent “clogging” of the sandpaper.
For example: if your bezel is P500 Grit size you could start brushing with P240 or P280, then brushing with P360 and finally with P500.
Now, I’m going to shown the two systems to make the brushing.
1- BRUSHING SYSTEM “A”
This is a system which needs more carpentry abilities but less manual abilities and patience.
ADVICE: The most important is the UNIFORMITY and the DIRECTION ALIGNMENT of brushing
You have to build a simple device with MDF board (about 22mm thickness). Following the instructions and dimensions indicated on PIC 1. This simple device will ASSURE THE UNIFORMITY AND DIRECTION ALIGNMENT OF THE BRUSHING
This device consists of:
- A kind of GUIDE, made of MDF, which becomes a sandpaper lane, which works as a guide for a straight brushing
- A BEZEL SUPPORT made of MDF. In this bezel support you must stick a double side adhesive tape (with thin support, no foam support) to stick and fix the bezel with it, as you can see on PIC 1.

PIC 1 - BRUSHING DEVICE FOR SYSTEM “A”- THE BEZEL SUPPORT
THE BEZEL SUPPORT MUST GLIDE SMOOTHLY (but without excessive play) INTO THE MDF GUIDE with the sandpaper lane. PLEASE ASSURE THIS SUBJECT BEFORE STARTING BRUSHING
When you stick the bezel in the bezel support, BE SURE THAT THE DIRECTION OF THE BRUSHING ALIGNMENT IS PARALLEL TO THE SIDE OF THE BEZEL SUPPORT WHICH SLIDES FOR THE MDF GUIDES.
In the MDF guide THE SANDPAPER MUST BE COMPLETELY FLAT AND TIGHT.
Once you have all prepared, you can start the brushing.
If your bezel is very damaged and, therefore, YOU ARE GOING TO USE SEVERAL GRIT SIZES, START WITH THE LOWER NUMBER (MORE ROUGH) AND ONCE YOU HAVE FINISH CHANGE TO THE FOLLOWING ONE. UNTIL FINISHING WITH THE FINAL GRIT SIZE SUITABLE FOR THE DAMAGED BEZEL.
You have to apply on the sandpaper some quantity of light machine oil to make easier and softer the brushing (If you have not success with oil, you can try dry brushing)

PIC 2 – BRUSHING PROCESS IN SYSTEM “A”
You must place the MDF piece with the stuck bezel face down, about 1cm from the beginning of the sandpaper lane, and move it, gliding smoothly, following the showed arrow (PIC 2).
YOU MUST TAKE THE SUPPORT, WITH YOUR FINGERS, AS INDICATED IN PIC 3 AND GLIDE SLOWLY AND SOFTLY, WITHOUT VERY STRONG PUSHING, AND ALWAYS IN THE SAME DIRECTION until 1-2 cm before the end of the sandpaper. DON’T RETURN BY THE SAME WAY BRUSHING. JUST LIFT UP THE SUPPORT WITH THE BEZEL AND START AGAIN THE BRUSHING AT THE BEGINING.
VERY IMPORTANT- BE SURE THE BEZEL IS ALWAYS IN CONTACT WITH THE SANDPAPER IN ITS ENTIRETY. DON’T ALLOW THAT SUPPORT TURNS FORWARD OR BACK WHEN YOU ARE SLIDING IT (SIDES PIC 3), TO NOT BRUSH THE EDGE OF THE BEZEL. YOU CAN FIND IN THE CENTER OF PIC 3 THE CORRECT WORKING WAY AND ON THE RIGHT AND THE LEFT THE WRONG WAYS.

PIC 3 – CORRECT AND WRONG WAYS FOR BRUSHING
For the first Grit size (more rough) you must repeat this process until you see that the scratches are completely come out. You have to brush the minimum necessary possible in order to reduce the bezel thickness as few as possible.
Clean the bezel with an absorbent paper towel roll (kitchen roll) after each sandpaper treatment. Or even, during treatment if you think it is very dirty, mainly with the first (more rough) sandpaper.
For the following Grit sizes, you must continue just until you achieve a uniform brushing finish (no more).
You can change the last sandpaper for a new one to make cleaner the last finish.
Clean the bezel in soapy water and dry it with clean paper roll.
2- BRUSHING “Guru-Ale” SYSTEM
As I have commented above, this is a modification of the system used by guru, employing the bezel support of my first system. That is why I call it “Guru-Ale” system.
This system is easier to start than the system “A” above indicated, and it needs less carpentry abilities, but you will need more ability, patience, care and attention for brushing.
Now, is time to choose by yourself. For me, I would prefer the “Guru-Ale” system. But, if you have carpenter abilities perhaps would be better the other system.
ADVICE: The most important is the UNIFORMITY and the DIRECTION ALIGNMENT of brushing
You must to prepare, with MDF board and two F Cramps, a device as indicated in PIC 4
This simple device will ASSURE THE UNIFORMITY AND DIRECTION ALIGNMENT OF THE BRUSHING, IF JUST DURING BRUSHING YOU ARE SURE THAT THE BEZEL SUPPORT ALWAYS GLIDES CLOSE TO THE WOOD GUIDE.
This device consists of:
- A GUIDE, for straight brushing, made of MDF, which press and fix the sandpaper over a MDF board or flat table. PIC 4
- A BEZEL SUPPORT made of MDF. In this bezel support you must stick a double side adhesive tape (with thin tape, no foam support) to stick and fix the bezel with it, as you can see on PIC 4.

PIC 4 - BRUSHING DEVICE FOR SYSTEM “Guru-Ale”- BEZEL SUPPORT
When you stick the bezel in the bezel support, BE SURE THAT THE DIRECTION OF THE BRUSHING ALIGNMENT IS PARALLEL TO THE SIDE OF THE BEZEL SUPPORT which glides close to the MDF guide.
THE BEZEL SUPPORT MUST GLIDE ALWAYS CLOSE TO THE MDF GUIDE. IN ORDER TO ASSURE THE UNIFORMITY AND DIRECTION ALIGNMENT OF THE BRUSHING
THE SURFACE OF THE BASE BOARD OR TABLE MUST BE VERY FLAT AND HARD AND THE SANDPAPER MUST BE COMPLETELY FLAT AND TIGHT. In order to assure these important conditions, you must apply a STRONG ADHESIVE TAPE at the end of the sandpaper (PIC 4).
Once you have all prepared, you can start the brushing.
If your bezel is very damaged and, therefore, YOU ARE GOING TO USE SEVERAL GRIT SIZES, START WITH THE LOWER NUMBER (MORE ROUGH) AND ONCE YOU HAVE FINISH CHANGE TO THE FOLLOWING ONE. UNTIL FINISHING WITH THE GRIT SIZE SUITABLE FOR THE DAMAGED BEZEL.
You have to apply on the sandpaper some quantity of light machine oil to make easier and softer the brushing (If you have not success with oil, you can try dry brushing

PIC 5 – BRUSHING PROCESS IN SYSTEM “Guru-Ale”
You must place the MDF piece with the stuck bezel face down, about 1cm from the beginning of the sandpaper lane, and move it, gliding smoothly, following the showed arrow (PIC 5).
YOU MUST TAKE THE SUPPORT, WITH YOUR FINGERS, AS INDICATED IN PIC3 AND GLIDE SLOWLY AND SOFTLY, WITHOUT VERY STRONG PUSHING, AND ALWAYS IN THE SAME DIRECTION until 1-2 cm before the end of the sandpaper. DON’T RETURN BY THE SAME WAY BRUSHING. JUST LIFT UP THE SUPPORT WITH THE BEZEL AND START AGAIN THE BRUSHING AT THE BEGINING.
VERY IMPORTANT- BE SURE THE BEZEL IS ALWAYS IN CONTACT WITH THE SANDPAPER IN ITS ENTIRETY. DON’T ALLOW THAT SUPPORT TURNS FORWARD OR BACK WHEN YOU ARE SLIDING IT (SIDES PIC 3), TO NOT BRUSH THE EDGE OF THE BEZEL. YOU CAN FIND IN THE CENTER OF PIC 3 THE CORRECT WORKING WAY AND ON THE RIGHT AND THE LEFT THE WRONG WAYS.
For the first Grit size (more rough) you must repeat this process until you see that the scratches are completely come out. You have to brush the minimum necessary possible in order to reduce the bezel thickness as few as possible.
Clean the bezel with an absorbent paper towel roll (kitchen roll) after each sandpaper treatment. Or even, during treatment if you think it is very dirty, mainly with the first (more rough) sandpaper.
For the following Grit sizes, you must continue just until you achieve a uniform brushing finish (no more).
You can change the last sandpaper for a new one to make cleaner the last finish.
Clean the bezel in soapy water and dry it with clean paper roll.
In this system, the device can be placed over a table with flat board (very good marble or crystal ) or it is better to use an auxiliary MDF board to not damage the table. PICS 6 & 7.

PIC 6 – BRUSHING DIRECTLY IN TABLE OR MDF BOARD

PIC 7 – BRUSHING WITH AUXILIARY MDF BOARD
And now, I will show the system to achieve a mirror finsh polishing.
3- MIRROR FINISH POLISHING SYSTEM FOR BEZELS
Sometimes the bezel has a MIRROR POLISHED upper surface. In this case we could achieve a high-grade polishing, mirror finish, by a double treatment:
- Firstly- BRUSH THE BEZEL BY ONE SYSTEM OF ABOVE MENTIONED.
Start brushing with sandpaper P400, and continue successively with P600, P800, P1000, P1500 and finally P2000. If the bezel is not very damaged you could start with P600, P800 or P1000 directly.
After brushing clean the bezel with paper towel roll.
With sandpaper P2000 is already almost polished. But is not yet like a mirror.
Clean the bezel with paper roll with some soapy water (to remove oil). Clean well the bezel holes. Then, dry it with a clean paper roll.
- Second- MAKE A “LAPPING” TO ACHIEVE MIRROR FINISH. PIC 8
Take a thick (over 6mm) glass surface of a size about 30x30 cm
Put a layer of polishing paste over the glass surface.

PIC 8 – POLISHING (MIRROR FINISH) OF THE BEZEL
Place the support bezel, with the stuck bezel face down, on the glass surface over the polishing paste.
Start “lapping” making movements in the shape of a big “8” as indicated in PIC 8.
When the bezel support is moved, it must not follow the “8” shape like a car in a road, don’t turn it, it must remain always parallel showing the same face to you. See PIC 8, during polishing, the side marked “A” in the bezel support must always be looking ahead.
You have finished the polishing treatment when the surface of the bezel has a mirror finish.
Clean the bezel in water and dry it.
WARNING: THESE SYSTEMS ARE SUITABLE TO REPAIR ALMOST ALL BEZELS. BUT THESE SYTEMS FOR BRUSHING AND POLISHING REQUIRE SOME EXPERIENCE IN HANDYCRAFT AND BRICOLAGE. IF YOU HAVE NOT DO-IT-YOURSELF ABILITIES DON’T START A TREATMENT WITH A BEZEL LIKE THE SHOWN IN THIS THREAD.
This Thread is open. I remain waiting for your comments, suggestions, corrections… and mainly for your experiences and results, in order to share them with all RWI people.
It would be very appreciated, some informations about the Grit sizes you have used for a concrete watch…some interesting variations…improvements…even experiments
As always, I hope to have been useful and helpful with this Thread.
Many thanks for your kind attention
ALE7575

