- 2/9/06
- 1,399
- 41
- 48
(Admin: please feel free to pin or move this thread to a different forum, if applicable)
The Rolex Submariner, in particular, is arguably one of the most popular, sought after, and replicated watches in the world. It's no wonder that the search for this very timepiece is what drives such a multitude of people to join these great forums in the first place. I know because that's how I found them. So for everyone, after a while of lurking & learning, then contributing and becoming a little tenured, one will inevitably read repeats of the ubiquitous question "Who has the best Sub?"... For our newest members, pay close attention--in all honesty, there is no true or steadfast answer to that question, and due to a constant market demand, there probably never will be. Each different model from every dealer & manufacturer has it's own list of pros, cons, and mods to be done.
As I'm sure plenty of other members do, I receive a vast number of PMs regarding modding these watches--specifically the diver's watches; the Submariner and Sea Dweller. In posting this thread, I will attempt to explain--in terms both veterans and novices will understand--how to take your basic, out-of-the-box replica, and hopefully move it a few steps closer to looking like a genuine.")
This article requires no advanced skill in order to achieve what is shown in the pictures below. These mods are not something so complicated & expert that they will transform your replicas into something that will fool anyone when put under a microscope; as no amount of modification will. These are, simply put, relatively quick & easy mods that I will try to illustrate as simply as possible, to help fellow hobbyists learn a little about what they're wearing and how to make it a bit more accurate, without high cost or the use of expensive or complex machinery.
You will find most of the tools & supplies I employ below are actually household items easy to come by for most watch-nuts, and for those that might not be, I have taken the liberty of including descriptions, pricing, and availability via links, for all the tools I use here.
The specific model I have chosen to modify for this article, is the newest release of the Rolex Sea Dweller, model # 16600. These are, of course, general modifications that can be performed on all of Rolex's dive watches, from the steel Submariner 16610, to the green 50th anniversary edition Submariner 16610LV, the two-tone 16613, the Sea Dweller 16600, etc.
If you don't already have them, some inexpensive tools that you find you'll repeatedly need in this hobby are the Beifang caseback keys:
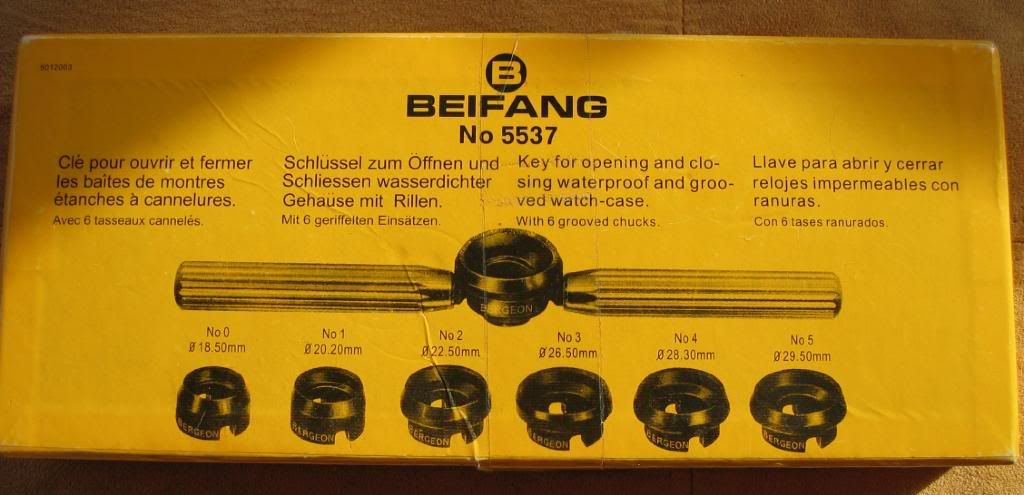
You'll find this multi-purpose set will open all types of Rolex casebacks, ladies and mens models including the newer mid-size unisex versions, and both the modern & vintage models. I purchased mine from a trusted & established dealer on this board, named Andrew. His link for these are here:
http://www.trustytime88.com/index.php?m ... cts_id=732
One of the screw & nut driver sets I use below, was acquired from Amazon, here:
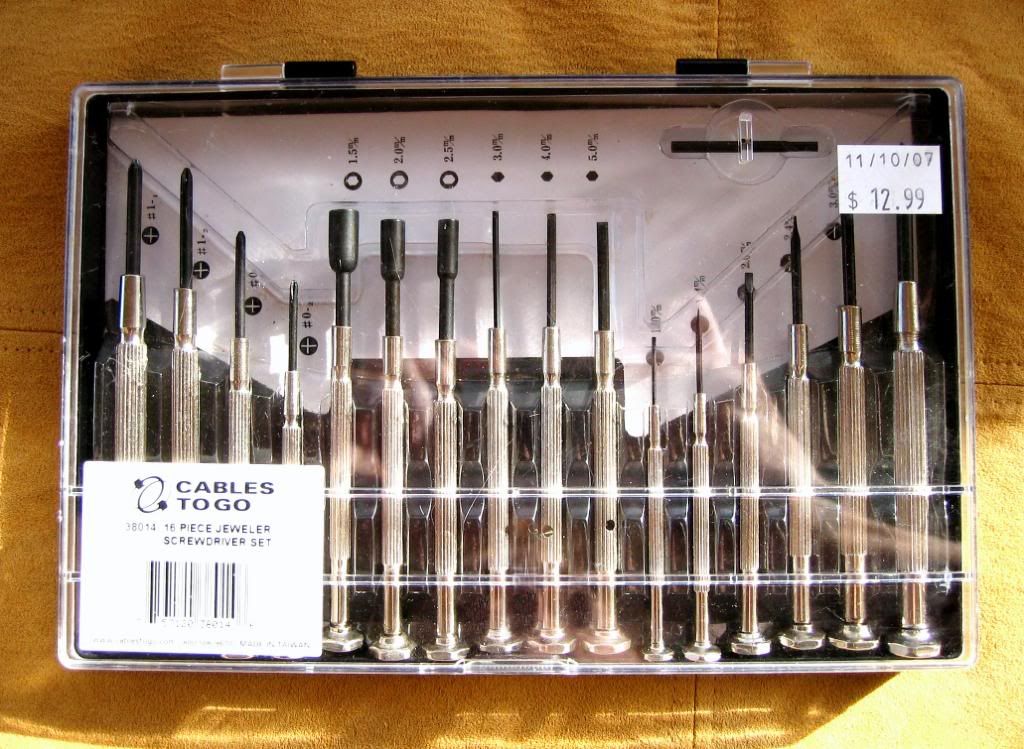
http://www.amazon.com/16-Pc-Jeweler-Scr ... 301&sr=8-2
The modification we will begin with is shaping the CGs (crown guards). Note: CGs differ from model to model, depending upon the make and the year. For example, the Sea Dweller does not have the exact same shape CGs as the Submariner does; and vintage Submariners do not have the same size or shape that the modern ones do. It's best to have a picture for reference when working on them. Try to use a picture of an actual genuine to model yours on, if you've never owned or studied one before--don't use pictures of modded replicas, because not all are done the same. I find one of the best places to get pictures of the genuine article is on eBay; there's usually a multitude of shots from various angles. It's quite easy to tell the difference between the scam artists and the reputable dealers, by looking at the amount of positive feedback and quantity of sales they've amassed under their screen-name. Here's a good example of a well respected dealer, currently offering the new Sea Dweller:
http://search.ebay.com/_W0QQsassZmvpwatchco
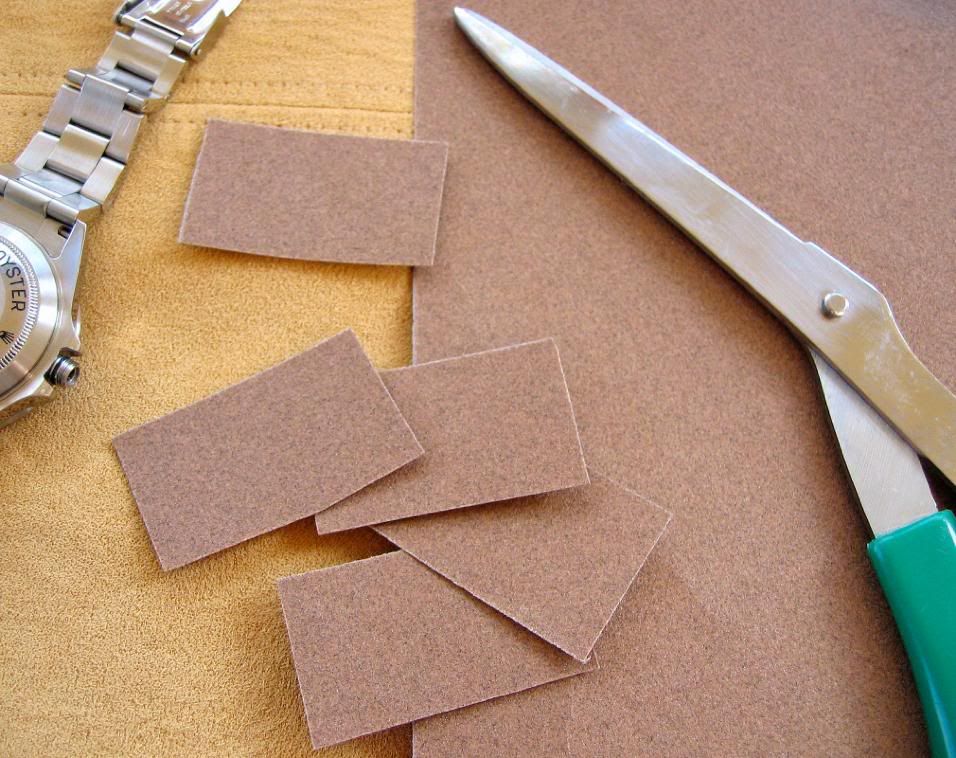
Now, to get started. Aside from the caseback opener & screwdriver set mentioned above, the materials we'll need for modding the crown guards are just a couple sheets of ordinary 150 grit sandpaper, a roll of Scotch tape, and a pair of scissors.
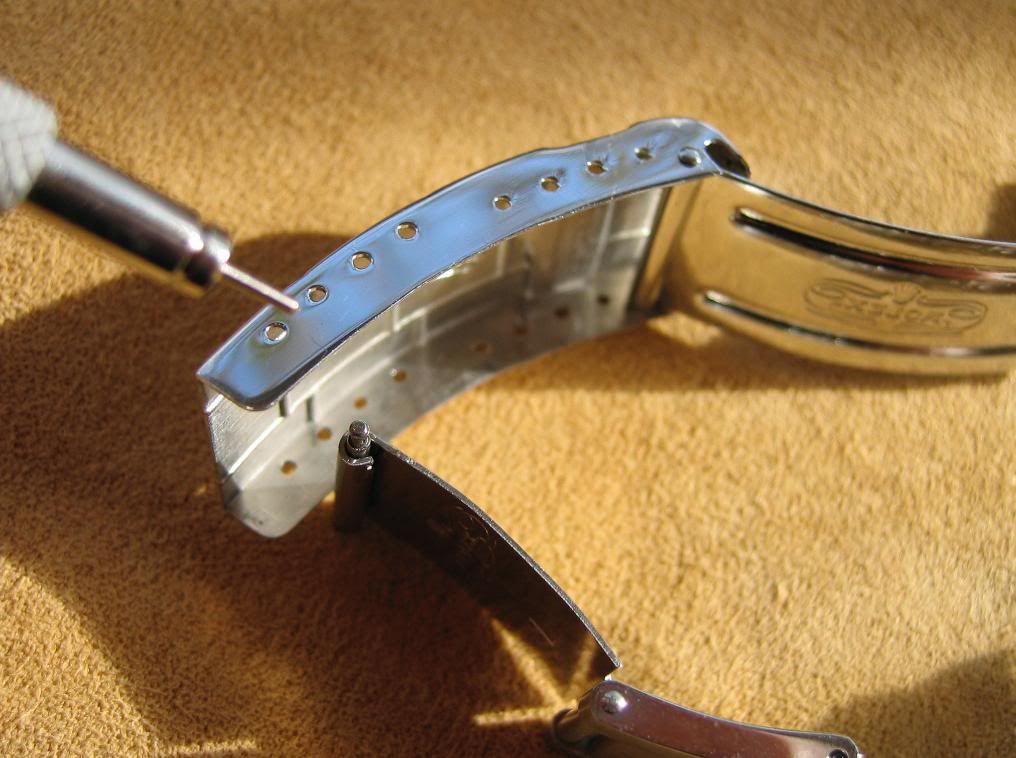
I like to start by removing the pin holding the diver's extension in the clasp, rather than removing a screw in one of the wristband's links (as some models are noted for having problems with those). You can use a watch-pin remover or simply the edge of a 1mm screwdriver:
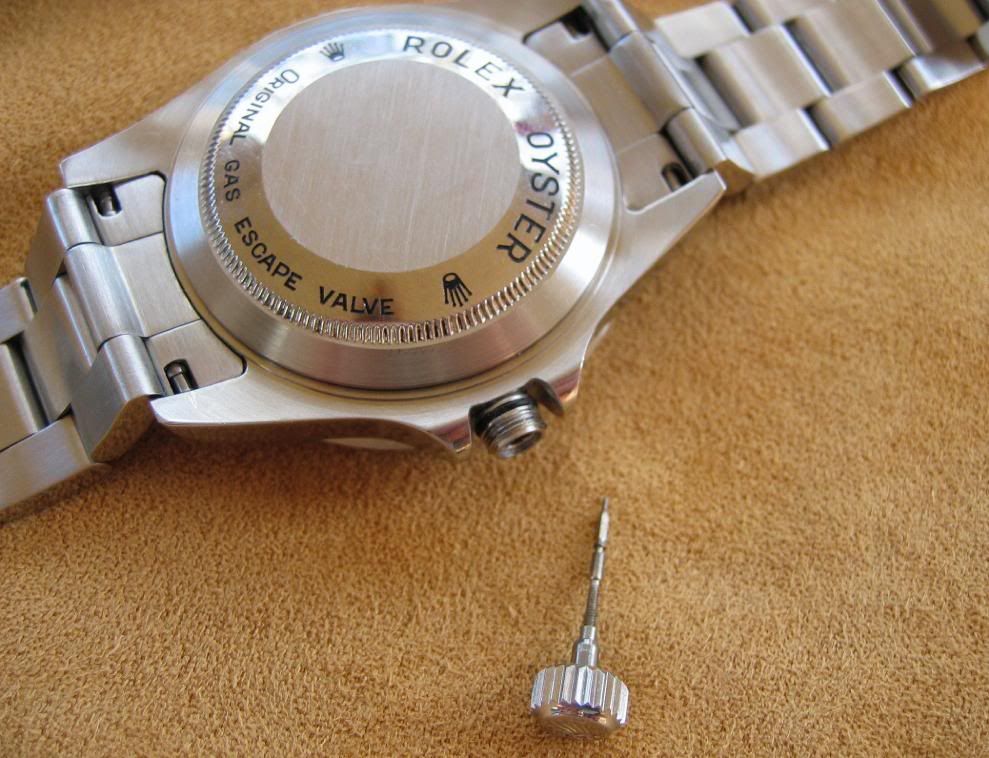
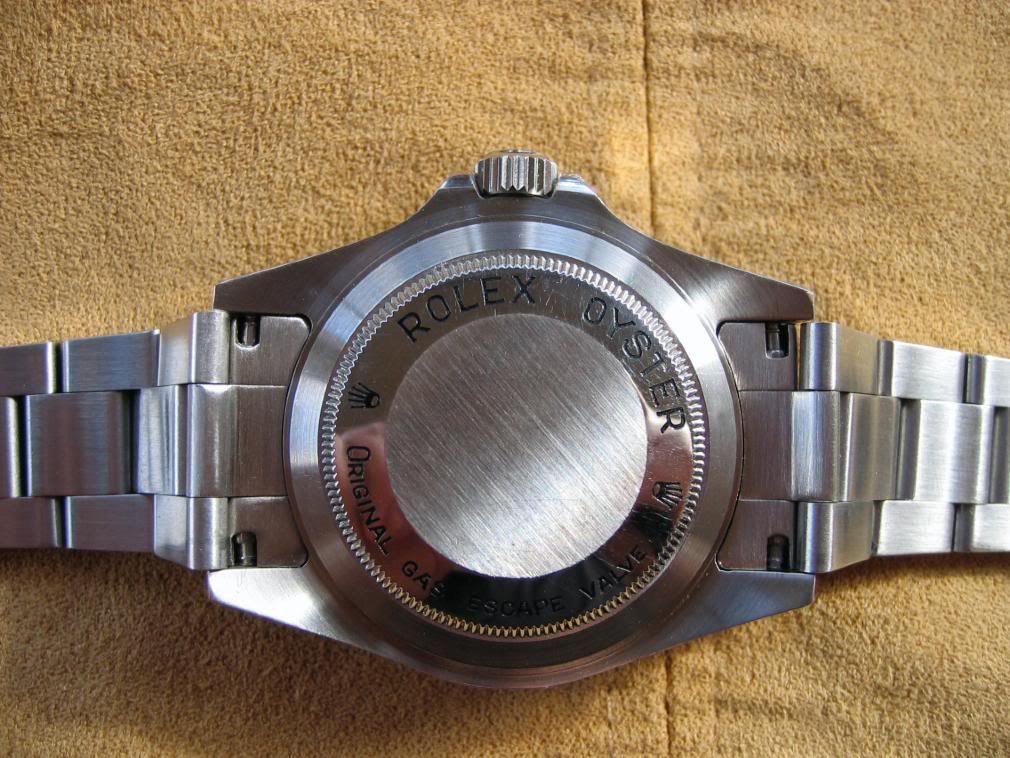
Next, remove the caseback:
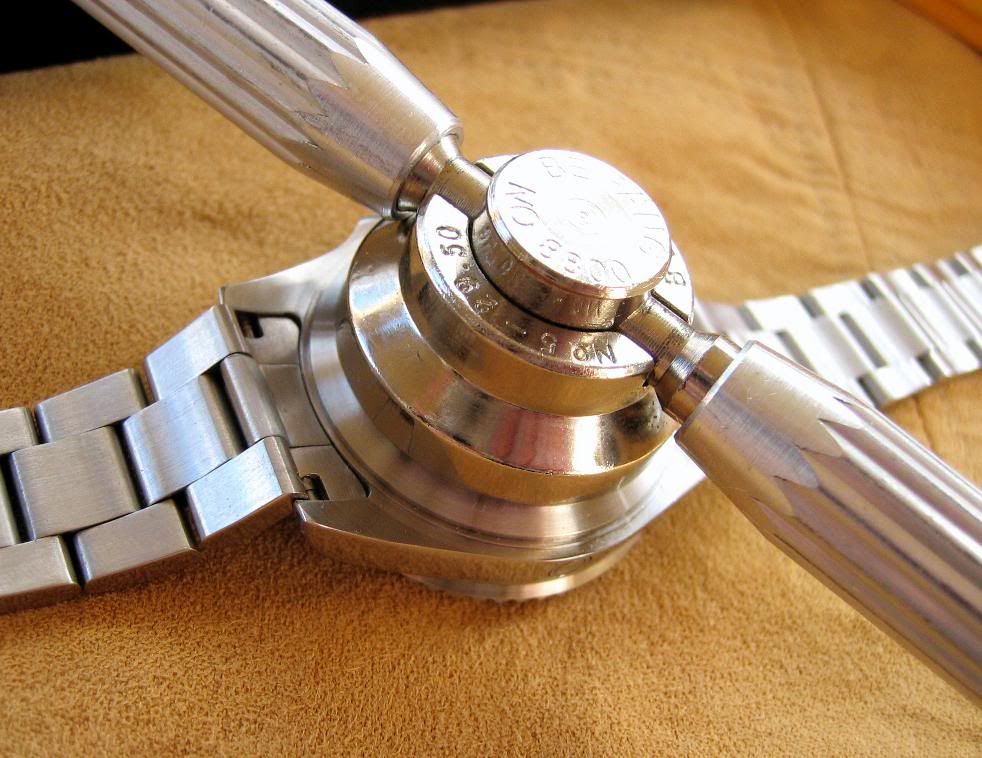
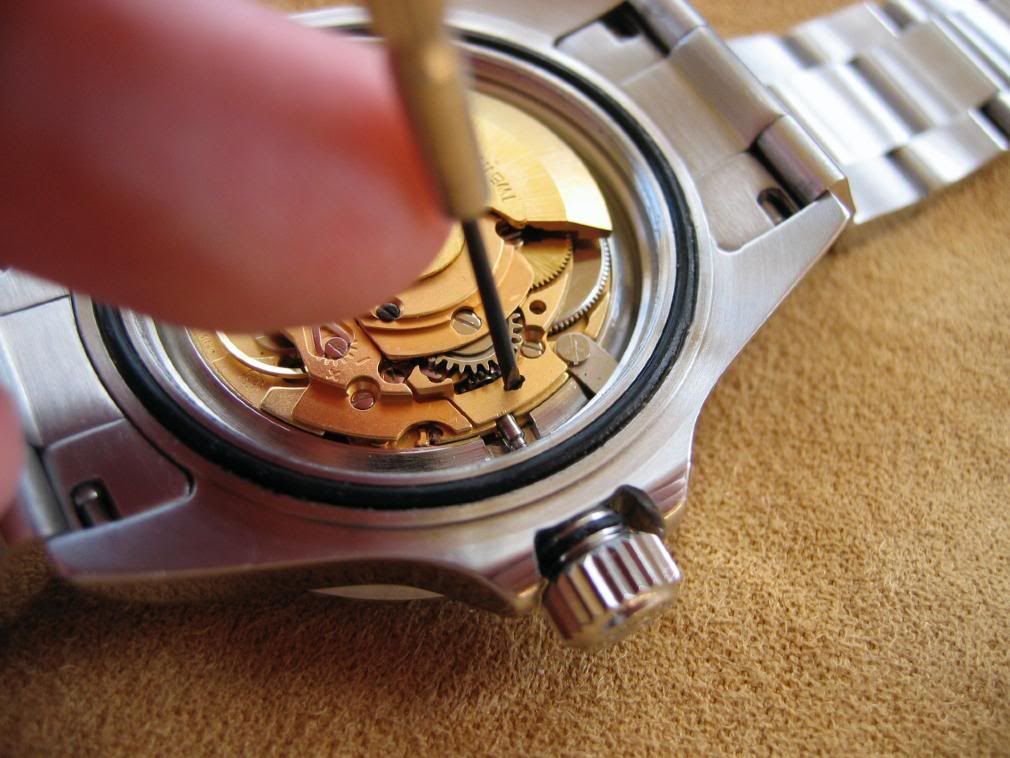
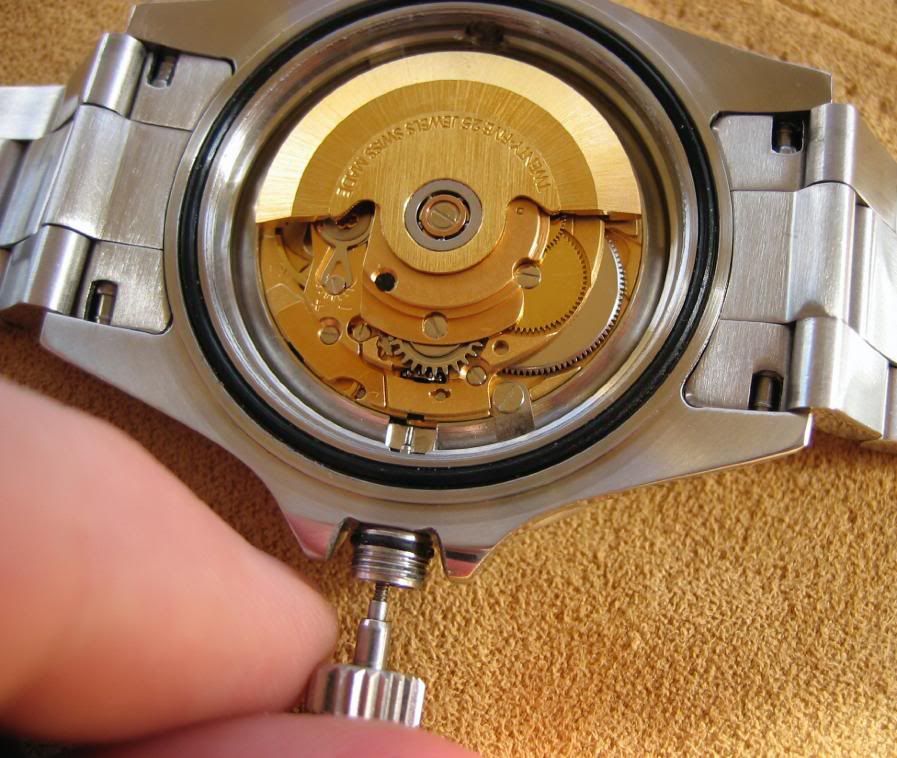
Unwind the crown from the tube and pull it out to the time-set position. The second hand should stop ticking on most models at this point. After you've done this, use nothing smaller than a 1.2mm screwdriver to gently depress the crown release mechanism (shown), while pulling on the crown to separate it from the movement:
Now, reattach the caseback to prevent dust & debris from entering through the back:
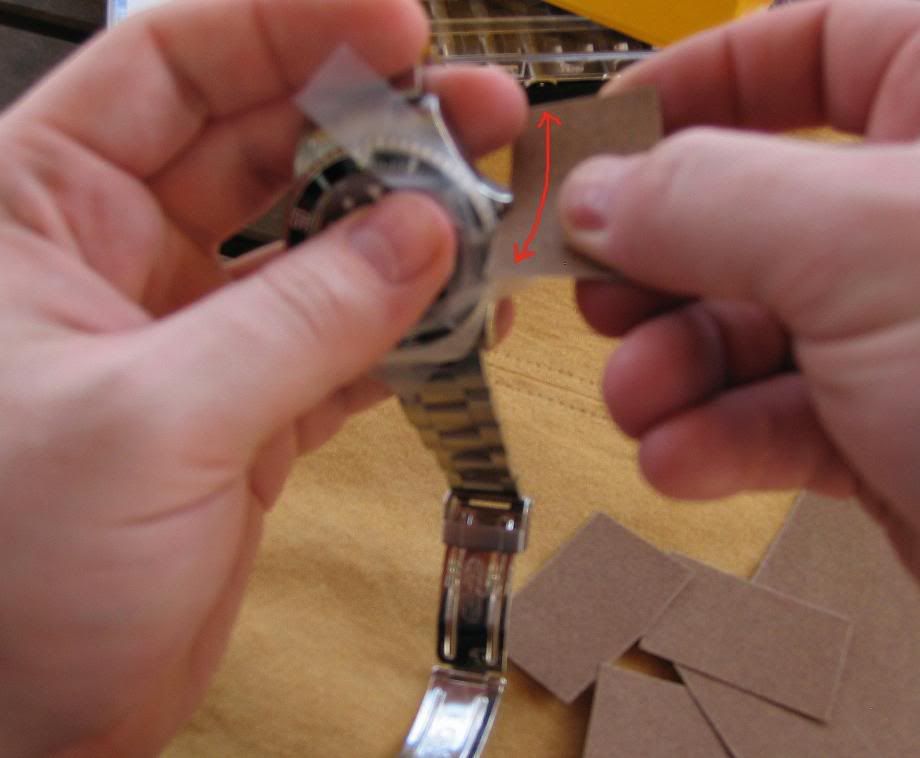
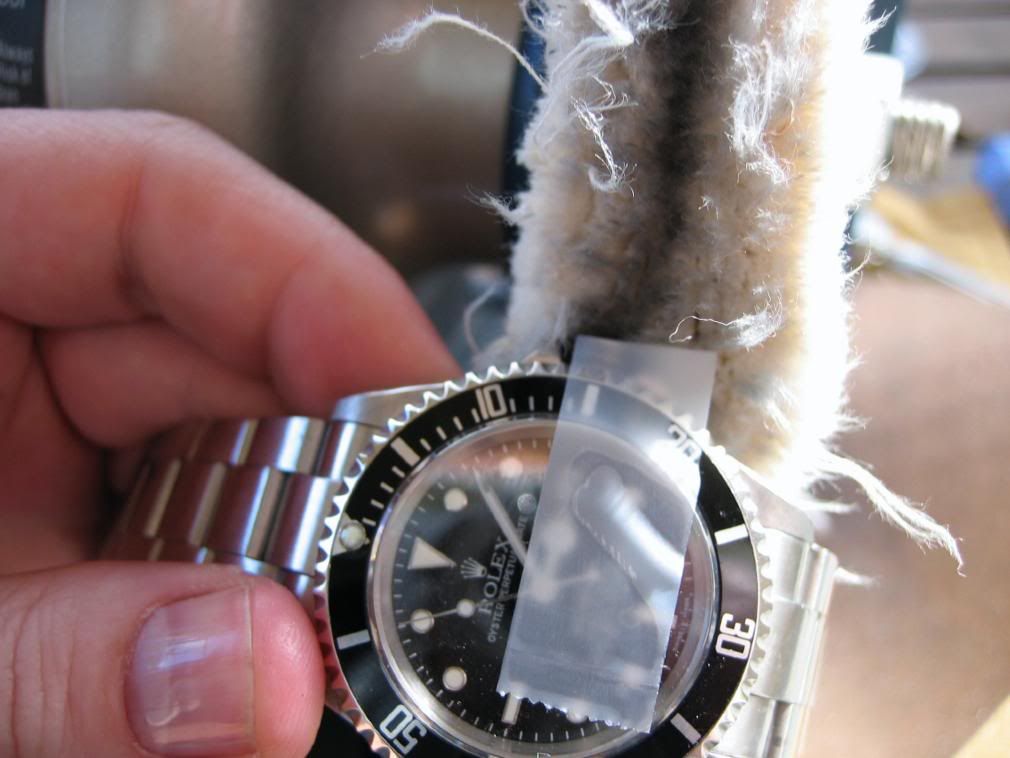
Next, cover the edge of the bezel with a strip of the Scotch tape to prevent it from getting scratched during sanding:
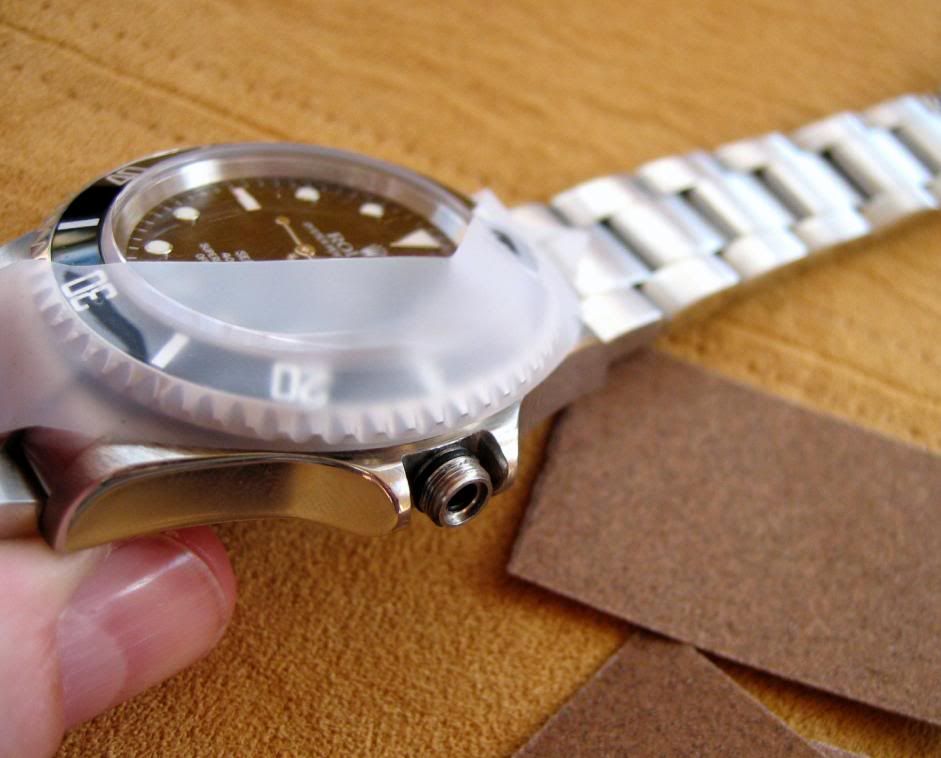
Make sure to cover the tube hole with tape, to prevent debris from entering through here:
Now, cut a few pieces of the sandpaper into 1 inch strips. Cut as many as you like, they'll wear out quick, and you'll probably burn through a lot of them:
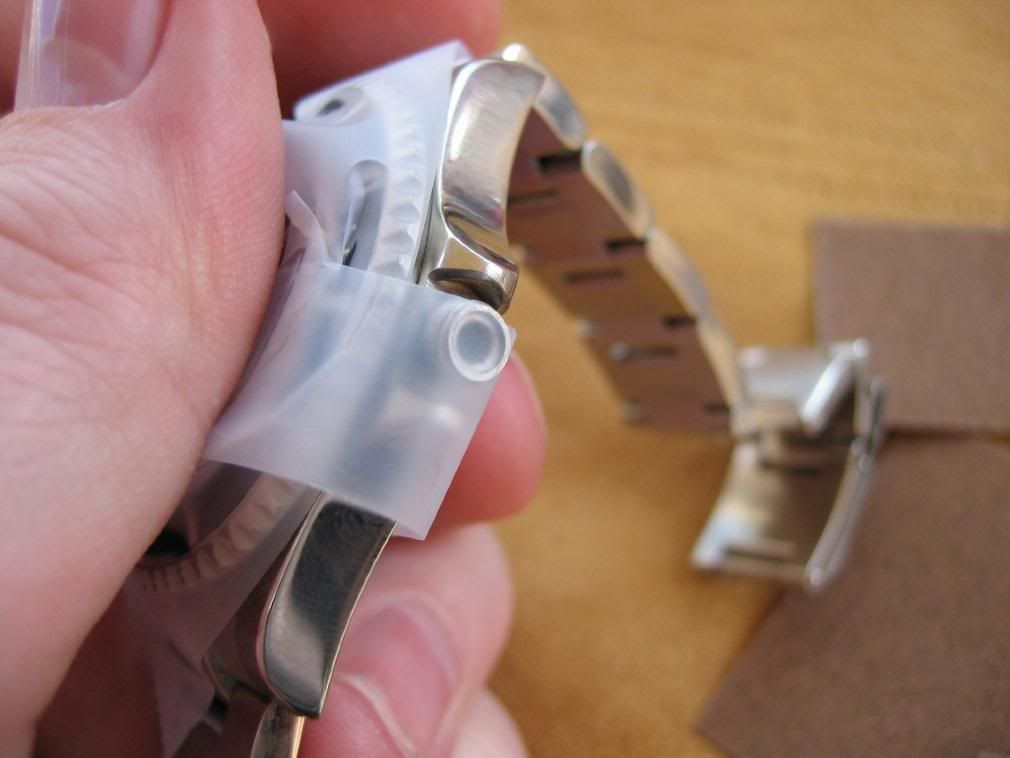
With the coarse side of the paper facing the CGs and the smooth backing facing the tube, begin sanding (only) the insides of the crown guards, with gentle, back and forth motions. Be careful the coarse side of the paper never touches the tube, as it can easily disfigure the tube's threads or ruin the tube gasket, rendering the watch hopeless for waterproofing, and possibly ruining the threads, making it unable to reattach the crown.
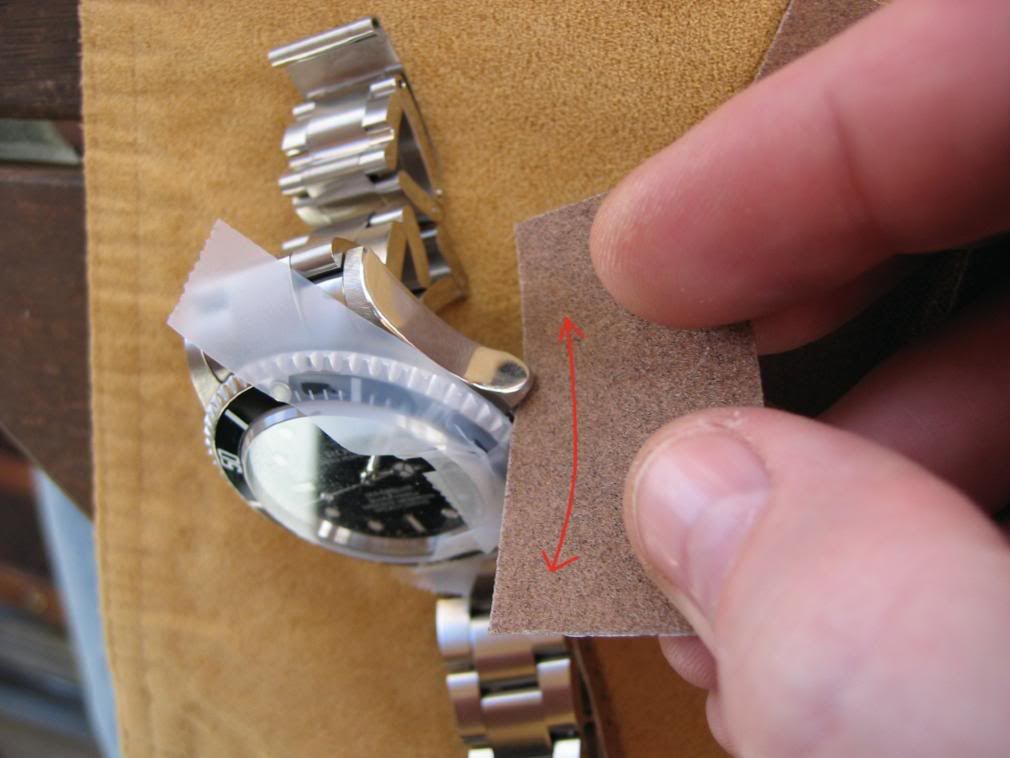
Alternate between right inside and left inside on the CGs, stopping every few minutes to check your progress, to make sure of the form & shape:
The reason we're using a more traditional method, rather than one with power-tools is because as a novice, one slip of the wrist with a Dremmel spinning at 4000-10,000 RPMs, and your watch was just rendered useless. Also make sure to check the tape occasionally, in case the sandpaper is eating through.
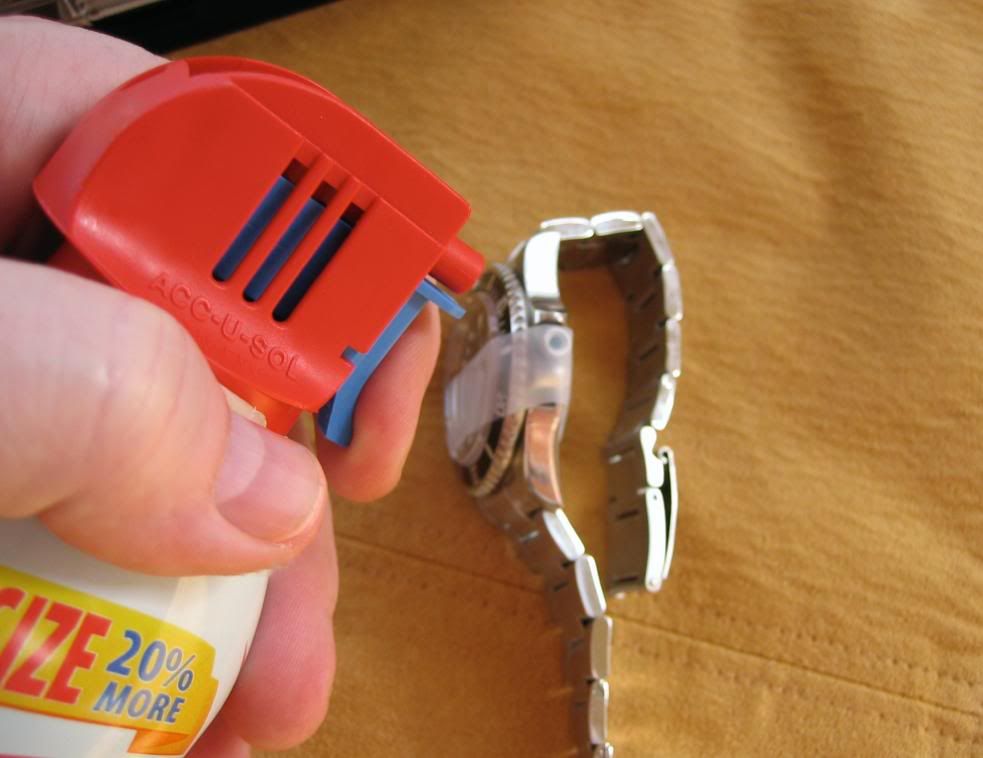
The whole process--depending upon your speed & efficiency--should take about 30 minutes. Once you've completed this, a simple can of compressed air will clear away most of the debris:
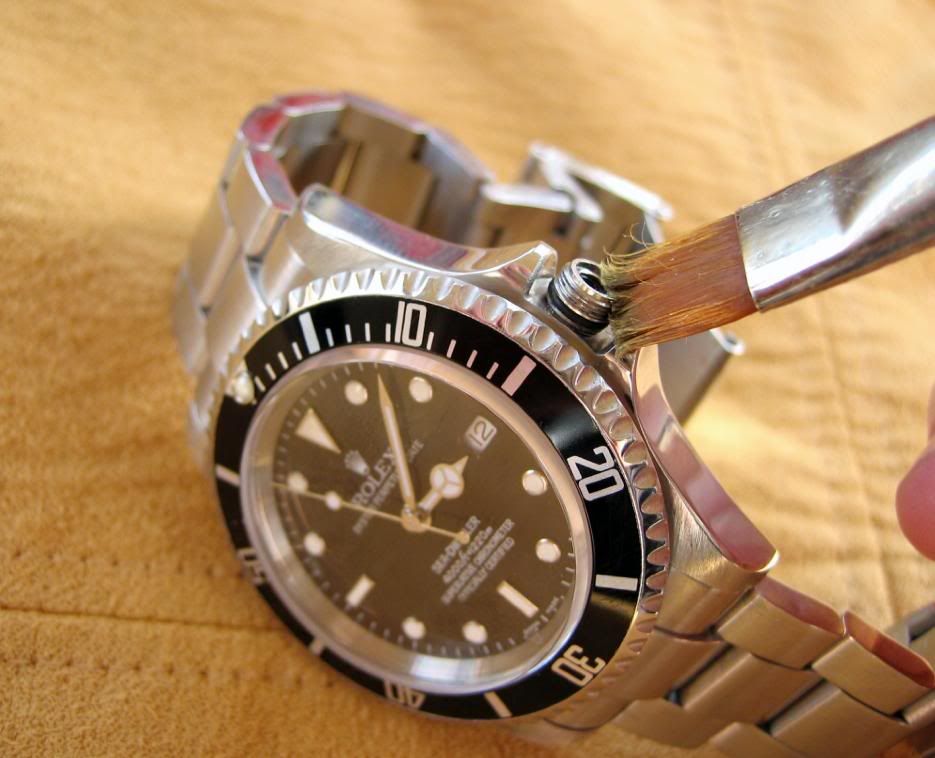
What is left, can also be removed with a small brush (this is also a good time to apply a thin coat of silicon grease, for waterproofing). You can easily find a 1 oz jar of silicon grease on eBay or Amazon for under four dollars.
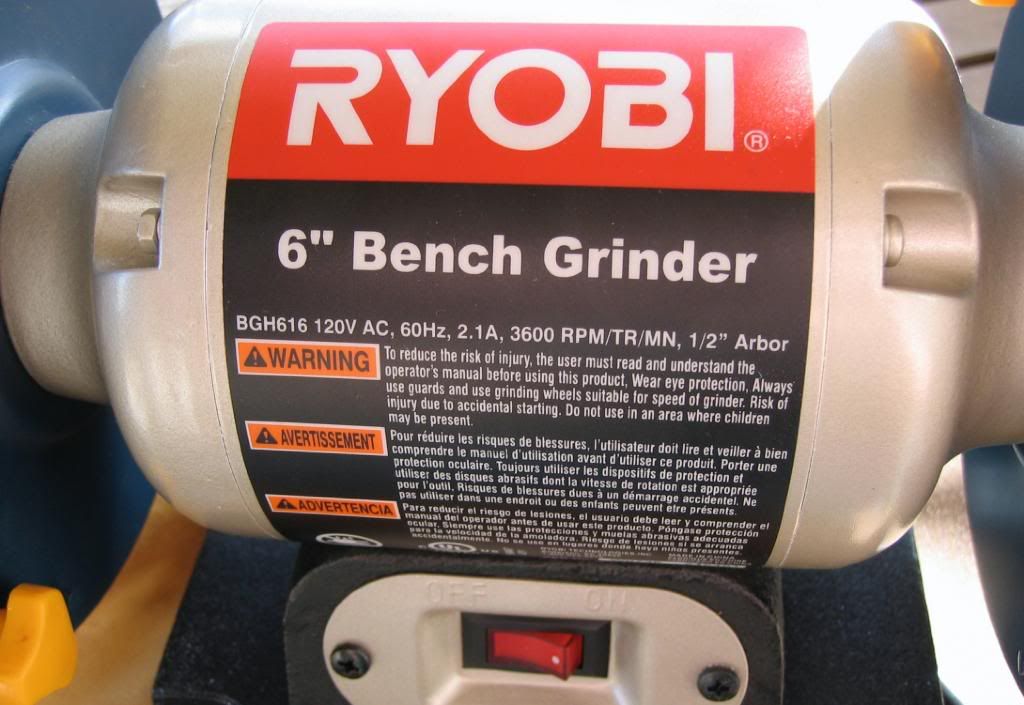
OPTIONAL: Instead of spending $70-100 on a Dremmel for polishing, most hardware stores sell bench-grinders that go up to 4000 RPMs for half the price of the Dremmel. I found a 6" Ryobi at the Home Depot for only $39; I just replaced one of the grinding stones with a cloth buffing pad:
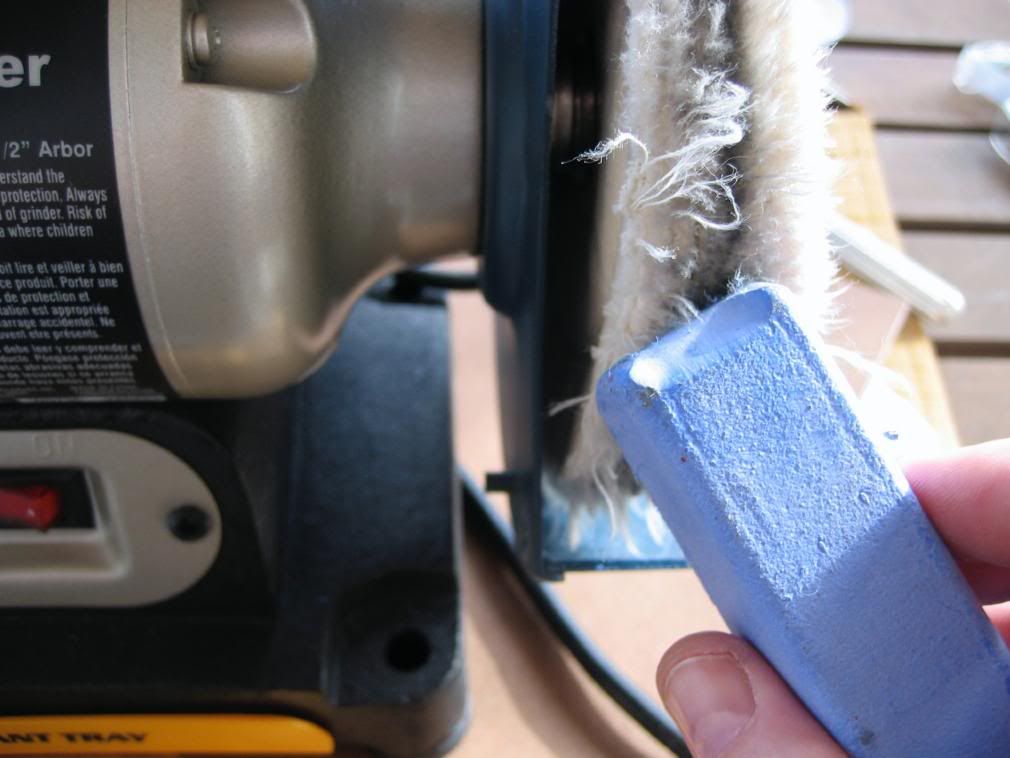
On the wrist, the insides of the CG's will not be visible to the naked eye, once the crown is back in place. But if you're a stickler, you can give them a quick polish with some extra-fine blue jewelers rouge:
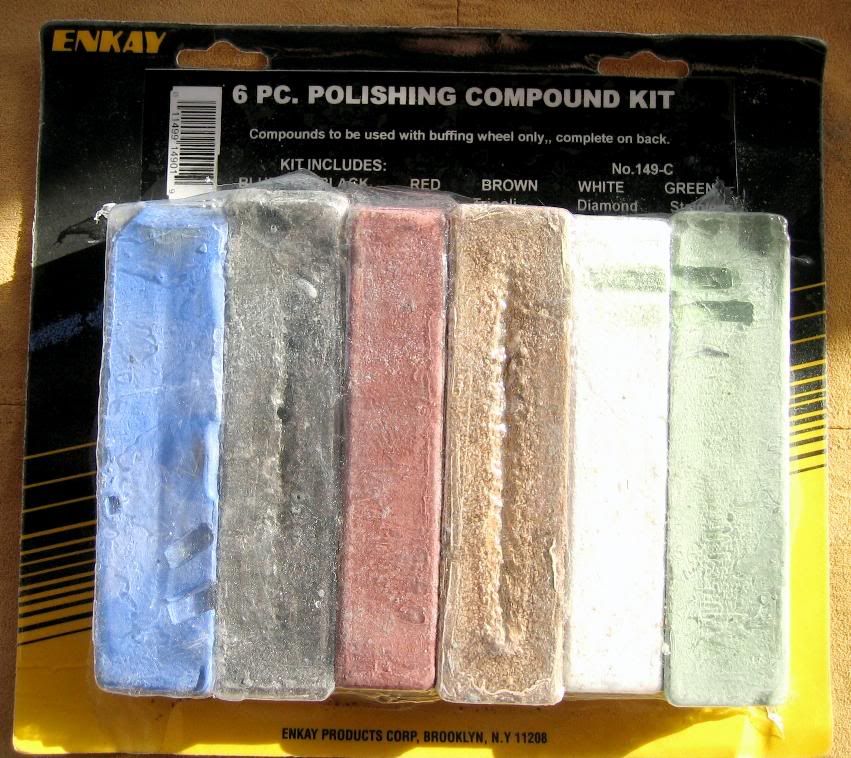
http://www.amazon.com/6-pc-Polishing-Co ... 693&sr=8-3
Be sure to leave the tape on when polishing:
Now remove the caseback once again, and line up the crown-stem to reinsert:
This might take a couple of attempts to get it aligned & synched up properly. Double-check this by adjusting the crown to make sure the movement winds, and reset the date & time if necessary. Now simply, reattach the caseback:
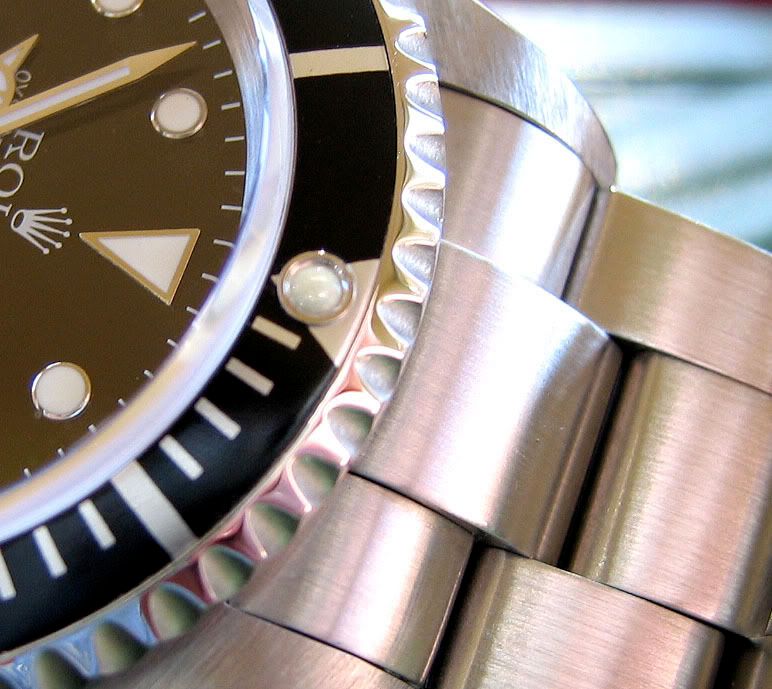
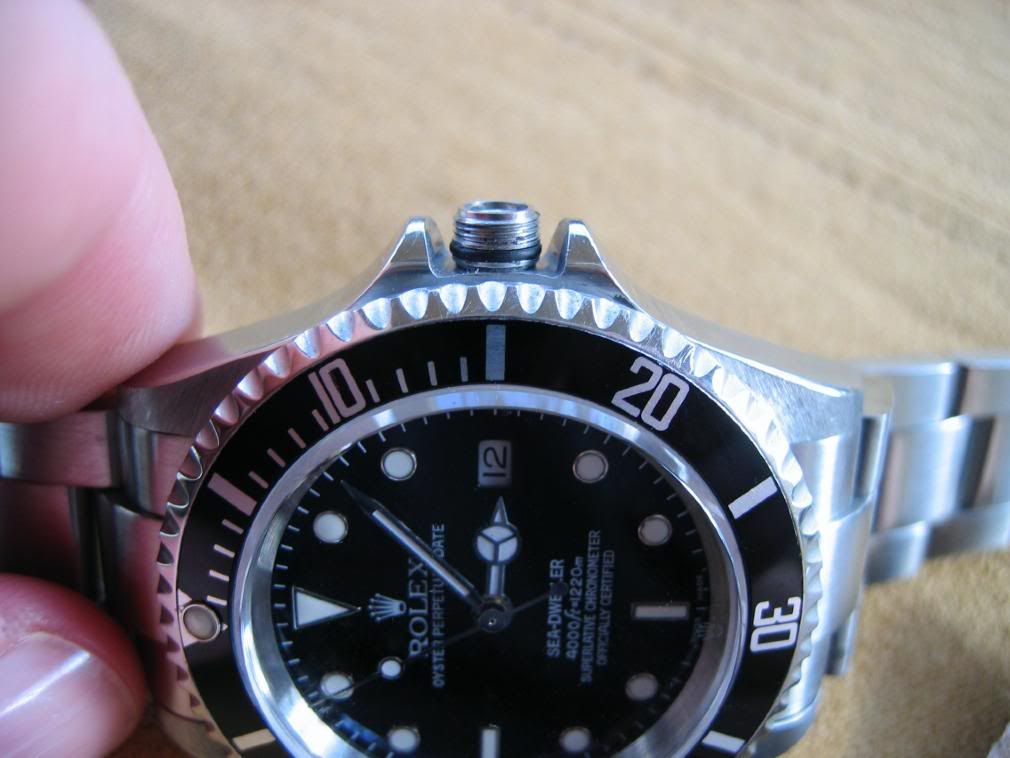
Your CGs should now look complete!
Next up, changing the bezel insert (and pearl).
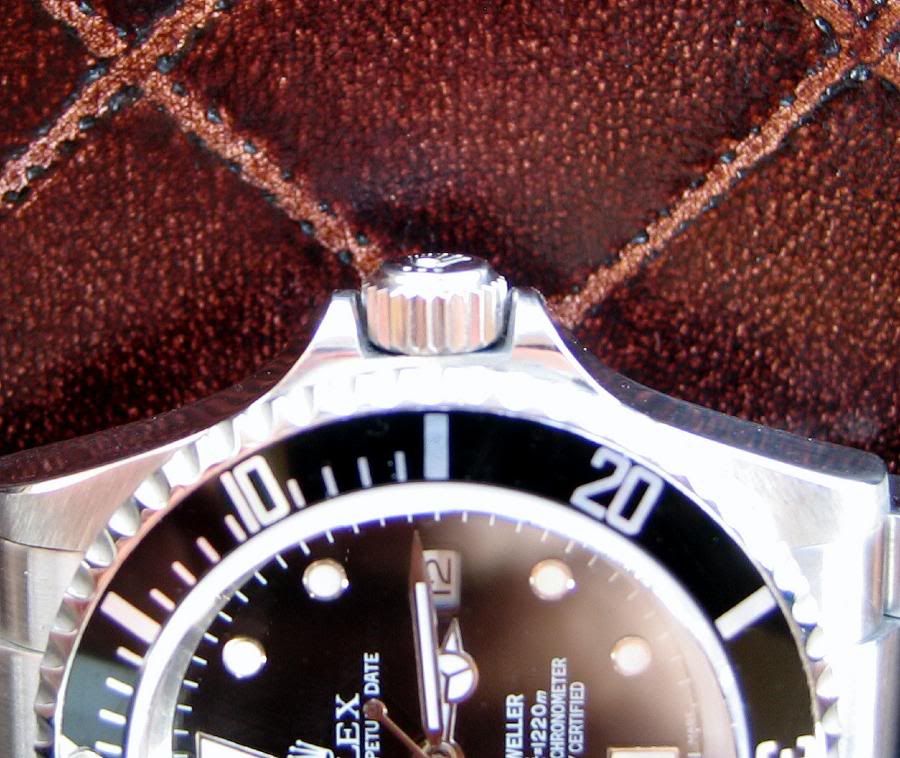
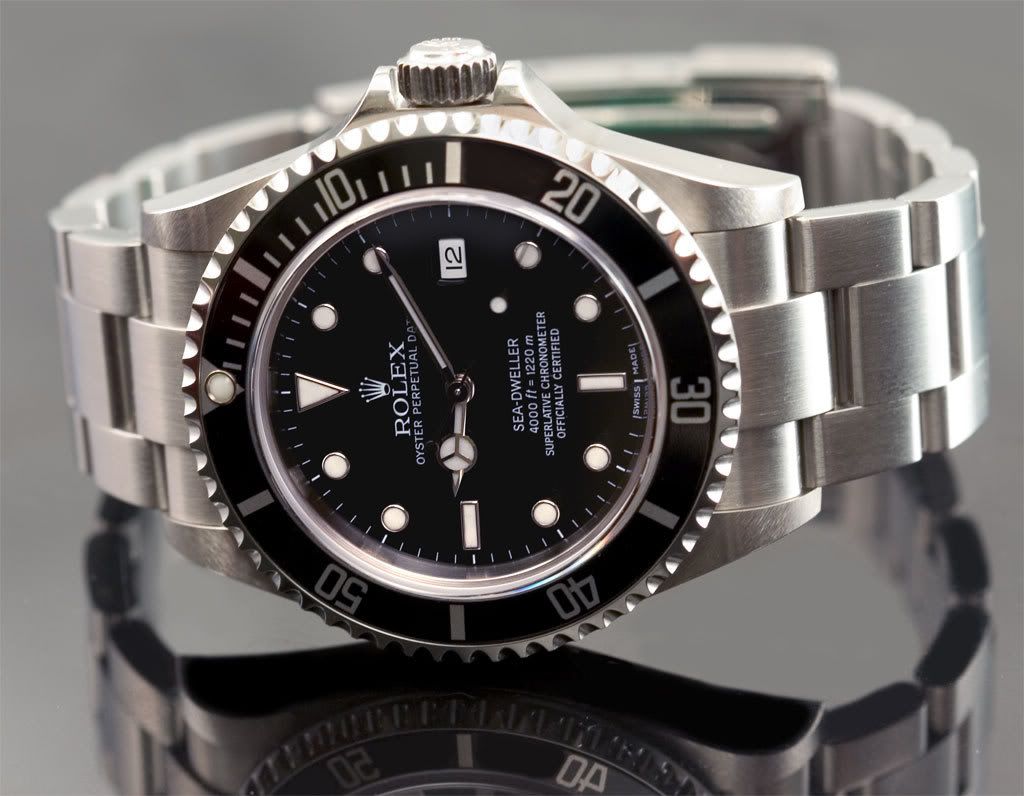
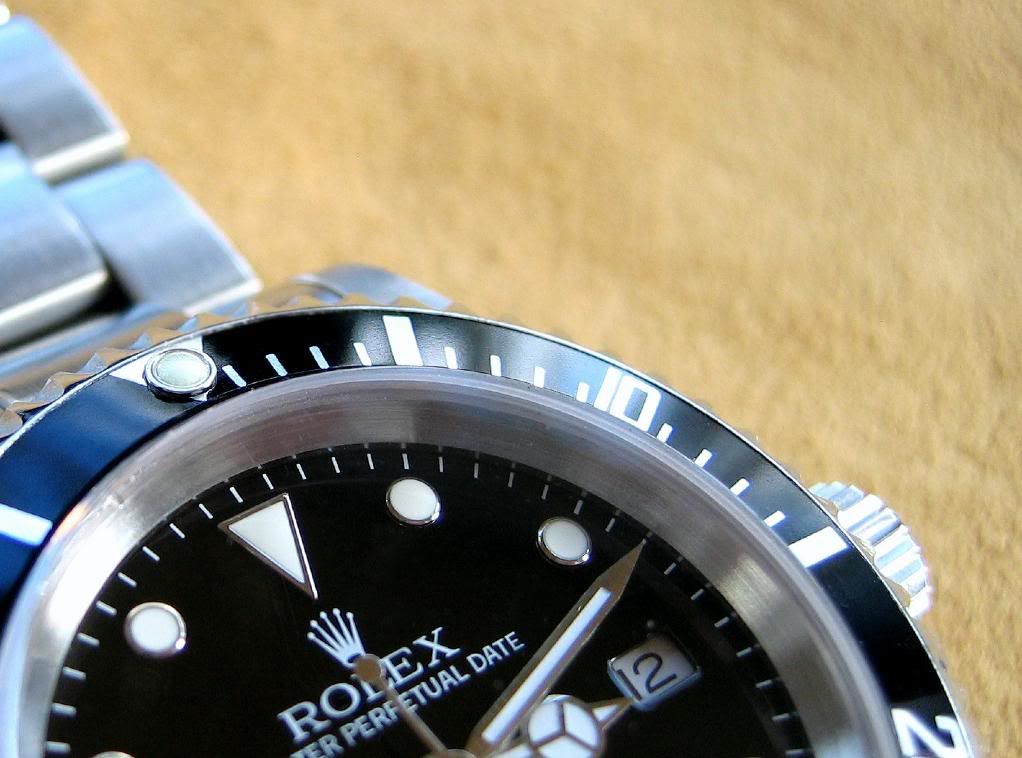
All reps come with inserts that aren't seated properly, and all have incorrect pearls. The colored bezel insert (in this case black with silver lettering) should sit slightly below the steel lip of the bezel itself. Observe the genuine:
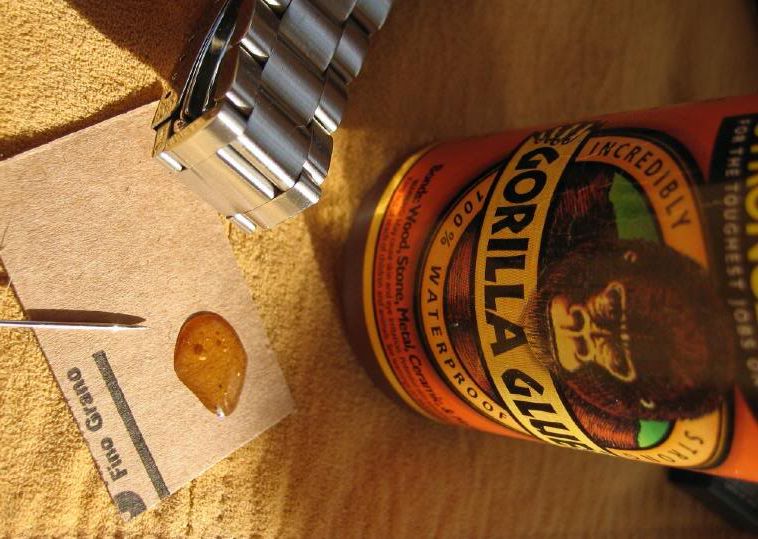
For this modification, you will need a good bezel insert (available from many sources, but the one I find the most accurate is listed below), another sheet of 150 grit sandpaper, some Gorilla brand glue, and a sewing needle.
Here's the link for your insert needs:
http://24.227.47.211/adn62/pc-177-32-ge ... rolex.aspx
And here's how your watch's needs break down, by part #:
I believe the older/vintage subs take the 315-5513-1-I
New Sea Dwellers take the 315-16660-1-I
Modern Subs take the 315-16800-1-I
LV subs take the 315-16800-GRN-I
TT blue subs take the 315-16808-2-I
and TT black subs take the 315-16808-1-I
The rest are self-explanatory. I prefer this site because they seem to have the crispest, thinnest print (much better than jewelery outlet & closest to the genuine), and the pearl is even better than watchmaterial.com.
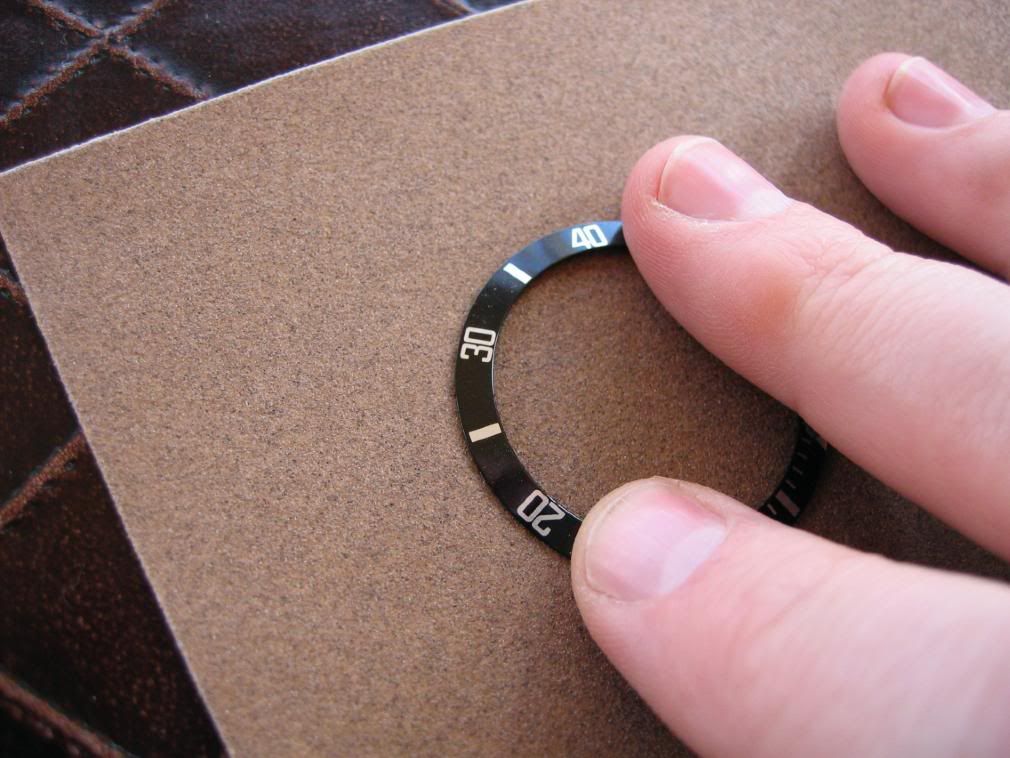
Start by getting a parring knife and popping the pearl off of your watch's current insert. You can use either a small 1.4mm screwdriver or the tip of a knife blade to remove the old bezel insert by the hole the pearl left behind. Discard both; you won't need them.
Most genuine and aftermarket bezel inserts don't perfectly fit replica watches, so some minor adjustments have to be done.
First, start by sanding the underside of the new bezel insert. Place the sheet of sandpaper, grit side up, on the table. Take note of which numbers are where on the insert when you start sanding--your fingers should be 30 minutes apart (i.e., holding the insert at the 0 and 30 minute markers, or the 15 and 45 minute markers). Gently, but firmly, sand the bottom of the insert in back & forth motions, moving left to right.
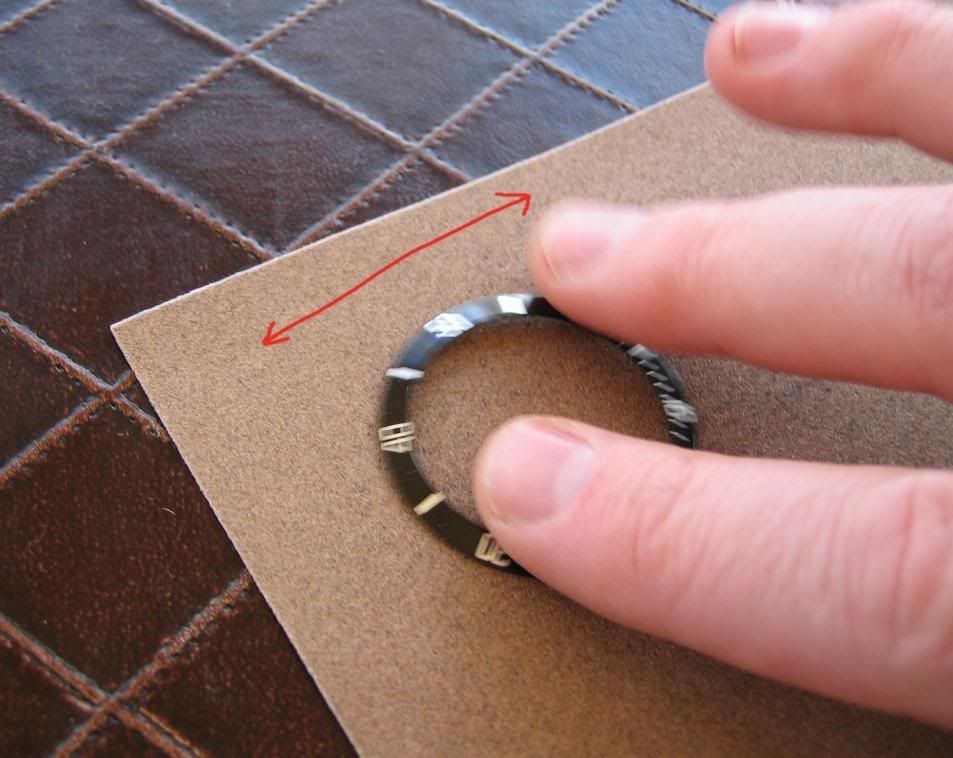
You will have to use some pressure to get the insert to stick to your hand while sanding, but not so much that you squish the insert; this will not only make the insert wider by flattening it, it will not sit in the bezel properly, and it will also make the crystal look to tall. Only make about 10 or 15 swipes, then move the insert & start again. Move the insert in your hand another 5 minutes marker, every time you stop (i.e. hold it at 0 & 30, make 10-15 swipes, then hold it at 5 & 35, then sand again, then hold it at 10 7 40 and sand again, etc.):

Underneath, you'll start to notice the paint coming off and the steel showing through; this is normal. Here you can see where not enough sanding has been done, as there are areas where the metal is more prevalent , which means that these parts of the insert will sit lower than where the paint still exists, which will sit higher & uneven:
Continue sanding until all sides are even:
Take note of the front as you sand--make sure you're not sanding too thin.
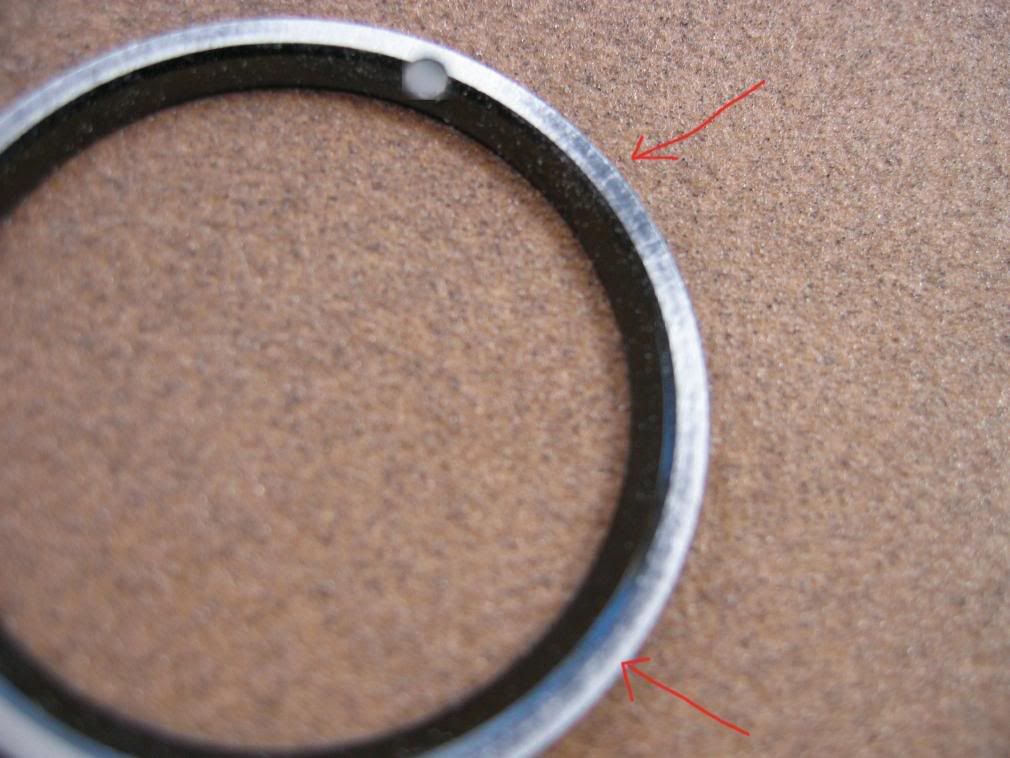
Next, check to see if the insert sits correctly in the bezel:
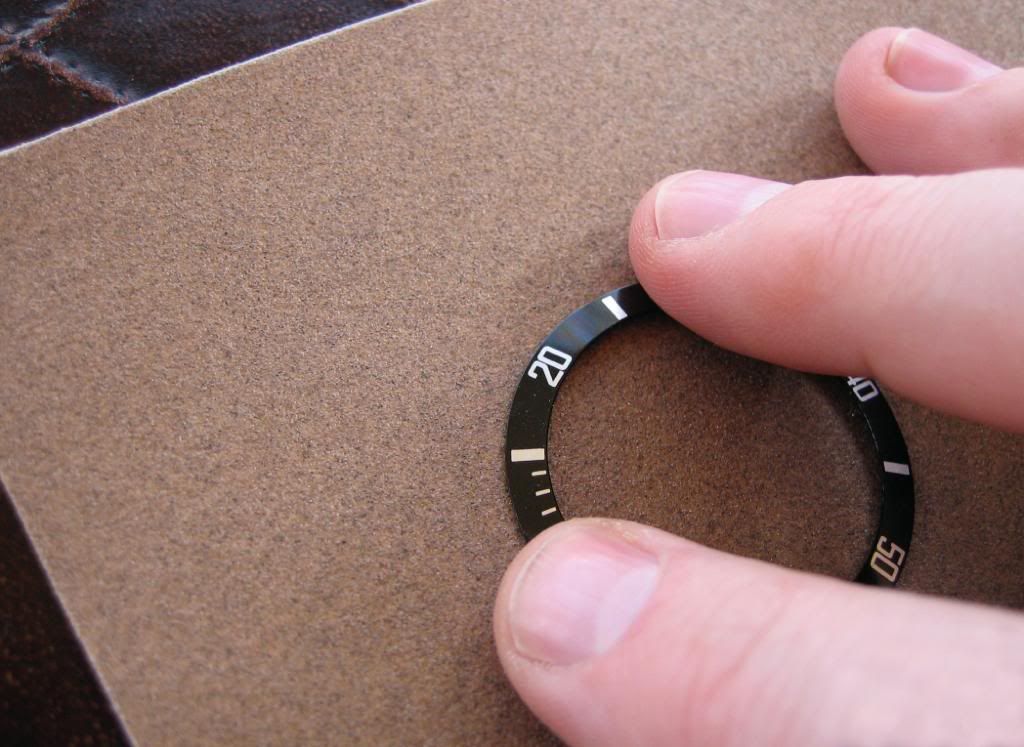
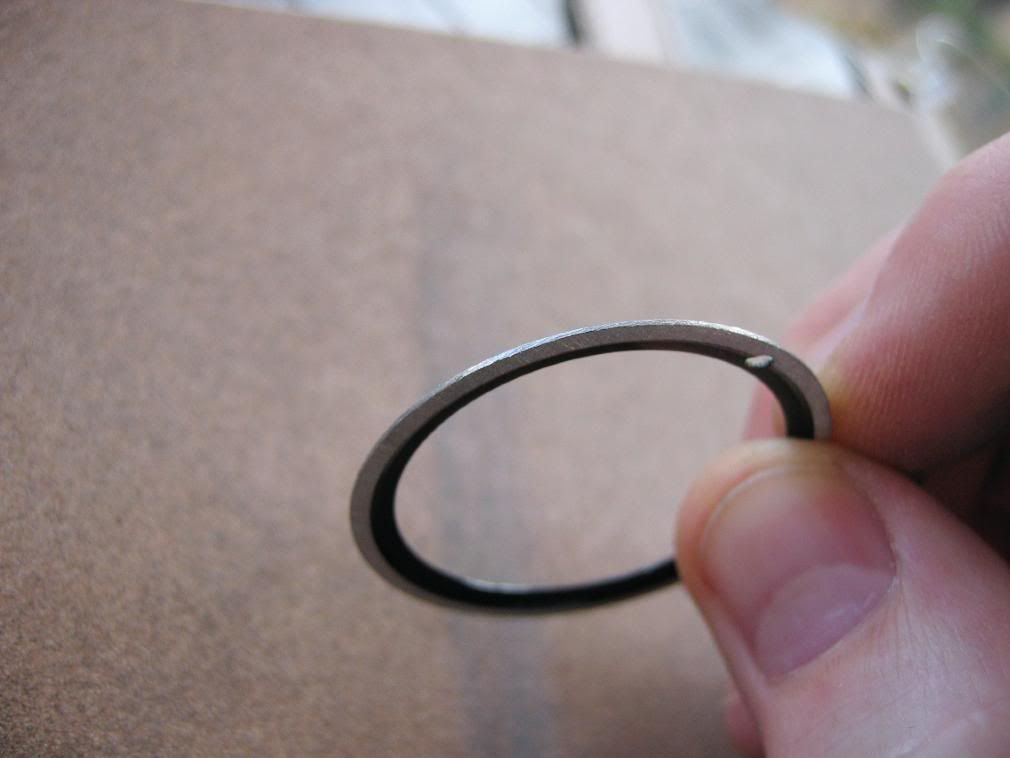
It doesn't look like it, so we'll have to sand the edges too. You'll also notice the sides of the insert still have paint on them, as they have not been sanded:
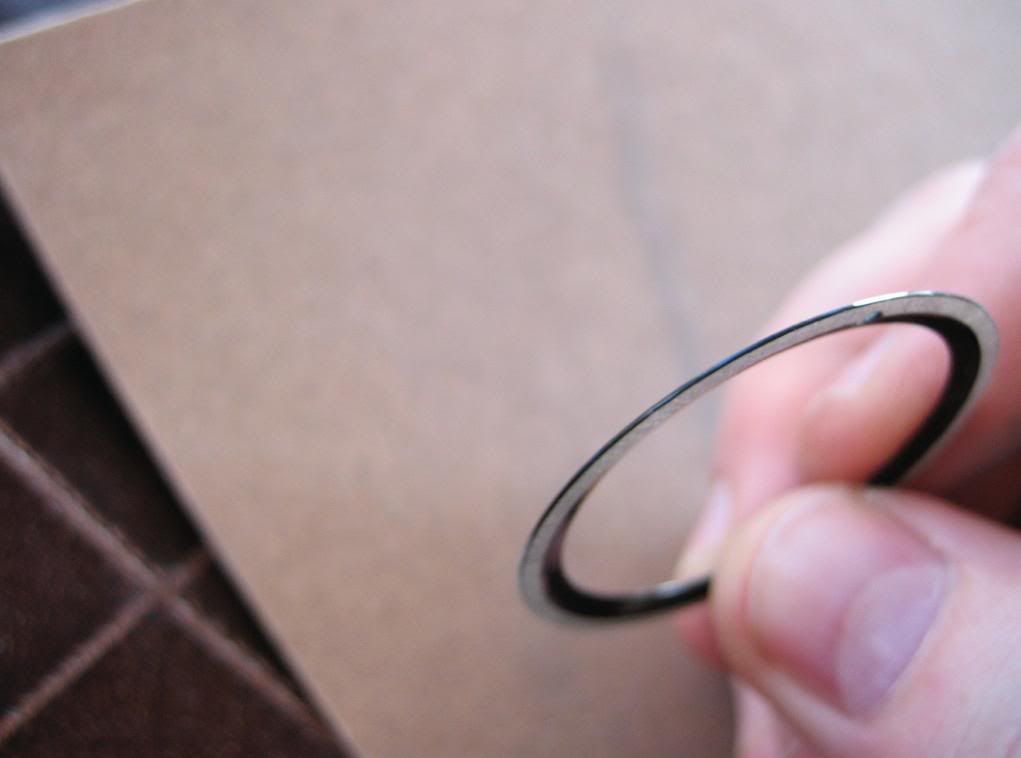
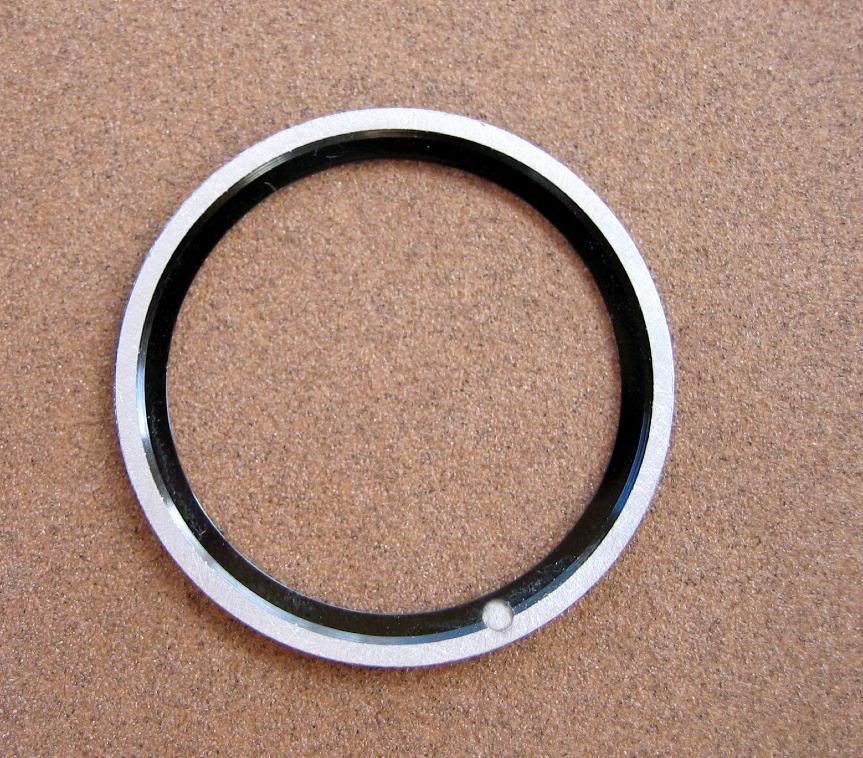
As opposed to one that has been sanded:
Start by holding the insert vertically, and gently begin sanding the sides by holding the insert steady place with your fingers, but rubbing the length of the insert that's showing, along the sandpaper in a straight line:
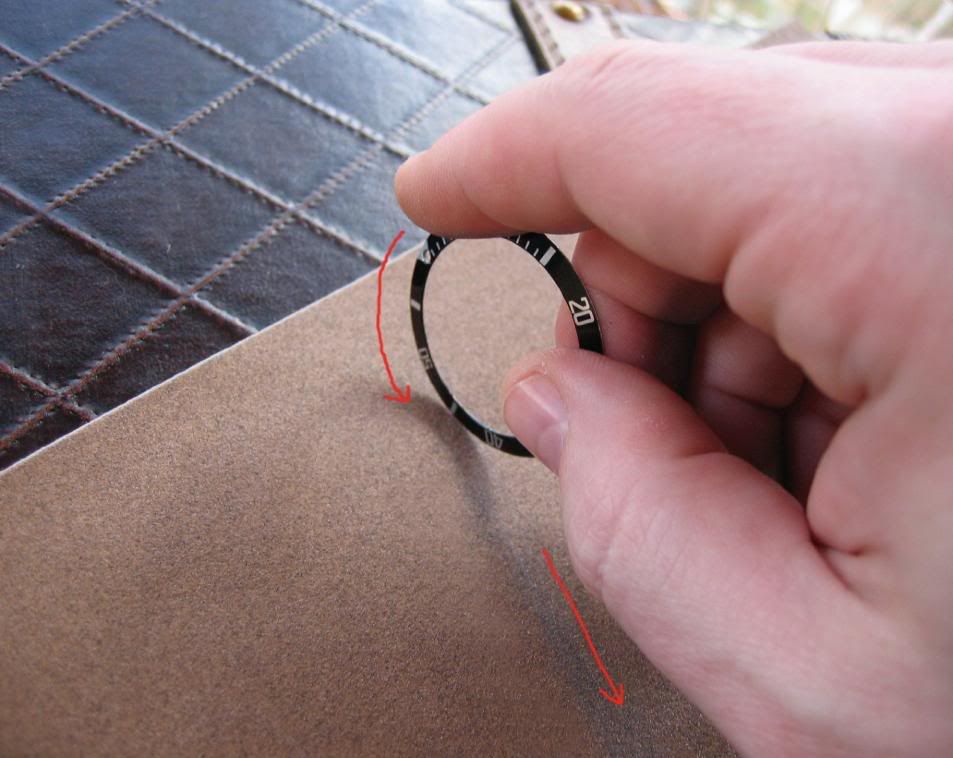
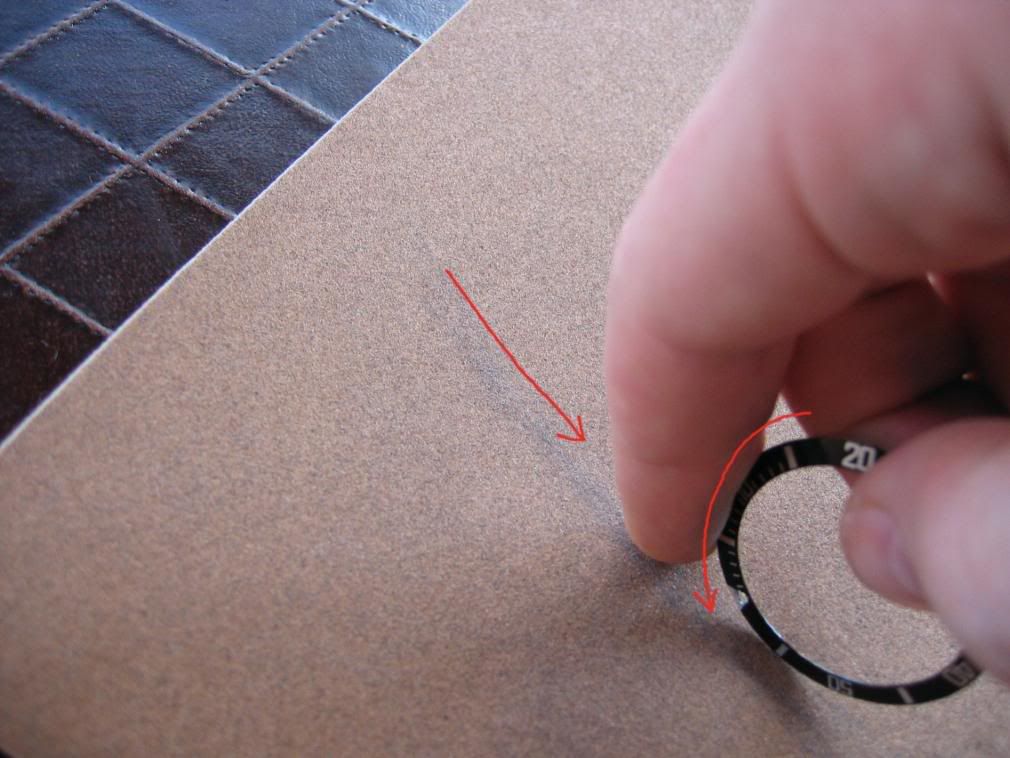
Sand in the same manner as you sanded the bottom, stopping after every 5 or 6 passes, to hold the insert another 5 minute marker down, and repeat the process by making 5 or 6 passes across the sandpaper with the new side of the bezel exposed (i.e., if you're holding it at the 0 & 30 markers, as you can see form the pics above, 40-50 will be the portion sanded). Continue this process all the way around the insert, making 5 or 6 passes between each 5 minute marker. Keep double-checking this sizing to see how it sits in the bezel. It's ready when it just squeezes in and sits just a hair below the lip, like this:
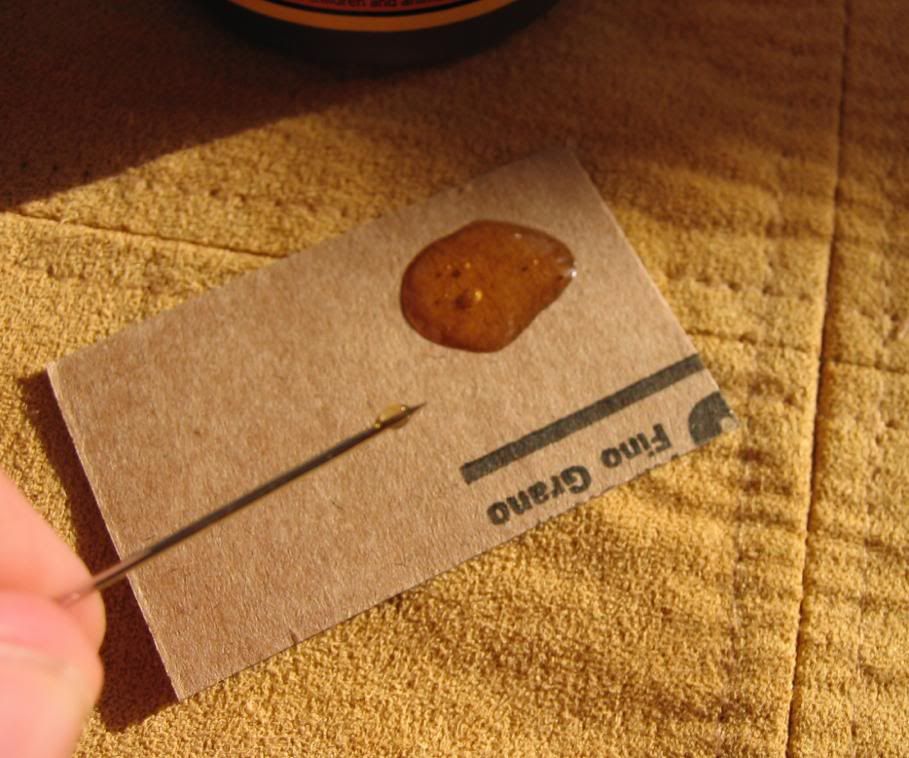
Now you're ready to glue. Gorilla glue expands to 2 or 3 times its size when curing, so only a modicum of glue is needed. One drop on a piece of paper is sufficient; you'll still have 99% of it left when you're done:
Apply the smallest of drops to the end of the sewing needle, by poking the tip into the drop of glue:
Then apply it to the bottom of the insert every centimeter or so:

Place the insert into the bezel, making sure to align it as close as possible to perfect--paying close attention to where the pearl is, in relation to the 12 o'clock marker on the dial, 15 minute marker, 45 minute marker, and so on:
If any glue seeps out over the edge of the bezel insert, simply clean it off by dipping the end of a cotton swab/Q-tip in nail polish remover & wipe it off. Don't worry, the solvent wont damage or discolor the insert. Once it's seated properly, lay it to rest on a counter (dial side facing straight up), and don't touch it for 2 hours, in order to give it time to dry. Gorilla glue dries & stabilizes in 2 hours, but takes 24 hours to completely cure, so don't get the watch wet for at least 24 hours after application.
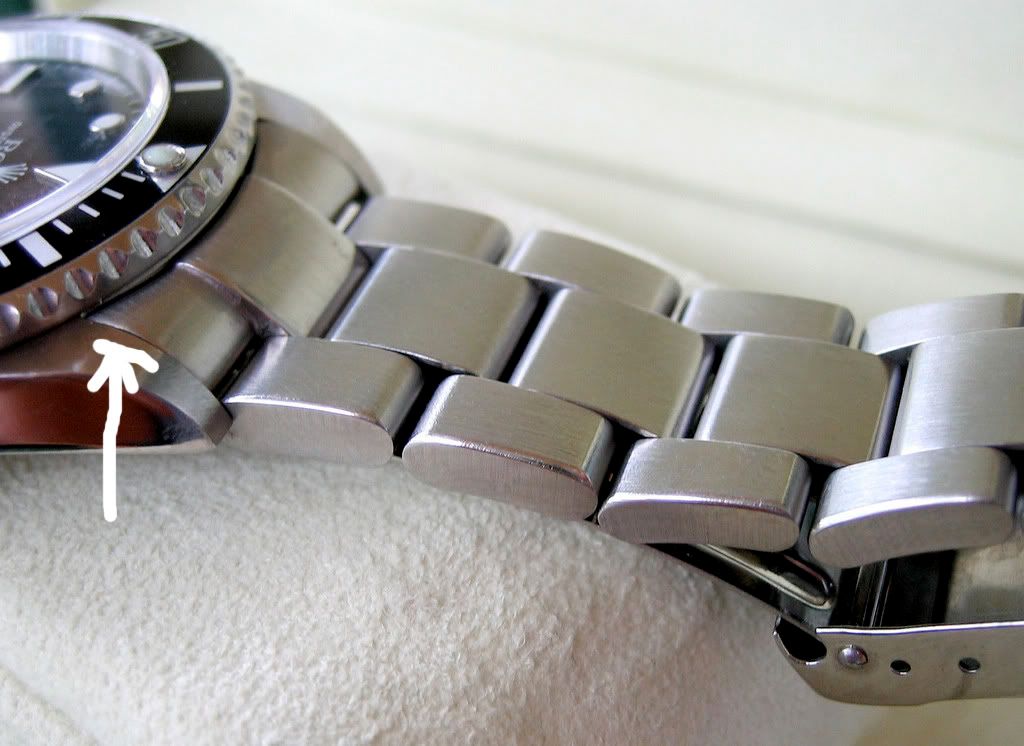
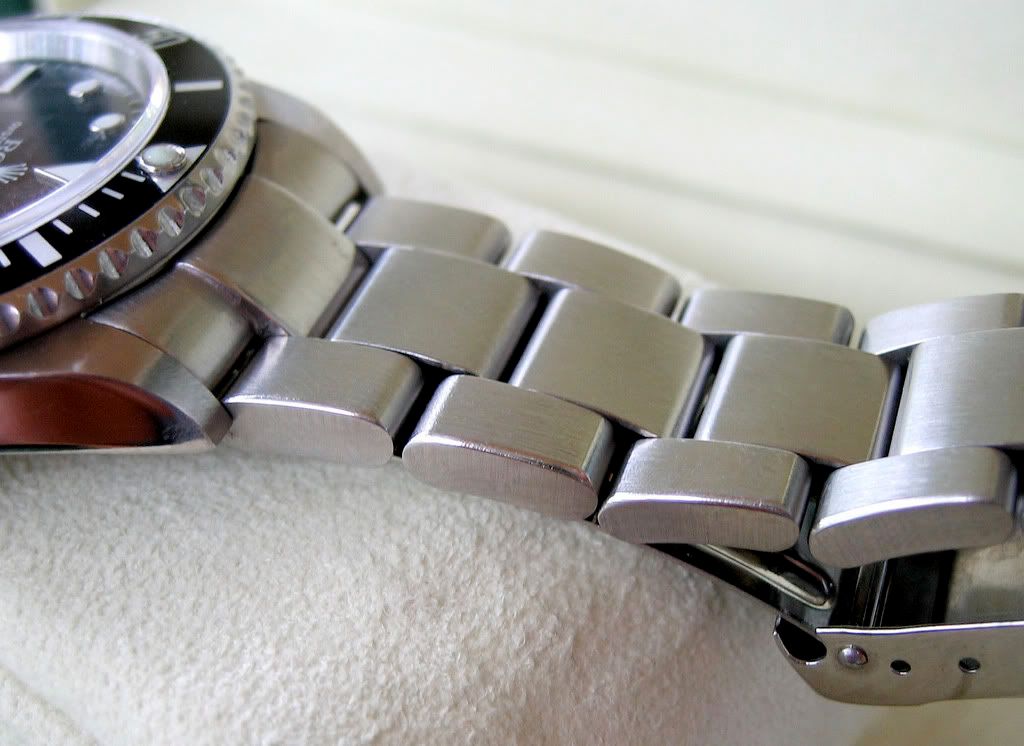
As a finishing touch, if you wish to slightly round the edges of the bracelet in order to make it look closer to the gen, simply use a nail-file or Emery board to smooth the edges down:
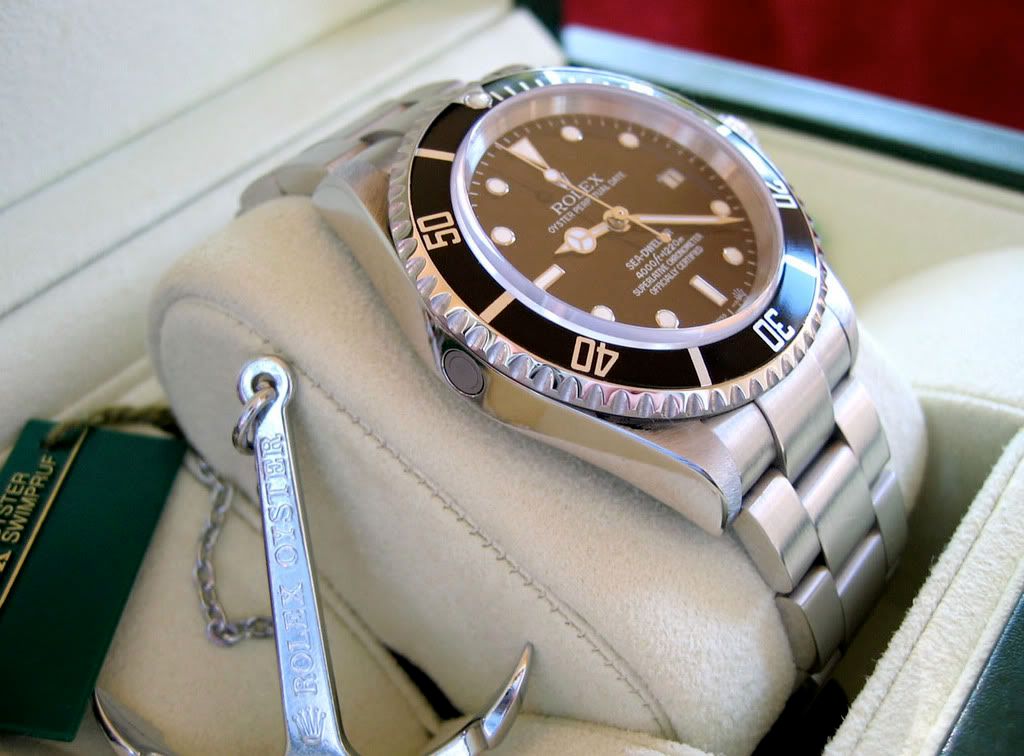
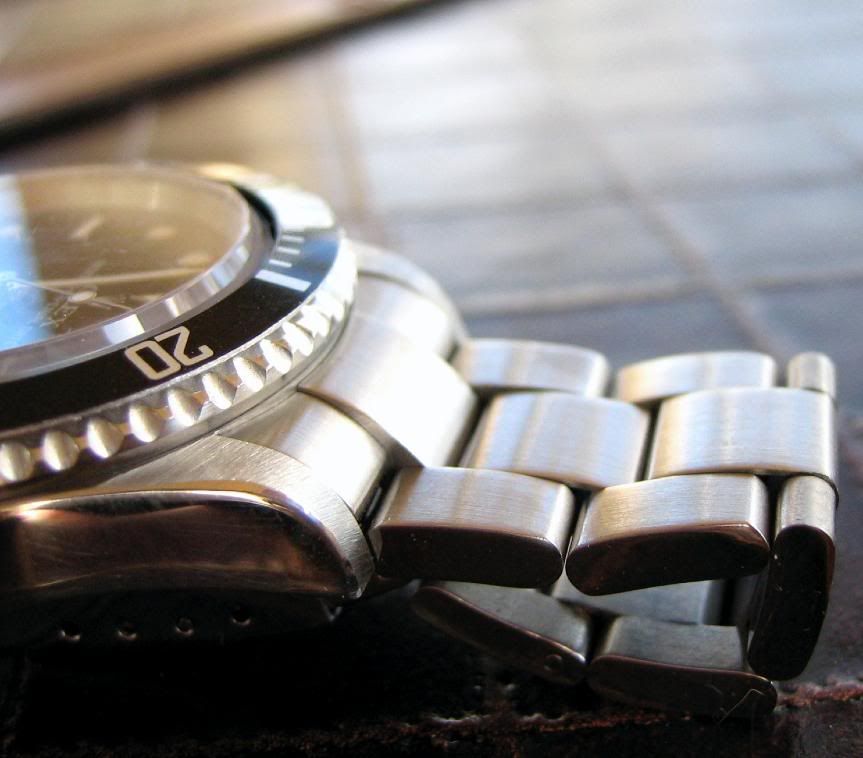
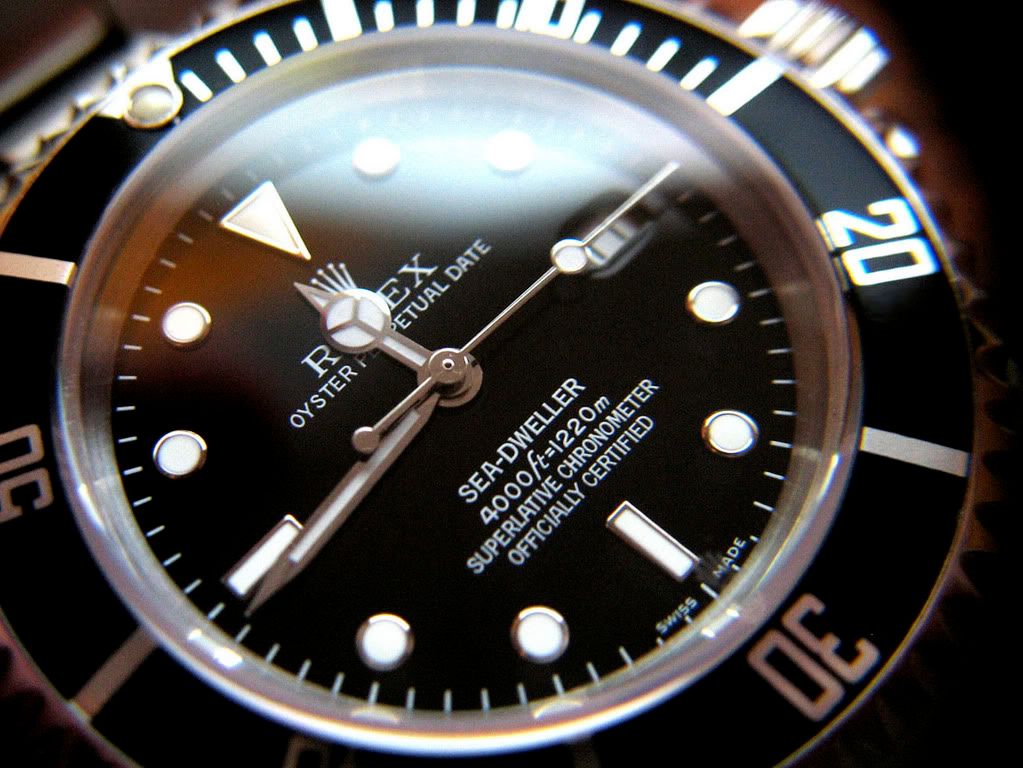
Now that you have all of these accomplished successfully , your watch is now damn near spot on to the gen! Have a look at the gen:
And now our finished product:
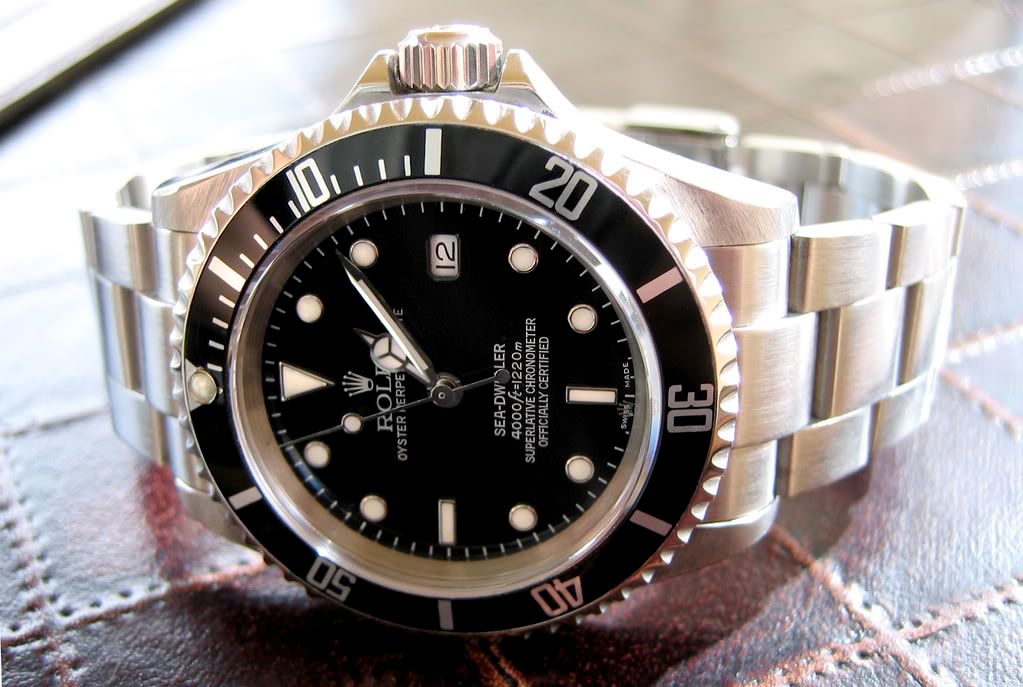
Absolutely perfect! Hope this will help you & your watches.
Thanks, and take care.
The Rolex Submariner, in particular, is arguably one of the most popular, sought after, and replicated watches in the world. It's no wonder that the search for this very timepiece is what drives such a multitude of people to join these great forums in the first place. I know because that's how I found them. So for everyone, after a while of lurking & learning, then contributing and becoming a little tenured, one will inevitably read repeats of the ubiquitous question "Who has the best Sub?"... For our newest members, pay close attention--in all honesty, there is no true or steadfast answer to that question, and due to a constant market demand, there probably never will be. Each different model from every dealer & manufacturer has it's own list of pros, cons, and mods to be done.
As I'm sure plenty of other members do, I receive a vast number of PMs regarding modding these watches--specifically the diver's watches; the Submariner and Sea Dweller. In posting this thread, I will attempt to explain--in terms both veterans and novices will understand--how to take your basic, out-of-the-box replica, and hopefully move it a few steps closer to looking like a genuine.
This article requires no advanced skill in order to achieve what is shown in the pictures below. These mods are not something so complicated & expert that they will transform your replicas into something that will fool anyone when put under a microscope; as no amount of modification will. These are, simply put, relatively quick & easy mods that I will try to illustrate as simply as possible, to help fellow hobbyists learn a little about what they're wearing and how to make it a bit more accurate, without high cost or the use of expensive or complex machinery.
You will find most of the tools & supplies I employ below are actually household items easy to come by for most watch-nuts, and for those that might not be, I have taken the liberty of including descriptions, pricing, and availability via links, for all the tools I use here.
The specific model I have chosen to modify for this article, is the newest release of the Rolex Sea Dweller, model # 16600. These are, of course, general modifications that can be performed on all of Rolex's dive watches, from the steel Submariner 16610, to the green 50th anniversary edition Submariner 16610LV, the two-tone 16613, the Sea Dweller 16600, etc.
If you don't already have them, some inexpensive tools that you find you'll repeatedly need in this hobby are the Beifang caseback keys:
You'll find this multi-purpose set will open all types of Rolex casebacks, ladies and mens models including the newer mid-size unisex versions, and both the modern & vintage models. I purchased mine from a trusted & established dealer on this board, named Andrew. His link for these are here:
http://www.trustytime88.com/index.php?m ... cts_id=732
One of the screw & nut driver sets I use below, was acquired from Amazon, here:
http://www.amazon.com/16-Pc-Jeweler-Scr ... 301&sr=8-2
The modification we will begin with is shaping the CGs (crown guards). Note: CGs differ from model to model, depending upon the make and the year. For example, the Sea Dweller does not have the exact same shape CGs as the Submariner does; and vintage Submariners do not have the same size or shape that the modern ones do. It's best to have a picture for reference when working on them. Try to use a picture of an actual genuine to model yours on, if you've never owned or studied one before--don't use pictures of modded replicas, because not all are done the same. I find one of the best places to get pictures of the genuine article is on eBay; there's usually a multitude of shots from various angles. It's quite easy to tell the difference between the scam artists and the reputable dealers, by looking at the amount of positive feedback and quantity of sales they've amassed under their screen-name. Here's a good example of a well respected dealer, currently offering the new Sea Dweller:
http://search.ebay.com/_W0QQsassZmvpwatchco
Now, to get started. Aside from the caseback opener & screwdriver set mentioned above, the materials we'll need for modding the crown guards are just a couple sheets of ordinary 150 grit sandpaper, a roll of Scotch tape, and a pair of scissors.
I like to start by removing the pin holding the diver's extension in the clasp, rather than removing a screw in one of the wristband's links (as some models are noted for having problems with those). You can use a watch-pin remover or simply the edge of a 1mm screwdriver:
Next, remove the caseback:
Unwind the crown from the tube and pull it out to the time-set position. The second hand should stop ticking on most models at this point. After you've done this, use nothing smaller than a 1.2mm screwdriver to gently depress the crown release mechanism (shown), while pulling on the crown to separate it from the movement:
Now, reattach the caseback to prevent dust & debris from entering through the back:
Next, cover the edge of the bezel with a strip of the Scotch tape to prevent it from getting scratched during sanding:
Make sure to cover the tube hole with tape, to prevent debris from entering through here:
Now, cut a few pieces of the sandpaper into 1 inch strips. Cut as many as you like, they'll wear out quick, and you'll probably burn through a lot of them:
With the coarse side of the paper facing the CGs and the smooth backing facing the tube, begin sanding (only) the insides of the crown guards, with gentle, back and forth motions. Be careful the coarse side of the paper never touches the tube, as it can easily disfigure the tube's threads or ruin the tube gasket, rendering the watch hopeless for waterproofing, and possibly ruining the threads, making it unable to reattach the crown.
Alternate between right inside and left inside on the CGs, stopping every few minutes to check your progress, to make sure of the form & shape:
The reason we're using a more traditional method, rather than one with power-tools is because as a novice, one slip of the wrist with a Dremmel spinning at 4000-10,000 RPMs, and your watch was just rendered useless. Also make sure to check the tape occasionally, in case the sandpaper is eating through.
The whole process--depending upon your speed & efficiency--should take about 30 minutes. Once you've completed this, a simple can of compressed air will clear away most of the debris:
What is left, can also be removed with a small brush (this is also a good time to apply a thin coat of silicon grease, for waterproofing). You can easily find a 1 oz jar of silicon grease on eBay or Amazon for under four dollars.
OPTIONAL: Instead of spending $70-100 on a Dremmel for polishing, most hardware stores sell bench-grinders that go up to 4000 RPMs for half the price of the Dremmel. I found a 6" Ryobi at the Home Depot for only $39; I just replaced one of the grinding stones with a cloth buffing pad:
On the wrist, the insides of the CG's will not be visible to the naked eye, once the crown is back in place. But if you're a stickler, you can give them a quick polish with some extra-fine blue jewelers rouge:
http://www.amazon.com/6-pc-Polishing-Co ... 693&sr=8-3
Be sure to leave the tape on when polishing:
Now remove the caseback once again, and line up the crown-stem to reinsert:
This might take a couple of attempts to get it aligned & synched up properly. Double-check this by adjusting the crown to make sure the movement winds, and reset the date & time if necessary. Now simply, reattach the caseback:
Your CGs should now look complete!
Next up, changing the bezel insert (and pearl).
All reps come with inserts that aren't seated properly, and all have incorrect pearls. The colored bezel insert (in this case black with silver lettering) should sit slightly below the steel lip of the bezel itself. Observe the genuine:
For this modification, you will need a good bezel insert (available from many sources, but the one I find the most accurate is listed below), another sheet of 150 grit sandpaper, some Gorilla brand glue, and a sewing needle.
Here's the link for your insert needs:
http://24.227.47.211/adn62/pc-177-32-ge ... rolex.aspx
And here's how your watch's needs break down, by part #:
I believe the older/vintage subs take the 315-5513-1-I
New Sea Dwellers take the 315-16660-1-I
Modern Subs take the 315-16800-1-I
LV subs take the 315-16800-GRN-I
TT blue subs take the 315-16808-2-I
and TT black subs take the 315-16808-1-I
The rest are self-explanatory. I prefer this site because they seem to have the crispest, thinnest print (much better than jewelery outlet & closest to the genuine), and the pearl is even better than watchmaterial.com.
Start by getting a parring knife and popping the pearl off of your watch's current insert. You can use either a small 1.4mm screwdriver or the tip of a knife blade to remove the old bezel insert by the hole the pearl left behind. Discard both; you won't need them.
Most genuine and aftermarket bezel inserts don't perfectly fit replica watches, so some minor adjustments have to be done.
First, start by sanding the underside of the new bezel insert. Place the sheet of sandpaper, grit side up, on the table. Take note of which numbers are where on the insert when you start sanding--your fingers should be 30 minutes apart (i.e., holding the insert at the 0 and 30 minute markers, or the 15 and 45 minute markers). Gently, but firmly, sand the bottom of the insert in back & forth motions, moving left to right.
You will have to use some pressure to get the insert to stick to your hand while sanding, but not so much that you squish the insert; this will not only make the insert wider by flattening it, it will not sit in the bezel properly, and it will also make the crystal look to tall. Only make about 10 or 15 swipes, then move the insert & start again. Move the insert in your hand another 5 minutes marker, every time you stop (i.e. hold it at 0 & 30, make 10-15 swipes, then hold it at 5 & 35, then sand again, then hold it at 10 7 40 and sand again, etc.):
Underneath, you'll start to notice the paint coming off and the steel showing through; this is normal. Here you can see where not enough sanding has been done, as there are areas where the metal is more prevalent , which means that these parts of the insert will sit lower than where the paint still exists, which will sit higher & uneven:
Continue sanding until all sides are even:
Take note of the front as you sand--make sure you're not sanding too thin.
Next, check to see if the insert sits correctly in the bezel:
It doesn't look like it, so we'll have to sand the edges too. You'll also notice the sides of the insert still have paint on them, as they have not been sanded:
As opposed to one that has been sanded:
Start by holding the insert vertically, and gently begin sanding the sides by holding the insert steady place with your fingers, but rubbing the length of the insert that's showing, along the sandpaper in a straight line:
Sand in the same manner as you sanded the bottom, stopping after every 5 or 6 passes, to hold the insert another 5 minute marker down, and repeat the process by making 5 or 6 passes across the sandpaper with the new side of the bezel exposed (i.e., if you're holding it at the 0 & 30 markers, as you can see form the pics above, 40-50 will be the portion sanded). Continue this process all the way around the insert, making 5 or 6 passes between each 5 minute marker. Keep double-checking this sizing to see how it sits in the bezel. It's ready when it just squeezes in and sits just a hair below the lip, like this:
Now you're ready to glue. Gorilla glue expands to 2 or 3 times its size when curing, so only a modicum of glue is needed. One drop on a piece of paper is sufficient; you'll still have 99% of it left when you're done:
Apply the smallest of drops to the end of the sewing needle, by poking the tip into the drop of glue:
Then apply it to the bottom of the insert every centimeter or so:
Place the insert into the bezel, making sure to align it as close as possible to perfect--paying close attention to where the pearl is, in relation to the 12 o'clock marker on the dial, 15 minute marker, 45 minute marker, and so on:
If any glue seeps out over the edge of the bezel insert, simply clean it off by dipping the end of a cotton swab/Q-tip in nail polish remover & wipe it off. Don't worry, the solvent wont damage or discolor the insert. Once it's seated properly, lay it to rest on a counter (dial side facing straight up), and don't touch it for 2 hours, in order to give it time to dry. Gorilla glue dries & stabilizes in 2 hours, but takes 24 hours to completely cure, so don't get the watch wet for at least 24 hours after application.
As a finishing touch, if you wish to slightly round the edges of the bracelet in order to make it look closer to the gen, simply use a nail-file or Emery board to smooth the edges down:
Now that you have all of these accomplished successfully , your watch is now damn near spot on to the gen! Have a look at the gen:
And now our finished product:
Absolutely perfect! Hope this will help you & your watches.
Thanks, and take care.