• Tired of adverts on RWI? - Subscribe by clicking HERE and PMing Trailboss for instructions and they will magically go away!

Making a gilt dial (not decal)

manodeoro

Section Moderator
Supporter
Section Moderator
Certified
13/10/16
3,830
2,148
113
Last attempt before 2 week vacation.

if I was going for the world famous Tulor brand I nailed it.

I am using toner transfer and I believe I have diagnosed the problem of not a 100% transfer. I think the paper is fusing to the molten toner and as I lift the transfer paper it’s pulling a bit of the toner with it. I can see it happening. Anyone familiar with toner transfer know if this is a heat/pressure issue or let the dial soak In water for hours for the paper to lift off on its own?


Did you tried sunnyscopa laser film-free decal paper for toner transfer ?
It works pretty well ;)
 

manodeoro

Section Moderator
Supporter
Section Moderator
Certified
13/10/16
3,830
2,148
113
I have prepared that dial ... probably my last trial at black plating ...

ce14940c89f9d552cc616edde95930de.jpg
 
  • Like
Reactions: Motorhead13

chrome72

Renowned Member
7/12/17
512
419
63
Houston TX Baby
manodeoro i noticed the transfer isn’t super clean and a few spots remain around the 7 and 8 o’clock marker. Is this normal and is typically not an issue on spots that will be lumed or would be covered up on a second application of the film free decal? Plating likes super clean surfaces.
 

manodeoro

Section Moderator
Supporter
Section Moderator
Certified
13/10/16
3,830
2,148
113
manodeoro i noticed the transfer isn’t super clean and a few spots remain around the 7 and 8 o’clock marker. Is this normal and is typically not an issue on spots that will be lumed or would be covered up on a second application of the film free decal? Plating likes super clean surfaces.

It's just my test dial plate with some old plating remaining :p but it's perfectly degreased and without anyting else remaining
If I fail plating that one I will clean it again, better this time, put another transfer on it and I'll send it to you ;)
 
  • Like
Reactions: chrome72

chrome72

Renowned Member
7/12/17
512
419
63
Houston TX Baby
It's just my test dial plate with some old plating remaining :p but it's perfectly degreased and without anyting else remaining
If I fail plating that one I will clean it again, better this time, put another transfer on it and I'll send it to you ;)

Any luck with yours? I am still stuck on getting perfect masks.
 

chrome72

Renowned Member
7/12/17
512
419
63
Houston TX Baby
Been trying to get perfect transfers onto the dial prior to plating. I have gone through multiple whole sheets adjusting a variable here and a variable there for each failure. I think I got my process down. I think I have tried 80 tests looking back at all my sheets to get here.


didn’t care if the dial size is a mismatch to the artwork. Just testing the process.


Did a quick dirty plating. I really didn’t care about how nice it looked and there is a finger smudge in there. Just wanted to make sure the text came through crisp.


next step is do a real dial and do a good cleaning off the dial prior to plating and the most important are….wear gloves while plating.


progress!
 

jamiex

Active Member
25/7/09
215
96
28
Yorkshire
Been trying to get perfect transfers onto the dial prior to plating. I have gone through multiple whole sheets adjusting a variable here and a variable there for each failure. I think I got my process down. I think I have tried 80 tests looking back at all my sheets to get here.


next step is do a real dial and do a good cleaning off the dial prior to plating and the most important are….wear gloves while plating.


progress!

Not long now mate.:thumbsup:
 

chrome72

Renowned Member
7/12/17
512
419
63
Houston TX Baby
I know some of you are attempting this along side of me and I’m glad.

I was getting good results with photoresist method but the “Swiss” was never legible. I reduced my UV exposure time and it came out a bit readable. Going to reduce UV exposure time even more and see if I can nail it. So far the photoresist method is giving what results but there are a lot of variables that can effect it plus it takes time to make one. I might even have to let the smaller detail parts of the dial (Swiss, crown) be exposed to less UV than the rest of the dial. I have also been doing toner transfer and getting consistent results in transferring the image onto the dial but I’m not sure if it’s as sharp as photoresist.

Below is what I did a little earlier today with photoresist method.


chrome72

Renowned Member
7/12/17
512
419
63
Houston TX Baby
Here are some of the methods I have been trying if anyone wants to attempt this:

Toner Transfer (Cold Process):
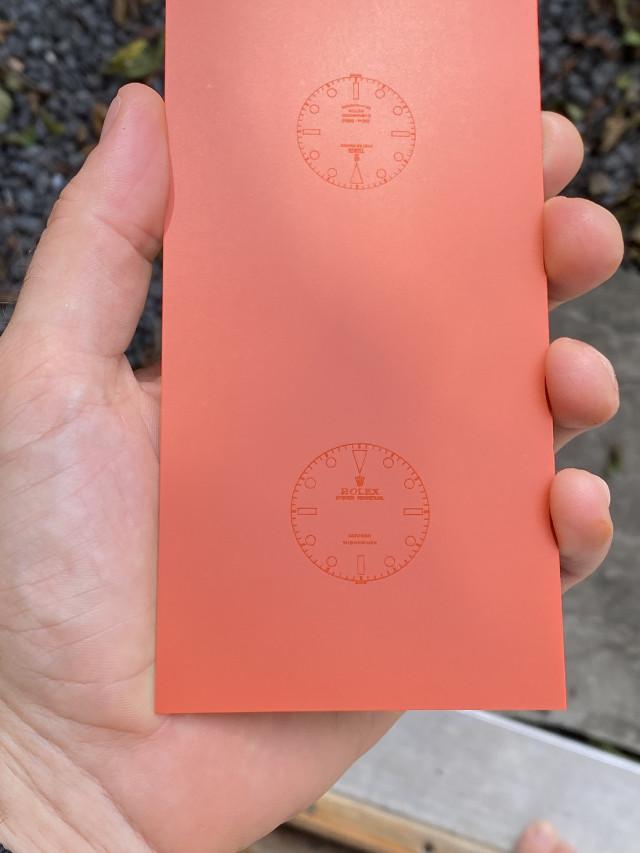
 Here is an overview
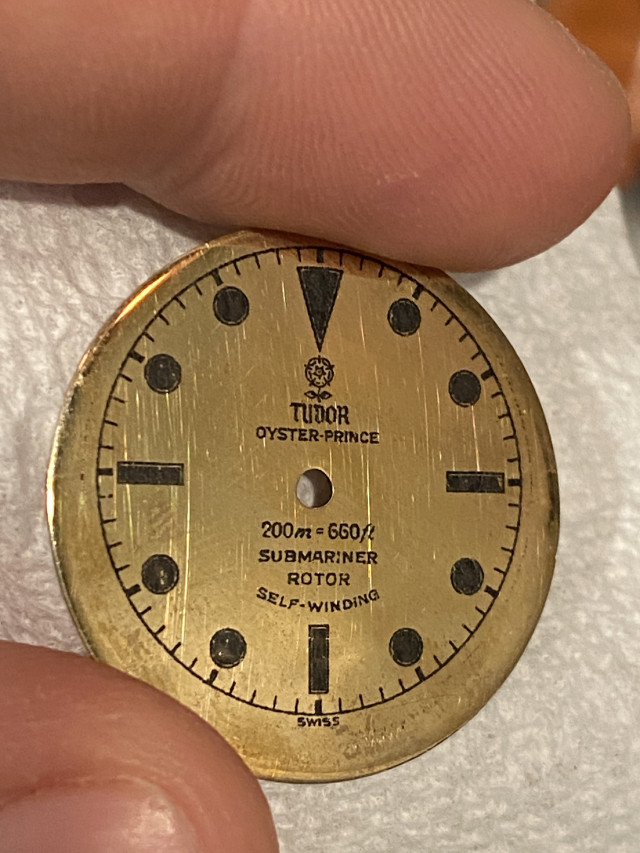
1) Print image mirror imaged and inverted colors. I found just regular glossy magazine paper works. Must use laser printer!
2) mix 3 parts acetone to 8 parts isopropyl alcohol (try to get 100% of each or you will need to tinker with ratio)
3) clean brass disc, flood with mixture from above
4) lay image on brass disc, lightly press briefly to ensure everything is touching the mixture/board. Let sit 15 secs.
5) apply even pressure for 2 minutes
6) remove pressure from dial and let air dry till the smell of the mixture is completely gone
7) place dial in water and let the paper float off.
8) clean/degrease and plate.

Toner Transfer (Hot method)
1) Print image mirror imaged and inverted colors. I found transfer paper works. Must use laser printer!
2) Place image down on brass disc.
3) I used my wifes hair straightener set to 270 F and pressed down for about 15 seconds, moved the dial around and repeated. Did this for 4 minutes. I place a folded up paper towel on the bottom of the hair straightener and then the dial and then the image. It provides a bit of filler between the gaps of the heating plates so allow for more pressure to be applied.
4) Place dial in water and let paper float off or to where you can easily peel it off

Toner Transfer Hot Method Option 2 (video)
1) Print image mirror imaged and inverted colors. I found transfer paper works. Must use laser printer!
2) Place image down on brass disc.
3) Feed dial through a laminator set on hot. You are looking for around 270ish degrees as the sweet spot. If you don't hack your machine to play with the roller speed, you will need to feed it through quite a few times. I do 12.
4) Place dial in water and let paper float off or to where you can easily peel it off

Toner Transfer Combo Method
I found my best results so far doing this by moving the straightener around briefly to set the image on then rolling it through the laminator.

Photo Resist: video
1) Depending on whether or not you are using positive or negative film will determine how you print your image. Will need to print mirror imaged (more later)
2) Print your image onto transparency paper (like over head film from way back when)
3) Stack 2 images ontop of each other so you have a super dark template
4) apply dry photoresistant film to your brass disc, either feed it through the laminator or use a hair dryer to make it smooth/tight.
5) Apply template from step 2 onto your covered dial. (you want the actual printed side down so there isnt even a micro gap between the dial and the transparency. This is why you print mirror imaged)
6) Place dial/template between 2 glass plates and use clamps or grips to make sure everything is tight.
7) Apply UV light to the board. There is a lot of figuring this step out unless you can control light source and time. I have used sun light, a uv nail lamp, and a regular light bulb. My best results appear to be bright sunlight for somewhere less than 3 minutes. You will be left with the image "baked" onto the dial.
8) Remove dial from UV light, remove top layer of film and place in a bath of washing soda and water. This will "wash" away the non baked on portions revealing your mask.
9) Clean/degrease and plate.

My Learnings
-
you can print toner transfer very cheaply. I print an entire sheet of dials out at the USPS for $.15 a sheet. You can mess up and tinker for cheap and quickly.
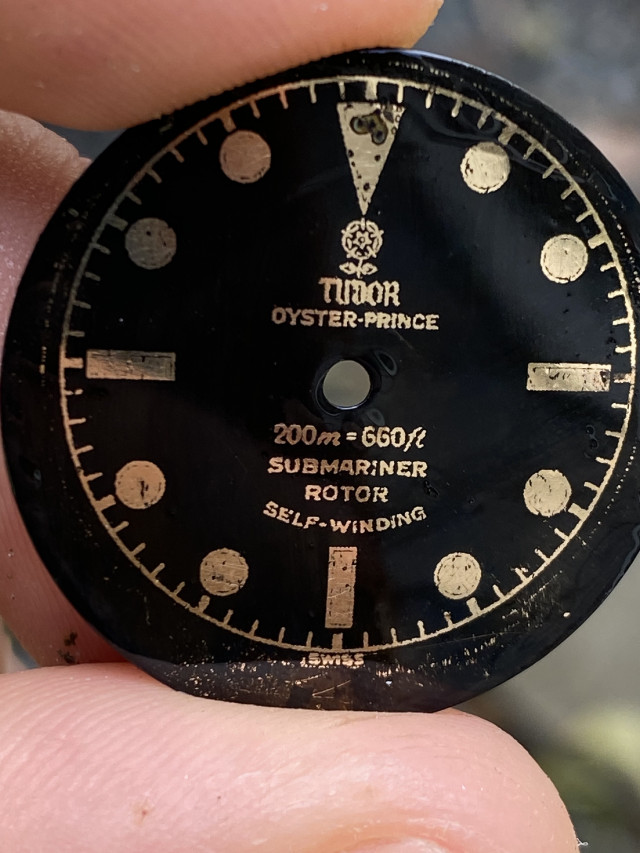
-I have had about 98% accurate transfer results with the cold method. I am sure i can tinker around more and get better results.
-Using my wifes hair straightener i have also gotten about 98% accuracy. I could increase heat a bit and see how that goes.
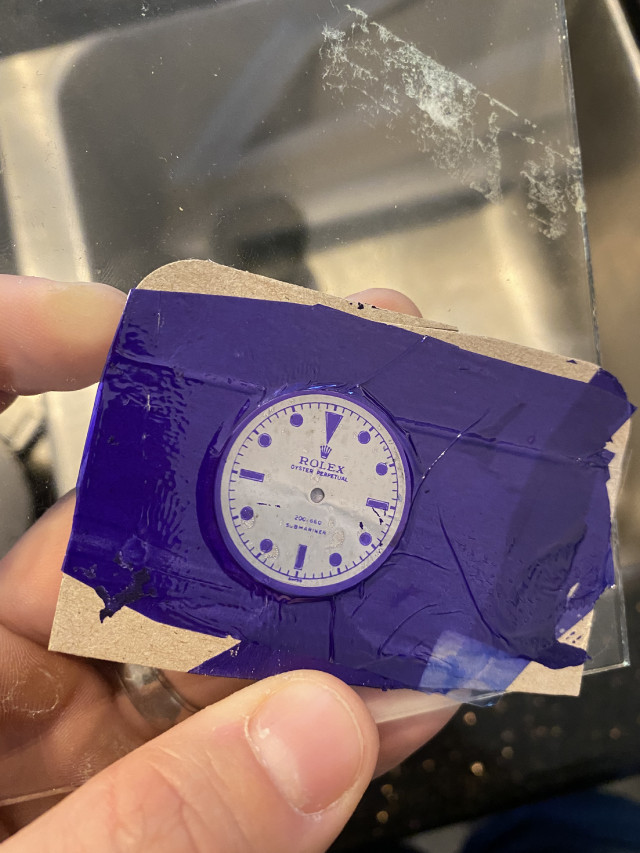
-Photoresist appears to give pretty sharp results but there is quite a learning curve. As stated above trying to get the "SWISS" legible and that is just an issue of time and UV exposure. There is a lot more that needs to be controlled this way.
-Using any of these methods, you could make a mask for plating pretty cheaply, with toner transfer costing you pennies.

There are 3 other options I have not tried.

1) Pad Printing: This is the most expensive method with a decent machine costing hundreds of dollars and then got to make a cliche for every design. So it adds up. jamiex I am looking at your to be my guinea pig. This method is going to be the only way to get color on your dial other than black and gilt.
2) Screen printing: You will need to figure out a good "ink" that can easily be washed away post plating and not too sticky enough where it wont show the small fonts/details.
3) Hacking a printer to print onto your dial. You would get super accurate results with this and can print whatever you want.

Now that I have shared my learnings and successes, you guys need to get busy tinkering!
 
  • Like
Reactions: dpd3672 and deadpan

jamiex

Active Member
25/7/09
215
96
28
Yorkshire
I’m ordering my pad printer at the weekend. I’ve just got my black nickel electrolyte to plate on top of the zinc plating, I’ve got a proper power supply, air pumps for agitation and heaters for my tanks for more accurate plating results. I’m hoping that we may start to see some decent results within the next 4 weeks.
It’s been a steep learning curve with a lot more to go but I’m optimistic that one of us will get there.
 
  • Like
Reactions: deadpan

manodeoro

Section Moderator
Supporter
Section Moderator
Certified
13/10/16
3,830
2,148
113
All the tools are in for pad printing! Gotta drill holes into the cliche and I’ll be good to go. Not sure how much trial and error I’ll experience.


Hey ... looks like a nice pad printer you have, quite different from those I see on Ali ...
I'm still trying to improve the film free method and ... it seems to be worth the time spent

c132eb0f36302a7611b7ec4492164489.jpg
 

chrome72

Renowned Member
7/12/17
512
419
63
Houston TX Baby
Hey ... looks like a nice pad printer you have, quite different from those I see on Ali ...
I'm still trying to improve the film free method and ... it seems to be worth the time spent

$75 Facebook marketplace special find. Just had to buy a pad. Was not expecting to find a nice one for such a steal. New they sell for $1,500.

your film frees are definitely very nice.
 

bigtiddygothgf

Active Member
7/10/18
303
137
43
Hey ... looks like a nice pad printer you have, quite different from those I see on Ali ...
I'm still trying to improve the film free method and ... it seems to be worth the time spent

c132eb0f36302a7611b7ec4492164489.jpg

that looks fantastic, what case set is that? would love to build a 3H FF