• Tired of adverts on RWI? - Subscribe by clicking HERE and PMing Trailboss for instructions and they will magically go away!

Project "RWI Raffle Win"... a 1675 Build

cjt202020

Renowned Member
Supporter
3/2/14
767
3,164
93
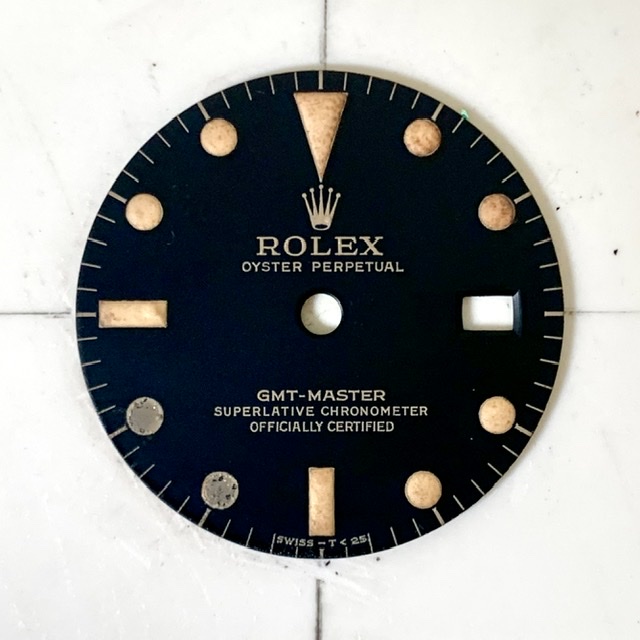
gaskets are readily available on eBay. As far as movement ring, p0pperini knows where to get one but he's holding out on us lol. I ended buying one from yukiwatch.com and it was $50. The movement you've got coming will have a dial spacer and I'm going to bet it has a date wheel overlay with Rolex style printed numbers. It looks like your dial has standard 2836 window. It probably won't line up with the movement's date ring. If I were you I'd try to get a date wheel that is standard 2836 spacing but has Rolex style print. Reason being is that I got a standard 1570 style dial and removing and replacing dial feet is a bitch. I imagine one way to do that without doing the dial feet is to glue the dial spacer to the dial and then gluing the dial spacer to the movement. There really isn't a big open spot on the movement to use dial tape.

The movement and parts I ordered from HK are stuck in a covid-19 delay :(

Itching to get started so thinking of sacrificing an old cartel 1675 for parts !

Do you think this movement would work in Milks case with my Yuki eta dial?

f9f20e85ab58d1ac6f543fd73cd96be3.jpg


Sent from my iPhone using Tapatalk
 

chubbychaser911

Active Member
31/10/19
404
112
43
That's a 2846 and I assume it has no GMT module correct. From what I understand the 2846 is the same size as a 2836 but has a lower beat rate. The lower beat rate is a nice thing because it is more accurate for the 1675. You won't be able to mount the GMT hand. I do know that the date wheel on the HZ 6460 (which is a 2836 with GMT module) is taller I think in order for the date wheel overlay to clear the center section of the movement dial side. But I would say that yeah you could probably put it in your case but you won't have your GMT hand in there. Your 2846 may also have the taller date wheel since it is coming out of a Rolex replica. You'll need to see if your date wheel will line up with your date display opening on your dial
 
  • Like
Reactions: cjt202020

cjt202020

Renowned Member
Supporter
3/2/14
767
3,164
93
Thanks again, will give a try after watching some diy watch making videos. Could ruin everything with hand fisted ness. If you never here from me again, you know it went up in flames


Sent from my iPhone using Tapatalk
 
  • Like
Reactions: p0pperini

chubbychaser911

Active Member
31/10/19
404
112
43
It should be pretty easy. You need to pull the winding stem by depressing the winding stem button gently and pulling it out. Then remove the two movement tab screws. Remove the tabs. Put a cloth over the watch and flip. It should fall in your palm. Place the movement face side up on a surface. Drop the watch case over it. Use something like a butterknife under the movement when you go to pick it up so the movement stays inside. Flip the watch so it is dial down. See if the movement will fit. It should clear the plexiglass if you have the plexiglass in it. Problems I can foresee is if the dial for the cartel is bigger than your case. Now if you're talking about replacing the dial today. Yes. Watch some videos. The way that ETA holds in their dial feet is very cool. Instead of screws they use levers. Pretty neat.
 
  • Like
Reactions: cjt202020

p0pperini

patr0n h0arder
Gold Patron
Certified
29/1/19
8,964
29,980
113
UK
Hey cjt202020 - it makes life easier if you use something solid but soft to turn the movement out on. I use my Bergeon No. 5395 - 75 cushion thingy. Cheap versions of these cushions cost about £4 on eBay or Wish. They're so cheap it's silly not to get one even if you only use it once. I know chubbychaser was describing the process assuming minimal tools, but I soon found out how adept I am at dropping things like movements and it sounds like you have the same sort of motor skills as me... so trust me, it'll be £4 well spent.

Anyhoo, I want to give a big shout-out to Mr Seamaster for his suggestion to use HEAT to cure my scratched dial. I was sure the scratches were only lacquer-deep, so I tried it, and it WORKED!

Of course, I couldn't resist carrying on playing around... and getting a little more enthusiastic with the kitchen blowtorch than I actually needed to. Continuing to heat the underside till the dial started to smoke resulted in some lovely patination to the lume plots. They've puffed a bit and got nice and toasty around the edges. And they're unevenly coloured now, which I like too! Hats off to Mr S and whoever it was that invented FIRE.

6Ew9t.jpg
 

cjt202020

Renowned Member
Supporter
3/2/14
767
3,164
93
Great advice thanks. Will add to the tools/ parts list! Any suggestions for hands removal tools?

Being patient and waiting for my plexi before attempting movement out of donor.

Managed to test fit crown and tube this morning, screwed in a treat.

Ordered the wrong size of case back seal some how so will try order again.

A few inserts showed up to practice sanding before to avoid ruining the milk one

That dial looks superb!


Sent from my iPhone using Tapatalk
 

Mr Seamaster

Renowned Member
27/4/12
532
314
63
Hey cjt202020 - it makes life easier if you use something solid but soft to turn the movement out on. I use my Bergeon No. 5395 - 75 cushion thingy. Cheap versions of these cushions cost about £4 on eBay or Wish. They're so cheap it's silly not to get one even if you only use it once. I know chubbychaser was describing the process assuming minimal tools, but I soon found out how adept I am at dropping things like movements and it sounds like you have the same sort of motor skills as me... so trust me, it'll be £4 well spent.

Anyhoo, I want to give a big shout-out to Mr Seamaster for his suggestion to use HEAT to cure my scratched dial. I was sure the scratches were only lacquer-deep, so I tried it, and it WORKED!

Of course, I couldn't resist carrying on playing around... and getting a little more enthusiastic with the kitchen blowtorch than I actually needed to. Continuing to heat the underside till the dial started to smoke resulted in some lovely patination to the lume plots. They've puffed a bit and got nice and toasty around the edges. And they're unevenly coloured now, which I like too! Hats off to Mr S and whoever it was that invented FIRE.

6Ew9t.jpg

Haha thanks N!
Great to see it back without scratches.

Cheers
 
  • Like
Reactions: p0pperini

p0pperini

patr0n h0arder
Gold Patron
Certified
29/1/19
8,964
29,980
113
UK
Yeah, I really like the look of the dial. Today I plan to mess it up again by having another stab at doing those missing lume plots...

Great advice thanks. Will add to the tools/ parts list! Any suggestions for hands removal tools?

There's a variety of hand removal tools. I've tried them all, but I prefer the simple pair of levers (with a very thin sheet of plastic card or dial protector under the hands so the dial isn't damaged).

To set the hands back on the pinions, I use a bit of Rodico to hold each hand and get it positioned over the pinion, and then press them on with a simple metal hand setting thingy. the only potential issue with the metal setting things is they could scratch a shiny hand, so recently I've started to use small lengths of clear plastic tube instead. Here's the stuff I use...

6NNkI.jpg
 
Last edited:
  • Like
Reactions: cjt202020

Mr Seamaster

Renowned Member
27/4/12
532
314
63
For hand setting, a cutted quetip should work too. It’s of very soft plastic/ paper and is hollow- mostly.

I‘m using those and never scratched a hand.
 
Last edited:

deadpan

Active Member
1/6/19
462
264
0
Over the horizon
Hey cjt202020 -

Anyhoo, I want to give a big shout-out to Mr Seamaster for his suggestion to use HEAT to cure my scratched dial. I was sure the scratches were only lacquer-deep, so I tried it, and it WORKED!

Of course, I couldn't resist carrying on playing around... and getting a little more enthusiastic with the kitchen blowtorch than I actually needed to. Continuing to heat the underside till the dial started to smoke resulted in some lovely patination to the lume plots. They've puffed a bit and got nice and toasty around the edges. And they're unevenly coloured now, which I like too! Hats off to Mr S and whoever it was that invented FIRE.

This may just be the best ageing technique I’ve used so far. My HR 6538 dial has been in a state of evolution (read learning how to mess up and then dig myself out a holes). I tried coffee etc a number of times with varying success. Read this here, and tried it on an old reject cartel dial. Managed to get a matte dial to gloss up. Then tried on my HR dial, and the Lume puffed up and coloured to a beautiful butterscotch! Despite nearly fuming both myself and my partner, I was able to control this effect quite well using a normal lighter. Thanks to both Mr Seamaster and p0pperini for alerting me to this technique.
 
  • Like
Reactions: p0pperini

cjt202020

Renowned Member
Supporter
3/2/14
767
3,164
93
d5772ba205663f81ff6ba392ab37e960.jpg


Spot the missing parts!

A plexi and caseback seal arrived. Pepsi sanding went tits up but found this old coke bezel which snapped into place. Was there even a 1675 coke reference?

Some tools on route to install the plexi and do the movement dial swaps etc.


Sent from my iPhone using Tapatalk
 
  • Like
Reactions: Solution6

p0pperini

patr0n h0arder
Gold Patron
Certified
29/1/19
8,964
29,980
113
UK
Was there even a 1675 coke reference?
I think the first appearance of the "Coke" colourway was on the 16760 (aka Fat Lady or Sophia Loren). But I'm sure some 1675 owners would have swapped their Pepsi GMT insert to a Coke for a change/updated look.
 
Last edited:

KJ2020

Time Traveler
Supporter
12/3/18
32,738
58,889
113
I think the first appearance of the "Coke" colourway was on the 16760 (aka Fat Lady or Sophia Loren). But I'm sure some 1675 owners would have swapped their Pepsi GMT insert to a Coke for a change/updated look.

Correct on the first appearance of the Coke insert on the first GMT Master II 16760.
 
  • Like
Reactions: p0pperini

Kalmine64

Active Member
Patron
Certified
21/9/19
437
347
63
EU
Hello guy
Just received my Milk parts build by Tripdog this morning.
Amazing work I’m thrilled with it. Maybe I’ll order additional insert more traditional blue/red to change from time to time from the fuschia

Some pics below :

72d80ecbbe783cae12b1578fcc5939c8.jpg


51b2eb67eaf3bd0b58095475df237420.jpg


00d75f427f7324588cc2ac2b8aefecd5.jpg


d1a08f9a250795fd6bd7fa761ed69d14.jpg


With its sisters

1c90dfe158469ac4db23ee4b4b943a6f.jpg


Envoyé de mon iPhone en utilisant Tapatalk
 

p0pperini

patr0n h0arder
Gold Patron
Certified
29/1/19
8,964
29,980
113
UK
Just received my Milk parts build by Tripdog this morning.
Amazing work I’m thrilled with it. Maybe I’ll order additional insert more traditional blue/red to change from time to time from the fuschia
Lovely looking build - congratulations!
 
  • Like
Reactions: KJ2020

DrHuHill

Active Member
27/11/18
323
550
93
the deep blue sea
Hello guy
Just received my Milk parts build by Tripdog this morning.
Amazing work I’m thrilled with it. Maybe I’ll order additional insert more traditional blue/red to change from time to time from the fuschia

Some pics below :

72d80ecbbe783cae12b1578fcc5939c8.jpg


51b2eb67eaf3bd0b58095475df237420.jpg


00d75f427f7324588cc2ac2b8aefecd5.jpg


d1a08f9a250795fd6bd7fa761ed69d14.jpg


Envoyé de mon iPhone en utilisant Tapatalk


How did tripdog aged the bezel insert like this???

It looks great IMHO
 

cjt202020

Renowned Member
Supporter
3/2/14
767
3,164
93
Wow. Looks splendid!

In other news and as suspected perhaps...my yuki dial feet do not line up with the cartel 2846 movement- will go back to waiting for new movement from HK I think..

f4aa36d5e2c81b9d3c522c7df1055501.jpg


I’m proud I managed to dismantle the cartel with my new tools. Hands popped off with a real spring -ended up all over the floor but managed to find them all, in one piece ! Thinking of taking a lighter and some bleach to the cartel dial and hands now they’re off!


Sent from my iPhone using Tapatalk
 
  • Like
Reactions: p0pperini

p0pperini

patr0n h0arder
Gold Patron
Certified
29/1/19
8,964
29,980
113
UK
I’m proud I managed to dismantle the cartel with my new tools. Hands popped off with a real spring -ended up all over the floor but managed to find them all, in one piece ! Thinking of taking a lighter and some bleach to the cartel dial and hands now they’re off!
Please don't get bleach anywhere near the dial or hands! Bleach is strictly for inserts.

Heat or diluted coffee on the dial. Diluted coffee staining on the hands (would be my suggestions). But best to go really easy if it's the first ageing you've done.

EDIT: Also... has that Yuki dial got any lume on it? It's hard to tell from the slightly motion-blurred photo, but it looks like it's only printed, not lumed.
 
Last edited:
  • Like
Reactions: KJ2020

deadpan

Active Member
1/6/19
462
264
0
Over the horizon
Please don't get bleach anywhere near the dial or hands! Bleach is strictly for inserts.

Heat or diluted coffee on the dial. Diluted coffee staining on the hands (would be my suggestions). But best to go really easy if it's the first ageing you've done.

EDIT: Also... has that Yuki dial got any lume on it? It's hard to tell from the slightly motion-blurred photo, but it looks like it's only printed, not lumed.

Agree on the bleach/ heat. Have tried heat on the hands in the past, and in my experience it just obliterates the lume. My dials responded well to a lighter (but only the lume-paint stayed the same.

For inserts I use acetone, then light brush with the softest wire wool (optional), then bleach (and keep checking it) on the insert. In my experience some inserts respond very differently to each other.

This insert was bleached (although I think it’s too much now so am starting with a fresh one) and the dial (at this point) had coffee staining the lume. (Sorry it’s not a GMT I’m afraid, but gives some reference).

8IxBj.jpg


I’ve tried with both real and instant coffee on dials and hands; Varying results, and always dried with a sheen which I didn’t like-hence me really liking the heat/ lighter/ blowtorch method above. One plus to the coffee, however, is that it can be removed and restarted easily. (Which heat cannot). I’m learning most of this as I go, but some of the techniques remind me of model making (and weathering) in my youth.
 
Last edited: