Hi all,
This is my first guide/tutorial. I know there's other guides out there that explain this process and maybe produce better results (?) but I thought I'd share the process of this project rather than just posting the finished product. Hopefully it will help someone out!
The base for this project was a "red" sub from Reg (Narikaa), you can see the details of our transaction in the Reviews Section - :thumbsup:
I've always admired vintage watches and the Red 1680 Sub is a classic. I wanted one that looked like it has really been through the wars and been bashed about - after all it would be nearly 40 years old. I looked at a lot of pics both on this forum and online and filled a folder full of pictures while I waited for my watch to be delivered.
As soon as the watch arrived I got to work, I don't have a workbench so I cleared down my desk and got everything I would need ready laid out to be used. I think this is an important step - It really helped to have a clear desk and everything I needed to hand so I didn’t have any distractions (rummaging around for a file or screwdriver).
The tools I used were as follows:
First step - Remove the original strap and keep the spring bars safe!
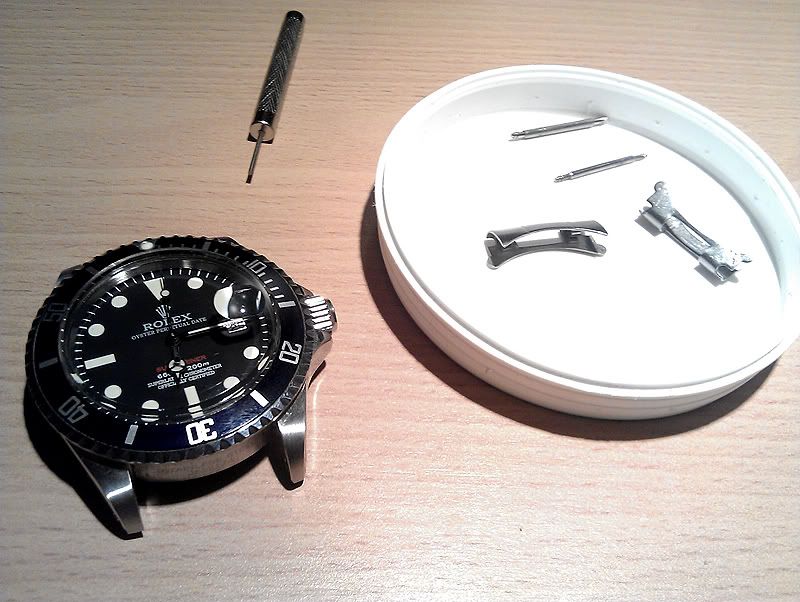
Then, Pop the bezel. There's various ways to do this. I slid a thin knife blade between the bezel and watch case and using a prying action to lift it and pop it off. At this point the spring which holds the bezel down may pop out and shoot across the room like mine did - so be prepared and keep this spring safe with the spring bars.
The Case...
I then set to work on the steel case with my coarse file, giving it a real going over and interspersing the filing with striking the case with the edge of the file to create grooves, dings and dints.
Working the sharp edges down to a smooth worn edge takes time so settle down and be patient. Remember to refer to your research pics to see how a gen Sub ages. Think about how scratches happen - catching the watch on an object, scraping it against a wall etc., then try and recreate these actions using your file.
Your Sub should be looking something like this...
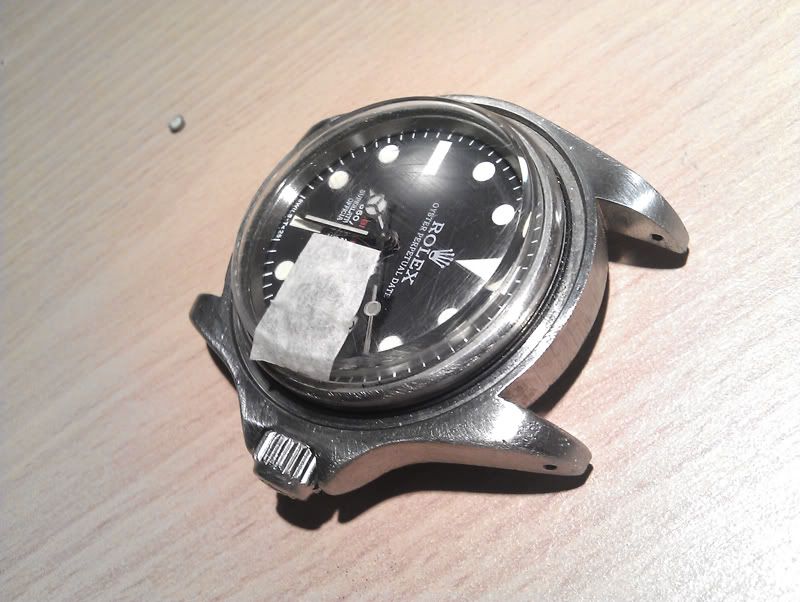
Note here how I covered the Cyclops with some masking tape. I noticed that it was taking a bit of a beating and was becoming very scratched and the date wasn’t legible - no worries, I can polish this up later but I guess we learn from our mistakes and it's a good tip.
Don’t worry if you scratch the acrylic - it’s going to get some harsh treatment later!
Continue to work the case with varying grades of file until you are happy with the texture/level of wear and damage. Then smooth off using your sandpaper and sanding block to dull any burrs causing by your rough filing. The steel might look a little dull at the point but we are going to rub it up later.
Bear in mind that you can always come back to the case if you want a more aggressive aging but you can never undo what you’ve done so make sure you’re not too drastic with filing/hammering/scratching. Also, there's a point when it's done and you will feel it's perfect, it’s tempting to want to do more but don't! STOP! It’s easy to ruin something if you overdo it...
Onto the bezel...
I really love the faded bezels that look like they've been laid out baking in the sun. The way to achieve this is by soaking the bezel insert in bleach but that will come soon...
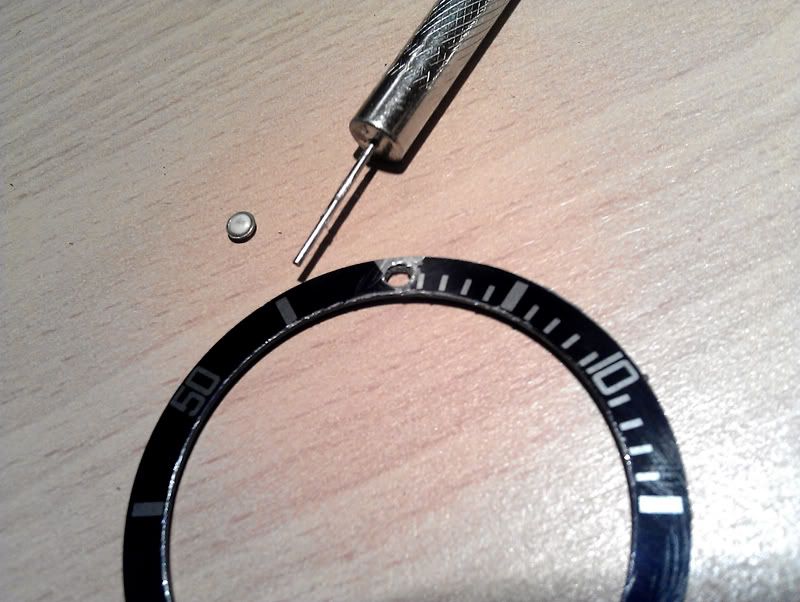
I popped the pearl; it didn’t look right anyway! It just popped out when I pushed it from the back with a pin. I also used a pin pusher to scratch around the pin hole to give the impression the pearl had been knocked out "in action".

Now its time to "key" the bezel insert for bleaching by using the sandpaper to rough up the paint and remove the gloss shine. I also ran the coarsest sandpaper round the edges of the insert to add more wear and tear. I then chipped away some of the paint on the outside of the bezel insert. Be careful not to bend the insert.
You now need to give the steel bezel ring the same treatment as the case, the steel on my bezel seemed to be of a harder grade than the case so the roughest treatment was required - bashing, gouging and filing. Leave the insert and bezel separate for now.
The Crystal
The raised crystal is an acrylic plastic. Very easy to scratch! Use the finest sandpaper or the detailing block to lightly skim over the surface. Again, think how scratches would occur and try and recreate these actions. Don't go too overboard, you need to be able to see the dial - it is a watch after all! If you do go too far, toothpaste can be used to buff the surface back a little.
Naturally the edges of the raised crystal would take some hammer from wearing it day-in day-out for 40 years, I used the same technique of knocking/hitting the edges with a smaller file to create a few chips - Don’t hit it too hard! While you have the file knock a few dings into the top surface too.
Peel off the masking tape and apply a similar process to the Cyclops but don’t be too rough.
The Dial
The scary part of this project for me was taking the watch apart to get the dial out.
You can get a full guide on doing this by checking out Edge's brilliant guide HERE

There are two small brackets with screws holding the movement into the case, very easily removed and a complete nightmare to get back in. Don't use a magnetised screwdriver - it just turns the whole thing into a pin and bracket lifting farce. Use some tweezers to handle the screw and a pin to hold down the bracket as you screw it back down.
Because I'm a noob, I didn’t take of the hands or split the dial face from the movement. I just re-inserted the crown stem and used the hack function to stop the hands at a reasonable place i.e. not hovering over a marker or the text- 9:17 is a good time. I could then use the crown to change the time if I needed too.
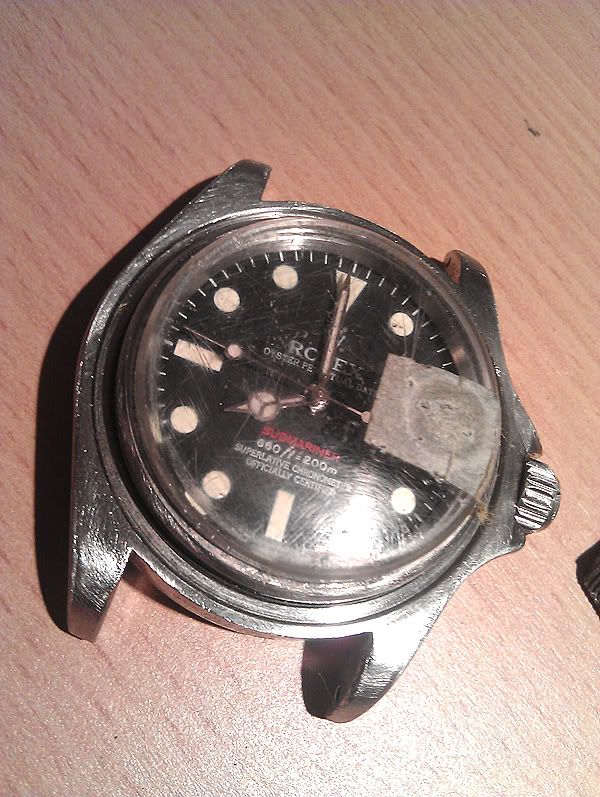
Again, being a noob I didn’t want to bake my dial in the oven as many others do so I opted for a coffee stain. The mixture needs to be thick otherwise it's just like a very thin wash which will make your dial shiny/patchy. Apply it with a small detail brush. If the mix is not right and too weak then this will happen...
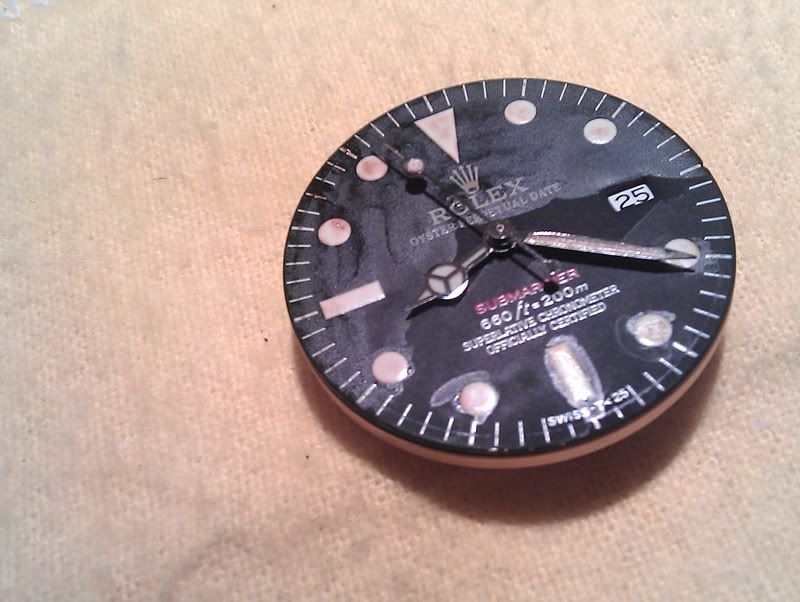
OH S**T!
The problem here is that as soon as you start to apply the mix it dries very quickly and creates a patchy effect - not what we want.
Never mind, I used another brush with water to wash off the horrible mess. It took several attempts to get the dial right using various strengths of mixture. I then used a very fine detail brush on the dial markers and hands with a thicker paste-like mix to try and recreate aged/ruined lume.
I used a very small piece of sandpaper on the dial markers to wear them a little, repeated the application of coffee and then scratched up the dial with light sandpaper to create some mild patina. Again - use your research pics to achieve the look you want.
I retraced my steps from Edge's guide and put the watch back together... It did not start ticking.
:facepalm:
I disassembled it again, checked the movement, removed the stem and replaced it.
[BLINK]Great success![/BLINK] It started up again, I guess the stem wasn't correctly seated.
I left the watch for an hour to make sure it was keeping time after our little mishap - it was! Thank god.
Bezel Bleaching
This is very straightforward : I used 100% bleach, others recommend a mix of bleach and water.
I put the bezel insert into a plastic tray and covered it in bleach. Left it for 5 mins and then agitated the mixture with my tweezers. It was clear that the bleach was stripping the insert nicely as the bubbles created from the agitation were going brown.
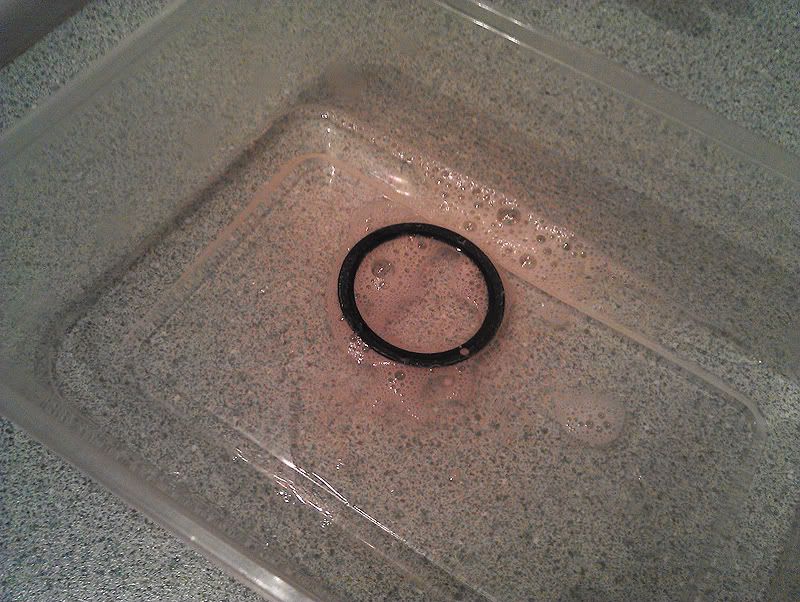
I removed the bezel with tweezers and ran it under the tap, it had started to fade but I needed more!
I repeated the process 3 times, rinsing and drying with tissue each time to check the progress. Fading is purely down to personal preference so adjust the process to suit you.
I re-attached the steel bezel to the watch, Remember the spring that you kept safe earlier - now it’s time to use it. It fits inside the interior lip of the bezel and the bezels pops back onto the watch. Simple!
Now to glue the insert back on to the bezel, I used superglue but others use double sided tape. Apply the superglue to the bezel with a brush rather than squeezing it out of the tube. Apply a similar amount on the reverse of the insert and stick it down, ensuring you don’t glue the insert to the acrylic or that glue runs out as you squeeze the insert down - you don’t want to glue the bezel to the case! Press down hard round the bezel insert, ensuring its even.
The beauty of the Red 1680 is the bi-directional non clicky bezel so don’t worry too much about aligning the pearl.
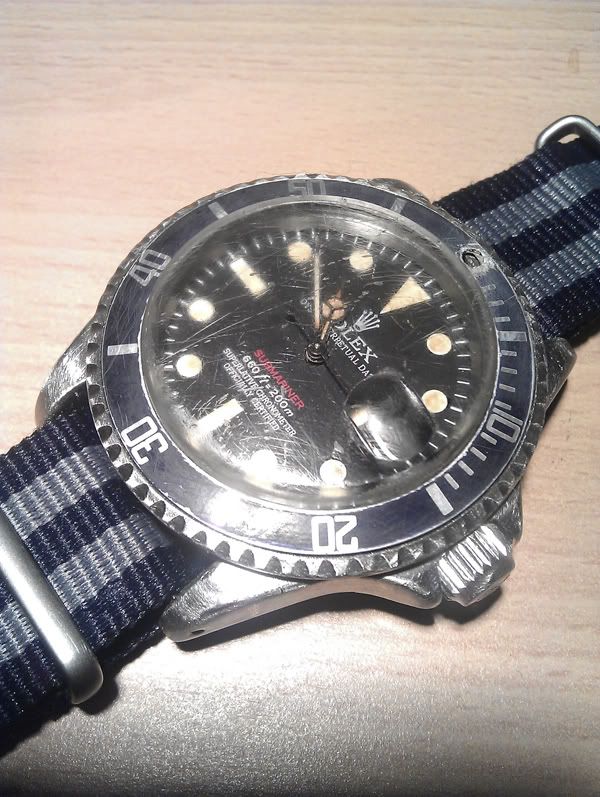
You should be left with something hopefully like this (give or take a few years of hard abuse)
Hopefully everyone found this useful and learned something! My top tips for this project are:
1. Be reserved and go steady, you can always do more aging but you can never undo serious damage
2. Research, research, research!
3. Learn from my mistakes
4. There is no definitive vintage sub look, It's your watch - make it how you want.
5. Get it on a NATO!
Thanks for reading!
This is my first guide/tutorial. I know there's other guides out there that explain this process and maybe produce better results (?) but I thought I'd share the process of this project rather than just posting the finished product. Hopefully it will help someone out!
The base for this project was a "red" sub from Reg (Narikaa), you can see the details of our transaction in the Reviews Section - :thumbsup:
I've always admired vintage watches and the Red 1680 Sub is a classic. I wanted one that looked like it has really been through the wars and been bashed about - after all it would be nearly 40 years old. I looked at a lot of pics both on this forum and online and filled a folder full of pictures while I waited for my watch to be delivered.
As soon as the watch arrived I got to work, I don't have a workbench so I cleared down my desk and got everything I would need ready laid out to be used. I think this is an important step - It really helped to have a clear desk and everything I needed to hand so I didn’t have any distractions (rummaging around for a file or screwdriver).
The tools I used were as follows:
- 3 grades of small detail files - Coarse to fine
- Coarse sandpaper
- Sanding detail block - foam block with fine sandpaper on it
- Wire Wool
- Usual Watchmakers Kit - Screwdrivers, push pins etc.
- Masking Tape
- Fine paintbrushes
- Strong coffee mixed into a paste
- Super Glue
- Bleach
- Cloths and tissues
First step - Remove the original strap and keep the spring bars safe!
Then, Pop the bezel. There's various ways to do this. I slid a thin knife blade between the bezel and watch case and using a prying action to lift it and pop it off. At this point the spring which holds the bezel down may pop out and shoot across the room like mine did - so be prepared and keep this spring safe with the spring bars.
The Case...
I then set to work on the steel case with my coarse file, giving it a real going over and interspersing the filing with striking the case with the edge of the file to create grooves, dings and dints.
Working the sharp edges down to a smooth worn edge takes time so settle down and be patient. Remember to refer to your research pics to see how a gen Sub ages. Think about how scratches happen - catching the watch on an object, scraping it against a wall etc., then try and recreate these actions using your file.
Your Sub should be looking something like this...
Note here how I covered the Cyclops with some masking tape. I noticed that it was taking a bit of a beating and was becoming very scratched and the date wasn’t legible - no worries, I can polish this up later but I guess we learn from our mistakes and it's a good tip.
Don’t worry if you scratch the acrylic - it’s going to get some harsh treatment later!
Continue to work the case with varying grades of file until you are happy with the texture/level of wear and damage. Then smooth off using your sandpaper and sanding block to dull any burrs causing by your rough filing. The steel might look a little dull at the point but we are going to rub it up later.
Bear in mind that you can always come back to the case if you want a more aggressive aging but you can never undo what you’ve done so make sure you’re not too drastic with filing/hammering/scratching. Also, there's a point when it's done and you will feel it's perfect, it’s tempting to want to do more but don't! STOP! It’s easy to ruin something if you overdo it...
Onto the bezel...
I really love the faded bezels that look like they've been laid out baking in the sun. The way to achieve this is by soaking the bezel insert in bleach but that will come soon...
I popped the pearl; it didn’t look right anyway! It just popped out when I pushed it from the back with a pin. I also used a pin pusher to scratch around the pin hole to give the impression the pearl had been knocked out "in action".
Now its time to "key" the bezel insert for bleaching by using the sandpaper to rough up the paint and remove the gloss shine. I also ran the coarsest sandpaper round the edges of the insert to add more wear and tear. I then chipped away some of the paint on the outside of the bezel insert. Be careful not to bend the insert.
You now need to give the steel bezel ring the same treatment as the case, the steel on my bezel seemed to be of a harder grade than the case so the roughest treatment was required - bashing, gouging and filing. Leave the insert and bezel separate for now.
The Crystal
The raised crystal is an acrylic plastic. Very easy to scratch! Use the finest sandpaper or the detailing block to lightly skim over the surface. Again, think how scratches would occur and try and recreate these actions. Don't go too overboard, you need to be able to see the dial - it is a watch after all! If you do go too far, toothpaste can be used to buff the surface back a little.
Naturally the edges of the raised crystal would take some hammer from wearing it day-in day-out for 40 years, I used the same technique of knocking/hitting the edges with a smaller file to create a few chips - Don’t hit it too hard! While you have the file knock a few dings into the top surface too.
Peel off the masking tape and apply a similar process to the Cyclops but don’t be too rough.
The Dial
The scary part of this project for me was taking the watch apart to get the dial out.
You can get a full guide on doing this by checking out Edge's brilliant guide HERE
There are two small brackets with screws holding the movement into the case, very easily removed and a complete nightmare to get back in. Don't use a magnetised screwdriver - it just turns the whole thing into a pin and bracket lifting farce. Use some tweezers to handle the screw and a pin to hold down the bracket as you screw it back down.
Because I'm a noob, I didn’t take of the hands or split the dial face from the movement. I just re-inserted the crown stem and used the hack function to stop the hands at a reasonable place i.e. not hovering over a marker or the text- 9:17 is a good time. I could then use the crown to change the time if I needed too.
Again, being a noob I didn’t want to bake my dial in the oven as many others do so I opted for a coffee stain. The mixture needs to be thick otherwise it's just like a very thin wash which will make your dial shiny/patchy. Apply it with a small detail brush. If the mix is not right and too weak then this will happen...
OH S**T!
The problem here is that as soon as you start to apply the mix it dries very quickly and creates a patchy effect - not what we want.
Never mind, I used another brush with water to wash off the horrible mess. It took several attempts to get the dial right using various strengths of mixture. I then used a very fine detail brush on the dial markers and hands with a thicker paste-like mix to try and recreate aged/ruined lume.
I used a very small piece of sandpaper on the dial markers to wear them a little, repeated the application of coffee and then scratched up the dial with light sandpaper to create some mild patina. Again - use your research pics to achieve the look you want.
I retraced my steps from Edge's guide and put the watch back together... It did not start ticking.
:facepalm:
I disassembled it again, checked the movement, removed the stem and replaced it.
[BLINK]Great success![/BLINK] It started up again, I guess the stem wasn't correctly seated.
I left the watch for an hour to make sure it was keeping time after our little mishap - it was! Thank god.
Bezel Bleaching
This is very straightforward : I used 100% bleach, others recommend a mix of bleach and water.
I put the bezel insert into a plastic tray and covered it in bleach. Left it for 5 mins and then agitated the mixture with my tweezers. It was clear that the bleach was stripping the insert nicely as the bubbles created from the agitation were going brown.
I removed the bezel with tweezers and ran it under the tap, it had started to fade but I needed more!
I repeated the process 3 times, rinsing and drying with tissue each time to check the progress. Fading is purely down to personal preference so adjust the process to suit you.
I re-attached the steel bezel to the watch, Remember the spring that you kept safe earlier - now it’s time to use it. It fits inside the interior lip of the bezel and the bezels pops back onto the watch. Simple!
Now to glue the insert back on to the bezel, I used superglue but others use double sided tape. Apply the superglue to the bezel with a brush rather than squeezing it out of the tube. Apply a similar amount on the reverse of the insert and stick it down, ensuring you don’t glue the insert to the acrylic or that glue runs out as you squeeze the insert down - you don’t want to glue the bezel to the case! Press down hard round the bezel insert, ensuring its even.
The beauty of the Red 1680 is the bi-directional non clicky bezel so don’t worry too much about aligning the pearl.
You should be left with something hopefully like this (give or take a few years of hard abuse)
Hopefully everyone found this useful and learned something! My top tips for this project are:
1. Be reserved and go steady, you can always do more aging but you can never undo serious damage
2. Research, research, research!
3. Learn from my mistakes
4. There is no definitive vintage sub look, It's your watch - make it how you want.
5. Get it on a NATO!
Thanks for reading!
