• Tired of adverts on RWI? - Subscribe by clicking HERE and PMing Trailboss for instructions and they will magically go away!

How to remove and replace a Ceramic Daytona bezel.

doumstyle

You're Saying I Can Sell?
14/9/19
89
20
8
Hi

I had the same problem as you, at first I had taken the joints from esslinger but they were not adjusted enough.
I have ordered some from cousins is much better, from memory it is 29.5 mm
with CF on noob or ARF it's ok and adjust as necessary
 

happyharrysco1

Known Member
19/7/20
105
52
28
Scotland - UK
Thanks for the info, as the original noob gasket was in good condition i re-used it so i'll order a replacement from Cousins and hopefully that will help things out as i would not feel confident on the water resistance longevity as is. Yes you are correct the stock gasket is 29.5Ø
 

p0pperini

patr0n h0arder
Gold Patron
Certified
29/1/19
8,962
29,949
113
UK
Just been reviewing this very nice guide again, prior to switching bezels on my Daytona with gen 116520 black dial and therefore incorrect black ceramic bezel (a nice CF one, but still wrong). I have the latest CF SS bezel to install. I've done it before, with good and bad endings (as mentioned on page 1), and that was ages ago, so it's always good to refresh one's memory (especially mine) about the potential pitfalls and problems before doing it again.

I've just removed the ceramic bezel without any issues, starting the easing up with a single edge razor blade, then moving on to a thicker Stanley blade, which was all it needed. It revealed a solid white Noob gasket (why Noob, why?) which looked like it had been reduced in height by the "I'll nibble it with my teeth" technique.

Zwafyj.png


So I've just ordered the R30520 replacement gasket from Cousins.

And, as with most Cousins orders, because the item price was so piddling, I ended up ordering a bunch of other stuff while I was there. Still, at least it means I now have a decent set of Horotec screwdrivers on the way... no more cheap handles with decent blades in for me - I'm going FULL PRO with my terrible watch modding.

BTW - opinions sought... This Daytona has a 2x AR Prof crystal installed. It means the gen black dial really sparkles and stands out beautifully. But, it's not at all gen like, obviously. While I'm switching to the correct SS bezel, I have the opportunity to replace the Prof with the more gen-like Noob crystal. So, what would you do, dear reader? Stick with the show-offy Prof, or go with the more gen-like Noob?
 
Last edited:

2841

Daytona Hoarder
Patron
Certified
6/6/19
1,967
1,832
113
USA
Just been reviewing this very nice guide again, prior to switching bezels on my Daytona with gen 116520 black dial and therefore incorrect black ceramic bezel (a nice CF one, but still wrong). I have the latest CF SS bezel to install. I've done it before, with good and bad endings (as mentioned on page 1), and that was ages ago, so it's always good to refresh one's memory (especially mine) about the potential pitfalls and problems before doing it again.

I've just removed the ceramic bezel without any issues, starting the easing up with a single edge razor blade, then moving on to a thicker Stanley blade, which was all it needed. It revealed a solid white Noob gasket (why Noob, why?) which looked like it had been reduced in height by the "I'll nibble it with my teeth" technique.

Zwafyj.png


So I've just ordered the R30520 replacement gasket from Cousins.

And, as with most Cousins orders, because the item price was so piddling, I ended up ordering a bunch of other stuff while I was there. Still, at least it means I now have a decent set of Horotec screwdrivers on the way... no more cheap handles with decent blades in for me - I'm going FULL PRO with my terrible watch modding.

BTW - opinions sought... This Daytona has a 2x AR Prof crystal installed. It means the gen black dial really sparkles and stands out beautifully. But, it's not at all gen like, obviously. While I'm switching to the correct SS bezel, I have the opportunity to replace the Prof with the more gen-like Noob crystal. So, what would you do, dear reader? Stick with the show-offy Prof, or go with the more gen-like Noob?

Depends on what you want. If your goal is as gen as possible, go with the Noob :)
 
  • Like
Reactions: p0pperini

p0pperini

patr0n h0arder
Gold Patron
Certified
29/1/19
8,962
29,949
113
UK
Depends on what you want. If your goal is as gen as possible, go with the Noob :)

Well, the reason I asked was because I'm in two minds. But actually, your reply is all I needed really - because I do prefer gen-like over flashy. So I'll reinstall the Noob crystal, when the gasket arrives. Cheers!
 

2841

Daytona Hoarder
Patron
Certified
6/6/19
1,967
1,832
113
USA
Well, the reason I asked was because I'm in two minds. But actually, your reply is all I needed really - because I do prefer gen-like over flashy. So I'll reinstall the Noob crystal, when the gasket arrives. Cheers!

My pleasure :)

and trust me, getting rid of that horrible white noob halo, is going to make the watch look so much better
 

butler182

Renowned Member
14/12/20
634
655
93
My pleasure :)

and trust me, getting rid of that horrible white noob halo, is going to make the watch look so much better

Will any after market crystal gasket work to fix the white halo effect from the noob stock gasket? I'm about to place and order with Otto Frei and found this one: part 29-295-1: http://www.ofrei.com/page419.html#5756 ...and Just want to verify it will improve the situation.
 

2841

Daytona Hoarder
Patron
Certified
6/6/19
1,967
1,832
113
USA
Will any after market crystal gasket work to fix the white halo effect from the noob stock gasket? I'm about to place and order with Otto Frei and found this one: part 29-295-1: http://www.ofrei.com/page419.html#5756 ...and Just want to verify it will improve the situation.

Sorry bud, I don’t know, I can only confirm the gaskets from either cousin or esslinger will do the trick :)
 

p0pperini

patr0n h0arder
Gold Patron
Certified
29/1/19
8,962
29,949
113
UK
Will any after market crystal gasket work to fix the white halo effect from the noob stock gasket? I'm about to place and order with Otto Frei and found this one: part 29-295-1: http://www.ofrei.com/page419.html#5756 ...and Just want to verify it will improve the situation.

The gasket from Cousins is described thus: Ø29.5 x Height 2.30mm Gasket (for 25.295C2)

Which isn't quite the same as the Offrei (for 29-295-1): 30.53 x 29.45 MM, Height: 2.3 mm

It might be "close enough"... And it might not be white. So do you want to risk $6.50 to give it try? (which seems a lot for a teeny plastic ring - the Cousins one is about $2!)
 

butler182

Renowned Member
14/12/20
634
655
93
The gasket from Cousins is described thus: Ø29.5 x Height 2.30mm Gasket (for 25.295C2)

Which isn't quite the same as the Offrei (for 29-295-1): 30.53 x 29.45 MM, Height: 2.3 mm

It might be "close enough"... And it might not be white. So do you want to risk $6.50 to give it try? (which seems a lot for a teeny plastic ring - the Cousins one is about $2!)

I would definitely go for the cousins gasket if they were located in the states, but shipping for me adds ~$10 to the order. I have a few other goodies I'm buying from ofrei, so I'm going to add their gasket as well...I'll let everyone know how it goes.
 
  • Like
Reactions: p0pperini

p0pperini

patr0n h0arder
Gold Patron
Certified
29/1/19
8,962
29,949
113
UK
I've been attempting to install the Noob crystal and CF stainless 116520 bezel using a Cousins gasket this afternoon. I'm having a real devil of a job getting the parts to stay in the correct position while I screw down the press. The frustrating thing is that I've done this job before. But it was a long time ago and I vaguely recall that I swapped over a complete bezel/crystal/gasket assembly from one watch to another - because that's how they tend to come off the watch.

So I wondered - is there any reason why I shouldn't press fit the crystal/gasket into the bezel first, and then press the crystal/gasket/bezel onto the watch all as one piece?
 

2841

Daytona Hoarder
Patron
Certified
6/6/19
1,967
1,832
113
USA
I've been attempting to install the Noob crystal and CF stainless 116520 bezel using a Cousins gasket this afternoon. I'm having a real devil of a job getting the parts to stay in the correct position while I screw down the press. The frustrating thing is that I've done this job before. But it was a long time ago and I vaguely recall that I swapped over a complete bezel/crystal/gasket assembly from one watch to another - because that's how they tend to come off the watch.

So I wondered - is there any reason why I shouldn't press fit the crystal/gasket into the bezel first, and then press the crystal/gasket/bezel onto the watch all as one piece?

I've never tried it like that. Usually i place the gasket in place, position the crystal, press the bezel slightly on with my fingers, to make sure its alligend, and then finish the job with the press. Try putting on a tiny amount of silicone grease to help the press

I could imagine that you can put it on as one piece, but i would imagine there would be a high possibility damaging the gasket, since this is the only "soft" part
 
  • Like
Reactions: p0pperini

p0pperini

patr0n h0arder
Gold Patron
Certified
29/1/19
8,962
29,949
113
UK
Thanks 2841, I guess I'll just try my best to stay patient and keep trying. Keeping the parts in position, while ensuring the LEC and bezel markers all stay aligned too is proving an excellent recipe for excessive swearing. :)

I may be over-complicating the process by using my "best" press, which screws down. When I did this before I only owned a cheap lever operated press - perhaps I'll give that a go and see if it's easier... I might be trying too hard to stick with the more sophisticated approach.
 

2841

Daytona Hoarder
Patron
Certified
6/6/19
1,967
1,832
113
USA
Thanks 2841, I guess I'll just try my best to stay patient and keep trying. Keeping the parts in position, while ensuring the LEC and bezel markers all stay aligned too is proving an excellent recipe for excessive swearing. :)

I may be over-complicating the process by using my "best" press, which screws down. When I did this before I only owned a cheap lever operated press - perhaps I'll give that a go and see if it's easier... I might be trying too hard to stick with the more sophisticated approach.

I’m using a cheep Amazon press, and I’ve done this procedure about 6-8 times the last couple of years. It should be fairly easy, but yes, sometimes we might over complicate simple procedures, because messing something up, really, really sucks :)
 
  • Like
Reactions: p0pperini

p0pperini

patr0n h0arder
Gold Patron
Certified
29/1/19
8,962
29,949
113
UK
Aaaaaaaaand... DONE! The latest version of Clean Factory's 116520 bezel installed.

Z4LT2F.png


Z4LX6t.png


Z4Ldv2.png


I'd like to add some notes on how I ended up doing it in the least painful way (for me).

First, I must mention my main error, which was attempting to press together a stack of loose components - the bezel, the crystal (inserted into gasket) and the case. This was just an exercise in frustration and hopelessness.

But I also found that trying to press the gasket onto the case with the crystal installed just wasn't working - one side would press on and then it was impossible to get the other side of the gasket over the lip of the rehaut. I was applying enough force that the "bar of soap" moment seemed likely at any moment, where the crystal or the gasket would suddenly pop off, and whack the hands or the gen dial. Yes, I did this without removing them - which is bad practice I know, but I didn't want to get into the hassle of removing the movement when it seemed a job that should be doable with it in place.

So, I decided to do it thus:

1. Fit the gasket onto the case.
2. Insert the crystal into the gasket and then rotate crystal so LEC is positioned correctly.
3. Place the bezel on the top edge of the gasket and align 60 and 120 marks at 12 and 6 positions respectively.
4. Smoosh #1 of bezel to fix it in place using the lever action press.
5. Further smooshes of bezel to get it fully seated using screw-down press.

Stages 1 and 2 might be how everyone else does it - but I hadn't picked up on this from the original tutorial or other comments here. I can't stress enough how much easier this makes the process... Fit the gasket onto the case first, without the crystal in it! And then pop the crystal into the gasket. Super-easy.

Note that I made use of my lever action press, because my heavy duty screw-down crystal press repeatedly rotated the bezel just a little bit as it began applying pressure to the components. It might just be a feature/fault of this particular model - it isn't a top of the line press by any means. And it meant that I had to remove the bezel/gasket/crystal 2 more times (and separate them, and then clean everything again...) before I gave up and went with the "two press" approach.

The simple cheap level press didn't get the bezel on straight in the horizontal plane, but it seated the bezel rigidly onto the gasket, and critically the 60/120 markers remained where they were meant to be. It could have done the whole job, but that would have required effort, whereas with a final application of the high torque screw-down, the bezel seated properly with no effort at all.

While I was trying to use the screw-down press for the whole process, I got fed up with the bits of plastic bag I was using to protect the watch parts constantly being in the way or slipping off, so I cut some circles of spare watchmaker mat and attached them to the dies I was using with double-sided tape. So much better.

Z4LvaY.png


Argh!
Z4L4On.png


Yay!
Z4LsJs.png


Z4LEFk.png


I apologise for derailing this topic from "how to remove/replace a ceramic bezel" and somewhat hijacking the thread in the process. But hopefully all this collective bezel swapping information will be helpful.
 

butler182

Renowned Member
14/12/20
634
655
93
Aaaaaaaaand... DONE! The latest version of Clean Factory's 116520 bezel installed.

I apologise for derailing this topic from "how to remove/replace a ceramic bezel" and somewhat hijacking the thread in the process. But hopefully all this collective bezel swapping information will be helpful.

Great information and exactly the detail I was looking for! Thank you for sharing. I'm planning to change my gasket in the next couple weeks and this info will help immensly (waiting for part from Ofrei). Was actually planning to purchase the screw down press beforehand, but I think I may give it a go entirely with my cheapo $15 lever style press first.
 
  • Like
Reactions: p0pperini

Gmc

You're Saying I Can Sell?
25/4/20
37
24
8
Spain
This question gets asked a lot in different threads so i thought i'd run through how i change the ceramic bezel on a Daytona.


There are two ways to remove the bezel. Either with a tool with jaws that will lift the bezel or with a blade/knife that you can use to prize the bezel from the case. I prefer to use the bezel tool but will show both methods.

Bezel tool -

Place a ziplock bag over the jaws of the bezel to protect the case, check all of the jaws are sitting in the gap of the bezel and the case, so you don't cause any damage.

​​​​​​


Takes a just a few turns to wind the jaws in and the bezel will be separated from the case


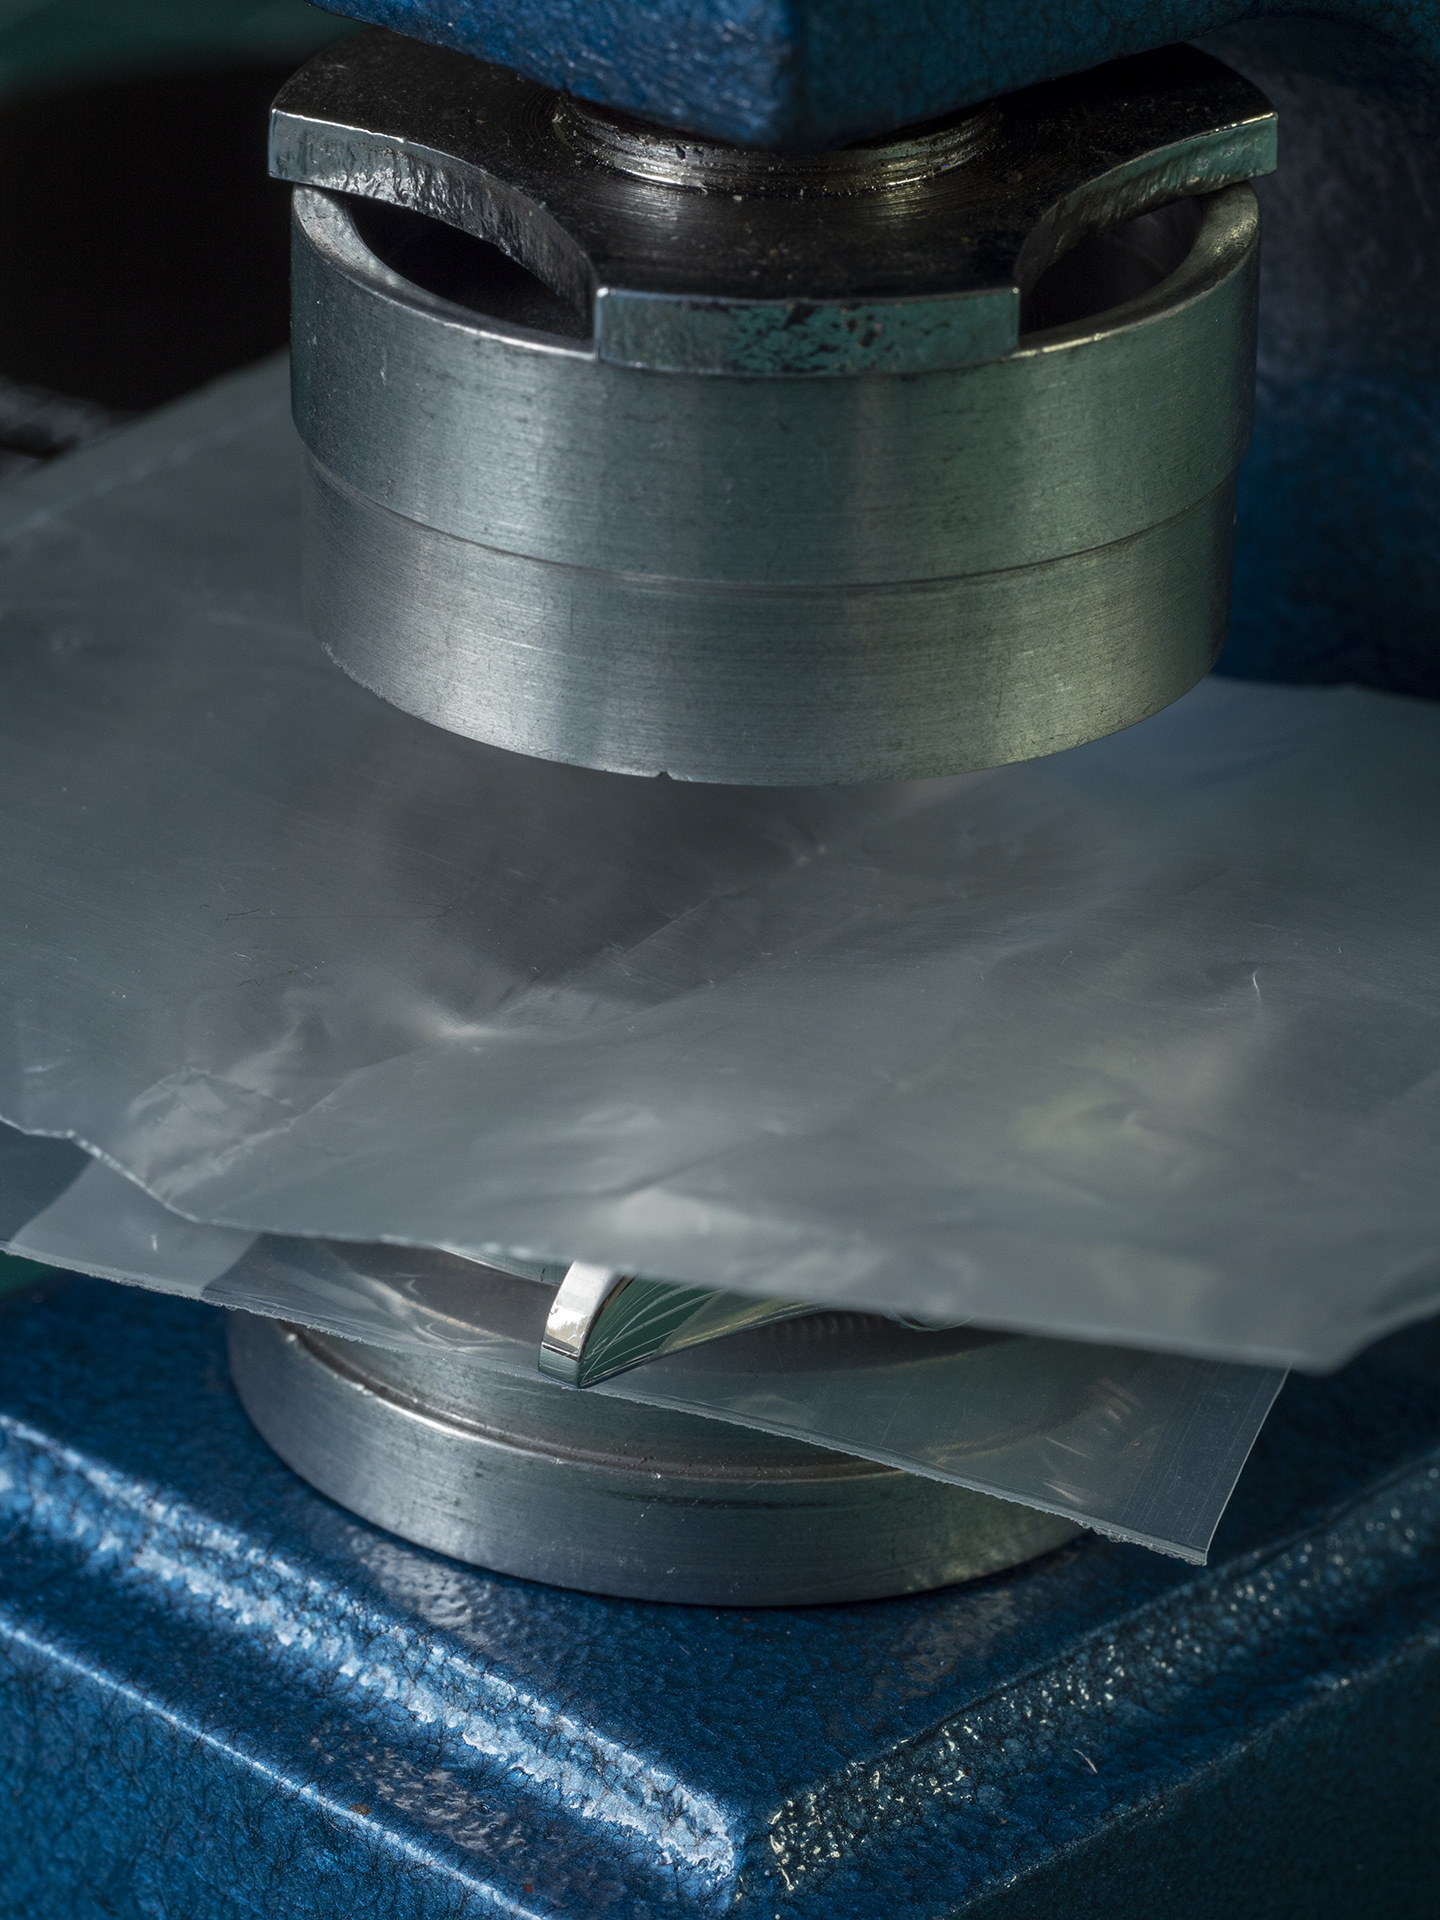
Using a Stanley knife blade -

Place a Stanley knife blade in a cleaning cloth, the thinner the better. Wrap it over the blade to protect the case. If you can find a safety blade without point edges, you don't want this thing anywhere near your wrists.

​​​​​​

You need to work the blade underneath the bezel. Some are much tighter than others, you just need to persist with it. Try different areas of the bezel. You're going to need to use a fair amount of force, be wary of placing too much pressure against the pushers with your hand. Make sure you move the position of the blade in the cloth as it starts to cut through it.

​​​​​​

Now the bezel is free, we need to remove the crystal that is still attached. I place it in a cheap press from eBay with a protective bag over the crystal.

​​​​​​


Check the inside of the crystal and the dial have no dust or particles of dirt on them. You don't want to mount everything back on and then realise there is something sitting underneath the crystal. Don't be tempted to blow on the dial or crystal with your mouth you need to use a tool like this


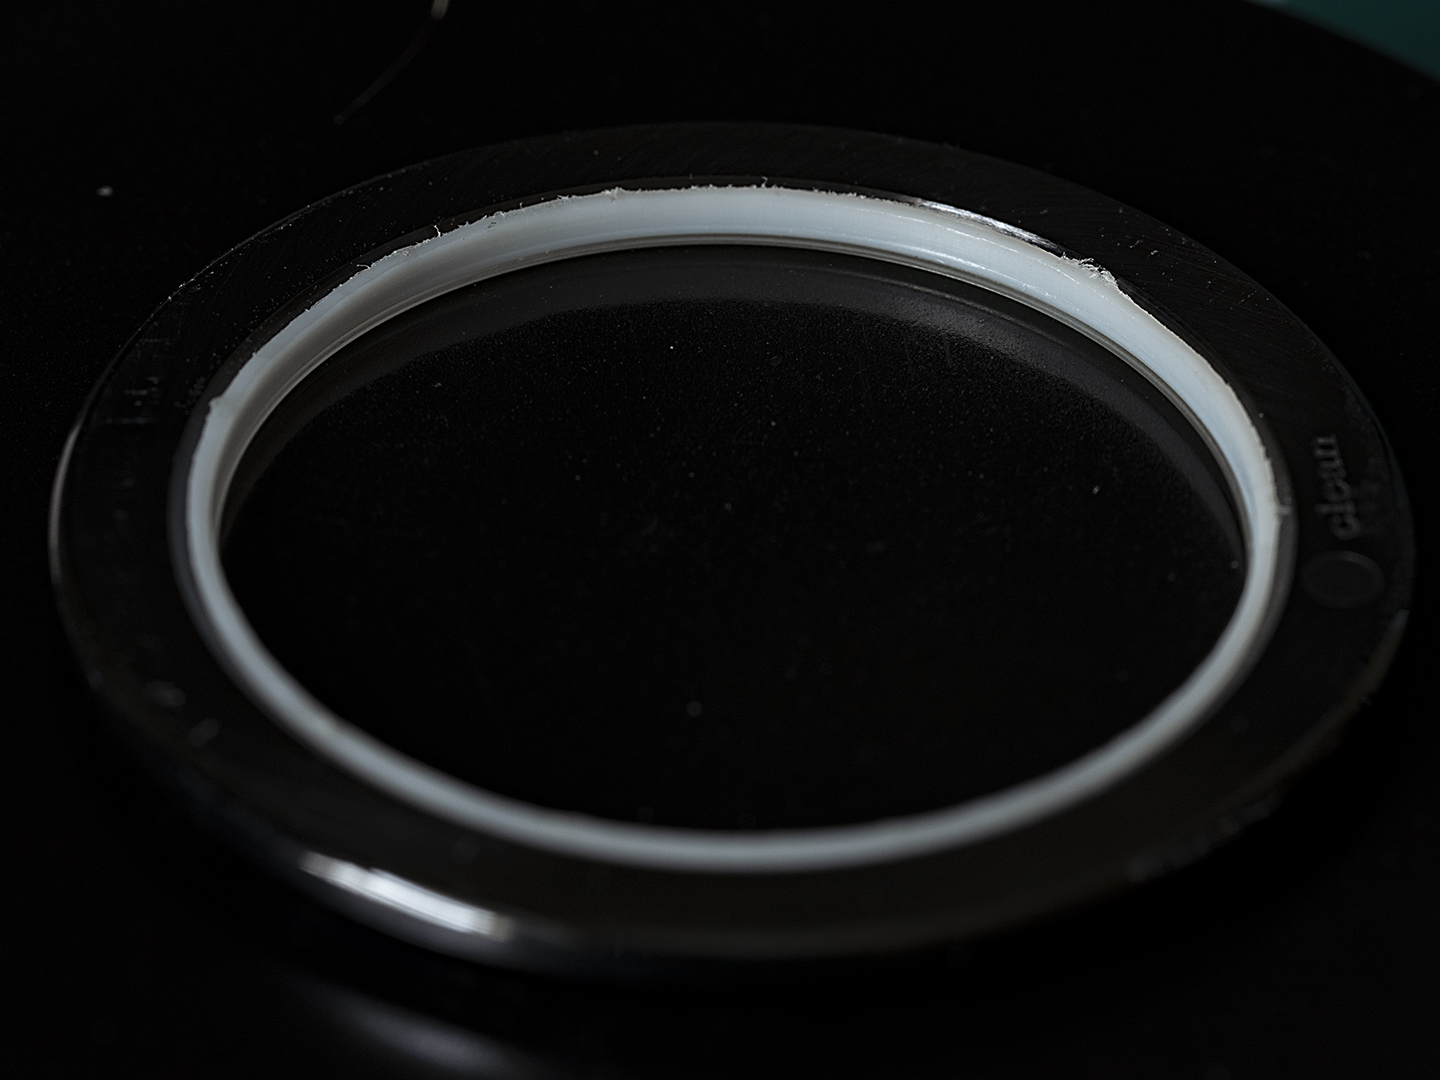
The crystal needs to be inside the gasket. Now you need to find the LEC at 6, place the crystal over a dark object and locate it. I mark it with a whiteboard marker that i can wipe away with my finger.

Next, put a very fine layer of silicon around the inside of the bezel, you don't want to see any lumps of grease, just enough so you can see a shimmer. Check everything is clean again and place the bezel on the crystal, nice and square, it shouldn't be overhanging more on any side. Adjust the bezel so the markers line up and the LEC is at 6.


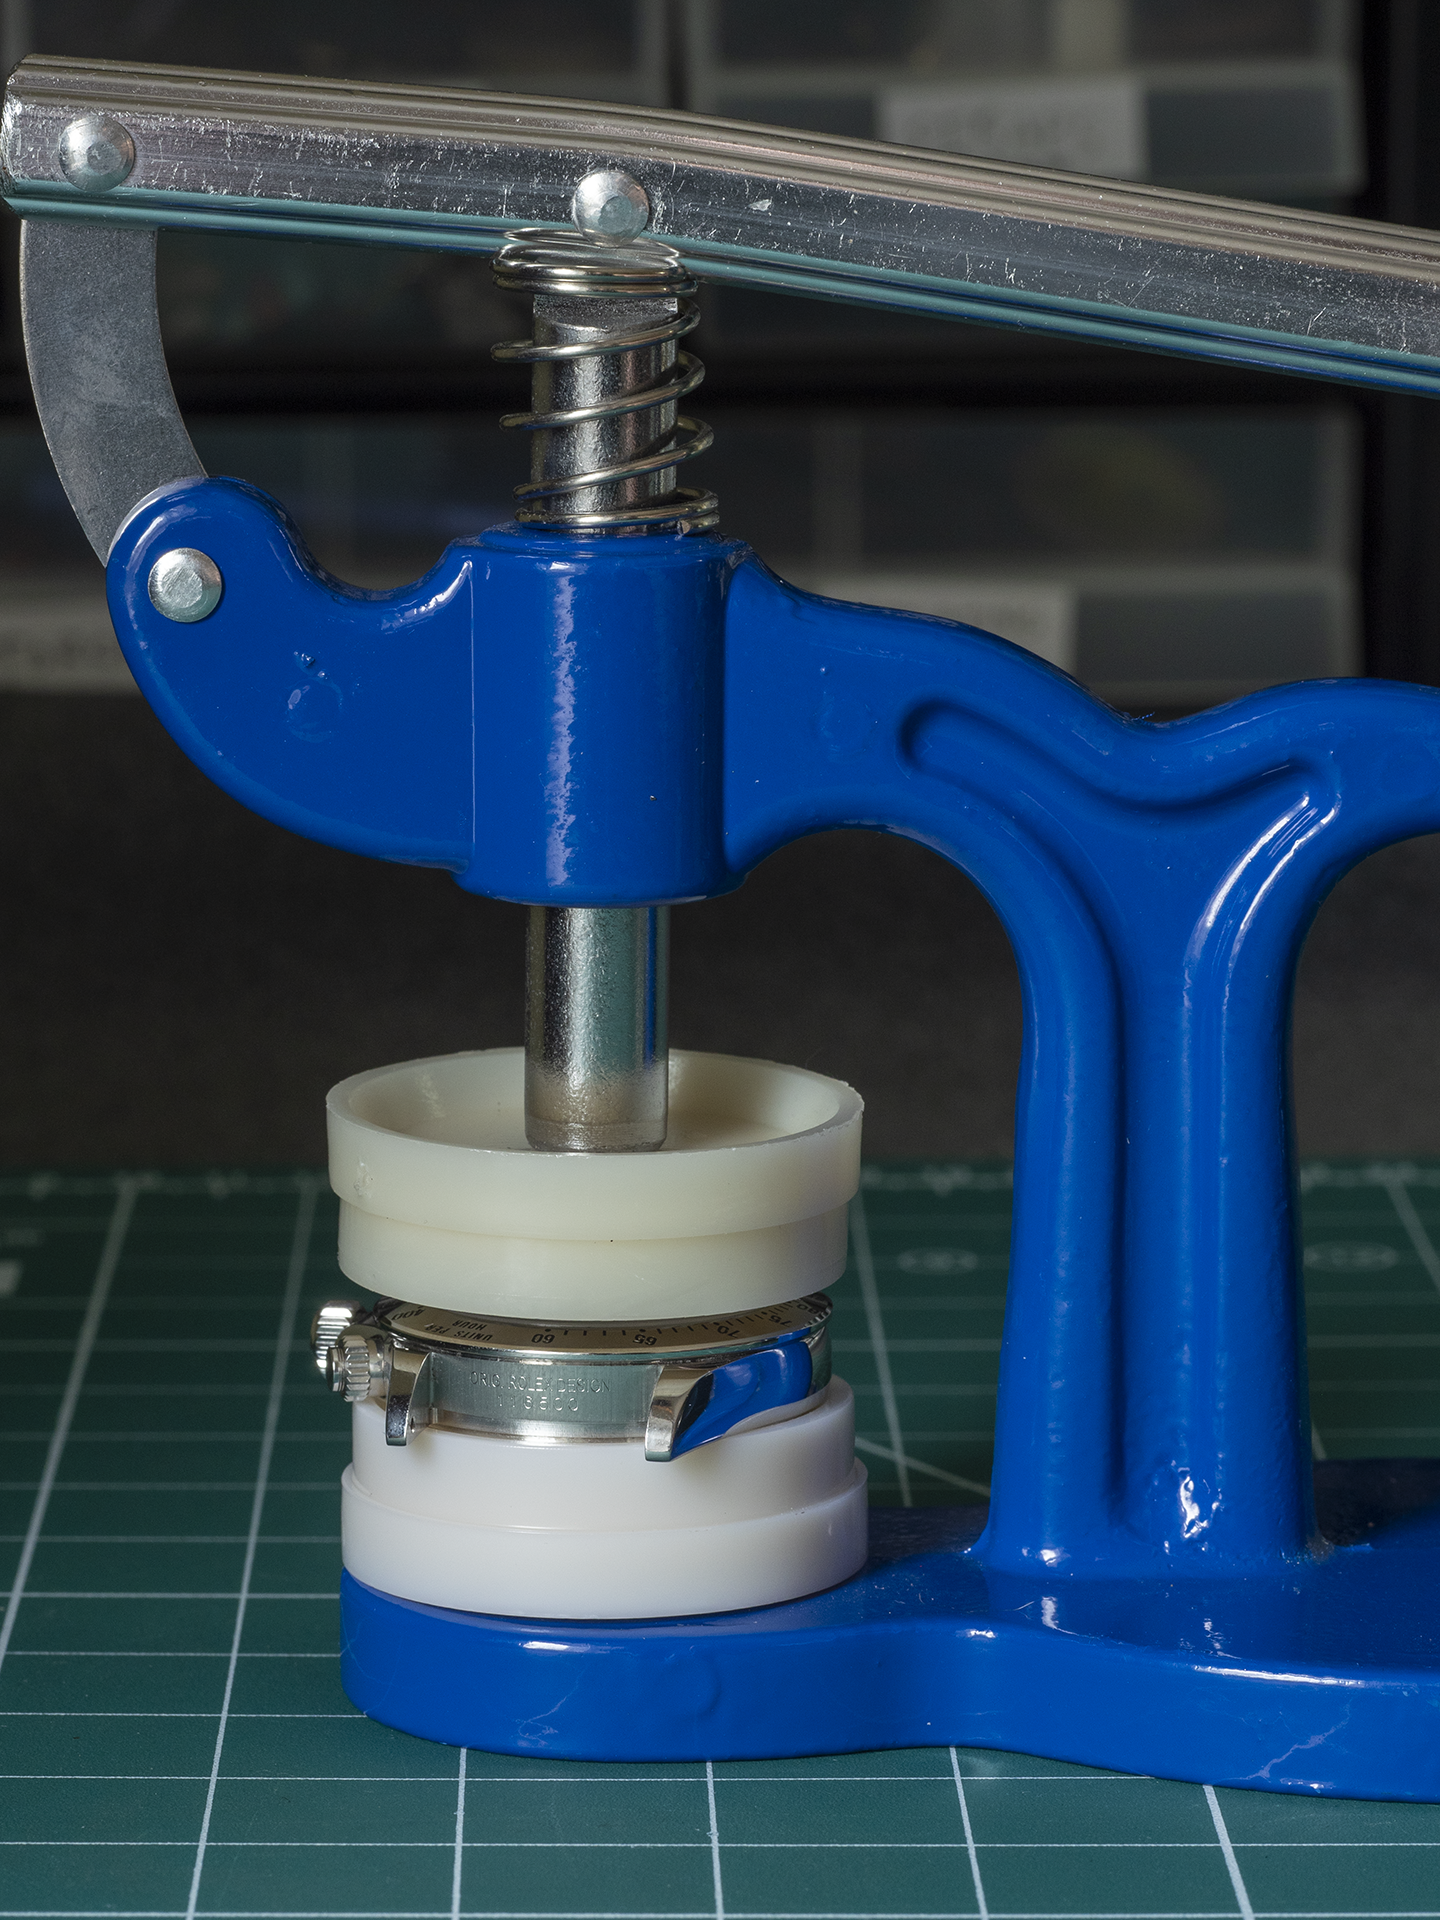
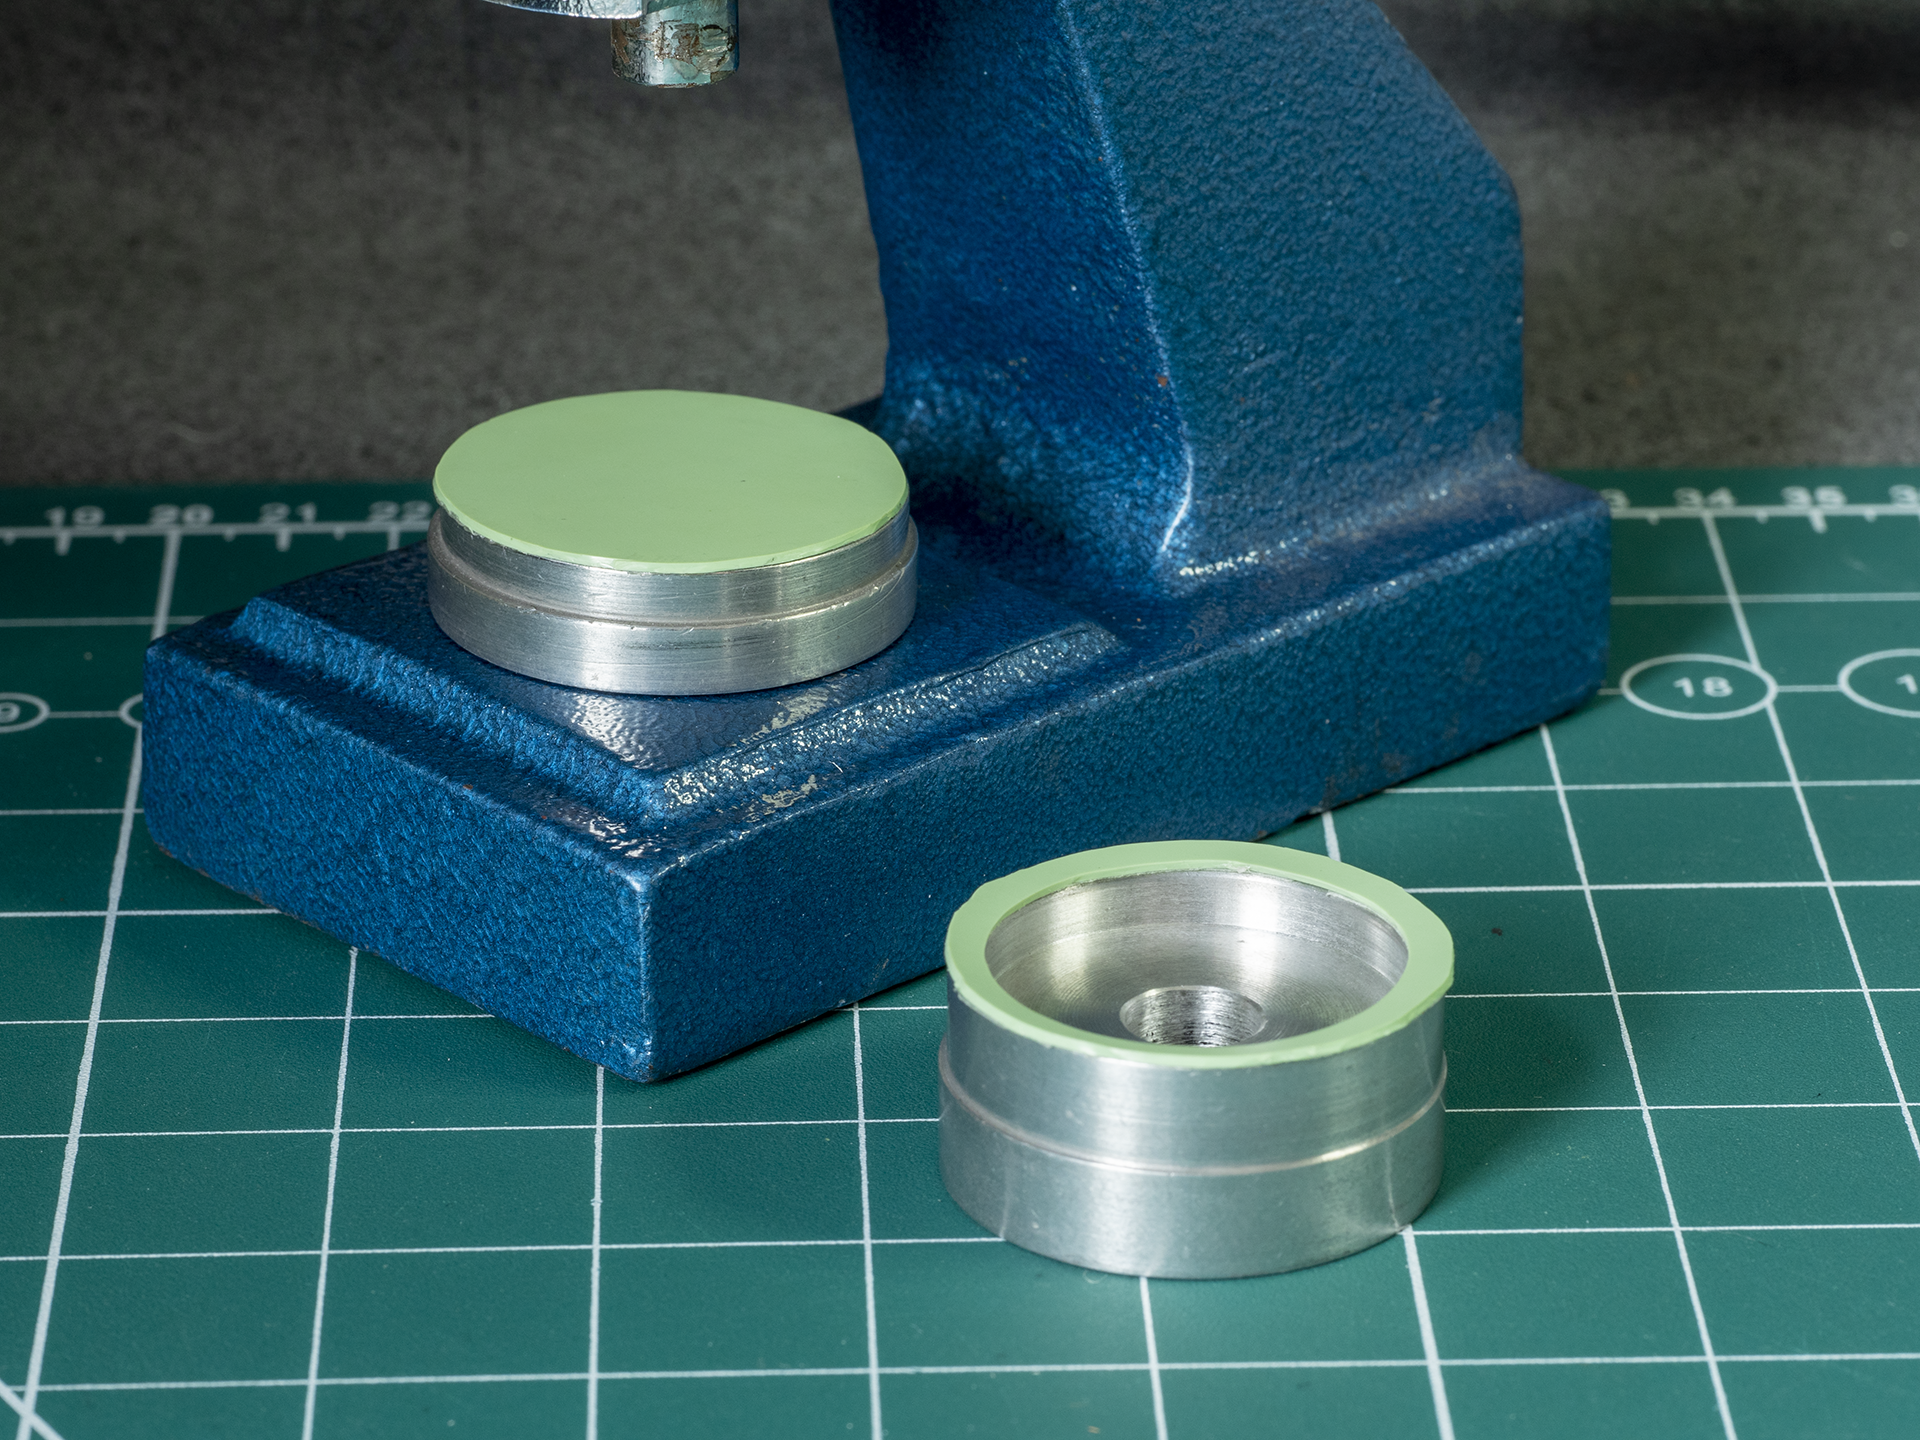
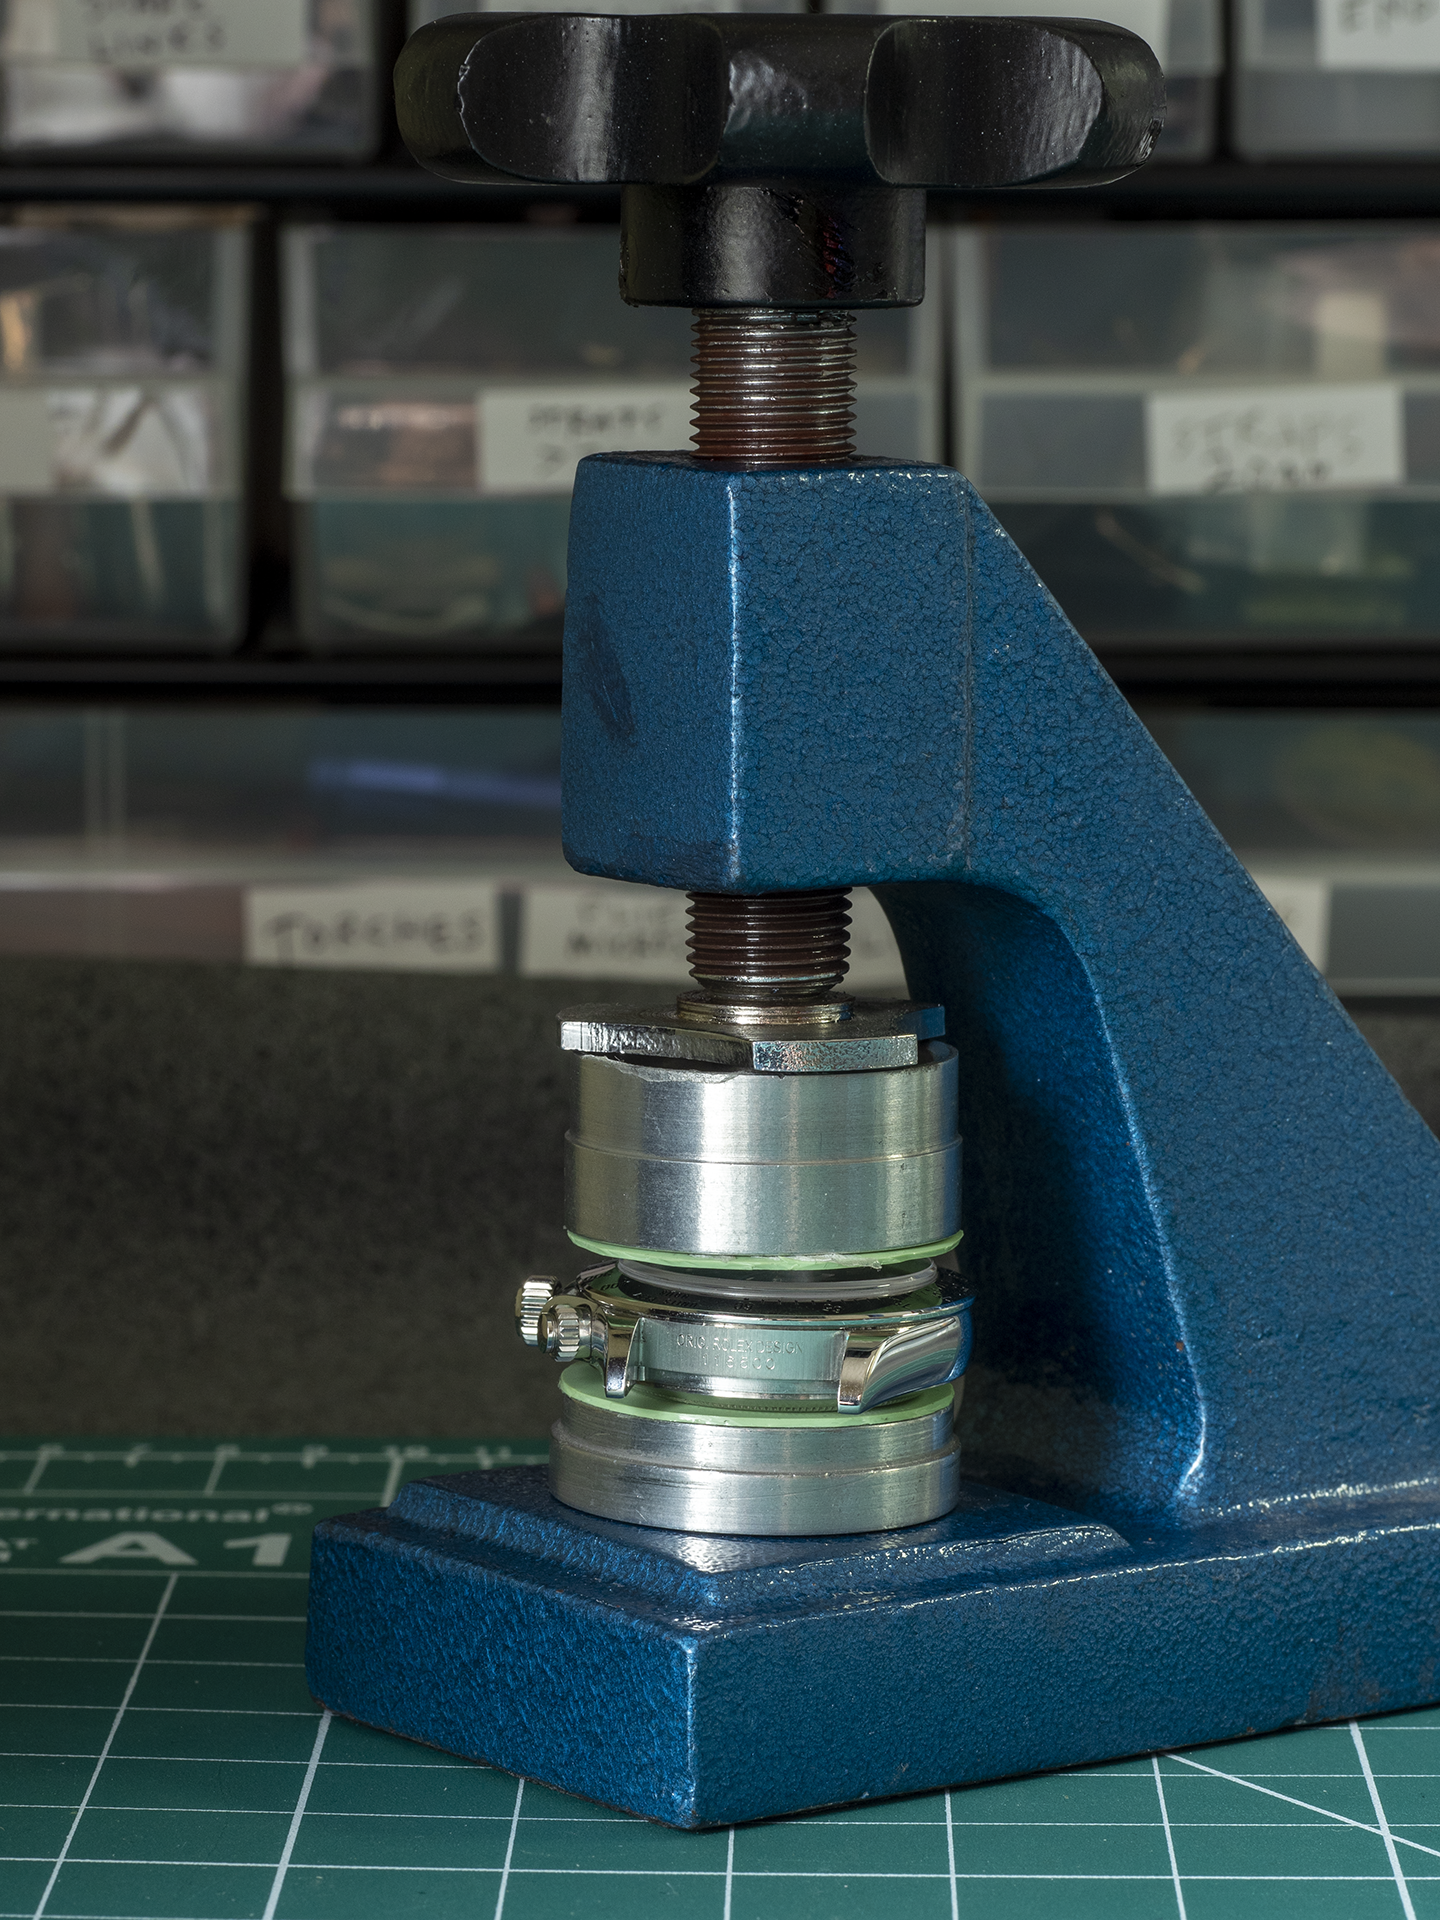
If you're happy, get your crystal press ready. i usually use a Robur press but if you're only doing one or two you wont want to be spending a ton of money on a press and dies.

​​​​​​

​​​​​​The advantage of this press over a cheaper one is it will press the bezel on straight every time, which saves a lot of time if you have a few to do. The parts are made to a higher standard. However, it can be done with a cheap $10 press from eBay if you take your time so we'll look at that for now. Theres a few different types, go for a lever type with dies that have threads.

Select a flat die for the bottom and a die that just fits over the glass for the top. Place the case on the press and very gently press down, if you squeeze it hard you run the risk of snapping the ceramic bezel. Remove the case and check it is still lined up. At this point you will be able to adjust it slightly. Keep repeating this until the bezel is almost pressed all the way down with a gap just big enough for your blade to fit underneath in case you need to remove it and start again.


So, that's how you install a ceramic bezel.

If you're good with your hands, plan on installing more than one and don't get stressed too easily i'd say give it a try. If not you might as well just send it to someone to do for you.

Thanks!!


Enviado desde mi iPhone utilizando Tapatalk
 

p0pperini

patr0n h0arder
Gold Patron
Certified
29/1/19
8,962
29,949
113
UK
p0pperini so now the thickness is 12.2/3 ?

SuperLory Nope. With the 2.3 Cousins gasket the overall thickness is now 12.5 mm.

Gmc nice post mate - quoting the entire OP just to add a one word comment. Perhaps you could consider editing that so you’re not repeating the entire tutorial?
 
Last edited: