• Tired of adverts on RWI? - Subscribe by clicking HERE and PMing Trailboss for instructions and they will magically go away!

Project: Installing Gen Parts on 4130 Daytona Movement

dogwood

I'm Pretty Popular
Patron
Certified
7/9/21
1,896
3,571
113
Canada
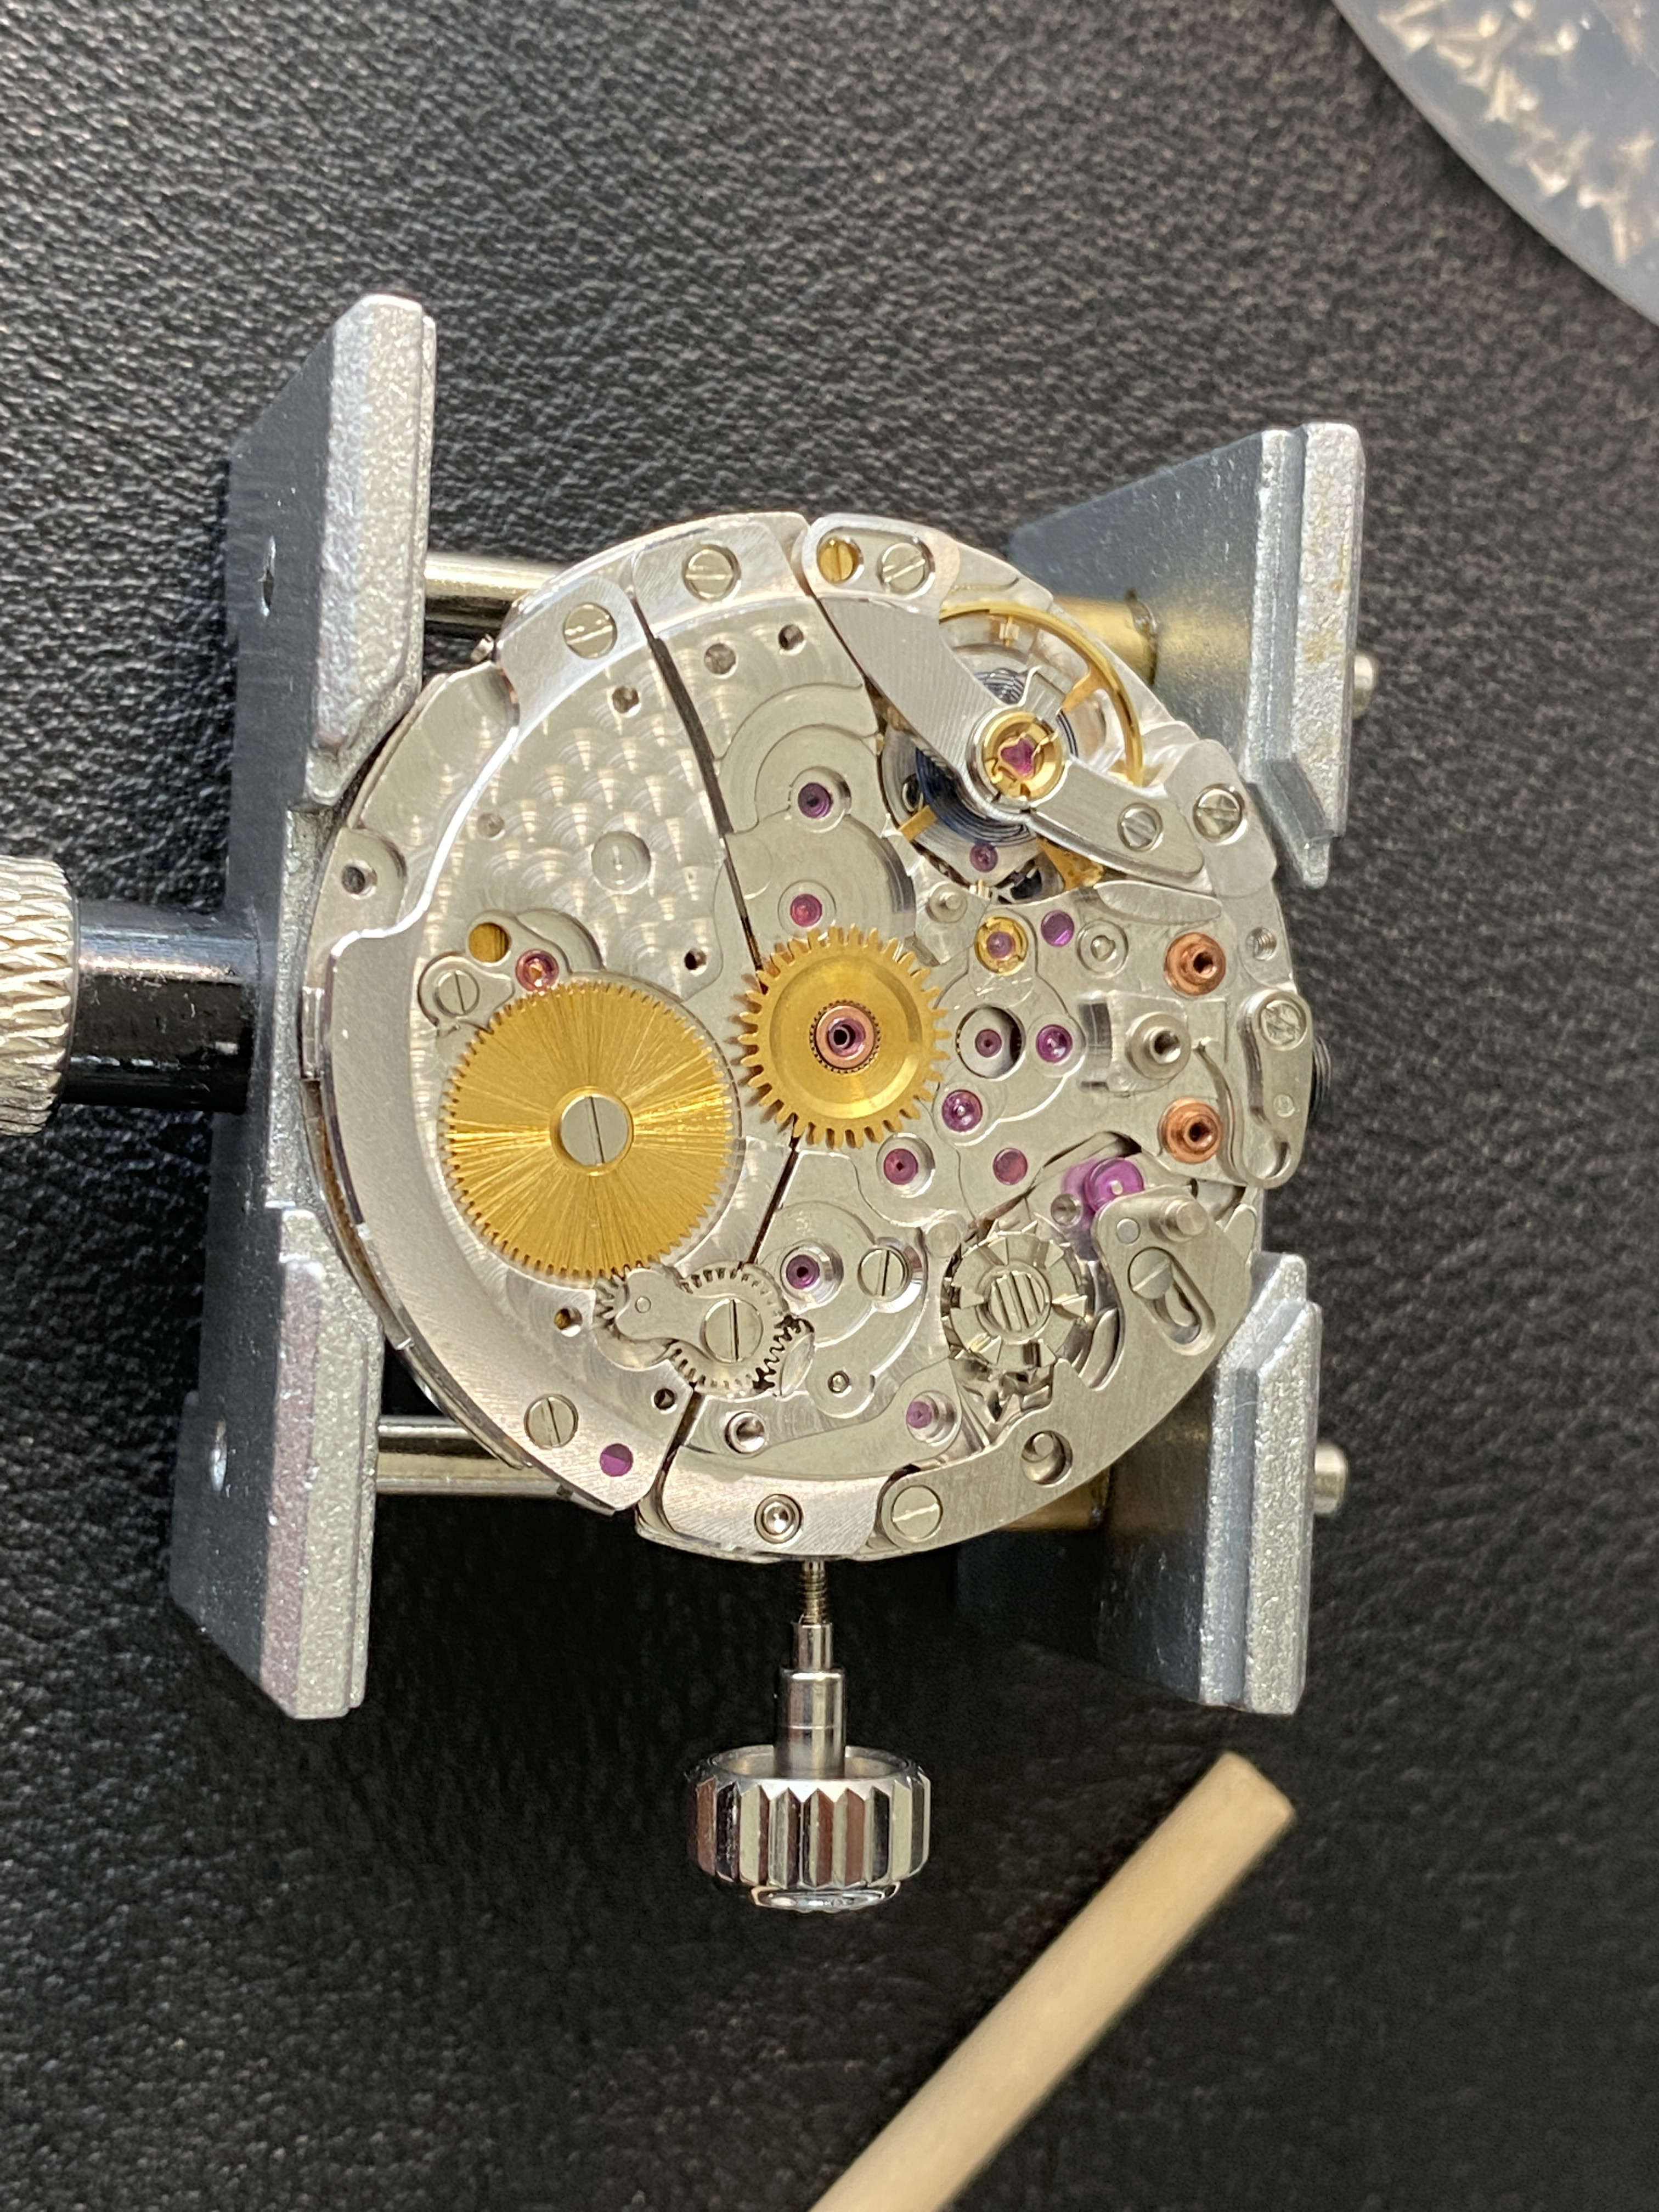
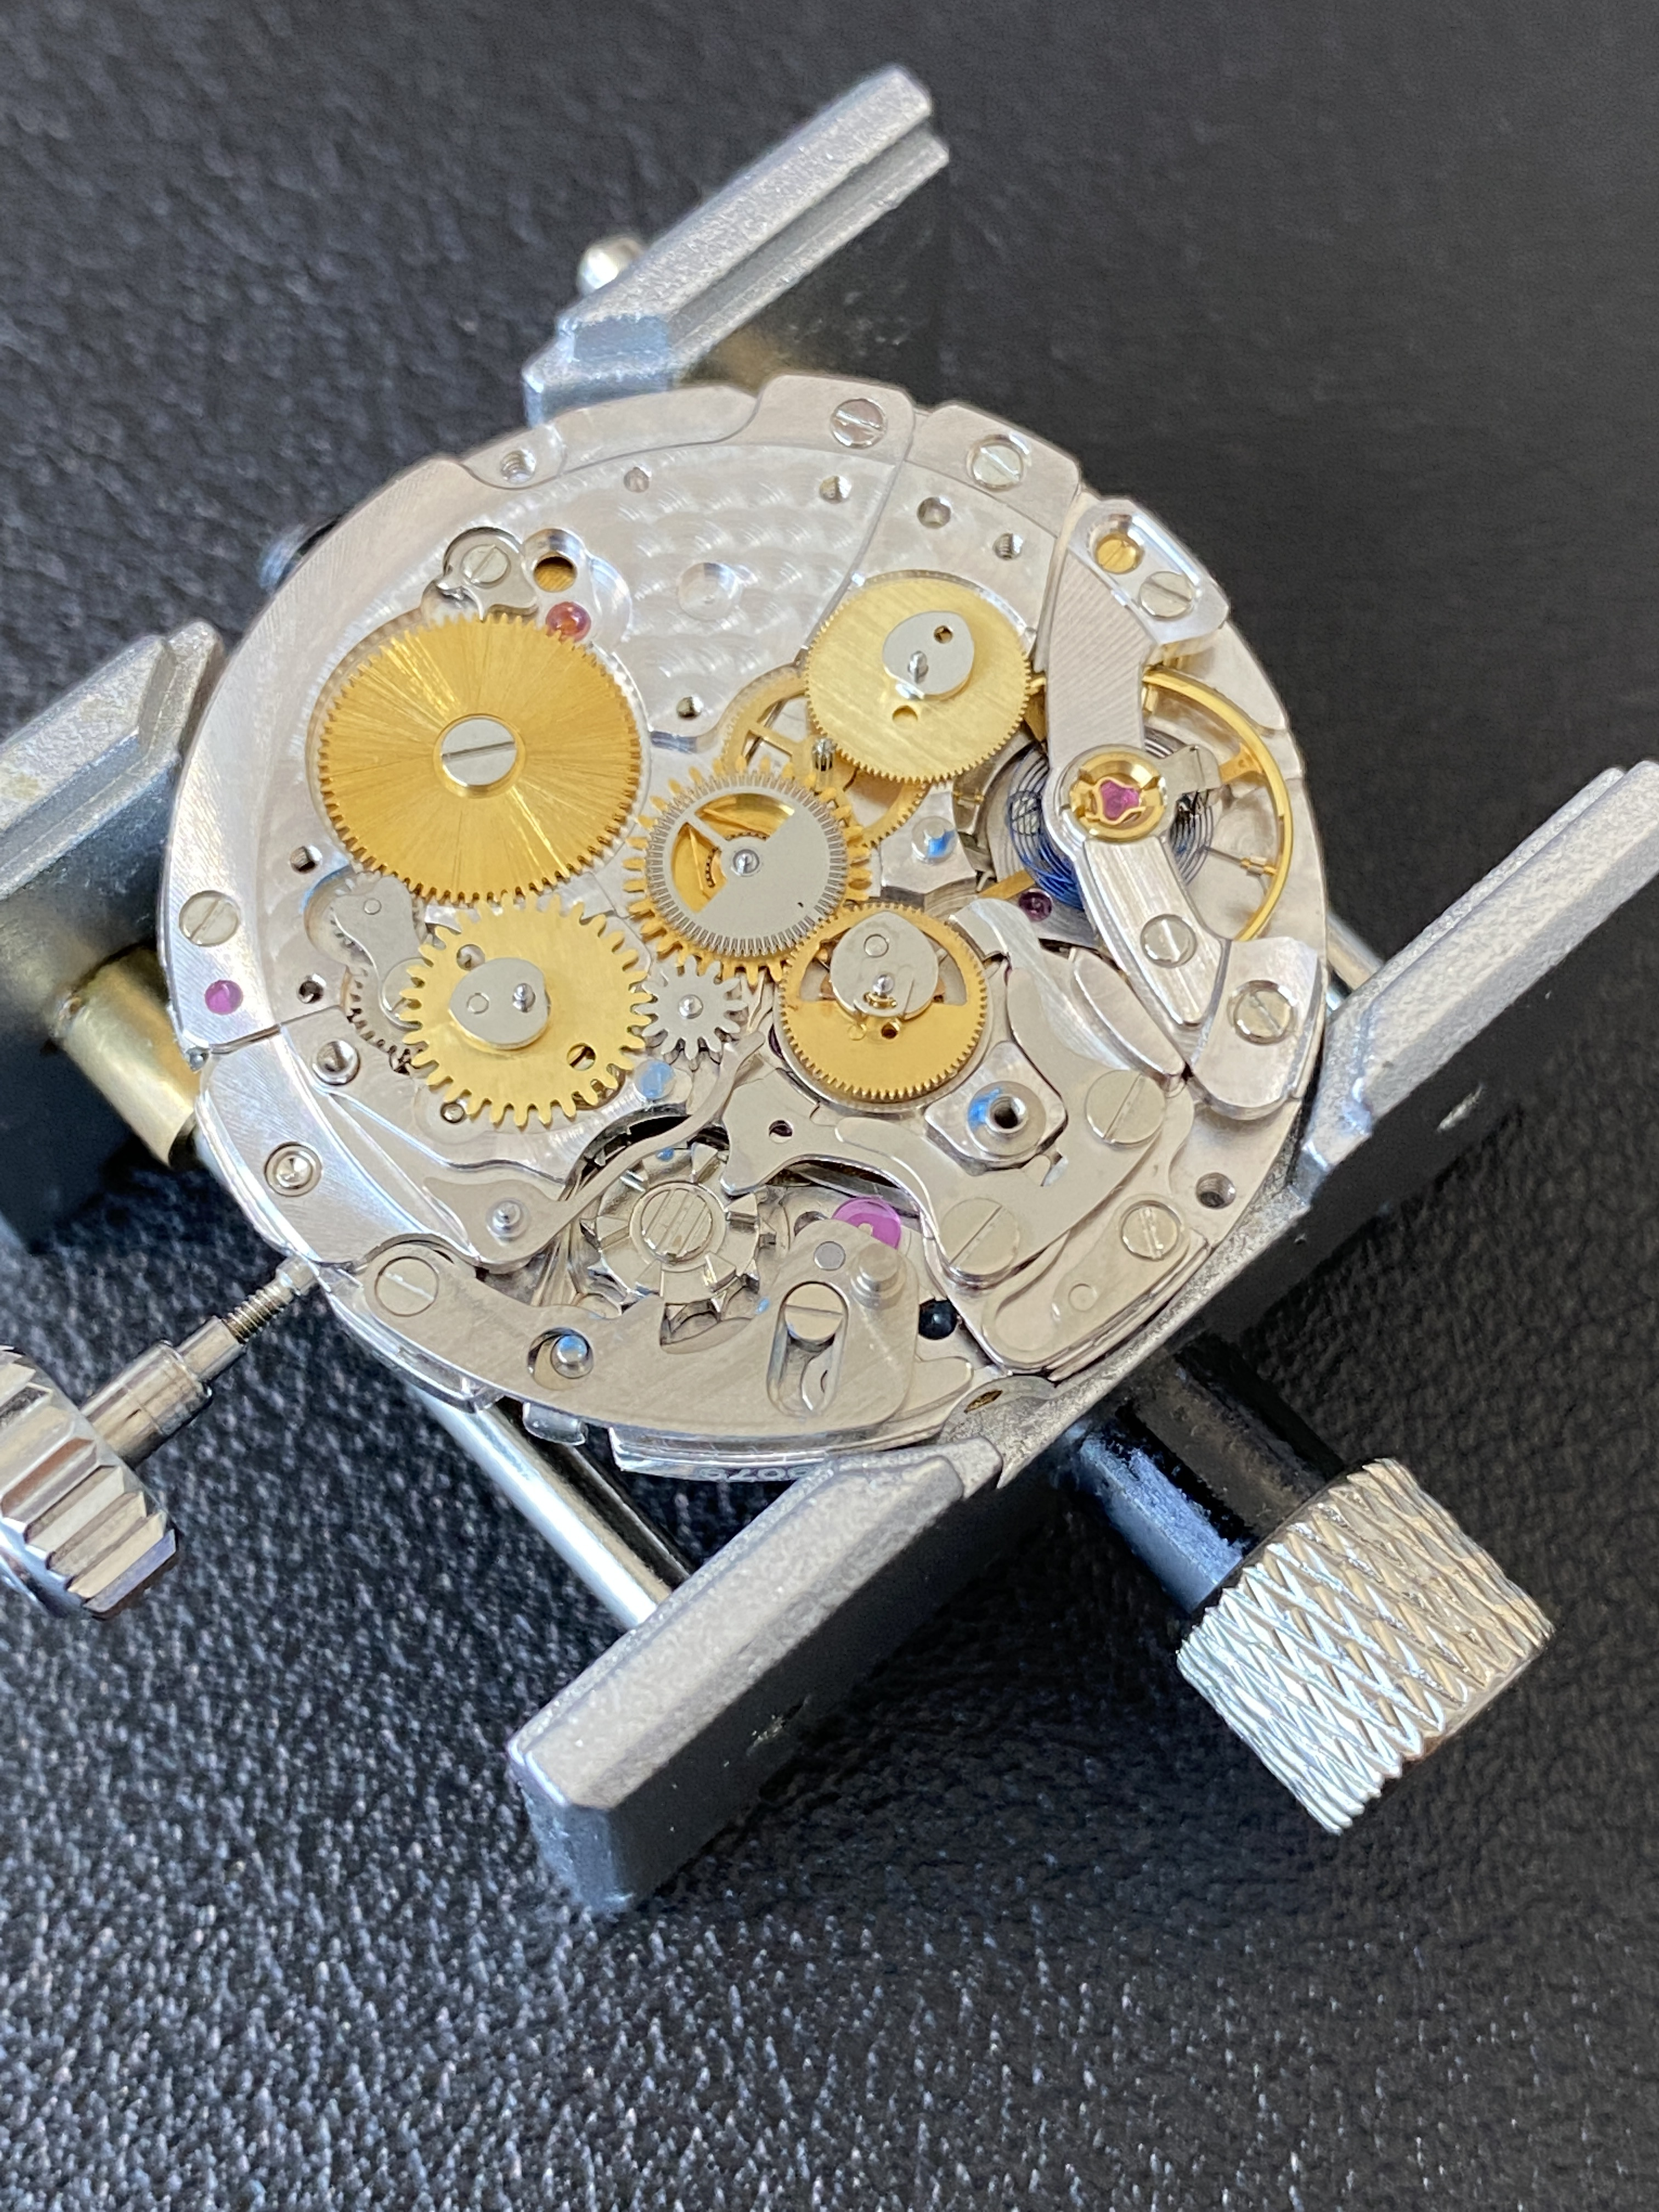
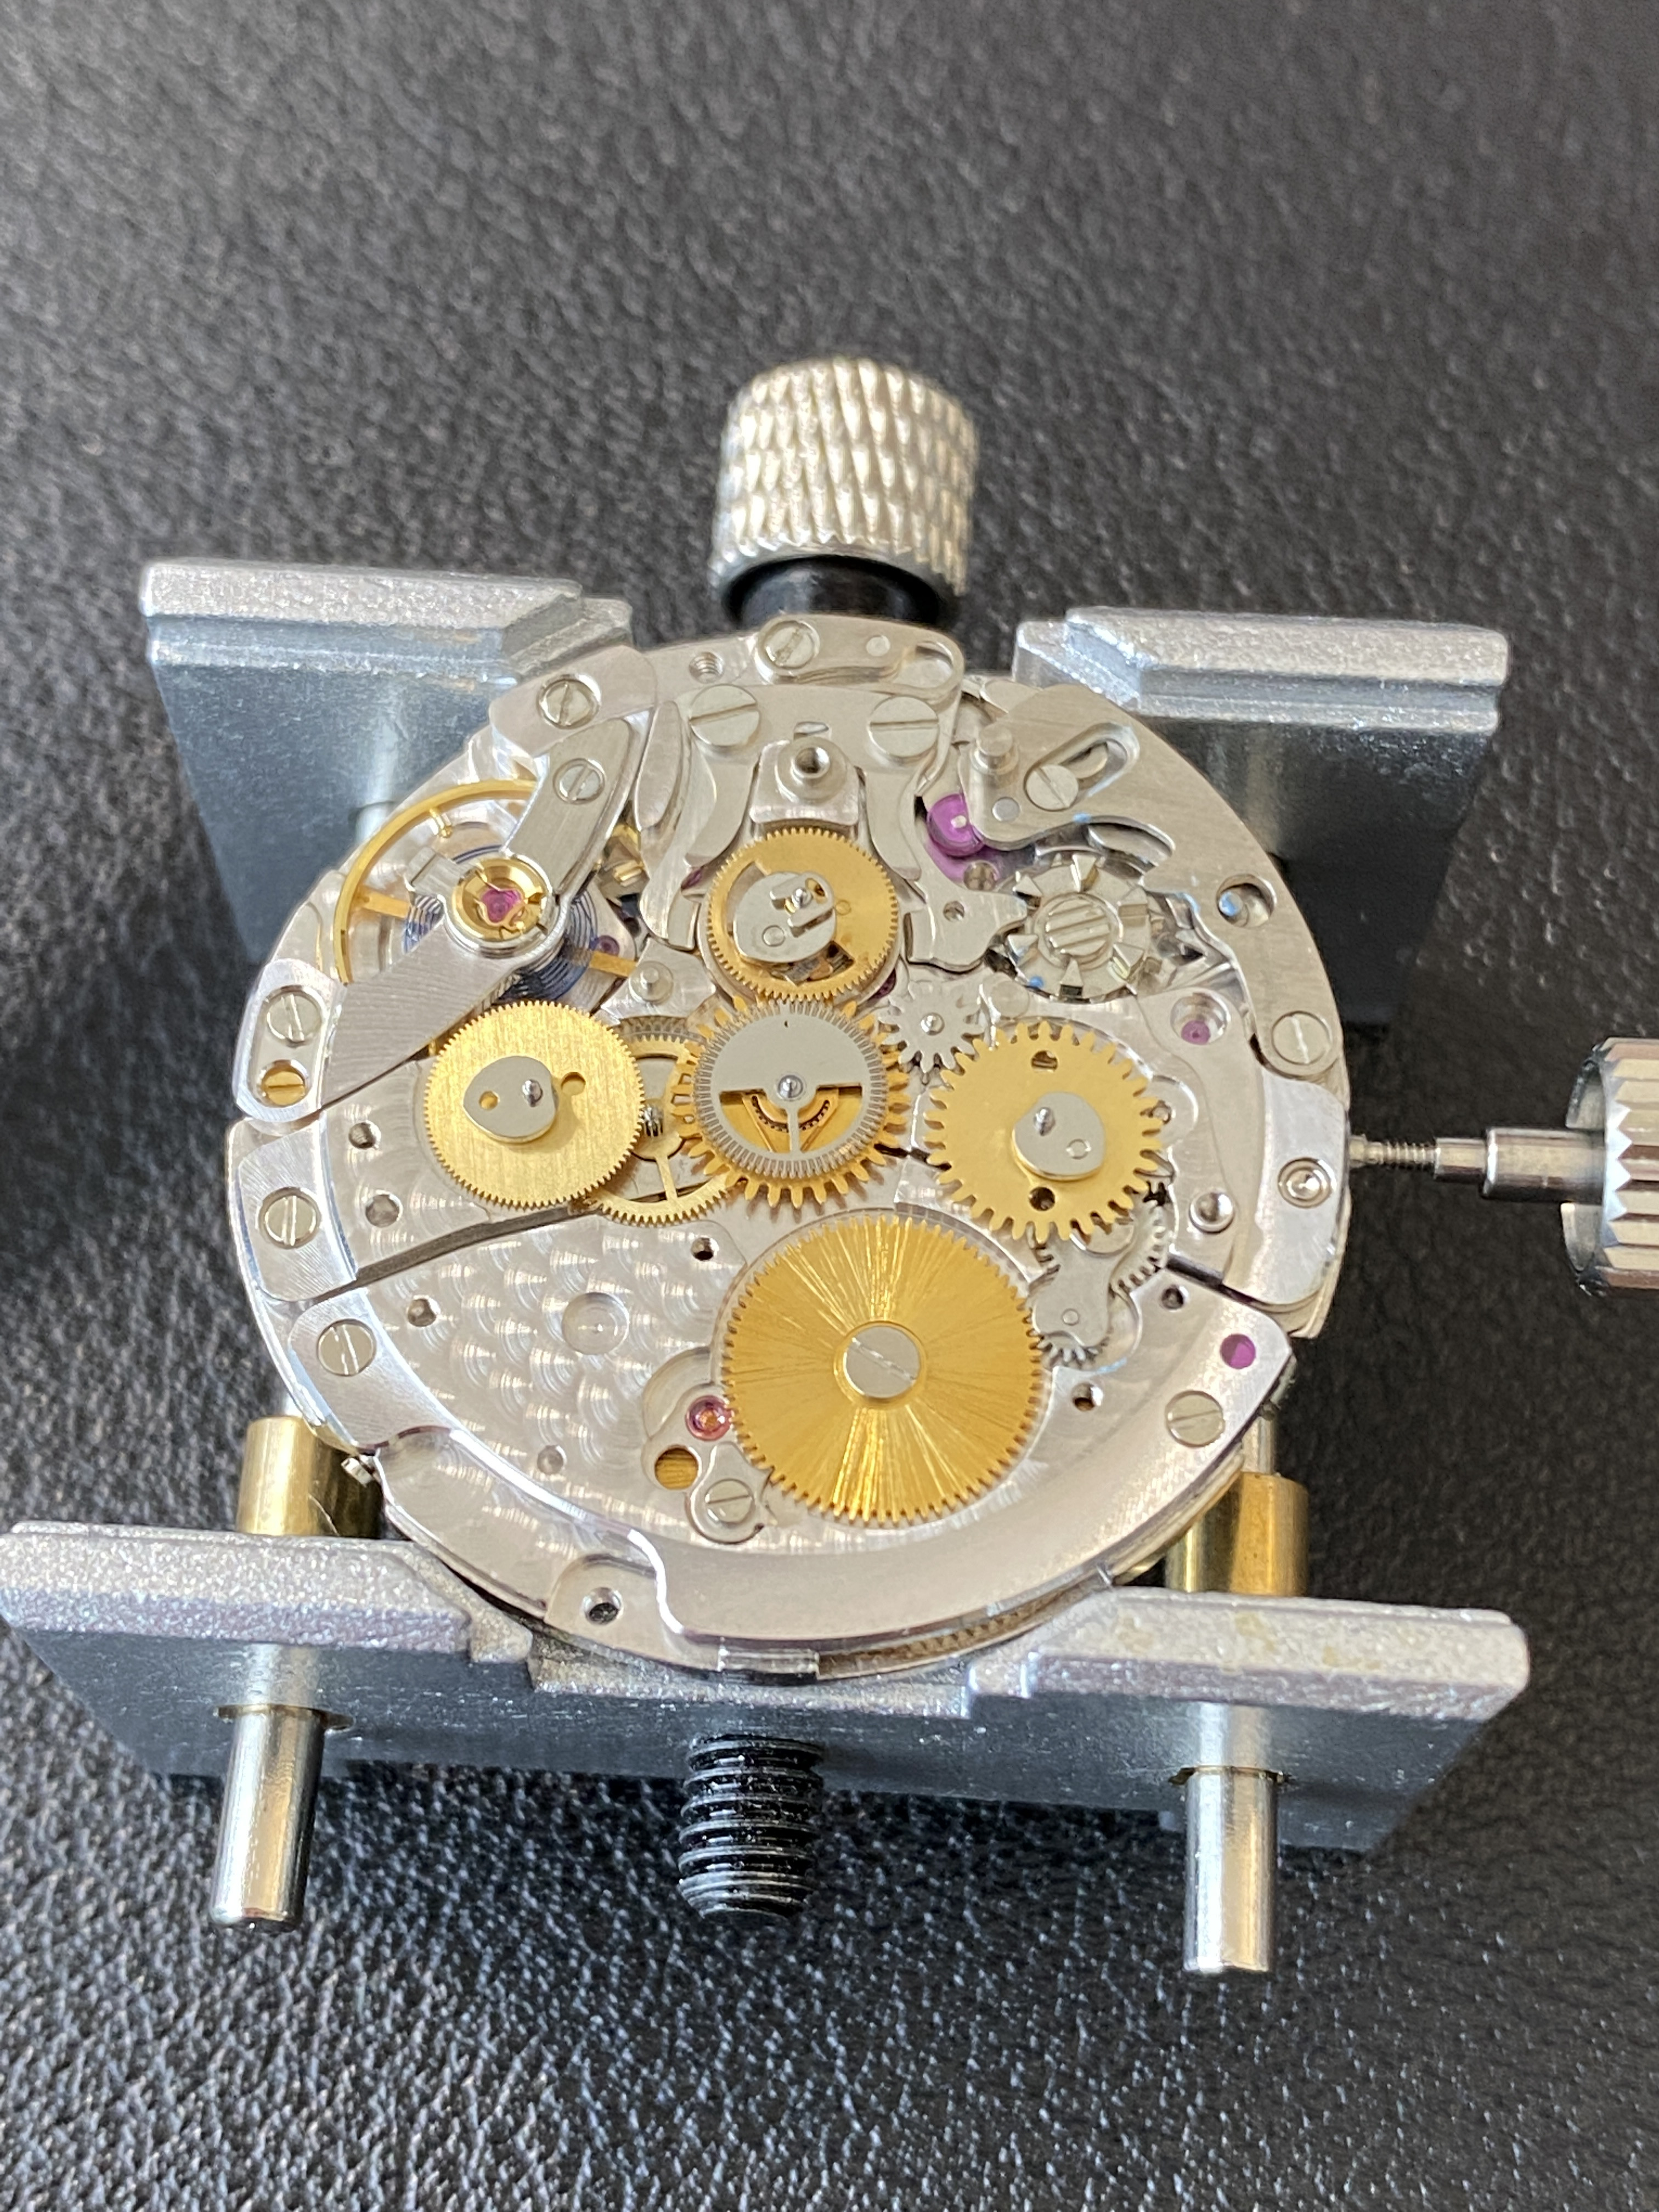
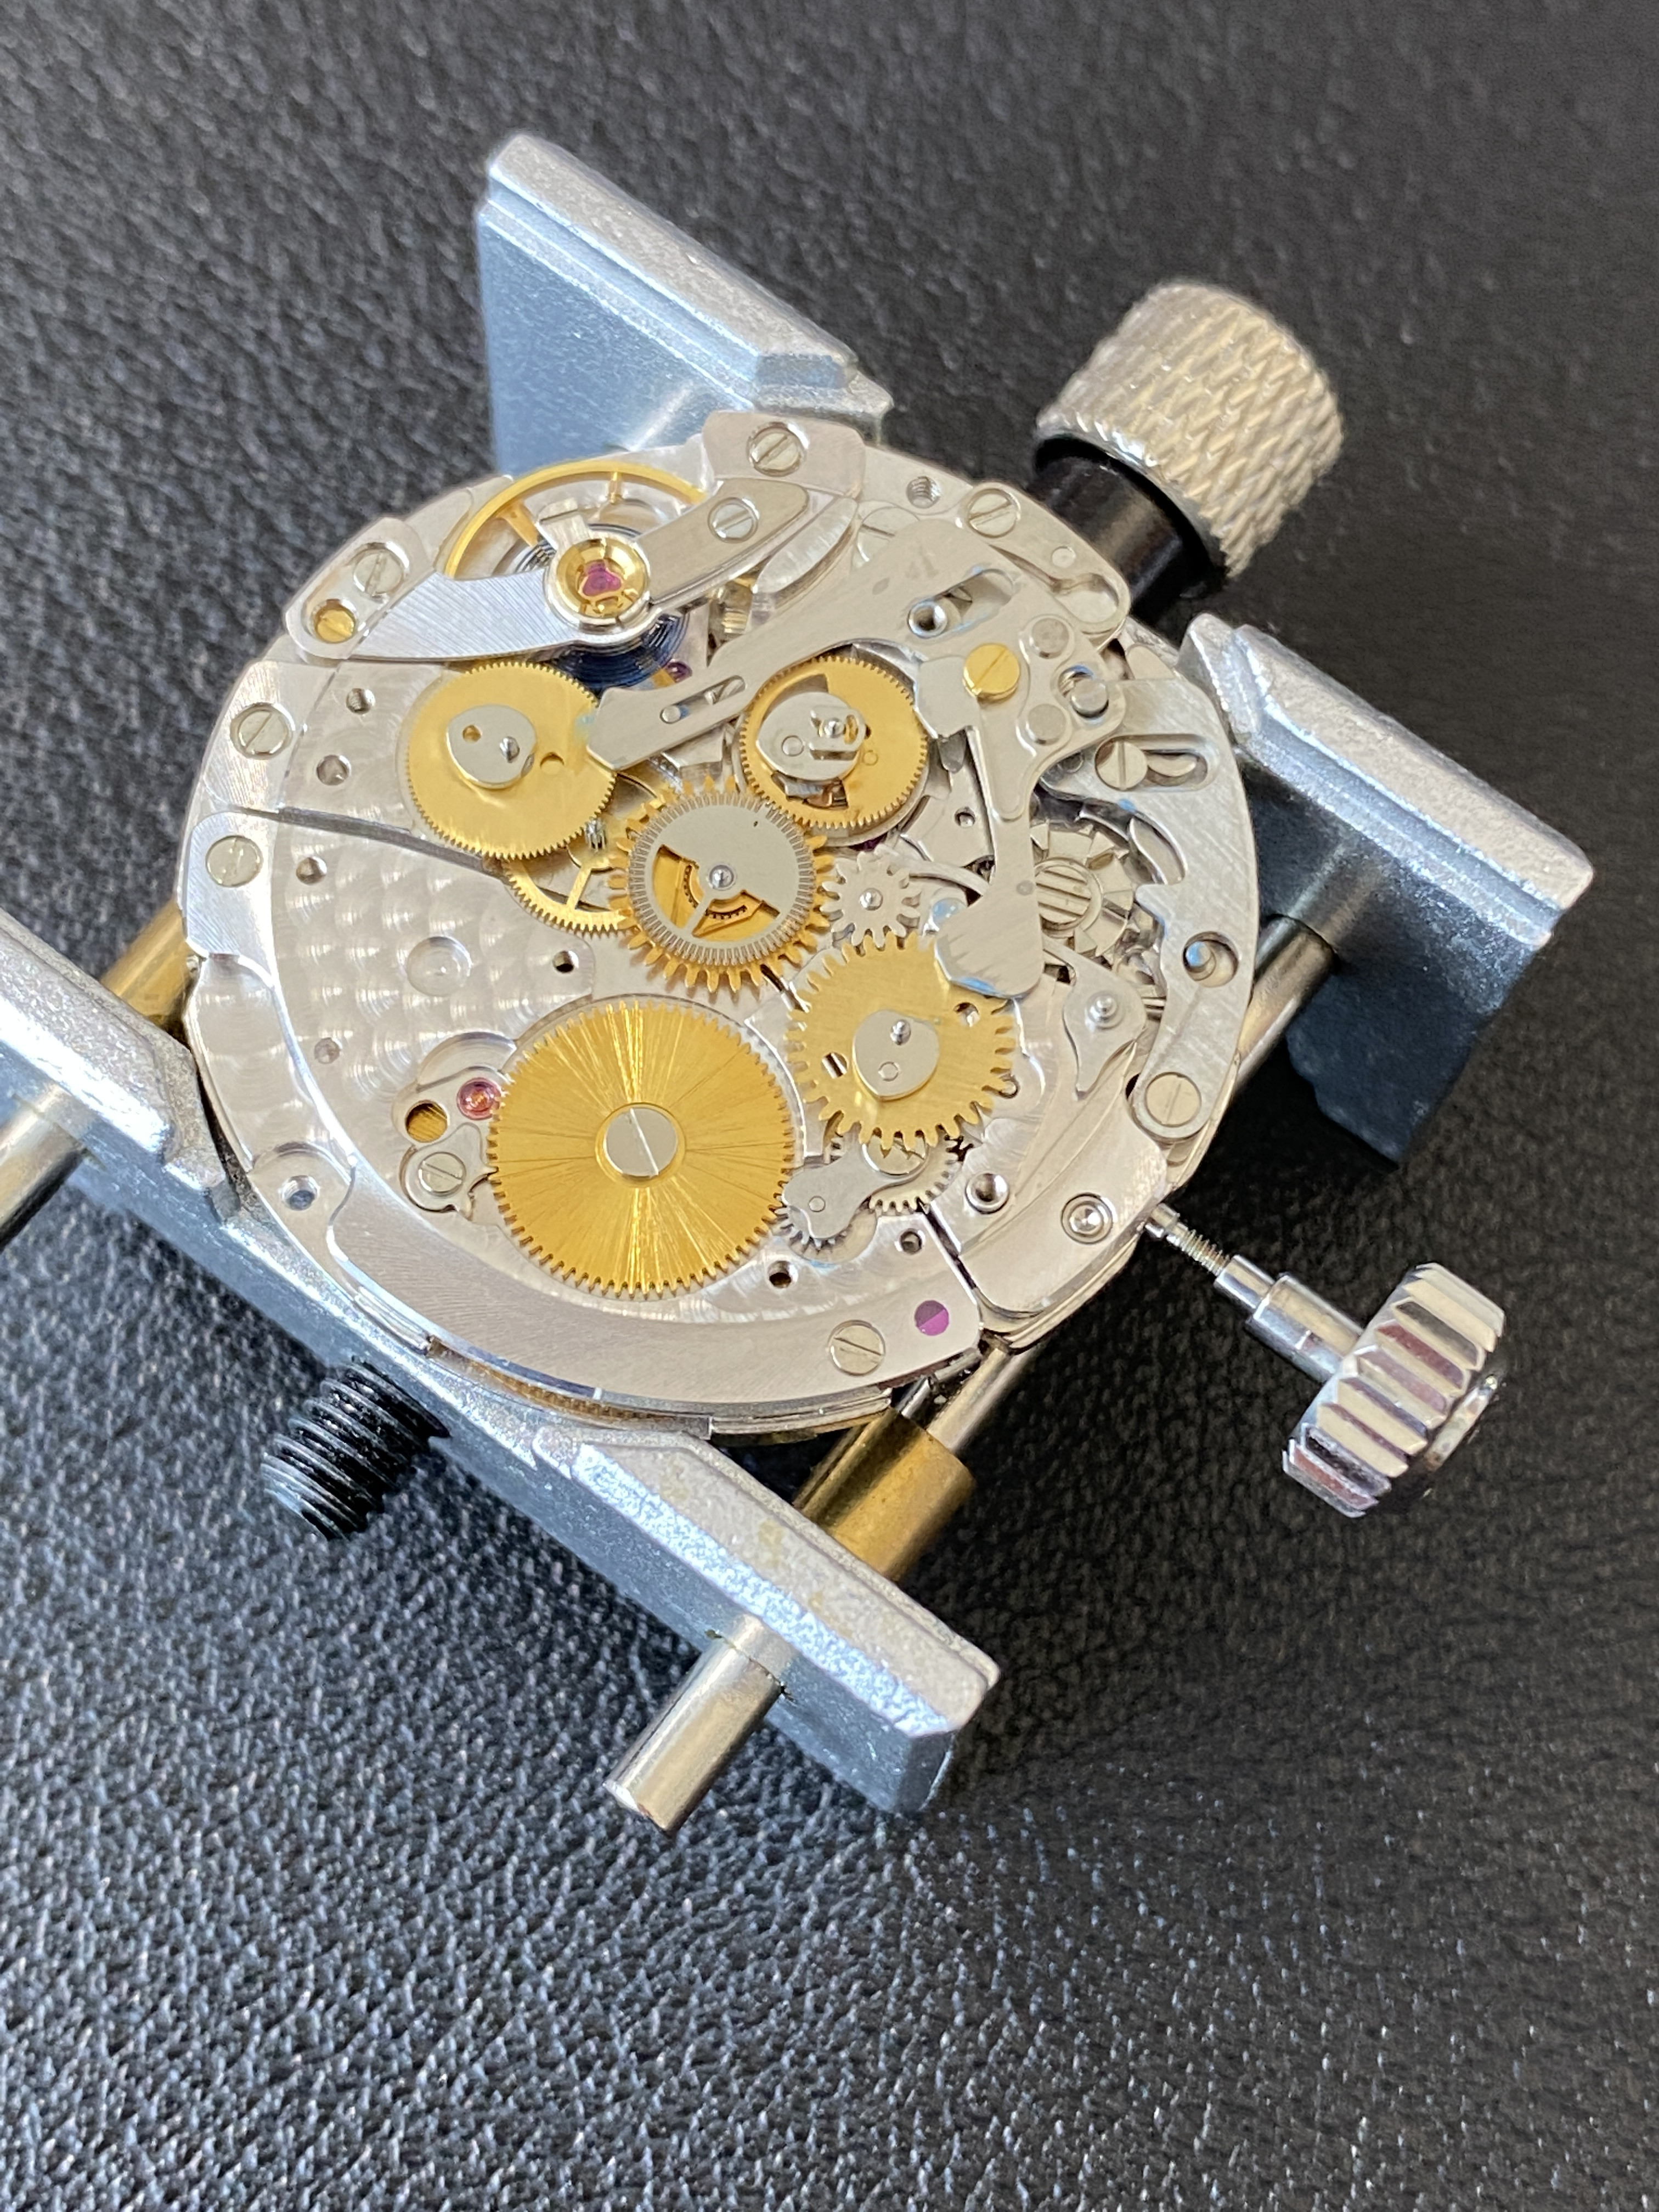
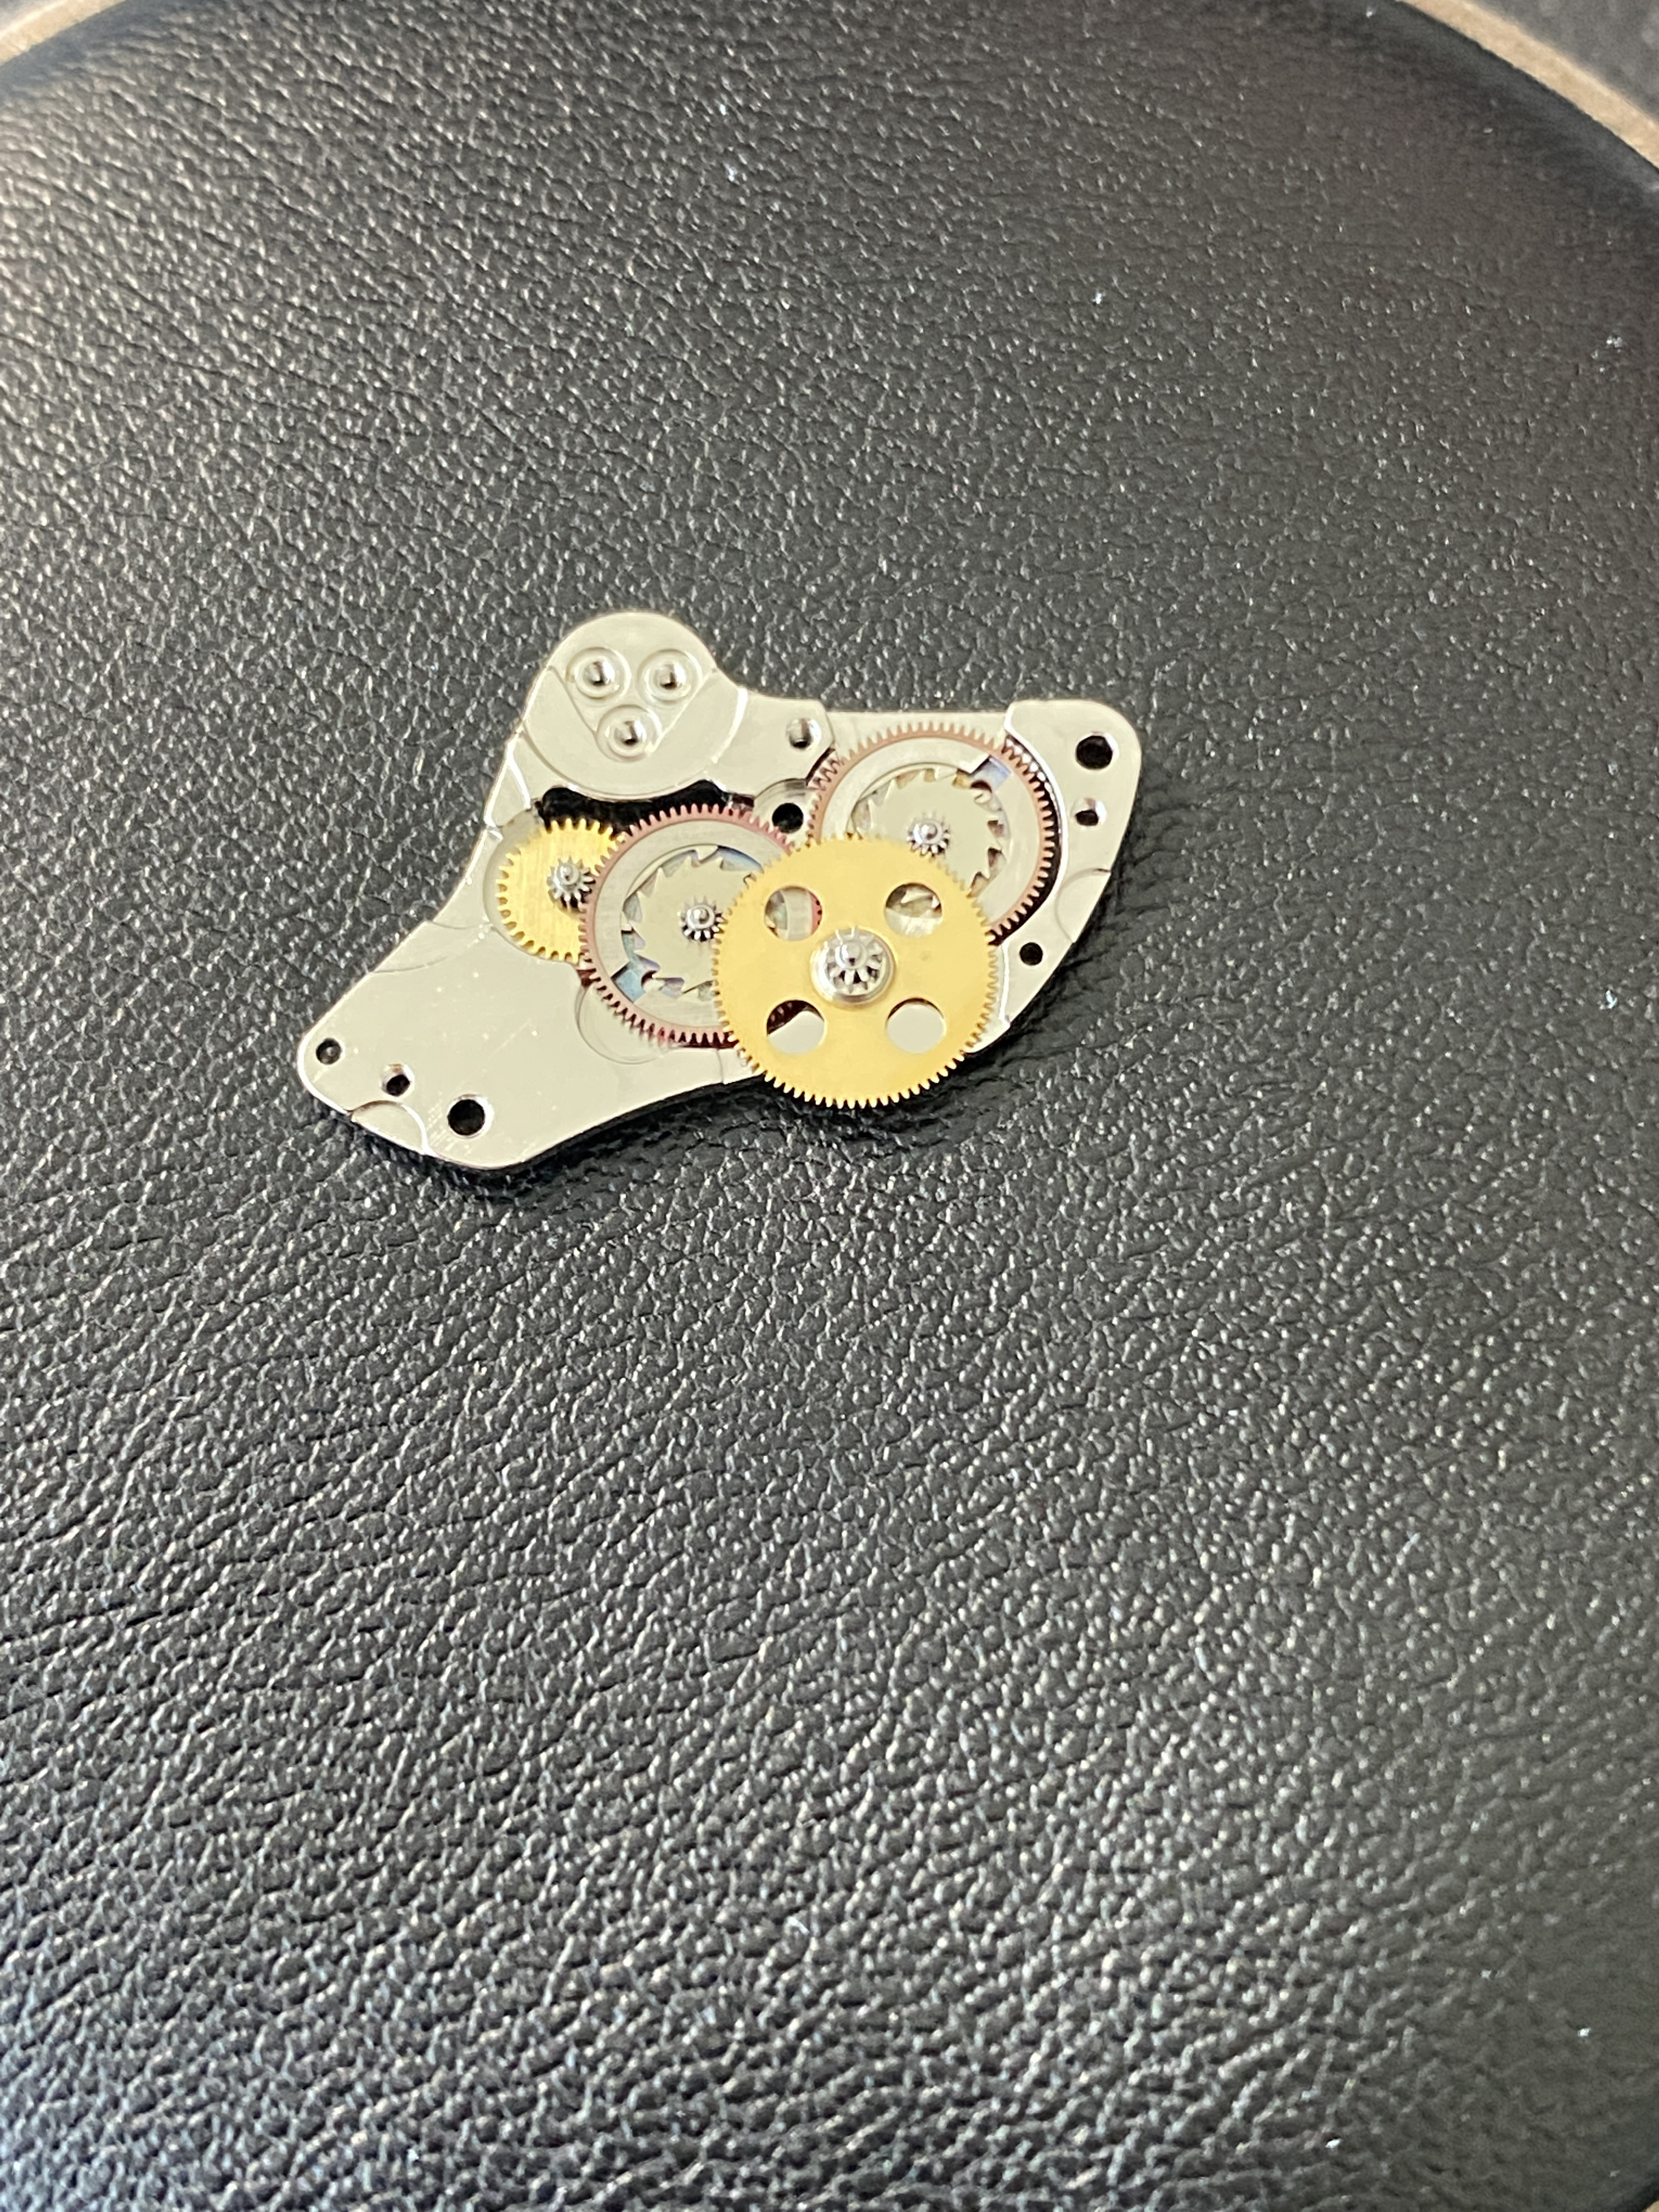
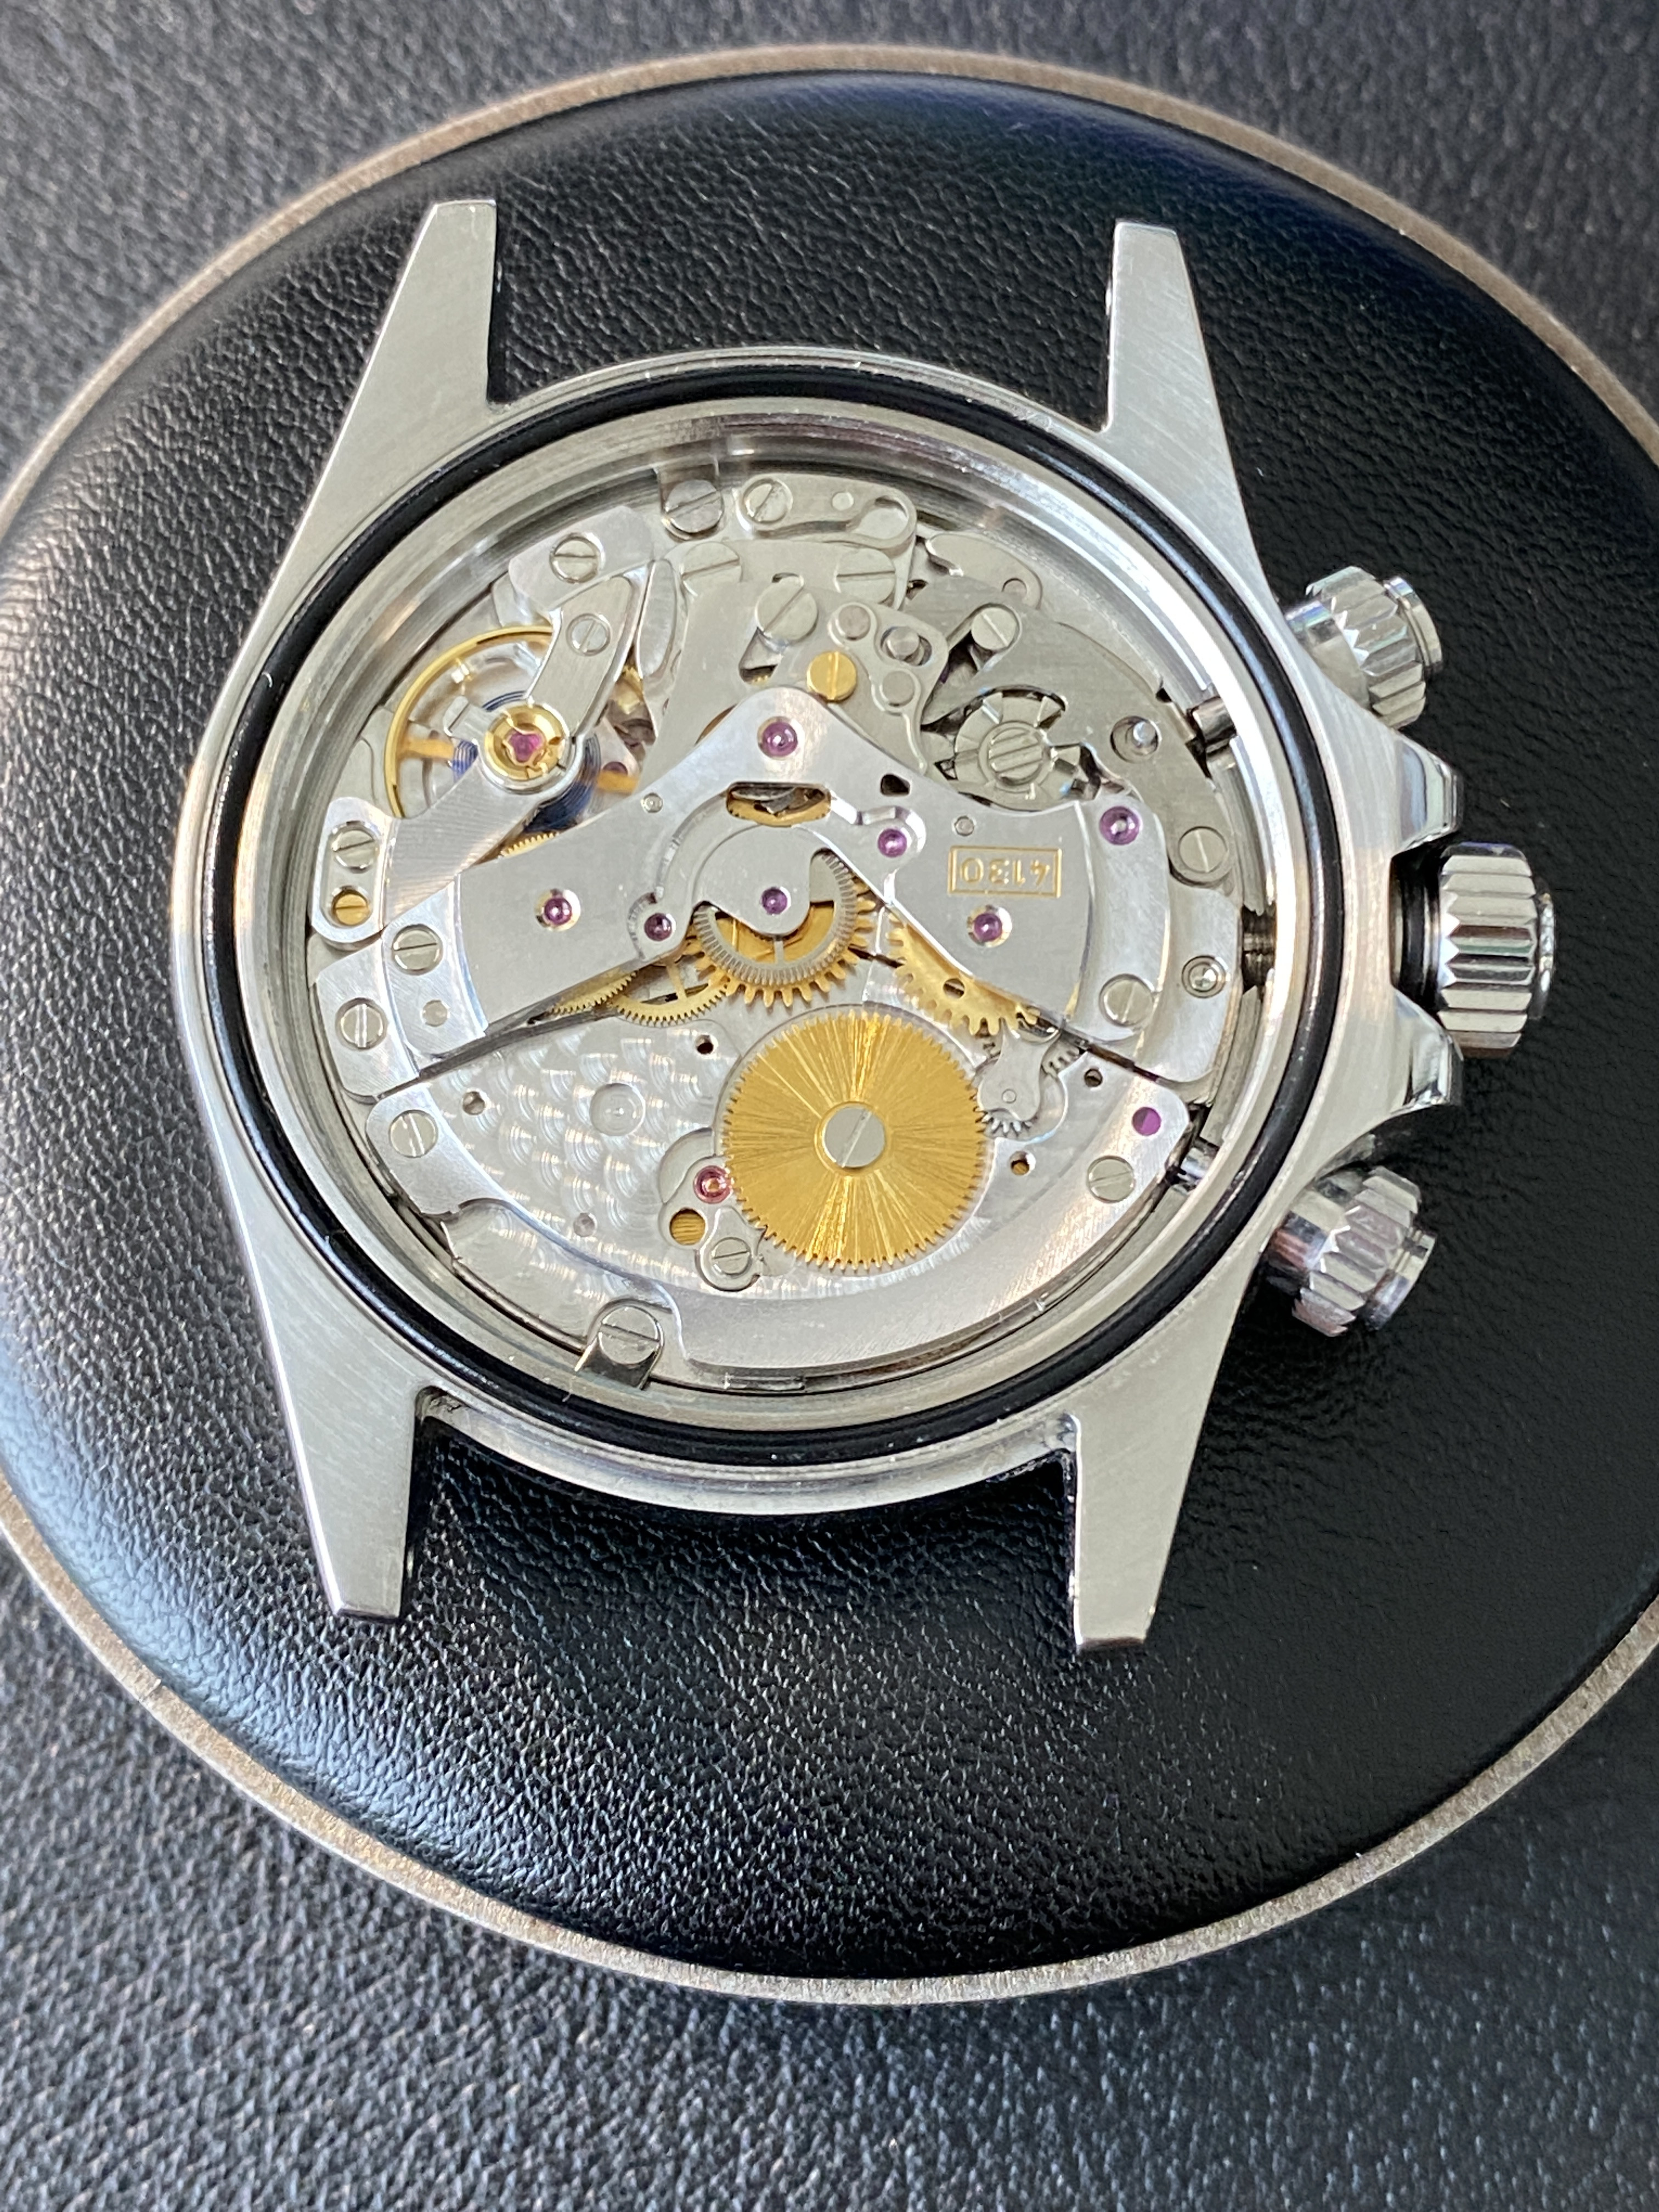
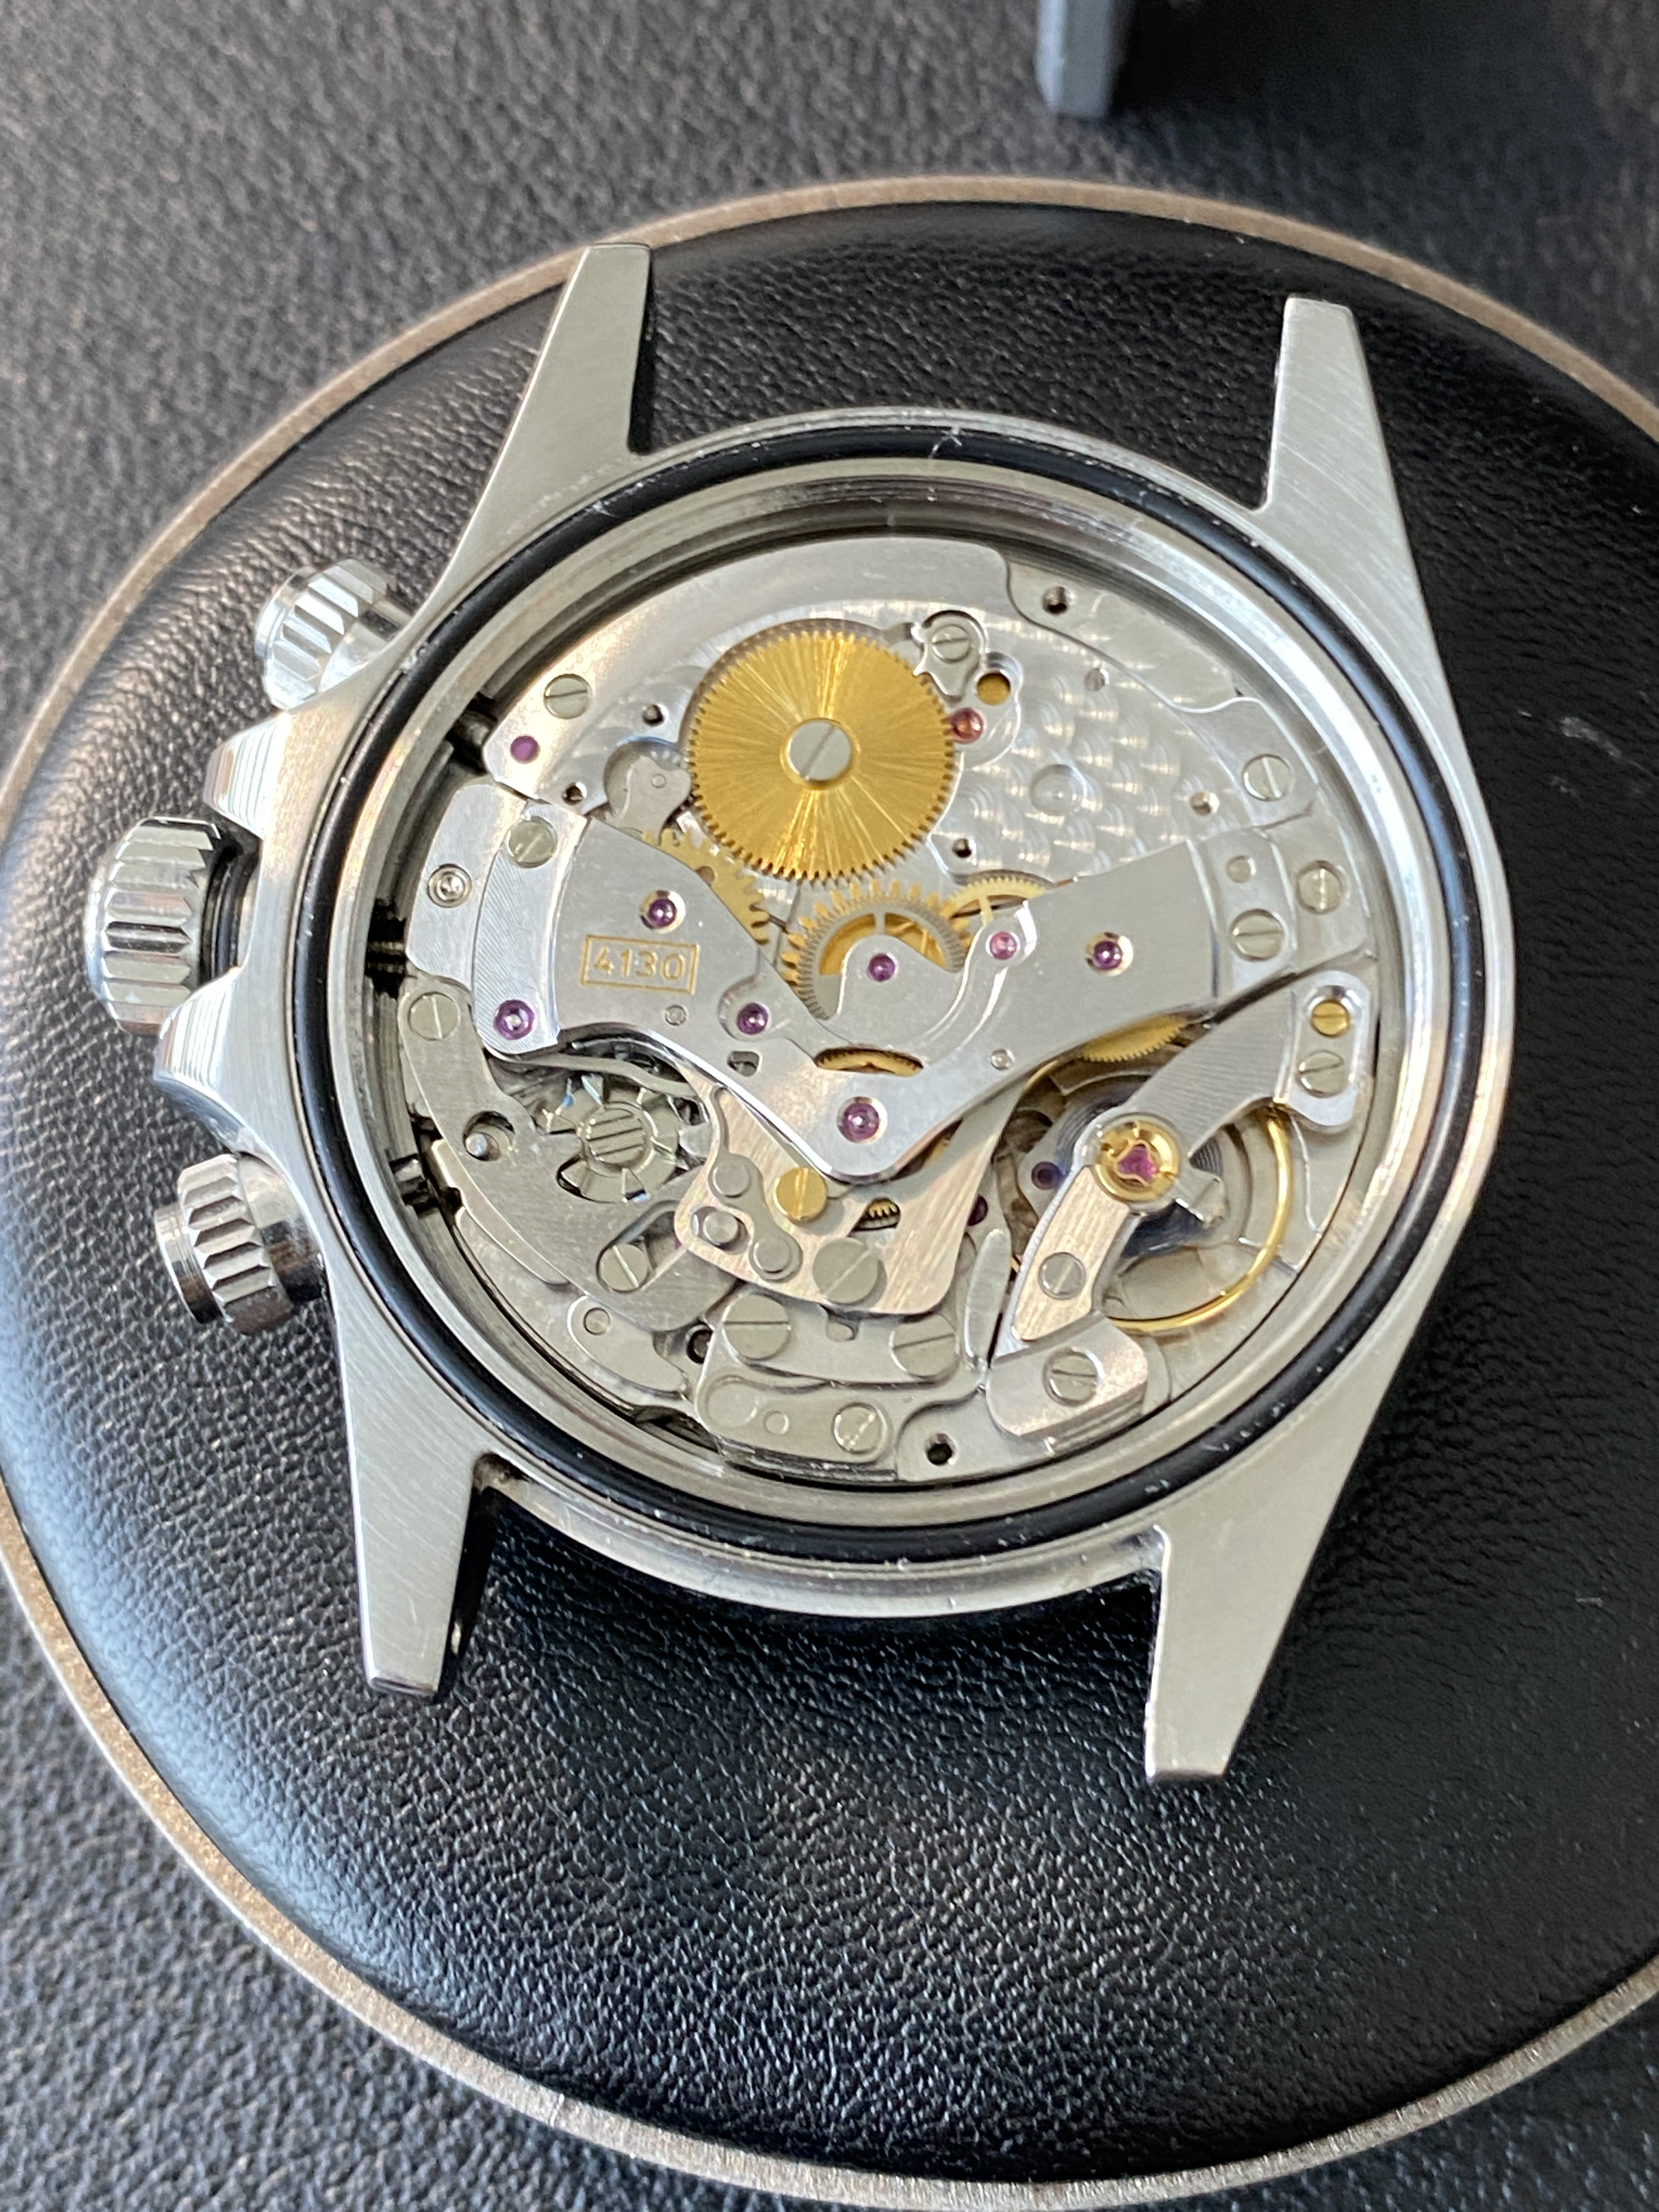
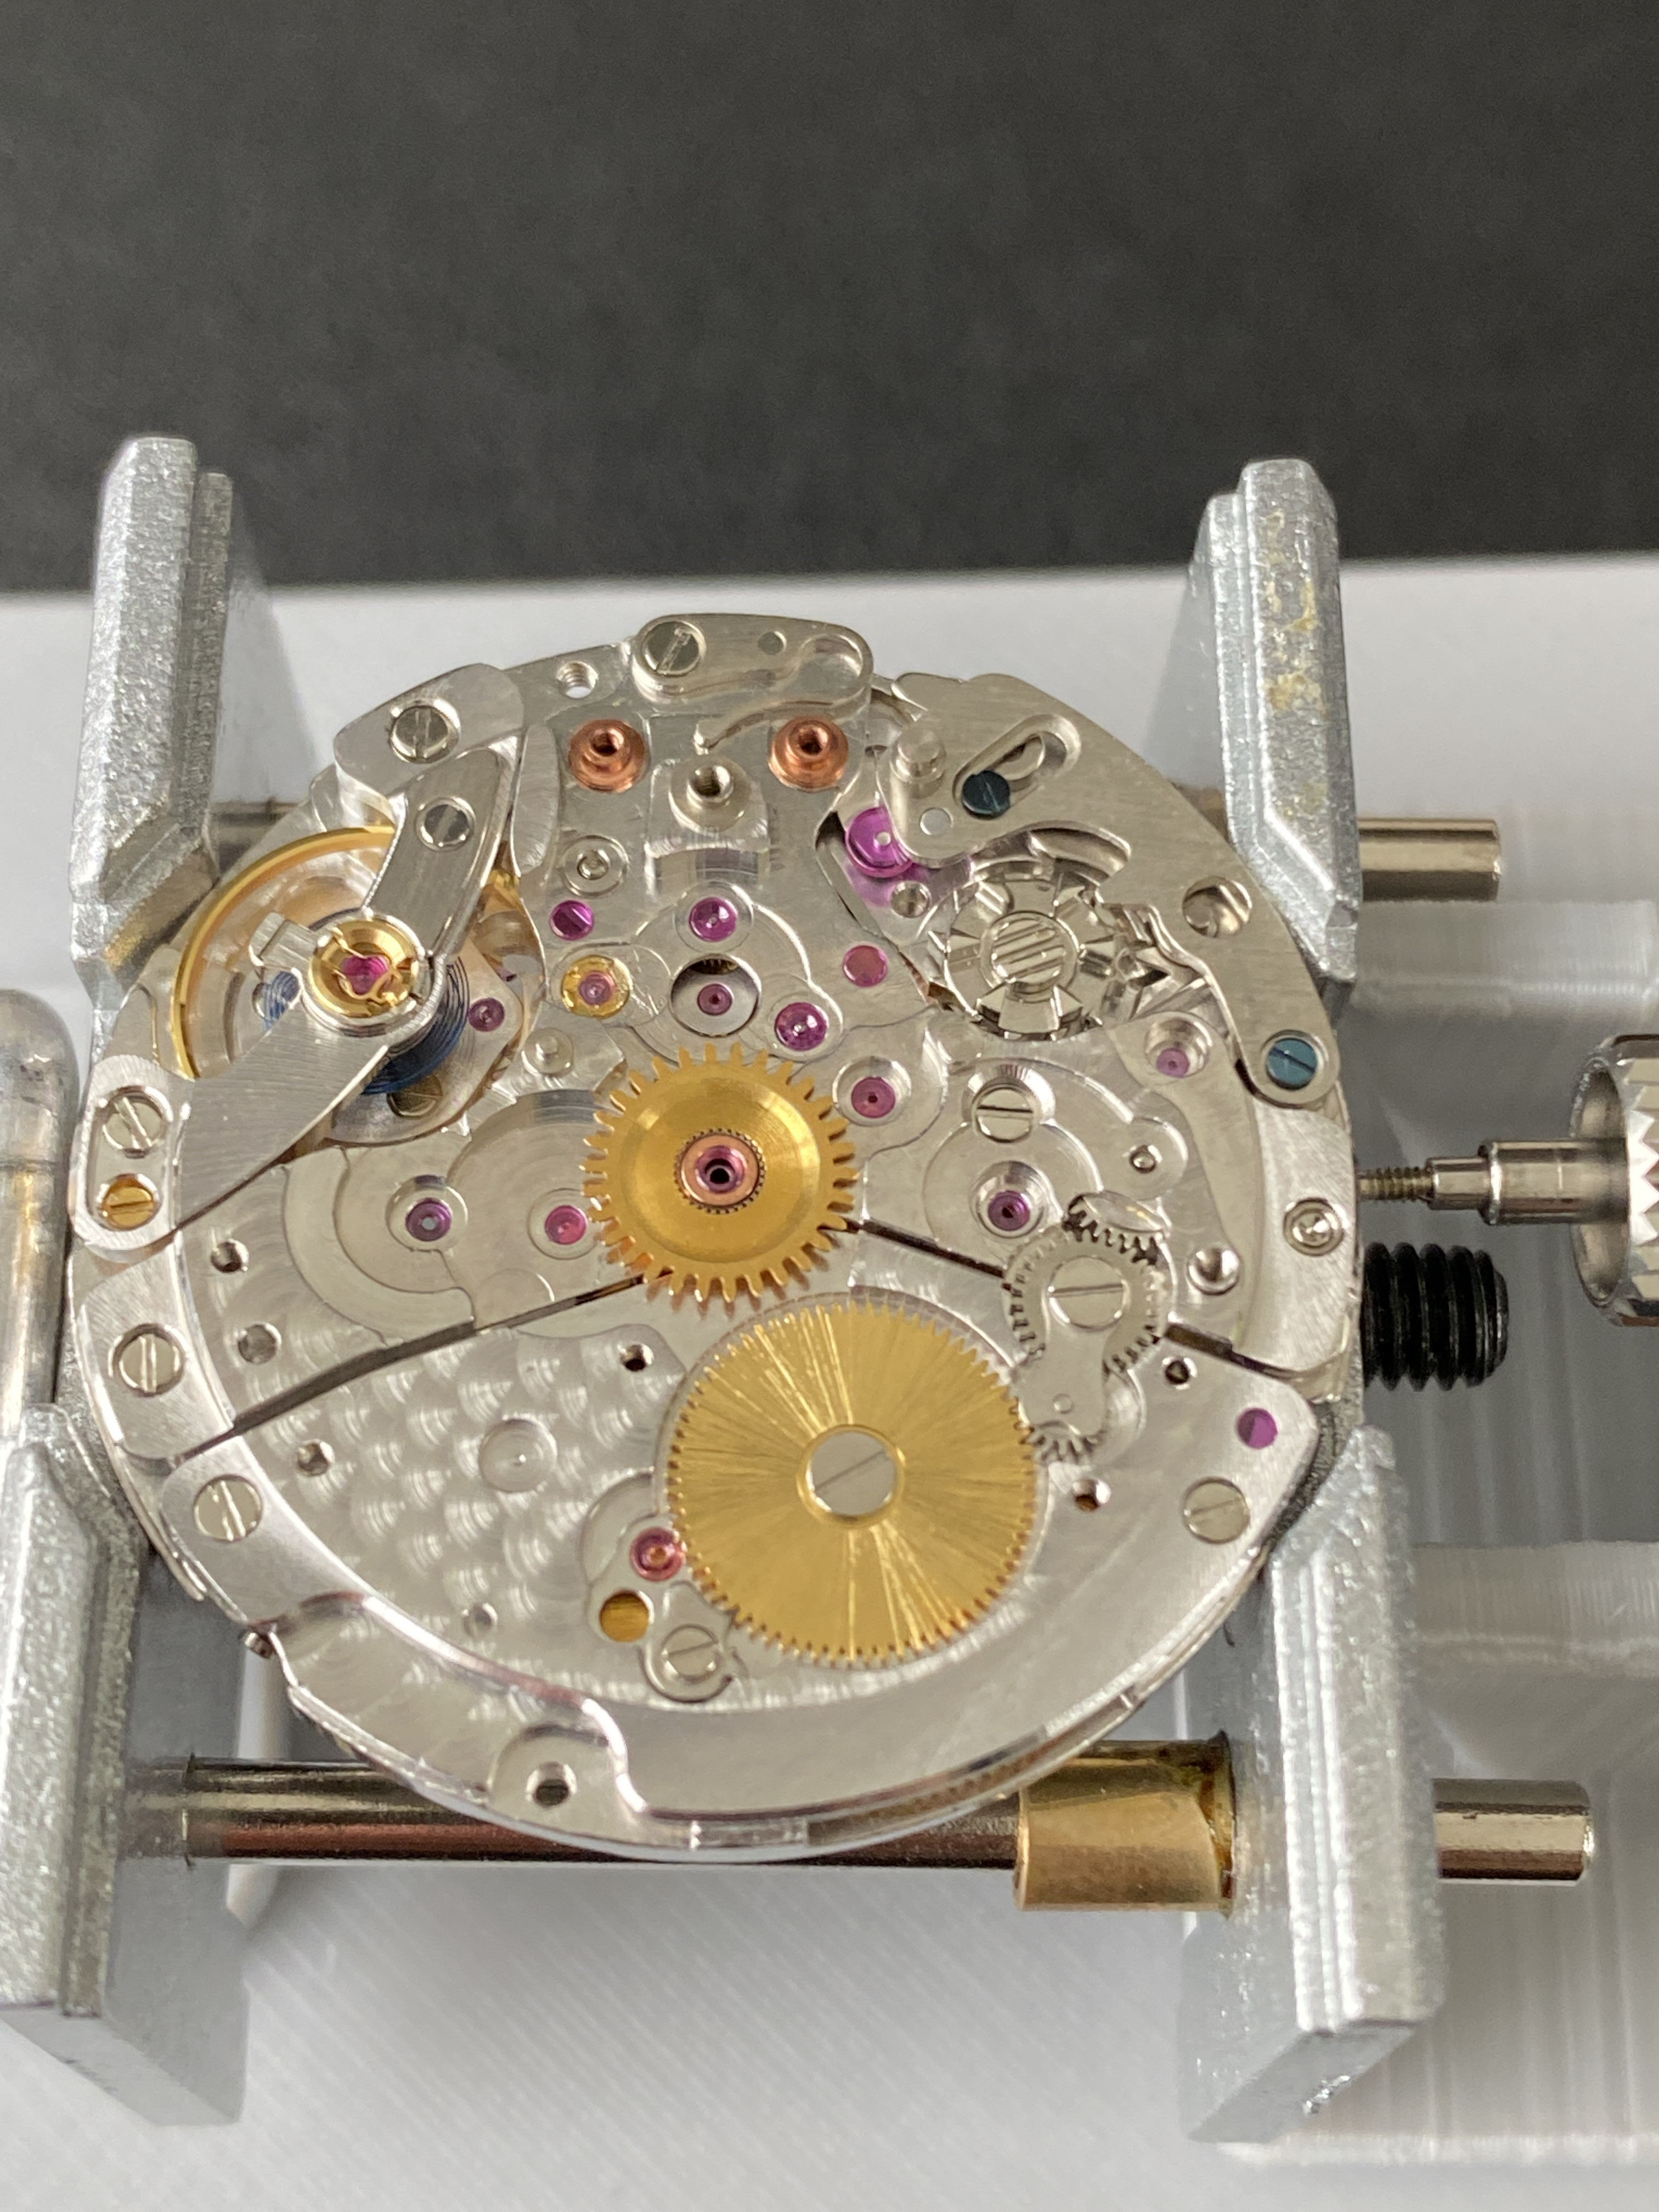
UPDATE: With the completion of my VS3235 gen parts install project, I'm back working on the 4130. Today I figured I'd move ahead with some more re-assembly while I wait for the KIF 3-2 springs to arrive from Cousins (it'll probably take around a week for it to arrive from the UK). I won't install any of the chronograph works until I can sort out the KIF spring on the main train bridge, but there's plenty to assemble before that. And to be honest when I'm not fighting with KIF springs things actually go pretty smoothly. I got the barrel, barrel bridge, click, ratchet, and intermedia crown wheel assembly, all installed without a hitch.

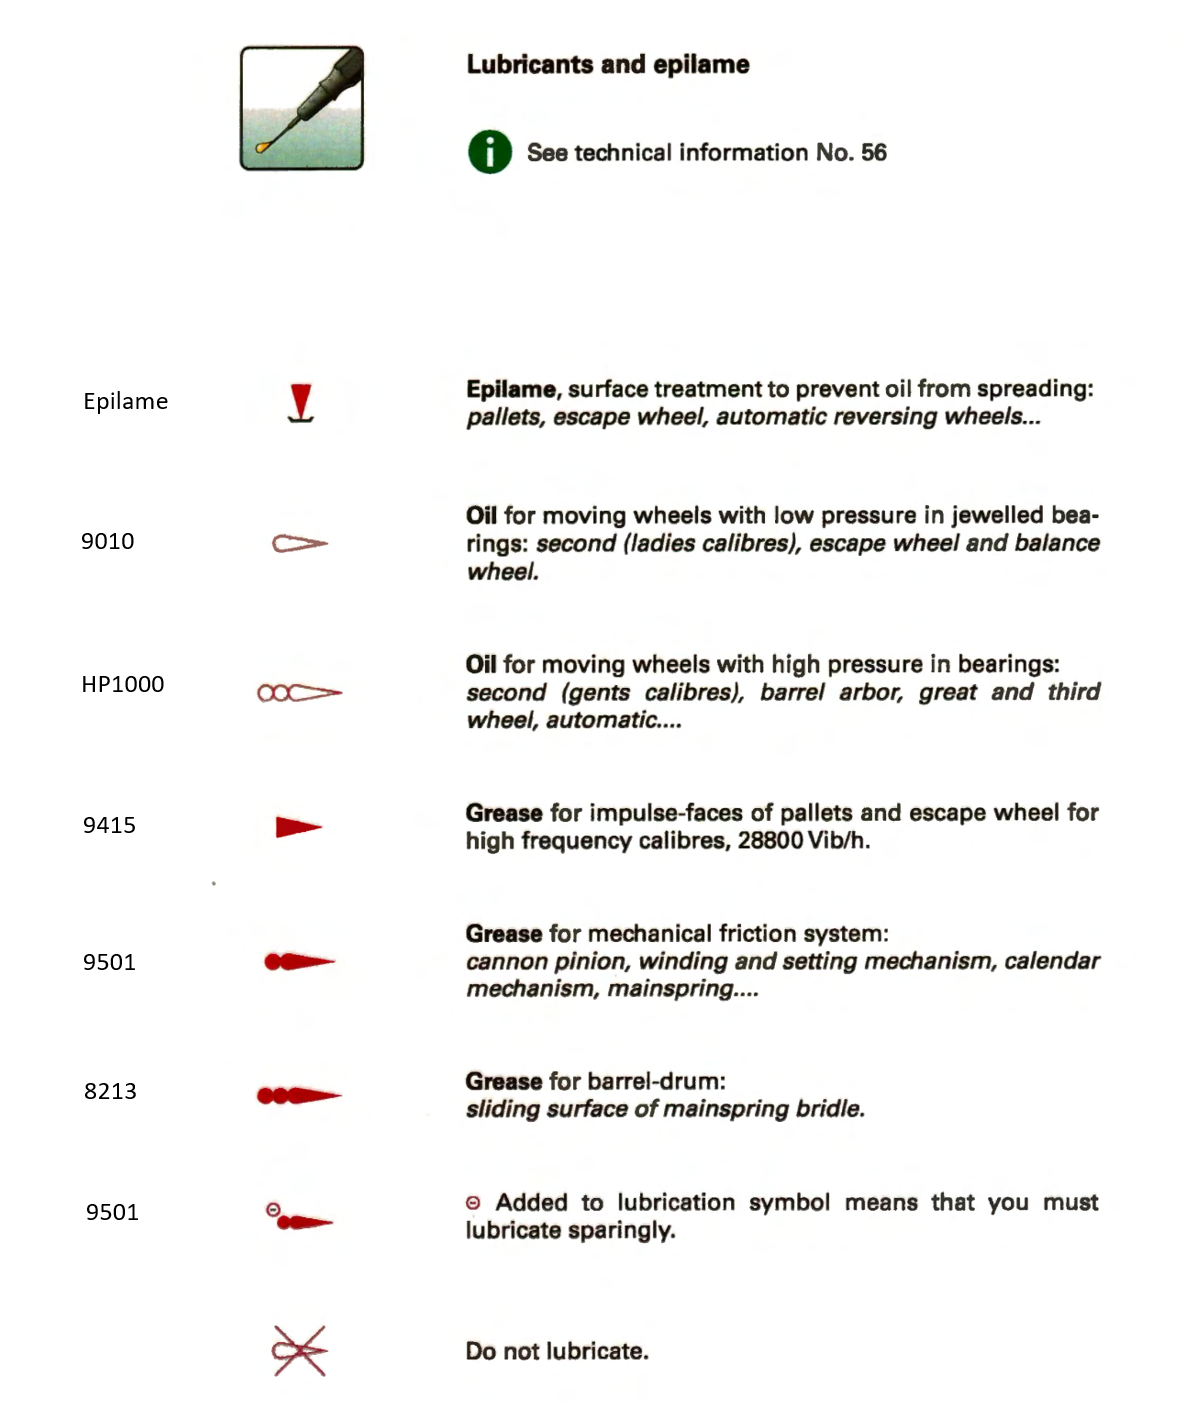
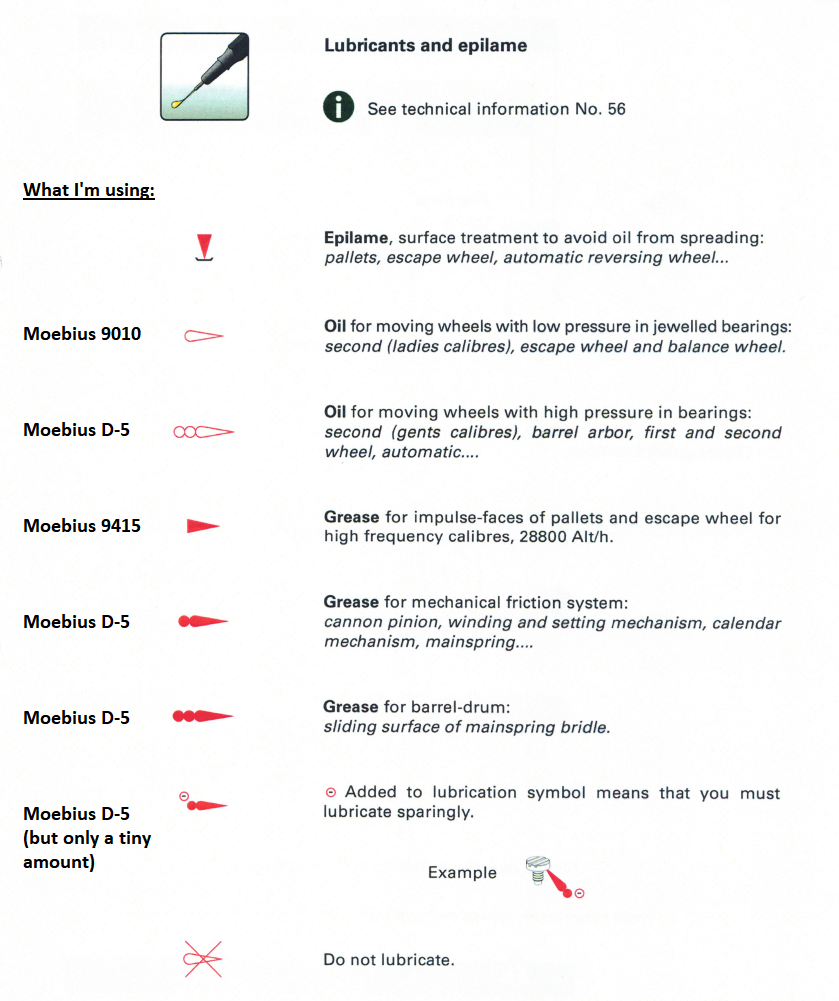
I've been lubricating mostly with D5 except for the shock settings for the balance and escape wheel which I'm using 9010 on, and obviously I'm using 9415 on the pallet stones. I still don't have epilame, so I'm just ignoring that for now. I'm sure I'll take this thing apart again before to long to service it again, and I can do epilame that time. But I do have a question about the use of D5 pretty much everywhere else... Here's a screenshot from the 4130 service guide and I've added what I'm using for each of the lubrication types that are called for. Am I massively screwing up? I have some Molykote, which (if any) of these symbols would I use Molykote for?


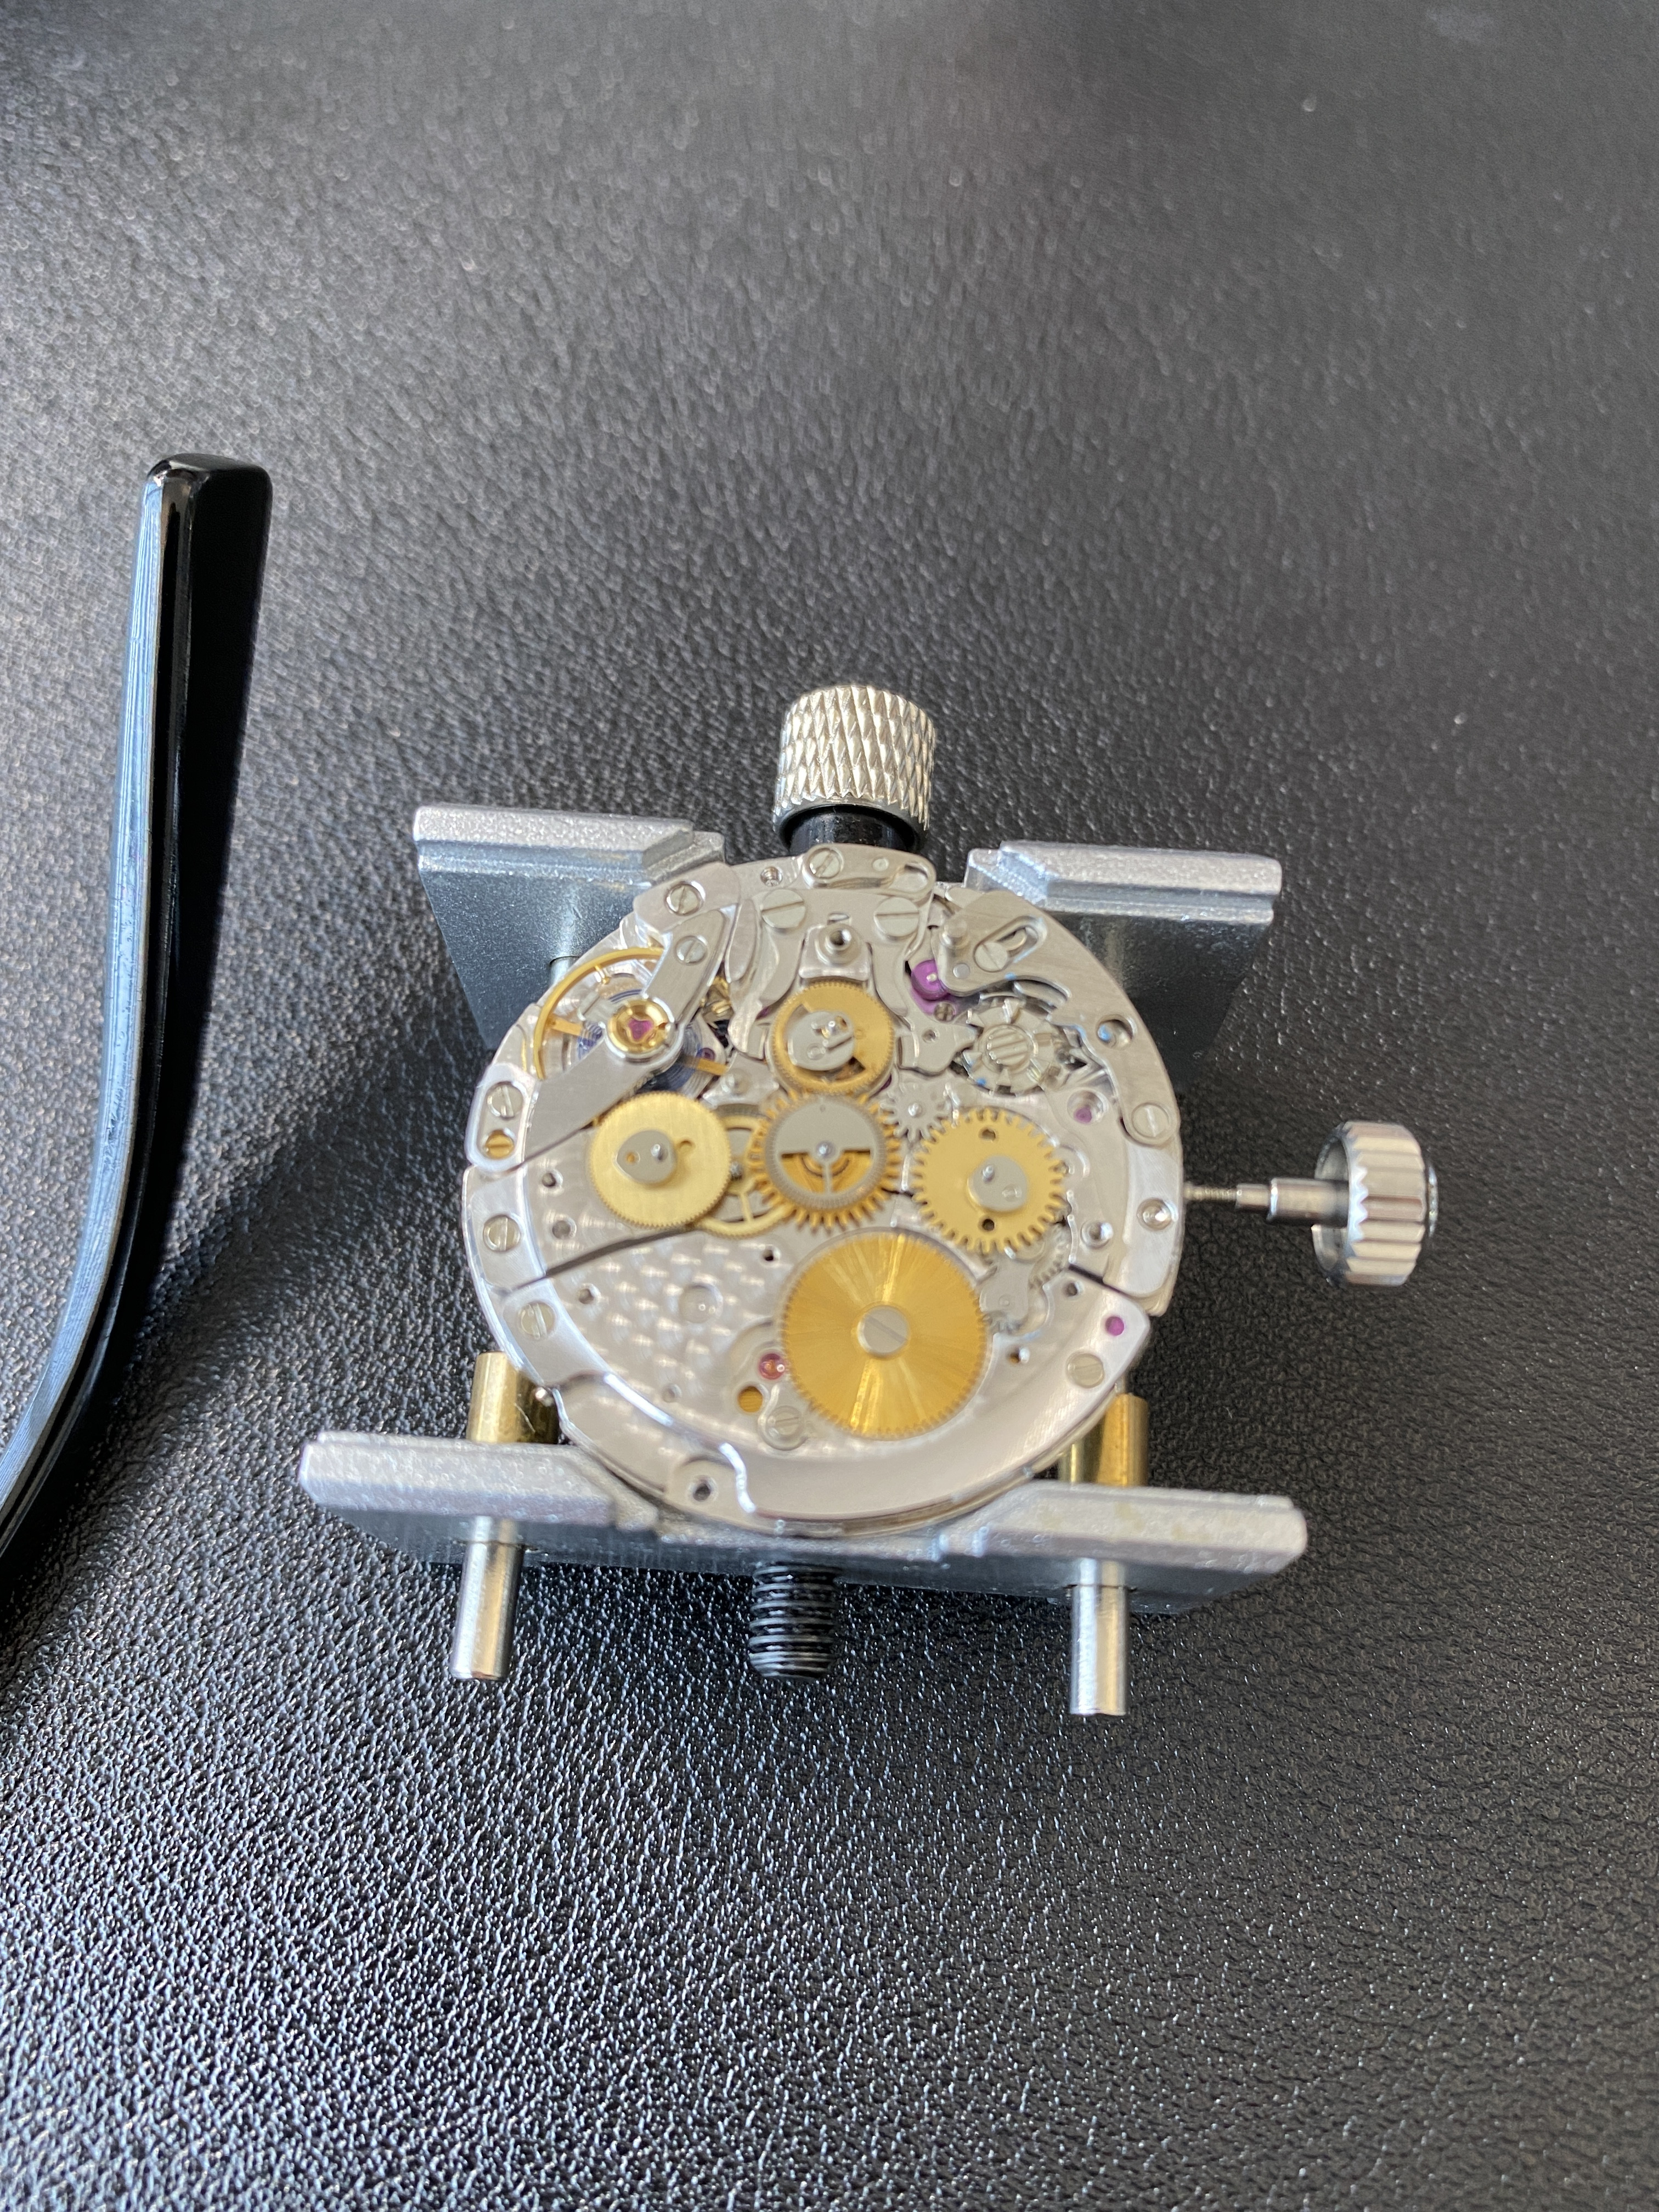
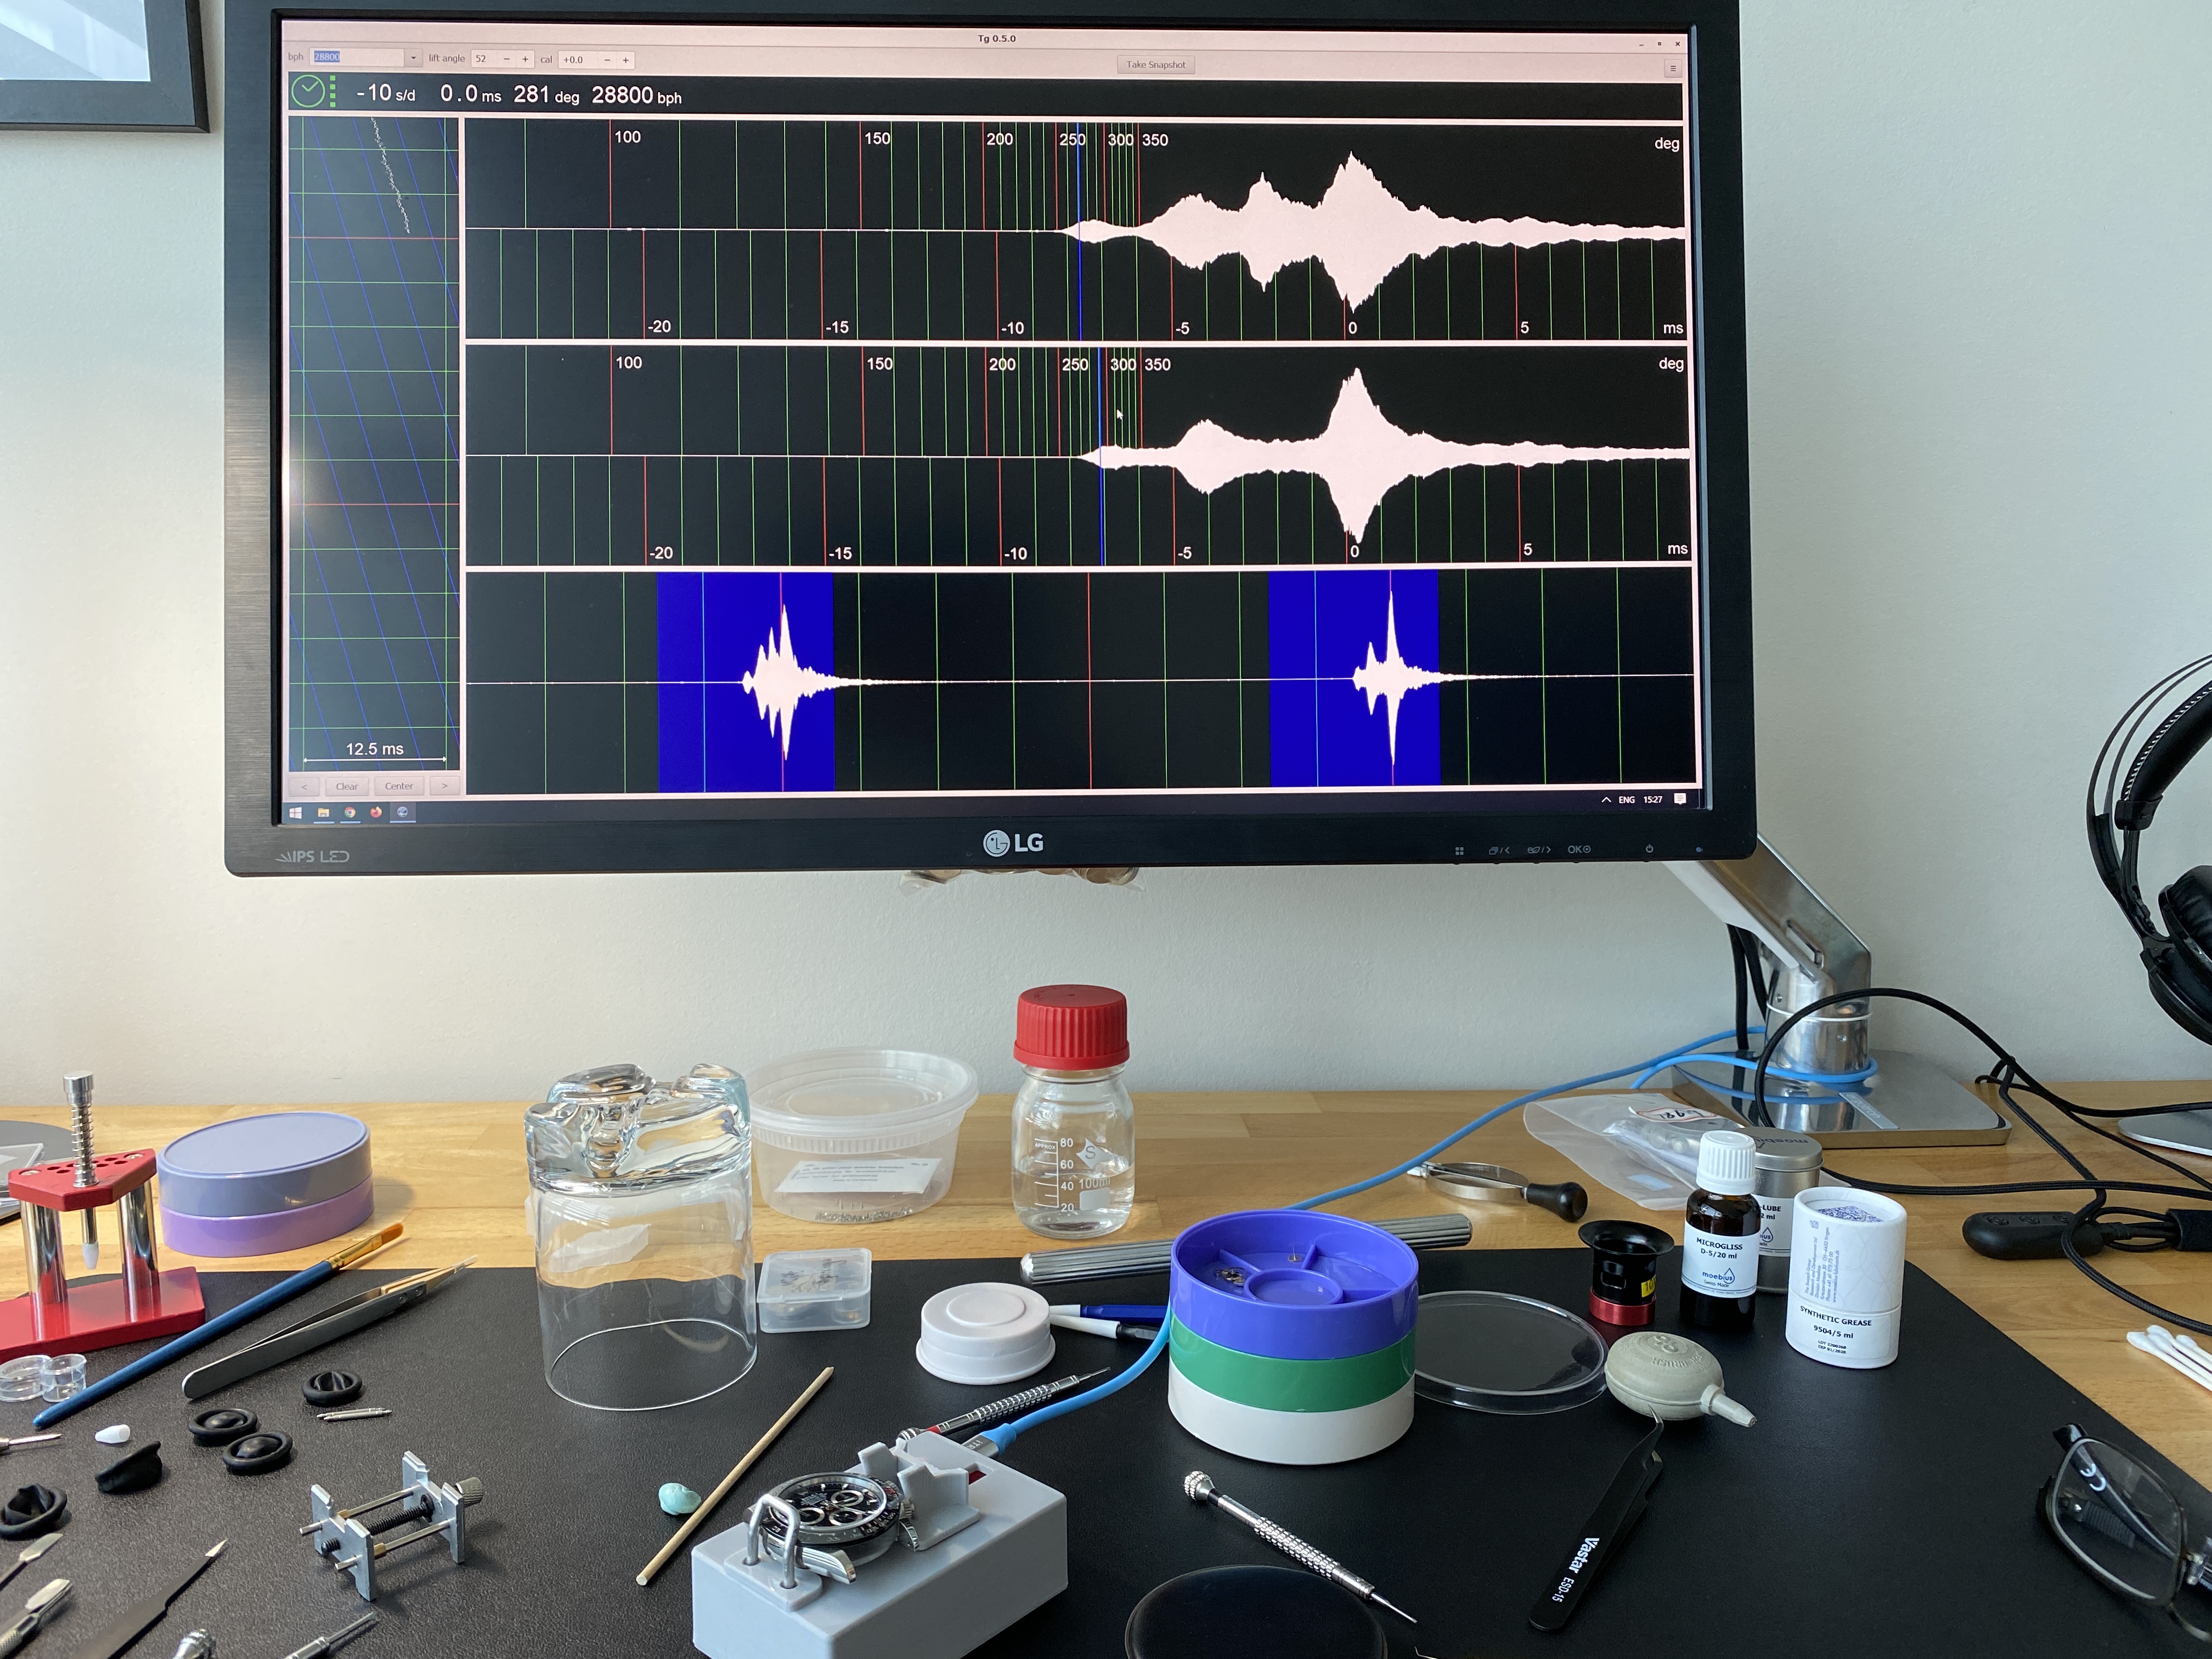
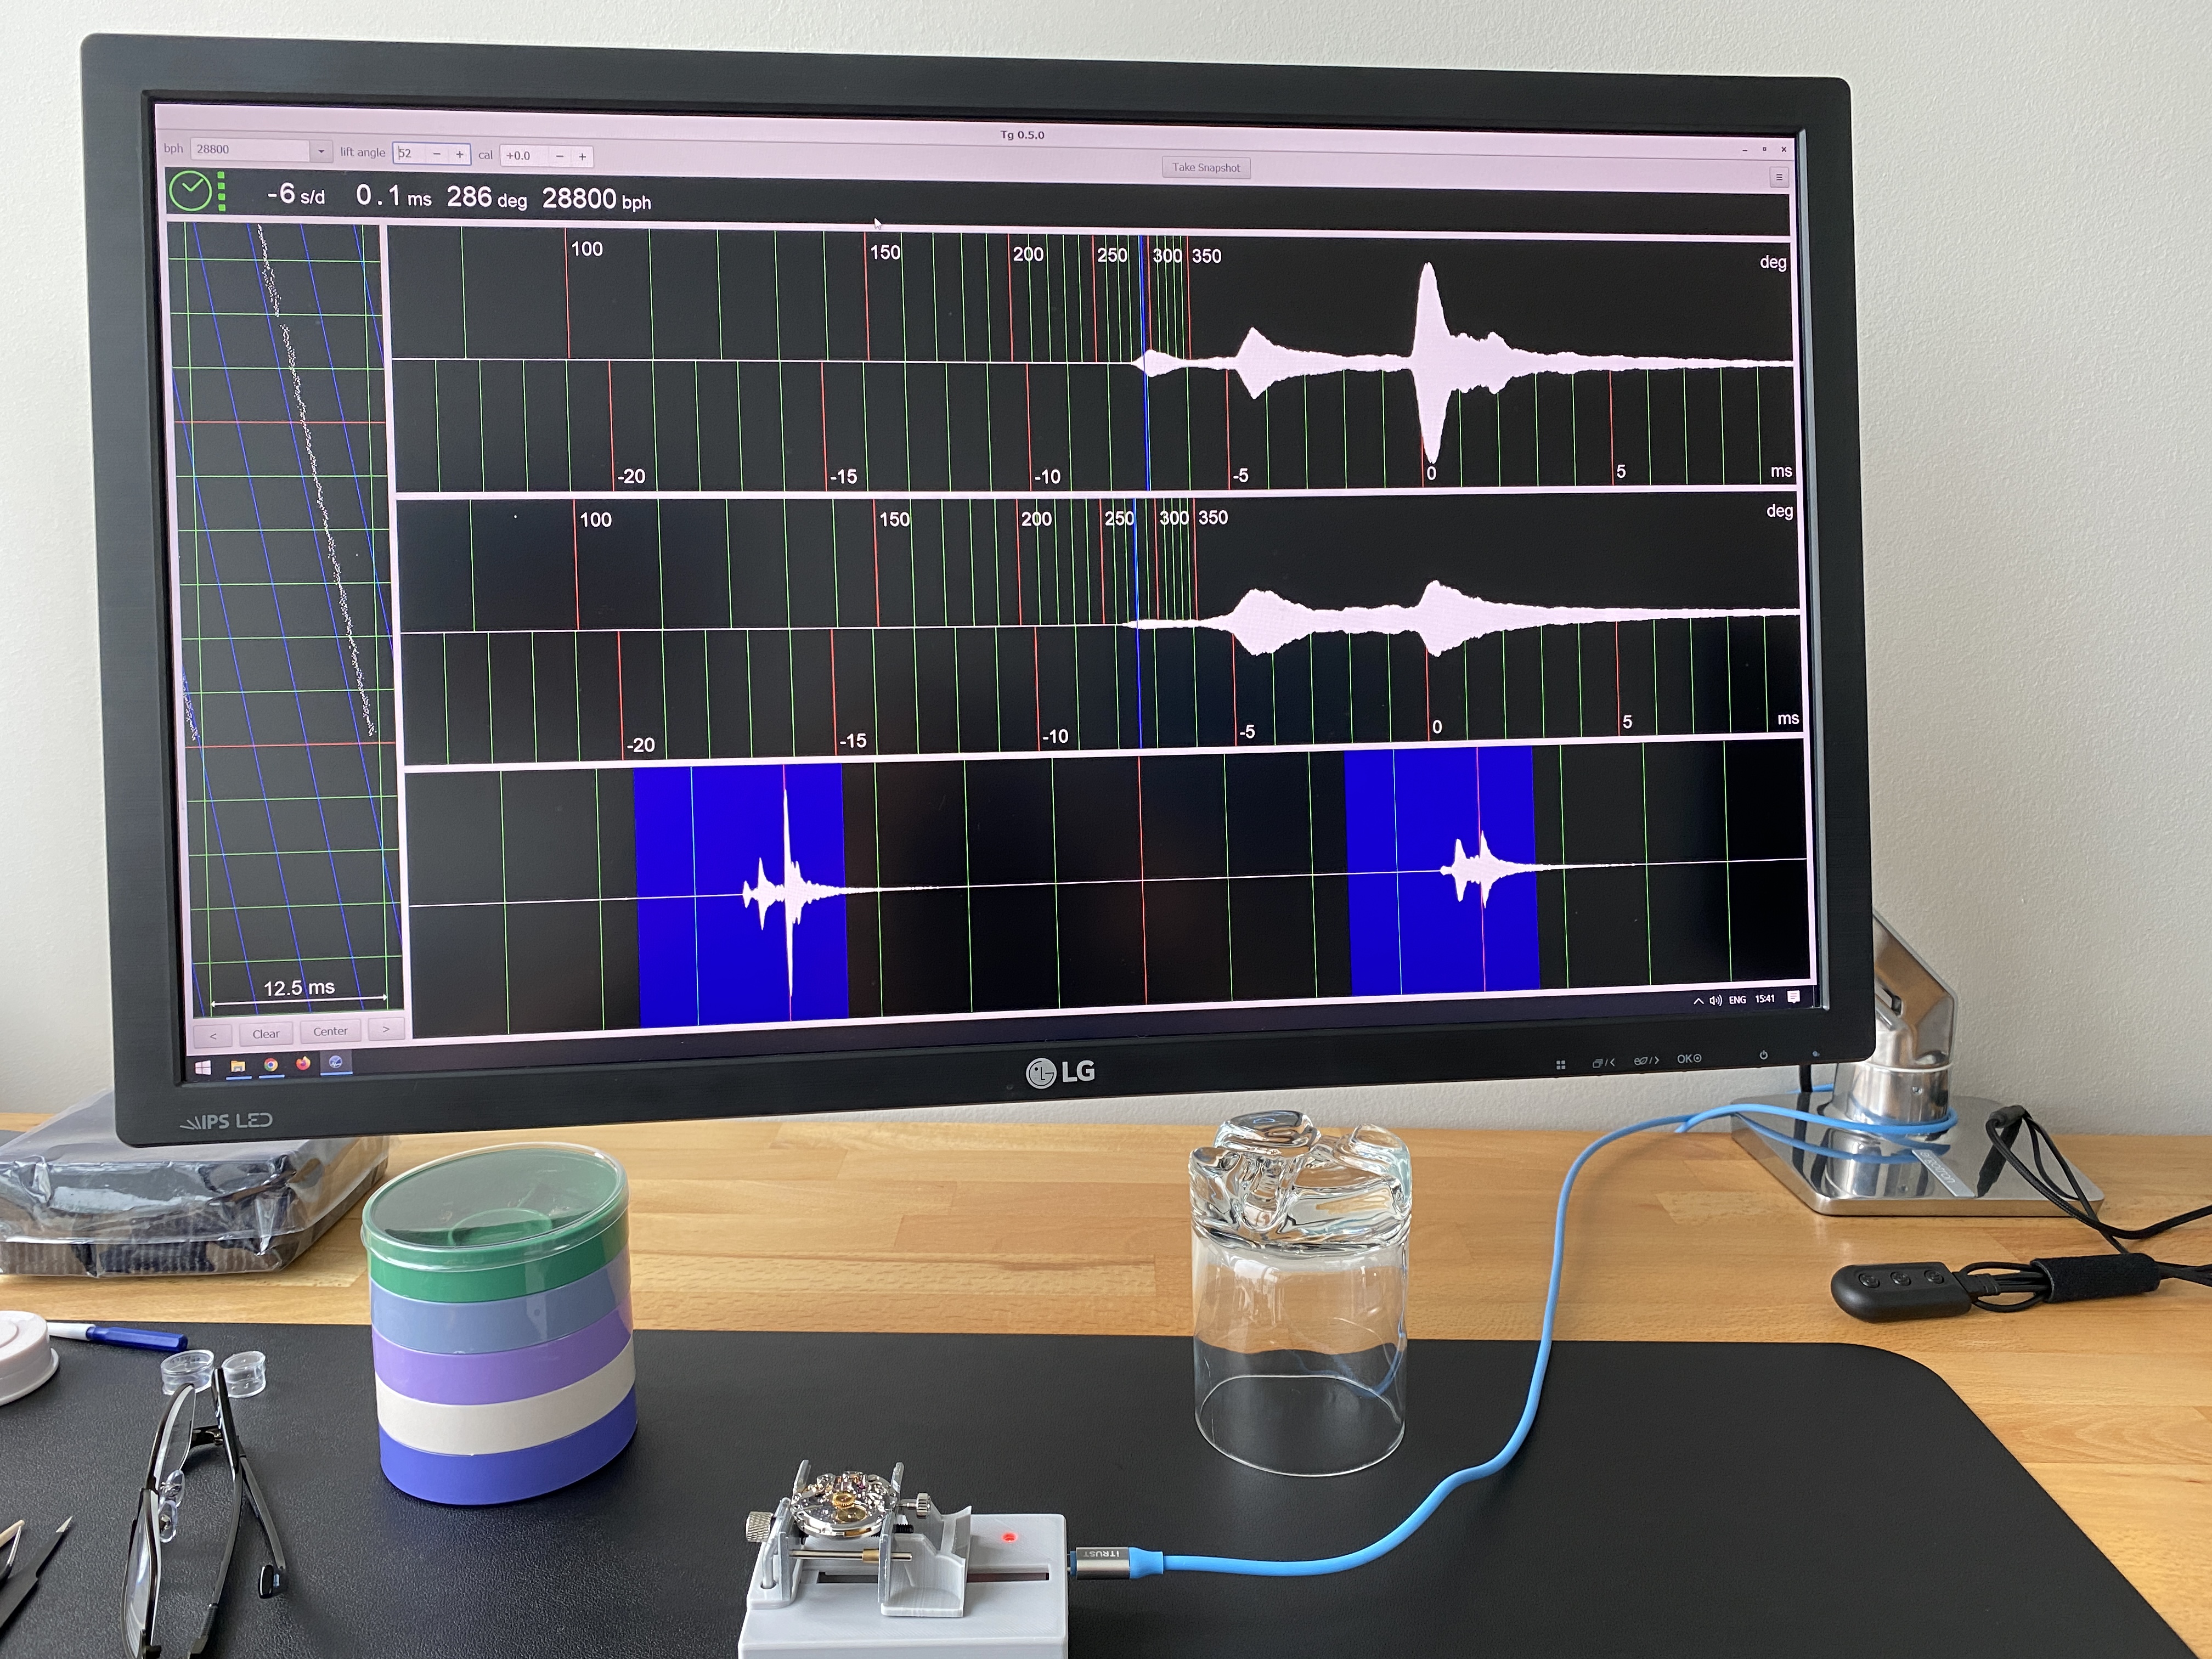
Once I got the barrel side all assembled I put in the pallet fork, pallet bridge, and balance assembly. Everything went together like a charm. Here's what I'm seeing on the timegrapher. I'm actually getting a better amplitude now (286 degrees) vs before I did anything to the movement (see first post... 238 degrees). I call that a win... Is it possible that I took a movement apart and put it back together in better working order than before? (Let's ignore the two broken screws and the broken KIF spring for now...).


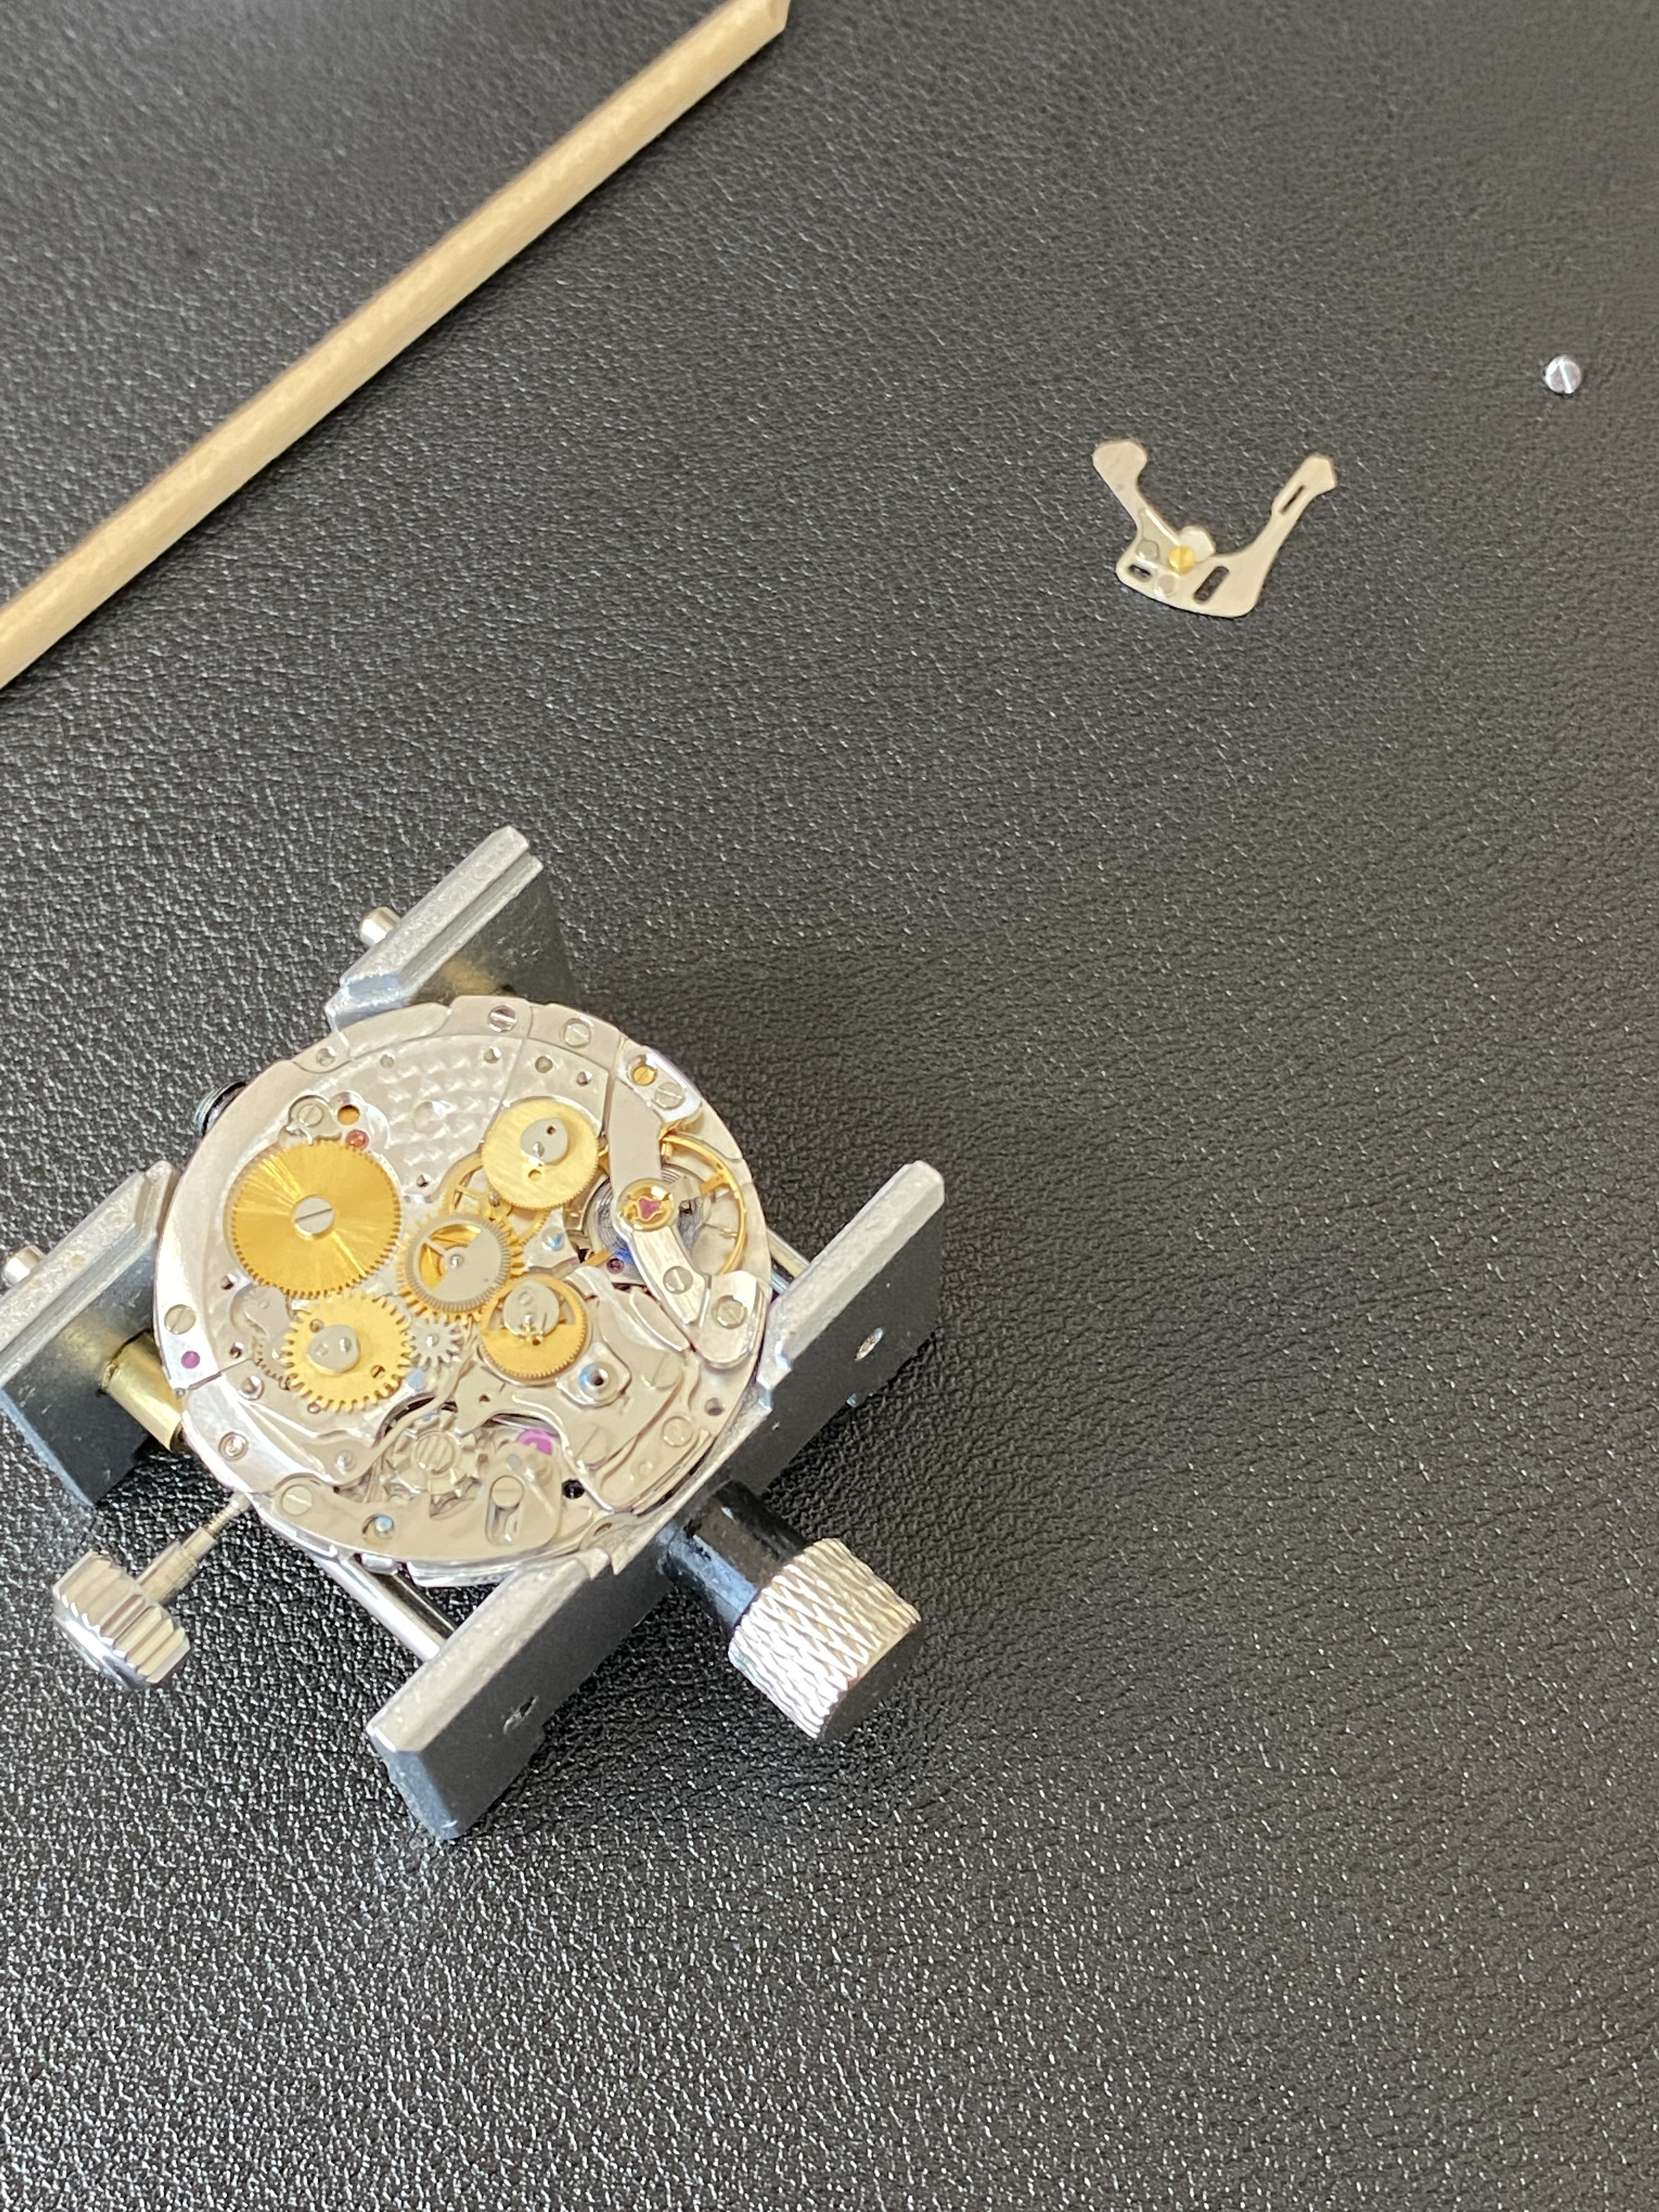
I think I'm going to wait for the replacement KIF springs to arrive before I go any further in the reassembly. But I will probably let the movement run in and see if the stability / amplitude changes as the lubrication works its way around the escape wheel / pallet stones.

As always thanks for coming along for the ride. Let's hope the rest of the assembly goes as smoothly when the spare parts arrive in a week.
 
  • Like
Reactions: SuperLory

FiveGuys

Horology Curious
25/12/20
20
39
13
Somewhere on watchrepairtalk I read some guy uses following chart and this was confirmed by an former Rolex service guy, can´t find the thread atm.

Epilame is really needed on Rolexes in general. The automatic module of the 31XX doesn´t work properly without it. Don´t know about the 4130, but I guess its the same.
Personally I have used HP1300 all the time on the hollow-two-dot-arrow
z2fchW.png
 
Last edited:
  • Like
Reactions: dogwood

kokemut

Active Member
9/1/17
245
50
28
This is awesome, thanks so much for this!
Any idea if the 4130-834 jumper for counters can be repaired if the thin part comes off of the thicker structure?


Sent from my iPhone using RWI
 
Last edited:

dogwood

I'm Pretty Popular
Patron
Certified
7/9/21
1,896
3,571
113
Canada
This is awesome, thanks so much for this!
Any idea if the 4130-834 jumper for counters can be repaired if the thin part comes off of the thicker structure?


Sent from my iPhone using RWI

I’m pretty sure that part one of those “replace it when broken, and don’t look at it too hard because it’s hella delicate” kinda parts.
 

vodamerc

Muppet
22/2/22
153
24
18
Australia
Slightly off topic but where did you source the usb timegrapher mic/holder? I've been using the same software but with a basic microphone which isn't great.
 

KJ2020

Time Traveler
Supporter
12/3/18
32,771
58,998
113
Somewhere on watchrepairtalk I read some guy uses following chart and this was confirmed by an former Rolex service guy, can´t find the thread atm.

Epilame is really needed on Rolexes in general. The automatic module of the 31XX doesn´t work properly without it. Don´t know about the 4130, but I guess its the same.
Personally I have used HP1300 all the time on the hollow-two-dot-arrow
z2fchW.png

Agree with HP1300 (D5) for the heavy oil. But for the 2nd grease I use Moebius 9504. There are a lot of different opinions on lube choices, getting close to a consensus choice is fine for hobbyists.

https://www.moebius-lubricants.ch/en/products/greases
 
Last edited:
  • Like
Reactions: dogwood

dogwood

I'm Pretty Popular
Patron
Certified
7/9/21
1,896
3,571
113
Canada
UPDATE: The assorted pillar screws that I ordered from cousins UK finally arrived today. I ordered them on June 19th, so that’s 32 days for the Royal Mail to deliver from the UK to Canada. It’s a good thing we in the rep game are well practiced at waiting anxiously by the mail slot…

The assorted screws from cousins are cheap, but they’re unsorted, as such I pulled out my calipers and started measuring heads and threads. For the two broken screws I needed 1.4mm heads and a 0.67mm thread. I eventually found two that fit the bill. The new screws threaded in nicely and the chronograph pushers function wonderfully with the new screws in place.


My next challenge is the Kif-3-2 spring on the main train bridge. Cousins also delivered my replacement Kif springs, so I’ll take a crack at that job this afternoon.
 
  • Like
Reactions: W47chl0v3r

dogwood

I'm Pretty Popular
Patron
Certified
7/9/21
1,896
3,571
113
Canada
UPDATE: I made some further progress today. I actually started by going backwards and removing a few parts so I could apply Moebius 9504 grease onto parts that I’d previously used D-5 oil on rather than grease (see posts above about which lubricants I was using, but after the suggestion to use a grease instead of a heavy oil, I ordered 9504 and re-did a bit of the lubrication.


Then I started the re-assembly of the chronograph components. To be honest it all went pretty smoothly, the clutch and hammer look intimidating, but where surprisingly easy to get into place.


Then it was time to get the dial and hands back on. The dial was easy to mount although I’d let one of the dial foot screws come out of the main plate, so I had to re-seat that, but tipping the movement on its side so the screw was vertical made it easy to get it into place.


Then it was time to put the hands back on… here I made a mistake and forgot to reset the chronograph before placing the subdial chrono hands and large second hand. To my horror, when I unhacked the movement and let the chrono run for a bit, then reset, my hands all went to random spots. Lesson learned: reset the chrono before fitting the hands.

My next move will be re-casing the movement and re-assembling the automatic module. I’m hoping that progress tomorrow will be as straight forward as it was today.

As always thanks for coming along for the ride.
 

Lotdem

Known Member
12/6/19
123
16
18
Good work.

Why did the gen balance bridge need to be broached? Was the hole too small or you needed to open up the aperture for alignment reasons.
 

dogwood

I'm Pretty Popular
Patron
Certified
7/9/21
1,896
3,571
113
Canada
Good work.

Why did the gen balance bridge need to be broached? Was the hole too small or you needed to open up the aperture for alignment reasons.

I needed to open the hole a bit so that it would align with the rep main plate. But it only needed to be opened up by a fraction of a millimeter.
 

dogwood

I'm Pretty Popular
Patron
Certified
7/9/21
1,896
3,571
113
Canada
MINOR UPDATE: I made some progress this morning… So, I left the chronograph running overnight, but when I came back this morning I found it stopped. It turned out that the hour hand had collided with one of the subdial hands. Upon closer inspection, when I fitted the hour hand I’d given it a downward slope so that it was almost grazing the dial, so low it would stall on the rivets on the subdial hands. it was an easy fix, I removed the main hands and re-installed them without the droop.

Next was the automatic module. My epilame solution has arrived and I figured I’d give it a try on the reversers (since the service manual calls for these parts to be treated with epilame). My method was simply to put the parts in the mesh basket of my epilame bottle, slosh the solution over the parts for a few seconds, then open the bottle and remove the parts to dry on blotting paper. Am I doing this right? Is a quick splash enough? Or do I need to soak the parts for a few minutes?


Regardless, the auto module went together pretty easily. I just dropped the reversers into place, applied a little d-5 oil on the reverser hub pins, the driving wheel bearing, and the teeth connecting the reverser to the automatic intermediate wheel. Then I screwed on the bridge and lubricated all the jewel pivots with D-5.
 

dogwood

I'm Pretty Popular
Patron
Certified
7/9/21
1,896
3,571
113
Canada
SUCCESS!!!

this afternoon I finished casing up the movement. Upon inspecting the dial to clean away any dust before casing, I found a few marks (perhaps finger prints?) and used a little residual oil remover (ROR) on a qtip to dab away the stain. I also noticed that there were quite a few scratches on the hands. About half way through this project I got a set of wooden tip tweezers, and I’m wondering if maybe the damage came from before I started using those? What do other people use to handle sensitive components?

regardless… I cased up the movement and secured it with the case clamps. It took me a couple of tries since at first I tried getting the screw threaded and rotating the clamp tan I to place, but that didn’t work on the second clamp even with the first one fully loosened off.


Next was getting the automatic module installed. This was harder than it felt like it should have been. The service manual says to make sure the mainspring is fully unwound before doing this… but still the module took a long time to get seated correctly. I’m guessing it was an issue with getting the teeth of the auto winder pinion to mush with the ratchet wheel. After a bit of fiddling and eventually applying a bit of wind through the crown, I got it seated nicely. However, when I attached the rotor and moved the rotor a bit I heard an audible click — as though applying torque through the rotor finally got some teeth to mesh. I checked and everything seems to be working, but I hope I didn’t break anything. As per the service manual, I applied three dabs of D5 oil to the rotor bearings before securing it.

I also cleaned and lubricated the o-ring on the caseback. Hopefully this keeps my water tight seal nice and tight.

After sealing up the case I checked the movement fully wound on my time grapher. It looks like I could still regulate the balance a little, but for now I’m happy.


And of course what project would be complete without the glory shot!


I’m not sure if I’ve done more harm than good to the movement, but I took it apart, put it back together, and it’s still working; and I’ve certainly learned a ton along the way. Thank you to everyone for the advice and words of encouragement.
 

dashing

Dashing Around
20/5/18
242
97
28
Metroville
I also noticed that there were quite a few scratches on the hands

based on my experience, if the scratches are in the direction of the hands movement -- perpendicular across the hands, they are likely to be caused by the hands touching at some point.
 
  • Like
Reactions: dogwood

bhehe6813

Renowned Member
Supporter
Certified
13/7/16
773
610
93
SUCCESS!!!

this afternoon I finished casing up the movement. Upon inspecting the dial to clean away any dust before casing, I found a few marks (perhaps finger prints?) and used a little residual oil remover (ROR) on a qtip to dab away the stain. I also noticed that there were quite a few scratches on the hands. About half way through this project I got a set of wooden tip tweezers, and I’m wondering if maybe the damage came from before I started using those? What do other people use to handle sensitive components?

regardless… I cased up the movement and secured it with the case clamps. It took me a couple of tries since at first I tried getting the screw threaded and rotating the clamp tan I to place, but that didn’t work on the second clamp even with the first one fully loosened off.


Next was getting the automatic module installed. This was harder than it felt like it should have been. The service manual says to make sure the mainspring is fully unwound before doing this… but still the module took a long time to get seated correctly. I’m guessing it was an issue with getting the teeth of the auto winder pinion to mush with the ratchet wheel. After a bit of fiddling and eventually applying a bit of wind through the crown, I got it seated nicely. However, when I attached the rotor and moved the rotor a bit I heard an audible click — as though applying torque through the rotor finally got some teeth to mesh. I checked and everything seems to be working, but I hope I didn’t break anything. As per the service manual, I applied three dabs of D5 oil to the rotor bearings before securing it.

I also cleaned and lubricated the o-ring on the caseback. Hopefully this keeps my water tight seal nice and tight.

After sealing up the case I checked the movement fully wound on my time grapher. It looks like I could still regulate the balance a little, but for now I’m happy.


And of course what project would be complete without the glory shot!


I’m not sure if I’ve done more harm than good to the movement, but I took it apart, put it back together, and it’s still working; and I’ve certainly learned a ton along the way. Thank you to everyone for the advice and words of encouragement.
Nice job. The screws breaking does not surprise me at all. I wouldn't be surprised if it was your fault either (over torqueing or over aggresive when loosening) or an over torque from the factory end.
 

Seadwellermike

Proud RWI Supporter
Banned
Certified
MINOR UPDATE: I made some progress this morning… So, I left the chronograph running overnight, but when I came back this morning I found it stopped. It turned out that the hour hand had collided with one of the subdial hands. Upon closer inspection, when I fitted the hour hand I’d given it a downward slope so that it was almost grazing the dial, so low it would stall on the rivets on the subdial hands. it was an easy fix, I removed the main hands and re-installed them without the droop.

Next was the automatic module. My epilame solution has arrived and I figured I’d give it a try on the reversers (since the service manual calls for these parts to be treated with epilame). My method was simply to put the parts in the mesh basket of my epilame bottle, slosh the solution over the parts for a few seconds, then open the bottle and remove the parts to dry on blotting paper. Am I doing this right? Is a quick splash enough? Or do I need to soak the parts for a few minutes?


Regardless, the auto module went together pretty easily. I just dropped the reversers into place, applied a little d-5 oil on the reverser hub pins, the driving wheel bearing, and the teeth connecting the reverser to the automatic intermediate wheel. Then I screwed on the bridge and lubricated all the jewel pivots with D-5.
Where did you get this bottle and solution? Also, where can I don’t the service manuals you mention? I’ve never used one and always done these movement by instinct, and I’d bet I’m doing something wrong.

Thank you for all you share, it’s awesome to see and helpful for all of us!