• Tired of adverts on RWI? - Subscribe by clicking HERE and PMing Trailboss for instructions and they will magically go away!

Meteorite dial for my Clean Factory GMT (second attempt at a "modding")

dogwood

I'm Pretty Popular
Patron
Certified
7/9/21
1,890
3,550
113
Canada
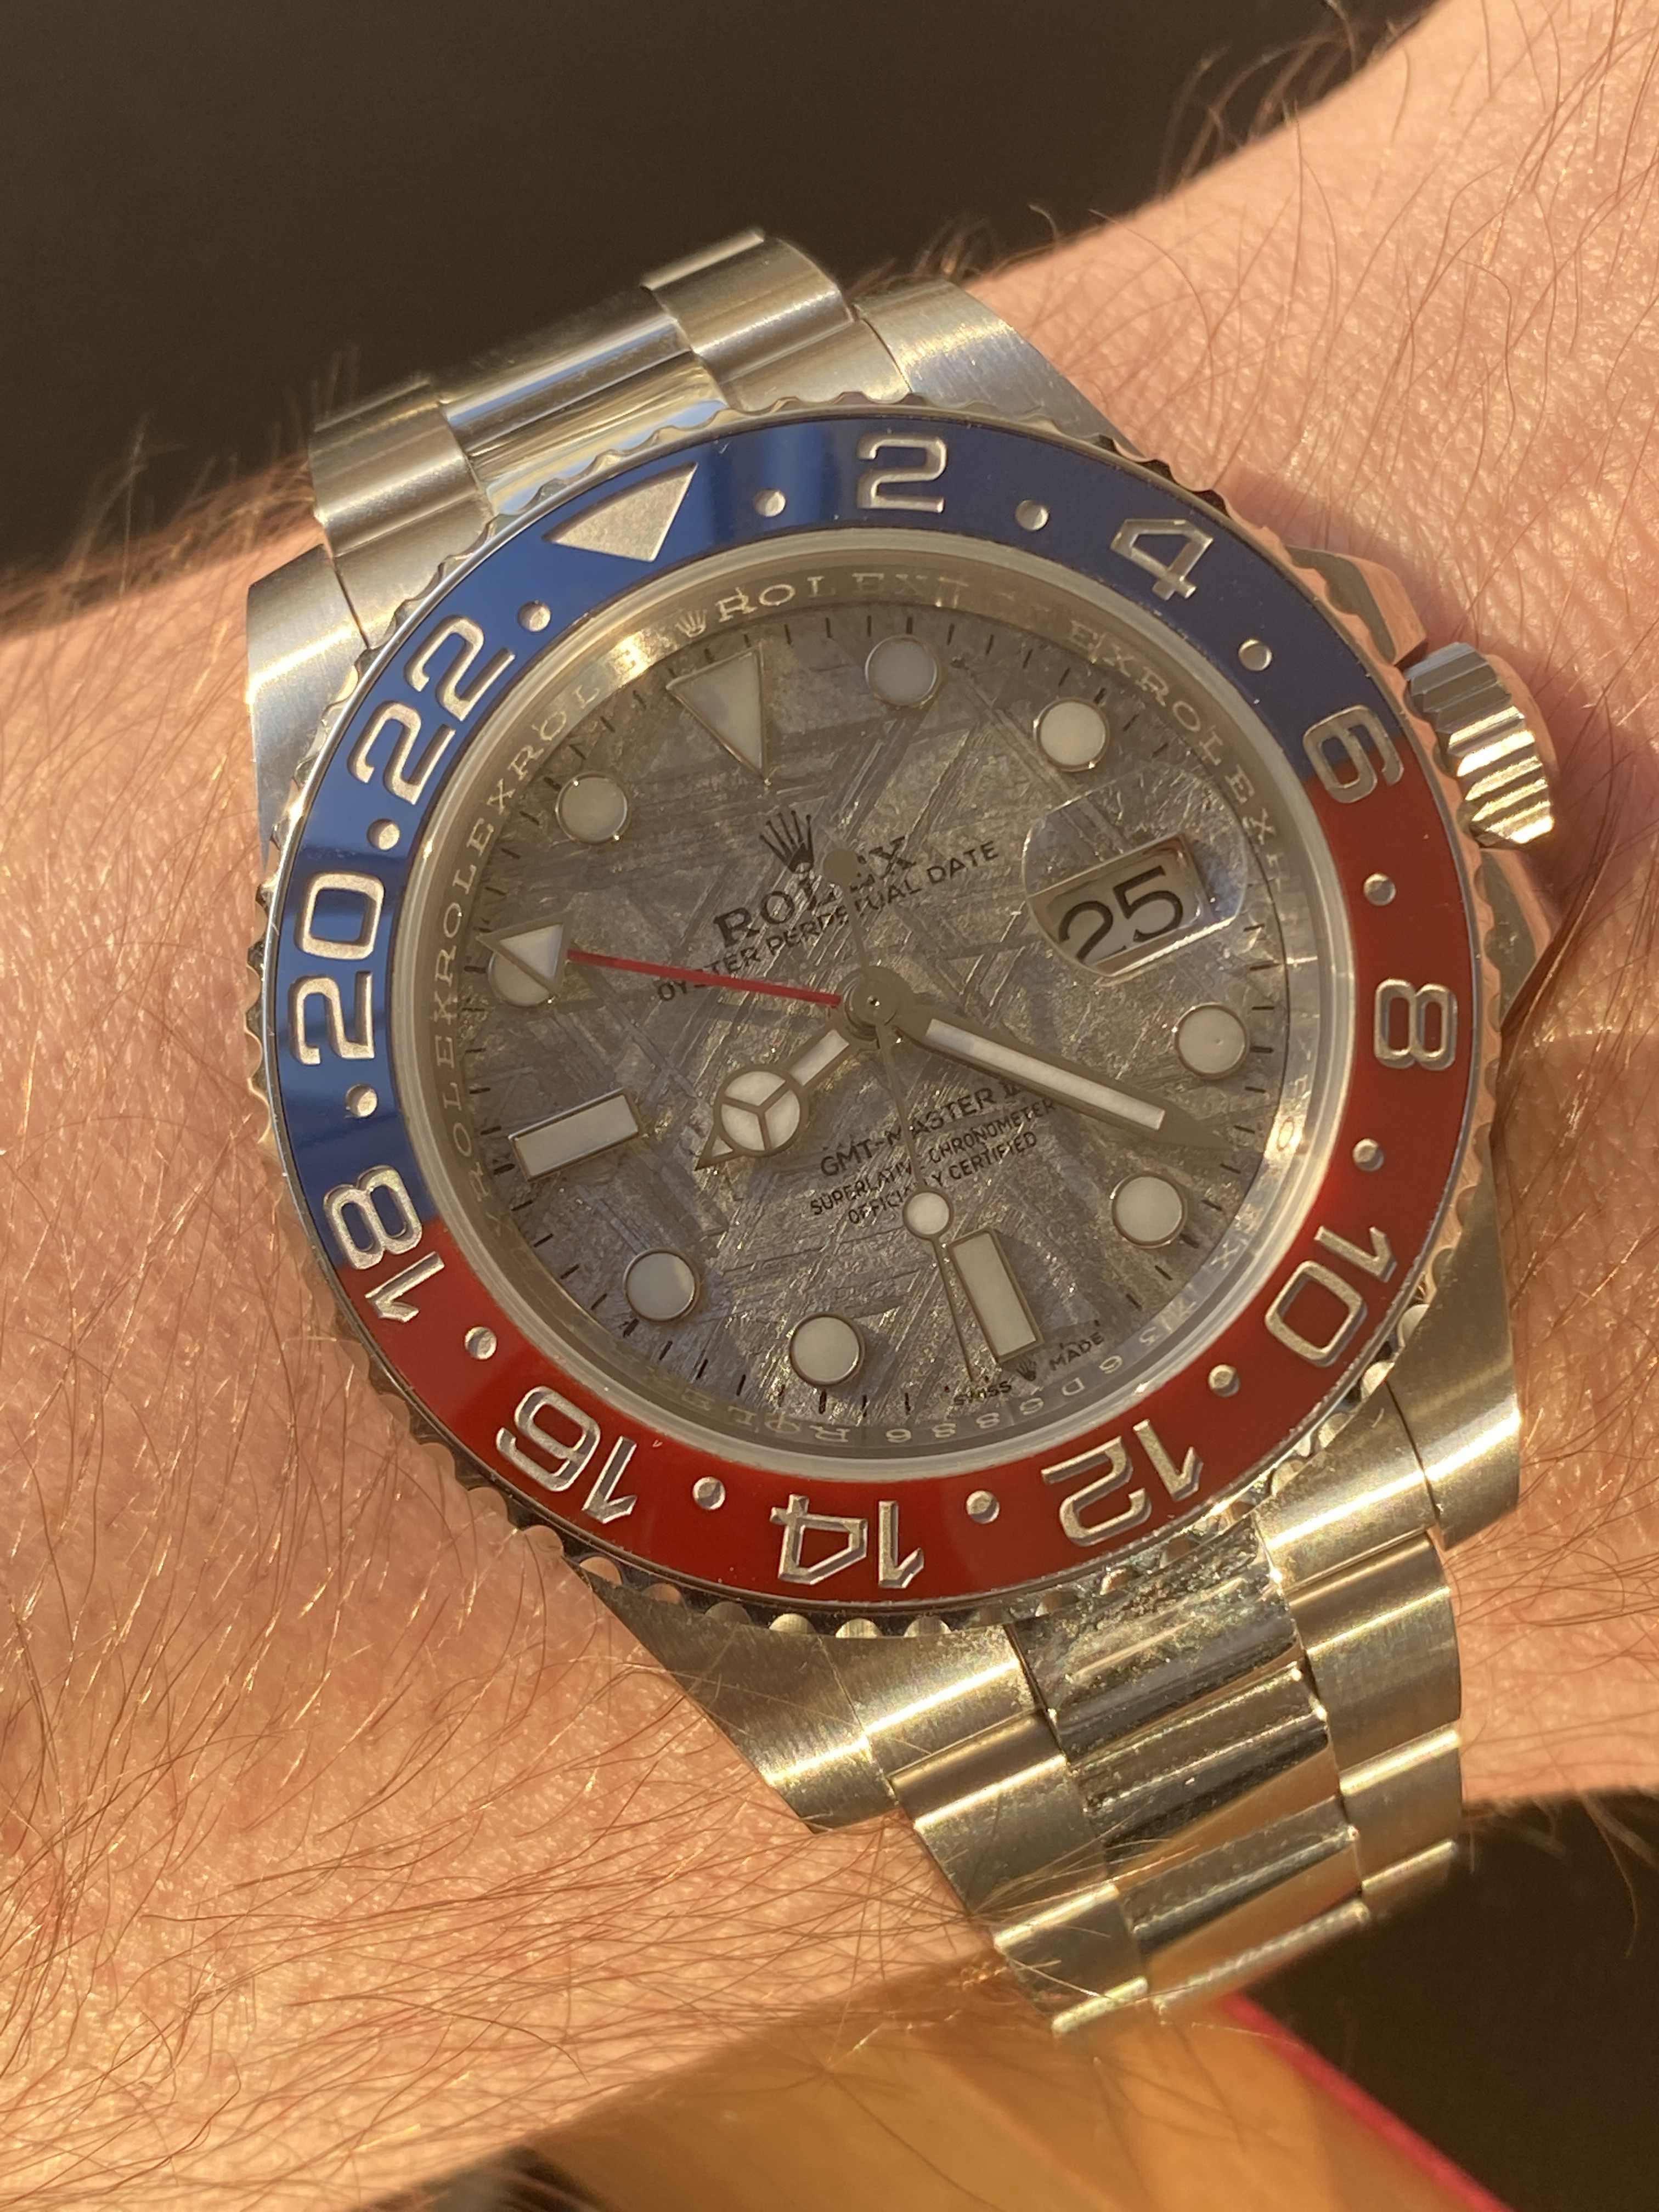
So, back in January I tried my hand at swapping the white gasket on my Noob v4 Daytona, and it wasn't an altogether terrible experience. A month after that, I thought I'd give servicing a movement a try... and well, that turned out ok, but not after a lot of "learning moments" along the way. Fast forward a few weeks, and I managed to snag one of the beautiful real meteorite dials that oascom makes. Just look at how beautiful this thing is:

I figured, I've swapped a gasket AND I've "serviced" a movement, how hard could a simple dial swap be... Famous last words.

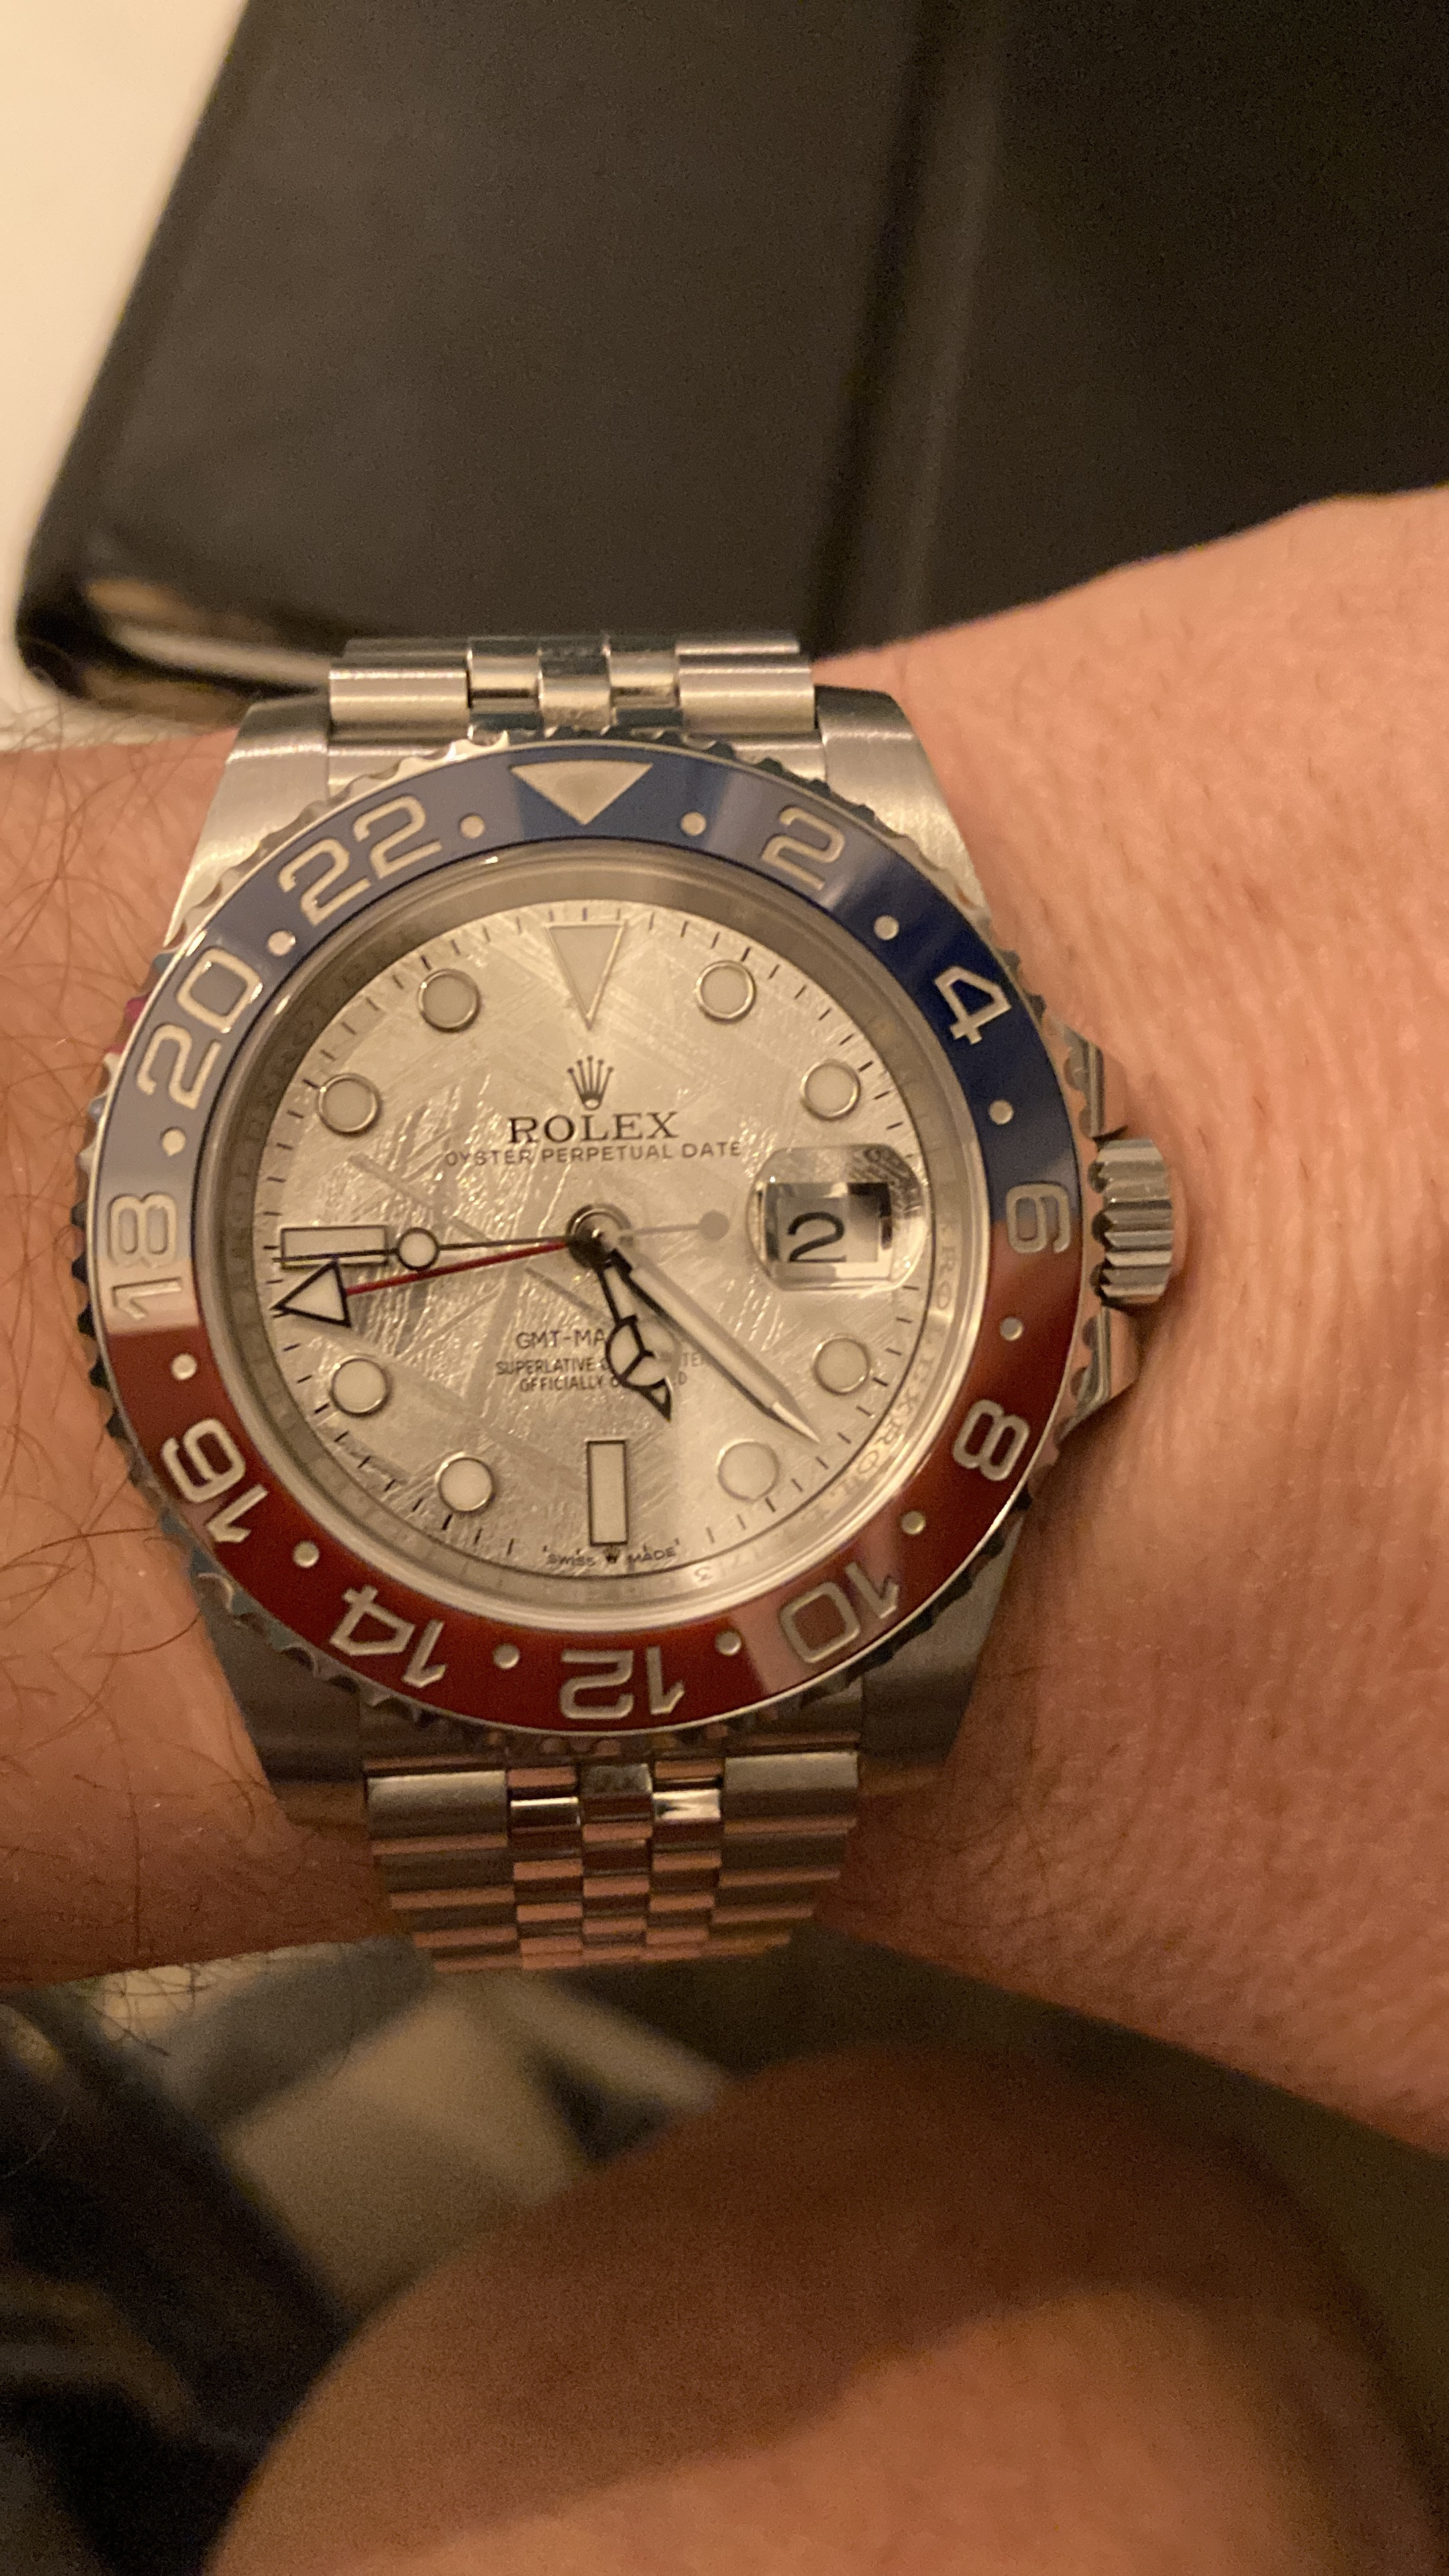
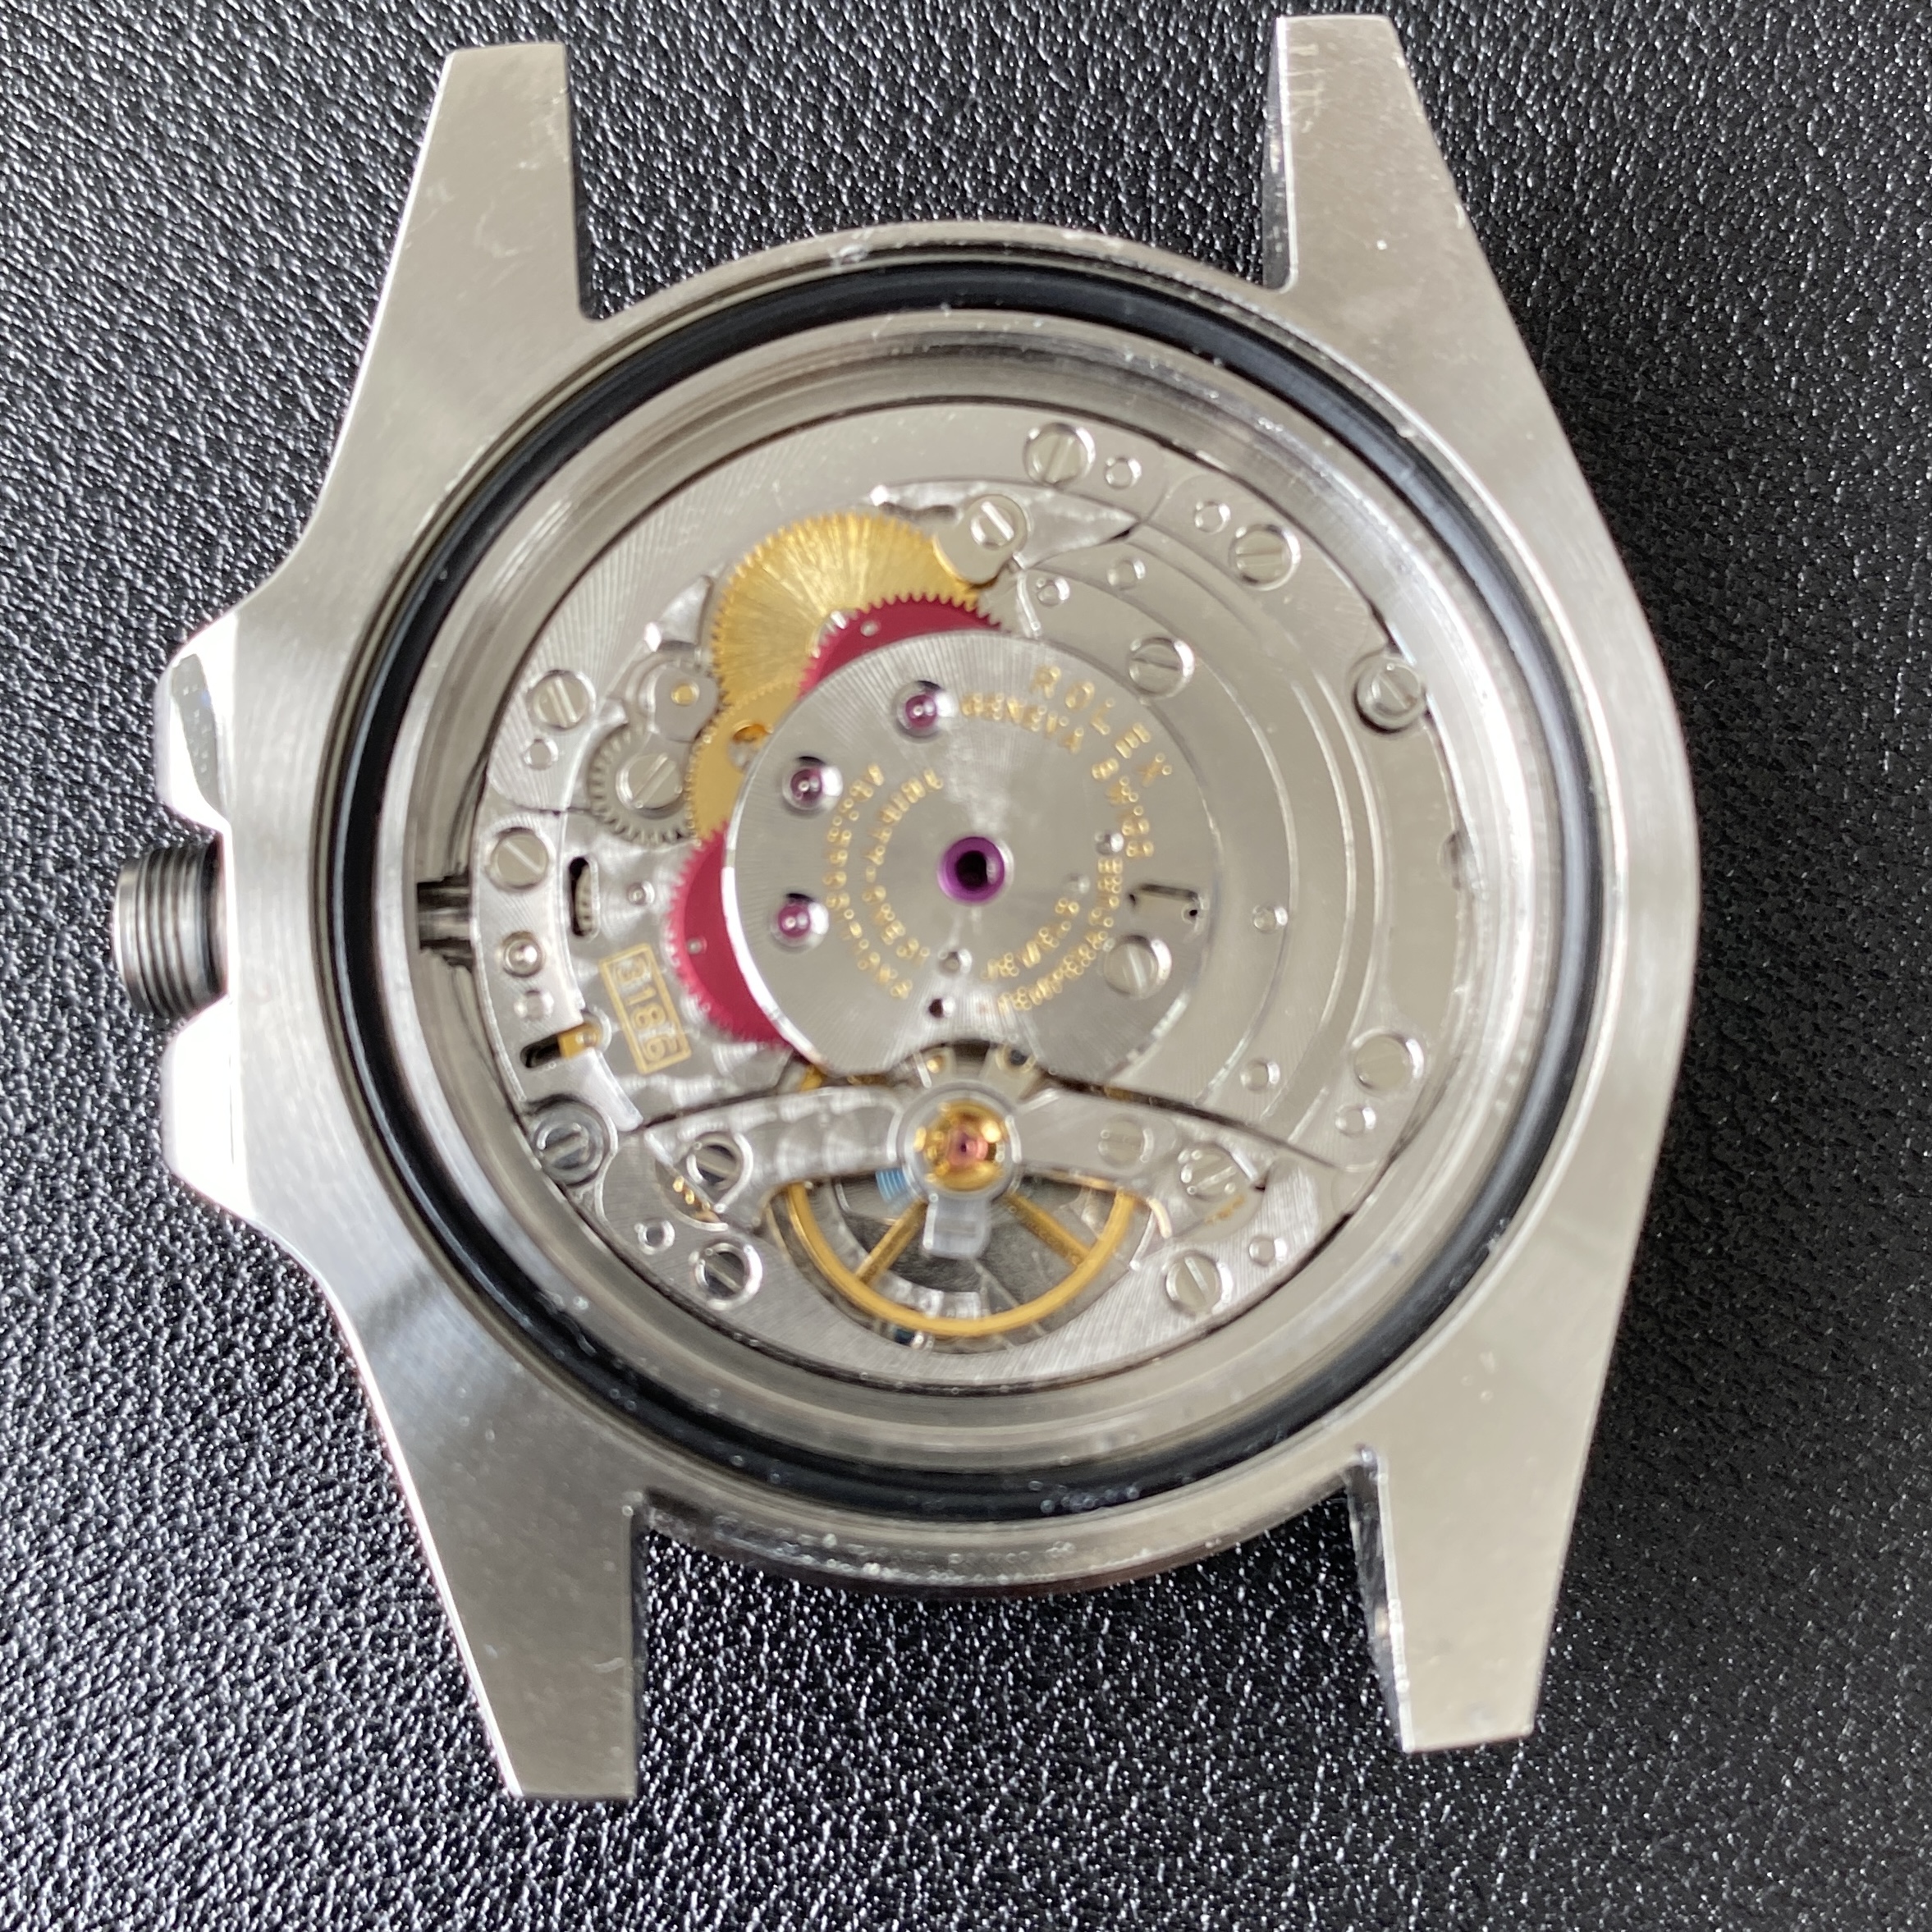
Here's where I started... a nice Clean Factory GMT Master II. Looks pretty. That's probably not going to last.


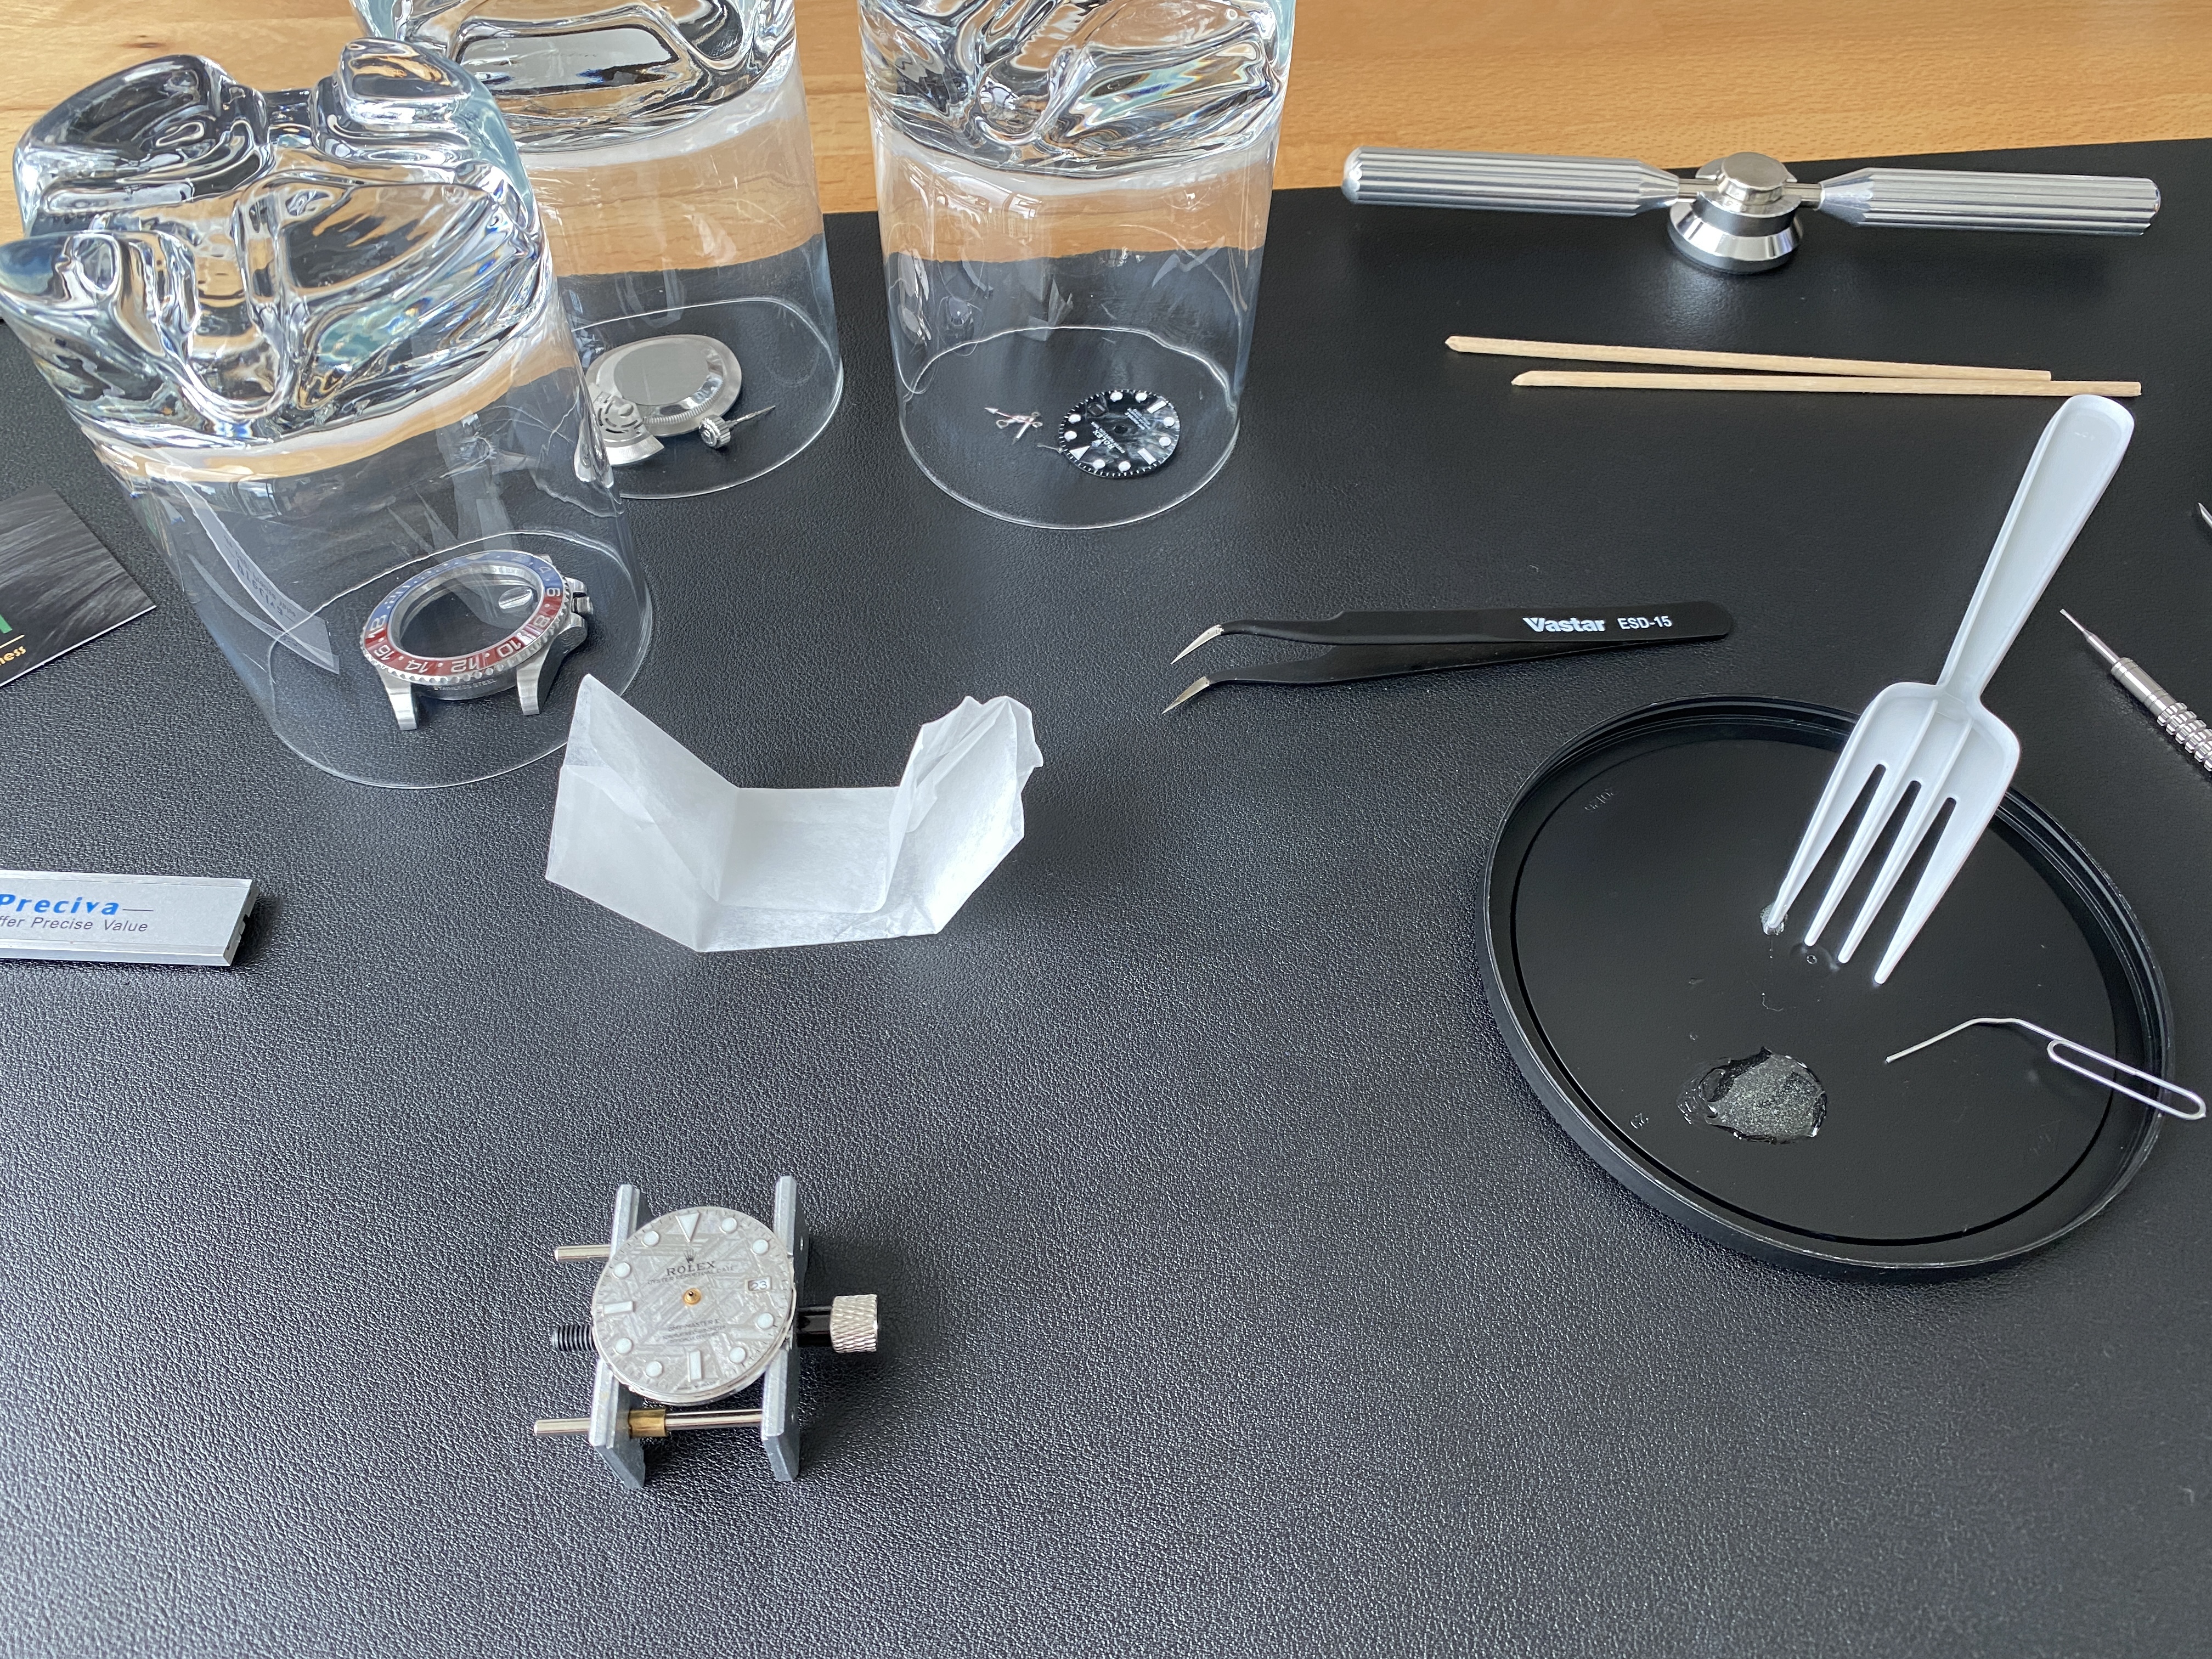
I started by removing the bracelet. That was easy.

Then I removed the rotor by sliding the little release thingy. I had to move the little release thingy farther than I thought, and it seemed pretty loose when I had it all the way slid outwards, but the rotor released and I was able to remove it.

Next was removing the stem -- easy breezy, pull the stem out to the outer most position, then push the little button, and it just comes free. Fortunately, when the stem is in this outermost position, the movement is "hacked" and stops moving. This is great since it makes removing the hands (the next step) easier. Strangely, the watch had almost no wind on it when I was doing this work, but I struggled to release the mainspring tension by holding back the click. I'm not sure I understand exactly how the click on this movement works, maybe I was pushing it in the wrong direction.


The next step was to remove the hands. For this I used saran wrap (cling wrap) over the dial and used two screw drivers to gently lift each hand off of the stack one at a time. I have a hand puller, but since I'd been stupid and not set the hands to all be aligned at midnight before I removed the stem, I didn't feel comfortable using the presto hand puller and opted for the screw driver method since it would allow me to remove one hand at a time.


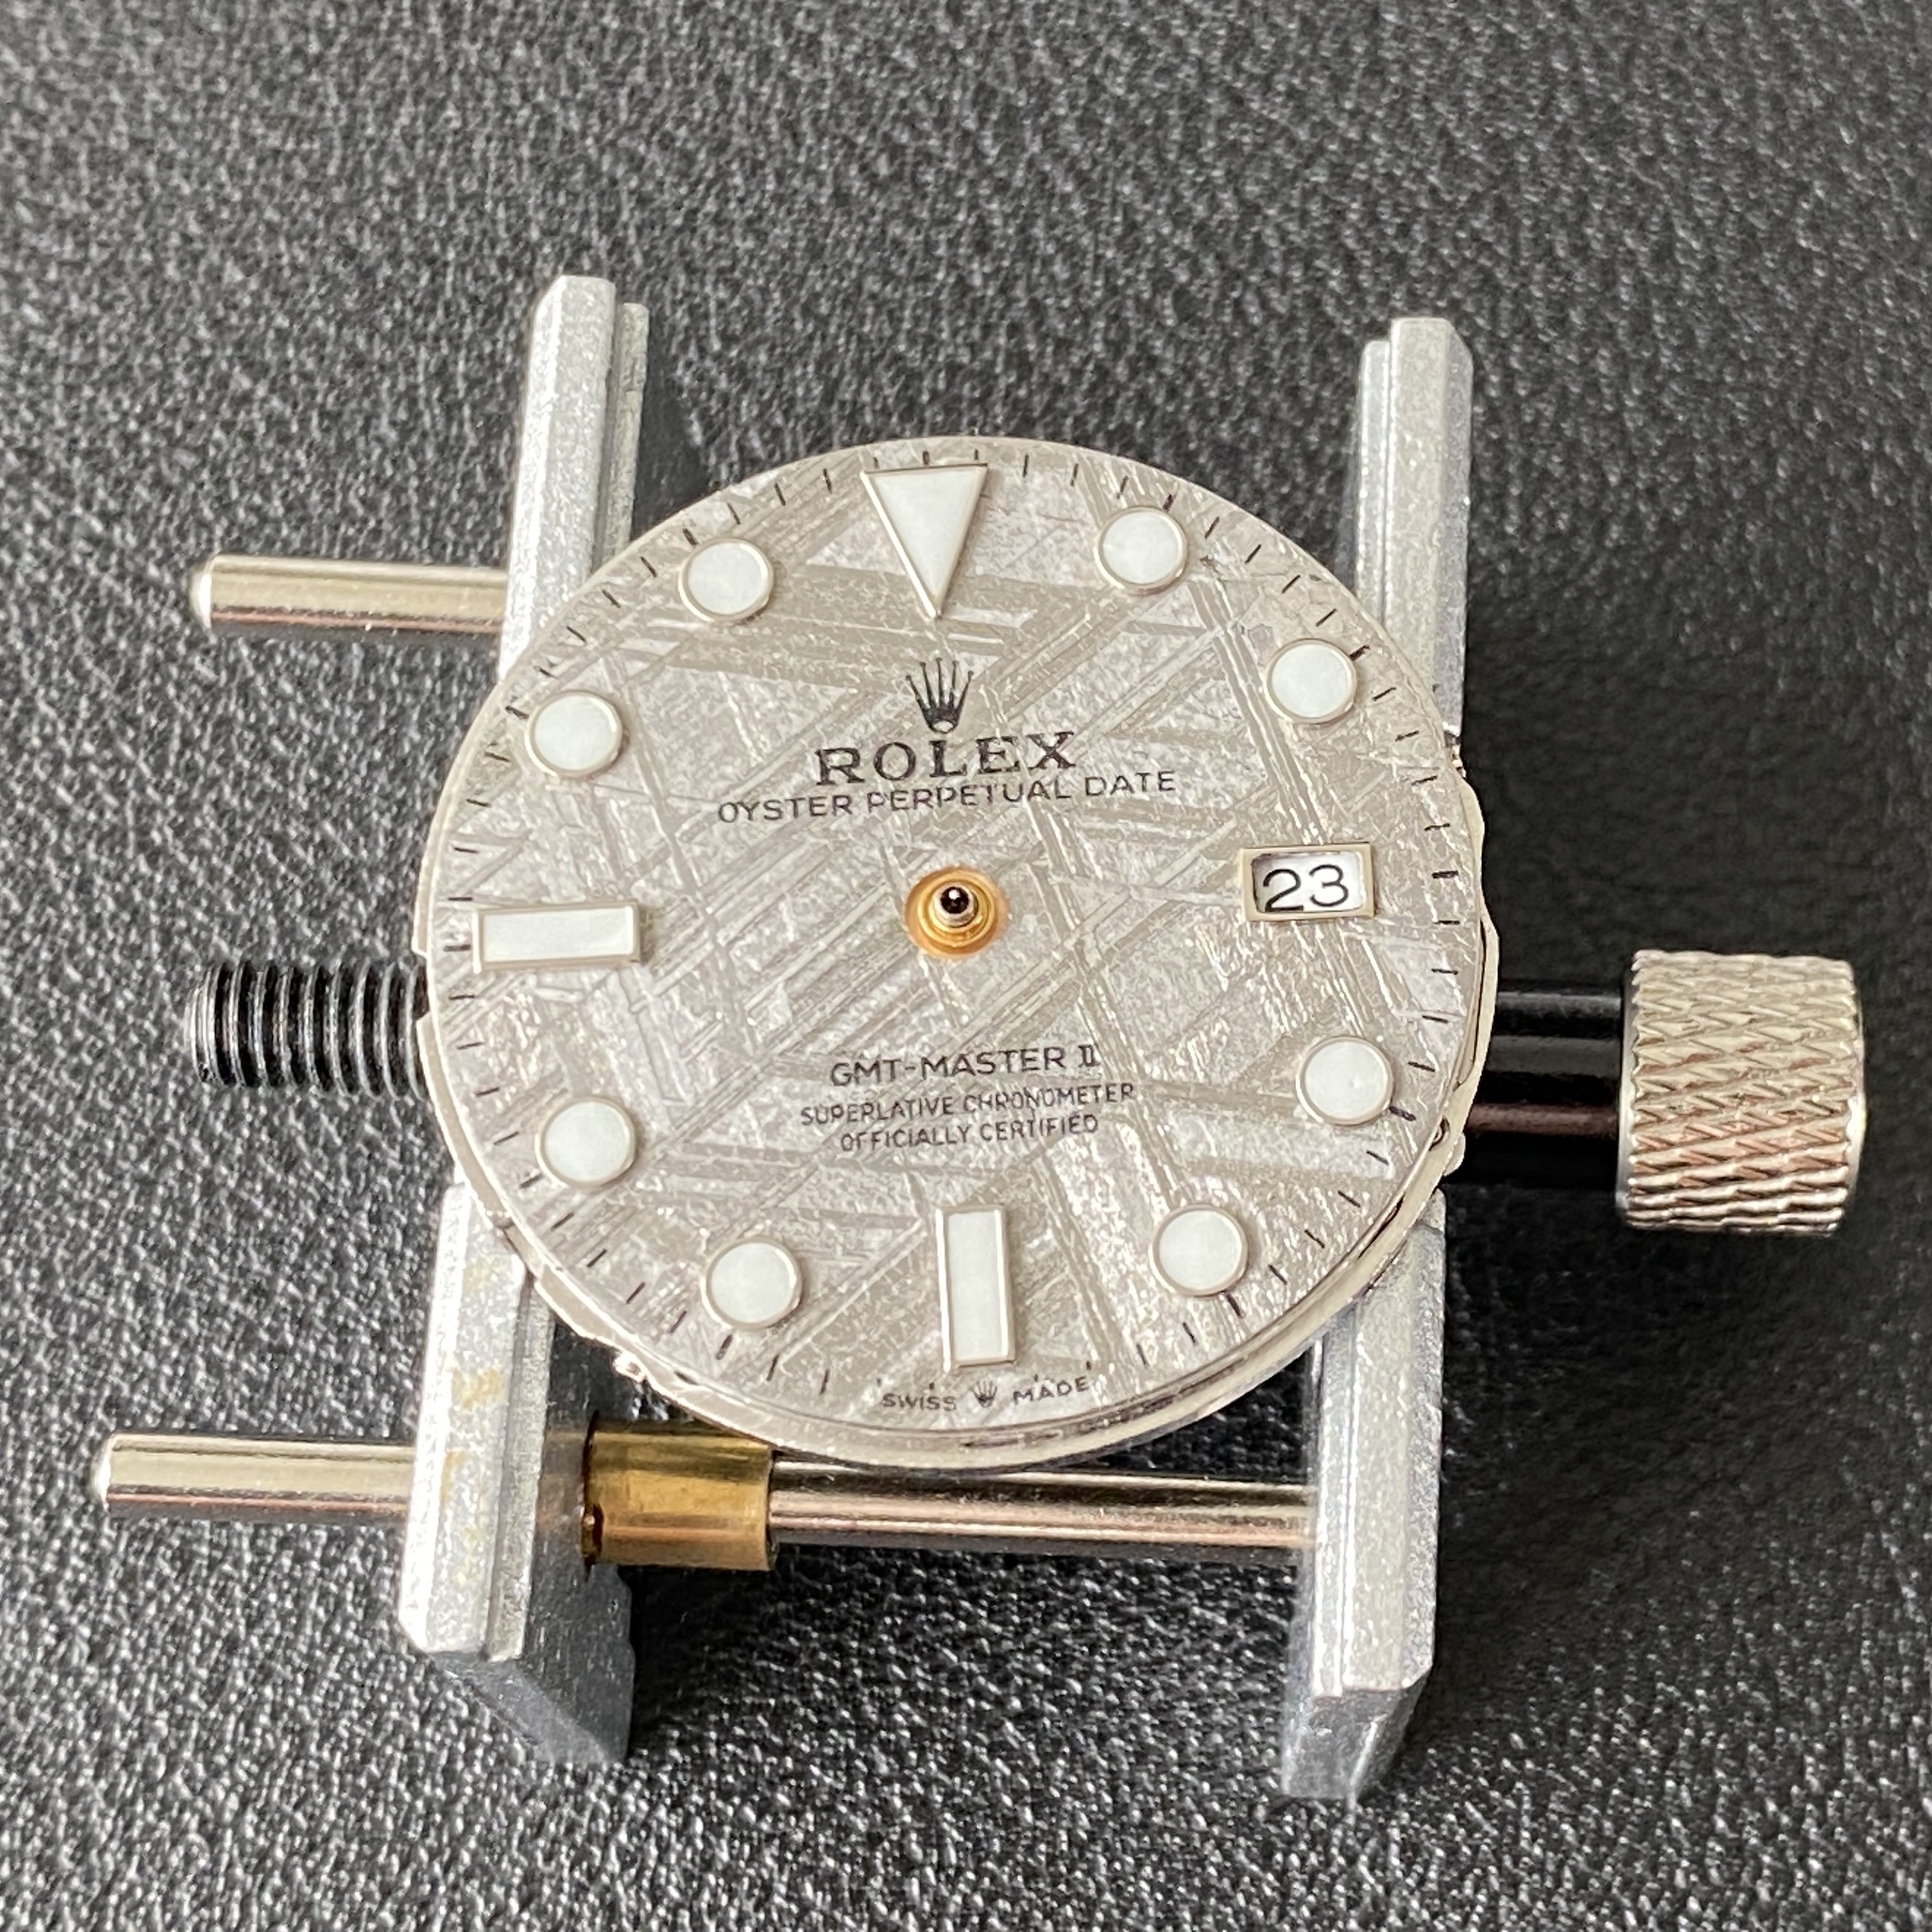
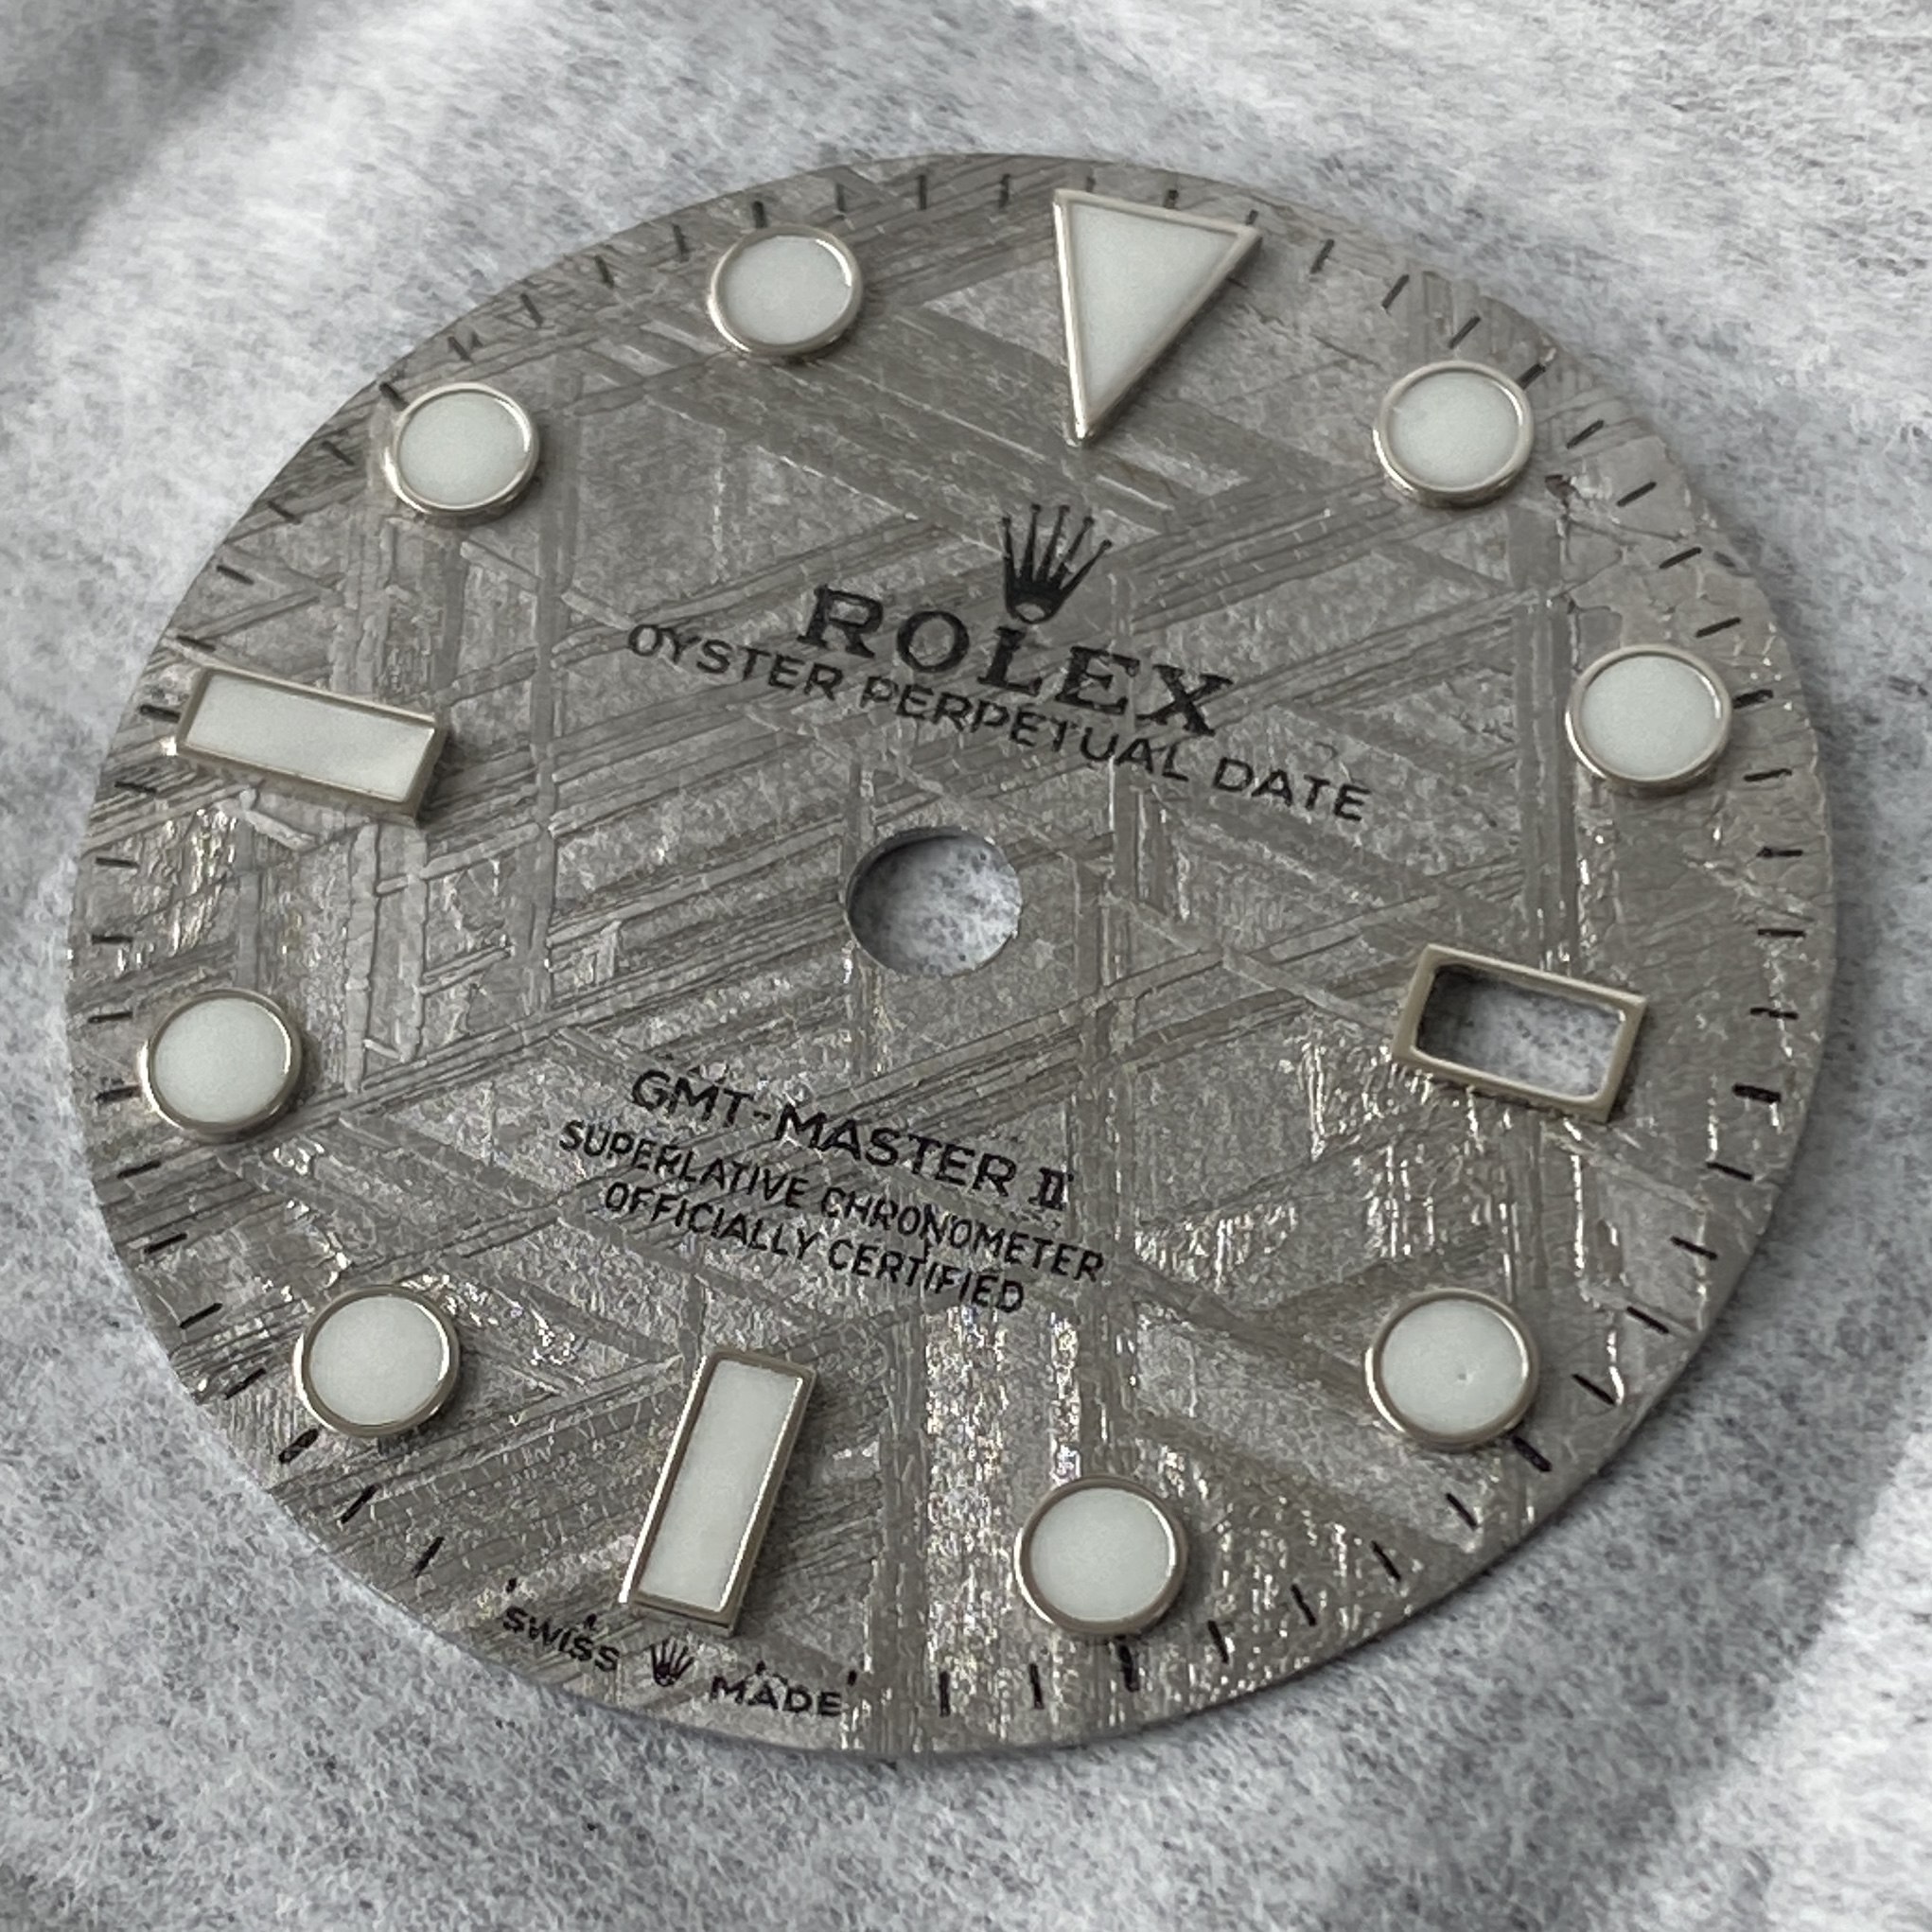
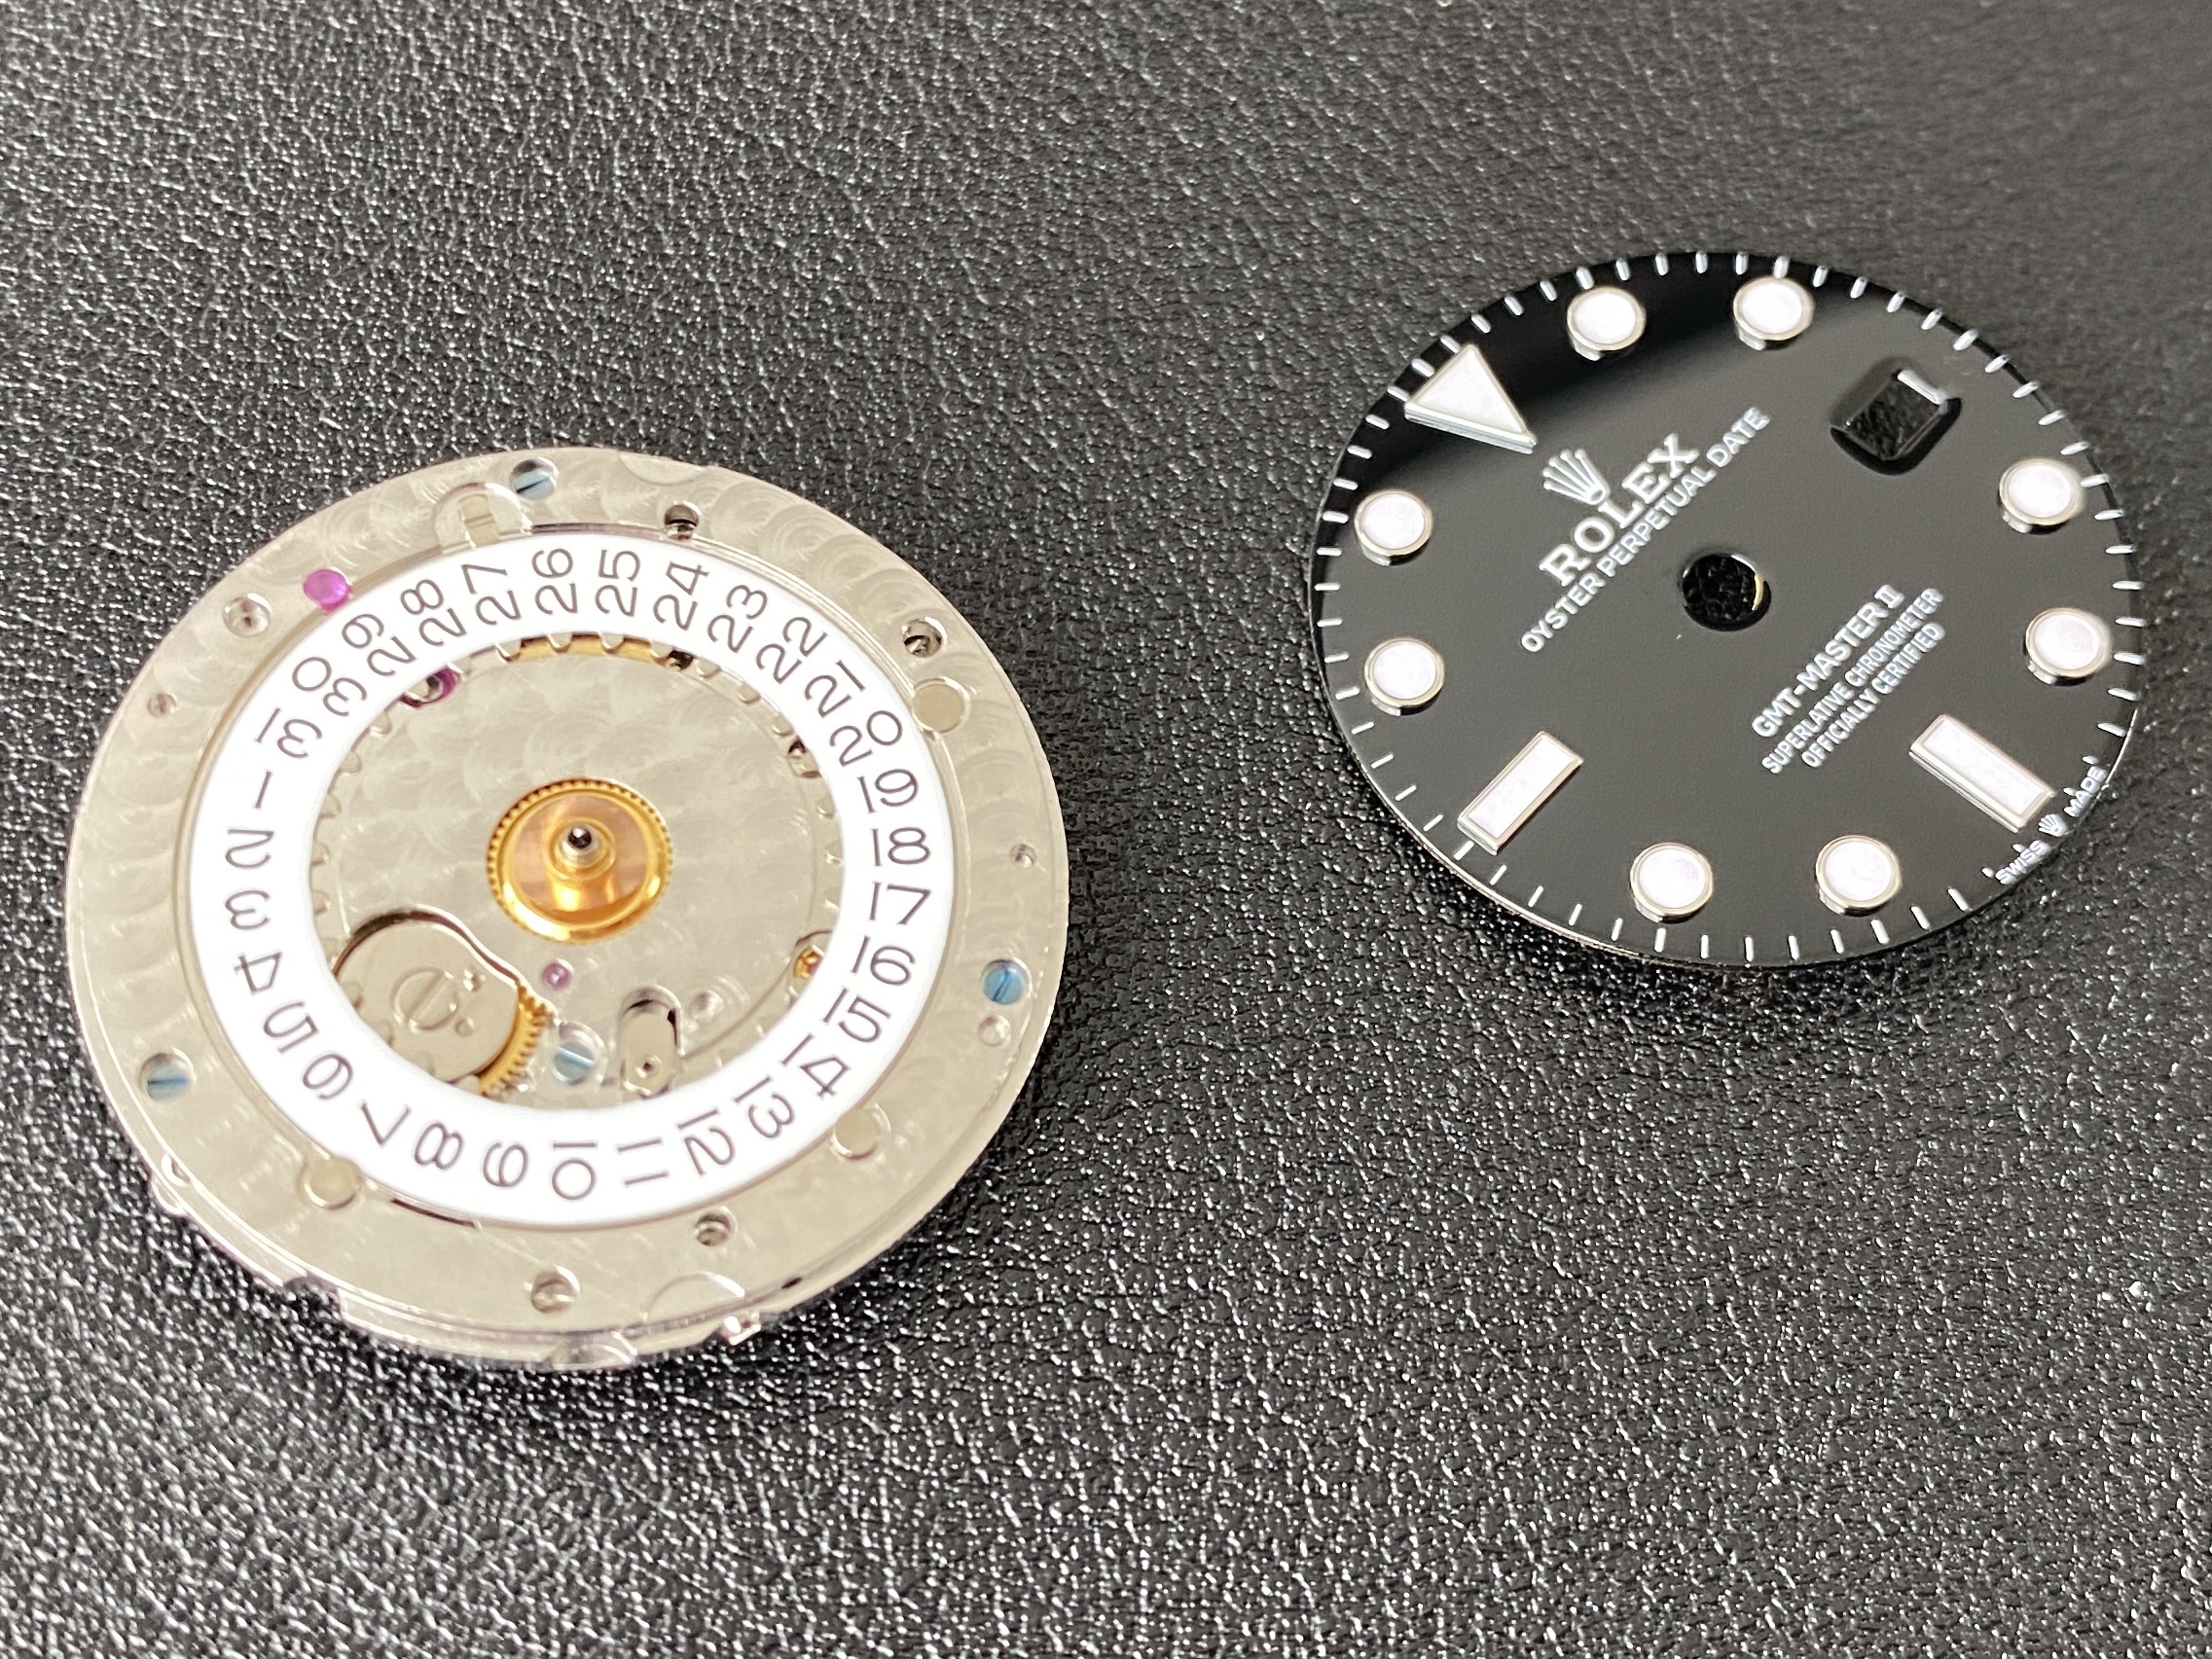
Next was removing the dial... another easy task. The VR3186 movement has two dial feet screws. This should have been a warning bell for me since the beautiful meteorite dial I'd received in the mail didn't have dial feet. But I plowed forward regardless. I slightly unscrewed the dial feet screws on the movement and used a thin screw driver in the two slots between the movement and the dial to gently lift the dial free. The dial came up no problem (much more easily than my Clean Factory DJ41 dial separated from the VR3235 movement I "serviced" a few weeks ago).


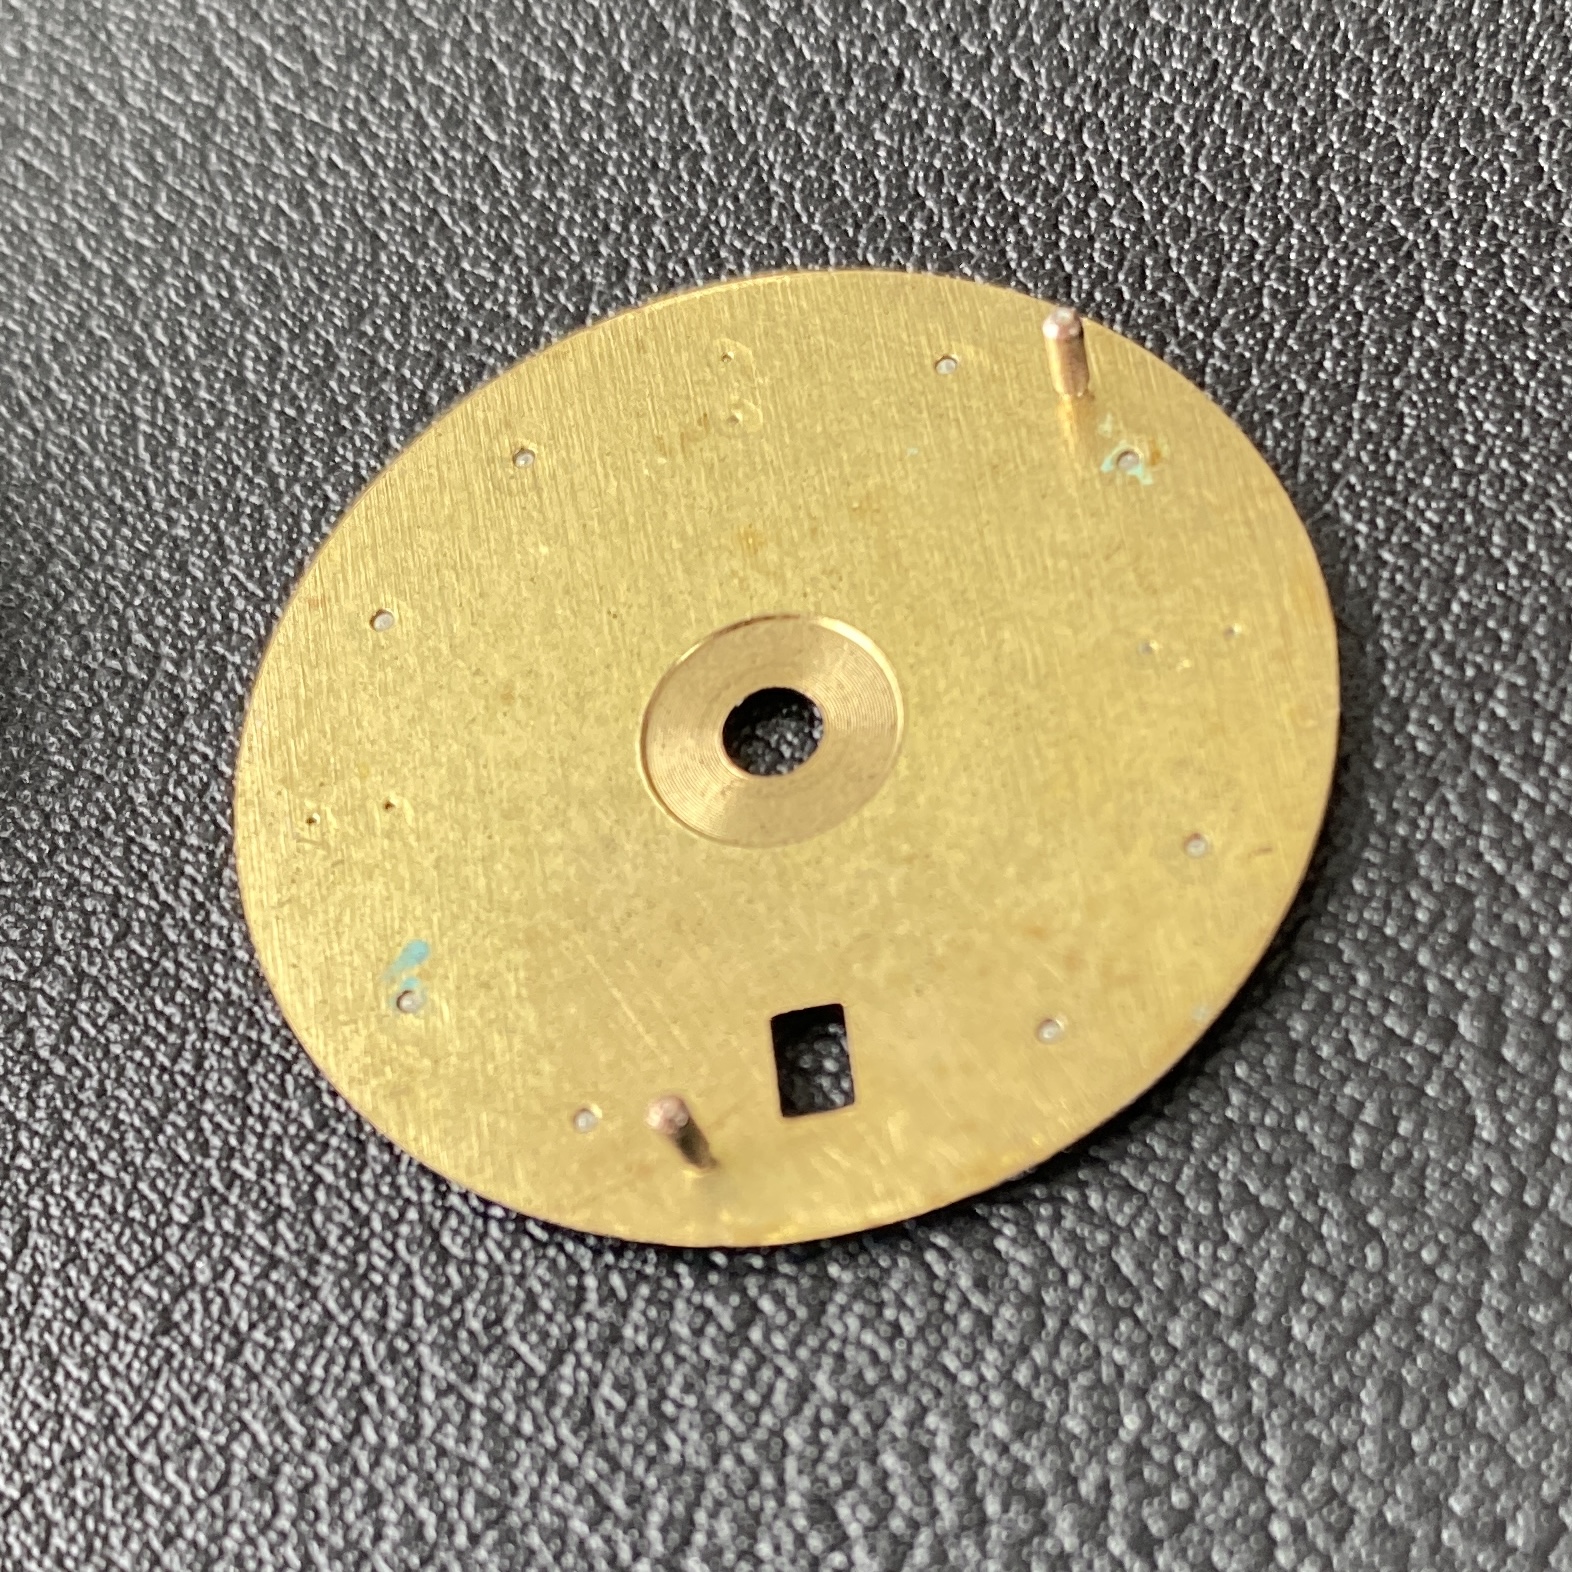
But it was at this moment, that I realized that I'd fucked up. The stock CF dial had dial feet. My fabulous meteorite dial didn't. This feels like it's going to be a problem.


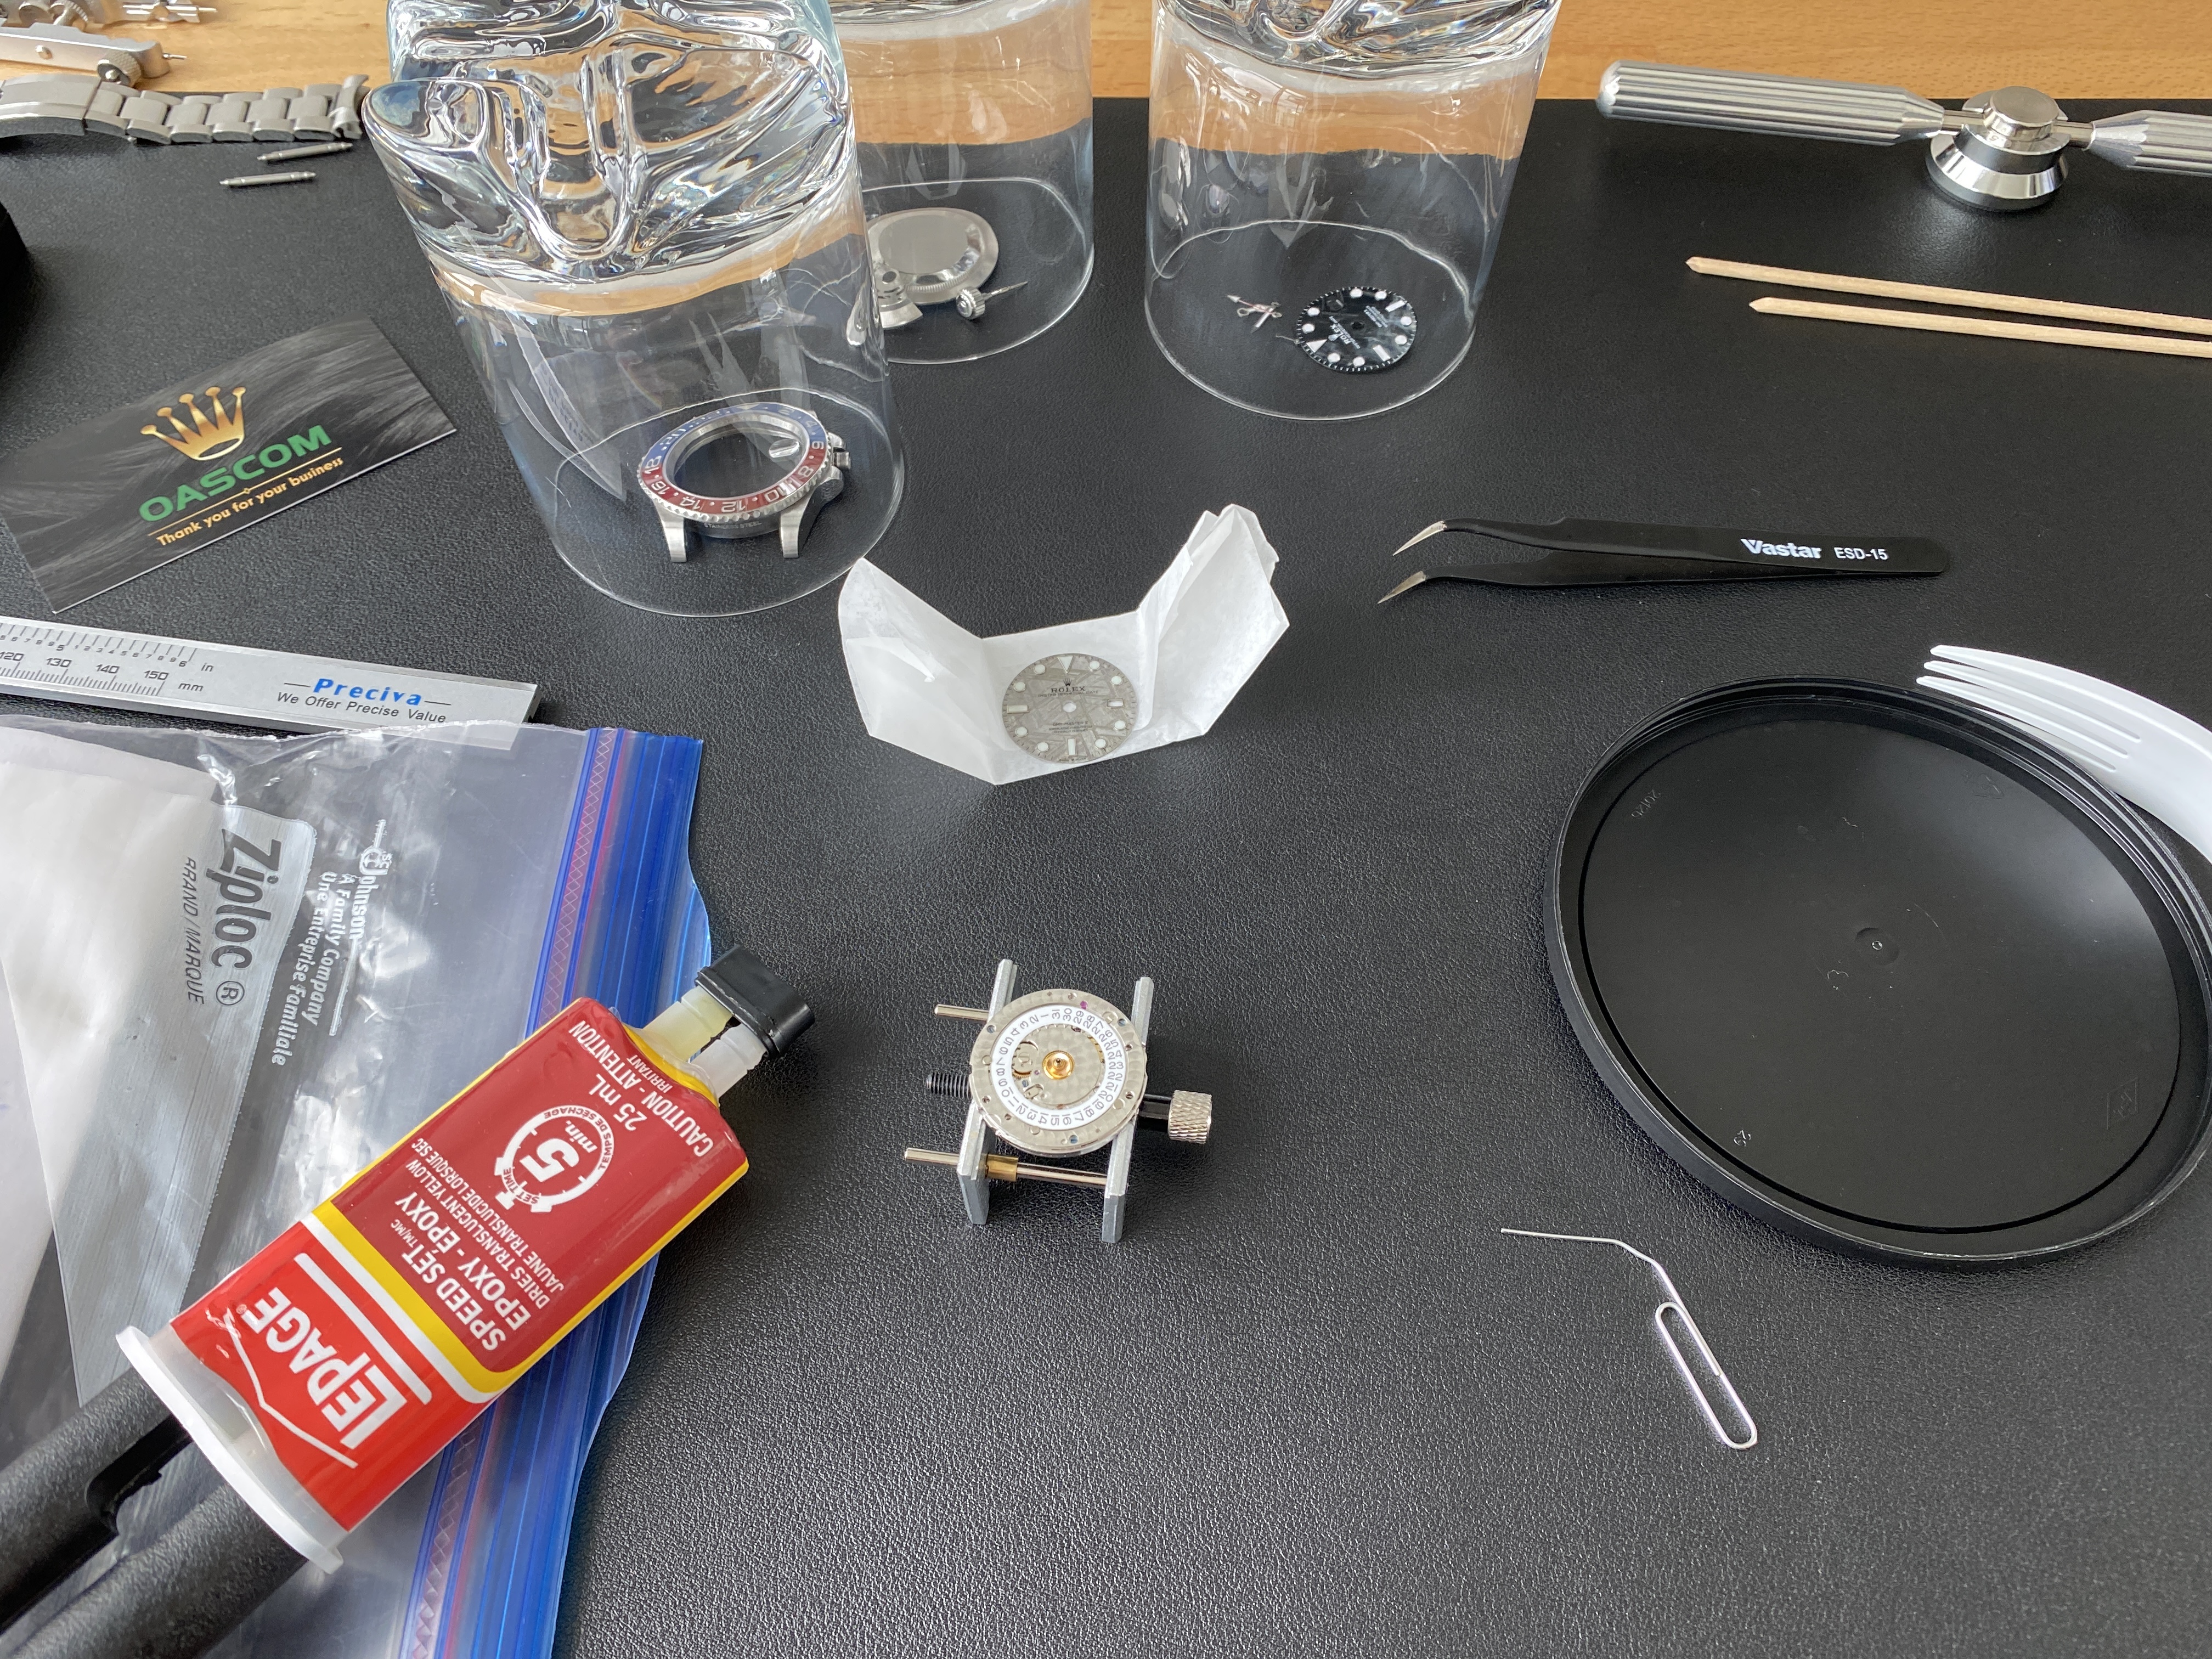
How does one attach a dial to a movement if the movement expects it to have feet, but the dial doesn't have feet? Do I need to make feet (out of wire?) and then glue them into the correct positions? Or is it possible to just place the dial on the movement and have it stay in place by being sandwiched between the movement and the case?
 

Oascom

Watchmaker / Modder
Vendor (Watch Repair)
Patron
Certified
19/1/16
4,373
4,955
113
WWW.WATCHMAKERUSA.COM
Epoxy the dial on top of the movement, align it with center hole and date window. Few dots of 5 min epoxy using toothpick to make little dots works best. Very easy and works perfectly, can remove it later if needed. Just make sure to use very little, you don't want it to spread.

If you have any questions or need some help PM me.

Good luck!
 

Yogibear

I'm Pretty Popular
21/8/19
1,409
614
113
Meteorite dials are so cool. This will look good when finished.
 

dogwood

I'm Pretty Popular
Patron
Certified
7/9/21
1,890
3,550
113
Canada
Epoxy the dial on top of the movement, align it with center hole and date window. Few dots of 5 min epoxy using toothpick to make little dots works best. Very easy and works perfectly, can remove it later if needed. Just make sure to use very little, you don't want it to spread.

If you have any questions or need some help PM me.

Good luck!

Awesome! Thanks for the tip... This is a lot simpler than what I found when I started googling (right after I posted the original post).

I was going down the rabbit hole of thinking about how I could epoxy some dial feet onto the dial in exactly the right position. Apparently it's possible to buy dial feet -- although I still haven't figured out which ones would be the right size. The dial feet on the CF dial are 0.95mm in diameter, but the dial feet I've seen for sale don't list size, they list the movement that they're compatible with e.g. 7750, 2824, etc... I can buy a variety pack that has feet for ten different movements on amazon for around C$20... but that still doesn't solve the problem of how to get the feet in exactly the right spot. But then I thought, I guess I could just use the movement as the "jig"... I could place the dial feet into the holes on the movement, apply a tiny bit of epoxy to the flanges of the feet, and then put the meteorite dial down on top.

But the idea of simply using a few tiny dots of epoxy rather than faffing around with dial feet, kinda feels like a smarter idea.
 

Beefcake

You're Saying I Can Sell?
1/7/21
74
39
18
Can't wait to see it finished! For some reason the stock reps with meteor dials always look terrible, I would think they could get or make a metal that imitates the look.
 

dogwood

I'm Pretty Popular
Patron
Certified
7/9/21
1,890
3,550
113
Canada
Progress update. I had some 5 minute epoxy on hand, so I decided to give it a go. I used a paperclip to dab 4 small dots of epoxy around the outside of the movement. I kept these dots really small because I really didn't want epoxy running into the date wheel and fouling the movement. I aligned the dial a held it in place by hand for 10 minutes. I figured that would be enough time for the epoxy to bond enough to hold the dial flush.

I was a fool.

In hind sight, I probably should have added a few more dots because after my first attempt one side of the dial came up about half a millimeter. But I didn't want to pry off the dial and start again, so instead I mixed another batch of epoxy and this time I used a junk screw driver (the cheapo ones that some TDs include with watches) and used to to insert a tiny amount of epoxy under the spot on the dial where it had come up. And this time I used a rolex caseback opener and a whetting stone as a weight to hold the dial in place while the epoxy cured.

It's still curing, and I'm going to leave it for an hour or two to make sure that the dial doesn't come loose when I'm putting the hands back on and re-casing the movement.

A few pics...
 
  • Like
Reactions: Oascom

TESLA760

Time is Money $$
Patron
Certified
7/2/11
23,013
15,871
113
Socal Wine Country
Why does the printing on that meteorite dial look like it came out of an inkjet printer ? Seems to not be very crisp.
 

Oascom

Watchmaker / Modder
Vendor (Watch Repair)
Patron
Certified
19/1/16
4,373
4,955
113
WWW.WATCHMAKERUSA.COM
Progress update. I had some 5 minute epoxy on hand, so I decided to give it a go. I used a paperclip to dab 4 small dots of epoxy around the outside of the movement. I kept these dots really small because I really didn't want epoxy running into the date wheel and fouling the movement. I aligned the dial a held it in place by hand for 10 minutes. I figured that would be enough time for the epoxy to bond enough to hold the dial flush.

I was a fool.

In hind sight, I probably should have added a few more dots because after my first attempt one side of the dial came up about half a millimeter. But I didn't want to pry off the dial and start again, so instead I mixed another batch of epoxy and this time I used a junk screw driver (the cheapo ones that some TDs include with watches) and used to to insert a tiny amount of epoxy under the spot on the dial where it had come up. And this time I used a rolex caseback opener and a whetting stone as a weight to hold the dial in place while the epoxy cured.

It's still curing, and I'm going to leave it for an hour or two to make sure that the dial doesn't come loose when I'm putting the hands back on and re-casing the movement.

A few pics...

Center hole can be tiny tiny bit left justified if needed for date window alignment.
Epoxy method leave a lot wiggle room if needed. It's custom made by hand and every dial is unique i found this is the best method and very easy for me :)

Like i said let me know if you need some help.

(Dial lifted cause of the washer )
 

dogwood

I'm Pretty Popular
Patron
Certified
7/9/21
1,890
3,550
113
Canada
Why does the printing on that meteorite dial look like it came out of an inkjet printer ? Seems to not be very crisp.

I don't know, but I suspect it's because the surface of the dial is actually pretty rough from the texture of the crystals of the meteorite. Also, these are extreme close up pics... the printing looks plenty sharp with the naked eye.
 

dogwood

I'm Pretty Popular
Patron
Certified
7/9/21
1,890
3,550
113
Canada
Center hole can be tiny tiny bit left justified if needed for date window alignment.
Epoxy method leave a lot wiggle room if needed. It's custom made by hand and every dial is unique i found this is the best method and very easy for me :)

Like i said let me know if you need some help.

(Dial lifted cause of the washer )

Yeah, that spring washer is what caused the one side of the dial to pop up... that and I think I might have been a little stingy with the epoxy out of fear that it would run. Also, I should have clamped it with a weight so that I didn't have to hold it by hand. But that's half the fun of this hobby -- learning!!!

And yeah, I tried hard to center the dial hole on the cannon pinion because I was worried about clearance for the hand stack, maybe that makes the date a little off center, but it's not something I'm worried about. Also, now that I've done this, if the date being a hair off center starts to bother me, then I'll know hot to fix it.

Thanks so much for the support and advice in this thread... 5-STAR after sales support :)
 
  • Like
Reactions: Oascom

dogwood

I'm Pretty Popular
Patron
Certified
7/9/21
1,890
3,550
113
Canada
SUCCESS!!!!!

i had to redo the epoxy dial mount because the first time it wasn’t quite centered against the rehaut when I re-cased the movement. It was only off by a tiny amount, but it was enough that it was gonna bother me. The second time doing the epoxy trick was way easier and I think I got the date window more aligned by offsetting the dial slightly relative to the cannon pinion.

man’s of course, here’s the final glamour shot:


as it happened I finished work on this project right at sunset, so the light was streaming in my office window at just the right angle to play with all the texture on the dial.

I’m very happy with this project.
 

Storm.

Mythical Poster
Supporter
Certified
14/2/20
7,062
9,851
113
Here's a tip for dial feet positioning

Put them in the movement.

Most of them come with adhesive on them. If not you use epoxy on the top of the pin.

Then position the dial.

Wait a few seconds. Pull the dial off. Feet are in the right position.
 
  • Like
Reactions: dogwood

dogwood

I'm Pretty Popular
Patron
Certified
7/9/21
1,890
3,550
113
Canada
Here's a tip for dial feet positioning

Put them in the movement.

Most of them come with adhesive on them. If not you use epoxy on the top of the pin.

Then position the dial.

Wait a few seconds. Pull the dial off. Feet are in the right position.
Great tip. Thanks. I’ve discovered how useful using the movement plate as a jig can be, especially for connecting things like the hairspring bridle to the balance staff. But I suppose it would also work well for dial feet.