-
Tired of adverts on RWI? - Subscribe by clicking HERE and PMing Trailboss for instructions and they will magically go away!
You are using an out of date browser. It may not display this or other websites correctly.
You should upgrade or use an alternative browser.
You should upgrade or use an alternative browser.
Recessing SEL on Sub Rep
- Thread starter SeikoFan
- Start date

dom1986
Renowned Member
- 20/1/15
- 593
- 151
- 43
OK, good news and bad news. The good news is the new eccentric spring bar worked AMAZINGLY. Not only was it an absolute breeze to install, the fit was VERY firm and snug (no way it's going to rotate). I just oriented the shimmed side to the bottom of the SEL, pressed it in using the tip of a precision flat blade screwdriver, made sure it was centered on the SEL. Done! Install SEL into watch case like normal, PERFECT.
You might remember from the OP that my first stab at this was stacking layers of very narrow strips of aluminum tape (about 1 mm wide) onto a 1.78 mm spring bar and pressing that in. That approach came out excellent for the bottom SEL, but the top SEL wasn't quite as awesome - failing to achieve a satisfactory level of recess at one of the lugs.
But with the new spring bar I built today, both ends of the SEL appear to be equally recessed and I am VERY happy with the amount of recess compared to before. The top SEL still isn't recessed quite as much as the bottom SEL, but there's nothing that can be done about that other than going down to a 1.5 mm spring bar and I'm not doing that because I find the 1.5 mm spring bars to be too flimsy. The SEL recess at both top lugs is even and deep enough to create enough contrast to make me very happy.
So that's the good news. Now the bad news.
The bad news is this spring bar was a son-of-a-B to make. The time spent to make the jig to machine the capillary tube is a one-time thing so I don't count that. I have the jig now. I can machine as much capillary tube as I need easily.
But cutting off a precise length of the machined capillary tubing (which must be done very carefully as it is SUPER thin and deforms easily) is a tedious process. Then there is the RTV silicone adhesive used to glue the 1.78 mm spring bar into the shell. First, you have to apply it under magnification, using a toothpick, and it still gets EVERYWHERE because you have to hold on to the part you're applying it to somehow. But then you have to somehow hold the two pieces in precise alignment for 5 hours to let the adhesive cure sufficiently for assembly. I chose to use my digital caliper to do that, and it worked very well for the task, but I don't have a dozen digital calipers lying around and making one spring bar every 5 hours seems like a terrible plan.
So...
I need to come up with a way to make these things a little easier to make. They work AWESOME, but they take too damn long to build. I say "they" even though I only made one so far and used it to replace the aluminum-tape-stacked spring bar in the top SEL from the first attempt. The bottom SEL still has the spring bar from the first attempt in it.
One option for making this easier to make would be if I could fashion up some sort of gluing jig that I could just set the 1.78 mm spring bar in, then fill a shell with RTV, and lay it in on top of the spring bar, and then have some sort of top half that holds everything in proper alignment. I think making such a jig might be a royal pain in the butt - and I'm not even that sure how well it would work. If the two halves aren't glued together and held in precise alignment I don't think the finished product would produce a satisfactory result.
That said, I have another idea that would still use the machined capillary tubing along with a 1.78 mm spring bar, but would be A LOT easier to assemble. I'm going to try that first and see how it goes.
OK, bad news aside, pics of the outcome with this design of the spring bar are needed, so here goes.
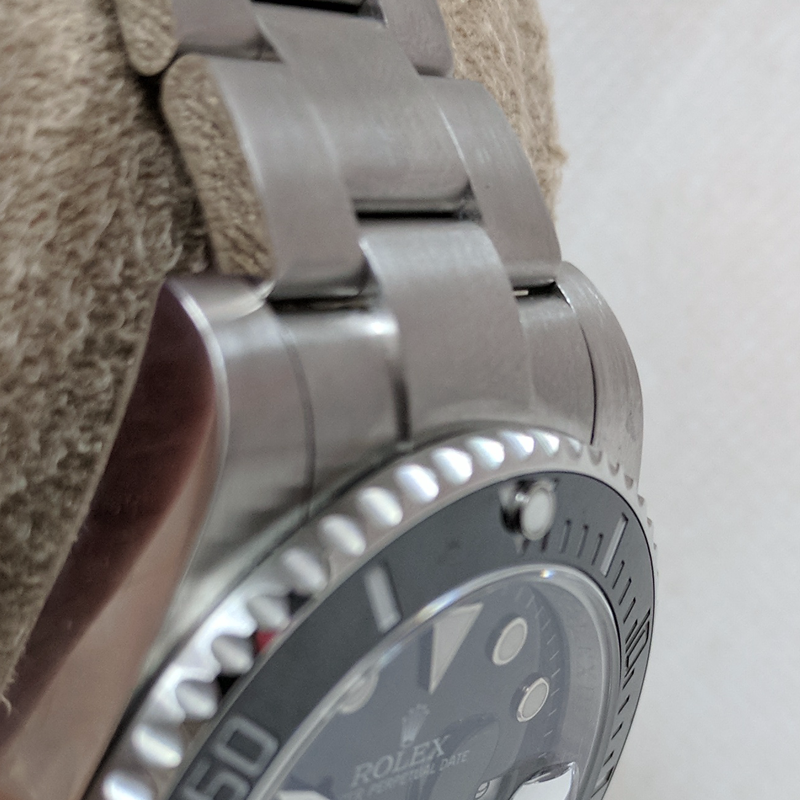
Here is what my top SEL fitment looked like before:
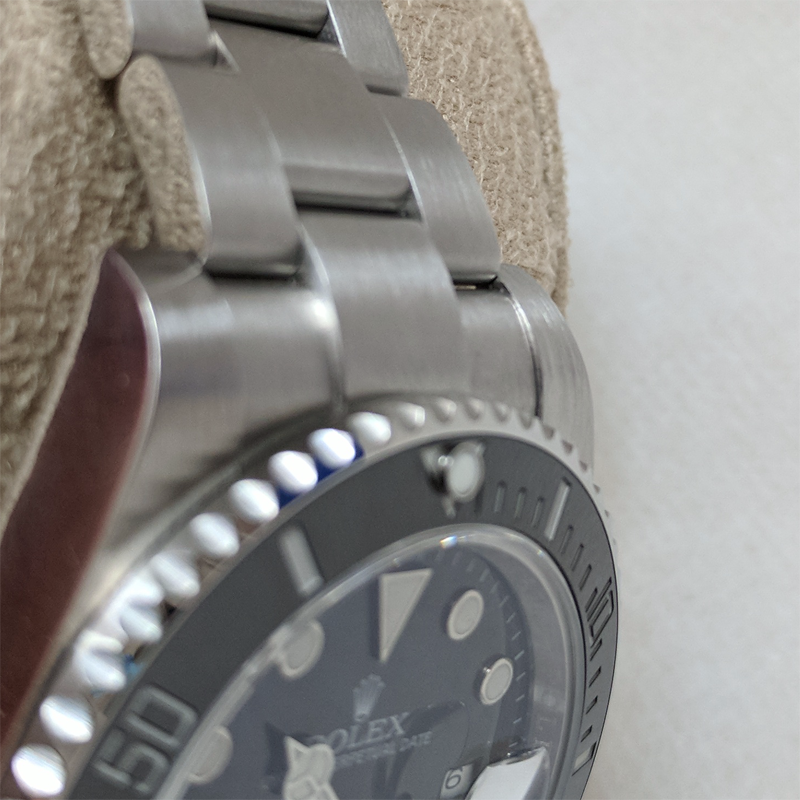
And here is what it looks like now:
That's all for now. More when I have something else to report.
P.S. No, I did not take a picture of the new eccentric spring bar. It was basically impossible to photograph and be able to see any detail. The CAD drawing earlier in this topic gives the best idea of how it is constructed. The only difference between the CAD drawing and how it's really done is the void between the shell and the 1.78 mm spring bar is empty in the CAD drawing whereas in the actual assembled article that void is filled with black silicone RTV adhesive.
Wow, mate this is fantastic work. So... the big question when can we buy some? Haha
Sent from my iPhone using Tapatalk
I spent a few more hours playing around in SolidWorks and finished up my simplified design. I need another size of end mill that I don't have and a new size of rod that I don't have. So I ordered all that stuff and it'll be here around Thursday or so.
As soon as it comes in I'll head over to the machine shop and fabricate a jig to hold the new rod and then try to make one of these. I'm really excited - I think this is the answer.
All of this would be super easy if we were making something the size of a cigar tube. But machining something the size of a small piece of toothpick really sucks.
I'm really excited about this new design. It's going to suck having to wait for things to arrive on Thursday.
This design is so robust and simple that if I could find a set of 1.5 mm spring bars that were worth a damn I'd actually entertain the notion of making a version of it for 1.5 mm spring bars. That would allow the SEL to be moved down over half a millimeter which would be great for folks whose SELs are very flush. With the 1.78 mm spring bar adapter the SEL is moved down about 0.28 millimeters (you'd think it would be 0.22 because 2.0 - 1.78 is 0.22 - but the hole is actually bigger than 2.0 mm so it is actually moved down a little more).
If you're already recessed a little then adding 0.28 mm to the recess looks pretty good. But if you're pretty close to flush you'd be a lot happier moving the SEL down 0.50 mm or so. Problem is the 1.5 mm spring bars I've got have a lot of play in the tips. The tips can wiggle quite a bit - which translates into SEL wiggle and we don't want SEL wiggle.
I played with crimping the ends of the 1.5 mm spring bars to make the tips fit tighter, and that does improve them, but cosmetically it is crummy and it also induced some drag on the tips that I didn't like.
I'll try to find some other 1.5 mm spring bars to buy and see if maybe some other brand is made better.
I have PayPal ready to purchase those SpringBar too
Inviato dal mio iPhone utilizzando Tapatalk
+1!!
Sent from my iPhone using Tapatalk Pro
Well, I'm frustrated. Everything I need to try the new, improved, should-be-easier-to-make design has arrived except for my 1.78 mm ball nose endmill. And I can't make the shells without that.
But, with what has arrived I can go ahead and work on making the jig that I need when machining the shell - so at least I'll have that out of the way.
It's just frustrating because the endmill supposedly shipped Monday, but the tracking number still says "awaiting package" so USPS doesn't even have the damn thing in their hands yet.
Eh, I'm really bad at waiting for things. They say "patience is a virtue", but it's a virtue I do not possess.
- 31/3/15
- 1,045
- 535
- 113
OK, I decided I wasn't waiting for that other damn 1.78 mm ball nose endmill that was supposedly shipped on 6/18 but the tracking number says the USPS doesn't have it in hand yet. So I cancelled the order and ordered another one, from a different vendor, paying a little extra for next day shipping so I would get it today (Friday, 6/22) so I can work on this over the weekend. It arrived today so I'm all set. Yay!
I also got another brand of 1.5 mm spring bars and they are much better made than the ones I already had on hand. Comparing the recess I get with the 1.78 mm bars to the recess on a gen I think the 1.78 looks about right. That said, I've already bought the 1.5 mm ball nose endmill, so making a version of the shell for a 1.5 mm spring bar will be simple, so I might as well make one and see how it looks.
Fingers crossed. Will post results when I have them - hopefully sometime Saturday.
Hey there! It’s Sunday already lolol!OK, I decided I wasn't waiting for that other damn 1.78 mm ball nose endmill that was supposedly shipped on 6/18 but the tracking number says the USPS doesn't have it in hand yet. So I cancelled the order and ordered another one, from a different vendor, paying a little extra for next day shipping so I would get it today (Friday, 6/22) so I can work on this over the weekend. It arrived today so I'm all set. Yay!
I also got another brand of 1.5 mm spring bars and they are much better made than the ones I already had on hand. Comparing the recess I get with the 1.78 mm bars to the recess on a gen I think the 1.78 looks about right. That said, I've already bought the 1.5 mm ball nose endmill, so making a version of the shell for a 1.5 mm spring bar will be simple, so I might as well make one and see how it looks.
Fingers crossed. Will post results when I have them - hopefully sometime Saturday.
Sent from my iPhone using Tapatalk Pro
Hey there! It’s Sunday already lolol!
Yes, weekend is half gone. Boo!
I went to my shop yesterday and spent a few hours on this. I ended up not liking the jig or the result it produced. I tried being lazy and making the jig out of wood because it is easier and quicker to work with. Wood worked really well in the first version where I just needed to make a half shell of thin tubing, but didn't work so well at all for what I'm doing now which requires a more positive hold.
I'm in Florida and it's getting up to 94 during the day here. My machine shop where the mill is doesn't have air conditioning so I started early but by Noon I was wiped out and called it a day.
Today I think I'll try going there in the evening instead. If I start at like 8pm then I'll have as many hours as I want as the temperature will be going down, not up. This would be a much more pleasant endeavor if it were November. Lol.
It's funny because these things are so damn easy to design in SolidWorks, but the fixturing (to actually machine the damn thing) is the hard part. You need to be able to hold this tiny part in place so that precisely the right amount of metal is removed, but there is so little metal left after the cut that traditional clamping methods won't work because after the cut it's impossible to clamp without crushing.
But I am confident that if I machine the jig from aluminum, and drill and tap it for a hold-down screw, it will work well - I just need to put in the time.
- 21/2/16
- 1,052
- 232
- 63
- 18/12/09
- 2,607
- 1,863
- 113
Dude, this is really solid work SeikoFan , hats off to you! I like the thinking outside the box and your persistence!
The worst part is the initial batch, manufacturing the prototype and test it, like in most cases. Do you think that once designed, tested and proven it works, we could create a project and send it to China to get it done? I am sure most members on the Rolex subforum would be happy to chip in and get a batch of a few hundreds-thousands of these done (if they are done well!). I most certainly would!
By the way, I assume these won't work on a 5-digit case, wouldn't they?